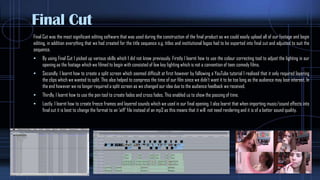
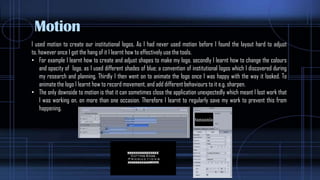
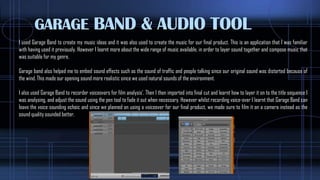
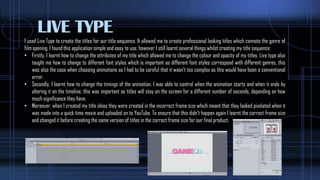
Ruba Islam
What have you learnt about technologies from the
process of constructing this product?
Research & Planning
Through the use of the internet I have been able to use different online software within my research and planning as I
wanted to make my work look visually interesting rather than posting long essays onto my blog.
• For example I used Prezi to create online Power Points consisting of film analysis, and genre research. As this was
my first time using Prezi I learnt how to use the basic functions e.g. selecting different themes, inserting pictures
and videos etc..
• I also used slide share, this allowed me to create PowerPoint presentations which I could then upload to slide share
and embed onto my blog, By using both slide share and Prezi I learnt how to embed things easily and efficiently onto
my blog.
• Additionally, I used storyboard that to create a storyboard for my opening, I learnt that this was easier and faster
than hand drawing and annotating a storyboard. This was because it enabled me to select a character and represent
it the way I desired by choosing different colours for their skin, hair, clothes, and shoes. It was also easy to
demonstrate the different types of cinematography I wanted to use, as I could just crop and adjust characters by
rotating/flipping them to suit the shot type.
• Moreover the internet aided me to strengthen my research and planning, as I used websites such as YouTube, Art Of
The Title, and IMDb. They helped me to research title sequences which share the same genre as the one I created
(Teen Comedy), this helped me gain inspiration as well as learning the codes and conventions of a Teen Comedy title
sequence which I then implemented into the final product. (e.g. high key lighting, a voiceover, different character
types within a particular social group).
Final Cut
Final Cut was the most significant editing software that was used during the construction of the final product as we could easily upload all of our footage and begin
editing, in addition everything that we had created for the title sequence e.g. titles and institutional logos had to be exported into final cut and adjusted to suit the
sequence.
 By using Final Cut I picked up various skills which I did not know previously. Firstly I learnt how to use the colour correcting tool to adjust the lighting in our
opening as the footage which we filmed to begin with consisted of low key lighting which is not a convention of teen comedy films.
 Secondly, I learnt how to create a split screen which seemed difficult at first however by following a YouTube tutorial I realised that it only required layering
the clips which we wanted to split. This also helped to compress the time of our film since we didn’t want it to be too long as the audience may lose interest. In
the end however we no longer required a split screen as we changed our idea due to the audience feedback we received.
 Thirdly, I learnt how to use the pen tool to create fades and cross fades, This enabled us to show the passing of time.
 Lastly, I learnt how to create freeze frames and layered sounds which we used in our final opening. I also learnt that when importing music/sound effects into
final cut it is best to change the format to an ‘aiff’ file instead of an mp3 as this means that it will not need rendering and it is of a better sound quality.
Motion
I used motion to create our institutional logos, As I had never used motion before I found the layout hard to adjust
to, however once I got the hang of it I learnt how to effectively use the tools.
• For example I learnt how to create and adjust shapes to make my logo, secondly I learnt how to change the colours
and opacity of logo, as I used different shades of blue; a convention of institutional logos which I discovered during
my research and planning, Thirdly I then went on to animate the logo once I was happy with the way it looked. To
animate the logo I learnt how to record movement, and add different behaviours to it e.g. sharpen.
• The only downside to motion is that it can sometimes close the application unexpectedly which meant I lost work that
I was working on, on more than one occasion. Therefore I learnt to regularly save my work to prevent this from
happening.
GARAGE BAND & AUDIO TOOL
I used Garage Band to create my music ideas and it was also used to create the music for our final product. This is an application that I was familiar
with having used it previously. However I learnt more about the wide range of music available, in order to layer sound together and compose music that
was suitable for my genre.
Garage band also helped me to embed sound effects such as the sound of traffic and people talking since our original sound was distorted because of
the wind. This made our opening sound more realistic since we used natural sounds of the environment.
I also used Garage Band to recorder voiceovers for film analysis’. Then I then imported into final cut and learnt how to layer it on to the title sequence I
was analysing, and adjust the sound using the pen tool to fade it out when necessary. However whilst recording voice-over I learnt that Garage Band can
leave the voice sounding echoic and since we planned on using a voiceover for our final product, we made sure to film it on a camera instead as the
sound quality sounded better,
LIVE TYPE
I used Live Type to create the titles for our title sequence. It allowed me to create professional looking titles which connote the genre of
film opening. I found this application simple and easy to use, however I still learnt several things whilst creating my title sequence:
• Firstly, I learnt how to change the attributes of my title which allowed me to change the colour and opacity of my titles. Live type also
taught me how to change to different font styles which is important as different font styles correspond with different genres, this
was also the case when choosing animations as I had to be careful that it wasn’t too complex as this would have been a conventional
error.
• Secondly, I learnt how to change the timings of the animation. I was able to control when the animation starts and when it ends by
altering it on the timeline, this was important as titles will stay on the screen for a different number of seconds, depending on how
much significance they have.
• Moreover, when I created my title ideas they were created in the incorrect frame size which meant that they looked pixelated when it
was made into a quick time movie and uploaded on to YouTube. To ensure that this didn’t happen again I learnt the correct frame size
and changed it before creating the same version of titles in the correct frame size for our final product.
OTHER TECHNOLOGY…
• Quick Time Player is something that was used consistently throughout the production process. It provided a fast and easy
way to convert videos in order to upload them onto YouTube and Vimeo. For example the institution logos, titles, and the final
product,
• Another thing that was a key aspect throughout the pre production process was our smartphones, Since all the members in
my group have a smartphone, we used this to our advantage and used apps such as WhatsApp and Facebook and created
group conversations in order to communicate with each other. This helped us to organize when and where to meet to
film, sending each other potential location and costume ideas, and coming up with a suitable voiceover script. It helped speed
up the process as we had instant communication with each other and did not have to rely on planning everything during
school hours.

What have you learnt about technologies from the

  • 1.
    Ruba Islam What haveyou learnt about technologies from the process of constructing this product?
  • 2.
    Research & Planning Throughthe use of the internet I have been able to use different online software within my research and planning as I wanted to make my work look visually interesting rather than posting long essays onto my blog. • For example I used Prezi to create online Power Points consisting of film analysis, and genre research. As this was my first time using Prezi I learnt how to use the basic functions e.g. selecting different themes, inserting pictures and videos etc.. • I also used slide share, this allowed me to create PowerPoint presentations which I could then upload to slide share and embed onto my blog, By using both slide share and Prezi I learnt how to embed things easily and efficiently onto my blog. • Additionally, I used storyboard that to create a storyboard for my opening, I learnt that this was easier and faster than hand drawing and annotating a storyboard. This was because it enabled me to select a character and represent it the way I desired by choosing different colours for their skin, hair, clothes, and shoes. It was also easy to demonstrate the different types of cinematography I wanted to use, as I could just crop and adjust characters by rotating/flipping them to suit the shot type. • Moreover the internet aided me to strengthen my research and planning, as I used websites such as YouTube, Art Of The Title, and IMDb. They helped me to research title sequences which share the same genre as the one I created (Teen Comedy), this helped me gain inspiration as well as learning the codes and conventions of a Teen Comedy title sequence which I then implemented into the final product. (e.g. high key lighting, a voiceover, different character types within a particular social group).
  • 3.
    Final Cut Final Cutwas the most significant editing software that was used during the construction of the final product as we could easily upload all of our footage and begin editing, in addition everything that we had created for the title sequence e.g. titles and institutional logos had to be exported into final cut and adjusted to suit the sequence.  By using Final Cut I picked up various skills which I did not know previously. Firstly I learnt how to use the colour correcting tool to adjust the lighting in our opening as the footage which we filmed to begin with consisted of low key lighting which is not a convention of teen comedy films.  Secondly, I learnt how to create a split screen which seemed difficult at first however by following a YouTube tutorial I realised that it only required layering the clips which we wanted to split. This also helped to compress the time of our film since we didn’t want it to be too long as the audience may lose interest. In the end however we no longer required a split screen as we changed our idea due to the audience feedback we received.  Thirdly, I learnt how to use the pen tool to create fades and cross fades, This enabled us to show the passing of time.  Lastly, I learnt how to create freeze frames and layered sounds which we used in our final opening. I also learnt that when importing music/sound effects into final cut it is best to change the format to an ‘aiff’ file instead of an mp3 as this means that it will not need rendering and it is of a better sound quality.
  • 4.
    Motion I used motionto create our institutional logos, As I had never used motion before I found the layout hard to adjust to, however once I got the hang of it I learnt how to effectively use the tools. • For example I learnt how to create and adjust shapes to make my logo, secondly I learnt how to change the colours and opacity of logo, as I used different shades of blue; a convention of institutional logos which I discovered during my research and planning, Thirdly I then went on to animate the logo once I was happy with the way it looked. To animate the logo I learnt how to record movement, and add different behaviours to it e.g. sharpen. • The only downside to motion is that it can sometimes close the application unexpectedly which meant I lost work that I was working on, on more than one occasion. Therefore I learnt to regularly save my work to prevent this from happening.
  • 5.
    GARAGE BAND &AUDIO TOOL I used Garage Band to create my music ideas and it was also used to create the music for our final product. This is an application that I was familiar with having used it previously. However I learnt more about the wide range of music available, in order to layer sound together and compose music that was suitable for my genre. Garage band also helped me to embed sound effects such as the sound of traffic and people talking since our original sound was distorted because of the wind. This made our opening sound more realistic since we used natural sounds of the environment. I also used Garage Band to recorder voiceovers for film analysis’. Then I then imported into final cut and learnt how to layer it on to the title sequence I was analysing, and adjust the sound using the pen tool to fade it out when necessary. However whilst recording voice-over I learnt that Garage Band can leave the voice sounding echoic and since we planned on using a voiceover for our final product, we made sure to film it on a camera instead as the sound quality sounded better,
  • 6.
    LIVE TYPE I usedLive Type to create the titles for our title sequence. It allowed me to create professional looking titles which connote the genre of film opening. I found this application simple and easy to use, however I still learnt several things whilst creating my title sequence: • Firstly, I learnt how to change the attributes of my title which allowed me to change the colour and opacity of my titles. Live type also taught me how to change to different font styles which is important as different font styles correspond with different genres, this was also the case when choosing animations as I had to be careful that it wasn’t too complex as this would have been a conventional error. • Secondly, I learnt how to change the timings of the animation. I was able to control when the animation starts and when it ends by altering it on the timeline, this was important as titles will stay on the screen for a different number of seconds, depending on how much significance they have. • Moreover, when I created my title ideas they were created in the incorrect frame size which meant that they looked pixelated when it was made into a quick time movie and uploaded on to YouTube. To ensure that this didn’t happen again I learnt the correct frame size and changed it before creating the same version of titles in the correct frame size for our final product.
  • 7.
    OTHER TECHNOLOGY… • QuickTime Player is something that was used consistently throughout the production process. It provided a fast and easy way to convert videos in order to upload them onto YouTube and Vimeo. For example the institution logos, titles, and the final product, • Another thing that was a key aspect throughout the pre production process was our smartphones, Since all the members in my group have a smartphone, we used this to our advantage and used apps such as WhatsApp and Facebook and created group conversations in order to communicate with each other. This helped us to organize when and where to meet to film, sending each other potential location and costume ideas, and coming up with a suitable voiceover script. It helped speed up the process as we had instant communication with each other and did not have to rely on planning everything during school hours.