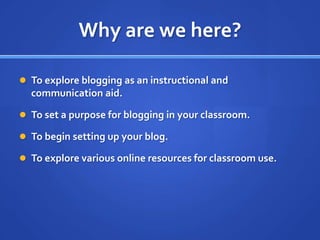
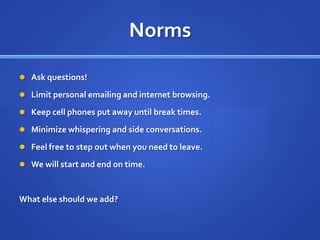
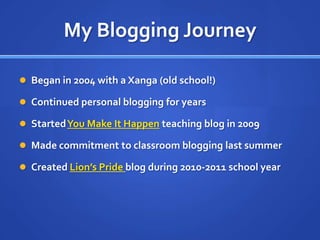
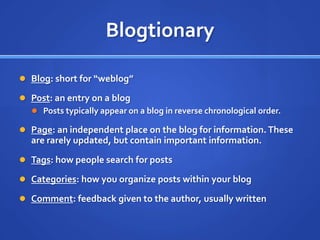
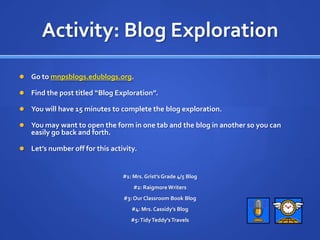
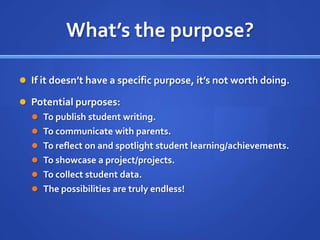
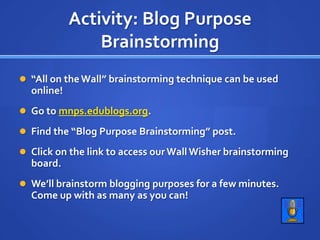
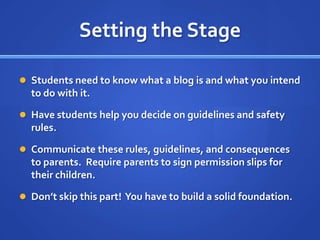
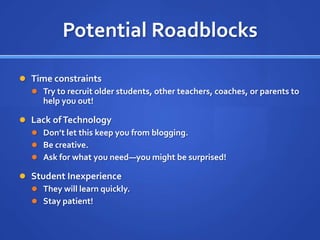
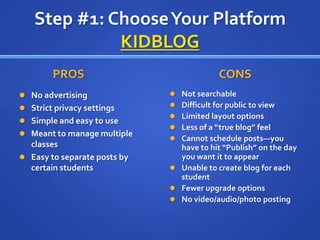
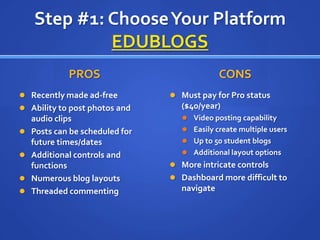
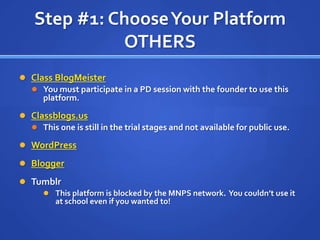
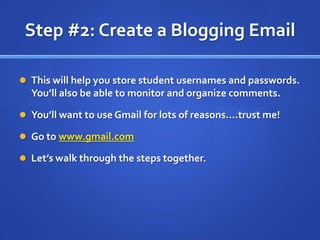
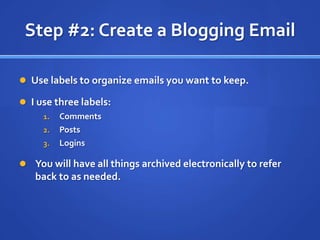
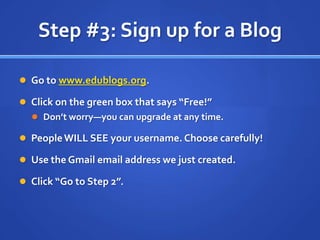
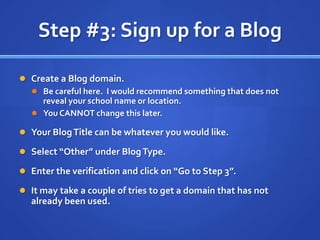
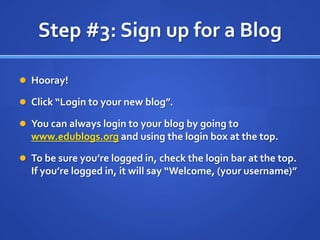
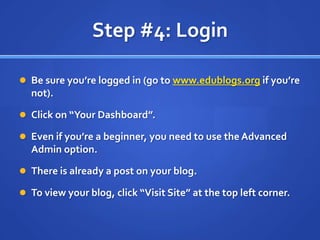
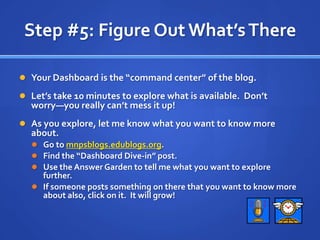
Getting Started in Classroom BloggingAshley Croft, 5th grade teacherMNPS Summer SWAP SymposiumJuly 22, 2011
Who am I?
Who are you?Go to mnpsblogs.edublogs.org.Find the “Participant Survey” post.Scroll to the bottom!Click on the Survey Monkey link to take this survey.Please only take the survey once.You will have 5 minutes to complete this survey.
Mixer Time!Don’t move until the music starts!Find someone wearing the same color as you somewhere on their body.Shorter person goes first. Introduce yourselves and find out this information:NameGrade LevelSchoolFavorite Summertime activityTaller person goes next.You have one song to discuss and find out this information.You will introduce your partner…take notes!
Why are we here?To explore blogging as an instructional and communication aid.To set a purpose for blogging in your classroom.To begin setting up your blog.To explore various online resources for classroom use.
NormsAsk questions!Limit personal emailing and internet browsing.Keep cell phones put away until break times.Minimize whispering and side conversations.Feel free to step out when you need to leave.We will start and end on time.What else should we add?
My Blogging JourneyBegan in 2004 with a Xanga (old school!)Continued personal blogging for yearsStarted You Make It Happen teaching blog in 2009Made commitment to classroom blogging last summerCreated Lion’s Pride blog during 2010-2011 school year
BlogtionaryBlog: short for “weblog”Post: an entry on a blogPosts typically appear on a blog in reverse chronological order.Page: an independent place on the blog for information. These are rarely updated, but contain important information.Tags: how people search for postsCategories: how you organize posts within your blogComment: feedback given to the author, usually written
Activity: Blog ExplorationGo to mnpsblogs.edublogs.org.Find the post titled “Blog Exploration”.You will have 15 minutes to complete the blog exploration.You may want to open the form in one tab and the blog in another so you can easily go back and forth.Let’s number off for this activity.#1: Mrs. Grist’s Grade 4/5 Blog#2: Raigmore Writers#3: Our Classroom Book Blog#4: Mrs. Cassidy’s Blog#5: Tidy Teddy’s Travels
What’s the purpose?If it doesn’t have a specific purpose, it’s not worth doing.Potential purposes:To publish student writing.To communicate with parents.To reflect on and spotlight student learning/achievements.To showcase a project/projects.To collect student data.The possibilities are truly endless!
Activity: Blog Purpose Brainstorming“All on the Wall” brainstorming technique can be used online!Go to mnps.edublogs.org.Find the “Blog Purpose Brainstorming” post.Click on the link to access our Wall Wisher brainstorming board.We’ll brainstorm blogging purposes for a few minutes.  Come up with as many as you can!
Setting the StageStudents need to know what a blog is and what you intend to do with it.Have students help you decide on guidelines and safety rules.Communicate these rules, guidelines, and consequences to parents.  Require parents to sign permission slips for their children.Don’t skip this part!  You have to build a solid foundation.
Potential RoadblocksTime constraintsTry to recruit older students, other teachers, coaches, or parents to help you out!Lack of TechnologyDon’t let this keep you from blogging.Be creative.Ask for what you need—you might be surprised!Student InexperienceThey will learn quickly.Stay patient!
Step #1: Choose Your PlatformKIDBLOGPROS		No advertisingStrict privacy settingsSimple and easy to useMeant to manage multiple classesEasy to separate posts by certain studentsCONSNot searchableDifficult for public to viewLimited layout optionsLess of a “true blog” feelCannot schedule posts—you have to hit “Publish” on the day you want it to appearUnable to create blog for each studentFewer upgrade optionsNo video/audio/photo posting
Step #1: Choose Your PlatformEDUBLOGSPROS	Recently made ad-freeAbility to post photos and audio clipsPosts can be scheduled for future times/datesAdditional controls and functionsNumerous blog layoutsThreaded commentingCONSMust pay for Pro status ($40/year)Video posting capabilityEasily create multiple usersUp to 50 student blogsAdditional layout optionsMore intricate controls Dashboard more difficult to navigate
Step #1: Choose Your PlatformOTHERSClass BlogMeisterYou must participate in a PD session with the founder to use this platform.Classblogs.usThis one is still in the trial stages and not available for public use.WordPressBloggerTumblrThis platform is blocked by the MNPS network.  You couldn’t use it at school even if you wanted to!
Step #2: Create a Blogging EmailThis will help you store student usernames and passwords.  You’ll also be able to monitor and organize comments.You’ll want to use Gmail for lots of reasons….trust me!Go to www.gmail.comLet’s walk through the steps together.
Step #2: Create a Blogging EmailUse labels to organize emails you want to keep.I use three labels:CommentsPostsLoginsYou will have all things archived electronically to refer back to as needed.
Step #3: Sign up for a BlogGo to www.edublogs.org.Click on the green box that says “Free!”Don’t worry—you can upgrade at any time.People WILL SEE your username. Choose carefully!Use the Gmail email address we just created.Click “Go to Step 2”.
Step #3: Sign up for a BlogCreate a Blog domain.Be careful here.  I would recommend something that does not reveal your school name or location.You CANNOT change this later.Your Blog Title can be whatever you would like.Select “Other” under Blog Type.Enter the verification and click on “Go to Step 3”.It may take a couple of tries to get a domain that has not already been used.
Step #3: Sign up for a BlogHooray!Click “Login to your new blog”.You can always login to your blog by going to www.edublogs.org and using the login box at the top.To be sure you’re logged in, check the login bar at the top.  If you’re logged in, it will say “Welcome, (your username)”
Step #4: LoginBe sure you’re logged in (go to www.edublogs.org if you’re not).Click on “Your Dashboard”.Even if you’re a beginner, you need to use the Advanced Admin option.There is already a post on your blog.To view your blog, click “Visit Site” at the top left corner.
Step #5: Figure Out What’s ThereYour Dashboard is the “command center” of the blog.Let’s take 10 minutes to explore what is available.  Don’t worry—you really can’t mess it up!As you explore, let me know what you want to know more about.Go to mnpsblogs.edublogs.org.Find the “Dashboard Dive-in” post.Use the Answer Garden to tell me what you want to explore further.If someone posts something on there that you want to know more about also, click on it.  It will grow!
Step # 6: Make a PostThere are several ways to get to the Post Editor page.Click on “Posts” in the menu on the left. Then click “Add New”.Click on “New Post” in the top right corner.Click on “(#) Posts” on your At a Glance box in the center. Then click “Add New” in the menu on the left.Go ahead and type your title and body.Remember to tag and categorize your post.Tags are intended for others to search.Categories are like file folders for your blog.
Step #6: Make a PostWhen you’re finished, click “Publish”.To schedule a post for a future date, go to the Publishing box.  Next to “Publish immediately”, click “Edit”.Schedule the post for a the date you desire.To protect a post with a password, click “Edit” next to the words “Visibility public”.
Step #7: Choose a ThemeOn the Dashboard menu, click on “Appearances”.Click “Themes”.Now that you have created a post, you can see what your blog will look like with the post.Themes can be changed at anytime.I would recommend leaving it constant once the blog is introduced to students.  I changed mine mid-year and students had to re-learn to navigate it.Take one song to play around with the themes.
Step #8: Add a PageMake sure you’re on the Dashboard page.Click on “Pages” in the Dashboard menu.Hover your mouse over the page name for additional options.To add a new page, click on “Add New” on the Dashboard menu (under “Pages”).Let’s practice editing your “About” page.
Step #9: Add New UsersTips:Have students decide on a username and password at the beginning of the year!Go ahead and enter them all into the blog.Click on “Users” in the Dashboard menu.Click “Add New” in the sub-menu.If you want students to be able to post without your approval, make them Authors.I would recommend making them all Contributors so you can approve posts first.
Step #9a: Add New UsersThe Gmail HackIMPORTANT: DO NOT USE STUDENT EMAILS!Using student emails will limit the amount of control you have over what students post and can access.The Gmail hack will make Edublogsthink you’re entering different emails, but all alerts will go to your email address.  Sneaky!Enter (your email)+(studentusername)@gmail.comFor example, croftlms+mab12@gmail.com.
Step #9: Add New UsersPro subscribers can Add New Users in bulk (up to 15 at a time).Free users will need to login to each account they create and change the password for the students.Label those emails with your “Password” label in Gmail.You won’t have to keep a paper record of passwords that way!
Step #10: Students Post!Students go to www.edublogs.org(just like you did).Login using the username and password they chose and you set up.Make sure they uncheck “Remember me”.They use the Easy Admin option.For previous posts, click on “My Posts” tab at the top.
Step #11: PublicizeTo get the full blogging experience, you need readers.Email everyone you know…teachers, parents, friends, etc.Encourage them to subscribe by email, RSS feed, or Google reader.Specifically ask them to leave comments for your students.
Step #12: CommentingTeach students how to comment.ModelPracticeEvaluateI used a PowerPoint to introduce this to students.Set guidelines for acceptable and unacceptable comments.Allow students to help you decipher between the two.Teach students how to be specific and productive with their commenting.Be sure to stay on top of approving comments.
Wrapping UpTo review what we’ve done today, we’ll create a Bubble Map using Popplet.Move your chair to share a computer with a partner.Go to mnpsblogs.edublogs.org.Find the “Wrapping Up” post and click on the Popplet link.With your partner, create a map of what you learned about today.One of you will have to sign up for Popplet.Email me the Popplet so I can add it to the MNPS Blogs site!
Wrapping UpLet’s create a Wordletogether to go on the blog about today’s training.Popcorn out words that you have heard frequently today.
Wrapping UpPlease email me with any questions at all!When you start your class blog, send me the link!  I will compile a list and add it to the MNPS Blogs website.Thank you for attending!

Starting a Classroom Blog

  • 1.
    Getting Started inClassroom BloggingAshley Croft, 5th grade teacherMNPS Summer SWAP SymposiumJuly 22, 2011
  • 2.
  • 3.
    Who are you?Goto mnpsblogs.edublogs.org.Find the “Participant Survey” post.Scroll to the bottom!Click on the Survey Monkey link to take this survey.Please only take the survey once.You will have 5 minutes to complete this survey.
  • 4.
    Mixer Time!Don’t moveuntil the music starts!Find someone wearing the same color as you somewhere on their body.Shorter person goes first. Introduce yourselves and find out this information:NameGrade LevelSchoolFavorite Summertime activityTaller person goes next.You have one song to discuss and find out this information.You will introduce your partner…take notes!
  • 5.
    Why are wehere?To explore blogging as an instructional and communication aid.To set a purpose for blogging in your classroom.To begin setting up your blog.To explore various online resources for classroom use.
  • 6.
    NormsAsk questions!Limit personalemailing and internet browsing.Keep cell phones put away until break times.Minimize whispering and side conversations.Feel free to step out when you need to leave.We will start and end on time.What else should we add?
  • 7.
    My Blogging JourneyBeganin 2004 with a Xanga (old school!)Continued personal blogging for yearsStarted You Make It Happen teaching blog in 2009Made commitment to classroom blogging last summerCreated Lion’s Pride blog during 2010-2011 school year
  • 8.
    BlogtionaryBlog: short for“weblog”Post: an entry on a blogPosts typically appear on a blog in reverse chronological order.Page: an independent place on the blog for information. These are rarely updated, but contain important information.Tags: how people search for postsCategories: how you organize posts within your blogComment: feedback given to the author, usually written
  • 9.
    Activity: Blog ExplorationGoto mnpsblogs.edublogs.org.Find the post titled “Blog Exploration”.You will have 15 minutes to complete the blog exploration.You may want to open the form in one tab and the blog in another so you can easily go back and forth.Let’s number off for this activity.#1: Mrs. Grist’s Grade 4/5 Blog#2: Raigmore Writers#3: Our Classroom Book Blog#4: Mrs. Cassidy’s Blog#5: Tidy Teddy’s Travels
  • 10.
    What’s the purpose?Ifit doesn’t have a specific purpose, it’s not worth doing.Potential purposes:To publish student writing.To communicate with parents.To reflect on and spotlight student learning/achievements.To showcase a project/projects.To collect student data.The possibilities are truly endless!
  • 11.
    Activity: Blog PurposeBrainstorming“All on the Wall” brainstorming technique can be used online!Go to mnps.edublogs.org.Find the “Blog Purpose Brainstorming” post.Click on the link to access our Wall Wisher brainstorming board.We’ll brainstorm blogging purposes for a few minutes. Come up with as many as you can!
  • 12.
    Setting the StageStudentsneed to know what a blog is and what you intend to do with it.Have students help you decide on guidelines and safety rules.Communicate these rules, guidelines, and consequences to parents. Require parents to sign permission slips for their children.Don’t skip this part! You have to build a solid foundation.
  • 13.
    Potential RoadblocksTime constraintsTryto recruit older students, other teachers, coaches, or parents to help you out!Lack of TechnologyDon’t let this keep you from blogging.Be creative.Ask for what you need—you might be surprised!Student InexperienceThey will learn quickly.Stay patient!
  • 14.
    Step #1: ChooseYour PlatformKIDBLOGPROS No advertisingStrict privacy settingsSimple and easy to useMeant to manage multiple classesEasy to separate posts by certain studentsCONSNot searchableDifficult for public to viewLimited layout optionsLess of a “true blog” feelCannot schedule posts—you have to hit “Publish” on the day you want it to appearUnable to create blog for each studentFewer upgrade optionsNo video/audio/photo posting
  • 15.
    Step #1: ChooseYour PlatformEDUBLOGSPROS Recently made ad-freeAbility to post photos and audio clipsPosts can be scheduled for future times/datesAdditional controls and functionsNumerous blog layoutsThreaded commentingCONSMust pay for Pro status ($40/year)Video posting capabilityEasily create multiple usersUp to 50 student blogsAdditional layout optionsMore intricate controls Dashboard more difficult to navigate
  • 16.
    Step #1: ChooseYour PlatformOTHERSClass BlogMeisterYou must participate in a PD session with the founder to use this platform.Classblogs.usThis one is still in the trial stages and not available for public use.WordPressBloggerTumblrThis platform is blocked by the MNPS network. You couldn’t use it at school even if you wanted to!
  • 17.
    Step #2: Createa Blogging EmailThis will help you store student usernames and passwords. You’ll also be able to monitor and organize comments.You’ll want to use Gmail for lots of reasons….trust me!Go to www.gmail.comLet’s walk through the steps together.
  • 18.
    Step #2: Createa Blogging EmailUse labels to organize emails you want to keep.I use three labels:CommentsPostsLoginsYou will have all things archived electronically to refer back to as needed.
  • 19.
    Step #3: Signup for a BlogGo to www.edublogs.org.Click on the green box that says “Free!”Don’t worry—you can upgrade at any time.People WILL SEE your username. Choose carefully!Use the Gmail email address we just created.Click “Go to Step 2”.
  • 20.
    Step #3: Signup for a BlogCreate a Blog domain.Be careful here. I would recommend something that does not reveal your school name or location.You CANNOT change this later.Your Blog Title can be whatever you would like.Select “Other” under Blog Type.Enter the verification and click on “Go to Step 3”.It may take a couple of tries to get a domain that has not already been used.
  • 21.
    Step #3: Signup for a BlogHooray!Click “Login to your new blog”.You can always login to your blog by going to www.edublogs.org and using the login box at the top.To be sure you’re logged in, check the login bar at the top. If you’re logged in, it will say “Welcome, (your username)”
  • 22.
    Step #4: LoginBesure you’re logged in (go to www.edublogs.org if you’re not).Click on “Your Dashboard”.Even if you’re a beginner, you need to use the Advanced Admin option.There is already a post on your blog.To view your blog, click “Visit Site” at the top left corner.
  • 23.
    Step #5: FigureOut What’s ThereYour Dashboard is the “command center” of the blog.Let’s take 10 minutes to explore what is available. Don’t worry—you really can’t mess it up!As you explore, let me know what you want to know more about.Go to mnpsblogs.edublogs.org.Find the “Dashboard Dive-in” post.Use the Answer Garden to tell me what you want to explore further.If someone posts something on there that you want to know more about also, click on it. It will grow!
  • 24.
    Step # 6:Make a PostThere are several ways to get to the Post Editor page.Click on “Posts” in the menu on the left. Then click “Add New”.Click on “New Post” in the top right corner.Click on “(#) Posts” on your At a Glance box in the center. Then click “Add New” in the menu on the left.Go ahead and type your title and body.Remember to tag and categorize your post.Tags are intended for others to search.Categories are like file folders for your blog.
  • 25.
    Step #6: Makea PostWhen you’re finished, click “Publish”.To schedule a post for a future date, go to the Publishing box. Next to “Publish immediately”, click “Edit”.Schedule the post for a the date you desire.To protect a post with a password, click “Edit” next to the words “Visibility public”.
  • 26.
    Step #7: Choosea ThemeOn the Dashboard menu, click on “Appearances”.Click “Themes”.Now that you have created a post, you can see what your blog will look like with the post.Themes can be changed at anytime.I would recommend leaving it constant once the blog is introduced to students. I changed mine mid-year and students had to re-learn to navigate it.Take one song to play around with the themes.
  • 27.
    Step #8: Adda PageMake sure you’re on the Dashboard page.Click on “Pages” in the Dashboard menu.Hover your mouse over the page name for additional options.To add a new page, click on “Add New” on the Dashboard menu (under “Pages”).Let’s practice editing your “About” page.
  • 28.
    Step #9: AddNew UsersTips:Have students decide on a username and password at the beginning of the year!Go ahead and enter them all into the blog.Click on “Users” in the Dashboard menu.Click “Add New” in the sub-menu.If you want students to be able to post without your approval, make them Authors.I would recommend making them all Contributors so you can approve posts first.
  • 29.
    Step #9a: AddNew UsersThe Gmail HackIMPORTANT: DO NOT USE STUDENT EMAILS!Using student emails will limit the amount of control you have over what students post and can access.The Gmail hack will make Edublogsthink you’re entering different emails, but all alerts will go to your email address. Sneaky!Enter (your email)+(studentusername)@gmail.comFor example, croftlms+mab12@gmail.com.
  • 30.
    Step #9: AddNew UsersPro subscribers can Add New Users in bulk (up to 15 at a time).Free users will need to login to each account they create and change the password for the students.Label those emails with your “Password” label in Gmail.You won’t have to keep a paper record of passwords that way!
  • 31.
    Step #10: StudentsPost!Students go to www.edublogs.org(just like you did).Login using the username and password they chose and you set up.Make sure they uncheck “Remember me”.They use the Easy Admin option.For previous posts, click on “My Posts” tab at the top.
  • 32.
    Step #11: PublicizeToget the full blogging experience, you need readers.Email everyone you know…teachers, parents, friends, etc.Encourage them to subscribe by email, RSS feed, or Google reader.Specifically ask them to leave comments for your students.
  • 33.
    Step #12: CommentingTeachstudents how to comment.ModelPracticeEvaluateI used a PowerPoint to introduce this to students.Set guidelines for acceptable and unacceptable comments.Allow students to help you decipher between the two.Teach students how to be specific and productive with their commenting.Be sure to stay on top of approving comments.
  • 34.
    Wrapping UpTo reviewwhat we’ve done today, we’ll create a Bubble Map using Popplet.Move your chair to share a computer with a partner.Go to mnpsblogs.edublogs.org.Find the “Wrapping Up” post and click on the Popplet link.With your partner, create a map of what you learned about today.One of you will have to sign up for Popplet.Email me the Popplet so I can add it to the MNPS Blogs site!
  • 35.
    Wrapping UpLet’s createa Wordletogether to go on the blog about today’s training.Popcorn out words that you have heard frequently today.
  • 36.
    Wrapping UpPlease emailme with any questions at all!When you start your class blog, send me the link! I will compile a list and add it to the MNPS Blogs website.Thank you for attending!

Editor's Notes

  • #10 Things to ask: title of blog, location of teacher/classroom, date of most recent post, title of most recent post, tags of most recent post, categories of most recent post, purpose of blog, how student safety is addressed, one thing you want to use, one suggestion you have for this teacher