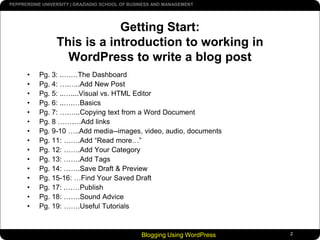
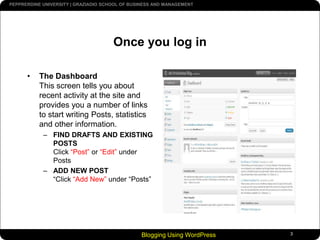
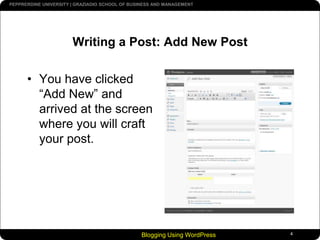
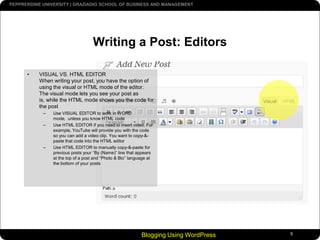
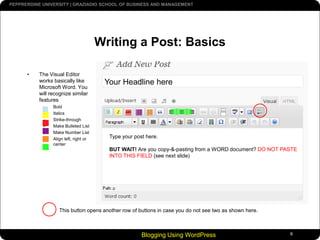
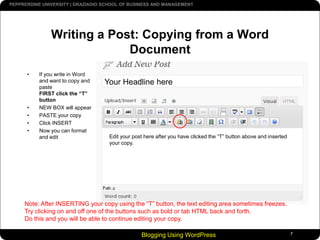
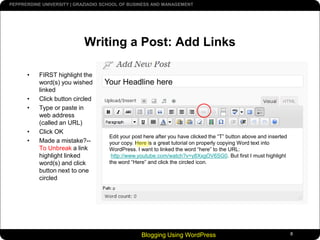
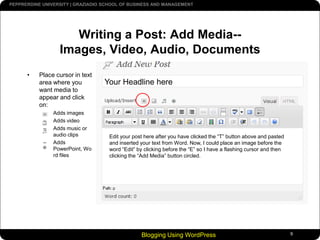
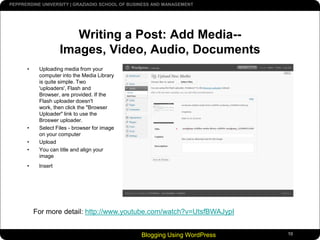
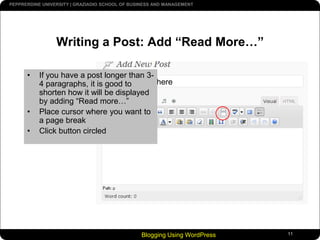
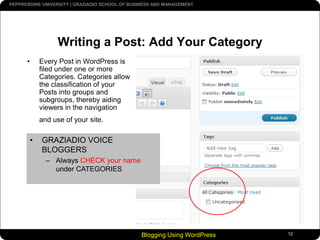
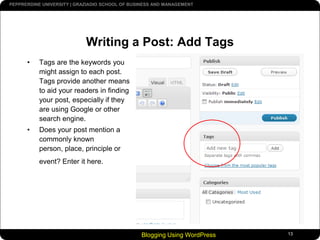
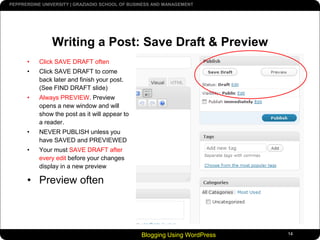
GETTING STARTEDBlogging Using WordPress
Blogging Using WordPress2Getting Start:This is a introduction to working in WordPress to write a blog post Pg. 3: .….…The DashboardPg. 4: ….…..Add New PostPg. 5: ..…....Visual vs. HTML EditorPg. 6: ..….…BasicsPg. 7: ….…..Copying text from a Word DocumentPg. 8 …….…Add linksPg. 9-10 …..Add media--images, video, audio, documentsPg. 11: …….Add “Read more…”Pg. 12: …….Add Your CategoryPg. 13: …….Add TagsPg. 14: …….Save Draft & PreviewPg. 15-16: …Find Your Saved DraftPg. 17: .……PublishPg. 18: …….Sound AdvicePg. 19: …….Useful Tutorials
Blogging Using WordPress3Once you log inThe DashboardThis screen tells you about recent activity at the site and provides you a number of links to start writing Posts, statistics and other information.FIND DRAFTS AND EXISTING POSTSClick “Post”or“Edit”under PostsADD NEW POST“Click “Add New” under “Posts”
Blogging Using WordPress4Writing a Post: Add New PostYou have clicked “Add New” and arrived at the screen where you will craft your post.
Blogging Using WordPress5Writing a Post: EditorsVISUAL VS. HTML EDITORWhen writing your post, you have the option of using the visual or HTML mode of the editor. The visual mode lets you see your post as is, while the HTML mode shows you the code for the post Use VISUAL EDITOR to work in WORD mode,  unless you know HTML codeUse HTML EDITOR if you need to insert video. For example, YouTube will provide you with the code so you can add a video clip. You want to copy-&-paste that code into the HTML editorUse HTML EDITOR to manually copy-&-paste for previous posts your “By (Name)” line that appears at the top of a post and “Photo & Bio” language at the bottom of your posts
Blogging Using WordPress6Writing a Post: BasicsThe Visual Editor works basically like Microsoft Word. You will recognize similar featuresBoldItalicsStrike-throughMake Bulleted ListMake Number ListAlign left, right or centerYour Headline hereType your post here.BUT WAIT! Are you copy-&-pasting from a WORD document? DO NOT PASTE INTO THIS FIELD (see next slide)This button opens another row of buttons in case you do not see two as shown here.
Blogging Using WordPress7Writing a Post: Copying from a Word DocumentIf you write in Word and want to copy and paste FIRST click the “T” buttonNEW BOX will appearPASTE your copyClick INSERTNow you can format and editYour Headline hereEdit your post here after you have clicked the “T” button above and inserted your copy.Note: After INSERTING your copy using the “T” button, the text editing area sometimes freezes. Try clicking on and off one of the buttons such as bold or tab HTML back and forth. Do this and you will be able to continue editing your copy.
Blogging Using WordPress8Writing a Post: Add LinksFIRST highlight the word(s) you wished linkedClick button circledType or paste in web address (called an URL)Click OKMade a mistake?--To Unbreak a link highlight linked word(s) and click button next to one circledYour Headline hereEdit your post here after you have clicked the “T” button above and inserted your copy. Here is a great tutorial on properly copying Word text into WordPress. I want to linked the word “here” to the URL:http://www.youtube.com/watch?v=y8XxgOV6SG0. But first I must highlightthe word “Here” and click the circled icon.
Blogging Using WordPress9Writing a Post: Add Media--Images, Video, Audio, DocumentsPlace cursor in text area where you want media to appear and click on:Adds images Adds videoAdds music or audio clipsAdds PowerPoint, Word filesYour Headline hereEdit your post here after you have clicked the “T” button above and pasted and inserted your text from Word. Now, I could place an image before the word “Edit” by clicking before the “E” so I have a flashing cursor and then clicking the “Add Media” button circled.
Blogging Using WordPress10Writing a Post: Add Media--Images, Video, Audio, DocumentsUploading media from your computer into the Media Library is quite simple. Two 'uploaders', Flash and Browser, are provided. If the Flash uploader doesn't work, then click the "Browser Uploader" link to use the Broswer uploader.Select Files - browser for image on your computerUploadYou can title and align your imageInsertFor more detail: http://www.youtube.com/watch?v=UtsfBWAJypI
Blogging Using WordPress11Writing a Post: Add “Read More…”If you have a post longer than 3-4 paragraphs, it is good to shorten how it will be displayed by adding “Read more…”Place cursor where you want to a page breakClick button circledYour Headline here
Blogging Using WordPress12Writing a Post: Add Your CategoryEvery Post in WordPress is filed under one or more Categories. Categories allow the classification of your Posts into groups and subgroups, thereby aiding viewers in the navigation and use of your site.GRAZIADIO VOICE BLOGGERS
Always CHECK your name under CATEGORIESBlogging Using WordPress13Writing a Post: Add TagsTags are the keywords you might assign to each post. Tags provide another means to aid your readers in finding your post, especially if they are using Google or other search engine.Does your post mention a commonly known person, place, principle or event? Enter it here.
Blogging Using WordPress14Writing a Post: Save Draft & PreviewClick SAVE DRAFT oftenClick SAVE DRAFT to come back later and finish your post. (See FIND DRAFT slide)Always PREVIEW. Preview opens a new window and will show the post as it will appear to a reader.NEVER PUBLISH unless you have SAVED and PREVIEWEDYour must SAVE DRAFT after every edit before your changes display in a new previewPreview often
Blogging Using WordPress15Writing a Post: Find Your Saved DraftYou can always find OLDER POSTS or that DRAFT you had started, but did not have time to finishClick either POSTS or EDIT under “Posts”
Blogging Using WordPress16Writing a Post: Find Your Saved DraftVia the Posts Edit SubPanel you can select the Post or Posts you wish to edit, delete, or view. HOOVER CURSOR over title of post and a menu will display. You can take the following actions.Edit - Post Name or clicking on the Edit option just below the Post Name, causes the Edit Posts screen to display.  Quick Edit - Quick Edit allows a quick in-line edit of certain fields related to a Post. Delete - This Action deletes the Posts..View - This Action presents the Post as it appears in a single Post view on the blog.
Blogging Using WordPress17Writing a Post: PublishNEVER PUBLISH unless you have SAVED and PREVIEWEDReady? Hit big blue buttonPost is now live to the world
Blogging Using WordPress18Writing a Post: Sound AdviceSpell Check and ProofCheck all the spelling and proof it thoroughly before you hit Publish. Think before you postRanting on blogs is commonplace today, but take a moment and think about what you are writing. Remember, once it is out there, it can be seen by many and crawled by search engines; and taking things back is harder once it is public. Take a moment to read what you've written before hitting the Publish button. When you are ready, share it with the world. Write about what you likeYou’ve heard this a thousand times before and it sounds too cliched, but it is true. If you force yourself to write something that you don’t really enjoy, it will show. Perhaps you might not have a specific theme for writing when you just start, but that’s ok. You’ll become more focused later. Just enjoy the experience and write what you like. Write frequentlyWrite as frequently as you can, may be even more than twice a day, but don’t let quantity get in the way of quality. Your viewers come for content, don’t give them useless stuff. Don’t use too much slangNot all the readers will be from your part of the world so make sure people can understand easily. Don't hide your emotionsTempting as it might be, don’t hide your real emotions. After all that is what a blog is about. If you want, you can stay anonymous and voice your feelings on whatever you are passionate about. You might have strong views on various subjects but let your readers know your passion. What is passion worth if you can’t even share it? You’ll actually love the discussions it can lead to. The discussions will broaden your own thinking and you might end up making some really good friends. Consider your readersPerhaps this sounds weird, but consider who needs to know about your blog before you tell them about your new blogging hobby. Will you be able to write freely if you tell them? How much should you let your readers know about you? Is it ok if your boss or girlfriend reads your posts? If you don’t want them to read, take anonymity measures accordingly. Use pictures and videosThey make the pages colorful and viewers get to see a little of your part of the world. They feel connected. Save your postsSave your posts before you press the publish button. Anything can happen with your computer or with an internet connection. You don’t need to lose your post.Courtesy of WordPress.org
Blogging Using WordPress19Writing a Post: Useful TutorialsHow to Correctly Copy/Paste Microsoft Word text into WordPresshttp://www.youtube.com/watch?v=y8XxgOV6SG0How to Add YouTube Video using WordPress 2.7http://www.youtube.com/watch?v=9ee22RLRMicHow to Insert Photos (WP v.2.7)http://www.youtube.com/watch?v=UtsfBWAJypIHow to Add Media and Linkshttp://www.youtube.com/watch?v=Pt1QL0wEHow to Write a Posthttp://wordpress-tutorials.ithemes.com/27tutsunbranded/wp27_writepost.swf

Graziadio Word Press Getting Started Show

  • 1.
  • 2.
    Blogging Using WordPress2GettingStart:This is a introduction to working in WordPress to write a blog post Pg. 3: .….…The DashboardPg. 4: ….…..Add New PostPg. 5: ..…....Visual vs. HTML EditorPg. 6: ..….…BasicsPg. 7: ….…..Copying text from a Word DocumentPg. 8 …….…Add linksPg. 9-10 …..Add media--images, video, audio, documentsPg. 11: …….Add “Read more…”Pg. 12: …….Add Your CategoryPg. 13: …….Add TagsPg. 14: …….Save Draft & PreviewPg. 15-16: …Find Your Saved DraftPg. 17: .……PublishPg. 18: …….Sound AdvicePg. 19: …….Useful Tutorials
  • 3.
    Blogging Using WordPress3Onceyou log inThe DashboardThis screen tells you about recent activity at the site and provides you a number of links to start writing Posts, statistics and other information.FIND DRAFTS AND EXISTING POSTSClick “Post”or“Edit”under PostsADD NEW POST“Click “Add New” under “Posts”
  • 4.
    Blogging Using WordPress4Writinga Post: Add New PostYou have clicked “Add New” and arrived at the screen where you will craft your post.
  • 5.
    Blogging Using WordPress5Writinga Post: EditorsVISUAL VS. HTML EDITORWhen writing your post, you have the option of using the visual or HTML mode of the editor. The visual mode lets you see your post as is, while the HTML mode shows you the code for the post Use VISUAL EDITOR to work in WORD mode, unless you know HTML codeUse HTML EDITOR if you need to insert video. For example, YouTube will provide you with the code so you can add a video clip. You want to copy-&-paste that code into the HTML editorUse HTML EDITOR to manually copy-&-paste for previous posts your “By (Name)” line that appears at the top of a post and “Photo & Bio” language at the bottom of your posts
  • 6.
    Blogging Using WordPress6Writinga Post: BasicsThe Visual Editor works basically like Microsoft Word. You will recognize similar featuresBoldItalicsStrike-throughMake Bulleted ListMake Number ListAlign left, right or centerYour Headline hereType your post here.BUT WAIT! Are you copy-&-pasting from a WORD document? DO NOT PASTE INTO THIS FIELD (see next slide)This button opens another row of buttons in case you do not see two as shown here.
  • 7.
    Blogging Using WordPress7Writinga Post: Copying from a Word DocumentIf you write in Word and want to copy and paste FIRST click the “T” buttonNEW BOX will appearPASTE your copyClick INSERTNow you can format and editYour Headline hereEdit your post here after you have clicked the “T” button above and inserted your copy.Note: After INSERTING your copy using the “T” button, the text editing area sometimes freezes. Try clicking on and off one of the buttons such as bold or tab HTML back and forth. Do this and you will be able to continue editing your copy.
  • 8.
    Blogging Using WordPress8Writinga Post: Add LinksFIRST highlight the word(s) you wished linkedClick button circledType or paste in web address (called an URL)Click OKMade a mistake?--To Unbreak a link highlight linked word(s) and click button next to one circledYour Headline hereEdit your post here after you have clicked the “T” button above and inserted your copy. Here is a great tutorial on properly copying Word text into WordPress. I want to linked the word “here” to the URL:http://www.youtube.com/watch?v=y8XxgOV6SG0. But first I must highlightthe word “Here” and click the circled icon.
  • 9.
    Blogging Using WordPress9Writinga Post: Add Media--Images, Video, Audio, DocumentsPlace cursor in text area where you want media to appear and click on:Adds images Adds videoAdds music or audio clipsAdds PowerPoint, Word filesYour Headline hereEdit your post here after you have clicked the “T” button above and pasted and inserted your text from Word. Now, I could place an image before the word “Edit” by clicking before the “E” so I have a flashing cursor and then clicking the “Add Media” button circled.
  • 10.
    Blogging Using WordPress10Writinga Post: Add Media--Images, Video, Audio, DocumentsUploading media from your computer into the Media Library is quite simple. Two 'uploaders', Flash and Browser, are provided. If the Flash uploader doesn't work, then click the "Browser Uploader" link to use the Broswer uploader.Select Files - browser for image on your computerUploadYou can title and align your imageInsertFor more detail: http://www.youtube.com/watch?v=UtsfBWAJypI
  • 11.
    Blogging Using WordPress11Writinga Post: Add “Read More…”If you have a post longer than 3-4 paragraphs, it is good to shorten how it will be displayed by adding “Read more…”Place cursor where you want to a page breakClick button circledYour Headline here
  • 12.
    Blogging Using WordPress12Writinga Post: Add Your CategoryEvery Post in WordPress is filed under one or more Categories. Categories allow the classification of your Posts into groups and subgroups, thereby aiding viewers in the navigation and use of your site.GRAZIADIO VOICE BLOGGERS
  • 13.
    Always CHECK yourname under CATEGORIESBlogging Using WordPress13Writing a Post: Add TagsTags are the keywords you might assign to each post. Tags provide another means to aid your readers in finding your post, especially if they are using Google or other search engine.Does your post mention a commonly known person, place, principle or event? Enter it here.
  • 14.
    Blogging Using WordPress14Writinga Post: Save Draft & PreviewClick SAVE DRAFT oftenClick SAVE DRAFT to come back later and finish your post. (See FIND DRAFT slide)Always PREVIEW. Preview opens a new window and will show the post as it will appear to a reader.NEVER PUBLISH unless you have SAVED and PREVIEWEDYour must SAVE DRAFT after every edit before your changes display in a new previewPreview often
  • 15.
    Blogging Using WordPress15Writinga Post: Find Your Saved DraftYou can always find OLDER POSTS or that DRAFT you had started, but did not have time to finishClick either POSTS or EDIT under “Posts”
  • 16.
    Blogging Using WordPress16Writinga Post: Find Your Saved DraftVia the Posts Edit SubPanel you can select the Post or Posts you wish to edit, delete, or view. HOOVER CURSOR over title of post and a menu will display. You can take the following actions.Edit - Post Name or clicking on the Edit option just below the Post Name, causes the Edit Posts screen to display. Quick Edit - Quick Edit allows a quick in-line edit of certain fields related to a Post. Delete - This Action deletes the Posts..View - This Action presents the Post as it appears in a single Post view on the blog.
  • 17.
    Blogging Using WordPress17Writinga Post: PublishNEVER PUBLISH unless you have SAVED and PREVIEWEDReady? Hit big blue buttonPost is now live to the world
  • 18.
    Blogging Using WordPress18Writinga Post: Sound AdviceSpell Check and ProofCheck all the spelling and proof it thoroughly before you hit Publish. Think before you postRanting on blogs is commonplace today, but take a moment and think about what you are writing. Remember, once it is out there, it can be seen by many and crawled by search engines; and taking things back is harder once it is public. Take a moment to read what you've written before hitting the Publish button. When you are ready, share it with the world. Write about what you likeYou’ve heard this a thousand times before and it sounds too cliched, but it is true. If you force yourself to write something that you don’t really enjoy, it will show. Perhaps you might not have a specific theme for writing when you just start, but that’s ok. You’ll become more focused later. Just enjoy the experience and write what you like. Write frequentlyWrite as frequently as you can, may be even more than twice a day, but don’t let quantity get in the way of quality. Your viewers come for content, don’t give them useless stuff. Don’t use too much slangNot all the readers will be from your part of the world so make sure people can understand easily. Don't hide your emotionsTempting as it might be, don’t hide your real emotions. After all that is what a blog is about. If you want, you can stay anonymous and voice your feelings on whatever you are passionate about. You might have strong views on various subjects but let your readers know your passion. What is passion worth if you can’t even share it? You’ll actually love the discussions it can lead to. The discussions will broaden your own thinking and you might end up making some really good friends. Consider your readersPerhaps this sounds weird, but consider who needs to know about your blog before you tell them about your new blogging hobby. Will you be able to write freely if you tell them? How much should you let your readers know about you? Is it ok if your boss or girlfriend reads your posts? If you don’t want them to read, take anonymity measures accordingly. Use pictures and videosThey make the pages colorful and viewers get to see a little of your part of the world. They feel connected. Save your postsSave your posts before you press the publish button. Anything can happen with your computer or with an internet connection. You don’t need to lose your post.Courtesy of WordPress.org
  • 19.
    Blogging Using WordPress19Writinga Post: Useful TutorialsHow to Correctly Copy/Paste Microsoft Word text into WordPresshttp://www.youtube.com/watch?v=y8XxgOV6SG0How to Add YouTube Video using WordPress 2.7http://www.youtube.com/watch?v=9ee22RLRMicHow to Insert Photos (WP v.2.7)http://www.youtube.com/watch?v=UtsfBWAJypIHow to Add Media and Linkshttp://www.youtube.com/watch?v=Pt1QL0wEHow to Write a Posthttp://wordpress-tutorials.ithemes.com/27tutsunbranded/wp27_writepost.swf