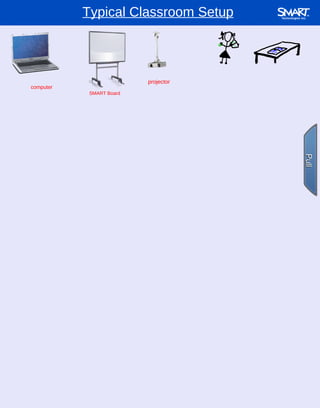
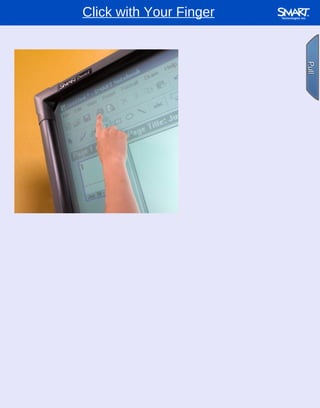
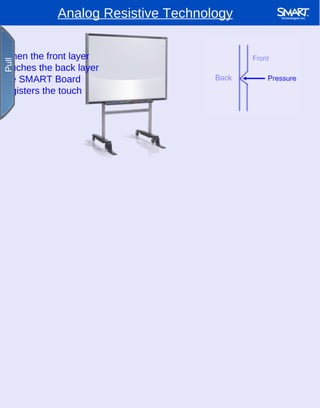
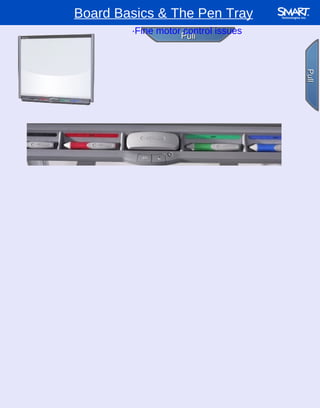
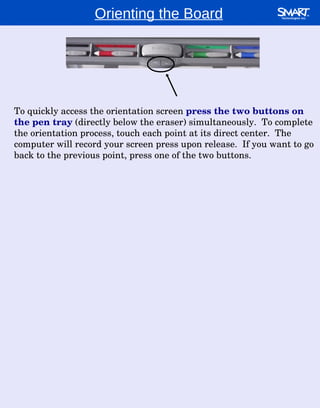
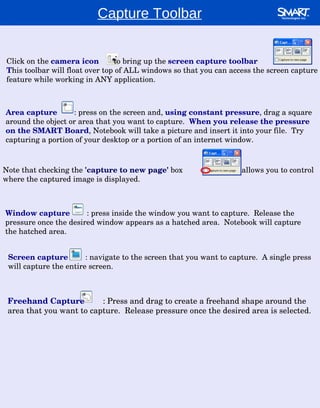
The presentation is about Scratch . In This presentation you will get various things to learn about Scratch. How to use it . How to start. It has various images and clarifying features which will enhance your Preseentation.
Provides a quick introduction to Scratch and how easy it is to get started
This was a presentation I did today for a course on Presentation Skills. However I thought other parents may find it interesting.
Scratch is an open-source application developed at MIT to teach students as young as five years old to program using drag and drop blocks. Your students can quickly create interactive animations, games, or presentations for school.
We will uncover an often overlooked feature of Scratch and integrate external sensors and inputs through our PicoBoard. Learn to build data collection, graphing, and visualization in Scratch!
Aimed at beginners to Inkscape and vector graphics, this bootcamp walks you through how to get started getting productive with Inkscape. It includes a tour of the user interface and hints/tips around the most useful basic functions the software offers.
This is a short tutorial for my students at USC, teaching them how to use Adobe's Edge Animate application to create an animated infographic. I go through some simple steps, using the Rectangle, Text and Clipping tools to show how to create a simple bar graph, and then using the Timeline, to make the bars bounce up into view.
Scratch is a simple environment designed by the Kindergarden Lifelong Learning Group at MIT.
In Scratch, sprites (objects) are manipulated on the stage (background) using various scripts (small program segments). Each sprite has its own set of scripts to control its behaviors and how it interacts with other sprites and events.
Describes a natural language engine built in C# that provides a strongly-typed parser and rules engine. For more information please visit http://blog.abodit.com
Una Nube para cada necesidad: Pública, Privada e HíbridaArsys
Presentación de Javier Salcedo, Product Director de Arsys, en Cloud Day, un evento organizado por EurcoCloud España.
Según la exclusividad del entorno tecnológico, la infraestructura cloud hosting se puede clasificar en tres tipos: nube pública, privada e híbrida. Aunque tienen ventajas compartidas —como la flexibilidad, la eficiencia y la disponibilidad—, la existencia de distintas configuraciones permite que cada empresa encuentre una nube a medida de sus necesidades más concretas en los principales aspectos críticos, como el aislamiento de red y los recursos o los acuerdos a nivel de servicio (SLA).
This tutorial will guide you through the steps to design a fidget spinner in Solidworks. We'll start by modeling a basic spinner, then we'll design our own counterweights to be machined. We'll make a dimensioned print for the counterweight, too! We'll end by creating an assembly for the spinner and I'll give you some next steps to take your design further.
I am the authorized K-12 representative in South Carolina for eInstruction by Turning Point.
Bill McIntosh
SchoolVision Inc..
Authorized South Carolina K-12 Consultant for eInstruction by Turning Technologies
Phone :843-442-8888
Email :WKMcIntosh@Comcast.net
Twitter : @OtisTMcIntosh
SchoolVision Website on Facebook: https://www.facebook.com/WKMIII
Website : www.einstruction.com
Stay Connected - @eInstruction • Facebook
Turning Technologies | 255 West Federal Street | Youngstown, OH Main: 330-746-3015 | Toll Free: 866-746-3015 | Fax: 330-884-6065
www.TurningTechnologies.com
Ethnobotany and Ethnopharmacology:
Ethnobotany in herbal drug evaluation,
Impact of Ethnobotany in traditional medicine,
New development in herbals,
Bio-prospecting tools for drug discovery,
Role of Ethnopharmacology in drug evaluation,
Reverse Pharmacology.
The Roman Empire A Historical Colossus.pdfkaushalkr1407
The Roman Empire, a vast and enduring power, stands as one of history's most remarkable civilizations, leaving an indelible imprint on the world. It emerged from the Roman Republic, transitioning into an imperial powerhouse under the leadership of Augustus Caesar in 27 BCE. This transformation marked the beginning of an era defined by unprecedented territorial expansion, architectural marvels, and profound cultural influence.
The empire's roots lie in the city of Rome, founded, according to legend, by Romulus in 753 BCE. Over centuries, Rome evolved from a small settlement to a formidable republic, characterized by a complex political system with elected officials and checks on power. However, internal strife, class conflicts, and military ambitions paved the way for the end of the Republic. Julius Caesar’s dictatorship and subsequent assassination in 44 BCE created a power vacuum, leading to a civil war. Octavian, later Augustus, emerged victorious, heralding the Roman Empire’s birth.
Under Augustus, the empire experienced the Pax Romana, a 200-year period of relative peace and stability. Augustus reformed the military, established efficient administrative systems, and initiated grand construction projects. The empire's borders expanded, encompassing territories from Britain to Egypt and from Spain to the Euphrates. Roman legions, renowned for their discipline and engineering prowess, secured and maintained these vast territories, building roads, fortifications, and cities that facilitated control and integration.
The Roman Empire’s society was hierarchical, with a rigid class system. At the top were the patricians, wealthy elites who held significant political power. Below them were the plebeians, free citizens with limited political influence, and the vast numbers of slaves who formed the backbone of the economy. The family unit was central, governed by the paterfamilias, the male head who held absolute authority.
Culturally, the Romans were eclectic, absorbing and adapting elements from the civilizations they encountered, particularly the Greeks. Roman art, literature, and philosophy reflected this synthesis, creating a rich cultural tapestry. Latin, the Roman language, became the lingua franca of the Western world, influencing numerous modern languages.
Roman architecture and engineering achievements were monumental. They perfected the arch, vault, and dome, constructing enduring structures like the Colosseum, Pantheon, and aqueducts. These engineering marvels not only showcased Roman ingenuity but also served practical purposes, from public entertainment to water supply.
Model Attribute Check Company Auto PropertyCeline George
In Odoo, the multi-company feature allows you to manage multiple companies within a single Odoo database instance. Each company can have its own configurations while still sharing common resources such as products, customers, and suppliers.
The Indian economy is classified into different sectors to simplify the analysis and understanding of economic activities. For Class 10, it's essential to grasp the sectors of the Indian economy, understand their characteristics, and recognize their importance. This guide will provide detailed notes on the Sectors of the Indian Economy Class 10, using specific long-tail keywords to enhance comprehension.
For more information, visit-www.vavaclasses.com
2024.06.01 Introducing a competency framework for languag learning materials ...Sandy Millin
http://sandymillin.wordpress.com/iateflwebinar2024
Published classroom materials form the basis of syllabuses, drive teacher professional development, and have a potentially huge influence on learners, teachers and education systems. All teachers also create their own materials, whether a few sentences on a blackboard, a highly-structured fully-realised online course, or anything in between. Despite this, the knowledge and skills needed to create effective language learning materials are rarely part of teacher training, and are mostly learnt by trial and error.
Knowledge and skills frameworks, generally called competency frameworks, for ELT teachers, trainers and managers have existed for a few years now. However, until I created one for my MA dissertation, there wasn’t one drawing together what we need to know and do to be able to effectively produce language learning materials.
This webinar will introduce you to my framework, highlighting the key competencies I identified from my research. It will also show how anybody involved in language teaching (any language, not just English!), teacher training, managing schools or developing language learning materials can benefit from using the framework.
2. Objectives: · Ensure a basic understanding of hardware and software ·Encourage the integration of technology into daily lessons ·Use existing resources
4. Typical Classroom Setup computer projector SMART Board Pull Pull Using the clipart shown, demonstrate how you would connect a SMART Board for classroom use.
5. Click with Your Finger A press with your finger is the same as a mouse click Pull Pull
6. Analog Resistive Technology When the front layer touches the back layer the SMART Board registers the touch Pull Pull
7. Board Basics & The Pen Tray Pull Pull · No batteries required ·Can use any object to write ·Fine motor control issues Pull Pull · Press with intent ·Only one point of contact
8. To quickly access the orientation screen press the two buttons on the pen tray (directly below the eraser) simultaneously. To complete the orientation process, touch each point at its direct center. The computer will record your screen press upon release. If you want to go back to the previous point, press one of the two buttons. Orienting the Board
9. To input text while standing at the SMART Board, press the on-screen keyboard button. While typing, remember that the SMART Board only accepts one point of contact at a time. The keyboard can be customized by changing the view and the settings. Try it. The On-Screen Keyboard
10. To access the right mouse button (or control click on a Mac) while standing at the SMART Board, press the right click mouse button. A bubble will appear in the lower right hand corner informing you that your next screen press will be a right click. The Right-Click Button
11. Writing and Erasing Use the pens to write on the board . Use the eraser to erase your writing. Remember to press firmly. Also, remember that the SMART Board only accepts one point of contact.
12. Select the eraser tool . Draw a large circle around the area that you wish to erase and then tap in the center of that circle. Erasing a Large Area: Circle Tap
15. Navigation Buttons Displays the previous notebook page Displays the next notebook page Adds a new blank page to your notebook
16. The Screen Shade The screen shade button can be placed overtop of any page. You can then use it to reveal information in smaller portions. When you click the button the screen appears. Little dimples will appear on the screen along the edges. Click on one of the circles and drag it towards the center. Double tap anywhere on the shade to restore it. Click the button to get rid of the shade.
17. Full Screen Mode The full screen button can be used to optimize the amount of board space to write on. Use the arrow buttons to move forward and backward through the pages of this notebook. To exit full screen click the exit full screen button.
18. Dual Page Display The dual page display button can be used to show 2 Notebook pages at once. To exit out of dual page display select the same button. ( Tip- select View- Zoom-Pin Page to keep 1 page stationary as you go through your Notebook file.)
19. Capture Toolbar Area capture : press on the screen and, using constant pressure , drag a square around the object or area that you want to capture. When you release the pressure on the SMART Board , Notebook will take a picture and insert it into your file. Try capturing a portion of your desktop or a portion of an internet window. Click on the camera icon to bring up the screen capture toolbar T his toolbar will float over top of ALL windows so that you can access the screen capture feature while working in ANY application. Window capture : press inside the window you want to capture. Release the pressure once the desired window appears as a hatched area. Notebook will capture the hatched area. Note that checking the 'capture to new page' box allows you to control where the captured image is displayed. Screen capture : navigate to the screen that you want to capture. A single press will capture the entire screen. Freehand Capture : Press and drag to create a freehand shape around the area that you want to capture. Release pressure once the desired area is selected.
20. Tables The tables button can be used to insert a table into Notebook. Select the number of rows and columns to create the table. Marquee select the entire table and use the handle on the top left to move. You can add/delete cells, add cell shades, and drag and drop into cells.
21. The Pen & Highlighter The pen tool can be used to write, draw or highlight in Notebook when not connected to a SMART Board. The pens and highlighters can be customized by clicking on the properties tab.
22. The Pen & Highlighter It was a small, comfortable room with two windows. The front one looked out onto the graveyard, the other to a little garden at the side. The large black range stood solidly in an alcove in the back wall, a thick dark pipe curving its way upward through the ceiling. Stretched out beneath the side window were a few shelves filled with books, old newspapers and odds and ends and by the front window stood a heavy wooden table with two chairs below. The flagstone floor was covered in a crimson, green and brown rug. Willie glanced at the armchair by the range and the objects that lay on top of the small wooden table; a pipe, a book and a baccy jar. From : Goodnight Uncle Tom Teaching Visualization - A Bird's Eye View
23. The Creative Pen Tool Use the creative pen tool to write on the board.
24. The Line Tool The line tool can be used to draw different types of lines. Select the properties tab to customize the lines.
25. The Line Tool: Perspective Drawing Pull Pull Perspective lines: Straight lines, drawn at an angle from the edges of objects, back into perceived distant space, until they finally converge at a point on the horizon line. These lines establish guidelines for drawing objects in proper perspective.
26. The Shape Tool Use the shape tool to add a variety of shapes to the page. Customize any shape by selecting the properties tab .
27. The Shape Pen Use the shape pen to add allow your shapes to snap. Try drawing a circle, triangle, and square.
28. The Shape Pen What shapes can you see? Suggested Examples: · Hiding and revealing, geometry, art, counting activities...
29. The Presentation Pen Use the presentation pen to access the spotlight, magnifier, and disappearing ink.
30. prime odd multiple of 5 prime 9 3 5 10 odd multiple of 5 2 Presentation pen - spotlight Presentation pen - spotlight
32. The Fill Tool Use the fill tool to fill objects with a specific color.
33. Fill tool Fill tool 1900-1920 1920-1940 1940-1960 vacuum cleaner tea bags neon lamps hearing aids television electric razor electron microscope electric guitar aqualung microwave 1900-1920 1920-1940 1940-1960 hovercraft
34. The Text Tool Click to create a text box for typing. After selecting this tool, tap anywhere on the page. If you click the keyboard button on the pen tray an on-screen keyboard will appear. You can now type in the text-box. if you prefer, you can also enter text from your computer's keyboard. NOTE: Text boxes cannot be erased with the eraser. You must use the delete button .
35. The Vertically Challenged Button Click on to move the toolbar to the bottom. This allows shorter students to reach the toolbar.
36. The Slide Sorter The slide sorter can be moved from left to right using the button. This allows users to present from either side of the SMART Board. Can expand it to see all the slides at once Organizing content ensuring flow Reorganizing after a period of reflection Brainstorming and then grouping similar ideas onto different pages allows you to jump back and forth to revisit previously developed ideas
37.
38. The Properties Tab The properties tab allows you to change properties of an object, set transparency, create object animation, and page recording.
39. Bacter Bacter Bacter Bacter Animation - spin Which of these triangles are equilateral? Animation - spin Which of these triangles are equilateral?
40. Page Recording Click on the properties tab and select page recording. This allows you to record a step by step process and save it as a recording on a Notebook page.
41. The Transparency Tool Select a shape and use the transparency tool from the properties tab to alter the transparency of the shape. Overlap shapes to see how the transparency works.
43. Resizing & Rotating Use the select tool to select one of the shapes above (by tapping on it). This will bring up three handles. Drag the green circle to rotate the shape. Drag the white circle to resize the shape. The third handle is the drop down menu. We will explore this option later. Example
45. The Drop Down Menu When you select an object (image, writing, typing) a drop down menu appears . Select the object above to see the drop down menu.
46. When you write something on the board with a pen additional options will appear in the drop down menu. Notebook has a built in text recognition feature and will return its 4 best guesses at what it is that you're trying to write. Click on the word above, from the drop down menu, choose the correct recognize option for this word. Now try it with another word. Text Recognition
47. The infinite cloner from the drop down menu allows you to create multiple copies of one item. Click on 'Dolly the Sheep'. From the drop down menu, select infinite cloner . Now you can drag multiple copies of Dolly onto the page. Infinite Cloner
48. Find the area of the following shapes. The area is _______ square units. The area is _______ square units. 18 20 Infinite Cloner
49.
50. Layering Layer the following cards in increasing numerical order. Objects in NB are layered in the order that they were created. To change the order of an object, tap on the object and select order from the drop down menu . Send backwards will take the object one layer backwards while send to back will take the object all the way to the back in one step. The same is true for bring forward and bring to front .
52. Locking The locking feature can also be found in the drop down menu. Lock in place will stop an object from moving on the page. You can unlock an object by clicking the little padlock icon and selecting "unlock".
53. Linking The linking feature allows you to link to a web page, page in Notebook, attachments file, or file on your computer.
54. Linking to the Internet Click on the image above to bring up the drop down menu . From the menu, select 'link' and then type in the internet address that you wish to link to. Don't forget to choose 'object' or 'corner icon' . Click 'ok' to complete the link.
55. Linking to the Internet SPACE Telescopes The Moon The Planets The Sun
56. Copying Images from the Internet To quickly copy an image from the internet simply locate the image that you want and then drag and drop it into your Notebook file. Make sure that the object that you want is actually an image and not just a link to an image. Also, be sure to reference the image. Click on the icon above and drag and drop the picture into Notebook. You need to be connected to the internet to complete this activity.
58. Click on the Gallery Side Tab and explore the extensive gallery collection. It is organized into folders and subfolders. Navigate through the folders by clicking the plus signs. When you see something you like, double click or drag it into your workspace. The Gallery Tab
59. You can search the gallery by typing a keyword into the search box at the top of the gallery page. Use the on-screen keyboard to type the words by clicking the keyboard button on the pen tray. Keyword Search
60. Keyword Search Types of Gallery Content pictures backgrounds interactive and multimedia lesson activities notebook files and pages