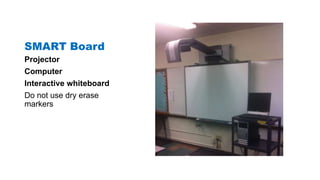
SMART Boards for 
the K8 Classroom 
Jeremy Anderson 
Manager of Academic Computing
Agenda 
Introduction to SMART Boards 
Overview of components & software 
General uses 
Demonstrations 
Group Brainstorm 
Resources 
Debrief
Outcomes 
By the end of this session you will be able to: 
1. Describe a SMART Board and list its basic functions. 
2. Identify SMART Notebook and SMART Inking and at least two 
uses of each. 
3. Apply your knowledge of SMART Board functions and 
software to design a hypothetical “SMART” activity.
What is a SMART Board?
SMART Board 
Projector 
Computer 
Interactive whiteboard 
Do not use dry erase 
markers
Pens & Eraser 
Four pen colors 
Eraser 
Pen colors can be 
customized in the SMART 
software.
Control Panel 
Turn on/off the projector 
Switch inputs
What applications are 
there & what do they 
do?
Floating Tools 
Tools appear on side of 
screen when computer 
started. 
Toolbar can be customized. 
Mainly for “quick and dirty” 
inking 
Mouse 
Pen 1 
Pen 2 
Highlighter 
Eraser 
Right Click 
SMART Notebook 
Keyboard 
Screenshot* 
Calibrate* 
Settings
Floating Tools – Draw 
PowerPoint 
Website 
Image 
Paint 
Word document 
PDF 
ANYTHING!
SMART 
Notebook 
Standalone software that 
must be launched. 
Mainly for making a 
collection of interactive 
objects, exercises, etc. 
Must save notebook.
SMART Notebook – Interact 
Fill in the blank 
Drag and drop 
Rearrange 
Measure 
Activity 
Gallery
Let’s Demo! 
Who wants to volunteer?
Basic Features – Floating Tools 
Orient 
Finger as mouse 
Pen 
Highlight 
Eraser 
Screen capture 
Click
Basic Features – Notebook 
Ink, text, shapes 
Insert image 
Fill in the blank 
Drag and drop / Rearrange 
Measure 
Save & Export
Let’s Demo! 
Sample Activities
Intermediate Features – 
Notebook 
Activity Builder 
Gallery Essentials 
Lesson Activity Toolkit
Brainstorm! 
Lightning Round
As Groups 
Get into groups of 3-5 and brainstorm some lessons or activities 
where you could use the SMART Board. On your group poster 
paper: 
1. List a few activity ideas. 
2. Pick one idea and draw the activity with 2 or 3 rough sketches 
3. Label the software – Floating Tools or Notebook 
4. Summarize the activity in 2 or 3 sentences 
Circulate to review the products of at least 2 other groups
Debrief
3 things you learned 
2 ways you can apply your learning 
1 question you still have
3… 2… 1…
Questions?
Thank you!

Introduction to SMART Boards for the K8 Classroom

  • 1.
    SMART Boards for the K8 Classroom Jeremy Anderson Manager of Academic Computing
  • 2.
    Agenda Introduction toSMART Boards Overview of components & software General uses Demonstrations Group Brainstorm Resources Debrief
  • 3.
    Outcomes By theend of this session you will be able to: 1. Describe a SMART Board and list its basic functions. 2. Identify SMART Notebook and SMART Inking and at least two uses of each. 3. Apply your knowledge of SMART Board functions and software to design a hypothetical “SMART” activity.
  • 4.
    What is aSMART Board?
  • 5.
    SMART Board Projector Computer Interactive whiteboard Do not use dry erase markers
  • 6.
    Pens & Eraser Four pen colors Eraser Pen colors can be customized in the SMART software.
  • 7.
    Control Panel Turnon/off the projector Switch inputs
  • 8.
    What applications are there & what do they do?
  • 9.
    Floating Tools Toolsappear on side of screen when computer started. Toolbar can be customized. Mainly for “quick and dirty” inking Mouse Pen 1 Pen 2 Highlighter Eraser Right Click SMART Notebook Keyboard Screenshot* Calibrate* Settings
  • 10.
    Floating Tools –Draw PowerPoint Website Image Paint Word document PDF ANYTHING!
  • 11.
    SMART Notebook Standalonesoftware that must be launched. Mainly for making a collection of interactive objects, exercises, etc. Must save notebook.
  • 12.
    SMART Notebook –Interact Fill in the blank Drag and drop Rearrange Measure Activity Gallery
  • 13.
    Let’s Demo! Whowants to volunteer?
  • 14.
    Basic Features –Floating Tools Orient Finger as mouse Pen Highlight Eraser Screen capture Click
  • 15.
    Basic Features –Notebook Ink, text, shapes Insert image Fill in the blank Drag and drop / Rearrange Measure Save & Export
  • 16.
  • 17.
    Intermediate Features – Notebook Activity Builder Gallery Essentials Lesson Activity Toolkit
  • 18.
  • 19.
    As Groups Getinto groups of 3-5 and brainstorm some lessons or activities where you could use the SMART Board. On your group poster paper: 1. List a few activity ideas. 2. Pick one idea and draw the activity with 2 or 3 rough sketches 3. Label the software – Floating Tools or Notebook 4. Summarize the activity in 2 or 3 sentences Circulate to review the products of at least 2 other groups
  • 20.
  • 21.
    3 things youlearned 2 ways you can apply your learning 1 question you still have
  • 22.
  • 23.
  • 24.

Editor's Notes

  • #10 The main purpose of Floating Tools is to annotate over anything on the screen. You can save screenshots
  • #11 The main purpose of Floating Tools is to annotate over anything on the screen. You can save screenshots
  • #12 More robust, added features over the basic inking of the Floating Tools. Aimed at creating interactive workbooks. You can think of a workbook as a lesson or a single activity.
  • #15 Bring up a website and a map image, call up volunteers to try each of these types of activities
  • #16 Close PPT and open Notebook. Call up volunteers to work through sample workbook activities. Activity 1 – insert an image – use a graphic organizer from K8 Activity 2 – use ink to fill in the graphic organizer Activity 3 – drag and drop – populate notebook page with map and labels Activity 4 – rearrange – populate notebook with shapes for creating a patterns Activity 5 – measure – add a compass and ruler to notebook page along with a triangle Activity 6 – export – demonstrate exporting to PDF for email/flashdrive
  • #18 Demonstrate how to make an activity in Notebook Open the Gallery Essentials and show interactive tools (abacus, e.g.)