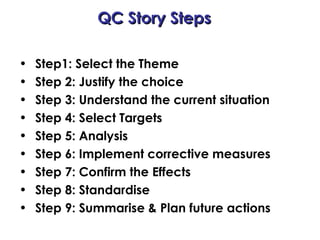
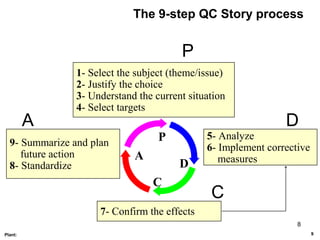
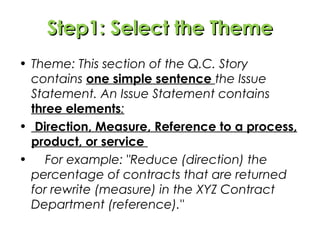
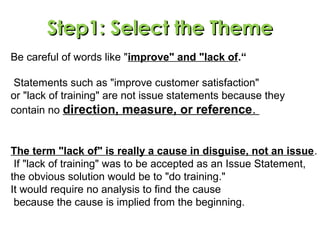
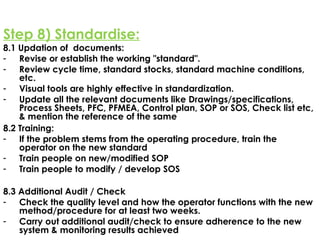
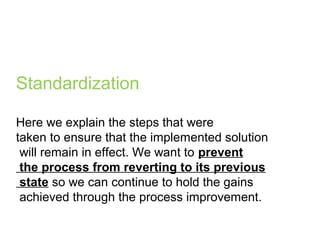
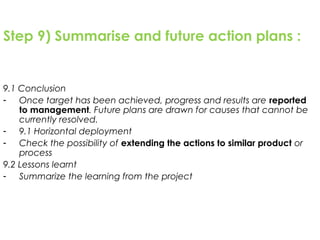
QC Story
2
1Plant:
Introduction to QC Story
1. Definition
"QC STORY" is a problem-solving technique
based on the examination of facts and
data, with no speculation, intended for
problems caused by a number of issues.
3
1Plant:
Introduction to QC Story
QC Story is not only applicable to
quality problems, but also
productivity, cost, logistic, power,
safety, etc., problems.
4
1Plant:
Introduction to QC Story
QC story: A means of communication
QC story is both a problem-solving tool and
also often a communication tool.
It's a way to present the problem in a clear and
understandable manner to a wider range of employees. So
all employees understand the work processes and the root
causes for the caused problems. Gradually, in solving
problems, all employees begin to include, including
operators.
A Q.C. Story is a document that is used to
explain work done during an improvement effort.
It contains elements that explain the steps in the
improvement effort.
Introduction to QC Story
6
1Plant:
Introduction to QC Story
QC story has been introduced in Europe, notably in Nissan's
Sunderland (UK) plant in 1992, then in the Barcelona plant.
Since QC Story was implemented, Nissan has evolved,
moving from an 11-step process to a more concise 9-step
process.
QC Story StepsQC Story Steps
• Step1: Select the Theme
• Step 2: Justify the choice
• Step 3: Understand the current situation
• Step 4: Select Targets
• Step 5: Analysis
• Step 6: Implement corrective measures
• Step 7: Confirm the Effects
• Step 8: Standardise
• Step 9: Summarise & Plan future actions
8
The 9-step QC Story process
1- Select the subject (theme/issue)
2- Justify the choice
3- Understand the current situation
4- Select targets
5- Analyze
6- Implement corrective
measures
7- Confirm the effects
9- Summarize and plan
future action
8- Standardize
P
C
D
A
9Plant:
P
D
C
A
Step1: Select the ThemeStep1: Select the Theme
• Theme: This section of the Q.C. Story
contains one simple sentence the Issue
Statement. An Issue Statement contains
three elements:
• Direction, Measure, Reference to a process,
product, or service
• For example: "Reduce (direction) the
percentage of contracts that are returned
for rewrite (measure) in the XYZ Contract
Department (reference)."
Be careful of words like "improve" and "lack of.“
Statements such as "improve customer satisfaction"
or "lack of training" are not issue statements because they
contain no direction, measure, or reference.
The term "lack of" is really a cause in disguise, not an issue.
If "lack of training" was to be accepted as an Issue Statement,
the obvious solution would be to "do training."
It would require no analysis to find the cause
because the cause is implied from the beginning.
Step1: Select the ThemeStep1: Select the Theme
Another word to avoid in an Issue Statement is
"and. "Usually when "and" is in the Issue Statement,
it indicates the presence of two issues.
It is commendable to try to resolve two issues at once,
but it can be very difficult and is sometimes impossible.
If the two issues have the same set of causes,
then choosing one issue will automatically lead
to the resolution of the second.
If the two issues have different causes,
it is a mistake to try to analyze and solve them together.
In either case, they should be two separate stories.
(And)
Step 2 – Justify the choice :
Parato diagram for RFI Defects per month
16
8
4
11 10
0
5
10
15
20
25
Wrinkels on
mo.roof
Excess gap rh
w /arch
Fouling w /blade to
w /s seal
W/loom on tapet
cover
Missing stopper
g/box lid
Defects
Defectpermonth
-60.00%
20.00%
100.00%
cumulative
percentage
,
In this section we explain why we are working on this
issue.
It is easy to say "customer satisfaction."
The question that needs to be addressed here is
"how do we know that this is the most important
thing to work on" to improve customer satisfaction?
We need to show how we know this is an issue.
Step 2 – Justify the choice
3. Understand the current situation3. Understand the current situation
Observation of process:
Results of process walk through / any non adherence
to standard practice or specifications, add process
flow chart if required
Add details like : Time to time, location to location,
person to person, stream to stream differences as
applicable
Use of Sketches, photos, stratification, run chart,
concentration diagram, histogram, control chart etc
as applicable
Here is where we explain the status
of the issue before we started working to
improve it.
3. Understand the current situation3. Understand the current situation
4. Select Target4. Select Target
Present
Level:
Target:
----------------------------------------------------------
----------------------------------------------------------
-- based on average data of last --- months
-----------------------------------------------------------
-----------------------------------------------------------
based on average data of last --- months
Identify the target. A target is a number indicating the
level of improvement to be achieved.
Step 5 – Analysis.
Wrinkles on
moulded roof
Operator not follow the sos
SOS not available
WSS CONCEPT NOT
APPLIED
Operator not fixed
ManMethod
SOS for for all the fitment
not available.
Material
Hole mismatch
Mould not o.k
Holes not match with body
Holes on body shifted.
Foam gets collapse
No step below all these acc.
Machine
Torque of battery operated gun not o.k.
Calibration not done.
TEST OF HYPOTHESISTEST OF HYPOTHESIS
No Probable
Cause
Testing and Observations Conclusion
5.2 Confirm the probable cause:
6. Implement the corrective measures6. Implement the corrective measures
6.1 Actions Decided
Root Cause Action Plan Target
Dt
Resp. Status
Step 6) Implement Corrective Measures:
- Ensure that probable action selected does not create side effects
- Before implementation, decide on the role of each member and a
schedule.
- Assign each corrective action a priority and stick to it.
- Involve the operators.
- The use of color, limits, graphics, and instructions at the place where
the corrective measure is to be applied are effective means of
drawing attention to it.
- Share the results with all interested parties!
Step 7) Confirm the results & effects:
7.1 Verify Results:
- Compare with the initial conditions (step 3) using the data (charts).
- Effects must be explained with respect to the direct effect, indirect
effect (repercussions), or non-material effect aspects.
7.2 Full Scale Implementation plan:
- The situation before and after the corrective action must be shown
and the same charts used as in step 4.
7.3 Tangible & Intangible benefits:
- If the effects can be converted into gains (financial), this is
preferable e.g. Return on investment, annualized savings
- In as far as possible, the effect of each action on the final result must
be shown (by numbering them).
Step 7 – Confirm the effect
Monitoring for Wrincles in RFI
4
9
13
106
12
18
22
3
13
23
Aug Sep Oct Nov Dec Jan Feb Mar
Month
Quantity
QRQC Methodology started (03.10.2007)
Step 8) Standardise:
8.1 Updation of documents:
- Revise or establish the working "standard".
- Review cycle time, standard stocks, standard machine conditions,
etc.
- Visual tools are highly effective in standardization.
- Update all the relevant documents like Drawings/specifications,
Process Sheets, PFC, PFMEA, Control plan, SOP or SOS, Check list etc,
& mention the reference of the same
8.2 Training:
- If the problem stems from the operating procedure, train the
operator on the new standard
- Train people on new/modified SOP
- Train people to modify / develop SOS
8.3 Additional Audit / Check
- Check the quality level and how the operator functions with the new
method/procedure for at least two weeks.
- Carry out additional audit/check to ensure adherence to the new
system & monitoring results achieved
Standardization
Here we explain the steps that were
taken to ensure that the implemented solution
will remain in effect. We want to prevent
the process from reverting to its previous
state so we can continue to hold the gains
achieved through the process improvement.
Step 9) Summarise and future action plans :
9.1 Conclusion
- Once target has been achieved, progress and results are reported
to management. Future plans are drawn for causes that cannot be
currently resolved.
- 9.1 Horizontal deployment
- Check the possibility of extending the actions to similar product or
process
9.2 Lessons learnt
- Summarize the learning from the project
Step 9 – Summarise and plan
future action
•WSS to be implemented to reduce the defect
•Body dimensions to be maintain
•Solution no. 4 will be required for eliminating the problem
but the cost will be more so it will be implemented in due
course till then all the other solution are implemented by
concern people. SOS writing is completed
Future PlanFuture Plan
In this last section we list the problems
that could be addressed next and the
issue that has been selected
to be the next project.
Qc story

Qc story

  • 1.
  • 2.
    2 1Plant: Introduction to QCStory 1. Definition "QC STORY" is a problem-solving technique based on the examination of facts and data, with no speculation, intended for problems caused by a number of issues.
  • 3.
    3 1Plant: Introduction to QCStory QC Story is not only applicable to quality problems, but also productivity, cost, logistic, power, safety, etc., problems.
  • 4.
    4 1Plant: Introduction to QCStory QC story: A means of communication QC story is both a problem-solving tool and also often a communication tool. It's a way to present the problem in a clear and understandable manner to a wider range of employees. So all employees understand the work processes and the root causes for the caused problems. Gradually, in solving problems, all employees begin to include, including operators.
  • 5.
    A Q.C. Storyis a document that is used to explain work done during an improvement effort. It contains elements that explain the steps in the improvement effort. Introduction to QC Story
  • 6.
    6 1Plant: Introduction to QCStory QC story has been introduced in Europe, notably in Nissan's Sunderland (UK) plant in 1992, then in the Barcelona plant. Since QC Story was implemented, Nissan has evolved, moving from an 11-step process to a more concise 9-step process.
  • 7.
    QC Story StepsQCStory Steps • Step1: Select the Theme • Step 2: Justify the choice • Step 3: Understand the current situation • Step 4: Select Targets • Step 5: Analysis • Step 6: Implement corrective measures • Step 7: Confirm the Effects • Step 8: Standardise • Step 9: Summarise & Plan future actions
  • 8.
    8 The 9-step QCStory process 1- Select the subject (theme/issue) 2- Justify the choice 3- Understand the current situation 4- Select targets 5- Analyze 6- Implement corrective measures 7- Confirm the effects 9- Summarize and plan future action 8- Standardize P C D A 9Plant: P D C A
  • 9.
    Step1: Select theThemeStep1: Select the Theme • Theme: This section of the Q.C. Story contains one simple sentence the Issue Statement. An Issue Statement contains three elements: • Direction, Measure, Reference to a process, product, or service • For example: "Reduce (direction) the percentage of contracts that are returned for rewrite (measure) in the XYZ Contract Department (reference)."
  • 10.
    Be careful ofwords like "improve" and "lack of.“ Statements such as "improve customer satisfaction" or "lack of training" are not issue statements because they contain no direction, measure, or reference. The term "lack of" is really a cause in disguise, not an issue. If "lack of training" was to be accepted as an Issue Statement, the obvious solution would be to "do training." It would require no analysis to find the cause because the cause is implied from the beginning. Step1: Select the ThemeStep1: Select the Theme
  • 11.
    Another word toavoid in an Issue Statement is "and. "Usually when "and" is in the Issue Statement, it indicates the presence of two issues. It is commendable to try to resolve two issues at once, but it can be very difficult and is sometimes impossible. If the two issues have the same set of causes, then choosing one issue will automatically lead to the resolution of the second. If the two issues have different causes, it is a mistake to try to analyze and solve them together. In either case, they should be two separate stories. (And)
  • 12.
    Step 2 –Justify the choice : Parato diagram for RFI Defects per month 16 8 4 11 10 0 5 10 15 20 25 Wrinkels on mo.roof Excess gap rh w /arch Fouling w /blade to w /s seal W/loom on tapet cover Missing stopper g/box lid Defects Defectpermonth -60.00% 20.00% 100.00% cumulative percentage ,
  • 13.
    In this sectionwe explain why we are working on this issue. It is easy to say "customer satisfaction." The question that needs to be addressed here is "how do we know that this is the most important thing to work on" to improve customer satisfaction? We need to show how we know this is an issue. Step 2 – Justify the choice
  • 14.
    3. Understand thecurrent situation3. Understand the current situation Observation of process: Results of process walk through / any non adherence to standard practice or specifications, add process flow chart if required Add details like : Time to time, location to location, person to person, stream to stream differences as applicable Use of Sketches, photos, stratification, run chart, concentration diagram, histogram, control chart etc as applicable
  • 15.
    Here is wherewe explain the status of the issue before we started working to improve it. 3. Understand the current situation3. Understand the current situation
  • 16.
    4. Select Target4.Select Target Present Level: Target: ---------------------------------------------------------- ---------------------------------------------------------- -- based on average data of last --- months ----------------------------------------------------------- ----------------------------------------------------------- based on average data of last --- months Identify the target. A target is a number indicating the level of improvement to be achieved.
  • 17.
    Step 5 –Analysis. Wrinkles on moulded roof Operator not follow the sos SOS not available WSS CONCEPT NOT APPLIED Operator not fixed ManMethod SOS for for all the fitment not available. Material Hole mismatch Mould not o.k Holes not match with body Holes on body shifted. Foam gets collapse No step below all these acc. Machine Torque of battery operated gun not o.k. Calibration not done.
  • 18.
    TEST OF HYPOTHESISTESTOF HYPOTHESIS No Probable Cause Testing and Observations Conclusion 5.2 Confirm the probable cause:
  • 19.
    6. Implement thecorrective measures6. Implement the corrective measures 6.1 Actions Decided Root Cause Action Plan Target Dt Resp. Status
  • 20.
    Step 6) ImplementCorrective Measures: - Ensure that probable action selected does not create side effects - Before implementation, decide on the role of each member and a schedule. - Assign each corrective action a priority and stick to it. - Involve the operators. - The use of color, limits, graphics, and instructions at the place where the corrective measure is to be applied are effective means of drawing attention to it. - Share the results with all interested parties!
  • 21.
    Step 7) Confirmthe results & effects: 7.1 Verify Results: - Compare with the initial conditions (step 3) using the data (charts). - Effects must be explained with respect to the direct effect, indirect effect (repercussions), or non-material effect aspects. 7.2 Full Scale Implementation plan: - The situation before and after the corrective action must be shown and the same charts used as in step 4. 7.3 Tangible & Intangible benefits: - If the effects can be converted into gains (financial), this is preferable e.g. Return on investment, annualized savings - In as far as possible, the effect of each action on the final result must be shown (by numbering them).
  • 22.
    Step 7 –Confirm the effect Monitoring for Wrincles in RFI 4 9 13 106 12 18 22 3 13 23 Aug Sep Oct Nov Dec Jan Feb Mar Month Quantity QRQC Methodology started (03.10.2007)
  • 23.
    Step 8) Standardise: 8.1Updation of documents: - Revise or establish the working "standard". - Review cycle time, standard stocks, standard machine conditions, etc. - Visual tools are highly effective in standardization. - Update all the relevant documents like Drawings/specifications, Process Sheets, PFC, PFMEA, Control plan, SOP or SOS, Check list etc, & mention the reference of the same 8.2 Training: - If the problem stems from the operating procedure, train the operator on the new standard - Train people on new/modified SOP - Train people to modify / develop SOS 8.3 Additional Audit / Check - Check the quality level and how the operator functions with the new method/procedure for at least two weeks. - Carry out additional audit/check to ensure adherence to the new system & monitoring results achieved
  • 24.
    Standardization Here we explainthe steps that were taken to ensure that the implemented solution will remain in effect. We want to prevent the process from reverting to its previous state so we can continue to hold the gains achieved through the process improvement.
  • 25.
    Step 9) Summariseand future action plans : 9.1 Conclusion - Once target has been achieved, progress and results are reported to management. Future plans are drawn for causes that cannot be currently resolved. - 9.1 Horizontal deployment - Check the possibility of extending the actions to similar product or process 9.2 Lessons learnt - Summarize the learning from the project
  • 26.
    Step 9 –Summarise and plan future action •WSS to be implemented to reduce the defect •Body dimensions to be maintain •Solution no. 4 will be required for eliminating the problem but the cost will be more so it will be implemented in due course till then all the other solution are implemented by concern people. SOS writing is completed
  • 27.
    Future PlanFuture Plan Inthis last section we list the problems that could be addressed next and the issue that has been selected to be the next project.