The document describes the process of creating a Safety page for a website. The author first created text boxes to structure the content and then added titles and paragraphs of text to each box. Colors and fonts were applied to the boxes and text for visual appeal and readability. The page included multiple columns of differently sized and colored boxes containing centered black text in a child-friendly font.
LF Energy Webinar: Electrical Grid Modelling and Simulation Through PowSyBl -...DanBrown980551
Do you want to learn how to model and simulate an electrical network from scratch in under an hour?
Then welcome to this PowSyBl workshop, hosted by Rte, the French Transmission System Operator (TSO)!
During the webinar, you will discover the PowSyBl ecosystem as well as handle and study an electrical network through an interactive Python notebook.
PowSyBl is an open source project hosted by LF Energy, which offers a comprehensive set of features for electrical grid modelling and simulation. Among other advanced features, PowSyBl provides:
- A fully editable and extendable library for grid component modelling;
- Visualization tools to display your network;
- Grid simulation tools, such as power flows, security analyses (with or without remedial actions) and sensitivity analyses;
The framework is mostly written in Java, with a Python binding so that Python developers can access PowSyBl functionalities as well.
What you will learn during the webinar:
- For beginners: discover PowSyBl's functionalities through a quick general presentation and the notebook, without needing any expert coding skills;
- For advanced developers: master the skills to efficiently apply PowSyBl functionalities to your real-world scenarios.
Builder.ai Founder Sachin Dev Duggal's Strategic Approach to Create an Innova...Ramesh Iyer
In today's fast-changing business world, Companies that adapt and embrace new ideas often need help to keep up with the competition. However, fostering a culture of innovation takes much work. It takes vision, leadership and willingness to take risks in the right proportion. Sachin Dev Duggal, co-founder of Builder.ai, has perfected the art of this balance, creating a company culture where creativity and growth are nurtured at each stage.
Smart TV Buyer Insights Survey 2024 by 91mobiles.pdf91mobiles
91mobiles recently conducted a Smart TV Buyer Insights Survey in which we asked over 3,000 respondents about the TV they own, aspects they look at on a new TV, and their TV buying preferences.
Let's dive deeper into the world of ODC! Ricardo Alves (OutSystems) will join us to tell all about the new Data Fabric. After that, Sezen de Bruijn (OutSystems) will get into the details on how to best design a sturdy architecture within ODC.
Software Delivery At the Speed of AI: Inflectra Invests In AI-Powered QualityInflectra
In this insightful webinar, Inflectra explores how artificial intelligence (AI) is transforming software development and testing. Discover how AI-powered tools are revolutionizing every stage of the software development lifecycle (SDLC), from design and prototyping to testing, deployment, and monitoring.
Learn about:
• The Future of Testing: How AI is shifting testing towards verification, analysis, and higher-level skills, while reducing repetitive tasks.
• Test Automation: How AI-powered test case generation, optimization, and self-healing tests are making testing more efficient and effective.
• Visual Testing: Explore the emerging capabilities of AI in visual testing and how it's set to revolutionize UI verification.
• Inflectra's AI Solutions: See demonstrations of Inflectra's cutting-edge AI tools like the ChatGPT plugin and Azure Open AI platform, designed to streamline your testing process.
Whether you're a developer, tester, or QA professional, this webinar will give you valuable insights into how AI is shaping the future of software delivery.
Connector Corner: Automate dynamic content and events by pushing a buttonDianaGray10
Here is something new! In our next Connector Corner webinar, we will demonstrate how you can use a single workflow to:
Create a campaign using Mailchimp with merge tags/fields
Send an interactive Slack channel message (using buttons)
Have the message received by managers and peers along with a test email for review
But there’s more:
In a second workflow supporting the same use case, you’ll see:
Your campaign sent to target colleagues for approval
If the “Approve” button is clicked, a Jira/Zendesk ticket is created for the marketing design team
But—if the “Reject” button is pushed, colleagues will be alerted via Slack message
Join us to learn more about this new, human-in-the-loop capability, brought to you by Integration Service connectors.
And...
Speakers:
Akshay Agnihotri, Product Manager
Charlie Greenberg, Host
UiPath Test Automation using UiPath Test Suite series, part 3DianaGray10
Welcome to UiPath Test Automation using UiPath Test Suite series part 3. In this session, we will cover desktop automation along with UI automation.
Topics covered:
UI automation Introduction,
UI automation Sample
Desktop automation flow
Pradeep Chinnala, Senior Consultant Automation Developer @WonderBotz and UiPath MVP
Deepak Rai, Automation Practice Lead, Boundaryless Group and UiPath MVP
Essentials of Automations: Optimizing FME Workflows with ParametersSafe Software
Are you looking to streamline your workflows and boost your projects’ efficiency? Do you find yourself searching for ways to add flexibility and control over your FME workflows? If so, you’re in the right place.
Join us for an insightful dive into the world of FME parameters, a critical element in optimizing workflow efficiency. This webinar marks the beginning of our three-part “Essentials of Automation” series. This first webinar is designed to equip you with the knowledge and skills to utilize parameters effectively: enhancing the flexibility, maintainability, and user control of your FME projects.
Here’s what you’ll gain:
- Essentials of FME Parameters: Understand the pivotal role of parameters, including Reader/Writer, Transformer, User, and FME Flow categories. Discover how they are the key to unlocking automation and optimization within your workflows.
- Practical Applications in FME Form: Delve into key user parameter types including choice, connections, and file URLs. Allow users to control how a workflow runs, making your workflows more reusable. Learn to import values and deliver the best user experience for your workflows while enhancing accuracy.
- Optimization Strategies in FME Flow: Explore the creation and strategic deployment of parameters in FME Flow, including the use of deployment and geometry parameters, to maximize workflow efficiency.
- Pro Tips for Success: Gain insights on parameterizing connections and leveraging new features like Conditional Visibility for clarity and simplicity.
We’ll wrap up with a glimpse into future webinars, followed by a Q&A session to address your specific questions surrounding this topic.
Don’t miss this opportunity to elevate your FME expertise and drive your projects to new heights of efficiency.
"Impact of front-end architecture on development cost", Viktor TurskyiFwdays
I have heard many times that architecture is not important for the front-end. Also, many times I have seen how developers implement features on the front-end just following the standard rules for a framework and think that this is enough to successfully launch the project, and then the project fails. How to prevent this and what approach to choose? I have launched dozens of complex projects and during the talk we will analyze which approaches have worked for me and which have not.
Key Trends Shaping the Future of Infrastructure.pdfCheryl Hung
Keynote at DIGIT West Expo, Glasgow on 29 May 2024.
Cheryl Hung, ochery.com
Sr Director, Infrastructure Ecosystem, Arm.
The key trends across hardware, cloud and open-source; exploring how these areas are likely to mature and develop over the short and long-term, and then considering how organisations can position themselves to adapt and thrive.
The Art of the Pitch: WordPress Relationships and SalesLaura Byrne
Clients don’t know what they don’t know. What web solutions are right for them? How does WordPress come into the picture? How do you make sure you understand scope and timeline? What do you do if sometime changes?
All these questions and more will be explored as we talk about matching clients’ needs with what your agency offers without pulling teeth or pulling your hair out. Practical tips, and strategies for successful relationship building that leads to closing the deal.
Neuro-symbolic is not enough, we need neuro-*semantic*Frank van Harmelen
Neuro-symbolic (NeSy) AI is on the rise. However, simply machine learning on just any symbolic structure is not sufficient to really harvest the gains of NeSy. These will only be gained when the symbolic structures have an actual semantics. I give an operational definition of semantics as “predictable inference”.
All of this illustrated with link prediction over knowledge graphs, but the argument is general.
Neuro-symbolic is not enough, we need neuro-*semantic*
Process of my Safety Page
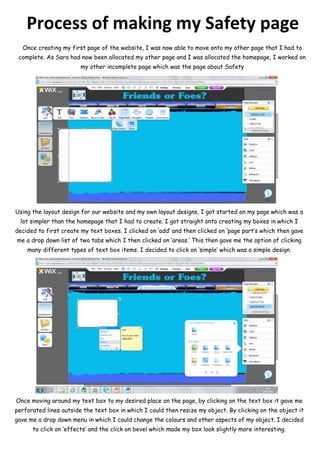
1. Process of making my Safety page
Once creating my first page of the website, I was now able to move onto my other page that I had to
complete. As Sara had now been allocated my other page and I was allocated the homepage, I worked on
my other incomplete page which was the page about Safety
Using the layout design for our website and my own layout designs, I got started on my page which was a
lot simpler than the homepage that I had to create. I got straight onto creating my boxes in which I
decided to first create my text boxes. I clicked on ‘add’ and then clicked on ‘page part’s which then gave
me a drop down list of two tabs which I then clicked on ‘areas.’ This then gave me the option of clicking
many different types of text box items. I decided to click on ‘simple’ which was a simple design.
Once moving around my text box to my desired place on the page, by clicking on the text box it gave me
perforated lines outside the text box in which I could then resize my object. By clicking on the object it
gave me a drop down menu in which I could change the colours and other aspects of my object. I decided
to click on ‘effects’ and the click on bevel which made my box look slightly more interesting.
2. By right clicking on my object I could then copy the item, I copied it twice in order to have three objects
and then I placed them one under another. I then copied them three more times and placed them in a
second column besides my first text boxes. I also, made these three bigger in width. I left a little gap on
the side as I though images could be added to make the page look a bit more interesting.
I now decided to change the colours of my text boxes. I decided to make each row different colour. By
clicking on the text box it would give me a list of options on how I could design that text box. I then
clicked on ‘Change colour’ I had to make sure that I was clicking onto ‘background’ and not ‘outline. I then
chose the colours for each of my topics and tried to make the colours as unisex as possible.
3. Now all my text boxes were completely designed in a way that I felt looked alright, I then moved onto
adding my text. I started with all the titles for my text boxes on the left hand side. I clicked on ‘add,’
then clicked on ‘text,’ which then gave me three options in which I clicked ‘titles.’ It then gave me the
option of picking many different titles in which I clicked on the simplest title as I would then edit the
title how I want. I then added in the writing that I wanted.
I was going to leave the fonts and colours of the writing to last and I decided to move onto my text in the
other text boxes. After gathering all the information I needed for this page, I started to insert the
information. I clicked on ’add,’ then clicked on ‘text’ and this time chose the option of ‘paragraphs.’ It gave
me a box which I could then move about, resize and add my own information to. I did this for all three of
the text boxes.
4. Finally, I had to edit some of the colours and fonts of my writing. When I double clicked on the boxes of
my writing it them gave me a toolbar in which I could change the colours and the fonts of my text. I
started of making all my texts the same font in which I made them all ‘Comic Sans MS’ as this is a very
child friendly font. I then made my text all in the centre and also changed the font colour of my texts on
the left hand side. I felt that black was easily read, hence why I kept my main information in black.
Finally, I had to edit some of the colours and fonts of my writing. When I double clicked on the boxes of
my writing it them gave me a toolbar in which I could change the colours and the fonts of my text. I
started of making all my texts the same font in which I made them all ‘Comic Sans MS’ as this is a very
child friendly font. I then made my text all in the centre and also changed the font colour of my texts on
the left hand side. I felt that black was easily read, hence why I kept my main information in black.