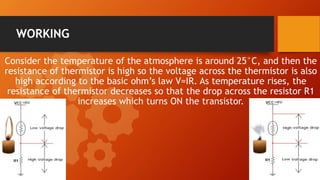
FIRE ALARM
PROJECT
• Fire Alarm Circuit is a simple circuit that detects the fire and
activates the Siren Sound or Buzzer. Fire Alarm Circuits are
very important devices to detect fire in the right time and
prevent any damage to people or property.
Introduction
REQUIRED COMPONENTS
• Power supply
• Capacitor (10μF)
• BC548 transistor
• High resistance thermistor
• Diode (1N4001)
• 6V Buzzer
• Resistors (33kΩ,470 Ω)
 Thermistor:
Thermistors are Temperature Dependent Resistors i.e. the
resistance of a Thermistor varies according to the ambient
temperature. In this project we have used a 10 KΊ Thermistor
with NTC. At 250C, the resistance of the 10 KΊ Thermistor is 10
KΊ. The following image shows the 10K Thermistor used in this
project
COMPONENTS DETAIL
COMPONENTS DETAIL
 Power supply/Battery:
A well regulated power supply/battery is essential for this
circuit because even slight variations in the supply voltage
could alter the biasing of the transistor used in the fire
sensing section and this could seriously affect the circuit’s
performance
COMPONENTS DETAIL
 Transistor:
Transistor is a semiconductor device used for
switching and amplification of weak signals. In this
project transistor vary with temperature, but the
semiconductor materials used for thermistors are
especially sensitive to temperature. The transistor
is turned ON by the voltage drop across the
resistor. When the transistor is turned ON, the
current from Vcc starts to flow via 6V buzzer which
produces a beep sound.
COMPONENTS DETAIL
 Diode:
A diode is a two-terminal electronic
component that conducts current primarily in
one direction. In this project diode is used for
enabling unidirectional conduction and the
capacitor removes sudden transients from the
thermistor.
Components Detail
 Capacitor:
A device used to store an electric charge, consisting of
one or more pairs of conductors separated by an insulator. In
this project when the current flow in the circuit capacitor will
be charged and when the circuit is broken or removed the
charged capacitor left which will cause to delay the buzzer
sound.
CIRCUIT DIAGRAM
WORKING
Consider the temperature of the atmosphere is around 25°C, and then the
resistance of thermistor is high so the voltage across the thermistor is also
high according to the basic ohm’s law V=IR. As temperature rises, the
resistance of thermistor decreases so that the drop across the resistor R1
increases which turns ON the transistor.
APPLICATIONS
 Home Security System
 School/College Labs
 Industries
 R&D Cells
ADDVANTAGES & DISADVANTAGES
 No longer use
 Senses near by the
 Fire(Heat)only
 Uses continuous Power Supply
Disadvantages:
Advantages:
 Sensing of fire(Heat) easily
 Simple Circuit
 Low Power Consumption
 Low cost
FUTURE SCOPE
 To overcome disadvantages and looking for implementation of
Automatic Fire detection
 In the place of Thermistor have to use Sensors.
 Uses the Speakers instead of Thermistor with Warning message
and Audio alert signal
PRACTICAL CIRCUIT
Presentation Fire Alarm_Project

Presentation Fire Alarm_Project

  • 2.
  • 3.
    • Fire AlarmCircuit is a simple circuit that detects the fire and activates the Siren Sound or Buzzer. Fire Alarm Circuits are very important devices to detect fire in the right time and prevent any damage to people or property. Introduction
  • 4.
    REQUIRED COMPONENTS • Powersupply • Capacitor (10μF) • BC548 transistor • High resistance thermistor • Diode (1N4001) • 6V Buzzer • Resistors (33kΩ,470 Ω)
  • 5.
     Thermistor: Thermistors areTemperature Dependent Resistors i.e. the resistance of a Thermistor varies according to the ambient temperature. In this project we have used a 10 KΩ Thermistor with NTC. At 250C, the resistance of the 10 KΩ Thermistor is 10 KΩ. The following image shows the 10K Thermistor used in this project COMPONENTS DETAIL
  • 6.
    COMPONENTS DETAIL  Powersupply/Battery: A well regulated power supply/battery is essential for this circuit because even slight variations in the supply voltage could alter the biasing of the transistor used in the fire sensing section and this could seriously affect the circuit’s performance
  • 7.
    COMPONENTS DETAIL  Transistor: Transistoris a semiconductor device used for switching and amplification of weak signals. In this project transistor vary with temperature, but the semiconductor materials used for thermistors are especially sensitive to temperature. The transistor is turned ON by the voltage drop across the resistor. When the transistor is turned ON, the current from Vcc starts to flow via 6V buzzer which produces a beep sound.
  • 8.
    COMPONENTS DETAIL  Diode: Adiode is a two-terminal electronic component that conducts current primarily in one direction. In this project diode is used for enabling unidirectional conduction and the capacitor removes sudden transients from the thermistor.
  • 9.
    Components Detail  Capacitor: Adevice used to store an electric charge, consisting of one or more pairs of conductors separated by an insulator. In this project when the current flow in the circuit capacitor will be charged and when the circuit is broken or removed the charged capacitor left which will cause to delay the buzzer sound.
  • 10.
  • 11.
    WORKING Consider the temperatureof the atmosphere is around 25°C, and then the resistance of thermistor is high so the voltage across the thermistor is also high according to the basic ohm’s law V=IR. As temperature rises, the resistance of thermistor decreases so that the drop across the resistor R1 increases which turns ON the transistor.
  • 12.
    APPLICATIONS  Home SecuritySystem  School/College Labs  Industries  R&D Cells
  • 13.
    ADDVANTAGES & DISADVANTAGES No longer use  Senses near by the  Fire(Heat)only  Uses continuous Power Supply Disadvantages: Advantages:  Sensing of fire(Heat) easily  Simple Circuit  Low Power Consumption  Low cost
  • 14.
    FUTURE SCOPE  Toovercome disadvantages and looking for implementation of Automatic Fire detection  In the place of Thermistor have to use Sensors.  Uses the Speakers instead of Thermistor with Warning message and Audio alert signal
  • 15.

Editor's Notes

  • #5 Notes to presenter: Description of what you learned in your own words on one side. Include information about the topic Details about the topic will also be helpful here. Tell the story of your learning experience. Just like a story there should always be a beginning, middle and an end. On the other side, you can add a graphic that provides evidence of what you learned. Feel free to use more than one slide to reflect upon your process. It also helps to add some video of your process.
  • #11 Notes to presenter: What did you think at first? What obstacles did you encounter along the way? How did you overcome those obstacles? What images can you add to support your process? This SmartArt allows you add images and text to help outline your process. If a picture is worth a thousand words, then pictures and words should help you communicate this reflection on learning perfectly! You can always click on Insert>SmartArt to change this graphic or select the graphic and click on the Design contextual menu to change the colors. Feel free to use more than one slide to reflect upon your process. It also helps to add some video of your process.
  • #13 Notes to presenter: What steps will you be taking as a result of this learning experience? Did you learn from any failed experiences? How will you do things differently? What advice will you give to others so they can learn from your experiences? How can you share what you learned with a real-world audience? Some examples of next steps might be: After delivering my first persuasive presentation, I am thinking about joining the debate team. After making my first film, I’m considering entering it in our school film festival or local film festival. After connecting with this career expert, I’d like to do some research on that career field because it sounds interesting to me. This SmartArt allows you add images and text to help outline your process. If a picture is worth a thousand words, then pictures and words should help you communicate this reflection on learning perfectly! You can always click on Insert>SmartArt to change this graphic or select the graphic and click on the Design contextual menu to change the colors. Feel free to use more than one slide to share your next steps. It also helps to add some video content to explain your message.