The document describes the musculoskeletal system, including:
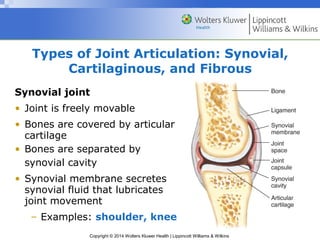
- Types of joints (synovial, cartilaginous, fibrous) and examples of each.
- An overview of synovial joints, their shapes that allow different movements, and examples.
- Guidelines for examining the major joints, including inspection, palpation, and range of motion tests.
- Anatomy and assessment techniques for specific joints like the shoulder, wrist/hand, spine, hip, knee, and ankle.


![musculoskeletal_system_examination[1] (1) (3).pptx](https://cdn.slidesharecdn.com/ss_thumbnails/musculoskeletalsystemexamination113-241005064436-de0b77f1-thumbnail.jpg?width=640&height=640&fit=bounds)


