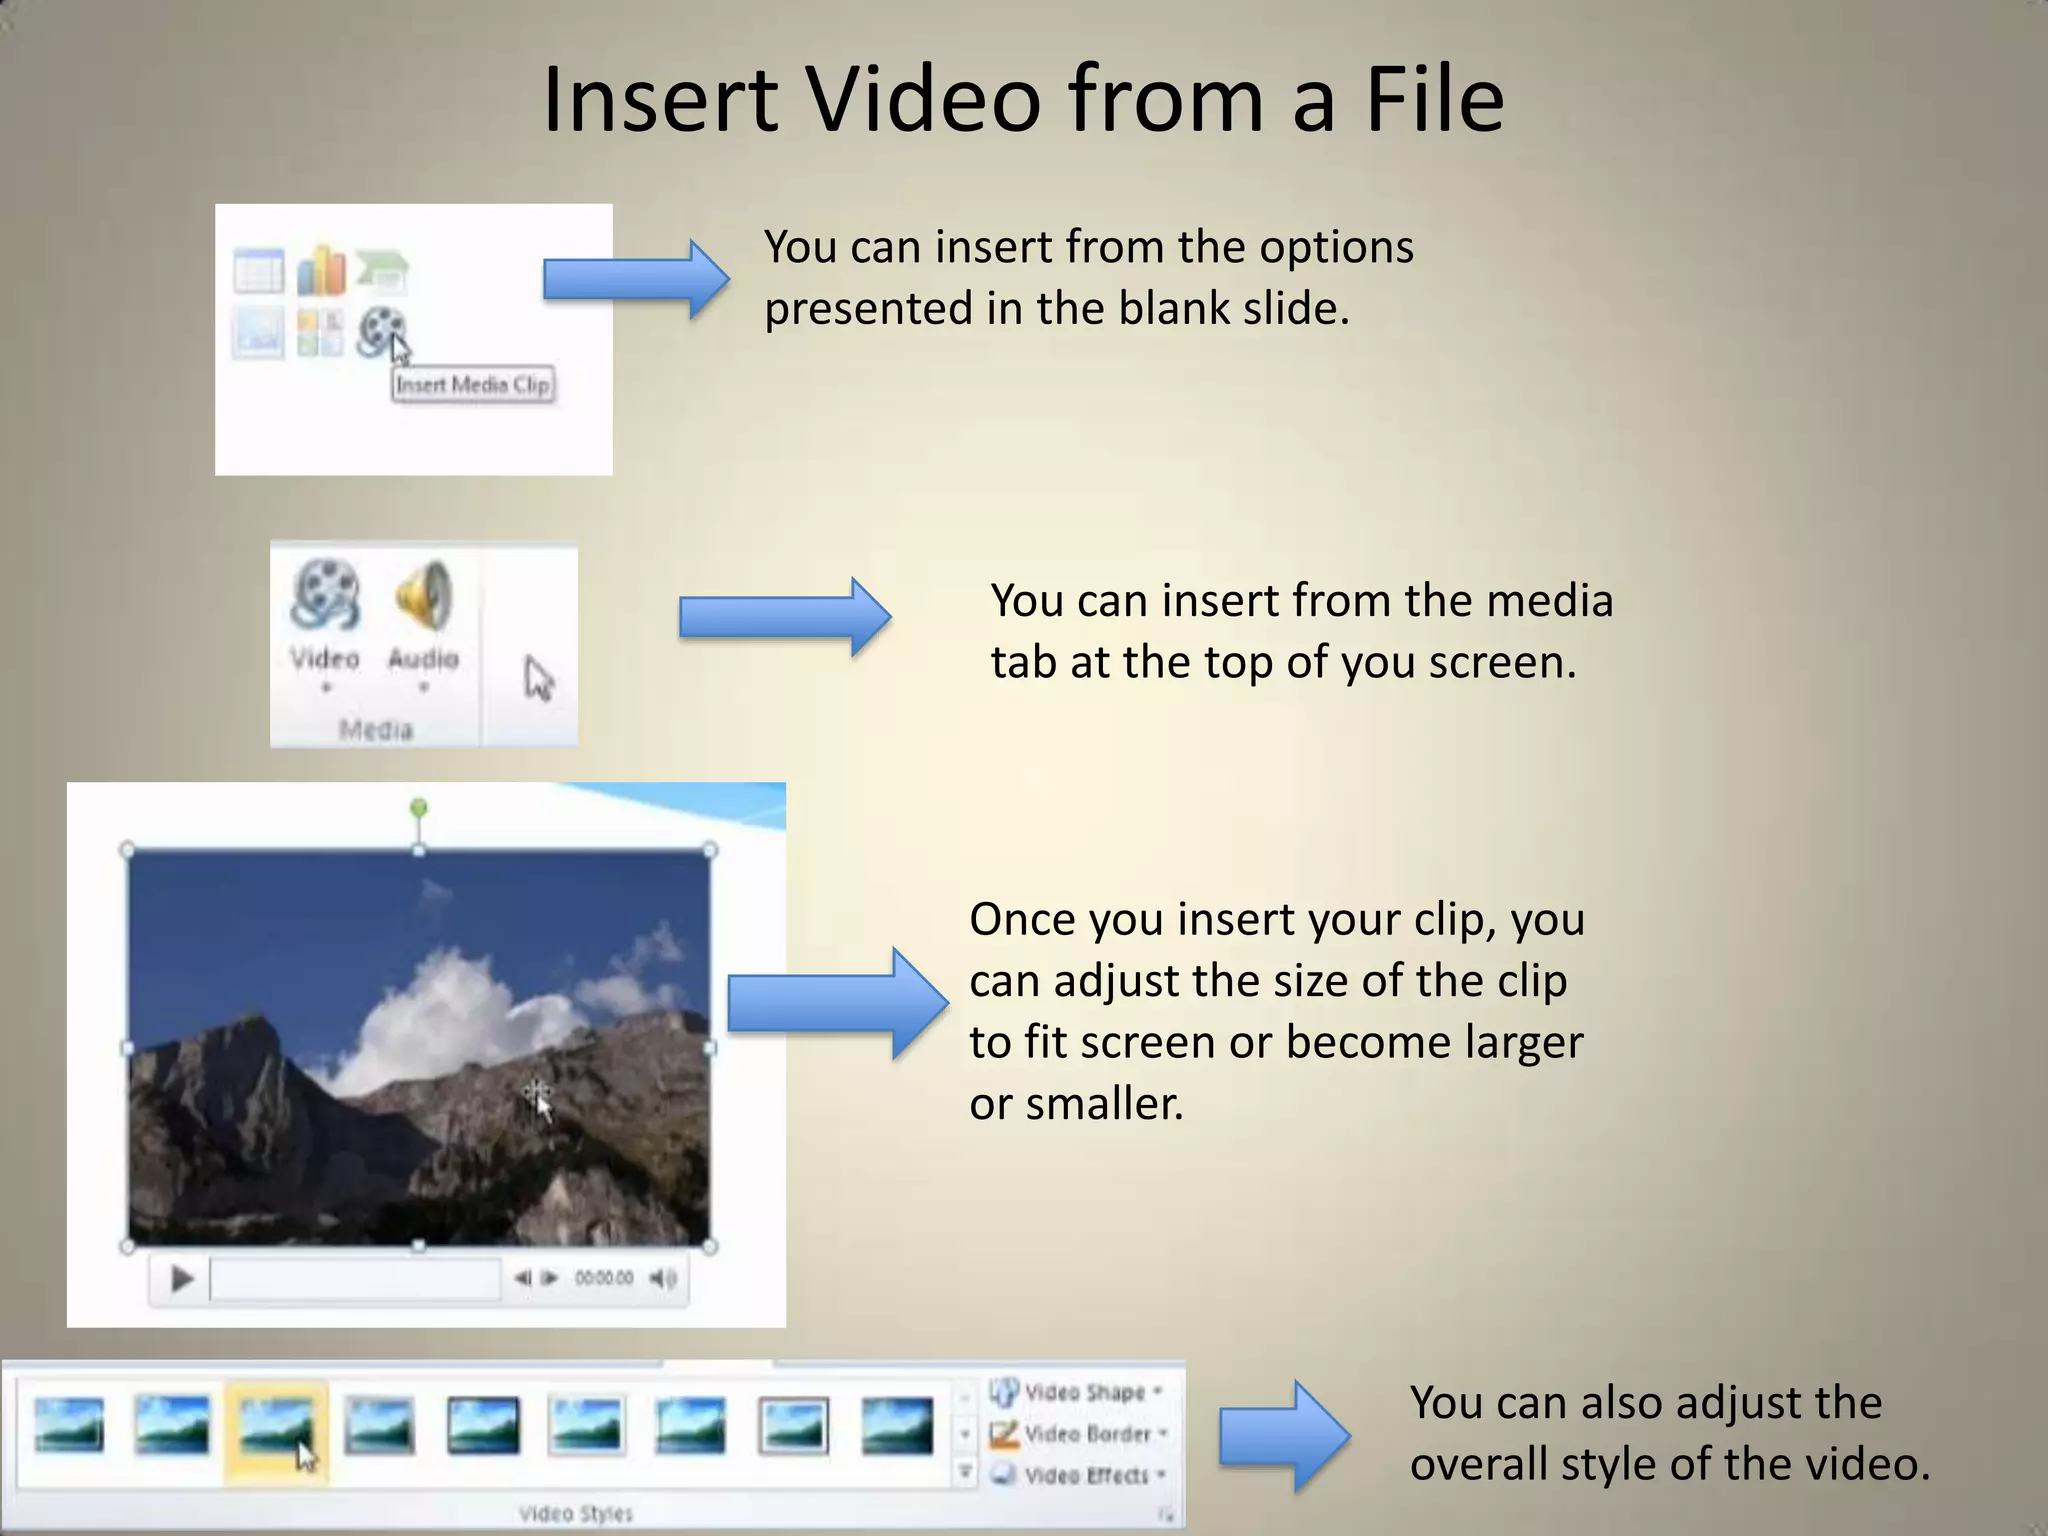
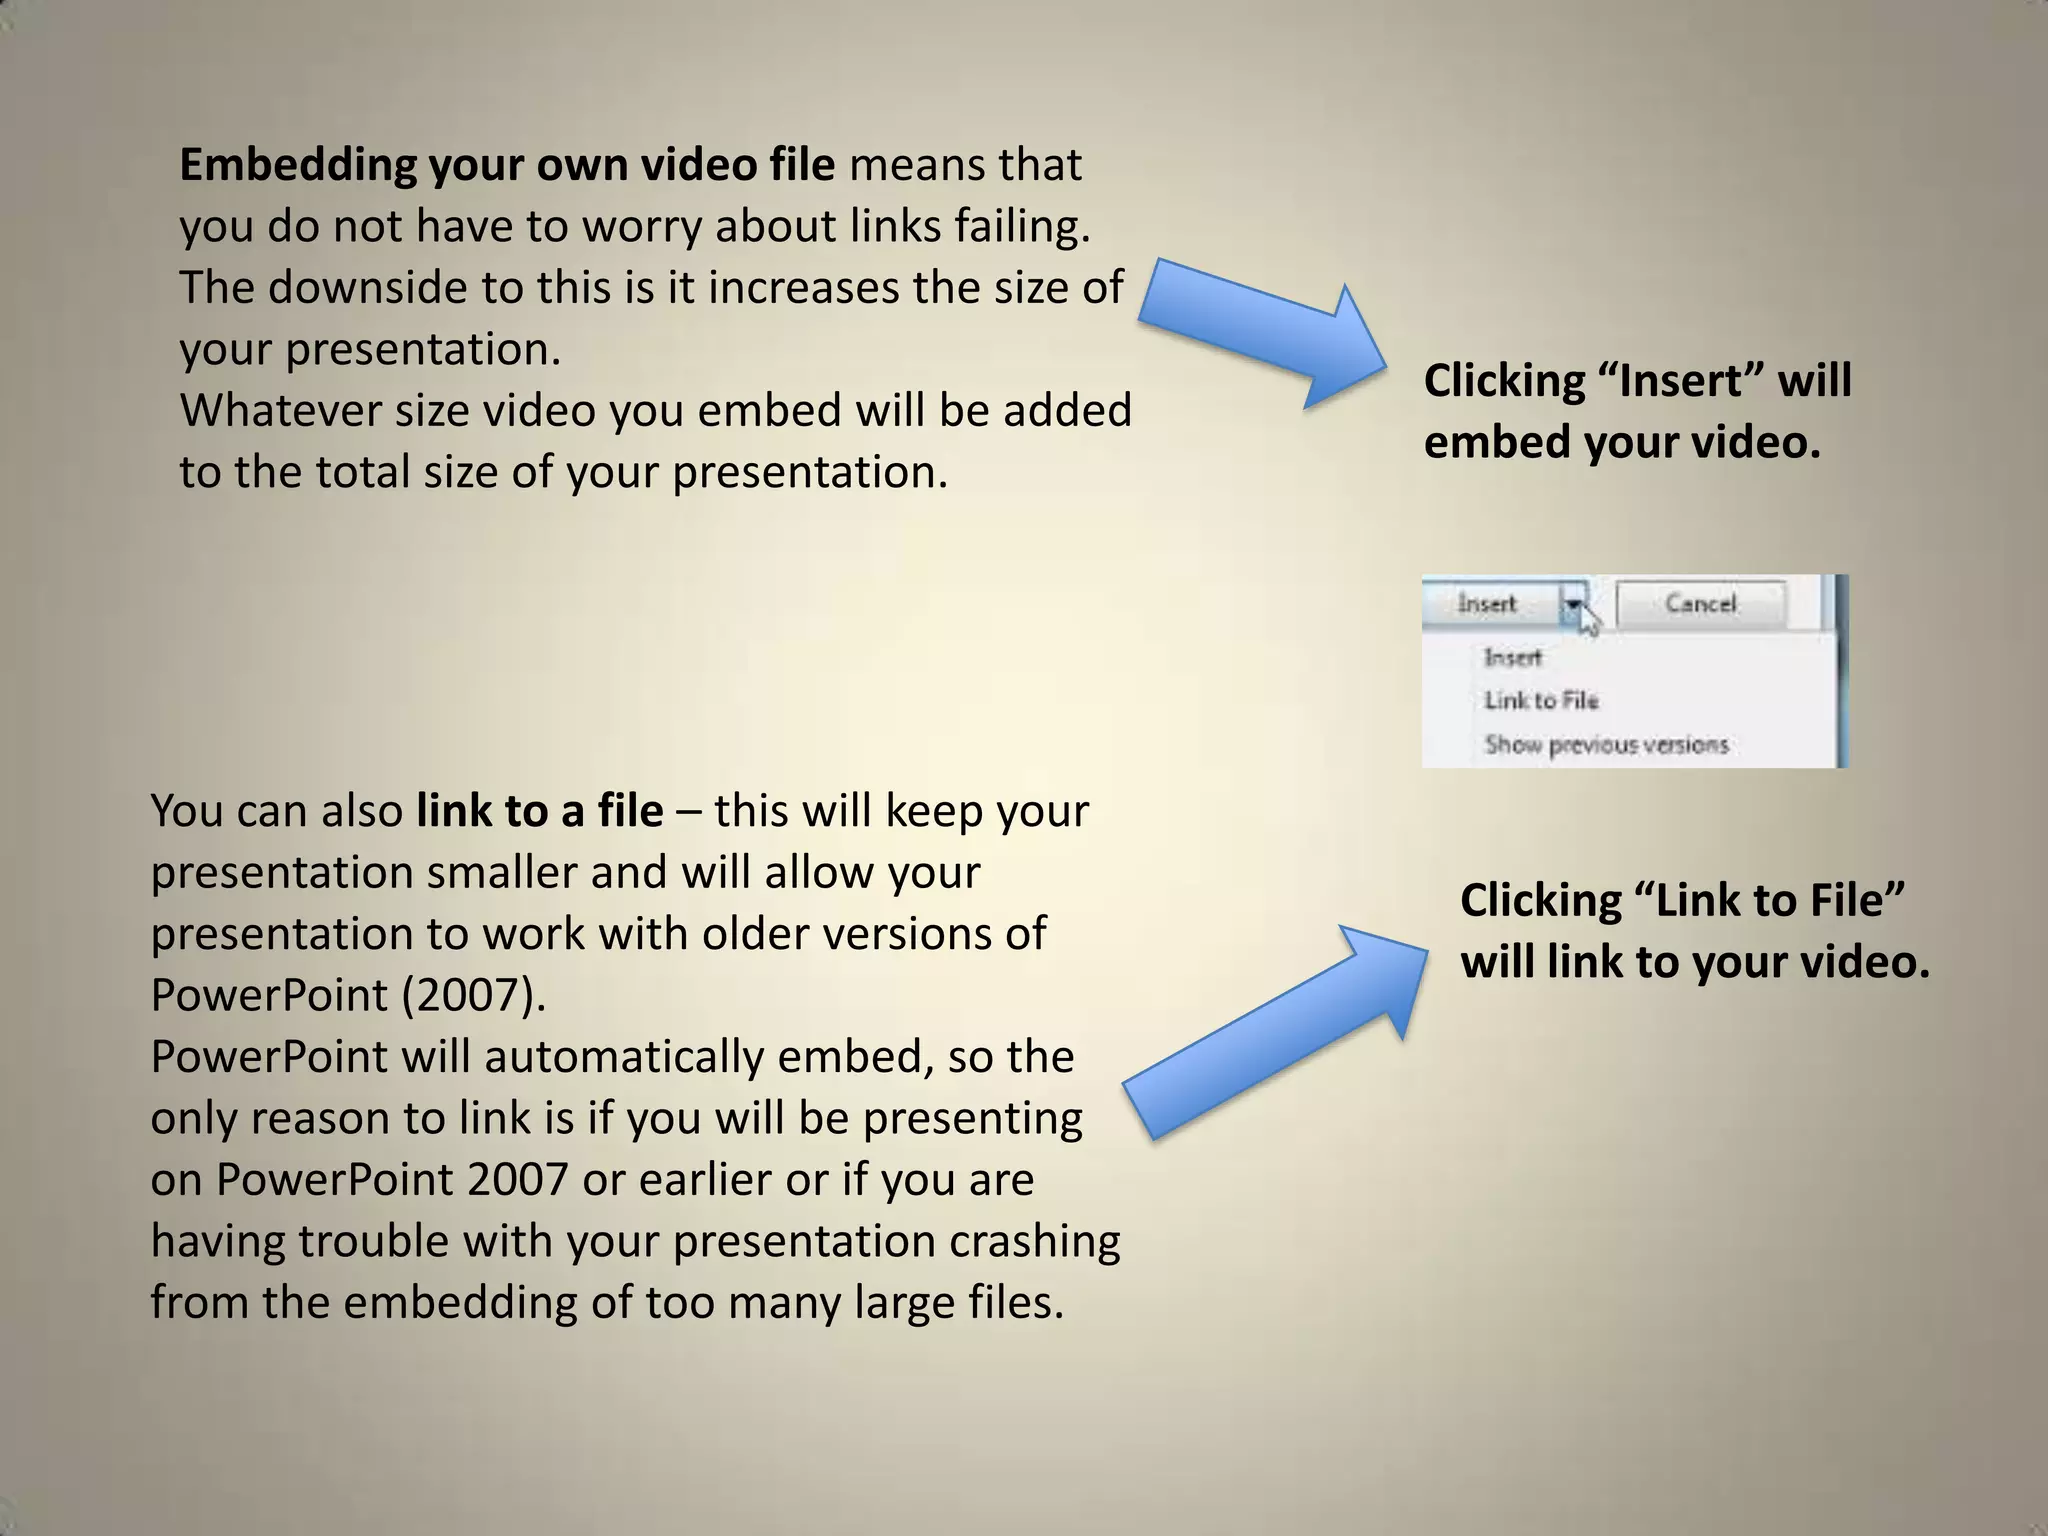
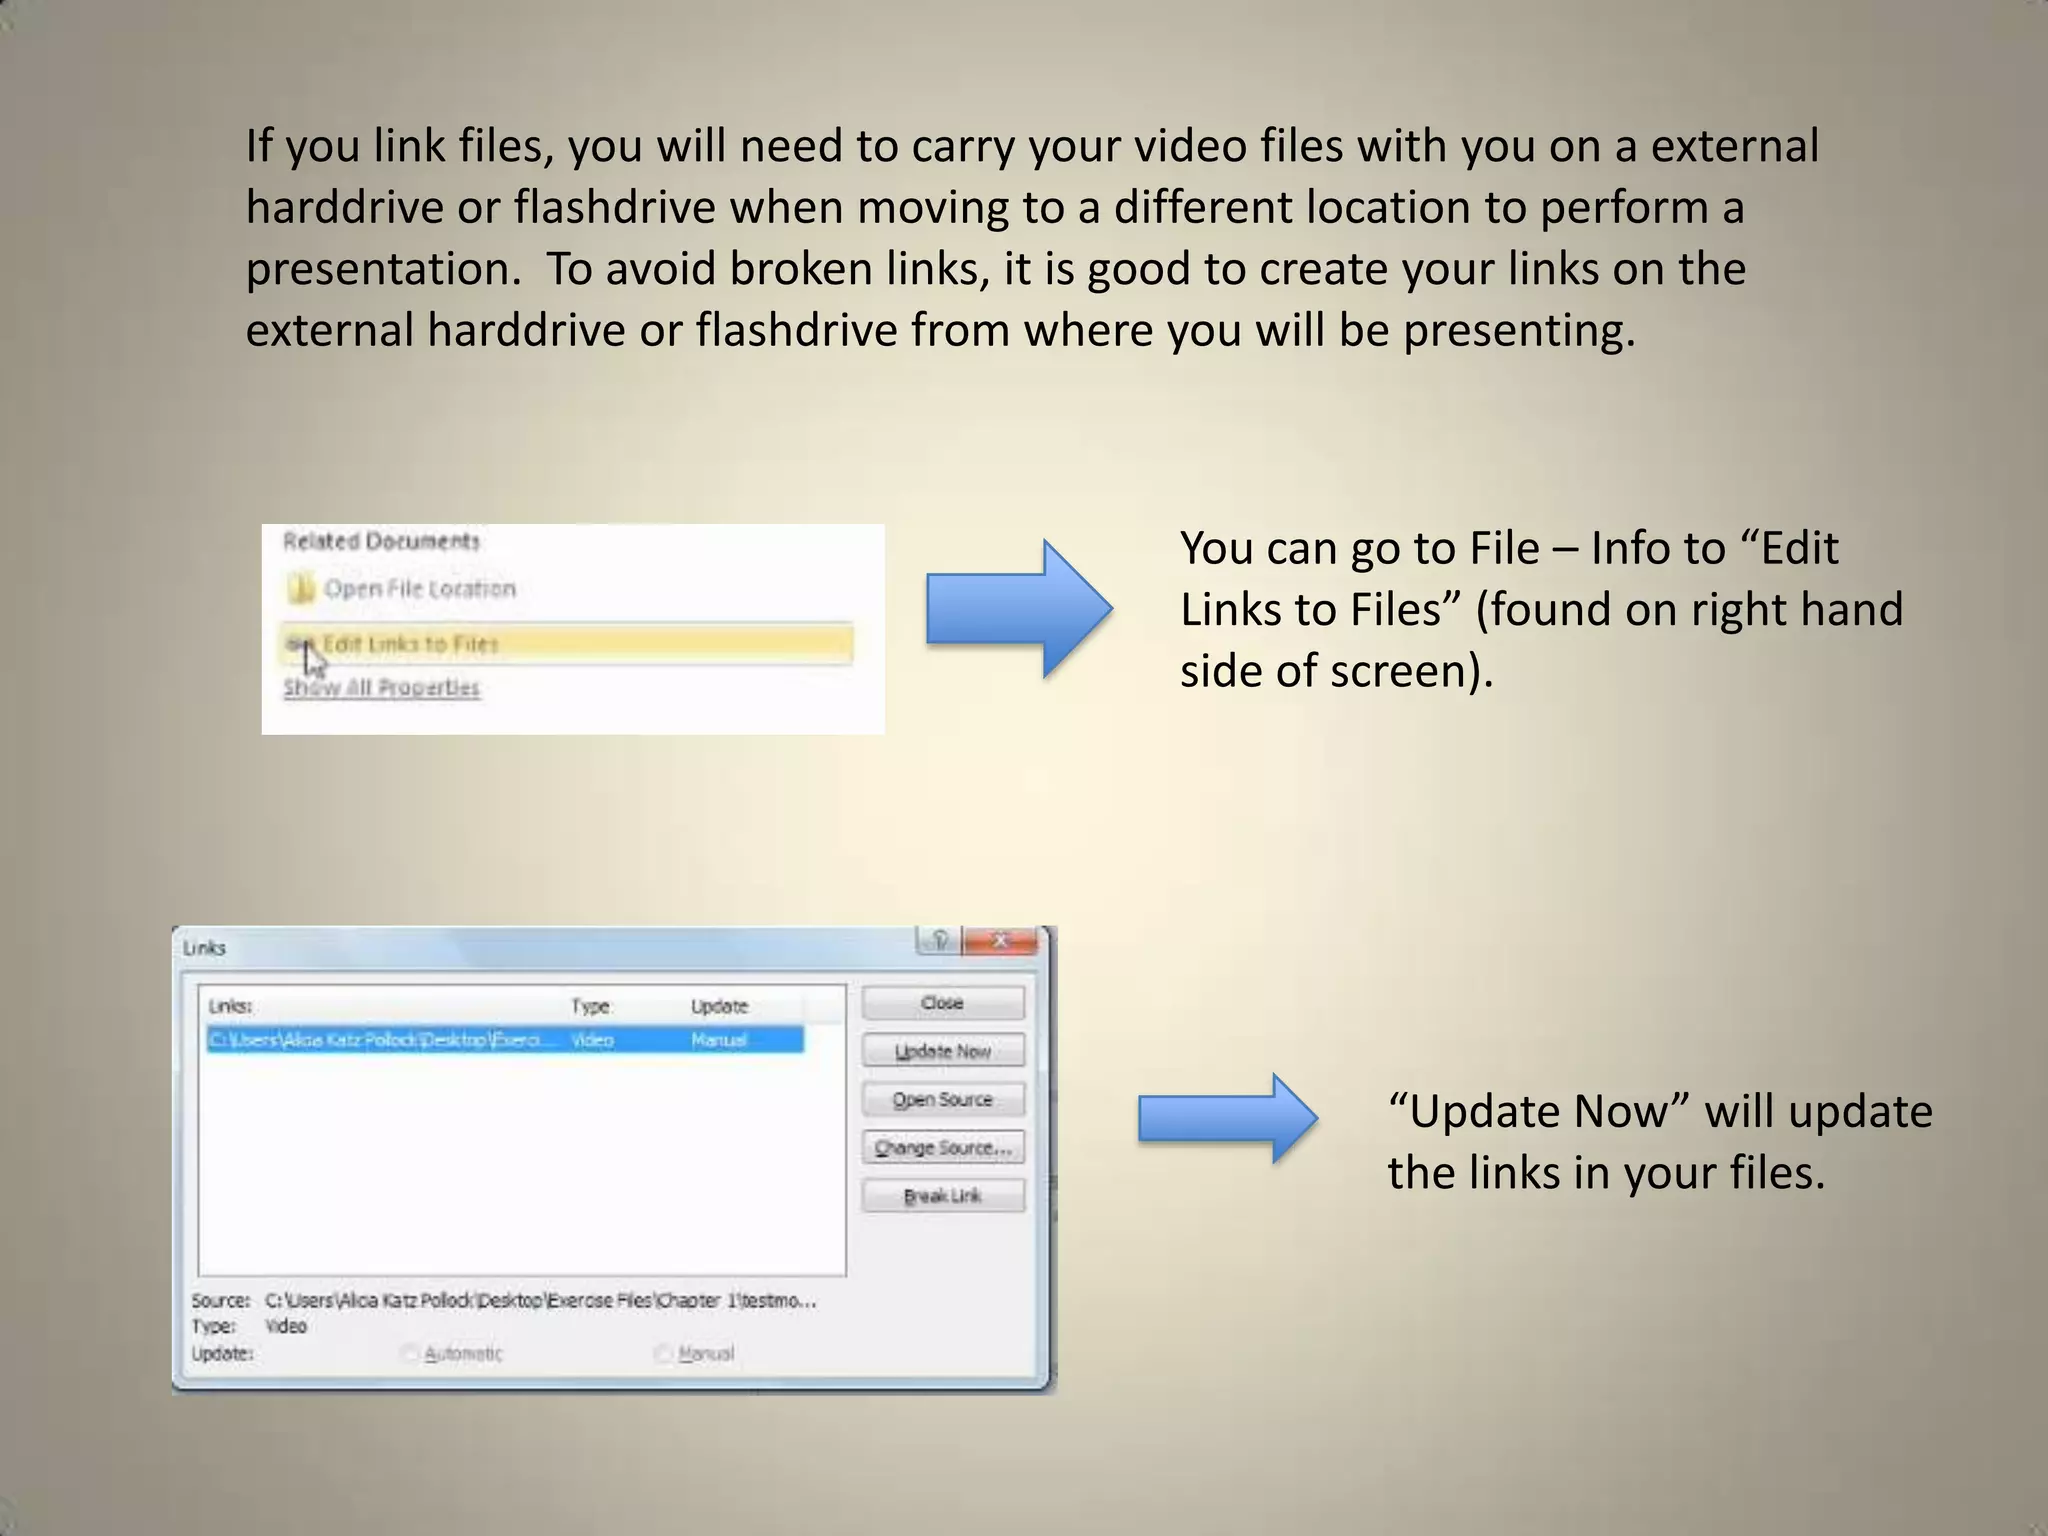
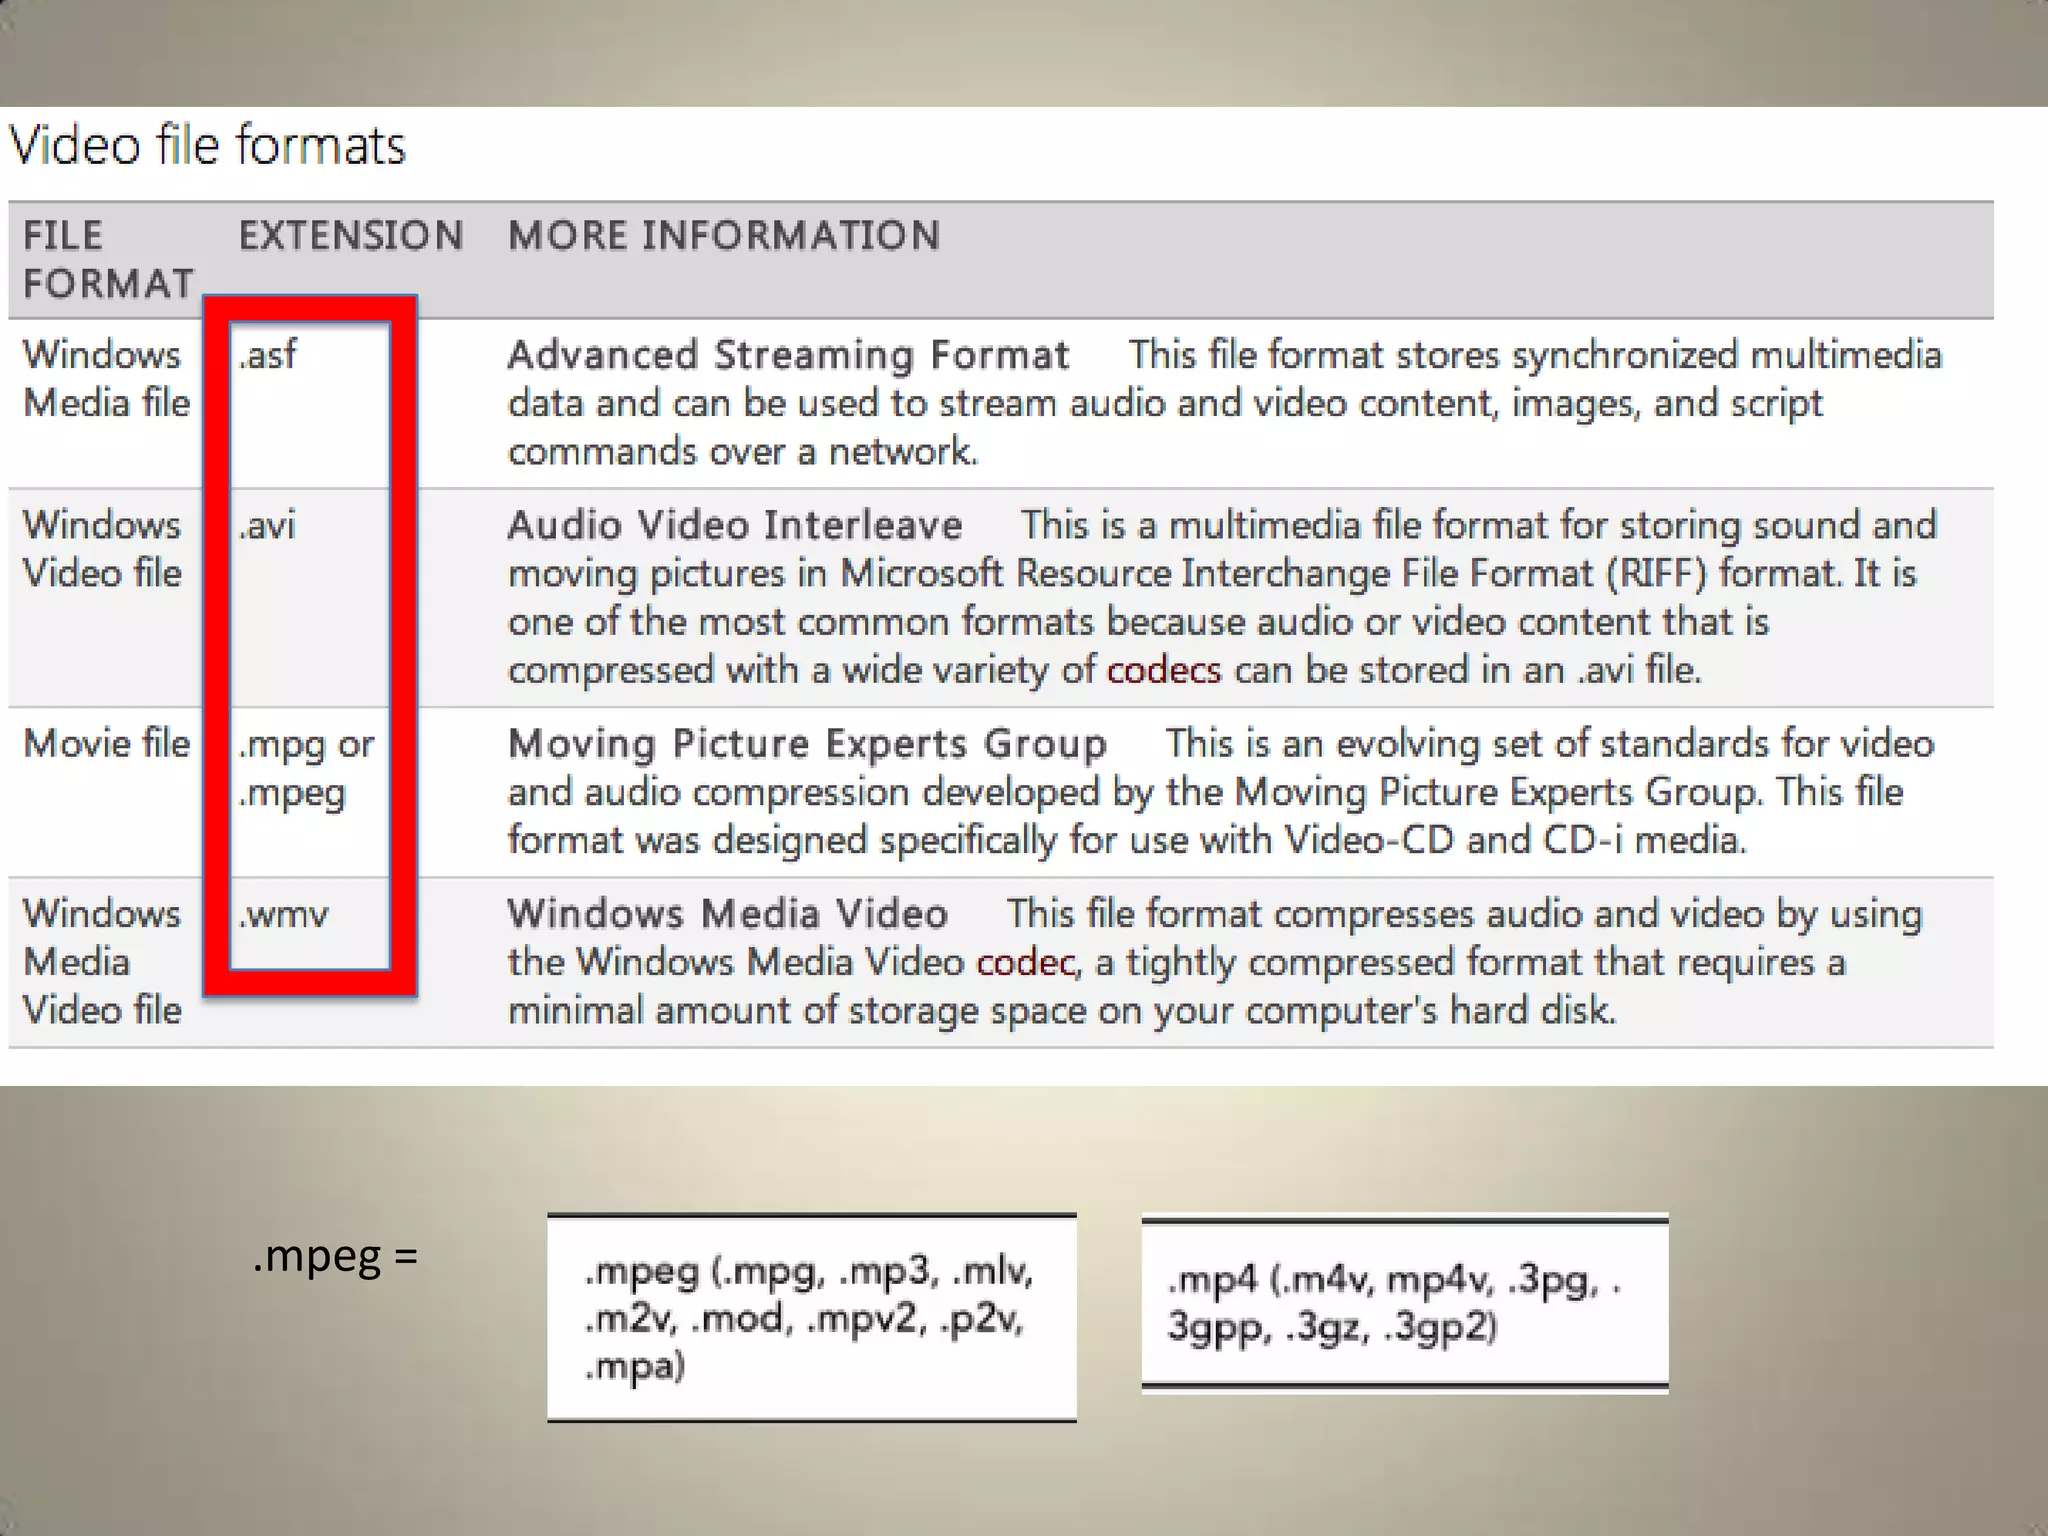
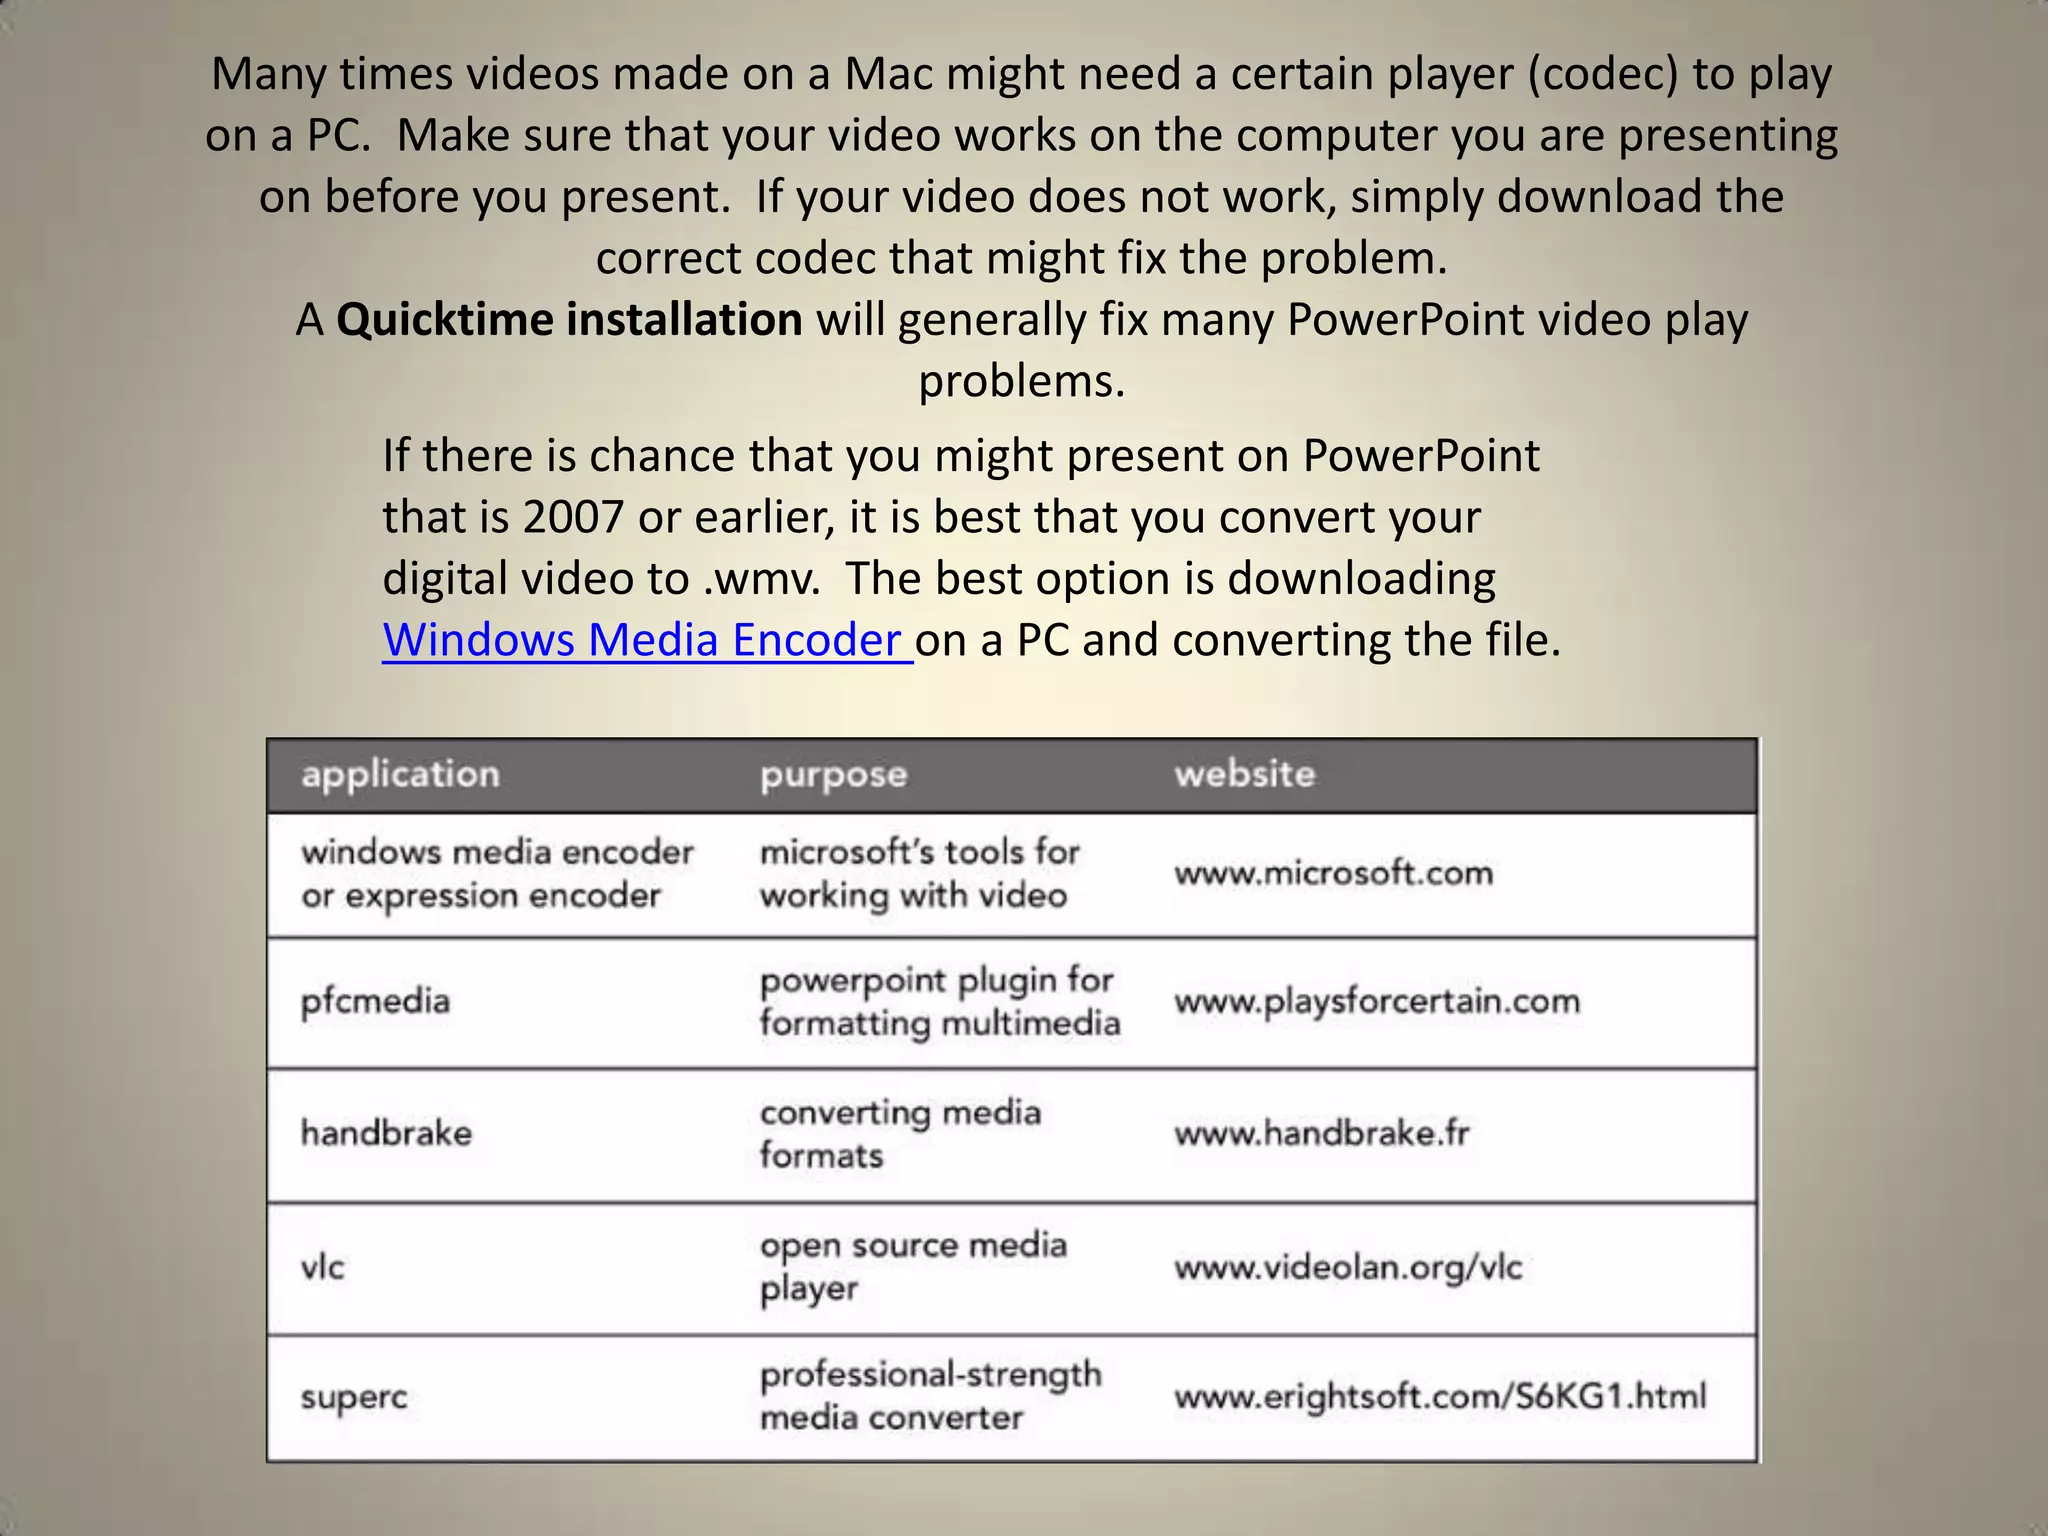
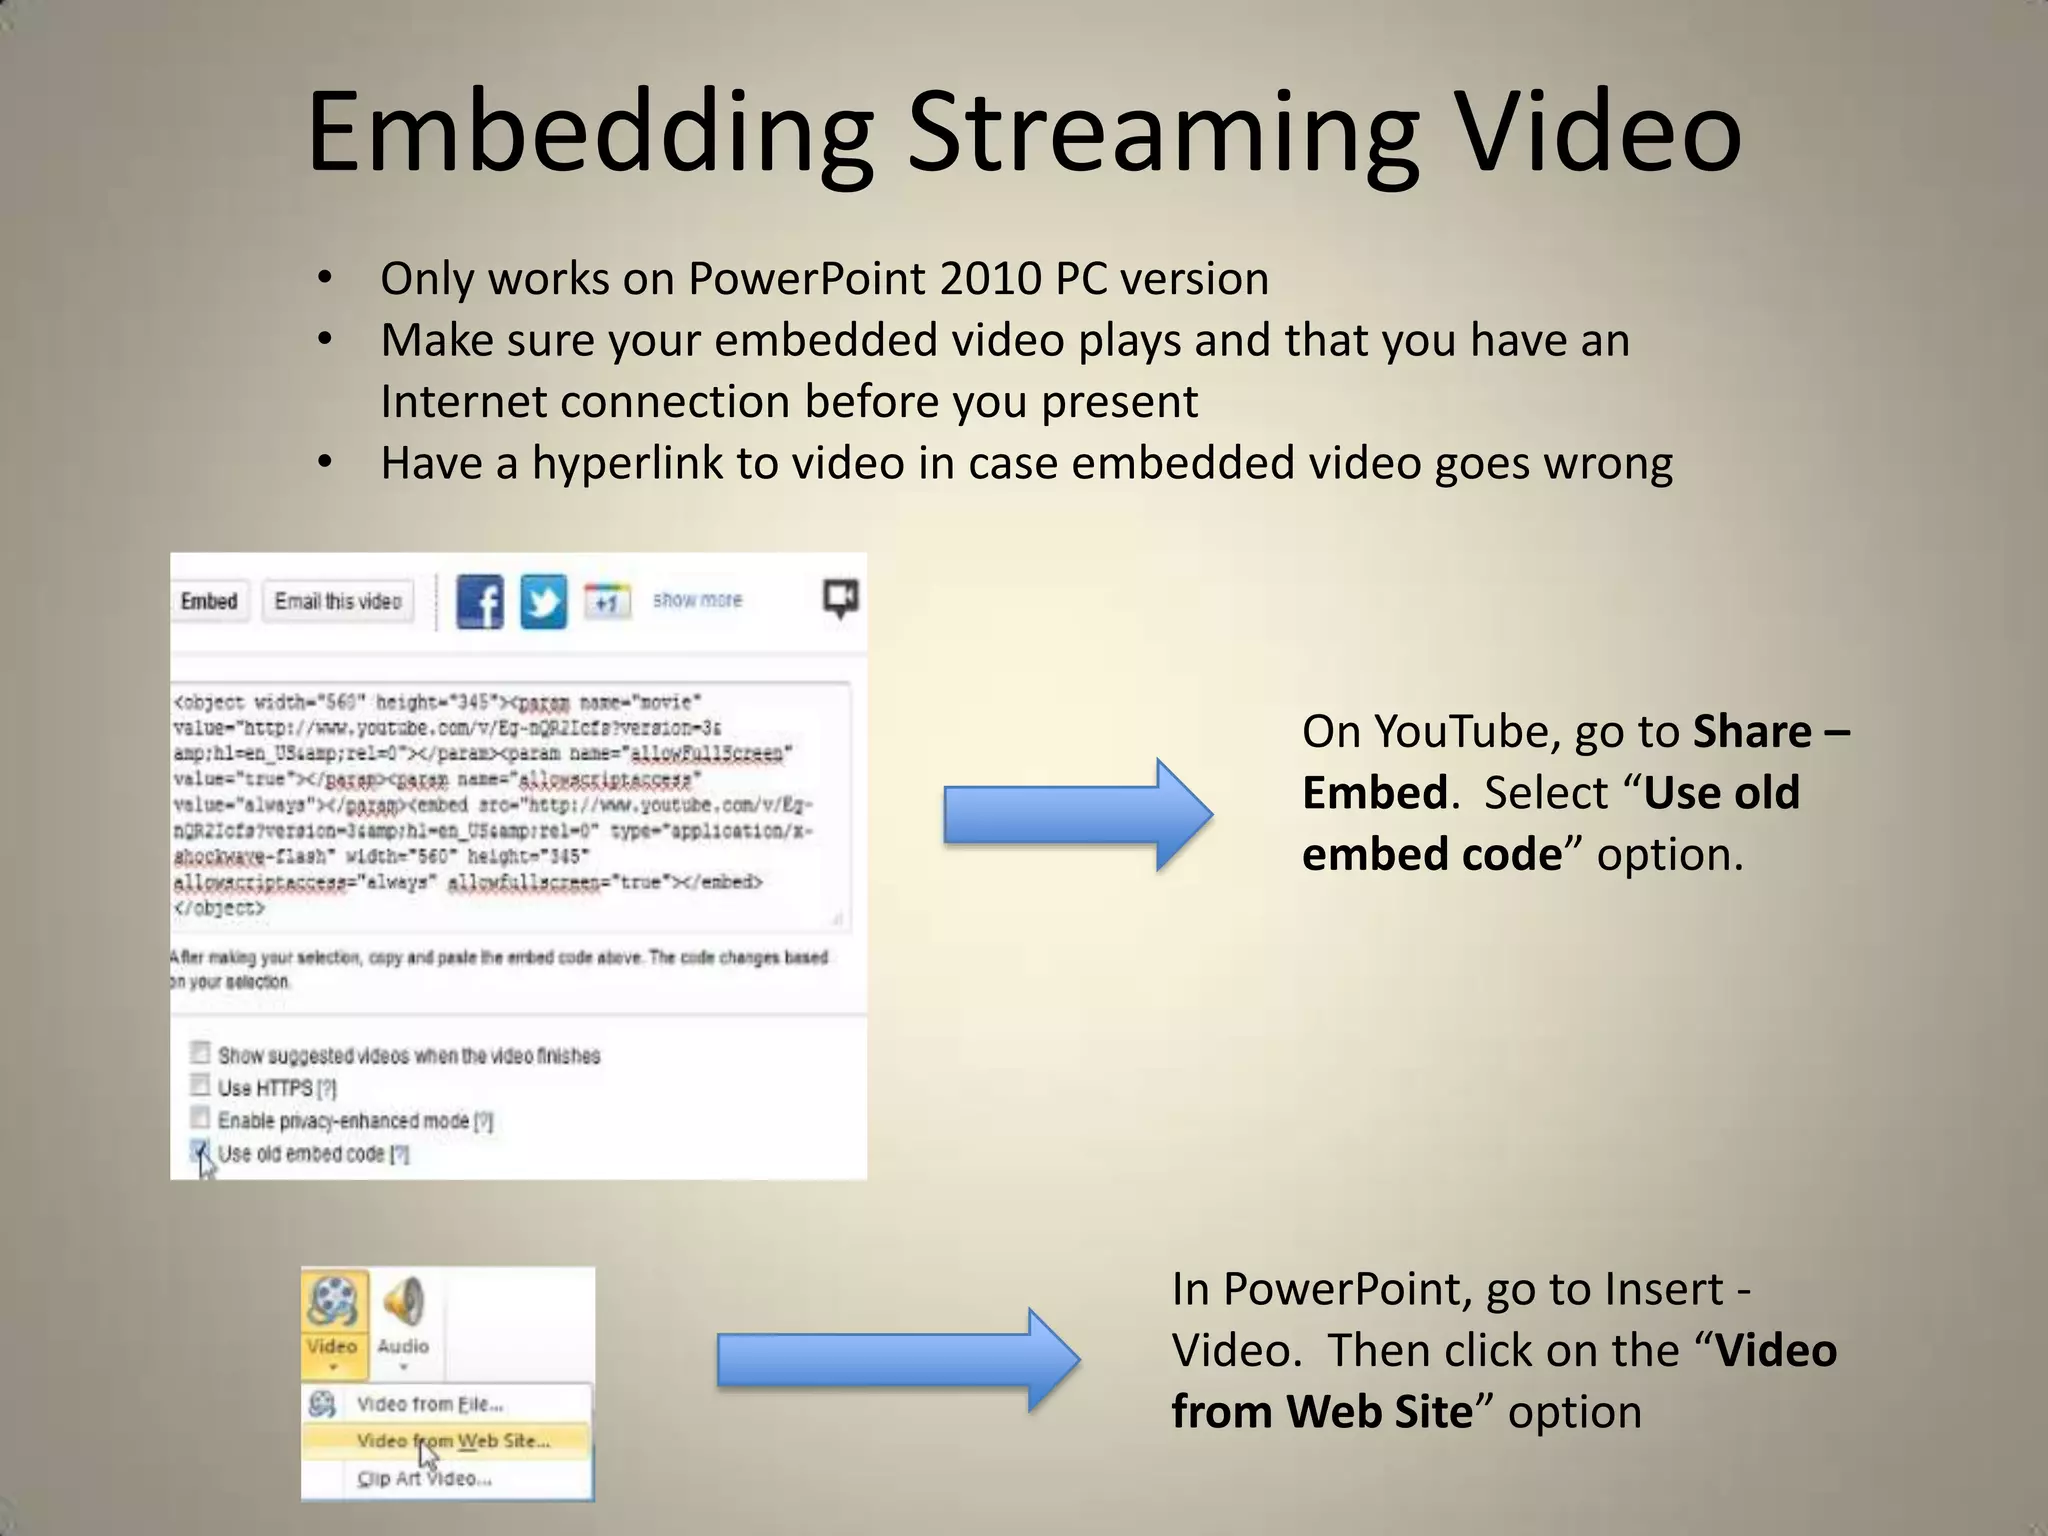
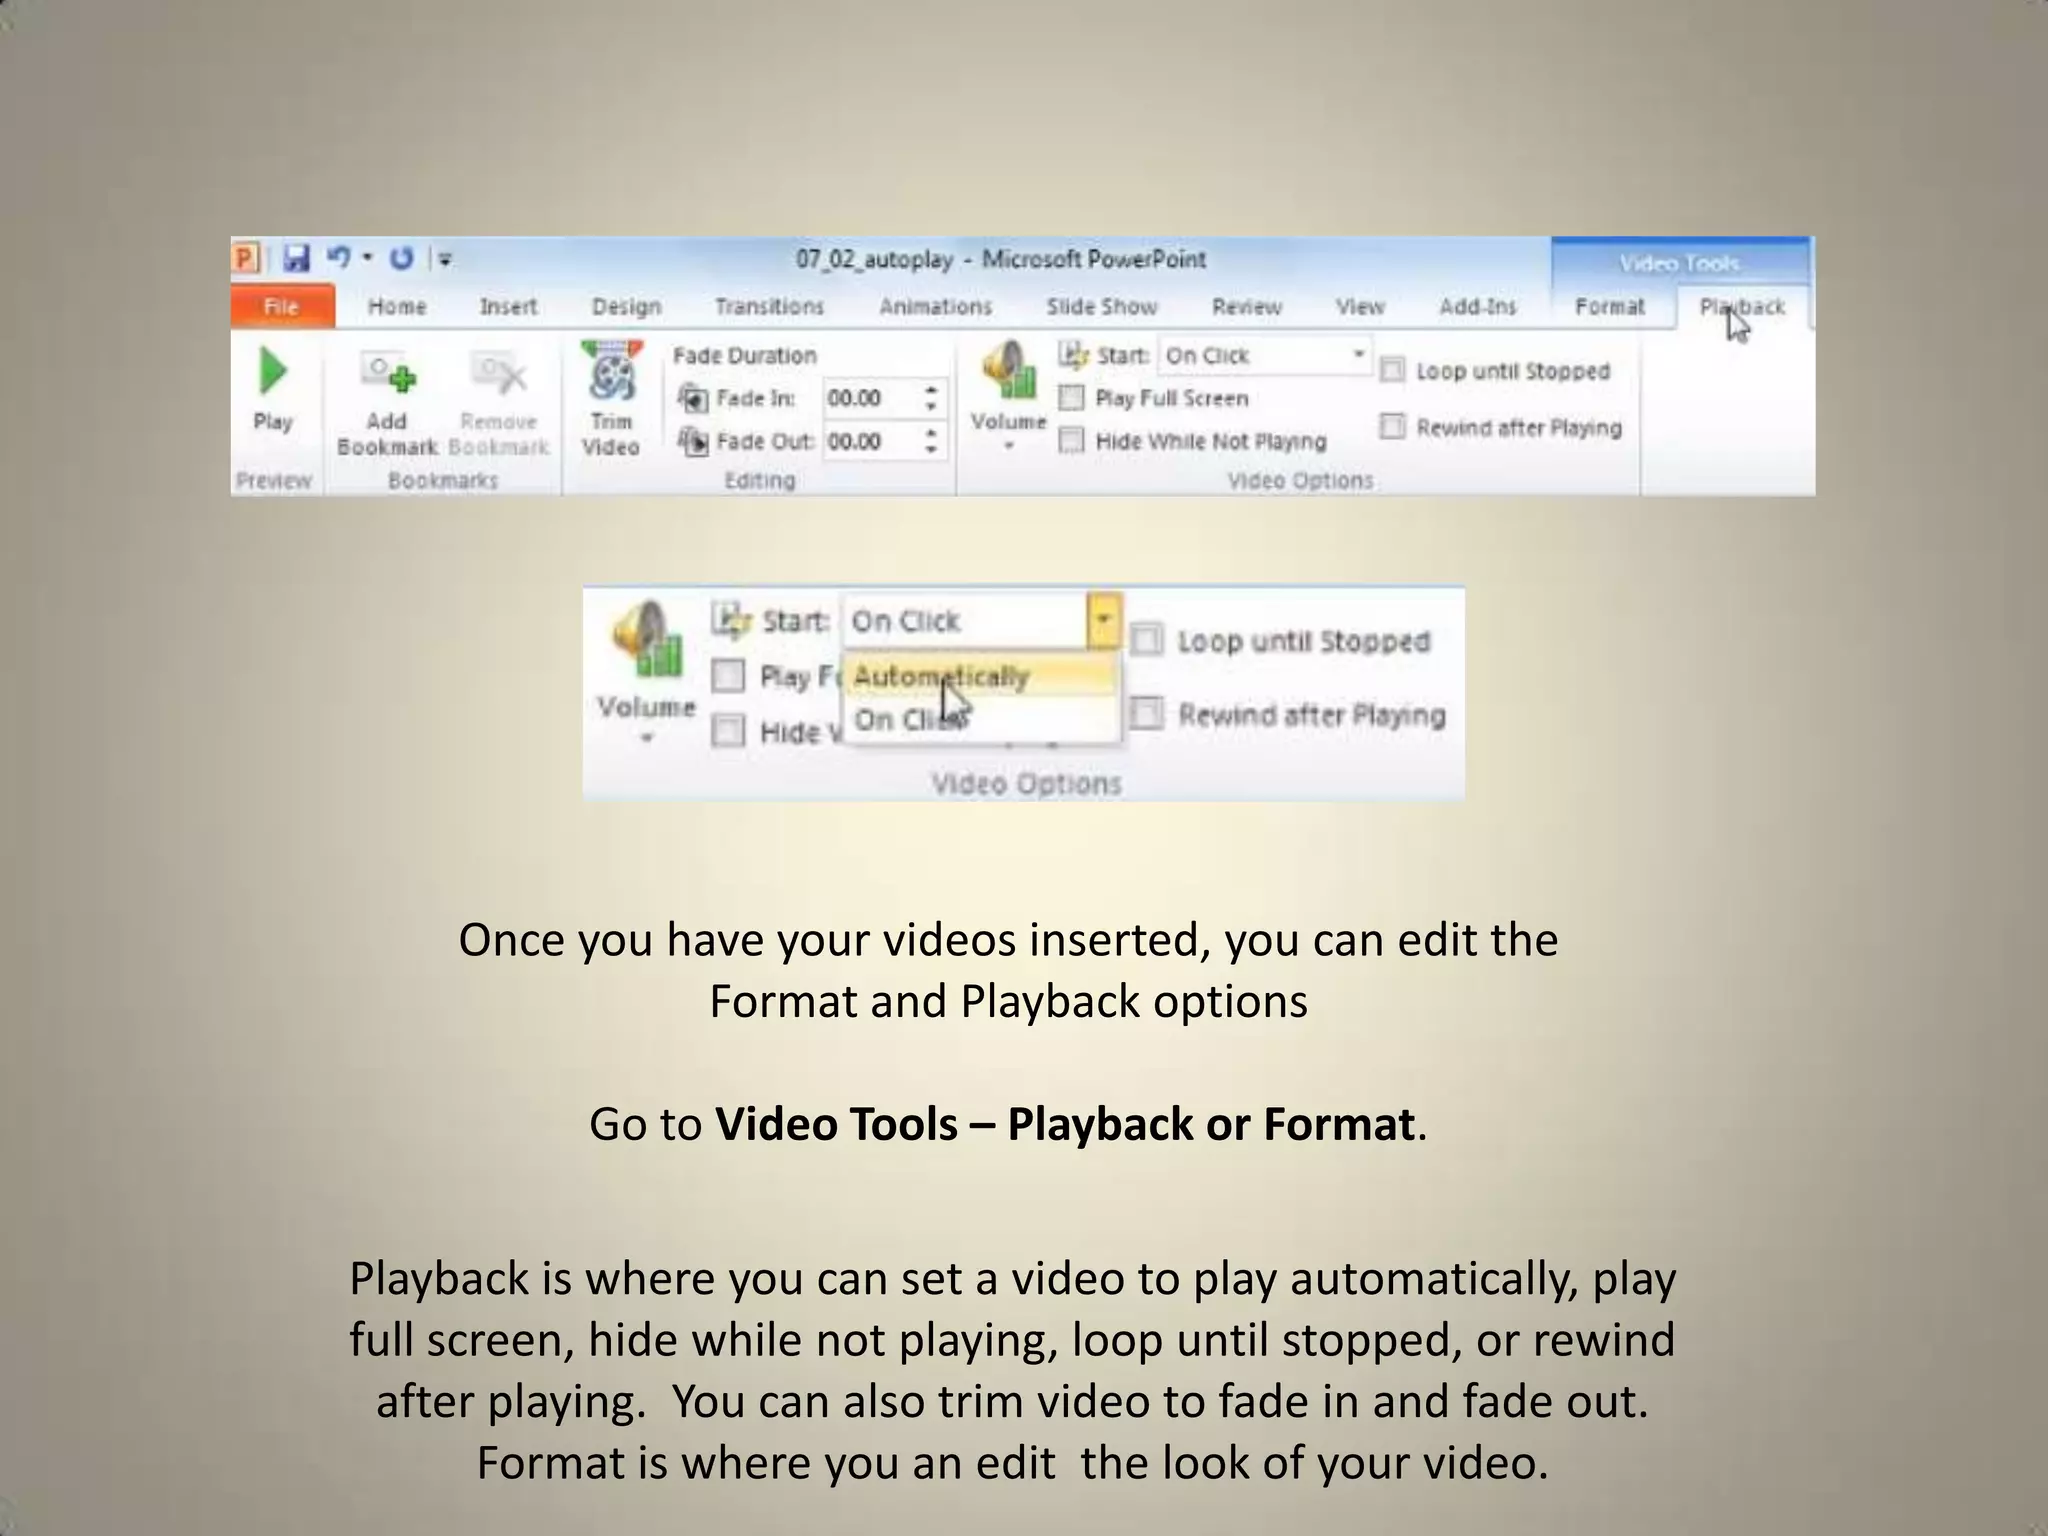
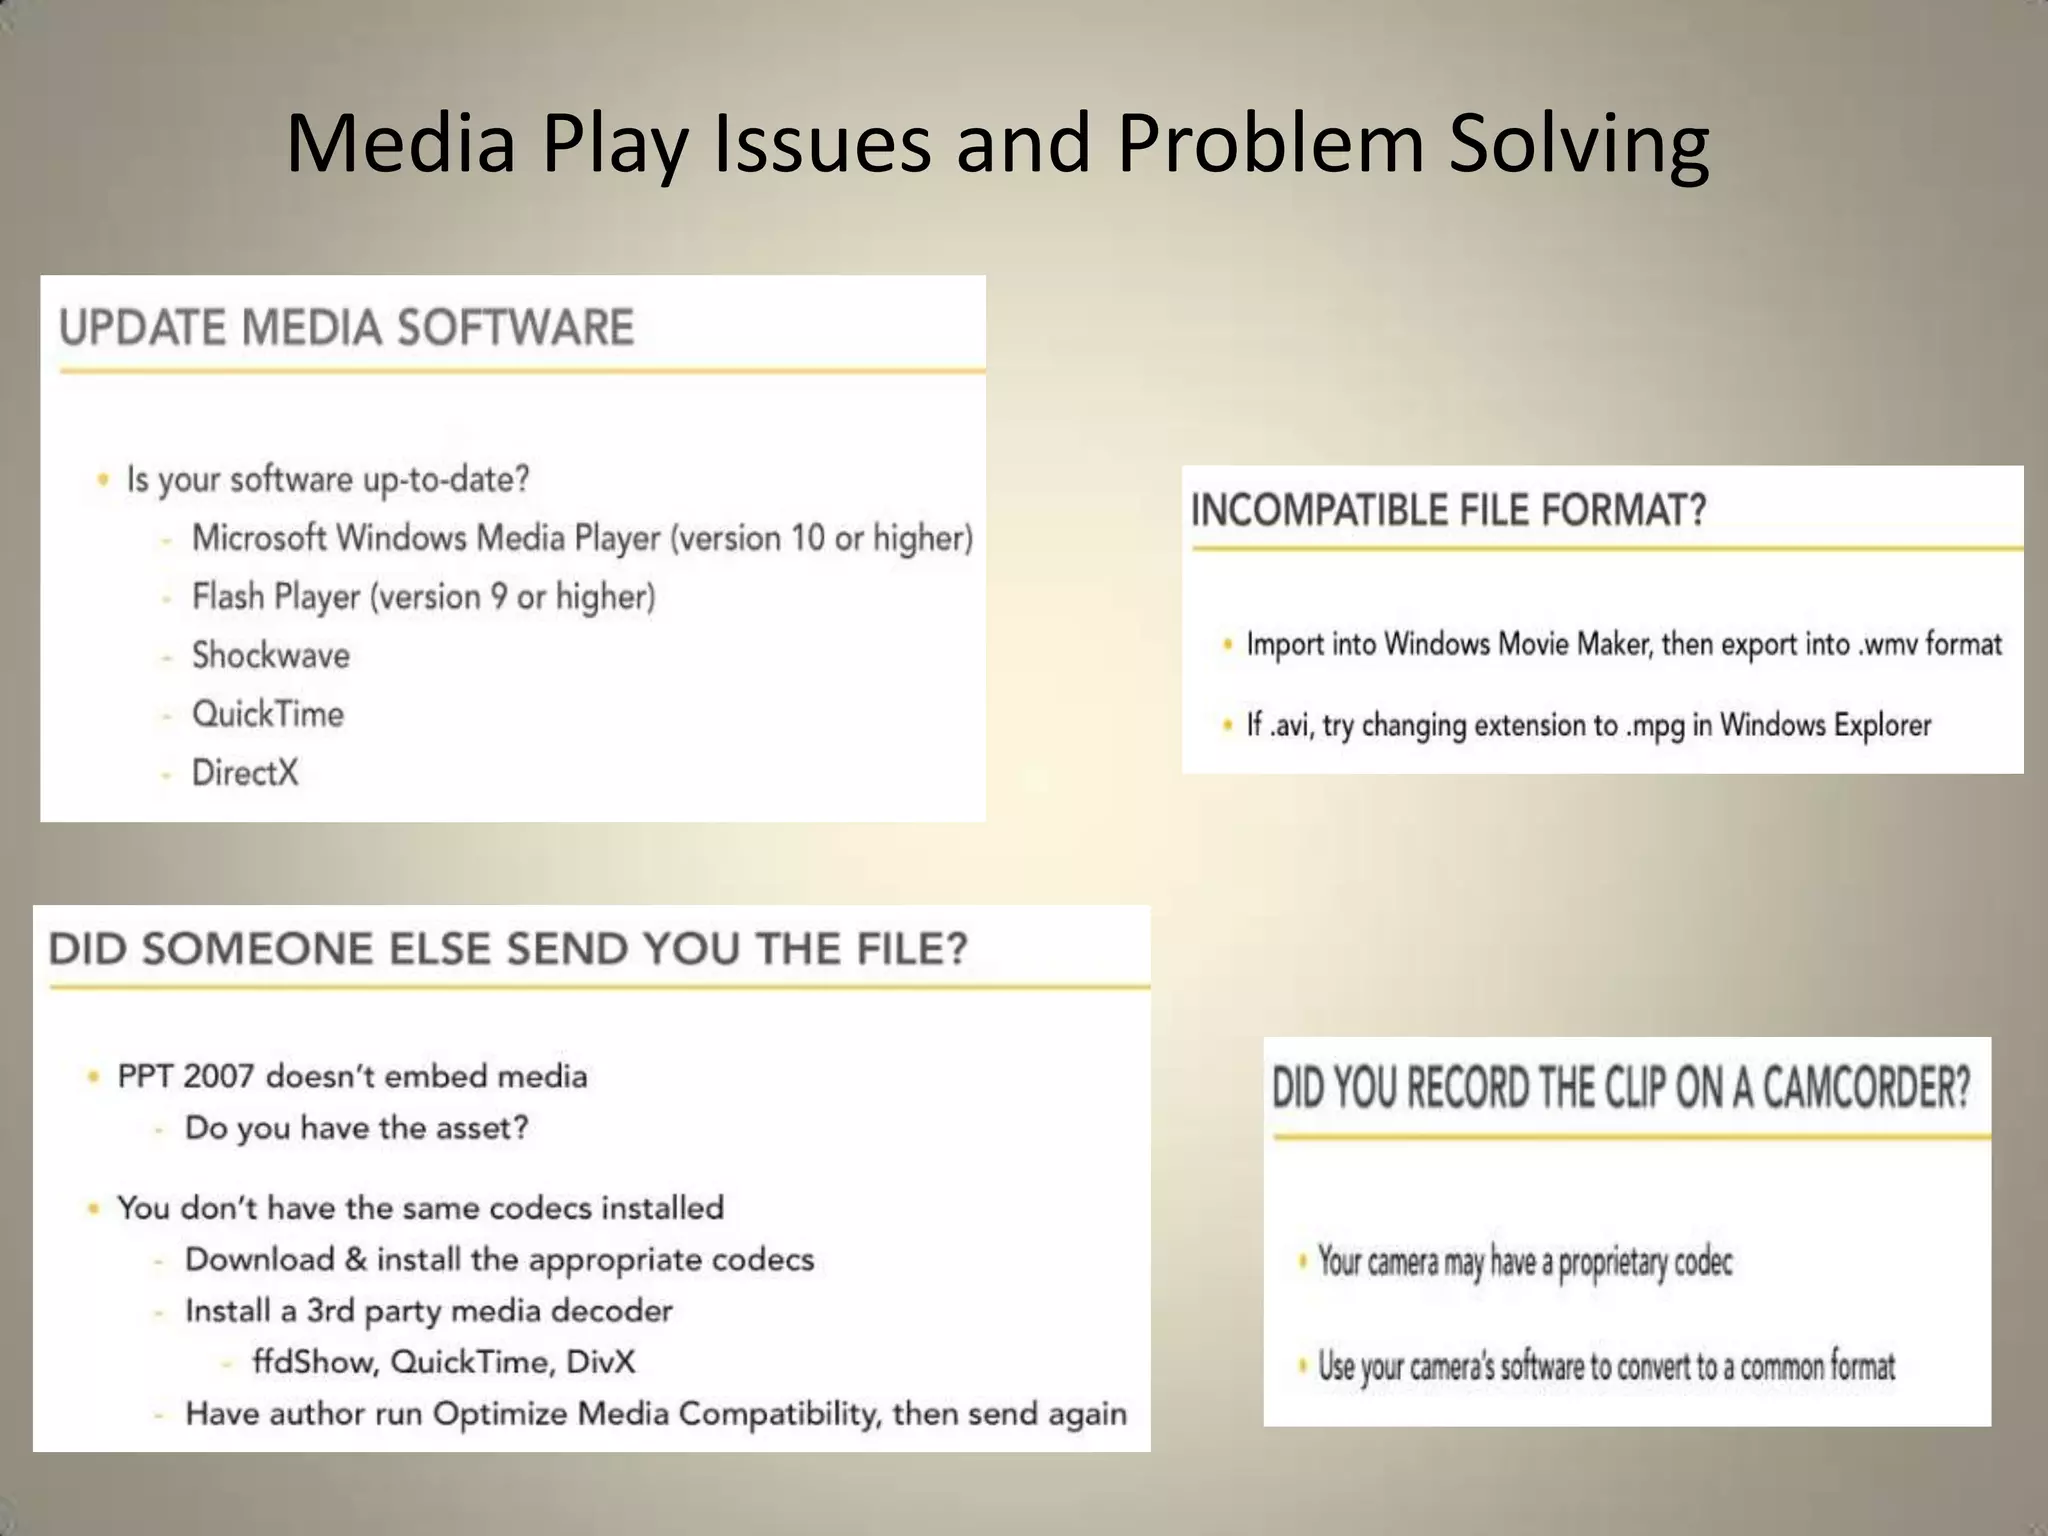
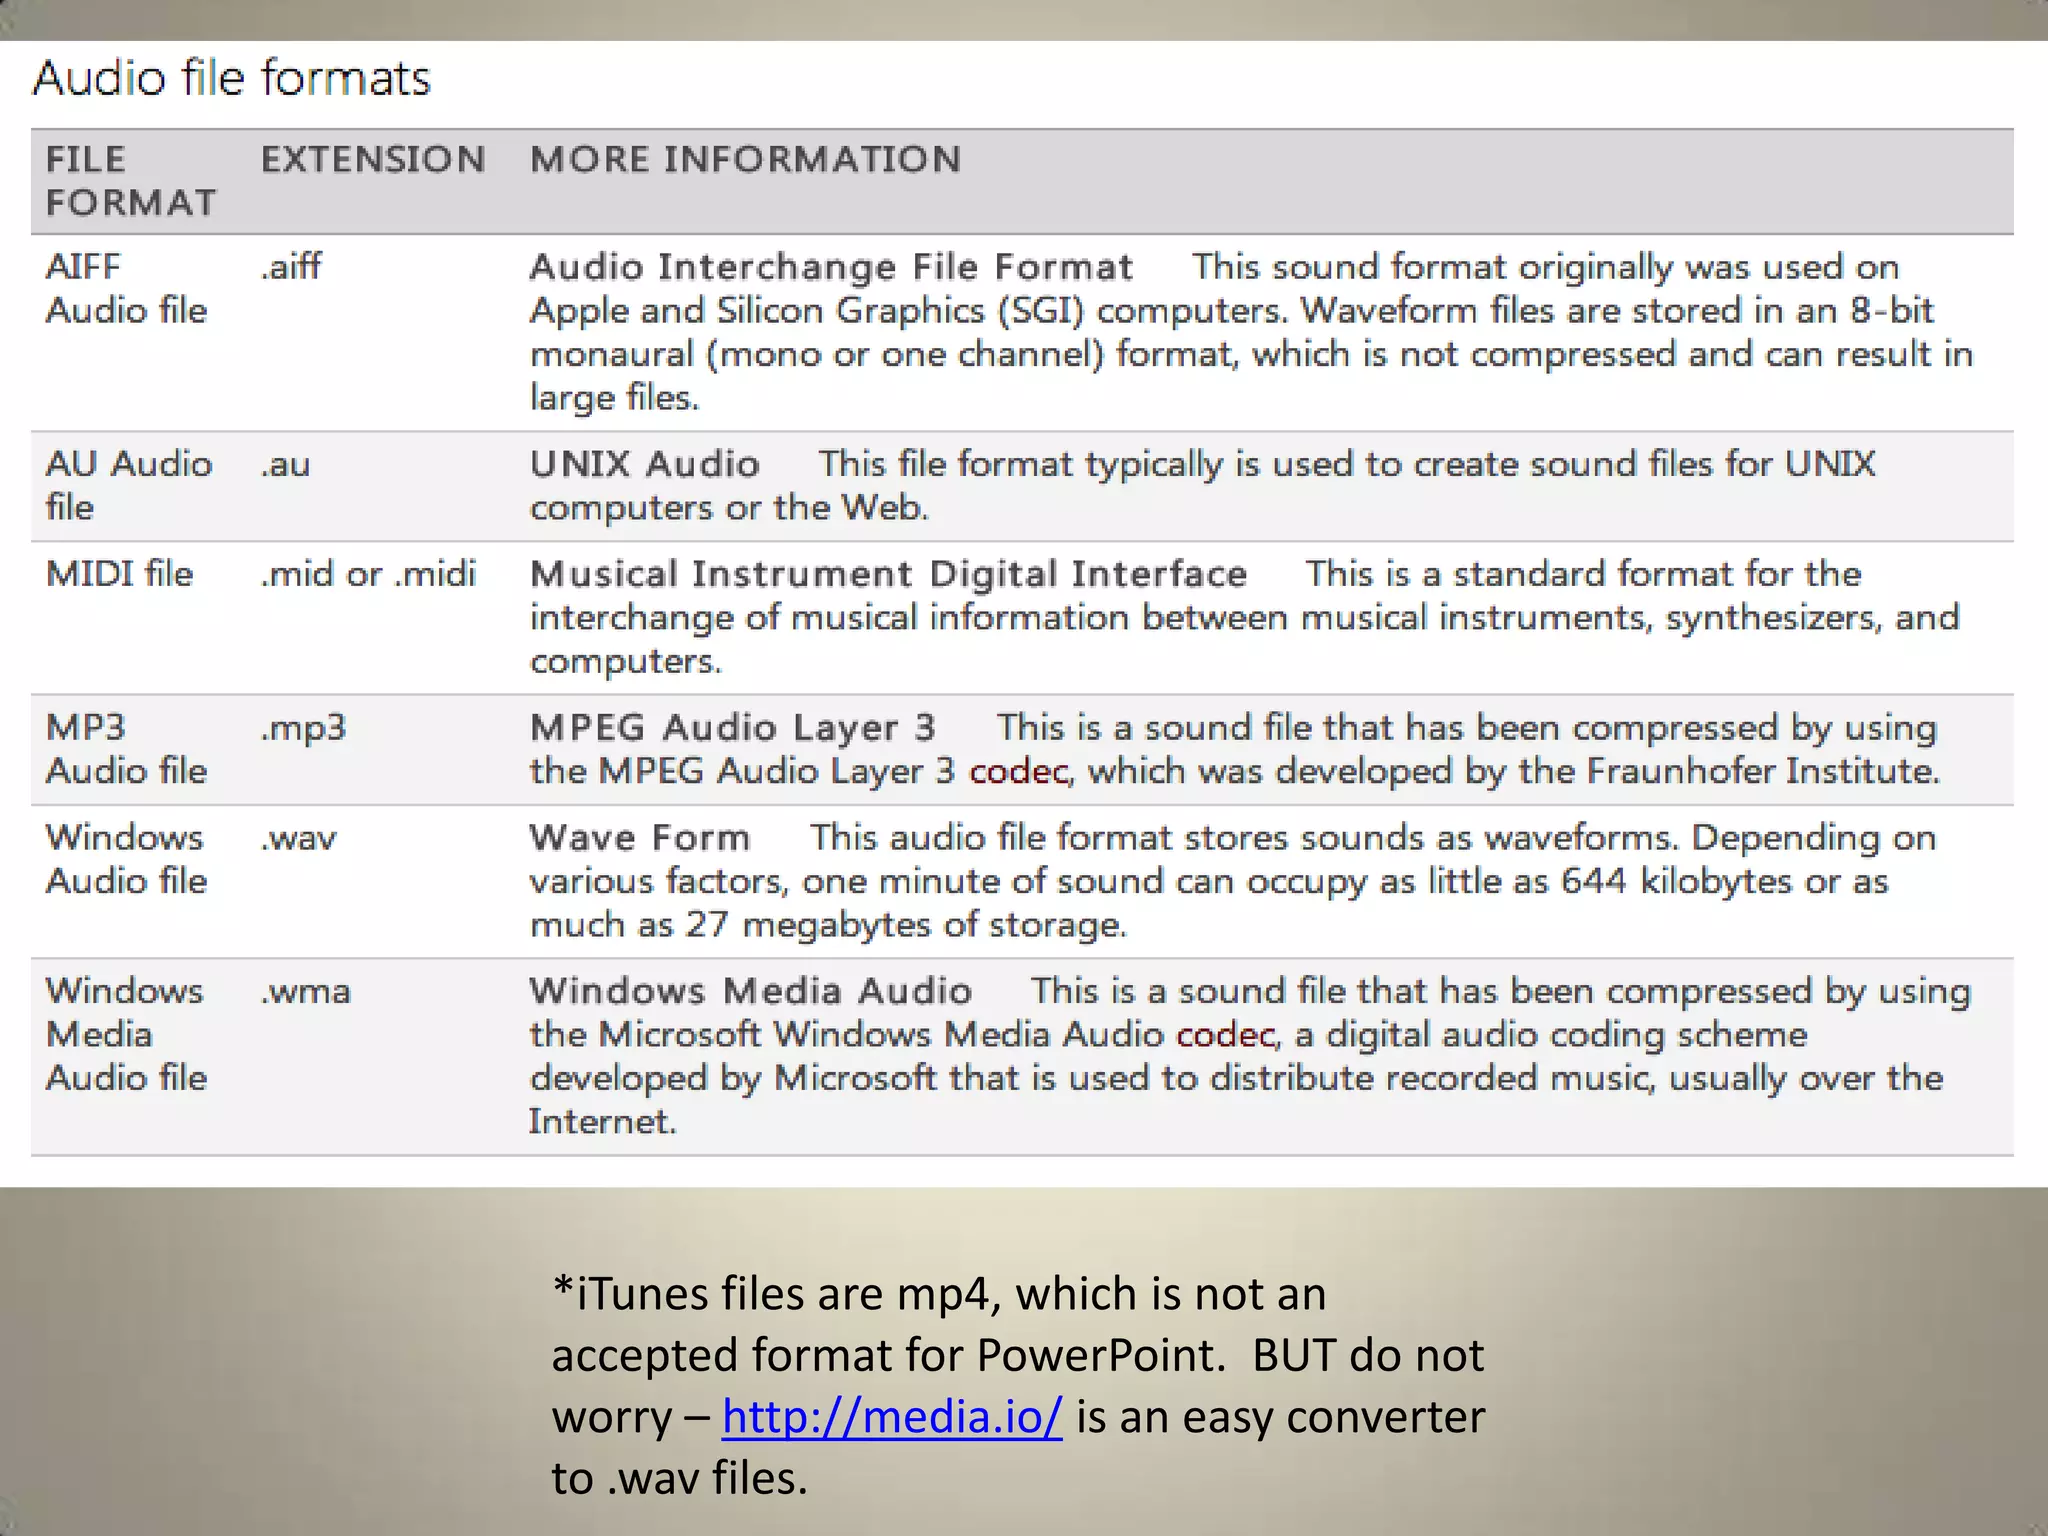
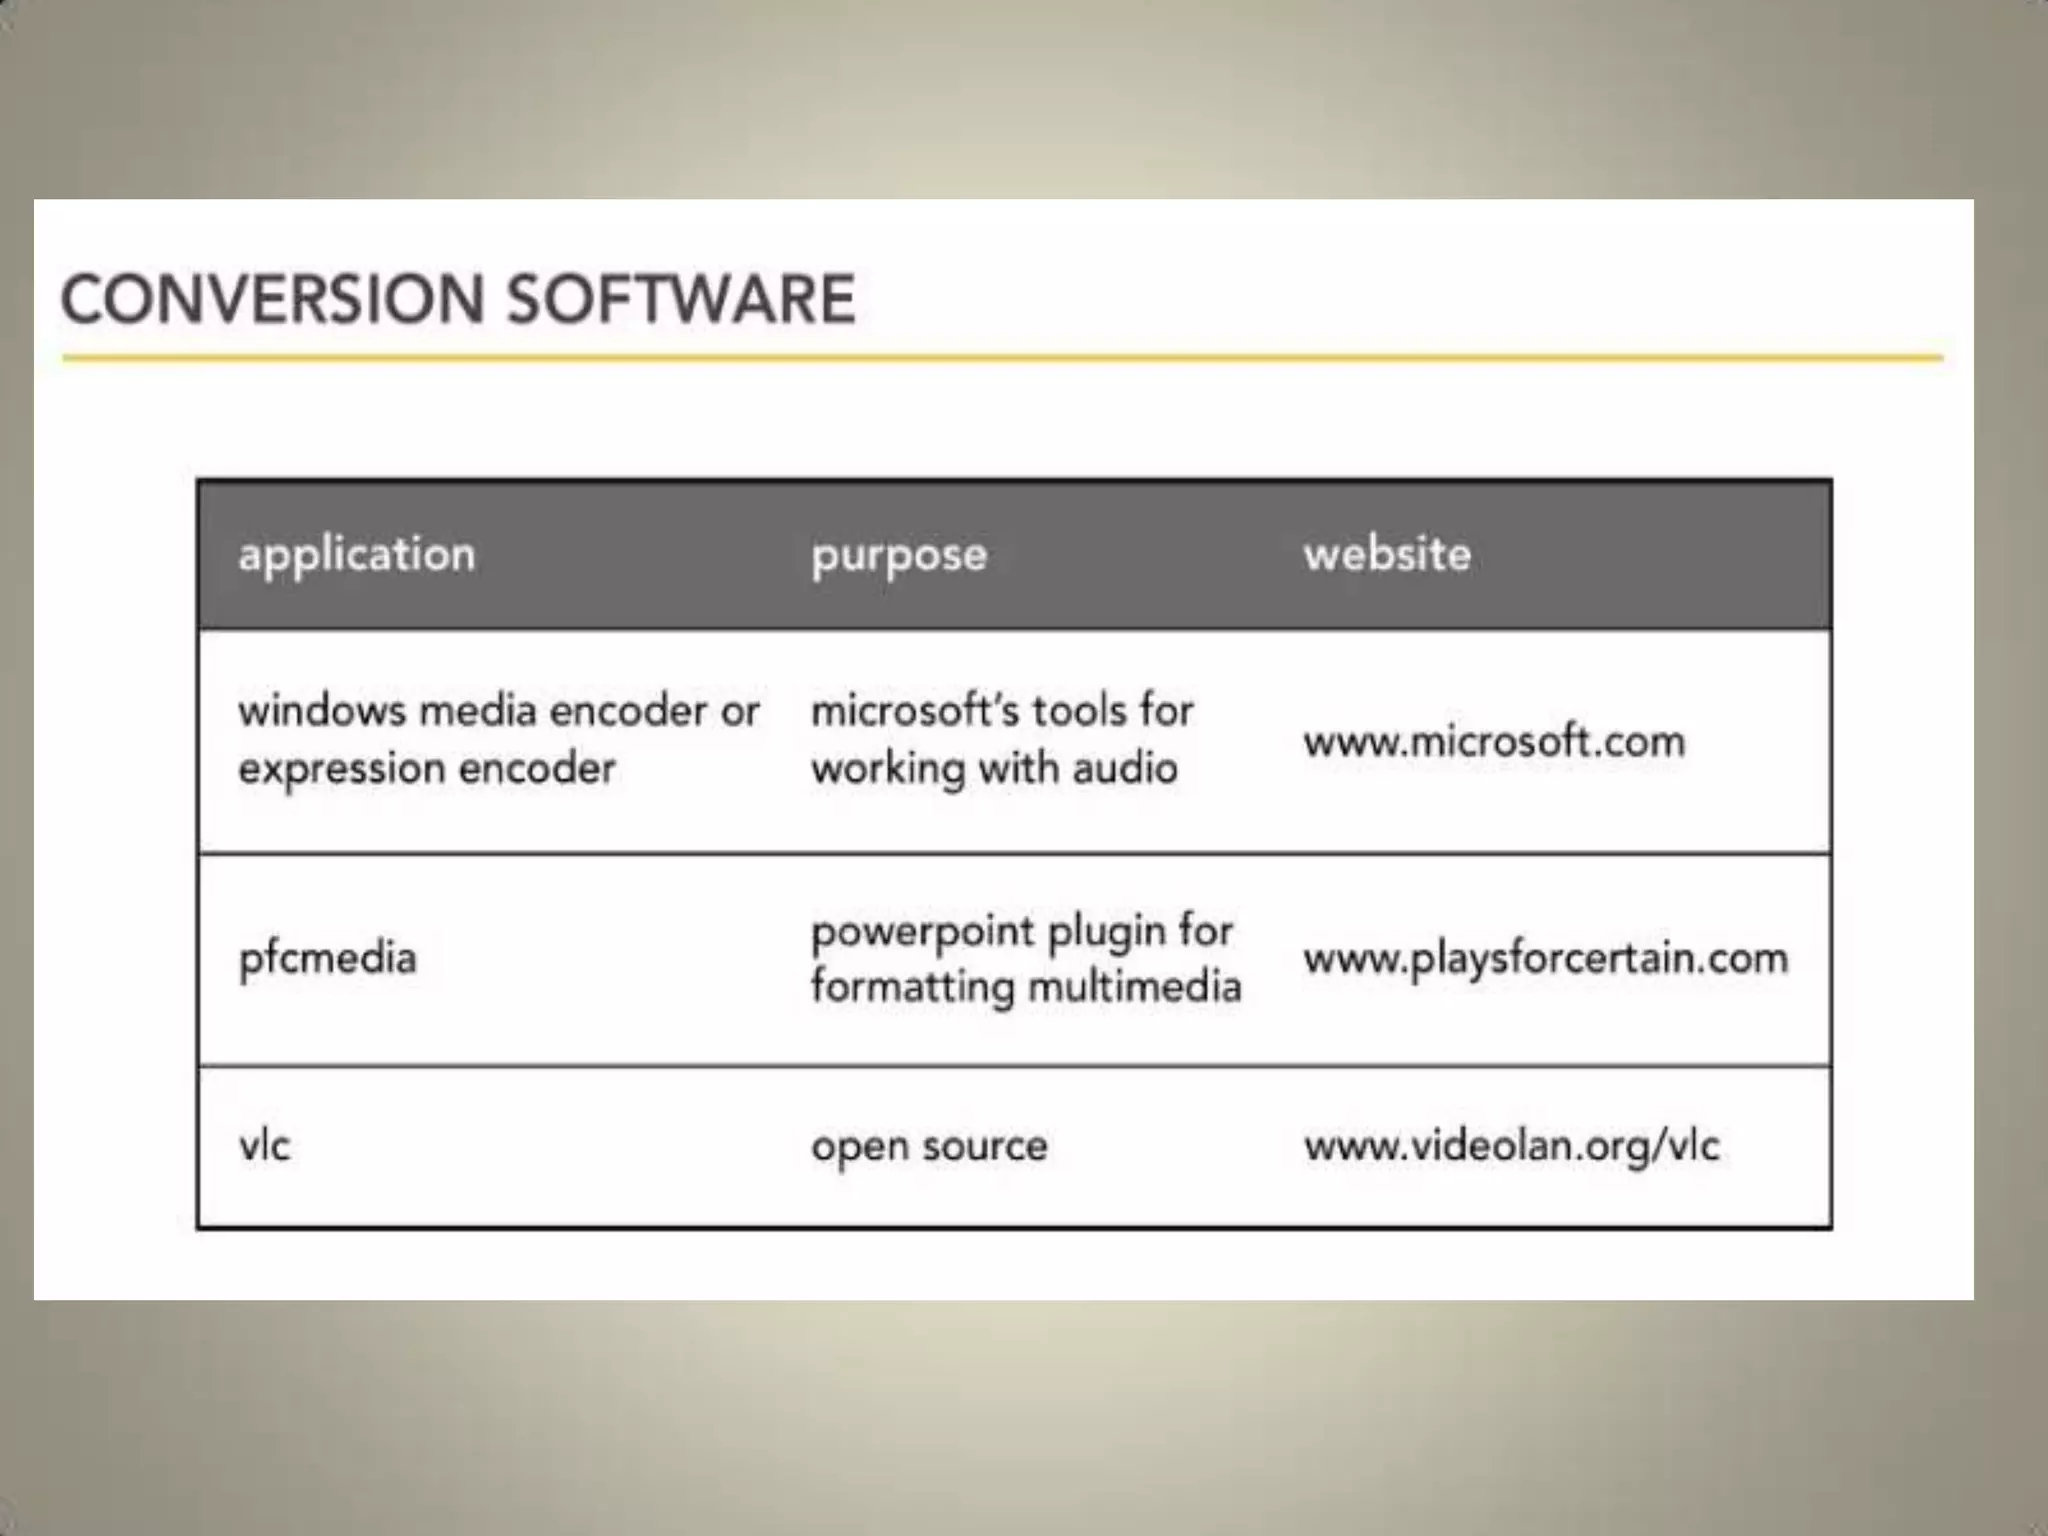
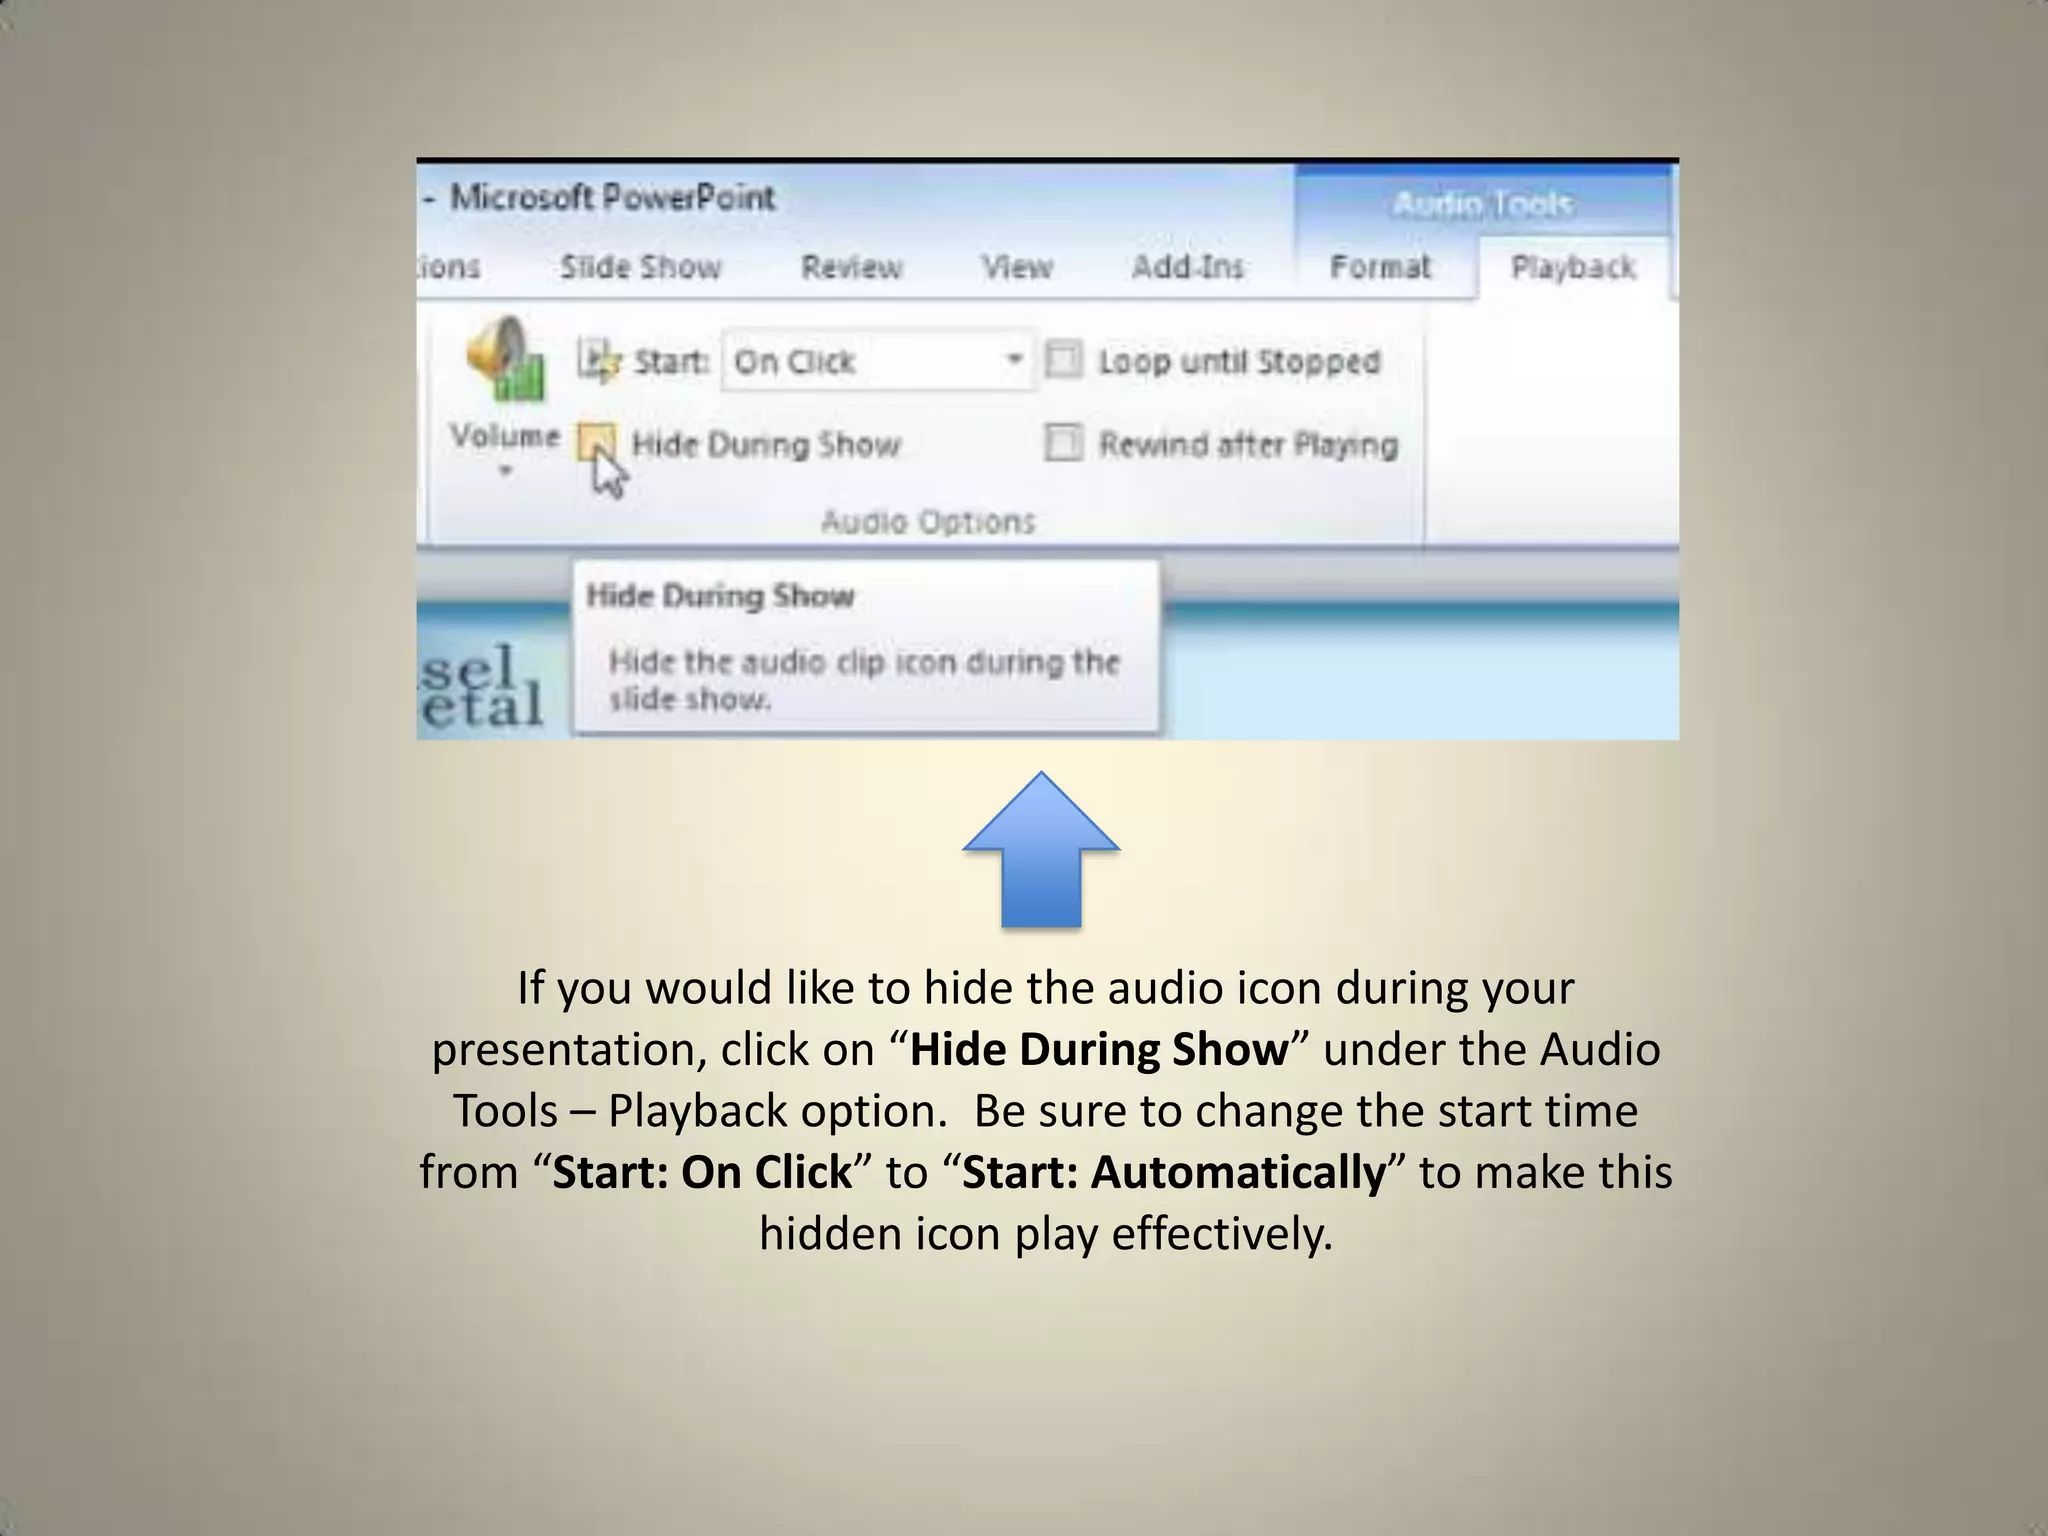
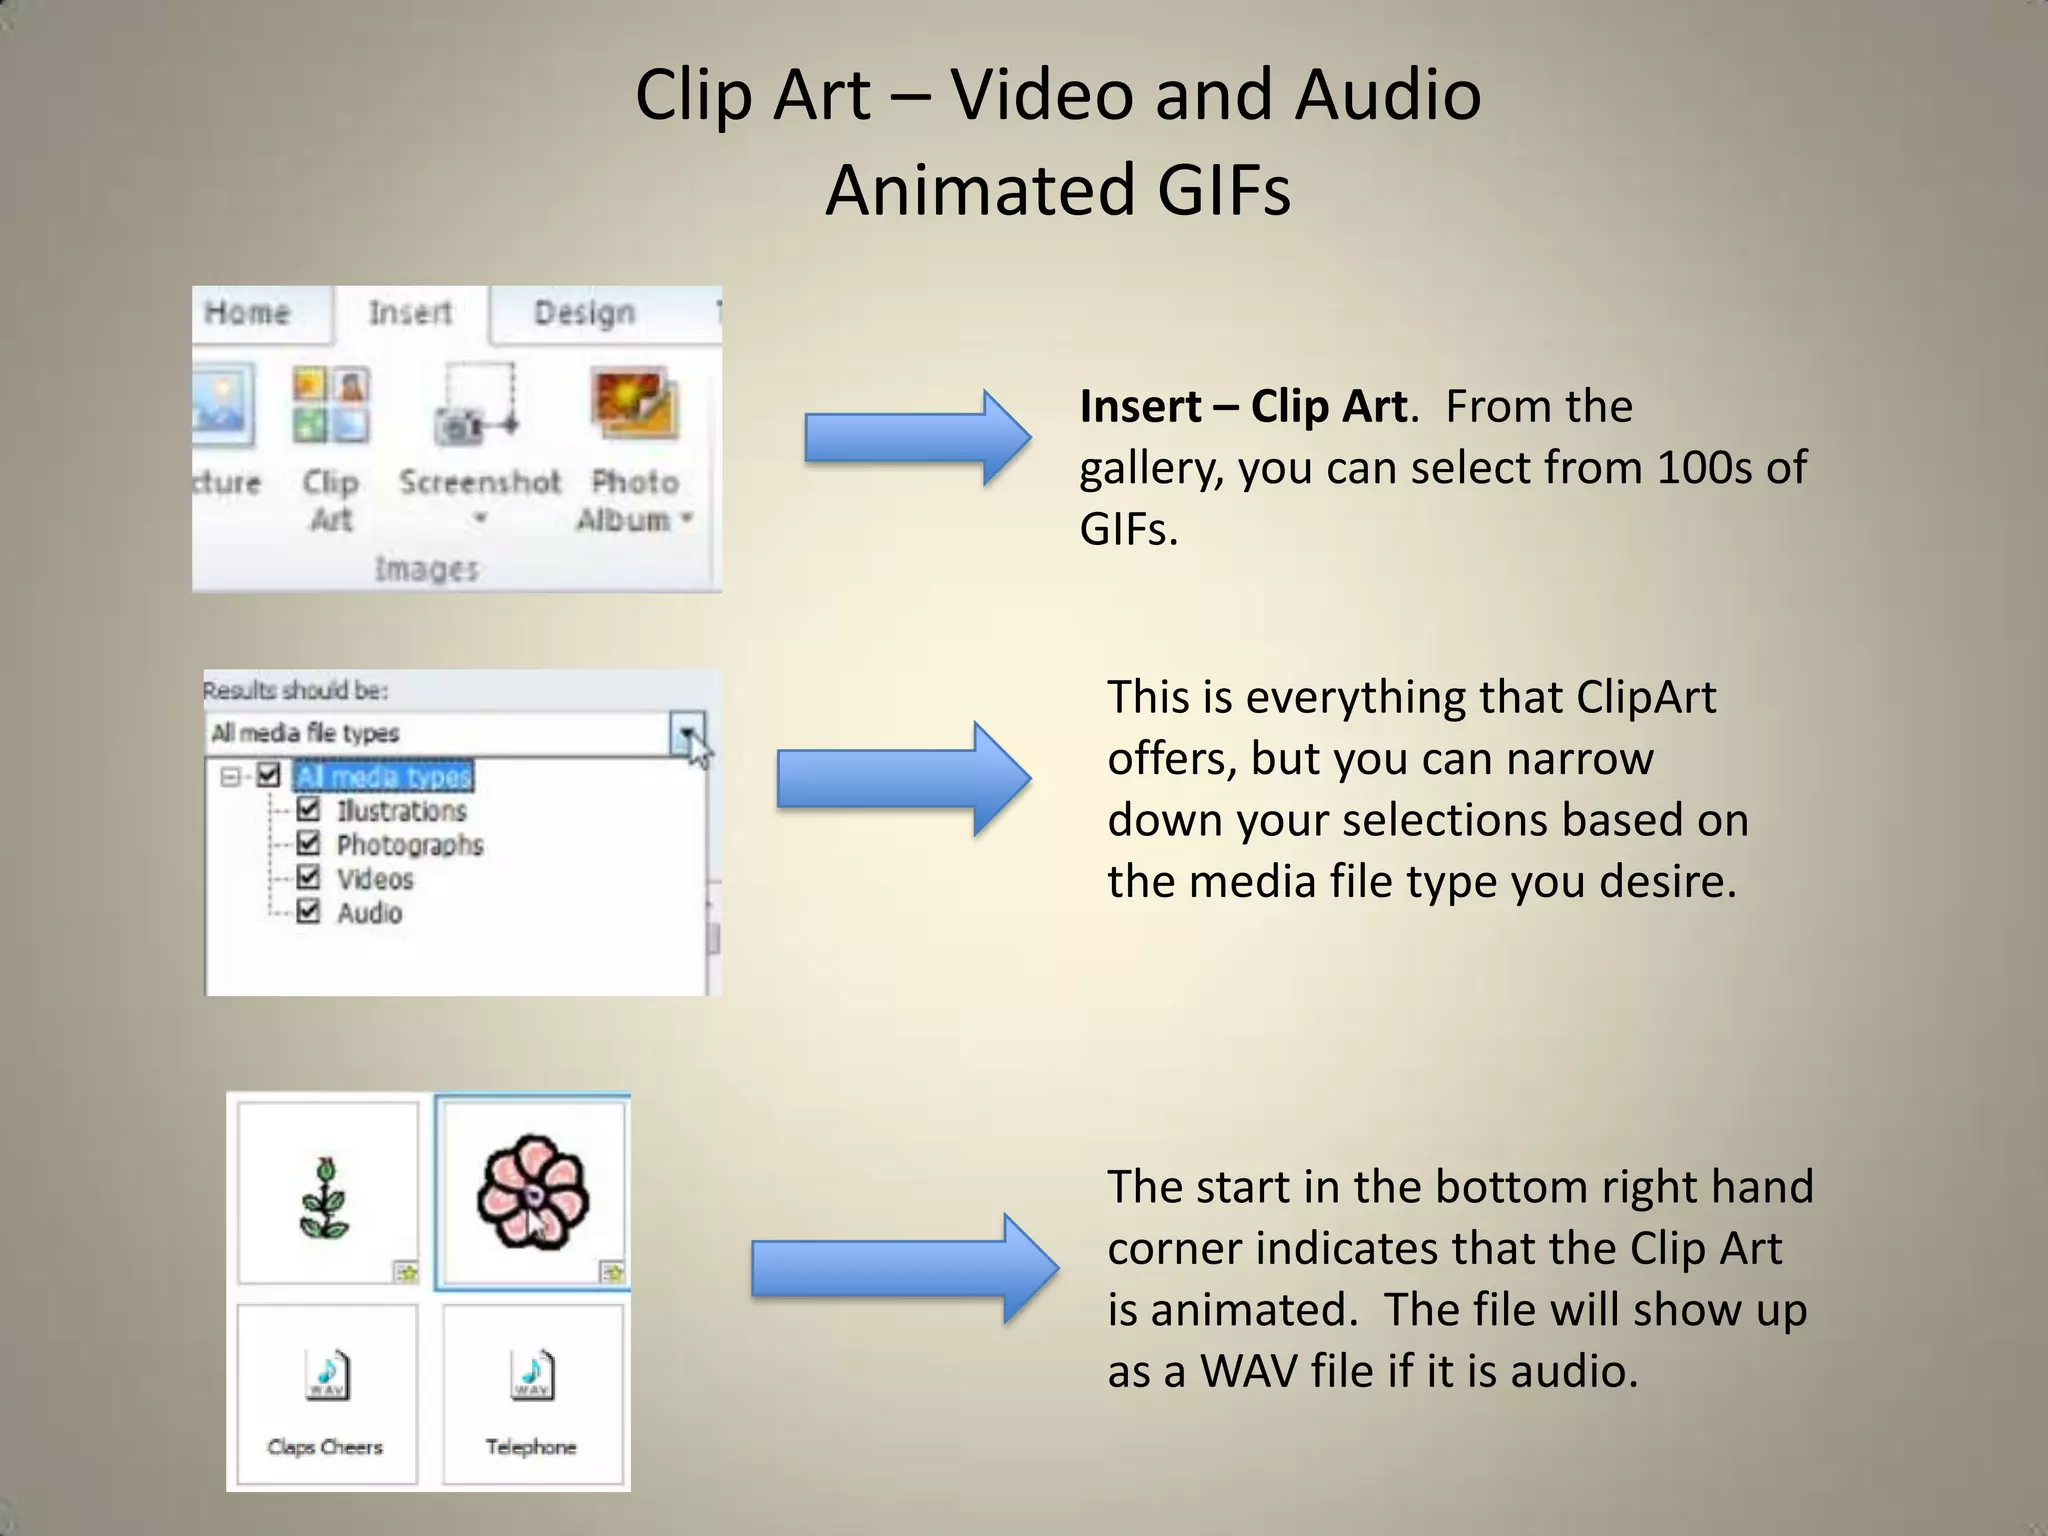
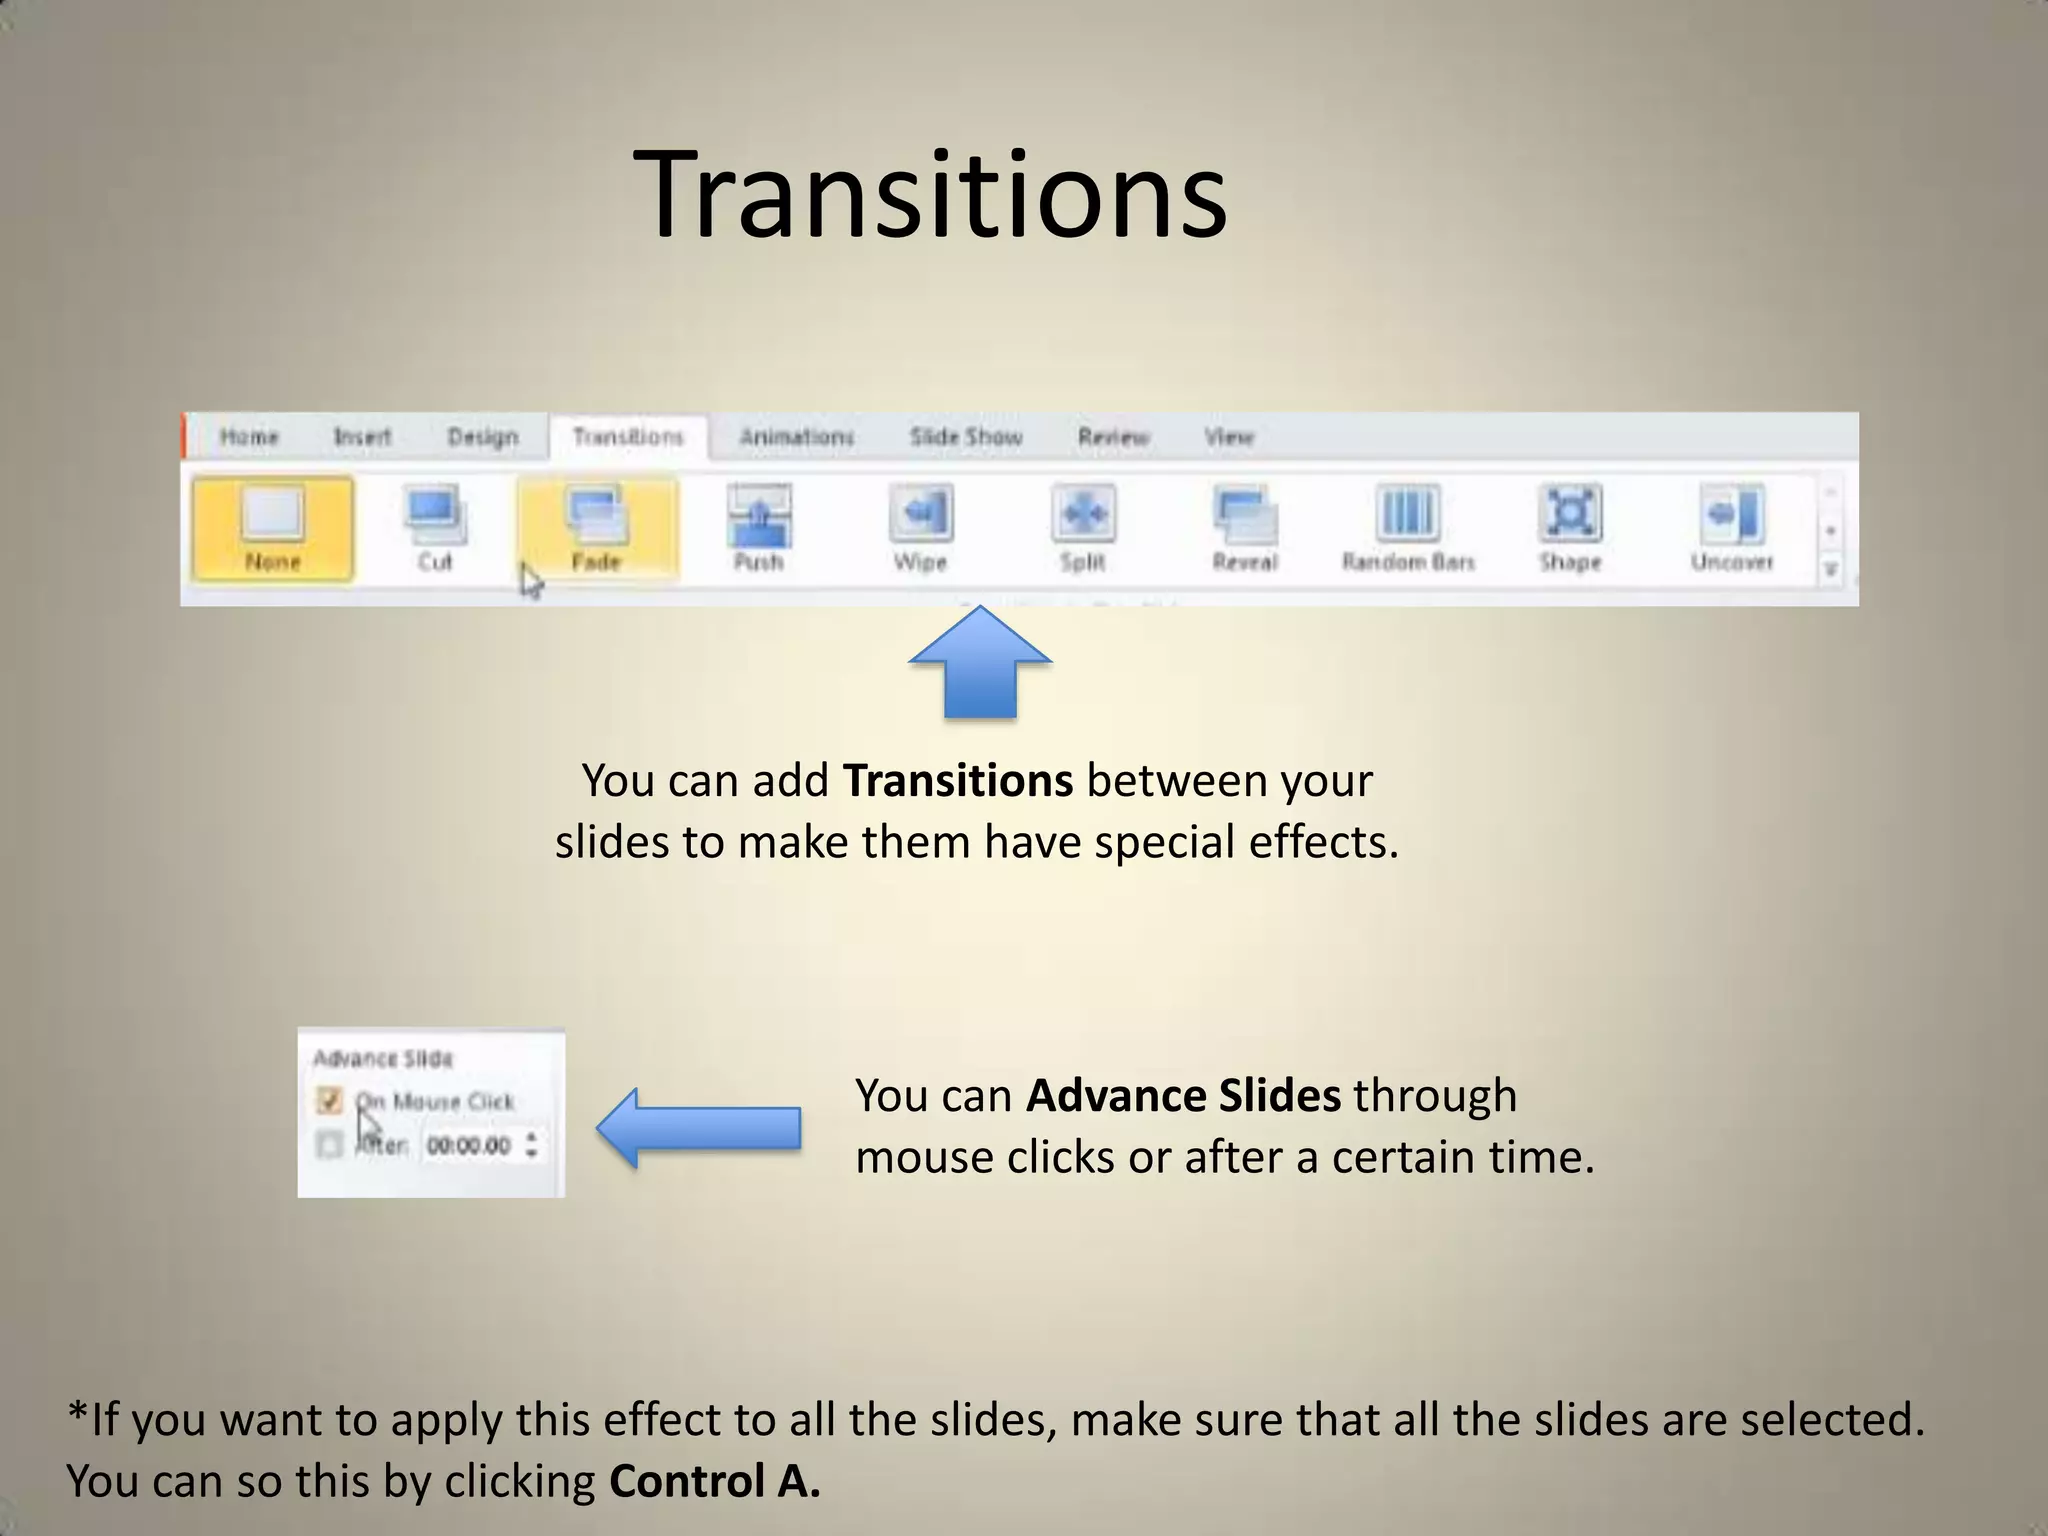
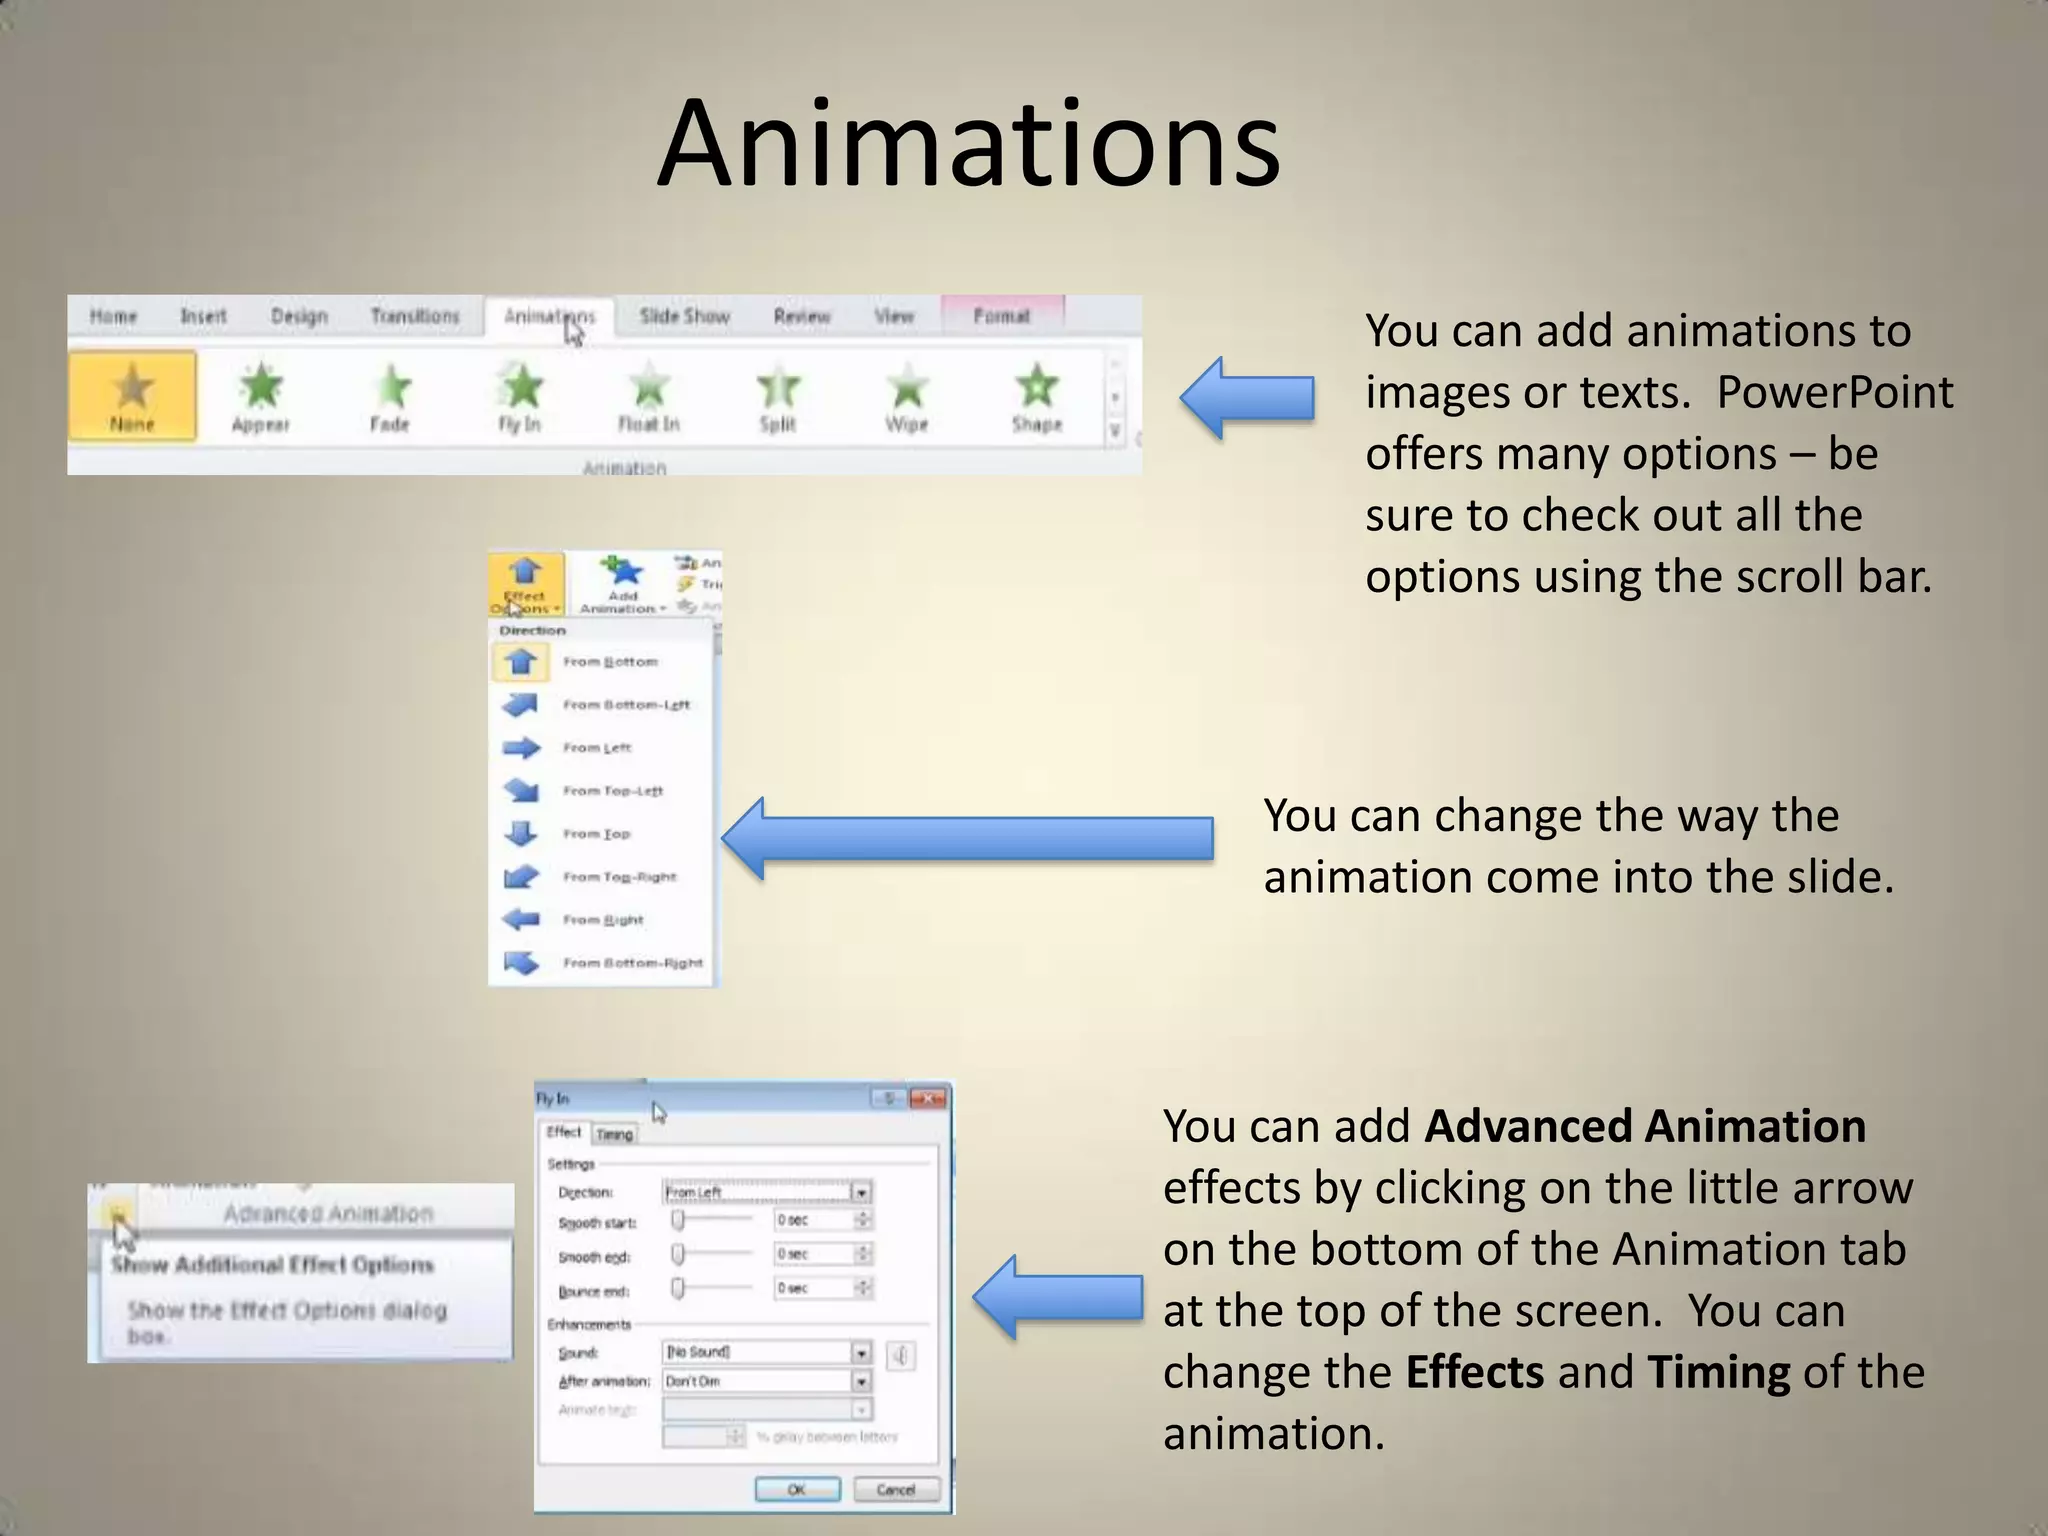
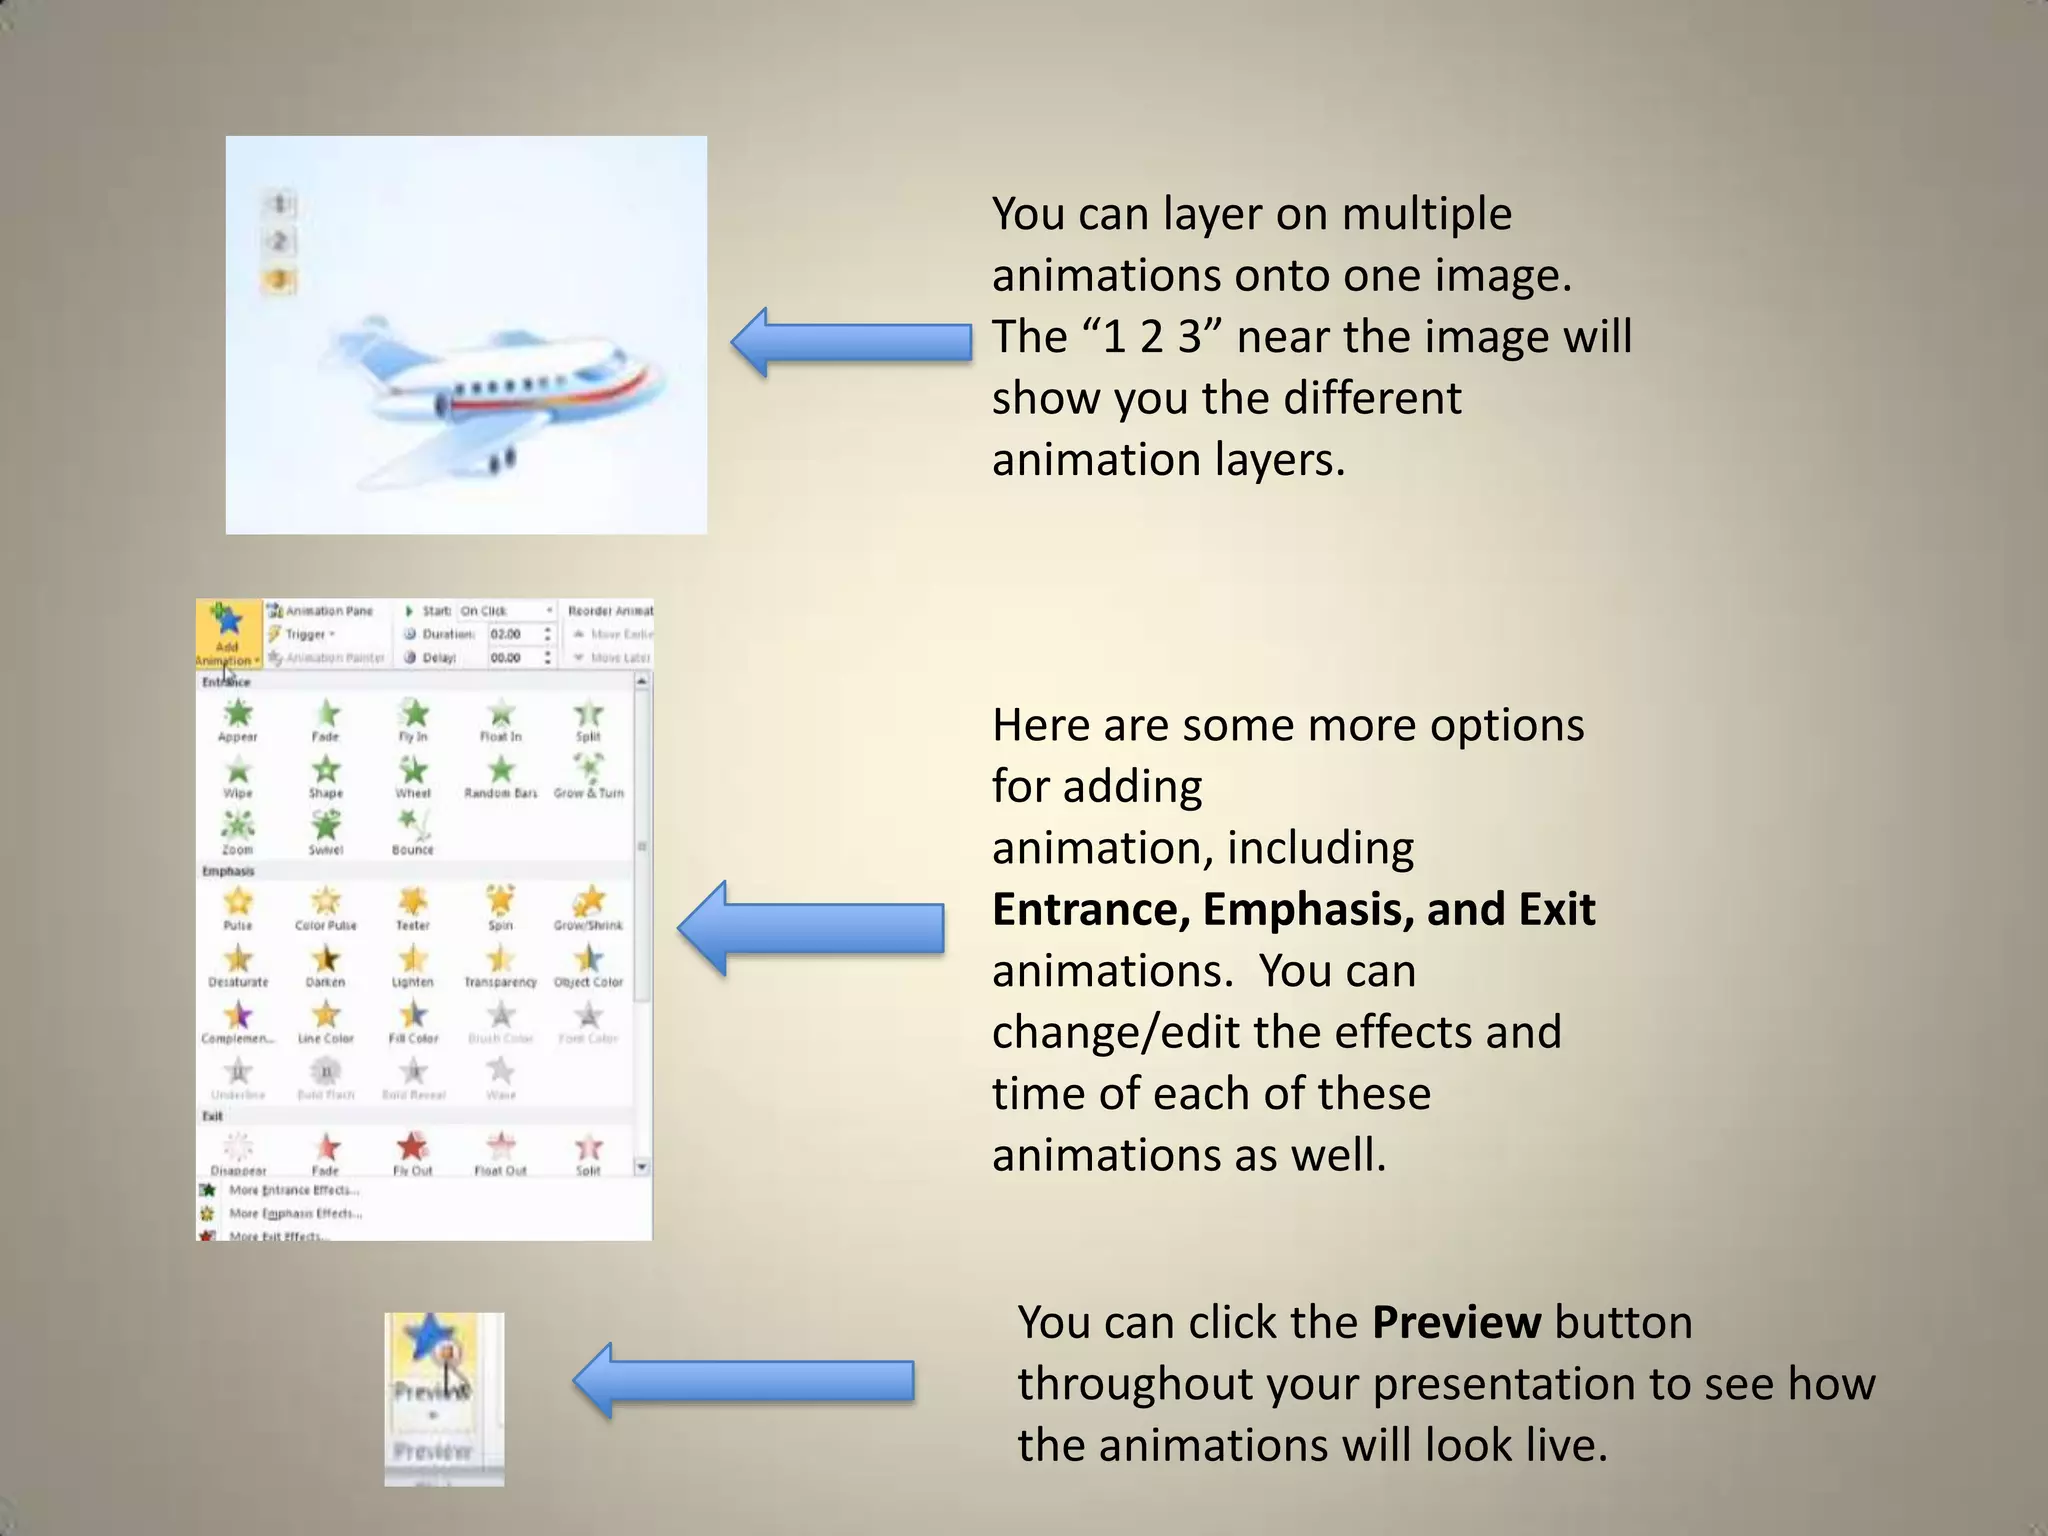
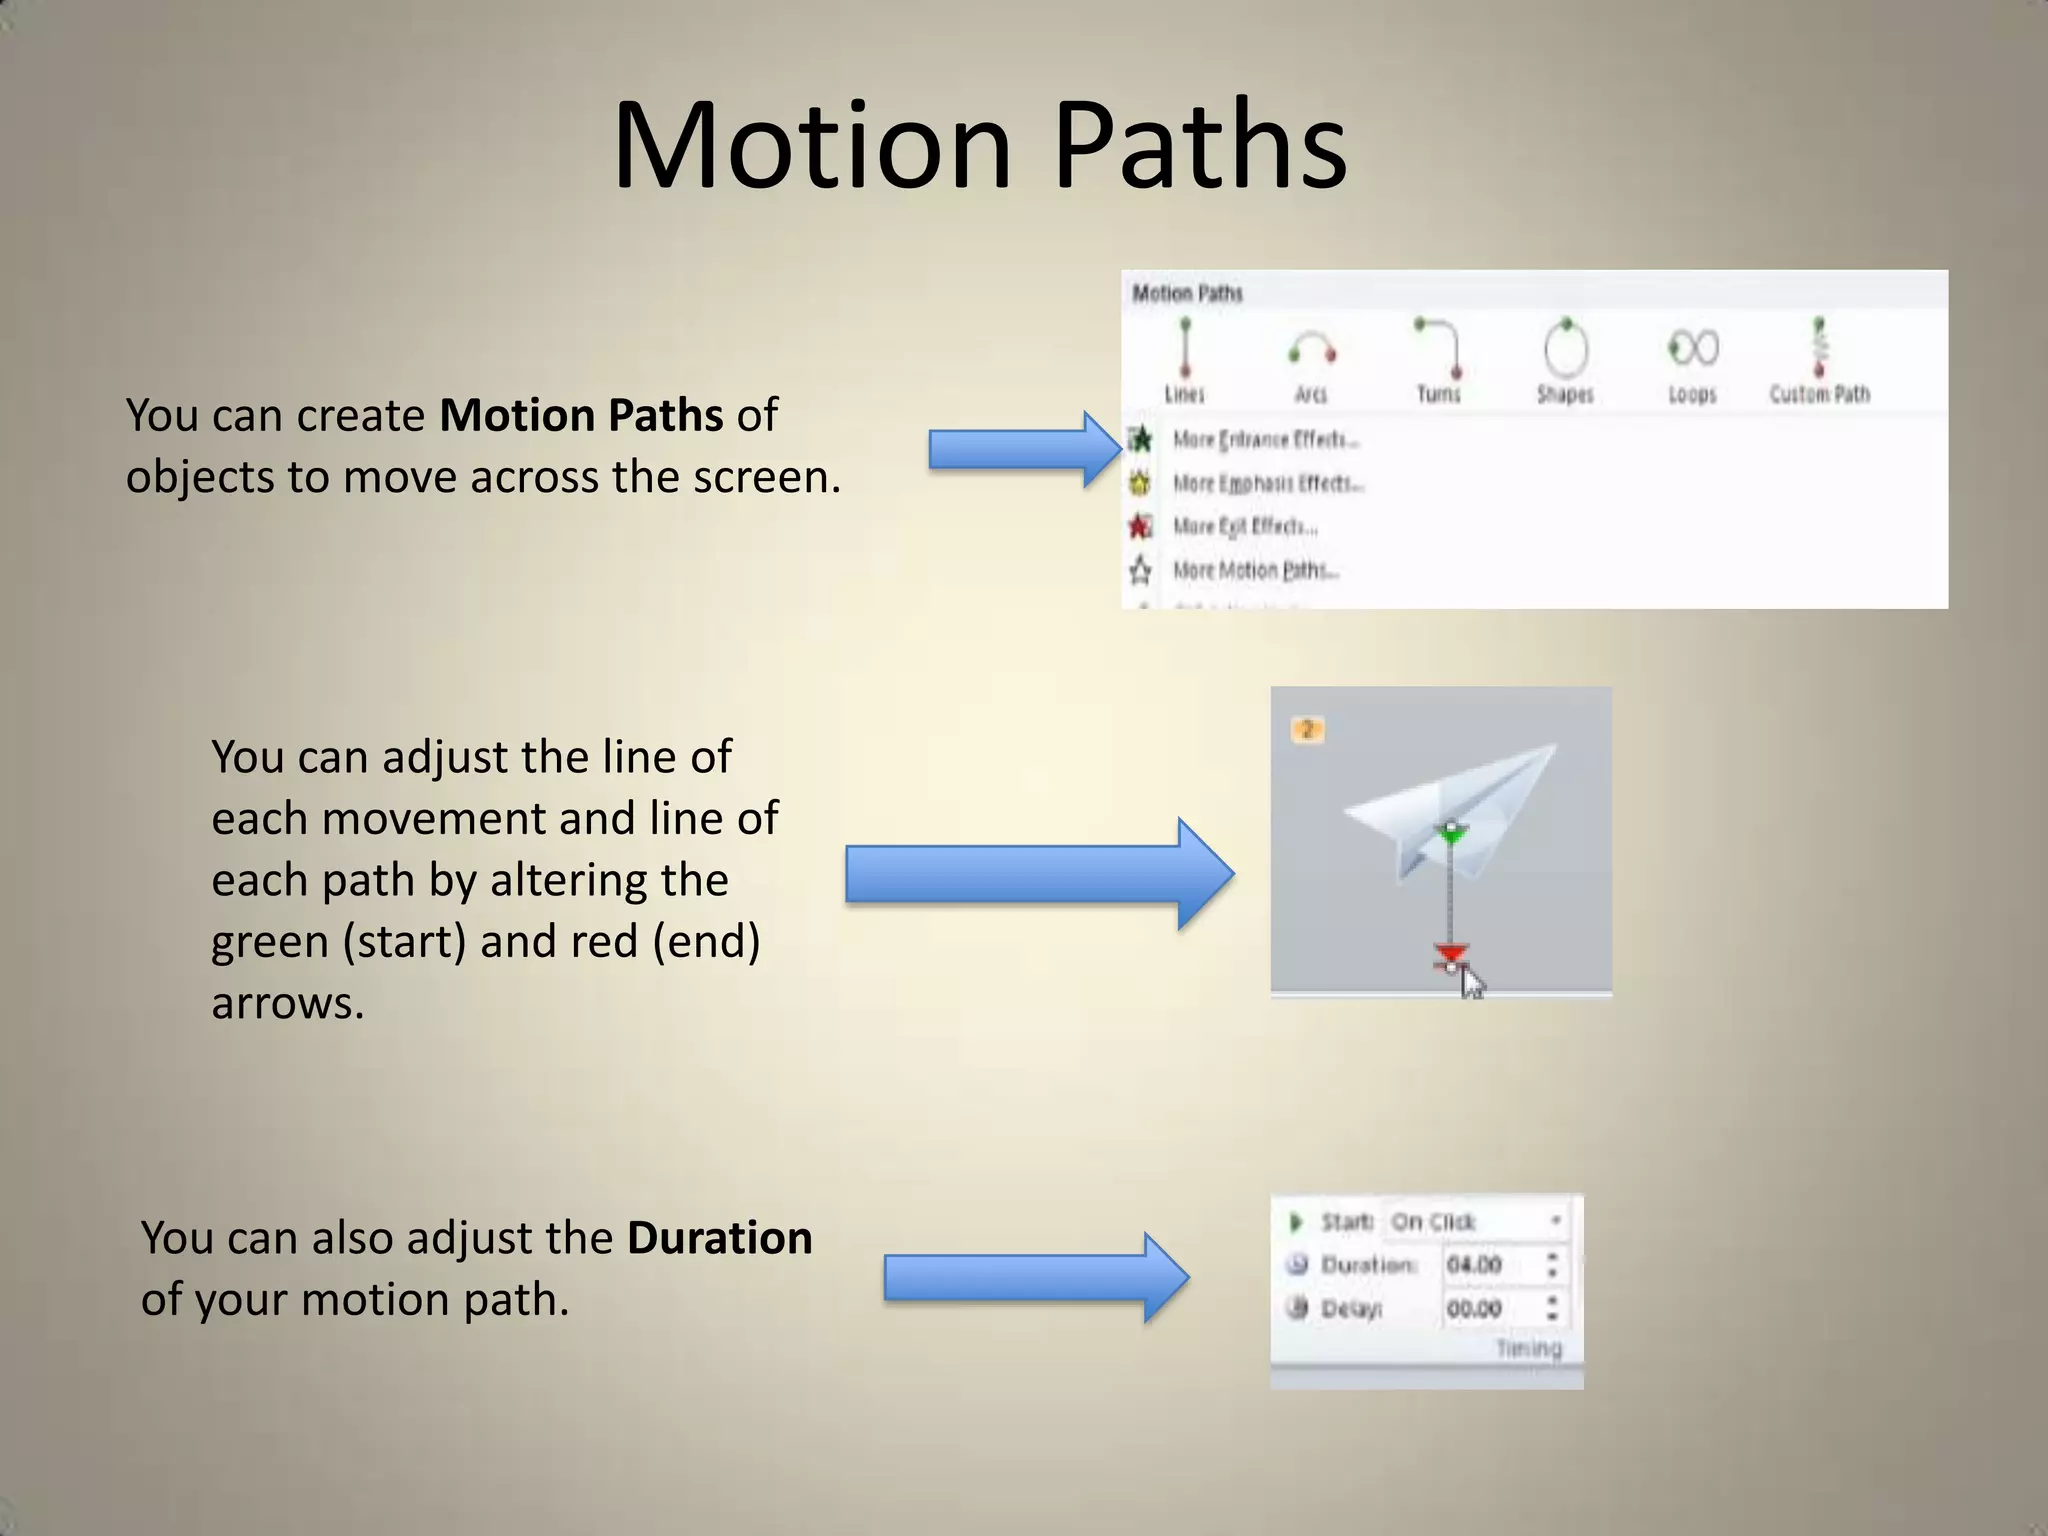
PowerPoint
Adding Video and Sound
By Samantha Harlow
Media & Resource Librarian
High Point University
Tips to Remember
• Practice practice practice
• Know your surroundings
• Be prepared for the worst and have
a back up plan
• Add hyperlink for embedded videos
• Do not put AV materials into
presentation unless it adds to your
presentation
Video
• Insert from a file
• Insert/embed from a website
(YouTube, Vimeo, etc)
• Clip art videos (GIFs)
Insert Video from a File
You can insert from the options
presented in the blank slide.

You can insert from the media
tab at the top of you screen.

Once you insert your clip, you
can adjust the size of the clip
to fit screen or become larger
or smaller.

You can also adjust the
overall style of the video.
Embedding your own video file means that
you do not have to worry about links failing.
The downside to this is it increases the size of
your presentation.
Whatever size video you embed will be added
to the total size of your presentation.

You can also link to a file – this will keep your
presentation smaller and will allow your
presentation to work with older versions of
PowerPoint (2007).
PowerPoint will automatically embed, so the
only reason to link is if you will be presenting
on PowerPoint 2007 or earlier or if you are
having trouble with your presentation crashing
from the embedding of too many large files.

Clicking “Insert” will
embed your video.

Clicking “Link to File”
will link to your video.
If you link files, you will need to carry your video files with you on a external
harddrive or flashdrive when moving to a different location to perform a
presentation. To avoid broken links, it is good to create your links on the
external harddrive or flashdrive from where you will be presenting.

You can go to File – Info to “Edit
Links to Files” (found on right hand
side of screen).

“Update Now” will update
the links in your files.
.mpeg =
Many times videos made on a Mac might need a certain player (codec) to play
on a PC. Make sure that your video works on the computer you are presenting
on before you present. If your video does not work, simply download the
correct codec that might fix the problem.
A Quicktime installation will generally fix many PowerPoint video play
problems.
If there is chance that you might present on PowerPoint
that is 2007 or earlier, it is best that you convert your
digital video to .wmv. The best option is downloading
Windows Media Encoder on a PC and converting the file.
Embedding Streaming Video
• Only works on PowerPoint 2010 PC version
• Make sure your embedded video plays and that you have an
Internet connection before you present
• Have a hyperlink to video in case embedded video goes wrong

On YouTube, go to Share –
Embed. Select “Use old
embed code” option.

In PowerPoint, go to Insert Video. Then click on the “Video
from Web Site” option
Copy and paste your code
into the blank box.

Once the video is inserted, double
click on the video to get it to work.
Once you have your videos inserted, you can edit the
Format and Playback options
Go to Video Tools – Playback or Format.

Playback is where you can set a video to play automatically, play
full screen, hide while not playing, loop until stopped, or rewind
after playing. You can also trim video to fade in and fade out.
Format is where you an edit the look of your video.
Media Play Issues and Problem Solving
Audio
•
•
•
•
•

Insert from a file into a slide
Insert clip art
Record audio into presentation
Inserting soundtrack and music
Record slide show from start to finish
*iTunes files are mp4, which is not an
accepted format for PowerPoint. BUT do not
worry – http://media.io/ is an easy converter
to .wav files.
Recording Using a Microphone

Setting up Microphone:
PC/Windows:
Control Panel – Hardware and Sound – Sound – Manage audio
devices – Recording tab – right click and set as default device
Configure – Set Up Microphone – go through steps
Mac:
System Preferences – Sound – Input
Make sure the correct microphone is reading and connected
Insert Audio to start.

Audio – Record Audio to bring up
your Record Sound box.

Push record to start
recording. You can stop and
continue recording or push
OK to insert into your slide.
Your audio recording will appear in
your slide. Remember about your
audio tools formatting options (same
as video formatting options).
If you want your sound to not play through PowerPoint, but
through an outside source (such as Windows Media Player or
iTunes) you can set your sound as an Action Button.

Go to Insert – Shapes – Action
Buttons (at the bottom).
Shift and drag over screen to
create the button.

When let go of
button, get Action
Settings options.
You can Hyperlink to
Other Files.

*This would mean that you need to bring your sound files with you when performing
your presentation. You will also need to make sure your presentation computer has your
outside audio source (such as iTunes and Windows Media Player).
To change the image of your
sound icon, go to Audio Tools –
Format – Change Picture.
Then navigate to the image you
would like to use.
You can then format this image
the same way you normally would
format images in PowerPoint.

You can also add Artistic
Effects and Picture Styles to
your sound icon.
If you would like to hide the audio icon during your
presentation, click on “Hide During Show” under the Audio
Tools – Playback option. Be sure to change the start time
from “Start: On Click” to “Start: Automatically” to make this
hidden icon play effectively.
Setting Slide Show to Music

Insert – Audio on the first slide of presentation
Navigate to music file (remember the file formats that can be used).
Go to Audio Tools –
Playback
Start – Play across slides
You can also “Hide During
Show”

If you want it to “Loop until
Stopped” click the box.
If you go to your Animation Pane
under Animations tab, you can
make sure that your music
soundtrack is going to play before
your content.
If it is not playing before
content, drag and drop it at the
start of your Animation Pane.
Recording a Presentation

Go to Slide Show – Set Up Slide Show.

Set up your show with the
settings that you desire.
Tips for Recording
• Remember to write out a script and practice before you record.
• Try and eliminate outside noise.
• Make sure your microphone is working before you record a long
presentation.
• If you mess up during your recording, remember that you can re-record a
specific slide later.
• Try and be as natural as possible. Try and not rush slide transitions or
speaking.
To start recording, push
Record Slide Show
Pick your settings
before you record.
The minute you push play, your
recording will start. The Recording
Timing bar will appear on the upper
left hand side of the screen.

You can pause
your presentation
as you go.

This is how long
you have been
presenting total.

This is how long
you have been on
the slide.

This is a repeat button that will
allow you to start over on a slide if
you mess up in the middle.
You can press Control and then click for a laser
pointer that will highlight certain parts of your
presentation.
Be sure to set this up before you begin recording in
“Set Up Show” options.

Once you are done recording, the slide who will appear in on your
screen showing you the time and the recordings for each slide.
Remember that you can Format and Playback the audio in each slide
the same way you can do any audio recording in PowerPoint.
To edit an individual slide after recording, double
click on the slide in the slide show view.
Once you are there, go to Record Slide Show –
Start Recording from Current Slide.

If you would like to delete
narration from a specific
slide, go to Record Slide Show
– Clear and then select what
you want deleted. This is a
good action to perform for
slides that you are using prerecorded audio (such as
interviews).
This will eliminate playback.
Clip Art – Video and Audio
Animated GIFs
Insert – Clip Art. From the
gallery, you can select from 100s of
GIFs.
This is everything that ClipArt
offers, but you can narrow
down your selections based on
the media file type you desire.

The start in the bottom right hand
corner indicates that the Clip Art
is animated. The file will show up
as a WAV file if it is audio.
Equipment to Rent at Smith Library:
First Floor, Media Center
• Audio recorders
• Microphones
• Video cameras:
–
–
–
–
–

Sony Bloggie
Sony Handycam
Canon Vixia
Canon Rebel DSLR
Please check out the media webpage
http://library.highpoint.edu/media/media.html for a full
list of options and hours of check out.
Transitions

You can add Transitions between your
slides to make them have special effects.

You can Advance Slides through
mouse clicks or after a certain time.

*If you want to apply this effect to all the slides, make sure that all the slides are selected.
You can so this by clicking Control A.
Animations
You can add animations to
images or texts. PowerPoint
offers many options – be
sure to check out all the
options using the scroll bar.

You can change the way the
animation come into the slide.

You can add Advanced Animation
effects by clicking on the little arrow
on the bottom of the Animation tab
at the top of the screen. You can
change the Effects and Timing of the
animation.
You can layer on multiple
animations onto one image.
The “1 2 3” near the image will
show you the different
animation layers.

Here are some more options
for adding
animation, including
Entrance, Emphasis, and Exit
animations. You can
change/edit the effects and
time of each of these
animations as well.
You can click the Preview button
throughout your presentation to see how
the animations will look live.
With the Animation Pane, you
can change the effects of each
animation separately.

You can also change the timing of each
animation by changing
start, duration, and delay of the
animation.
Motion Paths
You can create Motion Paths of
objects to move across the screen.

You can adjust the line of
each movement and line of
each path by altering the
green (start) and red (end)
arrows.

You can also adjust the Duration
of your motion path.
Problems?
Microsoft Support
support.microsoft.com
Feel free to contact me at
sharlow@highpoint.edu
336-841-9462.

Also, please check out the Media Webpage.
http://library.highpoint.edu/media/media.html
References

This presentation was used with the help of the
“PowerPoint 2010: Audio and Video in Depth”
with Alicia Katz Pollock from Lynda.com

Powerpoint: Video and Audio

  • 1.
    PowerPoint Adding Video andSound By Samantha Harlow Media & Resource Librarian High Point University
  • 2.
    Tips to Remember •Practice practice practice • Know your surroundings • Be prepared for the worst and have a back up plan • Add hyperlink for embedded videos • Do not put AV materials into presentation unless it adds to your presentation
  • 3.
    Video • Insert froma file • Insert/embed from a website (YouTube, Vimeo, etc) • Clip art videos (GIFs)
  • 4.
    Insert Video froma File You can insert from the options presented in the blank slide. You can insert from the media tab at the top of you screen. Once you insert your clip, you can adjust the size of the clip to fit screen or become larger or smaller. You can also adjust the overall style of the video.
  • 5.
    Embedding your ownvideo file means that you do not have to worry about links failing. The downside to this is it increases the size of your presentation. Whatever size video you embed will be added to the total size of your presentation. You can also link to a file – this will keep your presentation smaller and will allow your presentation to work with older versions of PowerPoint (2007). PowerPoint will automatically embed, so the only reason to link is if you will be presenting on PowerPoint 2007 or earlier or if you are having trouble with your presentation crashing from the embedding of too many large files. Clicking “Insert” will embed your video. Clicking “Link to File” will link to your video.
  • 6.
    If you linkfiles, you will need to carry your video files with you on a external harddrive or flashdrive when moving to a different location to perform a presentation. To avoid broken links, it is good to create your links on the external harddrive or flashdrive from where you will be presenting. You can go to File – Info to “Edit Links to Files” (found on right hand side of screen). “Update Now” will update the links in your files.
  • 7.
  • 8.
    Many times videosmade on a Mac might need a certain player (codec) to play on a PC. Make sure that your video works on the computer you are presenting on before you present. If your video does not work, simply download the correct codec that might fix the problem. A Quicktime installation will generally fix many PowerPoint video play problems. If there is chance that you might present on PowerPoint that is 2007 or earlier, it is best that you convert your digital video to .wmv. The best option is downloading Windows Media Encoder on a PC and converting the file.
  • 9.
    Embedding Streaming Video •Only works on PowerPoint 2010 PC version • Make sure your embedded video plays and that you have an Internet connection before you present • Have a hyperlink to video in case embedded video goes wrong On YouTube, go to Share – Embed. Select “Use old embed code” option. In PowerPoint, go to Insert Video. Then click on the “Video from Web Site” option
  • 10.
    Copy and pasteyour code into the blank box. Once the video is inserted, double click on the video to get it to work.
  • 12.
    Once you haveyour videos inserted, you can edit the Format and Playback options Go to Video Tools – Playback or Format. Playback is where you can set a video to play automatically, play full screen, hide while not playing, loop until stopped, or rewind after playing. You can also trim video to fade in and fade out. Format is where you an edit the look of your video.
  • 13.
    Media Play Issuesand Problem Solving
  • 15.
    Audio • • • • • Insert from afile into a slide Insert clip art Record audio into presentation Inserting soundtrack and music Record slide show from start to finish
  • 16.
    *iTunes files aremp4, which is not an accepted format for PowerPoint. BUT do not worry – http://media.io/ is an easy converter to .wav files.
  • 18.
    Recording Using aMicrophone Setting up Microphone: PC/Windows: Control Panel – Hardware and Sound – Sound – Manage audio devices – Recording tab – right click and set as default device Configure – Set Up Microphone – go through steps Mac: System Preferences – Sound – Input Make sure the correct microphone is reading and connected
  • 19.
    Insert Audio tostart. Audio – Record Audio to bring up your Record Sound box. Push record to start recording. You can stop and continue recording or push OK to insert into your slide. Your audio recording will appear in your slide. Remember about your audio tools formatting options (same as video formatting options).
  • 20.
    If you wantyour sound to not play through PowerPoint, but through an outside source (such as Windows Media Player or iTunes) you can set your sound as an Action Button. Go to Insert – Shapes – Action Buttons (at the bottom). Shift and drag over screen to create the button. When let go of button, get Action Settings options. You can Hyperlink to Other Files. *This would mean that you need to bring your sound files with you when performing your presentation. You will also need to make sure your presentation computer has your outside audio source (such as iTunes and Windows Media Player).
  • 21.
    To change theimage of your sound icon, go to Audio Tools – Format – Change Picture. Then navigate to the image you would like to use. You can then format this image the same way you normally would format images in PowerPoint. You can also add Artistic Effects and Picture Styles to your sound icon.
  • 22.
    If you wouldlike to hide the audio icon during your presentation, click on “Hide During Show” under the Audio Tools – Playback option. Be sure to change the start time from “Start: On Click” to “Start: Automatically” to make this hidden icon play effectively.
  • 23.
    Setting Slide Showto Music Insert – Audio on the first slide of presentation Navigate to music file (remember the file formats that can be used). Go to Audio Tools – Playback Start – Play across slides You can also “Hide During Show” If you want it to “Loop until Stopped” click the box.
  • 24.
    If you goto your Animation Pane under Animations tab, you can make sure that your music soundtrack is going to play before your content. If it is not playing before content, drag and drop it at the start of your Animation Pane.
  • 25.
    Recording a Presentation Goto Slide Show – Set Up Slide Show. Set up your show with the settings that you desire.
  • 26.
    Tips for Recording •Remember to write out a script and practice before you record. • Try and eliminate outside noise. • Make sure your microphone is working before you record a long presentation. • If you mess up during your recording, remember that you can re-record a specific slide later. • Try and be as natural as possible. Try and not rush slide transitions or speaking. To start recording, push Record Slide Show Pick your settings before you record.
  • 27.
    The minute youpush play, your recording will start. The Recording Timing bar will appear on the upper left hand side of the screen. You can pause your presentation as you go. This is how long you have been presenting total. This is how long you have been on the slide. This is a repeat button that will allow you to start over on a slide if you mess up in the middle.
  • 28.
    You can pressControl and then click for a laser pointer that will highlight certain parts of your presentation. Be sure to set this up before you begin recording in “Set Up Show” options. Once you are done recording, the slide who will appear in on your screen showing you the time and the recordings for each slide. Remember that you can Format and Playback the audio in each slide the same way you can do any audio recording in PowerPoint.
  • 29.
    To edit anindividual slide after recording, double click on the slide in the slide show view. Once you are there, go to Record Slide Show – Start Recording from Current Slide. If you would like to delete narration from a specific slide, go to Record Slide Show – Clear and then select what you want deleted. This is a good action to perform for slides that you are using prerecorded audio (such as interviews). This will eliminate playback.
  • 30.
    Clip Art –Video and Audio Animated GIFs Insert – Clip Art. From the gallery, you can select from 100s of GIFs. This is everything that ClipArt offers, but you can narrow down your selections based on the media file type you desire. The start in the bottom right hand corner indicates that the Clip Art is animated. The file will show up as a WAV file if it is audio.
  • 31.
    Equipment to Rentat Smith Library: First Floor, Media Center • Audio recorders • Microphones • Video cameras: – – – – – Sony Bloggie Sony Handycam Canon Vixia Canon Rebel DSLR Please check out the media webpage http://library.highpoint.edu/media/media.html for a full list of options and hours of check out.
  • 32.
    Transitions You can addTransitions between your slides to make them have special effects. You can Advance Slides through mouse clicks or after a certain time. *If you want to apply this effect to all the slides, make sure that all the slides are selected. You can so this by clicking Control A.
  • 33.
    Animations You can addanimations to images or texts. PowerPoint offers many options – be sure to check out all the options using the scroll bar. You can change the way the animation come into the slide. You can add Advanced Animation effects by clicking on the little arrow on the bottom of the Animation tab at the top of the screen. You can change the Effects and Timing of the animation.
  • 34.
    You can layeron multiple animations onto one image. The “1 2 3” near the image will show you the different animation layers. Here are some more options for adding animation, including Entrance, Emphasis, and Exit animations. You can change/edit the effects and time of each of these animations as well. You can click the Preview button throughout your presentation to see how the animations will look live.
  • 35.
    With the AnimationPane, you can change the effects of each animation separately. You can also change the timing of each animation by changing start, duration, and delay of the animation.
  • 36.
    Motion Paths You cancreate Motion Paths of objects to move across the screen. You can adjust the line of each movement and line of each path by altering the green (start) and red (end) arrows. You can also adjust the Duration of your motion path.
  • 37.
    Problems? Microsoft Support support.microsoft.com Feel freeto contact me at sharlow@highpoint.edu 336-841-9462. Also, please check out the Media Webpage. http://library.highpoint.edu/media/media.html
  • 38.
    References This presentation wasused with the help of the “PowerPoint 2010: Audio and Video in Depth” with Alicia Katz Pollock from Lynda.com