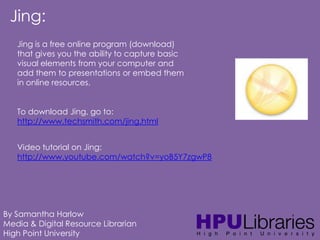
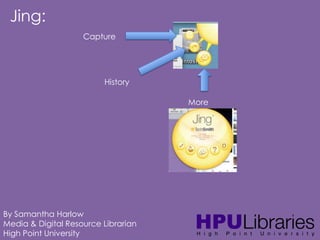
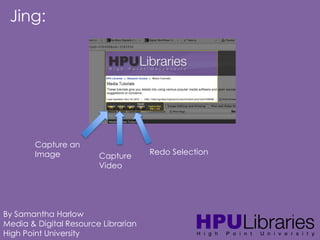
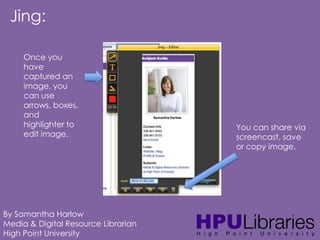
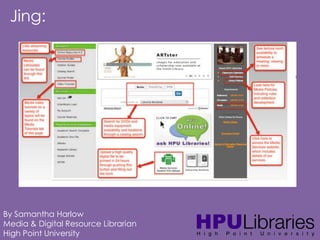
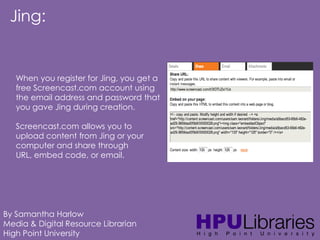
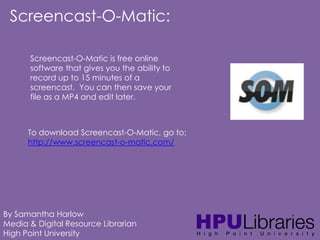
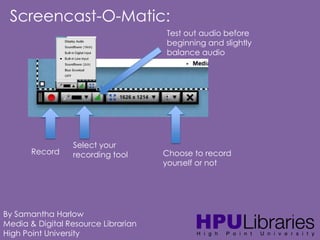
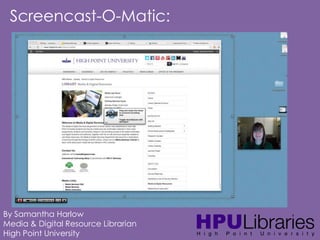
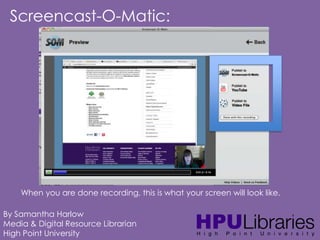
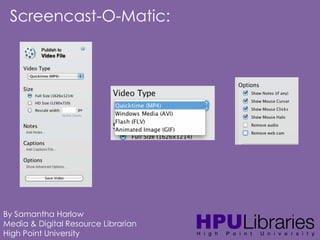
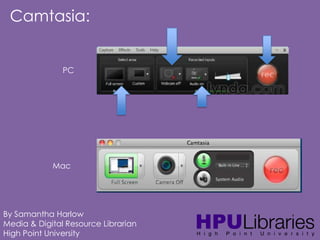
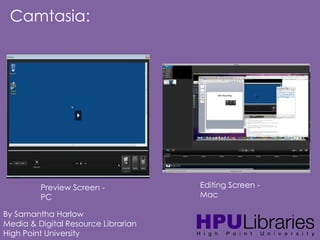
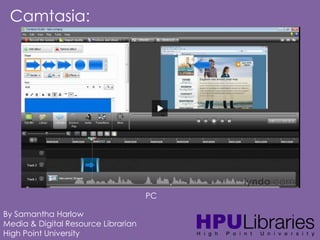
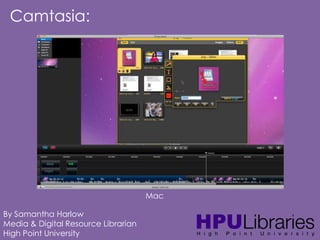
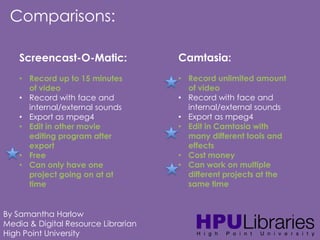
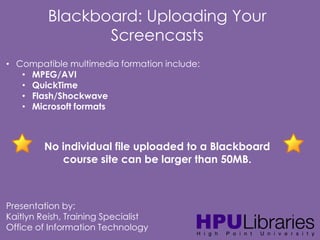
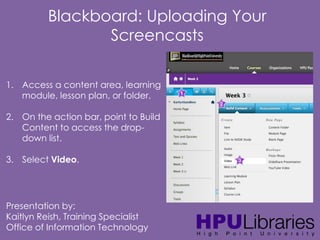
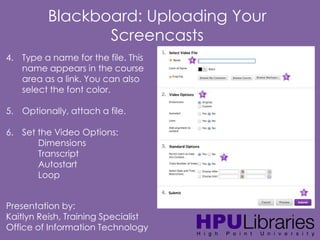
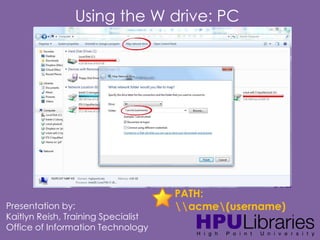
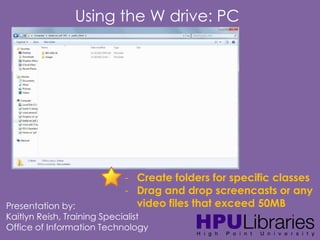
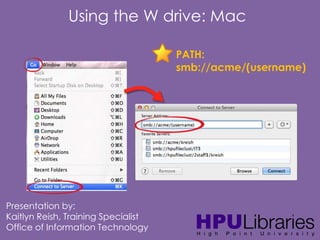
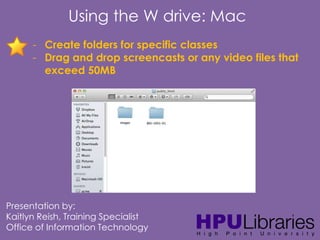
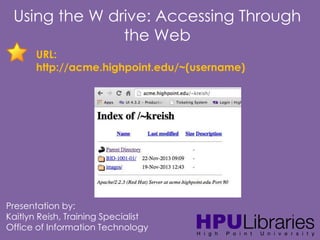
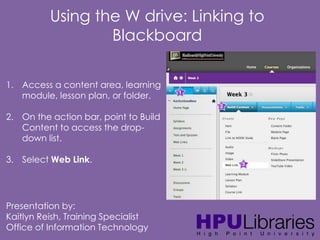
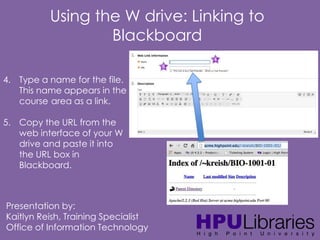
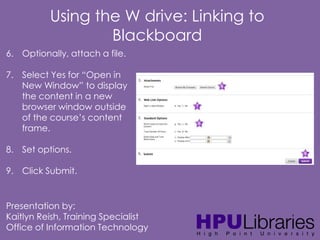
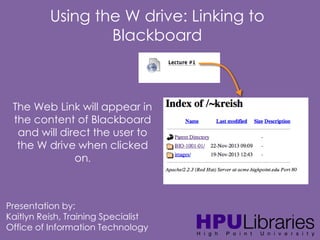
Flipped Classroom Workshop:
Creating your own Content

Image taken from http://etceteraward.blogspot.com/

By Samantha Harlow & Kaitlyn Reish
High Point University
Creating your own Content:
• Document tutorials or presentations with
instructions and visuals
• Video tutorials or a computer program
• Lecture of yourself talking and/or
recording over a presentation
• Combining lectures, tutorials, and videos
into one lecture
• More?
By Samantha Harlow
Media & Digital Resource Librarian
High Point University
Jing:
Jing is a free online program (download)
that gives you the ability to capture basic
visual elements from your computer and
add them to presentations or embed them
in online resources.

To download Jing, go to:
http://www.techsmith.com/jing.html
Video tutorial on Jing:
http://www.youtube.com/watch?v=yoB5Y7zgwP8

By Samantha Harlow
Media & Digital Resource Librarian
High Point University
Jing:
Capture

History
More

By Samantha Harlow
Media & Digital Resource Librarian
High Point University
Jing:

Capture an
Image

Capture
Video

By Samantha Harlow
Media & Digital Resource Librarian
High Point University

Redo Selection
Jing:
Once you
have
captured an
image, you
can use
arrows, boxes,
and
highlighter to
edit image.

By Samantha Harlow
Media & Digital Resource Librarian
High Point University

You can share via
screencast, save
or copy image.
Jing:

By Samantha Harlow
Media & Digital Resource Librarian
High Point University
Jing:

When you register for Jing, you get a
free Screencast.com account using
the email address and password that
you gave Jing during creation.
Screencast.com allows you to
upload content from Jing or your
computer and share through
URL, embed code, or email.

By Samantha Harlow
Media & Digital Resource Librarian
High Point University
Screencast-O-Matic:
Screencast-O-Matic is free online
software that gives you the ability to
record up to 15 minutes of a
screencast. You can then save your
file as a MP4 and edit later.

To download Screencast-O-Matic, go to:
http://www.screencast-o-matic.com/

By Samantha Harlow
Media & Digital Resource Librarian
High Point University
Screencast-O-Matic:
Test out audio before
beginning and slightly
balance audio

Record

Select your
recording tool

By Samantha Harlow
Media & Digital Resource Librarian
High Point University

Choose to record
yourself or not
Screencast-O-Matic:

By Samantha Harlow
Media & Digital Resource Librarian
High Point University
Screencast-O-Matic:

When you are done recording, this is what your screen will look like.
By Samantha Harlow
Media & Digital Resource Librarian
High Point University
Screencast-O-Matic:

By Samantha Harlow
Media & Digital Resource Librarian
High Point University
Camtasia:
Camtasia allows you create more
professional screencast videos by
letting you edit your footage
when you are done.
To get Camtasia on a work
computer, contact HPU IT through
the ticket system through
Blackboard.
Media Services has extensive Camtasia tutorial
on the Media Tutorials guide (under Internet and
Screen Capture):
http://guides.highpoint.edu/content.php?pid=43
6406&sid=3571563
By Samantha Harlow
Media & Digital Resource Librarian
High Point University
Camtasia:

PC

Mac

By Samantha Harlow
Media & Digital Resource Librarian
High Point University
Camtasia:

Preview Screen PC
By Samantha Harlow
Media & Digital Resource Librarian
High Point University

Editing Screen Mac
Camtasia:

PC
By Samantha Harlow
Media & Digital Resource Librarian
High Point University
Camtasia:

Mac
By Samantha Harlow
Media & Digital Resource Librarian
High Point University
Camtasia:
What can you do with Camtasia?
• Add effects such as text, arrows, highlighting
items, images, and more
• Cut out unwanted sections of tutorials
• Enhance audio and add more audio (voiceover
option)
• Record videos from YouTube to edit (but still have
to follow copyright and fair use rules)

By Samantha Harlow
Media & Digital Resource Librarian
High Point University
Comparisons:
Screencast-O-Matic:

Camtasia:

• Record up to 15 minutes
of video
• Record with face and
internal/external sounds
• Export as mpeg4
• Edit in other movie
editing program after
export
• Free
• Can only have one
project going on at at
time

• Record unlimited amount
of video
• Record with face and
internal/external sounds
• Export as mpeg4
• Edit in Camtasia with
many different tools and
effects
• Cost money
• Can work on multiple
different projects at the
same time

By Samantha Harlow
Media & Digital Resource Librarian
High Point University
YouTube:
Since Blackboard has a limited amount of
space you can use for uploading videos, you
can upload your work to YouTube as a public
or private link (depending on how many
people you want seeing your footage).
Here is a video on Uploading Videos to YouTube:
http://www.youtube.com/watch?v=c-R9n261GJM
Kaitlyn is also going to talk about using the
W drive as an option.

By Samantha Harlow
Media & Digital Resource Librarian
High Point University
Blackboard: Uploading Screencasts
and Other Options

Presentation by:
Kaitlyn Reish, IT Training Specialist
and
head of HPU Blackboard training
Blackboard Video Everywhere:
Another Personal Capture Function
• Video Everywhere is a feature of the Content Editor Building Block. Users can
record a video and upload it directly to Blackboard. The feature provides the
ability for instructors and students to:
• Record a video on the fly using a webcam
• Embed the video seamlessly in course materials, interactions, and
feedback through the content editor.
• Reuse previously recorded videos by choosing from one’s own “library” of
videos.
• The videos are created and managed through an integration
with YouTube. Users need to have a Google account, which is free.

Presentation by:
Kaitlyn Reish, Training Specialist
Office of Information Technology
Blackboard Video Everywhere:
Another Personal Capture Function
Blackboard: Uploading Your
Screencasts
• Compatible multimedia formation include:
• MPEG/AVI
• QuickTime
• Flash/Shockwave
• Microsoft formats

No individual file uploaded to a Blackboard
course site can be larger than 50MB.

Presentation by:
Kaitlyn Reish, Training Specialist
Office of Information Technology
Blackboard: Uploading Your
Screencasts
1. Access a content area, learning
module, lesson plan, or folder.
2. On the action bar, point to Build
Content to access the dropdown list.
3. Select Video.

Presentation by:
Kaitlyn Reish, Training Specialist
Office of Information Technology
Blackboard: Uploading Your
Screencasts
4. Type a name for the file. This
name appears in the course
area as a link. You can also
select the font color.
5. Optionally, attach a file.
6. Set the Video Options:
Dimensions
Transcript
Autostart
Loop
Presentation by:
Kaitlyn Reish, Training Specialist
Office of Information Technology
Blackboard: Uploading Your
Screencasts
7. Select Options for the item.
- Select Yes to Permit Users to
View this Content.
- Select Yes/No to Track Number
of Views.
- For Enter Date and Time
Restrictions, you can set
items to display on a specific
date and time and to stop
displaying on a specific date
and time.

8. Click Submit
Presentation by:
Kaitlyn Reish, Training Specialist
Office of Information Technology
Using the W drive: PC

Presentation by:
Kaitlyn Reish, Training Specialist
Office of Information Technology

PATH:
acme(username)
Using the W drive: PC

- Create folders for specific classes
- Drag and drop screencasts or any
video files that exceed 50MB

Presentation by:
Kaitlyn Reish, Training Specialist
Office of Information Technology
Using the W drive: Mac
PATH:
smb://acme/(username)

Presentation by:
Kaitlyn Reish, Training Specialist
Office of Information Technology
Using the W drive: Mac
- Create folders for specific classes
- Drag and drop screencasts or any video files that
exceed 50MB

Presentation by:
Kaitlyn Reish, Training Specialist
Office of Information Technology
Using the W drive: Accessing Through
the Web
URL:
http://acme.highpoint.edu/~(username)

Presentation by:
Kaitlyn Reish, Training Specialist
Office of Information Technology
Using the W drive: Linking to
Blackboard
1. Access a content area, learning
module, lesson plan, or folder.
2. On the action bar, point to Build
Content to access the dropdown list.
3. Select Web Link.

Presentation by:
Kaitlyn Reish, Training Specialist
Office of Information Technology
Using the W drive: Linking to
Blackboard
4. Type a name for the file.
This name appears in the
course area as a link.
5. Copy the URL from the
web interface of your W
drive and paste it into
the URL box in
Blackboard.

Presentation by:
Kaitlyn Reish, Training Specialist
Office of Information Technology
Using the W drive: Linking to
Blackboard
6. Optionally, attach a file.
7. Select Yes for “Open in
New Window” to display
the content in a new
browser window outside
of the course’s content
frame.
8. Set options.

9. Click Submit.

Presentation by:
Kaitlyn Reish, Training Specialist
Office of Information Technology
Using the W drive: Linking to
Blackboard

The Web Link will appear in
the content of Blackboard
and will direct the user to
the W drive when clicked
on.

Presentation by:
Kaitlyn Reish, Training Specialist
Office of Information Technology
Camtasia:
Questions?
Please contact either:
Samantha Harlow, Media & Digital Resource
Librarian
sharlow@highpoint.edu
Or
Kaitlyn Reish, IT Training Specialist
Kaitlyn Reish
kreish@highpoint.edu

HPU Flipped Classroom: Creating Your Own Content

  • 1.
    Flipped Classroom Workshop: Creatingyour own Content Image taken from http://etceteraward.blogspot.com/ By Samantha Harlow & Kaitlyn Reish High Point University
  • 2.
    Creating your ownContent: • Document tutorials or presentations with instructions and visuals • Video tutorials or a computer program • Lecture of yourself talking and/or recording over a presentation • Combining lectures, tutorials, and videos into one lecture • More? By Samantha Harlow Media & Digital Resource Librarian High Point University
  • 3.
    Jing: Jing is afree online program (download) that gives you the ability to capture basic visual elements from your computer and add them to presentations or embed them in online resources. To download Jing, go to: http://www.techsmith.com/jing.html Video tutorial on Jing: http://www.youtube.com/watch?v=yoB5Y7zgwP8 By Samantha Harlow Media & Digital Resource Librarian High Point University
  • 4.
    Jing: Capture History More By Samantha Harlow Media& Digital Resource Librarian High Point University
  • 5.
    Jing: Capture an Image Capture Video By SamanthaHarlow Media & Digital Resource Librarian High Point University Redo Selection
  • 6.
    Jing: Once you have captured an image,you can use arrows, boxes, and highlighter to edit image. By Samantha Harlow Media & Digital Resource Librarian High Point University You can share via screencast, save or copy image.
  • 7.
    Jing: By Samantha Harlow Media& Digital Resource Librarian High Point University
  • 8.
    Jing: When you registerfor Jing, you get a free Screencast.com account using the email address and password that you gave Jing during creation. Screencast.com allows you to upload content from Jing or your computer and share through URL, embed code, or email. By Samantha Harlow Media & Digital Resource Librarian High Point University
  • 9.
    Screencast-O-Matic: Screencast-O-Matic is freeonline software that gives you the ability to record up to 15 minutes of a screencast. You can then save your file as a MP4 and edit later. To download Screencast-O-Matic, go to: http://www.screencast-o-matic.com/ By Samantha Harlow Media & Digital Resource Librarian High Point University
  • 10.
    Screencast-O-Matic: Test out audiobefore beginning and slightly balance audio Record Select your recording tool By Samantha Harlow Media & Digital Resource Librarian High Point University Choose to record yourself or not
  • 11.
    Screencast-O-Matic: By Samantha Harlow Media& Digital Resource Librarian High Point University
  • 12.
    Screencast-O-Matic: When you aredone recording, this is what your screen will look like. By Samantha Harlow Media & Digital Resource Librarian High Point University
  • 13.
    Screencast-O-Matic: By Samantha Harlow Media& Digital Resource Librarian High Point University
  • 14.
    Camtasia: Camtasia allows youcreate more professional screencast videos by letting you edit your footage when you are done. To get Camtasia on a work computer, contact HPU IT through the ticket system through Blackboard. Media Services has extensive Camtasia tutorial on the Media Tutorials guide (under Internet and Screen Capture): http://guides.highpoint.edu/content.php?pid=43 6406&sid=3571563 By Samantha Harlow Media & Digital Resource Librarian High Point University
  • 15.
    Camtasia: PC Mac By Samantha Harlow Media& Digital Resource Librarian High Point University
  • 16.
    Camtasia: Preview Screen PC BySamantha Harlow Media & Digital Resource Librarian High Point University Editing Screen Mac
  • 17.
    Camtasia: PC By Samantha Harlow Media& Digital Resource Librarian High Point University
  • 18.
    Camtasia: Mac By Samantha Harlow Media& Digital Resource Librarian High Point University
  • 19.
    Camtasia: What can youdo with Camtasia? • Add effects such as text, arrows, highlighting items, images, and more • Cut out unwanted sections of tutorials • Enhance audio and add more audio (voiceover option) • Record videos from YouTube to edit (but still have to follow copyright and fair use rules) By Samantha Harlow Media & Digital Resource Librarian High Point University
  • 20.
    Comparisons: Screencast-O-Matic: Camtasia: • Record upto 15 minutes of video • Record with face and internal/external sounds • Export as mpeg4 • Edit in other movie editing program after export • Free • Can only have one project going on at at time • Record unlimited amount of video • Record with face and internal/external sounds • Export as mpeg4 • Edit in Camtasia with many different tools and effects • Cost money • Can work on multiple different projects at the same time By Samantha Harlow Media & Digital Resource Librarian High Point University
  • 21.
    YouTube: Since Blackboard hasa limited amount of space you can use for uploading videos, you can upload your work to YouTube as a public or private link (depending on how many people you want seeing your footage). Here is a video on Uploading Videos to YouTube: http://www.youtube.com/watch?v=c-R9n261GJM Kaitlyn is also going to talk about using the W drive as an option. By Samantha Harlow Media & Digital Resource Librarian High Point University
  • 22.
    Blackboard: Uploading Screencasts andOther Options Presentation by: Kaitlyn Reish, IT Training Specialist and head of HPU Blackboard training
  • 23.
    Blackboard Video Everywhere: AnotherPersonal Capture Function • Video Everywhere is a feature of the Content Editor Building Block. Users can record a video and upload it directly to Blackboard. The feature provides the ability for instructors and students to: • Record a video on the fly using a webcam • Embed the video seamlessly in course materials, interactions, and feedback through the content editor. • Reuse previously recorded videos by choosing from one’s own “library” of videos. • The videos are created and managed through an integration with YouTube. Users need to have a Google account, which is free. Presentation by: Kaitlyn Reish, Training Specialist Office of Information Technology
  • 24.
    Blackboard Video Everywhere: AnotherPersonal Capture Function
  • 25.
    Blackboard: Uploading Your Screencasts •Compatible multimedia formation include: • MPEG/AVI • QuickTime • Flash/Shockwave • Microsoft formats No individual file uploaded to a Blackboard course site can be larger than 50MB. Presentation by: Kaitlyn Reish, Training Specialist Office of Information Technology
  • 26.
    Blackboard: Uploading Your Screencasts 1.Access a content area, learning module, lesson plan, or folder. 2. On the action bar, point to Build Content to access the dropdown list. 3. Select Video. Presentation by: Kaitlyn Reish, Training Specialist Office of Information Technology
  • 27.
    Blackboard: Uploading Your Screencasts 4.Type a name for the file. This name appears in the course area as a link. You can also select the font color. 5. Optionally, attach a file. 6. Set the Video Options: Dimensions Transcript Autostart Loop Presentation by: Kaitlyn Reish, Training Specialist Office of Information Technology
  • 28.
    Blackboard: Uploading Your Screencasts 7.Select Options for the item. - Select Yes to Permit Users to View this Content. - Select Yes/No to Track Number of Views. - For Enter Date and Time Restrictions, you can set items to display on a specific date and time and to stop displaying on a specific date and time. 8. Click Submit Presentation by: Kaitlyn Reish, Training Specialist Office of Information Technology
  • 29.
    Using the Wdrive: PC Presentation by: Kaitlyn Reish, Training Specialist Office of Information Technology PATH: acme(username)
  • 30.
    Using the Wdrive: PC - Create folders for specific classes - Drag and drop screencasts or any video files that exceed 50MB Presentation by: Kaitlyn Reish, Training Specialist Office of Information Technology
  • 31.
    Using the Wdrive: Mac PATH: smb://acme/(username) Presentation by: Kaitlyn Reish, Training Specialist Office of Information Technology
  • 32.
    Using the Wdrive: Mac - Create folders for specific classes - Drag and drop screencasts or any video files that exceed 50MB Presentation by: Kaitlyn Reish, Training Specialist Office of Information Technology
  • 33.
    Using the Wdrive: Accessing Through the Web URL: http://acme.highpoint.edu/~(username) Presentation by: Kaitlyn Reish, Training Specialist Office of Information Technology
  • 34.
    Using the Wdrive: Linking to Blackboard 1. Access a content area, learning module, lesson plan, or folder. 2. On the action bar, point to Build Content to access the dropdown list. 3. Select Web Link. Presentation by: Kaitlyn Reish, Training Specialist Office of Information Technology
  • 35.
    Using the Wdrive: Linking to Blackboard 4. Type a name for the file. This name appears in the course area as a link. 5. Copy the URL from the web interface of your W drive and paste it into the URL box in Blackboard. Presentation by: Kaitlyn Reish, Training Specialist Office of Information Technology
  • 36.
    Using the Wdrive: Linking to Blackboard 6. Optionally, attach a file. 7. Select Yes for “Open in New Window” to display the content in a new browser window outside of the course’s content frame. 8. Set options. 9. Click Submit. Presentation by: Kaitlyn Reish, Training Specialist Office of Information Technology
  • 37.
    Using the Wdrive: Linking to Blackboard The Web Link will appear in the content of Blackboard and will direct the user to the W drive when clicked on. Presentation by: Kaitlyn Reish, Training Specialist Office of Information Technology
  • 38.
    Camtasia: Questions? Please contact either: SamanthaHarlow, Media & Digital Resource Librarian sharlow@highpoint.edu Or Kaitlyn Reish, IT Training Specialist Kaitlyn Reish kreish@highpoint.edu