This iMovie tutorial document provides instructions for getting started with iMovie, including how to import videos and photos, edit clips, add titles and effects, and export or share the finished project. The summary highlights the main sections:
- Section 1 explains how to create a new project, import videos and photos, and organize clips in the project library.
- Section 2 details the editing tools for selecting and moving clips, deleting scenes, and using buttons to add themes, music, titles, and transitions.
- Section 3 provides options for exporting the finished project as a file, DVD, or publishing to YouTube, as well as equipment that can be rented from the library.
For the Hawaii Flash User Group - March 24th 2016.
Recording: https://experts.adobeconnect.com/_a204547676/p4hcg0of4li/?launcher=false&fcsContent=true&pbMode=normal
www.mediacenterimac.com - Editing is part of the creative post-production process of filmmaking. Editing always a major demand in the electronic media scenario. We are the best institute in terms of video editing & photography courses.We have Industry Professionals & State –of-art set up.
PRPL Video Director, Masood Ahmed, walks us through the 5 main phases of the video production process.
Topics discussed:
- Development
- Pre-Production
- Production
- Post-Production
- Distribution
Adobe Premiere Pro: An Introduction to the Basics_Mujeeb RiazMujeeb Riaz
"Keyword"
"adobe premiere pro tutorial pdf"
"adobe premiere pro cs6 ppt"
"convert powerpoint to video adobe premiere"
"export powerpoint to video"
"step by step premiere pro"
"powerpoint vs premiere pro"
"how to make presentation in adobe premiere"
Use of Adobe Premiere pro with Mujeeb Riaz
Learn Adobe Premiere Pro with Mujeeb Riaz
This is a general overview of the animation process. Covering the initial planning stage, pre-production, shot planning and output. Presented as part of a course introduction to digital graphics and animation series.
Operating companies or professionals need to foresee the results of their decisions and steps, a representative model provides chance to simulate and see the results of their actions.
Convert flip video to Adobe Premiere Pro and edit video from a Flip camera in Adobe CS4 for Flip Mino/Ultra HD work in Adobe
Premiere Elements software.
Software Delivery At the Speed of AI: Inflectra Invests In AI-Powered QualityInflectra
In this insightful webinar, Inflectra explores how artificial intelligence (AI) is transforming software development and testing. Discover how AI-powered tools are revolutionizing every stage of the software development lifecycle (SDLC), from design and prototyping to testing, deployment, and monitoring.
Learn about:
• The Future of Testing: How AI is shifting testing towards verification, analysis, and higher-level skills, while reducing repetitive tasks.
• Test Automation: How AI-powered test case generation, optimization, and self-healing tests are making testing more efficient and effective.
• Visual Testing: Explore the emerging capabilities of AI in visual testing and how it's set to revolutionize UI verification.
• Inflectra's AI Solutions: See demonstrations of Inflectra's cutting-edge AI tools like the ChatGPT plugin and Azure Open AI platform, designed to streamline your testing process.
Whether you're a developer, tester, or QA professional, this webinar will give you valuable insights into how AI is shaping the future of software delivery.
Kubernetes & AI - Beauty and the Beast !?! @KCD Istanbul 2024Tobias Schneck
As AI technology is pushing into IT I was wondering myself, as an “infrastructure container kubernetes guy”, how get this fancy AI technology get managed from an infrastructure operational view? Is it possible to apply our lovely cloud native principals as well? What benefit’s both technologies could bring to each other?
Let me take this questions and provide you a short journey through existing deployment models and use cases for AI software. On practical examples, we discuss what cloud/on-premise strategy we may need for applying it to our own infrastructure to get it to work from an enterprise perspective. I want to give an overview about infrastructure requirements and technologies, what could be beneficial or limiting your AI use cases in an enterprise environment. An interactive Demo will give you some insides, what approaches I got already working for real.
The Art of the Pitch: WordPress Relationships and SalesLaura Byrne
Clients don’t know what they don’t know. What web solutions are right for them? How does WordPress come into the picture? How do you make sure you understand scope and timeline? What do you do if sometime changes?
All these questions and more will be explored as we talk about matching clients’ needs with what your agency offers without pulling teeth or pulling your hair out. Practical tips, and strategies for successful relationship building that leads to closing the deal.
Smart TV Buyer Insights Survey 2024 by 91mobiles.pdf91mobiles
91mobiles recently conducted a Smart TV Buyer Insights Survey in which we asked over 3,000 respondents about the TV they own, aspects they look at on a new TV, and their TV buying preferences.
UiPath Test Automation using UiPath Test Suite series, part 4DianaGray10
Welcome to UiPath Test Automation using UiPath Test Suite series part 4. In this session, we will cover Test Manager overview along with SAP heatmap.
The UiPath Test Manager overview with SAP heatmap webinar offers a concise yet comprehensive exploration of the role of a Test Manager within SAP environments, coupled with the utilization of heatmaps for effective testing strategies.
Participants will gain insights into the responsibilities, challenges, and best practices associated with test management in SAP projects. Additionally, the webinar delves into the significance of heatmaps as a visual aid for identifying testing priorities, areas of risk, and resource allocation within SAP landscapes. Through this session, attendees can expect to enhance their understanding of test management principles while learning practical approaches to optimize testing processes in SAP environments using heatmap visualization techniques
What will you get from this session?
1. Insights into SAP testing best practices
2. Heatmap utilization for testing
3. Optimization of testing processes
4. Demo
Topics covered:
Execution from the test manager
Orchestrator execution result
Defect reporting
SAP heatmap example with demo
Speaker:
Deepak Rai, Automation Practice Lead, Boundaryless Group and UiPath MVP
Builder.ai Founder Sachin Dev Duggal's Strategic Approach to Create an Innova...Ramesh Iyer
In today's fast-changing business world, Companies that adapt and embrace new ideas often need help to keep up with the competition. However, fostering a culture of innovation takes much work. It takes vision, leadership and willingness to take risks in the right proportion. Sachin Dev Duggal, co-founder of Builder.ai, has perfected the art of this balance, creating a company culture where creativity and growth are nurtured at each stage.
Dev Dives: Train smarter, not harder – active learning and UiPath LLMs for do...UiPathCommunity
💥 Speed, accuracy, and scaling – discover the superpowers of GenAI in action with UiPath Document Understanding and Communications Mining™:
See how to accelerate model training and optimize model performance with active learning
Learn about the latest enhancements to out-of-the-box document processing – with little to no training required
Get an exclusive demo of the new family of UiPath LLMs – GenAI models specialized for processing different types of documents and messages
This is a hands-on session specifically designed for automation developers and AI enthusiasts seeking to enhance their knowledge in leveraging the latest intelligent document processing capabilities offered by UiPath.
Speakers:
👨🏫 Andras Palfi, Senior Product Manager, UiPath
👩🏫 Lenka Dulovicova, Product Program Manager, UiPath
2. Getting Started
• File – New Project
• Can set to Widescreen, Standard, or iPhone.
• Can rename your project by double clicking on
name on the right of the screen.
• Importing movies:
– File – Import Movies
– Navigate to your video – this might take a couple
of minutes, depending on length of clip.
3. • Importing directly from camera
– Click on Camera button on right hand side of screen
– Select all of clips from the screen which appears that you would like to import.
Or push the “Import All” button.
– Name your new event and import video as “Large” in order to save room –
this is still a high quality import.
5. • Select footage that you want to edit.
• Move footage to box labeled “Project Library.”
• The box next to the viewing screen is where you will be
performing your editing.
• You can select scenes/images to delete or move by
selecting clips using the yellow box.
16. Other options within iMovie:
• Create a trailer http://support.apple.com/kb/PH2228
• Organize your video http://support.apple.com/kb/PH2120
• Keyboard shortcuts and shortcuts menus
– http://support.apple.com/kb/PH2132
• Adding sound effects and other audio
–
http://support.apple.com/kb/VI39?viewlocale=en_US
• Add video effects http://support.apple.com/kb/VI40?viewlocale=en_US such
as aged film, cartoon, vignette, dream, sepia, or x-ray.
• Stabilize shaky video
–
http://support.apple.com/kb/VI33?viewlocale=en_US
17. More options with iMovie
• How to slow down or speed up clips in iMovie
’09 and ’11 http://www.youtube.com/watch?v=3Py5CA4GAQY
• Exporting Powerpoint presentations to iMovie
– http://www.youtube.com/watch?v=Thv5BOP2Xgc
• Ken Burns Effect: zooming in, zooming out,
and panning across still photographs.
– http://www.youtube.com/watch?v=_qX9ii-t51o
• iMovie on iPad 2
–
http://www.youtube.com/watch?v=MEaWuCrI24s
18. Equipment to Rent at Smith Library:
First Floor, Media Center
• Audio recorders
• Microphones
• Video cameras:
–
–
–
–
–
Sony Bloggie
Sony Handycam
Canon Vixia
Canon Rebel DSLR
Please check out the Media & Digital Services website
for a full list of options and hours of check out.
20. Create a DVD
• You can send your footage directly to iDVD, a
program on your Mac that creates a
professional quality DVD.
• Once you select Share-iDVD, your project will
automatically open up in iDVD.
• From iDVD, you can add multiple videos or
photographs.
• When ready, insert blank DVD into CD drive on
Mac and push “burn” button.
24. YouTube Privacy
You have the option of making your YouTube video public, unlisted, or private.
You can choose this option while uploading your video to YouTube.
25. Microsoft Movie Maker
Movie Maker Tutorial
http://windows.microsoft.com/en-US/windows-live/movie-maker-get-started
26. Problems?
Apple iMovie support has a troubleshooting page on
their main page.
http://www.apple.com/support/imovie/
Please feel free to email me at: sharlow@highpoint.edu
Editor's Notes
Today I am here to talk to you about the Mac film editing software iMovie. iMovie comes free on all Macs and is available on the Macs in the media lab in Smith Library. Any media lab on campus with Mac computers should have this software installed. I am going to go over the basic functions of iMovie in order so you better know what options you have when you start editing your films for this class. Throughout the presentation and towards the end I will have links to many helpful tutorial videos available on the internet. I will also have a link to my email address, so feel free to email me any time if you have issues with your film editing.
First click on the iMovie icon, which you can see above in this presentation. To start a new project, go to File – New Project. This is where you have the option of creating your film in Widescreen, Standard, or iPhone. You can name or rename your project by double clicking on the project name at any point throughout your project. To import movies from a file already on your computer, go to File – Import movies. From here you can navigate to your video. Working with media is a time consuming process, so please allow yourself enough time for larger video files to upload into iMovie.
You can also import directly from a video recording camera and into iMovies. You can have iMovie automatically select all the footage from the camera or manually choose from different films in your camera.
This is what your newly imported footage is going to look like on your screen.
Once you are ready to edit, you can select the footage from you camera that you want to edit by dragging and clicking over footage. Then you can drag and drop the footage into the box labeled “Project Library.” This is where you will be performing your editing.
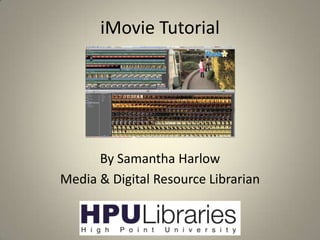
Below your editing box are many different options for what you can do to your project. The picture on this slide is great because it will let you know quickly what all of these important functions are. So just real quickly, lets read over these buttons because it will let you know what you can do to your projects. The ones to particularly pay attention to is the buttons on the far right: read these buttons
Another important button to be aware of is the Inspector button. The Inspector offers you options to edit in more detail in clips, video, and audio. These images represent each of these three options. Notice that you can adjust the settings on stabilization, exposure, brightness, contrast, saturation, white point, fades, and more.
Next I am going to go over the workflows of how to perform the most popular actions within iMovie. The rest of the presentation I have put detailed slides of how to perform each of these actions, so hopefully you can come back to these slides later on. Read opening paragraphs describing themes.
You can also add background music from your iTunes library. Read opening paragraph describing process You could also add interviews in the background through iTunes with this button. The good (and sometimes bad thing) about working on iMovie on a Mac is that is super compatible with other Mac programs such as iTunes.
Similarly to iTunes, iMovie also works very well with iPhoto.
Read opening paragraph
Read opening paragraph
I just went over the basic functions of iMovie, but there are many other actions you can perform while editing in iMovie. In this part of the presentation I included a list of the other editing options in iMovie and hyperlinks out to websites with video tutorials on how to perform these functions in iMovie. List out options
Note: speeding up and slowing down footage is not available in all versions of iMovie. 2009 and 2011 (and currently) have pretty easy options, so if you would like to perform this action and your version does not allow you, please stop by the Media Lab in Smith Library and I or a student can assist you.
Now a days many apple products come with built in video cameras, but these have limited memory and can be shaky. If you would like to rent out equipment, the Media Center rents out equipment for 24 hours to students. We have audio recorders, microphones (these are on order, but will be here soon), and video cameras. We also have tripods to make your cameras less shakey. GO THROUGH MEDIA WEBPAGE: high light hours open, streaming, software, contact information.
So now you are done editing your video project: what is next? You need to export your project. This way your project can either be uploaded to the internet, saved on a harddrive, or burned onto a DVD. So to export a movie, go to Share – Export movie. Be sure to name your project again (iMovie makes you name things quite often). You can choose from the file options listed on this picture, and iMovie does a good job showing what these files are compatible with. I usually export into Large because I do not care about my movie playing on a iPod, but you could also choose Medium if this is important to you. Be sure you know where you are saving your files. And no matter what option you choose, all iMovie files are exported into MP4 (a very compatible moving image format – it works with pretty much anything).
iDVD has been discontinued for newer macs, therefore some of you might have to come into the Media Lab at Smith Library (or any media lab on campus with iDVD or a burning software). Most softwares will burn easily from an iMovie import. And obviously burning a DVD will only work if you have a disc drive (so not an a MacAir).
So from iMovies, you can choose Share – iDVD and it will automatically import your project into iDVD. If you are interested in learning more about iDVD, please look at and watch the tutorials through the above link.
You also have the option of publishing your video directly online. Again, go to Share, and look you can view the different publishing options, such as YouTube, Facebook, and Vimeo. Once you select your choice, it will show you a screen where you can choose how to import the video. You an even upload directly to your YouTube account (which is the same as your Gmail account if you have one). Please be careful uploading this way because you will have to go into your YouTube account after the upload and change privacy settings later (which we will talk about in the next couple of slides).
Youtube excepts many types of moving image format, and mpeg4 is what iMovie creates. In case you are using a different version of editing software, please check make sure you are working with the correct file extension.
In order to easily share video, you can upload to Youtube and make your videos private or unlisted (both not found by the public). Read over the difference between the two – but pretty similar as far as I can tell.
Feel free to email me or stop by the Media Lab at any time. If you think your question will take a while, please schedule a tutorial session with me and I would be happy to sit down with you in my office. Do you have any questions about this presentation?