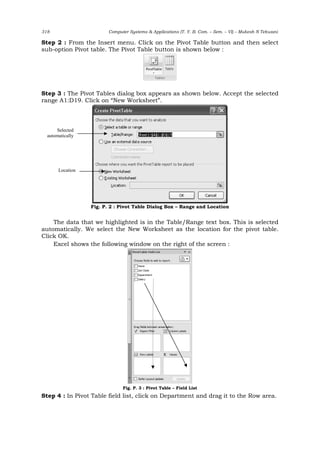
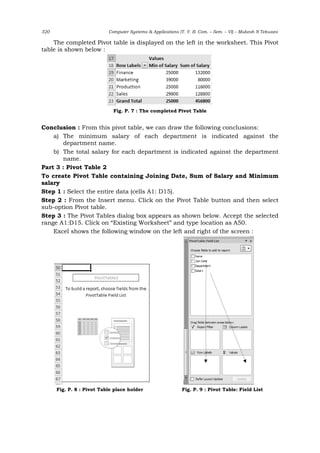
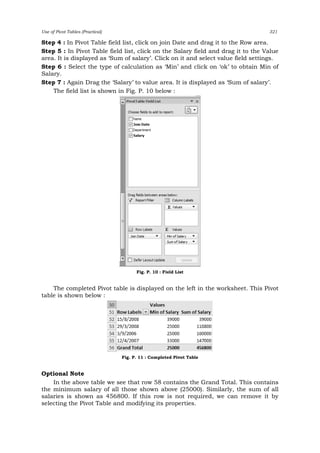
SlideShare a Scribd company logo
Use of Pivot Tables (Practical) 317
Prepare a worksheet containing the Name, Join Date, Department and Salary
in Columns A, B, C, and D respectively from rows 1 to 31 the first row contains
the headings and the remaining rows contain data. Use your own data.
Carry out the following operations on this worksheet.
1. Save the worksheet under your name followed by your roll no., question
no. e.g. MONA1232
2. Prepare another Pivot table on the same data taking Department in the
row area and Average Salary and Maximum Salary in the data area.
3. Prepare a Pivot table report containing Join Date in the row area and Sum
of Salary and Minimum Salary in the data area.
Note : We illustrate this procedure for only 4 different departments.
Carry out the following operations on this worksheet :
Part 1: To create a new file and save it.
Step 1 : Open a new workbook and type the data as per instructions given in the
question. A part of the worksheet looks like this (we have shown data only for 14
employees, but you may enter more data as per the question).
Fig. P. 1 : Data entry
Step 2 : Save the workbook: After typing the data, click on the Office button and
Select Save As.. option from the menu. Save the workbook with the name
MONA1233. Replace MONA with your name, 123 with your roll number, but keep
the last digit 3 as it is the practical number. Then, click on Save. The file will be
saved with name you gave. The filename extension will be. XLSX.
Part 2 : Pivot Table 1
To create Pivot Table containing Department, Average Salary and Maximum
Salary.
Step 1 : Select the entire data (cells A1: D15).
Use of Pivot Tables
III – 3 – (Practicals)
318 Computer Systems & Applications (T. Y. B. Com. – Sem. – VI) – Mukesh N Tekwani
Step 2 : From the Insert menu. Click on the Pivot Table button and then select
sub-option Pivot table. The Pivot Table button is shown below :
Step 3 : The Pivot Tables dialog box appears as shown below. Accept the selected
range A1:D19. Click on “New Worksheet”.
Fig. P. 2 : Pivot Table Dialog Box – Range and Location
The data that we highlighted is in the Table/Range text box. This is selected
automatically. We select the New Worksheet as the location for the pivot table.
Click OK.
Excel shows the following window on the right of the screen :
Fig. P. 3 : Pivot Table – Field List
Step 4 : In Pivot Table field list, click on Department and drag it to the Row area.
Location
Selected
automatically
Use of Pivot Tables (Practical) 319
Step 5 : In Pivot Table filed list, click on the Salary field and drag it to the Value
area. It is displayed as ‘Sum of salary’. Click on it and select value field settings
(Fig. P. 4).
Fig. P. 4 : Value Field Settings Fig. P. 5 : Value Field Settings – Selecting Min
Step 6 : Select the type of calculation as ‘Min’ and click on ‘ok’ to obtain Min of
Salary(Fig P. 5).
Step 7 : Again Drag the ‘Salary’ to value area. It is displayed as ‘Sum of salary’.
Fig. P. 6 : Pivot Table – Field List after Step 6
320 Computer Systems & Applications (T. Y. B. Com. – Sem. – VI) – Mukesh N Tekwani
The completed Pivot table is displayed on the left in the worksheet. This Pivot
table is shown below :
Fig. P. 7 : The completed Pivot Table
Conclusion : From this pivot table, we can draw the following conclusions:
a) The minimum salary of each department is indicated against the
department name.
b) The total salary for each department is indicated against the department
name.
Part 3 : Pivot Table 2
To create Pivot Table containing Joining Date, Sum of Salary and Minimum
salary
Step 1 : Select the entire data (cells A1: D15).
Step 2 : From the Insert menu. Click on the Pivot Table button and then select
sub-option Pivot table.
Step 3 : The Pivot Tables dialog box appears as shown below. Accept the selected
range A1:D15. Click on “Existing Worksheet” and type location as A50.
Excel shows the following window on the left and right of the screen :
Fig. P. 8 : Pivot Table place holder Fig. P. 9 : Pivot Table: Field List
Use of Pivot Tables (Practical) 321
Step 4 : In Pivot Table field list, click on join Date and drag it to the Row area.
Step 5 : In Pivot Table field list, click on the Salary field and drag it to the Value
area. It is displayed as ‘Sum of salary’. Click on it and select value field settings.
Step 6 : Select the type of calculation as ‘Min’ and click on ‘ok’ to obtain Min of
Salary.
Step 7 : Again Drag the ‘Salary’ to value area. It is displayed as ‘Sum of salary’.
The field list is shown in Fig. P. 10 below :
Fig. P. 10 : Field List
The completed Pivot table is displayed on the left in the worksheet. This Pivot
table is shown below :
Fig. P. 11 : Completed Pivot Table
Optional Note
In the above table we see that row 58 contains the Grand Total. This contains
the minimum salary of all those shown above (25000). Similarly, the sum of all
salaries is shown as 456800. If this row is not required, we can remove it by
selecting the Pivot Table and modifying its properties.
322 Computer Systems & Applications (T. Y. B. Com. – Sem. – VI) – Mukesh N Tekwani
Selecting Pivot Table and Modifying its properties
Step 1 : Click on cell A50 since that is the location of the Pivot Table.
Step 2 : Right click and select PivotTable options. It brings up the following
dialog box (Fig. P. 12).
Fig. P. 12 : Pivot Table Options Dialog Box
Step 3 : Select the Totals & Filters tab (shown below in Fig. P. 13).
Fig. P. 13 : Pivot Table Options Dialog Box – Totals & Filters
Deselect this check
box
Select this tab
Use of Pivot Tables (Practical) 323
Deselect the option “Show grand totals for columns” and click OK. The Pivot
table now changes to the following :
Fig. P. 14 : Final Pivot Table, without column totals

More Related Content

What's hot

Module 6 (2) type of excel chart
Module 6 (2) type of excel chartModule 6 (2) type of excel chart
Module 6 (2) type of excel chart
Dr. Shalini Pandey
 

What's hot (20)

Module 6 (2) type of excel chart
Module 6 (2) type of excel chartModule 6 (2) type of excel chart
Module 6 (2) type of excel chart
 
Ms excel excersices
Ms excel excersicesMs excel excersices
Ms excel excersices
 
Dashboard
DashboardDashboard
Dashboard
 
Pivot Table & Chart_Parakramesh Jaroli_Pacific University
Pivot Table & Chart_Parakramesh Jaroli_Pacific UniversityPivot Table & Chart_Parakramesh Jaroli_Pacific University
Pivot Table & Chart_Parakramesh Jaroli_Pacific University
 
MS Excel Pivot Table Reports & Charts
MS Excel Pivot Table Reports & ChartsMS Excel Pivot Table Reports & Charts
MS Excel Pivot Table Reports & Charts
 
Dervy bis-155-final-exam-guide-music-on-demand-new
Dervy bis-155-final-exam-guide-music-on-demand-newDervy bis-155-final-exam-guide-music-on-demand-new
Dervy bis-155-final-exam-guide-music-on-demand-new
 
Excel booklet
Excel bookletExcel booklet
Excel booklet
 
Ppt on pivot table
Ppt on pivot tablePpt on pivot table
Ppt on pivot table
 
Excel2002
Excel2002Excel2002
Excel2002
 
Excel2002
Excel2002Excel2002
Excel2002
 
How to Insert a Graph into Microsoft Excel 2007
How to Insert a Graph into Microsoft Excel 2007How to Insert a Graph into Microsoft Excel 2007
How to Insert a Graph into Microsoft Excel 2007
 
Creating graphs in excel
Creating graphs in excelCreating graphs in excel
Creating graphs in excel
 
Making a Chart Using Excel
Making a Chart Using ExcelMaking a Chart Using Excel
Making a Chart Using Excel
 
Microsoft Excel Basics
Microsoft Excel BasicsMicrosoft Excel Basics
Microsoft Excel Basics
 
Excel: Sensitivity Analysis with data tables
Excel: Sensitivity Analysis with data tablesExcel: Sensitivity Analysis with data tables
Excel: Sensitivity Analysis with data tables
 
exploring_ecap_grader_c2_Transactions_LastFirst. solution
exploring_ecap_grader_c2_Transactions_LastFirst. solutionexploring_ecap_grader_c2_Transactions_LastFirst. solution
exploring_ecap_grader_c2_Transactions_LastFirst. solution
 
Ms Excel
Ms ExcelMs Excel
Ms Excel
 
Microsoft excel part 2
Microsoft excel part 2Microsoft excel part 2
Microsoft excel part 2
 
50 MS Excel Tips and Tricks
50 MS Excel Tips and Tricks 50 MS Excel Tips and Tricks
50 MS Excel Tips and Tricks
 
6.6 Creating Calculated Controls
6.6 Creating Calculated Controls6.6 Creating Calculated Controls
6.6 Creating Calculated Controls
 

Similar to Pivot table

MS_Excel_Module4.1 ffor beginners yo .pptx
MS_Excel_Module4.1 ffor beginners yo .pptxMS_Excel_Module4.1 ffor beginners yo .pptx
MS_Excel_Module4.1 ffor beginners yo .pptx
shagunjain2k22phdcs0
 
WinEst As 1. Es2. Tassignment stInfo (Esti.docx
WinEst As 1. Es2. Tassignment stInfo (Esti.docxWinEst As 1. Es2. Tassignment stInfo (Esti.docx
WinEst As 1. Es2. Tassignment stInfo (Esti.docx
alanfhall8953
 
LabsLab5Lab5_Excel_SH.htmlLab 5 SpreadsheetsLearning Outcomes.docx
LabsLab5Lab5_Excel_SH.htmlLab 5 SpreadsheetsLearning Outcomes.docxLabsLab5Lab5_Excel_SH.htmlLab 5 SpreadsheetsLearning Outcomes.docx
LabsLab5Lab5_Excel_SH.htmlLab 5 SpreadsheetsLearning Outcomes.docx
DIPESH30
 
Excel Intro Part2 2007
Excel Intro Part2 2007Excel Intro Part2 2007
Excel Intro Part2 2007
simply_coool
 
Copying Files Across Workbooks Lab 5, Step 1 A. Save al.docx
Copying Files Across Workbooks Lab 5, Step 1  A. Save al.docxCopying Files Across Workbooks Lab 5, Step 1  A. Save al.docx
Copying Files Across Workbooks Lab 5, Step 1 A. Save al.docx
maxinesmith73660
 
BudgetAccounting, IncAnual Budget2013Qtr 1Qtr 2Qtr 3Qtr 4TotalsRev.docx
BudgetAccounting, IncAnual Budget2013Qtr 1Qtr 2Qtr 3Qtr 4TotalsRev.docxBudgetAccounting, IncAnual Budget2013Qtr 1Qtr 2Qtr 3Qtr 4TotalsRev.docx
BudgetAccounting, IncAnual Budget2013Qtr 1Qtr 2Qtr 3Qtr 4TotalsRev.docx
hartrobert670
 
Lesson 18 Creating Pivot Tables
Lesson 18 Creating Pivot TablesLesson 18 Creating Pivot Tables
Lesson 18 Creating Pivot Tables
guevarra_2000
 
MAT 240 Random Sampling in Excel Tutorial This tutorial wi
MAT 240 Random Sampling in Excel Tutorial This tutorial wiMAT 240 Random Sampling in Excel Tutorial This tutorial wi
MAT 240 Random Sampling in Excel Tutorial This tutorial wi
AbramMartino96
 
MAT 240 Random Sampling in Excel Tutorial This tutorial wi
MAT 240 Random Sampling in Excel Tutorial This tutorial wiMAT 240 Random Sampling in Excel Tutorial This tutorial wi
MAT 240 Random Sampling in Excel Tutorial This tutorial wi
AbramMartino96
 

Similar to Pivot table (20)

Pranavi verma-class-9-spreadsheet
Pranavi verma-class-9-spreadsheetPranavi verma-class-9-spreadsheet
Pranavi verma-class-9-spreadsheet
 
Budget entries import in Dynamics AX 2012
Budget entries import in Dynamics AX 2012Budget entries import in Dynamics AX 2012
Budget entries import in Dynamics AX 2012
 
Excel Intro Part2
Excel Intro Part2Excel Intro Part2
Excel Intro Part2
 
MS_Excel_Module4.1 ffor beginners yo .pptx
MS_Excel_Module4.1 ffor beginners yo .pptxMS_Excel_Module4.1 ffor beginners yo .pptx
MS_Excel_Module4.1 ffor beginners yo .pptx
 
WinEst As 1. Es2. Tassignment stInfo (Esti.docx
WinEst As 1. Es2. Tassignment stInfo (Esti.docxWinEst As 1. Es2. Tassignment stInfo (Esti.docx
WinEst As 1. Es2. Tassignment stInfo (Esti.docx
 
LabsLab5Lab5_Excel_SH.htmlLab 5 SpreadsheetsLearning Outcomes.docx
LabsLab5Lab5_Excel_SH.htmlLab 5 SpreadsheetsLearning Outcomes.docxLabsLab5Lab5_Excel_SH.htmlLab 5 SpreadsheetsLearning Outcomes.docx
LabsLab5Lab5_Excel_SH.htmlLab 5 SpreadsheetsLearning Outcomes.docx
 
Excel Intro Part2 2007
Excel Intro Part2 2007Excel Intro Part2 2007
Excel Intro Part2 2007
 
Copying Files Across Workbooks Lab 5, Step 1 A. Save al.docx
Copying Files Across Workbooks Lab 5, Step 1  A. Save al.docxCopying Files Across Workbooks Lab 5, Step 1  A. Save al.docx
Copying Files Across Workbooks Lab 5, Step 1 A. Save al.docx
 
Introduction to Eikon Excel
Introduction to Eikon ExcelIntroduction to Eikon Excel
Introduction to Eikon Excel
 
Libre Office Calc Lesson 5: Working with Data
Libre Office Calc Lesson 5: Working with DataLibre Office Calc Lesson 5: Working with Data
Libre Office Calc Lesson 5: Working with Data
 
Lecture 10: introduction to computer
Lecture 10: introduction to computerLecture 10: introduction to computer
Lecture 10: introduction to computer
 
BudgetAccounting, IncAnual Budget2013Qtr 1Qtr 2Qtr 3Qtr 4TotalsRev.docx
BudgetAccounting, IncAnual Budget2013Qtr 1Qtr 2Qtr 3Qtr 4TotalsRev.docxBudgetAccounting, IncAnual Budget2013Qtr 1Qtr 2Qtr 3Qtr 4TotalsRev.docx
BudgetAccounting, IncAnual Budget2013Qtr 1Qtr 2Qtr 3Qtr 4TotalsRev.docx
 
Ifsm 201 Future Our Mission/newtonhelp.com
Ifsm 201 Future Our Mission/newtonhelp.comIfsm 201 Future Our Mission/newtonhelp.com
Ifsm 201 Future Our Mission/newtonhelp.com
 
Lesson 18 Creating Pivot Tables
Lesson 18 Creating Pivot TablesLesson 18 Creating Pivot Tables
Lesson 18 Creating Pivot Tables
 
Ifsm 201 Enhance teaching / snaptutorial.com
Ifsm 201 Enhance teaching / snaptutorial.comIfsm 201 Enhance teaching / snaptutorial.com
Ifsm 201 Enhance teaching / snaptutorial.com
 
IFSM 201 Exceptional Education - snaptutorial.com
IFSM 201  Exceptional Education - snaptutorial.comIFSM 201  Exceptional Education - snaptutorial.com
IFSM 201 Exceptional Education - snaptutorial.com
 
How to make Gantt chart in Excel
How to make Gantt chart in ExcelHow to make Gantt chart in Excel
How to make Gantt chart in Excel
 
Pivot-Table-Handout1-projectcubicle lecture notes
Pivot-Table-Handout1-projectcubicle lecture notesPivot-Table-Handout1-projectcubicle lecture notes
Pivot-Table-Handout1-projectcubicle lecture notes
 
MAT 240 Random Sampling in Excel Tutorial This tutorial wi
MAT 240 Random Sampling in Excel Tutorial This tutorial wiMAT 240 Random Sampling in Excel Tutorial This tutorial wi
MAT 240 Random Sampling in Excel Tutorial This tutorial wi
 
MAT 240 Random Sampling in Excel Tutorial This tutorial wi
MAT 240 Random Sampling in Excel Tutorial This tutorial wiMAT 240 Random Sampling in Excel Tutorial This tutorial wi
MAT 240 Random Sampling in Excel Tutorial This tutorial wi
 

More from Mukesh Tekwani

More from Mukesh Tekwani (20)

Computer Science Made Easy - Youtube Channel
Computer Science Made Easy - Youtube ChannelComputer Science Made Easy - Youtube Channel
Computer Science Made Easy - Youtube Channel
 
The Elphinstonian 1988-College Building Centenary Number (2).pdf
The Elphinstonian 1988-College Building Centenary Number (2).pdfThe Elphinstonian 1988-College Building Centenary Number (2).pdf
The Elphinstonian 1988-College Building Centenary Number (2).pdf
 
Circular motion
Circular motionCircular motion
Circular motion
 
Gravitation
GravitationGravitation
Gravitation
 
ISCE-Class 12-Question Bank - Electrostatics - Physics
ISCE-Class 12-Question Bank - Electrostatics  -  PhysicsISCE-Class 12-Question Bank - Electrostatics  -  Physics
ISCE-Class 12-Question Bank - Electrostatics - Physics
 
Hexadecimal to binary conversion
Hexadecimal to binary conversion Hexadecimal to binary conversion
Hexadecimal to binary conversion
 
Hexadecimal to decimal conversion
Hexadecimal to decimal conversion Hexadecimal to decimal conversion
Hexadecimal to decimal conversion
 
Hexadecimal to octal conversion
Hexadecimal to octal conversionHexadecimal to octal conversion
Hexadecimal to octal conversion
 
Gray code to binary conversion
Gray code to binary conversion Gray code to binary conversion
Gray code to binary conversion
 
What is Gray Code?
What is Gray Code? What is Gray Code?
What is Gray Code?
 
Decimal to Binary conversion
Decimal to Binary conversionDecimal to Binary conversion
Decimal to Binary conversion
 
Video Lectures for IGCSE Physics 2020-21
Video Lectures for IGCSE Physics 2020-21Video Lectures for IGCSE Physics 2020-21
Video Lectures for IGCSE Physics 2020-21
 
Refraction and dispersion of light through a prism
Refraction and dispersion of light through a prismRefraction and dispersion of light through a prism
Refraction and dispersion of light through a prism
 
Refraction of light at a plane surface
Refraction of light at a plane surfaceRefraction of light at a plane surface
Refraction of light at a plane surface
 
Spherical mirrors
Spherical mirrorsSpherical mirrors
Spherical mirrors
 
Atom, origin of spectra Bohr's theory of hydrogen atom
Atom, origin of spectra Bohr's theory of hydrogen atomAtom, origin of spectra Bohr's theory of hydrogen atom
Atom, origin of spectra Bohr's theory of hydrogen atom
 
Refraction of light at spherical surfaces of lenses
Refraction of light at spherical surfaces of lensesRefraction of light at spherical surfaces of lenses
Refraction of light at spherical surfaces of lenses
 
ISCE (XII) - PHYSICS BOARD EXAM FEB 2020 - WEIGHTAGE
ISCE (XII) - PHYSICS BOARD EXAM FEB 2020 - WEIGHTAGEISCE (XII) - PHYSICS BOARD EXAM FEB 2020 - WEIGHTAGE
ISCE (XII) - PHYSICS BOARD EXAM FEB 2020 - WEIGHTAGE
 
Cyber Laws
Cyber LawsCyber Laws
Cyber Laws
 
XML
XMLXML
XML
 

Recently uploaded

AI/ML Infra Meetup | Improve Speed and GPU Utilization for Model Training & S...
AI/ML Infra Meetup | Improve Speed and GPU Utilization for Model Training & S...AI/ML Infra Meetup | Improve Speed and GPU Utilization for Model Training & S...
AI/ML Infra Meetup | Improve Speed and GPU Utilization for Model Training & S...
Alluxio, Inc.
 
Mastering Windows 7 A Comprehensive Guide for Power Users .pdf
Mastering Windows 7 A Comprehensive Guide for Power Users .pdfMastering Windows 7 A Comprehensive Guide for Power Users .pdf
Mastering Windows 7 A Comprehensive Guide for Power Users .pdf
mbmh111980
 

Recently uploaded (20)

TROUBLESHOOTING 9 TYPES OF OUTOFMEMORYERROR
TROUBLESHOOTING 9 TYPES OF OUTOFMEMORYERRORTROUBLESHOOTING 9 TYPES OF OUTOFMEMORYERROR
TROUBLESHOOTING 9 TYPES OF OUTOFMEMORYERROR
 
AI/ML Infra Meetup | Improve Speed and GPU Utilization for Model Training & S...
AI/ML Infra Meetup | Improve Speed and GPU Utilization for Model Training & S...AI/ML Infra Meetup | Improve Speed and GPU Utilization for Model Training & S...
AI/ML Infra Meetup | Improve Speed and GPU Utilization for Model Training & S...
 
How Does XfilesPro Ensure Security While Sharing Documents in Salesforce?
How Does XfilesPro Ensure Security While Sharing Documents in Salesforce?How Does XfilesPro Ensure Security While Sharing Documents in Salesforce?
How Does XfilesPro Ensure Security While Sharing Documents in Salesforce?
 
Vitthal Shirke Microservices Resume Montevideo
Vitthal Shirke Microservices Resume MontevideoVitthal Shirke Microservices Resume Montevideo
Vitthal Shirke Microservices Resume Montevideo
 
Mastering Windows 7 A Comprehensive Guide for Power Users .pdf
Mastering Windows 7 A Comprehensive Guide for Power Users .pdfMastering Windows 7 A Comprehensive Guide for Power Users .pdf
Mastering Windows 7 A Comprehensive Guide for Power Users .pdf
 
Field Employee Tracking System| MiTrack App| Best Employee Tracking Solution|...
Field Employee Tracking System| MiTrack App| Best Employee Tracking Solution|...Field Employee Tracking System| MiTrack App| Best Employee Tracking Solution|...
Field Employee Tracking System| MiTrack App| Best Employee Tracking Solution|...
 
Accelerate Enterprise Software Engineering with Platformless
Accelerate Enterprise Software Engineering with PlatformlessAccelerate Enterprise Software Engineering with Platformless
Accelerate Enterprise Software Engineering with Platformless
 
Agnieszka Andrzejewska - BIM School Course in Kraków
Agnieszka Andrzejewska - BIM School Course in KrakówAgnieszka Andrzejewska - BIM School Course in Kraków
Agnieszka Andrzejewska - BIM School Course in Kraków
 
Using IESVE for Room Loads Analysis - Australia & New Zealand
Using IESVE for Room Loads Analysis - Australia & New ZealandUsing IESVE for Room Loads Analysis - Australia & New Zealand
Using IESVE for Room Loads Analysis - Australia & New Zealand
 
top nidhi software solution freedownload
top nidhi software solution freedownloadtop nidhi software solution freedownload
top nidhi software solution freedownload
 
Abortion ^Clinic ^%[+971588192166''] Abortion Pill Al Ain (?@?) Abortion Pill...
Abortion ^Clinic ^%[+971588192166''] Abortion Pill Al Ain (?@?) Abortion Pill...Abortion ^Clinic ^%[+971588192166''] Abortion Pill Al Ain (?@?) Abortion Pill...
Abortion ^Clinic ^%[+971588192166''] Abortion Pill Al Ain (?@?) Abortion Pill...
 
Advanced Flow Concepts Every Developer Should Know
Advanced Flow Concepts Every Developer Should KnowAdvanced Flow Concepts Every Developer Should Know
Advanced Flow Concepts Every Developer Should Know
 
OpenFOAM solver for Helmholtz equation, helmholtzFoam / helmholtzBubbleFoam
OpenFOAM solver for Helmholtz equation, helmholtzFoam / helmholtzBubbleFoamOpenFOAM solver for Helmholtz equation, helmholtzFoam / helmholtzBubbleFoam
OpenFOAM solver for Helmholtz equation, helmholtzFoam / helmholtzBubbleFoam
 
Top Mobile App Development Companies 2024
Top Mobile App Development Companies 2024Top Mobile App Development Companies 2024
Top Mobile App Development Companies 2024
 
De mooiste recreatieve routes ontdekken met RouteYou en FME
De mooiste recreatieve routes ontdekken met RouteYou en FMEDe mooiste recreatieve routes ontdekken met RouteYou en FME
De mooiste recreatieve routes ontdekken met RouteYou en FME
 
GraphAware - Transforming policing with graph-based intelligence analysis
GraphAware - Transforming policing with graph-based intelligence analysisGraphAware - Transforming policing with graph-based intelligence analysis
GraphAware - Transforming policing with graph-based intelligence analysis
 
A Python-based approach to data loading in TM1 - Using Airflow as an ETL for TM1
A Python-based approach to data loading in TM1 - Using Airflow as an ETL for TM1A Python-based approach to data loading in TM1 - Using Airflow as an ETL for TM1
A Python-based approach to data loading in TM1 - Using Airflow as an ETL for TM1
 
Crafting the Perfect Measurement Sheet with PLM Integration
Crafting the Perfect Measurement Sheet with PLM IntegrationCrafting the Perfect Measurement Sheet with PLM Integration
Crafting the Perfect Measurement Sheet with PLM Integration
 
Cyaniclab : Software Development Agency Portfolio.pdf
Cyaniclab : Software Development Agency Portfolio.pdfCyaniclab : Software Development Agency Portfolio.pdf
Cyaniclab : Software Development Agency Portfolio.pdf
 
Gamify Your Mind; The Secret Sauce to Delivering Success, Continuously Improv...
Gamify Your Mind; The Secret Sauce to Delivering Success, Continuously Improv...Gamify Your Mind; The Secret Sauce to Delivering Success, Continuously Improv...
Gamify Your Mind; The Secret Sauce to Delivering Success, Continuously Improv...
 

Pivot table

  • 1. Use of Pivot Tables (Practical) 317 Prepare a worksheet containing the Name, Join Date, Department and Salary in Columns A, B, C, and D respectively from rows 1 to 31 the first row contains the headings and the remaining rows contain data. Use your own data. Carry out the following operations on this worksheet. 1. Save the worksheet under your name followed by your roll no., question no. e.g. MONA1232 2. Prepare another Pivot table on the same data taking Department in the row area and Average Salary and Maximum Salary in the data area. 3. Prepare a Pivot table report containing Join Date in the row area and Sum of Salary and Minimum Salary in the data area. Note : We illustrate this procedure for only 4 different departments. Carry out the following operations on this worksheet : Part 1: To create a new file and save it. Step 1 : Open a new workbook and type the data as per instructions given in the question. A part of the worksheet looks like this (we have shown data only for 14 employees, but you may enter more data as per the question). Fig. P. 1 : Data entry Step 2 : Save the workbook: After typing the data, click on the Office button and Select Save As.. option from the menu. Save the workbook with the name MONA1233. Replace MONA with your name, 123 with your roll number, but keep the last digit 3 as it is the practical number. Then, click on Save. The file will be saved with name you gave. The filename extension will be. XLSX. Part 2 : Pivot Table 1 To create Pivot Table containing Department, Average Salary and Maximum Salary. Step 1 : Select the entire data (cells A1: D15). Use of Pivot Tables III – 3 – (Practicals)
  • 2. 318 Computer Systems & Applications (T. Y. B. Com. – Sem. – VI) – Mukesh N Tekwani Step 2 : From the Insert menu. Click on the Pivot Table button and then select sub-option Pivot table. The Pivot Table button is shown below : Step 3 : The Pivot Tables dialog box appears as shown below. Accept the selected range A1:D19. Click on “New Worksheet”. Fig. P. 2 : Pivot Table Dialog Box – Range and Location The data that we highlighted is in the Table/Range text box. This is selected automatically. We select the New Worksheet as the location for the pivot table. Click OK. Excel shows the following window on the right of the screen : Fig. P. 3 : Pivot Table – Field List Step 4 : In Pivot Table field list, click on Department and drag it to the Row area. Location Selected automatically
  • 3. Use of Pivot Tables (Practical) 319 Step 5 : In Pivot Table filed list, click on the Salary field and drag it to the Value area. It is displayed as ‘Sum of salary’. Click on it and select value field settings (Fig. P. 4). Fig. P. 4 : Value Field Settings Fig. P. 5 : Value Field Settings – Selecting Min Step 6 : Select the type of calculation as ‘Min’ and click on ‘ok’ to obtain Min of Salary(Fig P. 5). Step 7 : Again Drag the ‘Salary’ to value area. It is displayed as ‘Sum of salary’. Fig. P. 6 : Pivot Table – Field List after Step 6
  • 4. 320 Computer Systems & Applications (T. Y. B. Com. – Sem. – VI) – Mukesh N Tekwani The completed Pivot table is displayed on the left in the worksheet. This Pivot table is shown below : Fig. P. 7 : The completed Pivot Table Conclusion : From this pivot table, we can draw the following conclusions: a) The minimum salary of each department is indicated against the department name. b) The total salary for each department is indicated against the department name. Part 3 : Pivot Table 2 To create Pivot Table containing Joining Date, Sum of Salary and Minimum salary Step 1 : Select the entire data (cells A1: D15). Step 2 : From the Insert menu. Click on the Pivot Table button and then select sub-option Pivot table. Step 3 : The Pivot Tables dialog box appears as shown below. Accept the selected range A1:D15. Click on “Existing Worksheet” and type location as A50. Excel shows the following window on the left and right of the screen : Fig. P. 8 : Pivot Table place holder Fig. P. 9 : Pivot Table: Field List
  • 5. Use of Pivot Tables (Practical) 321 Step 4 : In Pivot Table field list, click on join Date and drag it to the Row area. Step 5 : In Pivot Table field list, click on the Salary field and drag it to the Value area. It is displayed as ‘Sum of salary’. Click on it and select value field settings. Step 6 : Select the type of calculation as ‘Min’ and click on ‘ok’ to obtain Min of Salary. Step 7 : Again Drag the ‘Salary’ to value area. It is displayed as ‘Sum of salary’. The field list is shown in Fig. P. 10 below : Fig. P. 10 : Field List The completed Pivot table is displayed on the left in the worksheet. This Pivot table is shown below : Fig. P. 11 : Completed Pivot Table Optional Note In the above table we see that row 58 contains the Grand Total. This contains the minimum salary of all those shown above (25000). Similarly, the sum of all salaries is shown as 456800. If this row is not required, we can remove it by selecting the Pivot Table and modifying its properties.
  • 6. 322 Computer Systems & Applications (T. Y. B. Com. – Sem. – VI) – Mukesh N Tekwani Selecting Pivot Table and Modifying its properties Step 1 : Click on cell A50 since that is the location of the Pivot Table. Step 2 : Right click and select PivotTable options. It brings up the following dialog box (Fig. P. 12). Fig. P. 12 : Pivot Table Options Dialog Box Step 3 : Select the Totals & Filters tab (shown below in Fig. P. 13). Fig. P. 13 : Pivot Table Options Dialog Box – Totals & Filters Deselect this check box Select this tab
  • 7. Use of Pivot Tables (Practical) 323 Deselect the option “Show grand totals for columns” and click OK. The Pivot table now changes to the following : Fig. P. 14 : Final Pivot Table, without column totals