Photoshop black and white tutorial
•Download as PPTX, PDF•
0 likes•62 views
Tutorial on how to edit images in Photoshop CS5 into black and white, also includes information on cropping, rule of thirds, choosing a correct image and saving
Report
Share
Report
Share

Recommended
Photoshop black and white tutorial better
1. Students completed a studio photo shoot in class, producing 6 black and white portrait images showing different facial features and angles.
2. As homework, students were assigned to complete the same photo shoot at home to produce another 6 images, for a total of 12 edited portraits.
3. The document provides guidance on choosing images to edit, using tools like levels adjustment and cropping to refine compositions according to techniques like the rule of thirds, and saving work in formats like PSD and JPEG.
Photography Composition Tips w/ Zoe Prinds-Flash
The document discusses various techniques for composing photographs, including following the rule of thirds by positioning important elements along the thirds lines or intersections, balancing elements to avoid empty space, using leading lines to guide the viewer's eye, incorporating symmetry or patterns, considering viewpoint, managing the background, adding depth through foreground/middle ground/background layers or overlapping, framing with natural frames, cropping to focus on the subject, experimenting enabled by digital photography, and treating composition "rules" as guidelines rather than strict rules.
Sarah Jones Photography Composition Presentation
2018 Business of Farming Conference Photography Composition Workshop. Presented by Sarah Jones Decker of Root Bottom Farm.
Guide On How To Take Better Photos
This document provides several tips to improve photography skills, including using limitations to be more creative, setting the white balance manually, framing the subject to remove distractions, shooting from different angles to find unique perspectives, and adjusting the focus on the subject while blurring the background. Implementing these tips through practice can help one overcome frustration and start taking better photos.
Framing
This document discusses the benefits and techniques of framing in photography. It explains that framing draws attention to the subject by blocking other parts of the image. Framing provides context, creates depth through layers, and leads the viewer's eye to the main focal point. Clever framing can also intrigue viewers. The document recommends using foreground objects, the environment, depth of field, and other photographic techniques to create effective frames that tell a story. Effective frames work with other photographic principles to make compelling images. Photographers should find frames with meaning related to the subject and emphasize the focal point without distraction.
Chapter 4 - Creating Better Pics
The document provides guidance on improving digital photography skills. It discusses proper framing and composition techniques, such as using the rule of thirds for layout, filling the frame with the subject, and balancing elements. It also addresses other important factors like lighting, exposure, clarity, and using different camera angles and points of view. The goal is to move beyond simply taking a picture to intentionally crafting well-designed images through planning and creative use of photographic techniques.
Unit 2 Tutorials (Part A)
This document provides instructions for three photo editing techniques:
1) "High Key Black & White" - Converts a photo to grayscale, applies curves adjustments, duplicates the layer and blurs it, then erases key areas to highlight them.
2) "Adding Dynamic Lighting & Spotlighting" - Applies lighting effects and lens flares to create dramatic images.
3) "Edge Enhancement & Clarity" - Uses an emboss filter on a duplicated layer set to Overlay mode to enhance edges and reduce camera shake in photos.
The 8 Basic Steps Elements 6
The document outlines 8 basic steps for photo editing in Adobe Photoshop Elements 6: 1) Rotate and crop the image, 2) Fix flaws using the clone stamp tool, 3) Expand the tonal range using levels, 4) Add contrast using curves, 5) Adjust color using levels, 6) Improve sharpness with unsharp mask, 7) Save the edited file, and 8) Compare the original and edited images. Each step provides instructions for using specific tools and adjustments to enhance the photo.
Intro to Cropping
The document provides guidance on cropping photographs for journalistic purposes. It discusses several reasons for cropping, including improving composition by focusing on the main subject and removing distracting elements. The "rule of thirds" for composition is explained, with the suggestion to place subjects near the intersecting lines of an imaginary three-by-three grid overlaid on the image. Care should be taken not to crop too tightly or in a way that "amputates" the subject. Examples are given of tight versus wide crops and good versus bad cropping. Instructions are provided for making a copy of an original photo before cropping and doing a simple keyboard crop using Macbooks in the classroom.
Landscape Focus Stacking for Photography
A key aspect of successful landscape photography is
image sharpness. Usually, it is desirable to ensure that all
elements of a scene, whether close or far, are captured in
sharp focus.
Read more on how to Focus Stack for a better landscape.
Using smartphone photography to build your brand on any budget
This document discusses using photography to build a brand on any budget. It covers finding your brand's purpose, creating images that sell through smartphone or professional photography, planning photo shoots, and editing images. Tips include telling a visual story, using people in photos, proper lighting and composition, and only editing photos to enhance the original message. The document emphasizes creating high-quality, on-brand visuals to engage target audiences across marketing channels.
Vector portraits
Vector Portraits provides 7 steps for creating a vector portrait from a reference photo: 1) Find a reference photo and remove the background. 2) Choose an interesting background. 3) Trace the skin outline and fill with skin color. 4) Trace color changes in the skin for shadows and highlights and fill accordingly. 5) Continue tracing details and filling with corresponding colors. 6) Add line details by stroking traced paths with a small, hard-edged brush in the traced colors. 7) The process is complete once all details are added.
Photography Pillar 2 - Focus and Clarity
Focus and clarity are essential elements of a good photograph. Two things must occur to achieve clear detail: focus and camera stability. Focus occurs at a specific distance, where light rays form a perfect cone at the image sensor. Photographers can control focus through various camera settings, including focus target, focus mode, focus point location, and drive mode. Achieving proper focus is key to directing the viewer's attention and enhancing the visual qualities and purpose of an image.
Warm ups Digital Photography Techniques
This document provides tips for improving photography composition and includes 13 rules of composition: 1) Rule of Thirds, 2) Subject Placement, 3) Background, 4) Focal Point, 5) Filling the Frame, 6) Perspective, 7) Framing, 8) Leading Lines, 9) S-Curves, 10) Form, 11) Texture, 12) Pattern/Shape, and 13) Color. The document instructs students to practice these techniques around campus and save their photos to a shared folder for review.
Tips
The document provides tips for using images effectively in scenarios for learning. It recommends using high quality images that fill the screen and immerse the learner in the environment without distractions. Creators should not hesitate to make their own images if needed to clearly depict what they want learners to see and should design screens so that choices and navigation buttons fit naturally within the scene.
Masood Aini | Tips and Tricks For Professional Photography
The document provides 10 photography tips and tricks from Masood Aini. The tips include framing your subject carefully by zooming in or moving closer; only showing your best photos to avoid boring others; shooting when the sun is low for warmer lighting and less eye shadows; turning the camera sideways when your subject is vertical; avoiding flash reflections on walls; understanding the camera's exposure metering and priority modes for shutter speed or aperture; using neutral density filters in bright light; and only using the in-camera flash as a last resort due to image quality issues. Contact information is provided at the end.
2 a & 2b mode dial settings
The document describes the different modes available on a camera's mode dial, including Portrait, Child, Landscape, Sports, Close-up, and Night Portrait. Each mode is designed to optimize camera settings like aperture, shutter speed, and flash usage for different types of subjects. Portrait and Child modes use a wide aperture and allow flash. Landscape uses a small aperture and tripod. Sports prioritizes fast shutter for moving subjects. Close-up uses a small aperture for depth of field. Night Portrait combines portrait settings with flash and longer shutter for low light.
7 Smartphone Photography Tips & Tricks that We Don’t Use Often
Did you know your volume button works as mobile camera controller or how does Panorama option work? Chances are - you are not even taking full advantage of your mobile camera tricks.
Kodak easysharez981
The document provides tips for improving photography skills and taking better photos. It discusses choosing the best images to showcase, using different angles and perspectives, adjusting the aperture in low light settings, using filters, experimenting with different viewpoints, knowing when to use the flash, balancing aperture, ISO, and shutter speed, and using photo editing software to adjust lighting if needed when taking outdoor photos. It also provides a link to learn more about the Kodak EasyShare Z981 digital camera.
5 Essential under-used Camera Features - Media Designs
It's time you get more involved with your DSLRs and get to know some of its underutilized features. These features are really important although at first you might not even recognize them.
Smartphone Photography Guide
Smartphone photography tips include getting familiar with camera features like tapping to focus, locking focus and exposure, and using framing guides. The guide recommends avoiding digital zoom and keeping the phone steady using both hands or a table for support to reduce blur. Other tips are trying different angles, analyzing light effects, and keeping the lens clean. It suggests being creative and lists popular photography apps.
Smartphone Photography
Presentation contain Introduction to phone photography, tips and tricks about the ways u can use ur phone to click some award winning photographs.
Photographic Composition
Photographic composition refers to the selection and arrangement of subjects or elements within the frame of an image. Good composition allows photographers to convey messages and emotions. There are several rules and techniques for effective composition, including using the rule of thirds to frame subjects off-center, visual cropping to remove unnecessary elements, and balancing different areas of light and dark. The document provides examples of different types of compositions like portraits, landscapes, and action shots, and gives tips for techniques like filling the frame and changing angles for portraits.
Freckle Removal
The document describes using Photoshop tools to remove freckles from eyes and adjust the color of the eyes. The spot healing tool was used to remove 5 freckles from the eyes after zooming in. The quick selection tool selected the white of the eyes and the hue and saturation panel was used to reduce redness and increase whiteness. The final result showed the photo fitted on the screen after all changes.
Huong dan su dung canon 40048
The document provides tips for shooting in low-light environments without using flash. It recommends using the camera's flash off mode (<7>) for situations where flash is prohibited or when wanting candlelight effects. It also advises steadying the camera using a tripod or wide-angle lens when the shutter speed display blinks to avoid camera shake blur, and instructs subjects to remain still until the photo is taken to prevent blur from movement in situations with slow shutter speeds.
Click! How to use smartphone photography to engage, empower and connect with ...
Click! How to use smartphone photography to engage, empower and connect with ...Else Kramer - Photosopher
We live in a visual world where everyone has become a creator of images. This offers amazing opportunities for both individuals and companies to create content and to tell their own stories.
In this keynote presentation for Preziday.com I explain why you need visuals, what kind of visuals rate high on the engagement scale, and give a mini smartphone photography workshop. Want to know more about the visual revolution? Visit http://www.visualrevolutionaries.com/.Research into equipment2
The document discusses the equipment used for photo shoots, including:
- A camera with a zoom lens, flash, and screen used to frame and take photos.
- Four lights (two in front, two in back) used to illuminate the subject and background, along with umbrellas to soften or harshly the light.
- An infrared that synchronizes the camera flash with the light flashes.
- Various backdrops that can be pulled down and taped in place behind the subject.
- A memory card and USB to upload photos from the camera to a computer.
Andy's handy focus calibration chart
This document provides instructions for making an Andy's Handy Focus Calibration Chart using poster board, a distance scale, and a focus chart. The instructions say to glue the distance scale to poster board, cut out notches, and slot the distance scale over tabs on the focus chart. Then glue the bottom tab of the distance scale to complete the assembly of the focus calibration chart.
Java
Java surgió en 1991 con el objetivo de desarrollar un lenguaje sencillo y portable que no dependiera del hardware. Java se ejecuta en una máquina virtual lo que permite que los programas escritos en Java se ejecuten en diferentes plataformas. Java permite polimorfismo mediante el cual un mismo código puede usarse con diferentes tipos de datos. Para programar en Java se requiere instalar la máquina virtual Java y un editor como JGrasp.
Configurar un chat
El documento describe cómo configurar un chat en un curso, incluyendo la configuración de parámetros generales como el nombre y descripción de la sala de chat, así como parámetros de sesiones como la fecha y hora de la primera reunión y la opción de guardar sesiones pasadas. Una vez configurado, los estudiantes podrán acceder a la sala de chat a través de un enlace, donde podrán ver la lista de personas en línea y enviar comentarios.
More Related Content
What's hot
Intro to Cropping
The document provides guidance on cropping photographs for journalistic purposes. It discusses several reasons for cropping, including improving composition by focusing on the main subject and removing distracting elements. The "rule of thirds" for composition is explained, with the suggestion to place subjects near the intersecting lines of an imaginary three-by-three grid overlaid on the image. Care should be taken not to crop too tightly or in a way that "amputates" the subject. Examples are given of tight versus wide crops and good versus bad cropping. Instructions are provided for making a copy of an original photo before cropping and doing a simple keyboard crop using Macbooks in the classroom.
Landscape Focus Stacking for Photography
A key aspect of successful landscape photography is
image sharpness. Usually, it is desirable to ensure that all
elements of a scene, whether close or far, are captured in
sharp focus.
Read more on how to Focus Stack for a better landscape.
Using smartphone photography to build your brand on any budget
This document discusses using photography to build a brand on any budget. It covers finding your brand's purpose, creating images that sell through smartphone or professional photography, planning photo shoots, and editing images. Tips include telling a visual story, using people in photos, proper lighting and composition, and only editing photos to enhance the original message. The document emphasizes creating high-quality, on-brand visuals to engage target audiences across marketing channels.
Vector portraits
Vector Portraits provides 7 steps for creating a vector portrait from a reference photo: 1) Find a reference photo and remove the background. 2) Choose an interesting background. 3) Trace the skin outline and fill with skin color. 4) Trace color changes in the skin for shadows and highlights and fill accordingly. 5) Continue tracing details and filling with corresponding colors. 6) Add line details by stroking traced paths with a small, hard-edged brush in the traced colors. 7) The process is complete once all details are added.
Photography Pillar 2 - Focus and Clarity
Focus and clarity are essential elements of a good photograph. Two things must occur to achieve clear detail: focus and camera stability. Focus occurs at a specific distance, where light rays form a perfect cone at the image sensor. Photographers can control focus through various camera settings, including focus target, focus mode, focus point location, and drive mode. Achieving proper focus is key to directing the viewer's attention and enhancing the visual qualities and purpose of an image.
Warm ups Digital Photography Techniques
This document provides tips for improving photography composition and includes 13 rules of composition: 1) Rule of Thirds, 2) Subject Placement, 3) Background, 4) Focal Point, 5) Filling the Frame, 6) Perspective, 7) Framing, 8) Leading Lines, 9) S-Curves, 10) Form, 11) Texture, 12) Pattern/Shape, and 13) Color. The document instructs students to practice these techniques around campus and save their photos to a shared folder for review.
Tips
The document provides tips for using images effectively in scenarios for learning. It recommends using high quality images that fill the screen and immerse the learner in the environment without distractions. Creators should not hesitate to make their own images if needed to clearly depict what they want learners to see and should design screens so that choices and navigation buttons fit naturally within the scene.
Masood Aini | Tips and Tricks For Professional Photography
The document provides 10 photography tips and tricks from Masood Aini. The tips include framing your subject carefully by zooming in or moving closer; only showing your best photos to avoid boring others; shooting when the sun is low for warmer lighting and less eye shadows; turning the camera sideways when your subject is vertical; avoiding flash reflections on walls; understanding the camera's exposure metering and priority modes for shutter speed or aperture; using neutral density filters in bright light; and only using the in-camera flash as a last resort due to image quality issues. Contact information is provided at the end.
2 a & 2b mode dial settings
The document describes the different modes available on a camera's mode dial, including Portrait, Child, Landscape, Sports, Close-up, and Night Portrait. Each mode is designed to optimize camera settings like aperture, shutter speed, and flash usage for different types of subjects. Portrait and Child modes use a wide aperture and allow flash. Landscape uses a small aperture and tripod. Sports prioritizes fast shutter for moving subjects. Close-up uses a small aperture for depth of field. Night Portrait combines portrait settings with flash and longer shutter for low light.
7 Smartphone Photography Tips & Tricks that We Don’t Use Often
Did you know your volume button works as mobile camera controller or how does Panorama option work? Chances are - you are not even taking full advantage of your mobile camera tricks.
Kodak easysharez981
The document provides tips for improving photography skills and taking better photos. It discusses choosing the best images to showcase, using different angles and perspectives, adjusting the aperture in low light settings, using filters, experimenting with different viewpoints, knowing when to use the flash, balancing aperture, ISO, and shutter speed, and using photo editing software to adjust lighting if needed when taking outdoor photos. It also provides a link to learn more about the Kodak EasyShare Z981 digital camera.
5 Essential under-used Camera Features - Media Designs
It's time you get more involved with your DSLRs and get to know some of its underutilized features. These features are really important although at first you might not even recognize them.
Smartphone Photography Guide
Smartphone photography tips include getting familiar with camera features like tapping to focus, locking focus and exposure, and using framing guides. The guide recommends avoiding digital zoom and keeping the phone steady using both hands or a table for support to reduce blur. Other tips are trying different angles, analyzing light effects, and keeping the lens clean. It suggests being creative and lists popular photography apps.
Smartphone Photography
Presentation contain Introduction to phone photography, tips and tricks about the ways u can use ur phone to click some award winning photographs.
Photographic Composition
Photographic composition refers to the selection and arrangement of subjects or elements within the frame of an image. Good composition allows photographers to convey messages and emotions. There are several rules and techniques for effective composition, including using the rule of thirds to frame subjects off-center, visual cropping to remove unnecessary elements, and balancing different areas of light and dark. The document provides examples of different types of compositions like portraits, landscapes, and action shots, and gives tips for techniques like filling the frame and changing angles for portraits.
Freckle Removal
The document describes using Photoshop tools to remove freckles from eyes and adjust the color of the eyes. The spot healing tool was used to remove 5 freckles from the eyes after zooming in. The quick selection tool selected the white of the eyes and the hue and saturation panel was used to reduce redness and increase whiteness. The final result showed the photo fitted on the screen after all changes.
Huong dan su dung canon 40048
The document provides tips for shooting in low-light environments without using flash. It recommends using the camera's flash off mode (<7>) for situations where flash is prohibited or when wanting candlelight effects. It also advises steadying the camera using a tripod or wide-angle lens when the shutter speed display blinks to avoid camera shake blur, and instructs subjects to remain still until the photo is taken to prevent blur from movement in situations with slow shutter speeds.
Click! How to use smartphone photography to engage, empower and connect with ...
Click! How to use smartphone photography to engage, empower and connect with ...Else Kramer - Photosopher
We live in a visual world where everyone has become a creator of images. This offers amazing opportunities for both individuals and companies to create content and to tell their own stories.
In this keynote presentation for Preziday.com I explain why you need visuals, what kind of visuals rate high on the engagement scale, and give a mini smartphone photography workshop. Want to know more about the visual revolution? Visit http://www.visualrevolutionaries.com/.Research into equipment2
The document discusses the equipment used for photo shoots, including:
- A camera with a zoom lens, flash, and screen used to frame and take photos.
- Four lights (two in front, two in back) used to illuminate the subject and background, along with umbrellas to soften or harshly the light.
- An infrared that synchronizes the camera flash with the light flashes.
- Various backdrops that can be pulled down and taped in place behind the subject.
- A memory card and USB to upload photos from the camera to a computer.
Andy's handy focus calibration chart
This document provides instructions for making an Andy's Handy Focus Calibration Chart using poster board, a distance scale, and a focus chart. The instructions say to glue the distance scale to poster board, cut out notches, and slot the distance scale over tabs on the focus chart. Then glue the bottom tab of the distance scale to complete the assembly of the focus calibration chart.
What's hot (20)
Using smartphone photography to build your brand on any budget
Using smartphone photography to build your brand on any budget
Masood Aini | Tips and Tricks For Professional Photography
Masood Aini | Tips and Tricks For Professional Photography
7 Smartphone Photography Tips & Tricks that We Don’t Use Often
7 Smartphone Photography Tips & Tricks that We Don’t Use Often
5 Essential under-used Camera Features - Media Designs
5 Essential under-used Camera Features - Media Designs
Click! How to use smartphone photography to engage, empower and connect with ...
Click! How to use smartphone photography to engage, empower and connect with ...
Viewers also liked
Java
Java surgió en 1991 con el objetivo de desarrollar un lenguaje sencillo y portable que no dependiera del hardware. Java se ejecuta en una máquina virtual lo que permite que los programas escritos en Java se ejecuten en diferentes plataformas. Java permite polimorfismo mediante el cual un mismo código puede usarse con diferentes tipos de datos. Para programar en Java se requiere instalar la máquina virtual Java y un editor como JGrasp.
Configurar un chat
El documento describe cómo configurar un chat en un curso, incluyendo la configuración de parámetros generales como el nombre y descripción de la sala de chat, así como parámetros de sesiones como la fecha y hora de la primera reunión y la opción de guardar sesiones pasadas. Una vez configurado, los estudiantes podrán acceder a la sala de chat a través de un enlace, donde podrán ver la lista de personas en línea y enviar comentarios.
Configurar un foro
El documento describe la configuración de un foro de discusión en línea, incluyendo opciones para el tipo de foro, adjuntos, suscripciones, umbrales de mensajes, calificaciones y acceso. Los tipos de foro incluyen debates individuales, preguntas y respuestas, y foros generales. Las opciones de configuración permiten personalizar el tamaño de archivo adjunto, seguimiento de lectura, límites de publicación y roles con permiso para calificar. Una vez configurado, los usuarios pueden publicar nuevos temas, enviar mensajes
Pa17 asia australasia_partner_prospectus_28_nov2016
The document announces the International Tri-Conference for Precision Agriculture in 2017, which will include the 7th Asian-Australasian Conference on Precision Agriculture, the 1st Asian-Australasian Conference on Precision Pastures and Livestock Farming, and Digital-Farmer 2017. The conferences will be held in Hamilton, New Zealand from October 16-18, 2017 and will bring together researchers, developers, regulators and farmers from Asia and Australasia to discuss the latest developments in precision agriculture. The document invites organizations to partner with the event and benefit from opportunities to promote their brand, interact with attendees, and support the international precision agriculture community. It provides details on the partnership packages, benefits, and sponsorship opportunities available.
Transition project
The document discusses how conceptual artists such as Richard Long and Michael Craig-Martin created works that questioned traditional notions of art by using ideas, actions, and transformations rather than physical objects. Long's "A Line Made by Walking" demonstrated how a simple action in nature could become a work of art. Craig-Martin's "An Oak Tree" transformed a glass of water into a tree through language and the viewer's perception rather than physically altering the objects. These works expanded what could be considered art by emphasizing concepts and the experience of the viewer over physical materials.
National-Service-and-Community-Health-Centers-A-Partnership-Built-to-Last
The Community HealthCorps program was created 20 years ago as a partnership between the National Association of Community Health Centers and AmeriCorps. It started with 9 health centers and 100 volunteers and has now grown to over 200 health centers annually engaging 535 AmeriCorps members. Members provide enabling services like case management and help enroll patients in health insurance. Over the years, their roles have expanded and they now help address social determinants of health. Community HealthCorps has proven effective, providing over 500,000 patient engagements annually and helping enroll thousands in insurance. Many members choose to pursue careers in community health after participating.
Bla bla bla
This short document promotes creating presentations using Haiku Deck, a tool for making slideshows. It encourages the reader to get started making their own Haiku Deck presentation and sharing it on SlideShare. In just one sentence, it pitches the idea of using Haiku Deck to easily design slideshows.
Stephen Gill
Stephen Gill creates multi-layered photographic images by pressing flowers, seeds, berries and other objects found in Hackney, East London into photographs. Some photographs were buried in Hackney Wick to allow decay to imprint on the images, combining the images with the place. Gill also places found objects directly into his camera so they are embedded in the photographic exposure. He describes helping the objects speak for themselves by removing them from their original locations.
Weebly set up
To set up a Weebly account:
1. Create a login and choose a layout for your site pages.
2. Choose a domain name for your website and create pages for Foundation, Component 1, Component 2, and Teacher's Comments.
3. Send a request to your teacher to become the editor by inputting their email in the Editors section of Settings.
Makalah Ilmu Budaya Dasar - Manusia dan Harapan
Manusia memiliki harapan karena merupakan bagian dari sifat manusia sebagai makhluk sosial yang memiliki kebutuhan hidup. Harapan dipengaruhi oleh faktor lingkungan sosial, ekonomi, dan pendidikan seseorang. Harapan juga tidak dapat dipisahkan dari kepercayaan terhadap diri sendiri dan Tuhan."
Viewers also liked (12)
Pa17 asia australasia_partner_prospectus_28_nov2016
Pa17 asia australasia_partner_prospectus_28_nov2016
National-Service-and-Community-Health-Centers-A-Partnership-Built-to-Last
National-Service-and-Community-Health-Centers-A-Partnership-Built-to-Last
Similar to Photoshop black and white tutorial
Camera angles and photography
Camera shots and angles are important in film and photography to set mood and atmosphere and direct viewer attention. Different shot types include long shots, close-ups, high and low angle shots, and birds eye views. When taking photos, photographers should fill the frame with their subject, use lighting and composition techniques like the rule of thirds, and consider factors like focal points, backgrounds, and action. Students are tasked with taking photos of an object from different angles, like close-up and extreme close-up, to later edit into a print advertisement.
Image Processing Techniques
This document discusses various types of digital image manipulation and editing techniques. It covers topics like pixelation, color casts, damaged images, exposure issues, panoramas, Hockney joiners, photomontages, colorization, and more. For each topic, it describes what could cause the issue, preventative measures photographers can take, and how to fix it in post-production editing software like Photoshop. The document provides guidance on digital image processing and enhancing techniques.
Photo Editing Part 2 and Cropping
This document provides guidance on ethical photo editing and manipulation. It discusses how photojournalists should avoid altering photos in substantive ways that change the reality of what was captured. Minor adjustments to tone, saturation, and color are acceptable, but removing or adding elements risks destroying the integrity and trustworthiness of the image. The document also provides tips on cropping photos effectively and using tools like curves and levels to improve images while maintaining ethical standards.
Image editing
This document provides an overview of basic concepts in image editing. It discusses the following key points:
- The objectives are to learn basic photo editing concepts and skills in Adobe Photoshop, apply these skills to produce a marketable product, and appreciate the relevance of photo editing.
- Basic editing techniques discussed include cropping, resizing, adjusting brightness/contrast, sharpening and softening, automatic enhancements, and data compression.
- Key terms like layers, selections, resolution, and color modes are also defined. Activities are included to help students identify editing effects and complete a concept web on the basics of image editing.
Photomedia in Creative Practice (CREATE IMAGES)
The document provides information on using photomedia in creative practice. It discusses taking photos and creating digital images, as well as manipulating images digitally. For taking photos, it emphasizes determining the purpose and use of images, considering composition including focal points and lighting. It also discusses camera types, resolution, color casts, and lens flares. The document then covers creating digital images through scanning, as well as manipulating images in Photoshop using layers, effects, and color correction tools.
Beginner's Guide to Adobe
Photoshop, InDesign, and Premiere Pro are the three software programs covered in this document. Photoshop is used primarily for editing photographs and images. It allows editing without damaging file quality and familiarizes users with industry standard software. InDesign is used for design work including text and image layout. Premiere Pro is used for video editing. The document provides step-by-step guides on getting started, understanding tools, and completing edits in each program.
Composition
The document provides 10 tips for improving photo composition:
1. Simplify scenes by choosing a clear subject and focal point.
2. Fill the frame and get close to the subject to avoid empty space and confusion.
3. Experiment with vertical and cropped shots to improve composition beyond horizontal shots.
4. Place the subject off-center rather than in the middle for more interesting photos.
5. Use lines like those from walls, roads or implied gazes to guide the viewer's eye through the photo.
6. Add drama with diagonal lines from wide angles or tilted camera positions.
7. Leave space in front of moving subjects or those looking off-frame for a
photography-guide-odysys
This document provides tips and techniques for innkeepers to take better photographs of their properties to use in online listings and marketing. It covers using your camera settings, deciding what to photograph, preparing the scene, composition techniques like the rule of thirds and framing, lighting, and ensuring proper focus. The goal is to provide informative photos that attract potential guests by accurately showing what the property looks like and feels like.
6 & 7 what have i learnt about technologies
The document discusses various technologies the student learned to use while constructing their magazine product. They learned how to adjust settings on a DSLR camera like white balance and exposure to take better photos. In Photoshop, they edited photos by improving exposure, saturation, and contrast, and subtly adjusting hue on one image. They also learned to effectively layout and design pages in Photoshop and InDesign by arranging elements, adding borders, resizing images and fonts. Looking back, the student improved at applying Photoshop skills like subtle photo editing to match conventions versus oversaturating images. They also took better photos using camera settings and got more practice with presentation software like Powtoon.
Photography Compositions
The document discusses various photography composition techniques including:
- The rule of thirds which positions important elements along imaginary lines that divide the frame into thirds both vertically and horizontally.
- Balance, where the main subject is offset from the center to make the image more interesting, and a secondary element is included to balance the composition.
- Leading lines which guide the eye through the frame along lines in the scene.
- Viewpoint, framing, cropping and simplifying the scene to isolate the subject and direct attention.
- Depth cues like foreground/background separation and overlapping to convey three-dimensionality in a two-dimensional medium.
Photography Composition Rules
The document discusses guidelines for enhancing photographs rather than definite rules. It outlines several compositional techniques for photographers to experiment with, including applying the rule of thirds to position important elements, balancing elements in the frame, using leading lines to guide the eye, and considering symmetry, viewpoints, backgrounds, depth, framing, cropping, and experimentation. While there are no set rules, exploring these guidelines can help improve photo composition.
Summer campdigital
The key to taking good pictures is the photographer, not the camera. Some simple tips to improve photos include following the rule of thirds when composing shots, capturing images from different angles and heights, paying attention to details like backgrounds, and framing the subject. Photographers should also get close to their subjects to fill the frame, be aware of backgrounds, and consider how empty space can tell a story. Flash use depends on lighting conditions, and action shots require understanding the camera's capture speed, while resolution depends on pixel count and intended use.
Case study 05
The document provides instructions for setting up and composing still life photographs in 4 steps. Step 1 discusses arranging objects and considering lighting and design principles. Step 2 addresses composition techniques like levels, open/closed forms, symmetry, and rhythm. Step 3 suggests using simple backdrops, varied lighting angles to make the scene more dynamic. Step 4 gives tips for positioning key, fill, and additional lights to properly illuminate the subject. The document then provides a case study example and some useful hints on subjects like backdrops, glass, and small objects.
Idea generation
This document discusses the process of creating a campaign poster. It includes sections on image selection, font selection, pre-sets and layout, and editing techniques. For the image selection, recycled photos were chosen that had dark colors and were focused. Two fonts from dafont.com, Valiant Times and Valiant Times Italic, were selected as they fit the theme. A pre-set layout was created as a blueprint, though it was later adjusted. Editing techniques included manipulating images to blend them and create shadows, as well as choosing a light yellow background color to create contrast. A mind map with multiple ideas was made to construct the overall project.
Digital Art (Virtual) week 2.pdf
This document outlines a week-long course on digital art, photography, and website creation from January 11th-15th. The week consists of lessons on photography techniques like camera angles, composition, and photo assignments. It also covers graphic design principles like the 10 rules of composition with examples. Students are assigned projects like a picture calendar, menu, and magazine cover. The final day challenges students to take photos using forced perspective optical illusions.
The Art of Photo Manipulation Technique
The Art created from the manipulation of two or more photographic images combined in whole or in part to create something new. Photo manipulation is an excellent example of a mixture of a traditional art form with the latest technologies to create an illusion of two or more photographic images combined.There are several ways in which image manipulation services can be used to improve the quality of images.
ICPS offer Exclusive photo manipulation service for your company or business, we request you to have a free trial or contact us. We process images in 24 hours.
quicktip_scanphotoshop
The document provides instructions for scanning photos into Adobe Photoshop CS3 and editing them. It describes how to scan photos using an HP scanner, then edit photos by rotating, cropping, resizing, removing red eye, converting to black and white, adjusting contrast and color, removing blemishes. It also explains how to save the edited photos.
Presentation2
This document provides instructions and details for creating a magazine front cover and double page spread using Photoshop and InDesign.
The first section describes setting up a document in Photoshop, importing an image to use as the main item on the cover, adding a gradient background, and placing text and additional elements like a barcode.
The second section discusses experimenting with blurring the background in Photoshop to create a marble effect and choosing a font using Dafont.
The third section provides steps taken in InDesign to set up a double page spread, import food images from Google and Pinterest, and add text boxes with columns of text using the Italian Breakfast font.
How to Sharpen an Image in Photoshop
Knowing how to sharpen a picture in Photoshop is helpful expertise for any photographic artist. Foggy pictures occur for various reasons. Perhaps you had your camera self-adjust and it set the center point in some unacceptable spot.
Similar to Photoshop black and white tutorial (20)
More from Mia Hodgson
Art transition journal project 2020 stage 2
This document provides guidelines for a creative project, stating that participants can work in any order or themes, for any duration, using single or double page spreads or a mix of formats, and with any medium, with additional themes also available to work with.
Art transition journal project 2020 stage 1 instructions
This document provides instructions for creating a visual art journal reflecting aspects of one's own life and personality. Students are asked to use a combination of drawings, paintings, text, and words in an A5 or A4 sketchbook or altered book. The goals are to develop observation drawing skills by looking closely at everyday objects, and to explore skills in creating imaginary drawings. Suggestions are given for constructing the journal, such as using cardboard, books, or accordion folding. Students will draw themes provided over several pages and continue adding to the journal over the summer.
Art transition journal project 2020 stage 1 themes
The document discusses stage 1 of a process involving themes. It appears to be outlining the initial stage or phase that focuses on identifying overarching topics, subjects, or concepts to lay the groundwork for subsequent stages or phases. In just a few words, the document title indicates it will address identifying or establishing foundational themes to kick off a multi-step effort.
Art transition journal project 2020 stage 1
This document provides instructions for creating a visual art journal reflecting aspects of one's own life. Students are asked to use a small sketchbook or altered book, combining drawings, paintings, and text using a variety of materials and techniques. The goal is to develop observation drawing skills by looking closely at everyday objects, and to explore skills in creating imaginary drawings. Examples of homemade sketchbooks are provided, as well as page layout inspiration from artists like Jose Naranja and Frida Kahlo who incorporated diverse media into detailed notebook art. Students are given initial themes to work on for 6 pages over an hour each.
Photography workshop activity day 2017
Photography workshop activity day 2017.
Using lighting, camera angle and framing to depict a narrative in a single photograph.
2016 examples
Year 10 photography workshop final photographs using lighting, camera angle and framing to depict a narrative.
FCHS 2017 Activity Day Photography Final Photos
Best images from Year 10 photography workshop on lighting, camera angle and framing to create narrative in photographs.
Fchs photography presentation
This document outlines four areas of work: AO1 focuses on development; AO2 discusses experimentation; AO3 covers recording such as a trip to Alexandra Palace by students; and AO4 concerns a final realization.
Analysis support sheet research template
This photograph by Gyula Halasz, known as Brassai, depicts an intimate moment between a couple in a café in Paris in 1932. The woman embraces her partner lovingly but their reflection in the mirror behind them seems to show her with a more forced expression. The photograph explores the juxtaposition between public and private emotions and how social expectations can influence behavior. Brassai was known for documenting intimate scenes of urban life in Paris.
Explaining the camera start guide
Beginners guide to digital camera functions - aperture, exposure, dof and shutter speed. Used as class research task.
Abstract photograpy lesson
Explanation with examples of the difference between abstraction and representational art in photography.
Abstract photography holiday task
Abstract photography focuses on shape, form, color, texture, and pattern rather than clear representations of objects. The subject of the photograph is often only a small part of its overall meaning. Photographers like Michael Wolf remove a sense of scale from scenes, while Edward Weston focused on intricate textures and patterns in everyday objects.
Mirrored images Photoshop CS5 Tutorial
This document provides instructions for creating a mirrored and rotated image in Photoshop. The steps are:
1. Duplicate an image layer and flip one copy to create a mirror image. Merge the layers.
2. Enlarge the canvas and flip another copy of the image to extend the mirror effect. Merge the visible layers.
3. Rotate the new layer and crop the edges. Repeat rotating the layer in 45 degree increments and adjusting the blend mode each time to create a kaleidoscope-like effect. Mask layers can be used to refine tones and colors.
Penn
This photograph shows a lobster claw being held down on a white table with rubber gloves and a hammer. The clinical white background and props contrast with the aggressive action, suggesting the preparation of luxurious food involves rough handling. Choosing a worn hammer as the prop hints that fancy food may be prepared in unsanitary conditions unknown to consumers. Overall the image conveys that beneath superficial differences, all living things experience similar treatment.
A2 truth--fantasy-or-fiction-2016
This document provides information and guidance for an A2 art exam on the theme of "Truth, Fantasy or Fiction". It outlines the structure of the exam including a 10 week preparatory study period and 12 hour timed exam. It provides tips for each of the four assessment objectives and suggests sub-categories to help with research and brainstorming ideas. Examples of artists are also given to illustrate different interpretations of the theme through their work.
AS Transformation exam 2016
The document provides guidance for a photography unit that focuses on transformation. It outlines four assessment objectives:
1) Develop - Students must analyze 5 images by relevant photographers and use the research to inform their own work.
2) Experiment - Students must take 3 sets of observations in response to 3 ideas, showing refinement over time. They must include contact sheets, edits, and enlargements.
3) Record - Students must complete a minimum of 8 sets of observations/recordings over the duration of the unit. They should demonstrate technical skills like composition, exposure, etc.
4) Realize - Students must further develop and refine their best ideas, working towards a 10-hour examination period exhibition at the end
Introduction to theme
This document provides information and guidance for students preparing for an externally set art exam titled "Transformation". It consists of 3 paragraphs:
1. The first paragraph reminds students to think independently about their ideas, fully explore mind maps and initial artists, and complete contact sheets for each idea. It advises choosing a subtheme they have variety of ideas for.
2. The second paragraph notes the exam is more personal, fast-paced and ambitious than coursework. It encourages students to be brave and stay up-to-date on tasks, coming to lessons prepared.
3. The third paragraph lists 4 tasks for students to complete that week in preparation, including creating a Pinterest board, mood board, full
FCHS Photography Presentation
Overview of the edexcel photography course run at Finchley Catholic High School, along with student examples and course requirements.
More from Mia Hodgson (18)
Art transition journal project 2020 stage 1 instructions
Art transition journal project 2020 stage 1 instructions
Art transition journal project 2020 stage 1 themes
Art transition journal project 2020 stage 1 themes
Recently uploaded
Beyond Degrees - Empowering the Workforce in the Context of Skills-First.pptx
Iván Bornacelly, Policy Analyst at the OECD Centre for Skills, OECD, presents at the webinar 'Tackling job market gaps with a skills-first approach' on 12 June 2024
Wound healing PPT
This document provides an overview of wound healing, its functions, stages, mechanisms, factors affecting it, and complications.
A wound is a break in the integrity of the skin or tissues, which may be associated with disruption of the structure and function.
Healing is the body’s response to injury in an attempt to restore normal structure and functions.
Healing can occur in two ways: Regeneration and Repair
There are 4 phases of wound healing: hemostasis, inflammation, proliferation, and remodeling. This document also describes the mechanism of wound healing. Factors that affect healing include infection, uncontrolled diabetes, poor nutrition, age, anemia, the presence of foreign bodies, etc.
Complications of wound healing like infection, hyperpigmentation of scar, contractures, and keloid formation.
The History of Stoke Newington Street Names
Presented at the Stoke Newington Literary Festival on 9th June 2024
www.StokeNewingtonHistory.com
বাংলাদেশ অর্থনৈতিক সমীক্ষা (Economic Review) ২০২৪ UJS App.pdf
বাংলাদেশের অর্থনৈতিক সমীক্ষা ২০২৪ [Bangladesh Economic Review 2024 Bangla.pdf] কম্পিউটার , ট্যাব ও স্মার্ট ফোন ভার্সন সহ সম্পূর্ণ বাংলা ই-বুক বা pdf বই " সুচিপত্র ...বুকমার্ক মেনু 🔖 ও হাইপার লিংক মেনু 📝👆 যুক্ত ..
আমাদের সবার জন্য খুব খুব গুরুত্বপূর্ণ একটি বই ..বিসিএস, ব্যাংক, ইউনিভার্সিটি ভর্তি ও যে কোন প্রতিযোগিতা মূলক পরীক্ষার জন্য এর খুব ইম্পরট্যান্ট একটি বিষয় ...তাছাড়া বাংলাদেশের সাম্প্রতিক যে কোন ডাটা বা তথ্য এই বইতে পাবেন ...
তাই একজন নাগরিক হিসাবে এই তথ্য গুলো আপনার জানা প্রয়োজন ...।
বিসিএস ও ব্যাংক এর লিখিত পরীক্ষা ...+এছাড়া মাধ্যমিক ও উচ্চমাধ্যমিকের স্টুডেন্টদের জন্য অনেক কাজে আসবে ...
Chapter wise All Notes of First year Basic Civil Engineering.pptx
Chapter wise All Notes of First year Basic Civil Engineering
Syllabus
Chapter-1
Introduction to objective, scope and outcome the subject
Chapter 2
Introduction: Scope and Specialization of Civil Engineering, Role of civil Engineer in Society, Impact of infrastructural development on economy of country.
Chapter 3
Surveying: Object Principles & Types of Surveying; Site Plans, Plans & Maps; Scales & Unit of different Measurements.
Linear Measurements: Instruments used. Linear Measurement by Tape, Ranging out Survey Lines and overcoming Obstructions; Measurements on sloping ground; Tape corrections, conventional symbols. Angular Measurements: Instruments used; Introduction to Compass Surveying, Bearings and Longitude & Latitude of a Line, Introduction to total station.
Levelling: Instrument used Object of levelling, Methods of levelling in brief, and Contour maps.
Chapter 4
Buildings: Selection of site for Buildings, Layout of Building Plan, Types of buildings, Plinth area, carpet area, floor space index, Introduction to building byelaws, concept of sun light & ventilation. Components of Buildings & their functions, Basic concept of R.C.C., Introduction to types of foundation
Chapter 5
Transportation: Introduction to Transportation Engineering; Traffic and Road Safety: Types and Characteristics of Various Modes of Transportation; Various Road Traffic Signs, Causes of Accidents and Road Safety Measures.
Chapter 6
Environmental Engineering: Environmental Pollution, Environmental Acts and Regulations, Functional Concepts of Ecology, Basics of Species, Biodiversity, Ecosystem, Hydrological Cycle; Chemical Cycles: Carbon, Nitrogen & Phosphorus; Energy Flow in Ecosystems.
Water Pollution: Water Quality standards, Introduction to Treatment & Disposal of Waste Water. Reuse and Saving of Water, Rain Water Harvesting. Solid Waste Management: Classification of Solid Waste, Collection, Transportation and Disposal of Solid. Recycling of Solid Waste: Energy Recovery, Sanitary Landfill, On-Site Sanitation. Air & Noise Pollution: Primary and Secondary air pollutants, Harmful effects of Air Pollution, Control of Air Pollution. . Noise Pollution Harmful Effects of noise pollution, control of noise pollution, Global warming & Climate Change, Ozone depletion, Greenhouse effect
Text Books:
1. Palancharmy, Basic Civil Engineering, McGraw Hill publishers.
2. Satheesh Gopi, Basic Civil Engineering, Pearson Publishers.
3. Ketki Rangwala Dalal, Essentials of Civil Engineering, Charotar Publishing House.
4. BCP, Surveying volume 1
Constructing Your Course Container for Effective Communication
Communicating effectively and consistently with students can help them feel at ease during their learning experience and provide the instructor with a communication trail to track the course's progress. This workshop will take you through constructing an engaging course container to facilitate effective communication.
Pengantar Penggunaan Flutter - Dart programming language1.pptx
Pengantar Penggunaan Flutter - Dart programming language1.pptx
How to Create a More Engaging and Human Online Learning Experience
How to Create a More Engaging and Human Online Learning Experience Wahiba Chair Training & Consulting
Wahiba Chair's Talk at the 2024 Learning Ideas Conference. Solutons Maths Escape Room Spatial .pptx
Solutions of Puzzles of Mathematics Escape Room Game in Spatial.io
Philippine Edukasyong Pantahanan at Pangkabuhayan (EPP) Curriculum
(𝐓𝐋𝐄 𝟏𝟎𝟎) (𝐋𝐞𝐬𝐬𝐨𝐧 𝟏)-𝐏𝐫𝐞𝐥𝐢𝐦𝐬
𝐃𝐢𝐬𝐜𝐮𝐬𝐬 𝐭𝐡𝐞 𝐄𝐏𝐏 𝐂𝐮𝐫𝐫𝐢𝐜𝐮𝐥𝐮𝐦 𝐢𝐧 𝐭𝐡𝐞 𝐏𝐡𝐢𝐥𝐢𝐩𝐩𝐢𝐧𝐞𝐬:
- Understand the goals and objectives of the Edukasyong Pantahanan at Pangkabuhayan (EPP) curriculum, recognizing its importance in fostering practical life skills and values among students. Students will also be able to identify the key components and subjects covered, such as agriculture, home economics, industrial arts, and information and communication technology.
𝐄𝐱𝐩𝐥𝐚𝐢𝐧 𝐭𝐡𝐞 𝐍𝐚𝐭𝐮𝐫𝐞 𝐚𝐧𝐝 𝐒𝐜𝐨𝐩𝐞 𝐨𝐟 𝐚𝐧 𝐄𝐧𝐭𝐫𝐞𝐩𝐫𝐞𝐧𝐞𝐮𝐫:
-Define entrepreneurship, distinguishing it from general business activities by emphasizing its focus on innovation, risk-taking, and value creation. Students will describe the characteristics and traits of successful entrepreneurs, including their roles and responsibilities, and discuss the broader economic and social impacts of entrepreneurial activities on both local and global scales.
Advanced Java[Extra Concepts, Not Difficult].docx
This is part 2 of my Java Learning Journey. This contains Hashing, ArrayList, LinkedList, Date and Time Classes, Calendar Class and more.
BBR 2024 Summer Sessions Interview Training
Qualitative research interview training by Professor Katrina Pritchard and Dr Helen Williams
Gender and Mental Health - Counselling and Family Therapy Applications and In...
A proprietary approach developed by bringing together the best of learning theories from Psychology, design principles from the world of visualization, and pedagogical methods from over a decade of training experience, that enables you to: Learn better, faster!
Recently uploaded (20)
Beyond Degrees - Empowering the Workforce in the Context of Skills-First.pptx
Beyond Degrees - Empowering the Workforce in the Context of Skills-First.pptx
IGCSE Biology Chapter 14- Reproduction in Plants.pdf
IGCSE Biology Chapter 14- Reproduction in Plants.pdf
বাংলাদেশ অর্থনৈতিক সমীক্ষা (Economic Review) ২০২৪ UJS App.pdf
বাংলাদেশ অর্থনৈতিক সমীক্ষা (Economic Review) ২০২৪ UJS App.pdf
Liberal Approach to the Study of Indian Politics.pdf
Liberal Approach to the Study of Indian Politics.pdf
Chapter wise All Notes of First year Basic Civil Engineering.pptx
Chapter wise All Notes of First year Basic Civil Engineering.pptx
B. Ed Syllabus for babasaheb ambedkar education university.pdf
B. Ed Syllabus for babasaheb ambedkar education university.pdf
Constructing Your Course Container for Effective Communication
Constructing Your Course Container for Effective Communication
Pengantar Penggunaan Flutter - Dart programming language1.pptx
Pengantar Penggunaan Flutter - Dart programming language1.pptx
How to Create a More Engaging and Human Online Learning Experience
How to Create a More Engaging and Human Online Learning Experience
Philippine Edukasyong Pantahanan at Pangkabuhayan (EPP) Curriculum
Philippine Edukasyong Pantahanan at Pangkabuhayan (EPP) Curriculum
Gender and Mental Health - Counselling and Family Therapy Applications and In...
Gender and Mental Health - Counselling and Family Therapy Applications and In...
spot a liar (Haiqa 146).pptx Technical writhing and presentation skills
spot a liar (Haiqa 146).pptx Technical writhing and presentation skills
Photoshop black and white tutorial
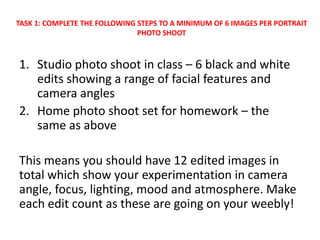
- 1. 1. Studio photo shoot in class – 6 black and white edits showing a range of facial features and camera angles 2. Home photo shoot set for homework – the same as above This means you should have 12 edited images in total which show your experimentation in camera angle, focus, lighting, mood and atmosphere. Make each edit count as these are going on your weebly! TASK 1: COMPLETE THE FOLLOWING STEPS TO A MINIMUM OF 6 IMAGES PER PORTRAIT PHOTO SHOOT
- 2. Choosing the right image to edit Sometimes it can be difficult to choose what image to invest in from your contact sheet. You are marked on your ability to select the correct image, so spend some time thinking about it. Below are some tips to help you: An obvious reject – the focus is off and so the intention of the photo to show details is lost A better image, however for the intentions of this shoot it isn’t right as there is too much of the face – but could it be cropped down? Detailed, in focus where it should be and shows the use of aperture, interesting, well-lit (and obviously edited)
- 3. Once your have chosen your image to edit, right click on it (hold down ctrl and click on a mouse key) and select open in Photoshop CS5
- 7. TASK 2: Crop your images to improve the COMPOSITION • Apply the following editing technique to all of your black and white images to show your strength in layout, framing and composition. Central framing – the focal point is in the middle of the frame Rule of thirds – the nose and lips are all along one of the vertical lines – see next slide
- 9. Use “the rule of thirds” for cropping This is the rule regarding where to position key bits of information in your frame so that it feels balanced and well composed. This image isn’t actually too bad in terms of composition, but the chin feels like it is taking up too much room. By using the crop tool, you can plan so that your key focal points sit on one or more of the corners of the rectangle in the middle of your guide. Notice how the crack in the lips have been placed on this cross, a scientific way to organise the composition of your images The final image may only seem slightly different, but it feels more considered and evenly spread and you will be marked on how well you recognise these key compositional details!
- 10. SAVING YOUR WORK…. When saving in Photoshop you can do this 2 ways: 1. If you have not finished editing and want to be able to access your layers again, save it as a Photoshop file (PSD) – WARNING – this makes the file size considerably large so only do this when you need to (do this today) 2. If you are finished and are sure you do not need to make anymore changes, or are ready to upload to weebly, save your image as a JPEG (JPG) – WARNING – although smaller in size this will compress your layers and so you will not be able to access them again