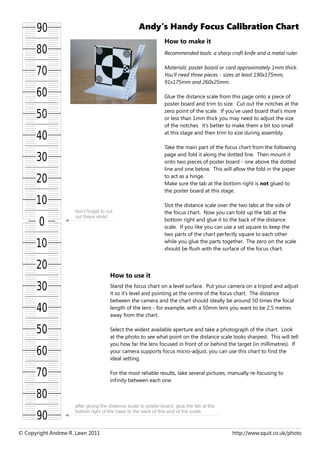
after gluing the distance scale to poster-board, glue the tab at the
bottom right of the base to the back of this end of the scale.
don’t forget to cut
out these slots!
How to make it
How to use it
Andy's Handy Focus Calibration Chart
Recommended tools: a sharp craft knife and a metal ruler.
Materials: poster board or card approximately 1mm thick.
You’ll need three pieces - sizes at least 190x175mm,
91x175mm and 260x25mm.
Glue the distance scale from this page onto a piece of
poster board and trim to size. Cut out the notches at the
zero point of the scale. If you’ve used board that’s more
or less than 1mm thick you may need to adjust the size
of the notches. It’s better to make them a bit too small
at this stage and then trim to size during assembly.
Take the main part of the focus chart from the following
page and fold it along the dotted line. Then mount it
onto two pieces of poster board - one above the dotted
line and one below. This will allow the fold in the paper
to act as a hinge.
Make sure the tab at the bottom right is glued to
the poster board at this stage.
Slot the distance scale over the two tabs at the side of
the focus chart. Now you can fold up the tab at the
bottom right and glue it to the back of the distance
scale. If you like you can use a set square to keep the
two parts of the chart perfectly square to each other
while you glue the parts together. The zero on the scale
should be flush with the surface of the focus chart.
not
Stand the focus chart on a level surface. Put your camera on a tripod and adjust
it so it’s level and pointing at the centre of the focus chart. The distance
between the camera and the chart should ideally be around 50 times the focal
length of the lens - for example, with a 50mm lens you want to be 2.5 metres
away from the chart.
Select the widest available aperture and take a photograph of the chart. Look
at the photo to see what point on the distance scale looks sharpest. This will tell
you how far the lens focused in front of or behind the target (in millimetres). If
your camera supports focus micro-adjust, you can use this chart to find the
ideal setting.
For the most reliable results, take several pictures, manually re-focusing to
infinity between each one.
http://www.squit.co.uk/photo© Copyright Andrew R. Lawn 2011
glue the back of this tab to the back of
the bottom end of the distance scale.
© Copyright Andrew R. Lawn 2011 • http://www.squit.co.uk/photo

Andy's handy focus calibration chart

  • 1.
    after gluing thedistance scale to poster-board, glue the tab at the bottom right of the base to the back of this end of the scale. don’t forget to cut out these slots! How to make it How to use it Andy's Handy Focus Calibration Chart Recommended tools: a sharp craft knife and a metal ruler. Materials: poster board or card approximately 1mm thick. You’ll need three pieces - sizes at least 190x175mm, 91x175mm and 260x25mm. Glue the distance scale from this page onto a piece of poster board and trim to size. Cut out the notches at the zero point of the scale. If you’ve used board that’s more or less than 1mm thick you may need to adjust the size of the notches. It’s better to make them a bit too small at this stage and then trim to size during assembly. Take the main part of the focus chart from the following page and fold it along the dotted line. Then mount it onto two pieces of poster board - one above the dotted line and one below. This will allow the fold in the paper to act as a hinge. Make sure the tab at the bottom right is glued to the poster board at this stage. Slot the distance scale over the two tabs at the side of the focus chart. Now you can fold up the tab at the bottom right and glue it to the back of the distance scale. If you like you can use a set square to keep the two parts of the chart perfectly square to each other while you glue the parts together. The zero on the scale should be flush with the surface of the focus chart. not Stand the focus chart on a level surface. Put your camera on a tripod and adjust it so it’s level and pointing at the centre of the focus chart. The distance between the camera and the chart should ideally be around 50 times the focal length of the lens - for example, with a 50mm lens you want to be 2.5 metres away from the chart. Select the widest available aperture and take a photograph of the chart. Look at the photo to see what point on the distance scale looks sharpest. This will tell you how far the lens focused in front of or behind the target (in millimetres). If your camera supports focus micro-adjust, you can use this chart to find the ideal setting. For the most reliable results, take several pictures, manually re-focusing to infinity between each one. http://www.squit.co.uk/photo© Copyright Andrew R. Lawn 2011
  • 2.
    glue the backof this tab to the back of the bottom end of the distance scale. © Copyright Andrew R. Lawn 2011 • http://www.squit.co.uk/photo