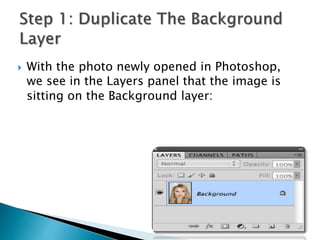
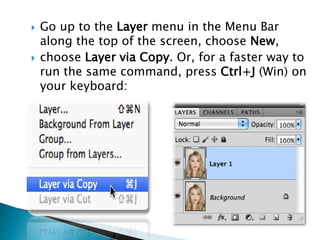
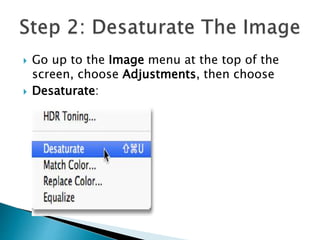
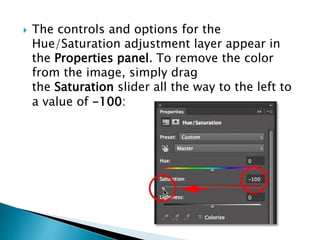
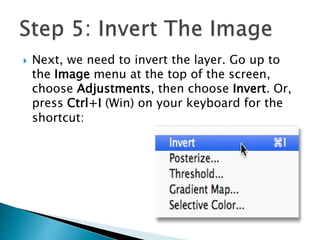
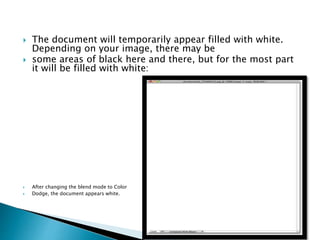
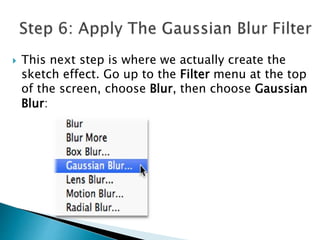
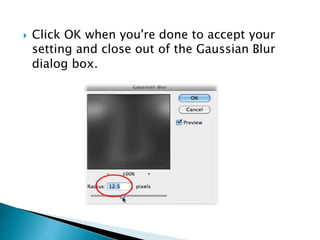
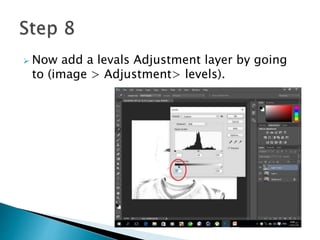
Submitted by:
Ahmad Mamand
Odette shalim
Dlven nader
University of Duhok
Faculty Of Science
Computer Department
 With the photo newly opened in Photoshop,
we see in the Layers panel that the image is
sitting on the Background layer:
 Go up to the Layer menu in the Menu Bar
along the top of the screen, choose New,
 choose Layer via Copy. Or, for a faster way to
run the same command, press Ctrl+J (Win) on
your keyboard:
 Go up to the Image menu at the top of the
screen, choose Adjustments, then choose
 Desaturate:
 The controls and options for the
Hue/Saturation adjustment layer appear in
the Properties panel. To remove the color
from the image, simply drag
the Saturation slider all the way to the left to
a value of -100:
 This removes all color from the photo,
leaving it in black and white
 Next, we need to make a copy of our
desaturated image. Go back up to the Layer
menu,
 choose New, then choose Layer via Copy, or
press Ctrl+J (Win) on your keyboard, just as
we did in Step 1. Photoshop makes a copy of
Layer 1, names
 it “Layer 1 copy”, and places it directly above
Layer 1 in the Layers panel:
 In the upper left of the Layers panel, change
the blend mode of the Background copy layer
from Normal (the default blend mode)
to Color Dodge:
 This inverts the image, giving it a film
negative appearance:
 Next, we need to invert the layer. Go up to
the Image menu at the top of the screen,
choose Adjustments, then choose Invert. Or,
press Ctrl+I (Win) on your keyboard for the
shortcut:
 The document will temporarily appear filled with white.
Depending on your image, there may be
 some areas of black here and there, but for the most part
it will be filled with white:
 After changing the blend mode to Color
 Dodge, the document appears white.
 This next step is where we actually create the
sketch effect. Go up to the Filter menu at the top
of the screen, choose Blur, then choose Gaussian
Blur:
 Click OK when you're done to accept your
setting and close out of the Gaussian Blur
dialog box.
 Now add a levals Adjustment layer by going
to (image > Adjustment> levels).
Pencil drawing
Pencil drawing

Pencil drawing

  • 1.
    Submitted by: Ahmad Mamand Odetteshalim Dlven nader University of Duhok Faculty Of Science Computer Department
  • 2.
     With thephoto newly opened in Photoshop, we see in the Layers panel that the image is sitting on the Background layer:
  • 3.
     Go upto the Layer menu in the Menu Bar along the top of the screen, choose New,  choose Layer via Copy. Or, for a faster way to run the same command, press Ctrl+J (Win) on your keyboard:
  • 4.
     Go upto the Image menu at the top of the screen, choose Adjustments, then choose  Desaturate:
  • 5.
     The controlsand options for the Hue/Saturation adjustment layer appear in the Properties panel. To remove the color from the image, simply drag the Saturation slider all the way to the left to a value of -100:
  • 6.
     This removesall color from the photo, leaving it in black and white
  • 7.
     Next, weneed to make a copy of our desaturated image. Go back up to the Layer menu,  choose New, then choose Layer via Copy, or press Ctrl+J (Win) on your keyboard, just as we did in Step 1. Photoshop makes a copy of Layer 1, names  it “Layer 1 copy”, and places it directly above Layer 1 in the Layers panel:
  • 9.
     In theupper left of the Layers panel, change the blend mode of the Background copy layer from Normal (the default blend mode) to Color Dodge:
  • 10.
     This invertsthe image, giving it a film negative appearance:
  • 11.
     Next, weneed to invert the layer. Go up to the Image menu at the top of the screen, choose Adjustments, then choose Invert. Or, press Ctrl+I (Win) on your keyboard for the shortcut:
  • 12.
     The documentwill temporarily appear filled with white. Depending on your image, there may be  some areas of black here and there, but for the most part it will be filled with white:  After changing the blend mode to Color  Dodge, the document appears white.
  • 13.
     This nextstep is where we actually create the sketch effect. Go up to the Filter menu at the top of the screen, choose Blur, then choose Gaussian Blur:
  • 14.
     Click OKwhen you're done to accept your setting and close out of the Gaussian Blur dialog box.
  • 15.
     Now adda levals Adjustment layer by going to (image > Adjustment> levels).