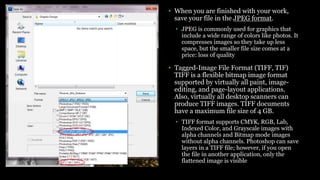
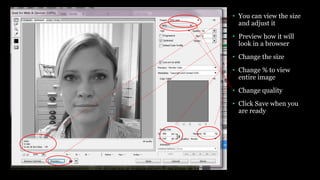
Graphic Design
Photoshop Lesson 1.1
Key Points
• Photoshop Images
• Photoshop Tools
• Meet Adobe instructor
• Saving
• Photoshop Resources
Photoshop
• Available for both Windows and Mac.
• Adobe Photoshop is an extremely powerful application that's used by many
professional photographers and designers.
-You can use Photoshop for almost any kind of image editing, such as
touching up photos, creating high-quality graphics, and much, much more.
• One of , if not the best, photo editing software programs.
Images: Raster vs. Vector
Raster images are made from tiny
blocks of color called pixels, the
smallest element of a digital image.
• Resolution determines the size of the
pixel
• Resolution is a measurement that
determines how many pixels get
packed into a given space
• Resolution=pixel density- or how
closely they are pack in pixels per
inch, ppi
• Baking cookies analogy –ask Mrs. Weaver
Vector images are made up of points
and paths that form shapes; these
shapes are filled and stroked (
outlined) with color. But these types of
images are more commonly created
and used by programs like Adobe
Illustrator.
• No pixels= resizing and image will
always look the same
• Watch Raster and Vector
video now
Setting Size and Resolution
• If you wanted to create an image for
web usage, then 72 ppi would be
sufficient
• If you plan on printing the image
you were editing on a standard
printer at home or in an office then
200 ppi is fine
• But if you were to send your image
to a high quality professional
printing company, 300 ppi is the
way to go. This is because they have
actual dots per inch or dpi to
account for .
Preset resolutions and sizes
• Under Preset: you can choose from
a list of predetermined
configurations based on the project
you are going to work on.
• It will automatically use 72 ppi if you
choose web or 300 ppi for photo.
Image dimension vs image size in a file
• Web preset • Note the image dimensions 640 x 480
• Note we are measuring in pixels
• Note the resolution is lower at 72 for
web
• Bottom right, look at the file space it
takes up- 900K or kilobyte
• Color Mode: RGB Color
• Background Contents: White
Bit, what is that?
• A bit is the smallest unit of
measurement that computers use to
store information.
• Each pixel in an image has a bit depth
• Bit depth controls how much color info
the image contains
• more bits = more colors = Bigger File
vs
Bits and color
• 1-bit or bitmap color mode-each bit can
only be black or white so these images are
black and white only
• 8-bit – can hold two values for each bit.
That’s 2 ^8th power or 256 color values.
Listen up, images in Gray scale mode
contain ONE channel so that is 8 bits per
channel equaling colors or shades of gray.
HOWEVER, RGB or Red, Green, Blue
contain three channels ( some people call
this 24-bit because of the 3 colors times 8
bit, 3 x 8 = 24. But it is still just 8 bit)
that’s 2^8 x 2^8 x 2^8= over 16 million
colors in your image.
• 8-bit CMYK ( sometimes referred to as
32-bit, but not technically) is the printed
version of 8-bit with Cyan(blue),
Magenta, Yellow, Black which would be
2^8 x 2^8 x 2^8 x 2^8. However a only
about 55,000 colors can be produced on
paper, which is why you would use CMYK.
They are the colors of ink
• 16-bit contain 65,536 colors in a
SINGLE channel, and are produced
by high end cameras shooting in
Raw or really good scanners. These
don’t look any different but they take
up twice as much space. Best for
photographers that want to have
many color changing options.
• 32-bit or HDR has way more colors
than any mortal really ever needs.
This is when a camera takes the
same picture at many different levels
of brightness. We will never use this
option.
• We will use 8-bit RGB most often
and comes as a standard preset
See the difference for
yourself. Notice how the
same image changes in color
and quality in the next slide.
Watch the Bits and Color Video now
Bitmap/1-bit Grayscale 8-bit RGB 8-bit
CMYK 8-bit RGB 16-bit RGB 32-bit
Back to Raster images
• Remember raster images have a
fixed number of pixels, so the closer
you get the more you can see.. Notice
when the flower is enlarged, it is
pixelated or fuzzy.
Creating a new document and its
Background color
• In this stage, you may leave the
background color white
• You may change this later if you
wish
• If an image has a transparent
background it will look checkered
with white and gray
Saving a document
• Hot Key to save is Ctrl + S
• A hot key is a shortcut to use on your
keyboard. I would like you to get used
to using them because they are more
efficient than going through multiple
menus.
• Or you can go to File Save As
• Save the file to your student thaw
space in a new folder you rename
called Graphic Design
• Name all your files like this-
Lastname_Firstname_Project
*do not use any spaces
• If you still plan to work on your
project, save the file as a Photoshop
(*PSD) this stands for Photoshop
Document
• This type of file format can not be
opened by many programs, so it is
best to only use with Adobe
programs
• When you are finished with your work,
save your file in the JPEG format.
• JPEG is commonly used for graphics that
include a wide range of colors like photos. It
compresses images so they take up less
space, but the smaller file size comes at a
price: loss of quality
• Tagged-Image File Format (TIFF, TIF)
TIFF is a flexible bitmap image format
supported by virtually all paint, image-
editing, and page-layout applications.
Also, virtually all desktop scanners can
produce TIFF images. TIFF documents
have a maximum file size of 4 GB.
• TIFF format supports CMYK, RGB, Lab,
Indexed Color, and Grayscale images with
alpha channels and Bitmap mode images
without alpha channels. Photoshop can save
layers in a TIFF file; however, if you open
the file in another application, only the
flattened image is visible
Two others you may consider
• GIF-Graphics Interchange Format
(pronounced Jif ) this is a popular choice for
graphics that include a limited number of
colors ( think simple cartoon art ), when you
need to save a transparent background, or
when you’re creating an animation.
• We may use this to produce projects later on
• PNG (Portable Network Graphics) is the up-
and-comer because it offers true
transparency and a wide range of colors. It
produces a higher-quality image than a
JPEG, but it generates lager files.
• When saving files from illustrator we will use
PNG to benefit from a transparent background
• Once you click save another window
will pop up asking you how large you
want the file to be saved as.
• There really isn't any reason that we
wouldn’t use the largest quality our
image will allow.
• If you were trying to save room when
attaching a lot of pictures to an email
you may choose medium over
maximum or high
When saving for web
• Choose Save for Web& Devices
• You can view the size
and adjust it
• Preview how it will
look in a browser
• Change the size
• Change % to view
entire image
• Change quality
• Click Save when you
are ready
Resources
• If you can’t figure out how to
accomplish a task in Photoshop,
Illustrator, or any other program we
will use, then you should search for
an answer online.
• Search by what it is you want to
know, and then type CS5.

P1.1

  • 1.
  • 2.
    Key Points • PhotoshopImages • Photoshop Tools • Meet Adobe instructor • Saving • Photoshop Resources
  • 3.
    Photoshop • Available forboth Windows and Mac. • Adobe Photoshop is an extremely powerful application that's used by many professional photographers and designers. -You can use Photoshop for almost any kind of image editing, such as touching up photos, creating high-quality graphics, and much, much more. • One of , if not the best, photo editing software programs.
  • 4.
    Images: Raster vs.Vector Raster images are made from tiny blocks of color called pixels, the smallest element of a digital image. • Resolution determines the size of the pixel • Resolution is a measurement that determines how many pixels get packed into a given space • Resolution=pixel density- or how closely they are pack in pixels per inch, ppi • Baking cookies analogy –ask Mrs. Weaver Vector images are made up of points and paths that form shapes; these shapes are filled and stroked ( outlined) with color. But these types of images are more commonly created and used by programs like Adobe Illustrator. • No pixels= resizing and image will always look the same • Watch Raster and Vector video now
  • 5.
    Setting Size andResolution • If you wanted to create an image for web usage, then 72 ppi would be sufficient • If you plan on printing the image you were editing on a standard printer at home or in an office then 200 ppi is fine • But if you were to send your image to a high quality professional printing company, 300 ppi is the way to go. This is because they have actual dots per inch or dpi to account for .
  • 6.
    Preset resolutions andsizes • Under Preset: you can choose from a list of predetermined configurations based on the project you are going to work on. • It will automatically use 72 ppi if you choose web or 300 ppi for photo.
  • 7.
    Image dimension vsimage size in a file • Web preset • Note the image dimensions 640 x 480 • Note we are measuring in pixels • Note the resolution is lower at 72 for web • Bottom right, look at the file space it takes up- 900K or kilobyte • Color Mode: RGB Color • Background Contents: White
  • 8.
    Bit, what isthat? • A bit is the smallest unit of measurement that computers use to store information. • Each pixel in an image has a bit depth • Bit depth controls how much color info the image contains • more bits = more colors = Bigger File vs
  • 9.
    Bits and color •1-bit or bitmap color mode-each bit can only be black or white so these images are black and white only • 8-bit – can hold two values for each bit. That’s 2 ^8th power or 256 color values. Listen up, images in Gray scale mode contain ONE channel so that is 8 bits per channel equaling colors or shades of gray. HOWEVER, RGB or Red, Green, Blue contain three channels ( some people call this 24-bit because of the 3 colors times 8 bit, 3 x 8 = 24. But it is still just 8 bit) that’s 2^8 x 2^8 x 2^8= over 16 million colors in your image. • 8-bit CMYK ( sometimes referred to as 32-bit, but not technically) is the printed version of 8-bit with Cyan(blue), Magenta, Yellow, Black which would be 2^8 x 2^8 x 2^8 x 2^8. However a only about 55,000 colors can be produced on paper, which is why you would use CMYK. They are the colors of ink • 16-bit contain 65,536 colors in a SINGLE channel, and are produced by high end cameras shooting in Raw or really good scanners. These don’t look any different but they take up twice as much space. Best for photographers that want to have many color changing options. • 32-bit or HDR has way more colors than any mortal really ever needs. This is when a camera takes the same picture at many different levels of brightness. We will never use this option. • We will use 8-bit RGB most often and comes as a standard preset
  • 10.
    See the differencefor yourself. Notice how the same image changes in color and quality in the next slide. Watch the Bits and Color Video now
  • 11.
    Bitmap/1-bit Grayscale 8-bitRGB 8-bit CMYK 8-bit RGB 16-bit RGB 32-bit
  • 12.
    Back to Rasterimages • Remember raster images have a fixed number of pixels, so the closer you get the more you can see.. Notice when the flower is enlarged, it is pixelated or fuzzy.
  • 13.
    Creating a newdocument and its Background color • In this stage, you may leave the background color white • You may change this later if you wish • If an image has a transparent background it will look checkered with white and gray
  • 14.
    Saving a document •Hot Key to save is Ctrl + S • A hot key is a shortcut to use on your keyboard. I would like you to get used to using them because they are more efficient than going through multiple menus. • Or you can go to File Save As • Save the file to your student thaw space in a new folder you rename called Graphic Design • Name all your files like this- Lastname_Firstname_Project *do not use any spaces
  • 15.
    • If youstill plan to work on your project, save the file as a Photoshop (*PSD) this stands for Photoshop Document • This type of file format can not be opened by many programs, so it is best to only use with Adobe programs
  • 16.
    • When youare finished with your work, save your file in the JPEG format. • JPEG is commonly used for graphics that include a wide range of colors like photos. It compresses images so they take up less space, but the smaller file size comes at a price: loss of quality • Tagged-Image File Format (TIFF, TIF) TIFF is a flexible bitmap image format supported by virtually all paint, image- editing, and page-layout applications. Also, virtually all desktop scanners can produce TIFF images. TIFF documents have a maximum file size of 4 GB. • TIFF format supports CMYK, RGB, Lab, Indexed Color, and Grayscale images with alpha channels and Bitmap mode images without alpha channels. Photoshop can save layers in a TIFF file; however, if you open the file in another application, only the flattened image is visible
  • 17.
    Two others youmay consider • GIF-Graphics Interchange Format (pronounced Jif ) this is a popular choice for graphics that include a limited number of colors ( think simple cartoon art ), when you need to save a transparent background, or when you’re creating an animation. • We may use this to produce projects later on • PNG (Portable Network Graphics) is the up- and-comer because it offers true transparency and a wide range of colors. It produces a higher-quality image than a JPEG, but it generates lager files. • When saving files from illustrator we will use PNG to benefit from a transparent background
  • 18.
    • Once youclick save another window will pop up asking you how large you want the file to be saved as. • There really isn't any reason that we wouldn’t use the largest quality our image will allow. • If you were trying to save room when attaching a lot of pictures to an email you may choose medium over maximum or high
  • 19.
    When saving forweb • Choose Save for Web& Devices
  • 20.
    • You canview the size and adjust it • Preview how it will look in a browser • Change the size • Change % to view entire image • Change quality • Click Save when you are ready
  • 21.
    Resources • If youcan’t figure out how to accomplish a task in Photoshop, Illustrator, or any other program we will use, then you should search for an answer online. • Search by what it is you want to know, and then type CS5.