Department of Mechanical Engineering
Metrology and Quality Control
Topic-Application of Metrology instruments to measure 5 features of any one
component available in our PROJECT LAB (each feature measurement 5 times).
Present the data in the form of bar-chart and pi-chart.
Present by-
Content
Introduction
 Instruments used in case study
 Research Case Study
 Sample Calculation for profile Projector
 Pie and bar charts
 Conclusion
 References
Introduction
Linear measuring instruments are designed either for line measurements or end Measurements. In end measuring instruments,
the measurement is taken between two end surfaces as in micrometer, slip gauge. Linear measurement applied to measurement
applies to measurement of lengths, diameters heights and thickness including external and internal measurements. The
instruments used for linear measurement can be classified as
1. Direct measuring instrument.
2. Indirect measuring instruments
The direct measuring instruments are of two types-
(i) Graduated
(ii) Non- graduated
 The graduated instruments include rules, vernier caliper, vernier height gauge, vernier depth gauge, micrometer, dial
indicator etc.
 The non-graduated instruments includes calipers trammels, telescope gauge, surface gauge, straight edges, wire gauge,
screw pitch gauges, etc.
1. Vernier caliper
Vernier caliper is linear measuring instrument which has of two scale one is fixed and other is movable.
the zero of the vernier scale coincides with zero of main scale.
For precise setting of the movable jaw an adjustment screw is provided.
Also arrangement screw is provided to lock the sliding scale on the fixed main scale.
Vernier calipers are employed for both internal and external measurements.
Instruments used in this case study
Least count of
vernier caliper is
0.02mm
Smallest division on main scale 1
Least count = -------------------------------------------- = --------------
No. of divisions on vernier scale 50
Least count = 0.02 mm
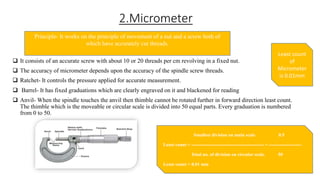
2.Micrometer
 It consists of an accurate screw with about 10 or 20 threads per cm revolving in a fixed nut.
 The accuracy of micrometer depends upon the accuracy of the spindle screw threads.
 Ratchet- It controls the pressure applied for accurate measurement.
 Barrel- It has fixed graduations which are clearly engraved on it and blackened for reading
 Anvil- When the spindle touches the anvil then thimble cannot be rotated further in forward direction least count.
The thimble which is the moveable or circular scale is divided into 50 equal parts. Every graduation is numbered
from 0 to 50.
Principle- It works on the principle of movement of a nut and a screw both of
which have accurately cut threads.
Least count
of
Micrometer
is 0.01mm
Smallest division on main scale 0.5
Least count = ----------------------------------------------- = ---------------------
Total no. of division on circular scale. 50
Least count = 0.01 mm
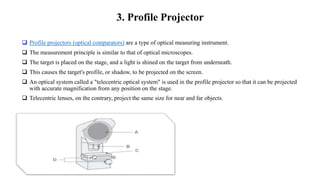
3. Profile Projector
 Profile projectors (optical comparators) are a type of optical measuring instrument.
 The measurement principle is similar to that of optical microscopes.
 The target is placed on the stage, and a light is shined on the target from underneath.
 This causes the target's profile, or shadow, to be projected on the screen.
 An optical system called a "telecentric optical system" is used in the profile projector so that it can be projected
with accurate magnification from any position on the stage.
 Telecentric lenses, on the contrary, project the same size for near and far objects.
Research Case Study
Fig.a) Object Fig.b) Thread Terminology
Fig.c) Dimensions of object
Readings by vernier caliper for dimension k
No. of
readings
Main
scale
reading
(MSR)
mm
Vernier
scale
reading
(VSR)
mm
Total
Reading
mm
1. 6 18 6.36
2. 6 10 6.20
3. 6 5 6.10
4. 6 19 6.38
5. 6 23 6.46
Sample Calculation for vernier
caliper
Total reading = MSR+ (LC *
VSR)
Total reading = 6+ (0.02*18)
Total reading = 6.36 mm
Readings by vernier caliper for dimension S
No. of
readings
Main
scale
reading
(MSR)
mm
Vernier
scale
reading
(VSR)
mm
Total
Reading
mm
1. 16 24 16.48
2. 16 24 16.48
3. 16 23 16.46
4. 16 24 16.48
5. 16 23 16.46
Readings by vernier caliper for dimension b
No. of
readings
Main
scale
reading
(MSR)
mm
Vernier
scale
reading
(VSR)
mm
Total
Reading
mm
1. 31 34 31.68
2. 31 20 31.40
3. 31 33 31.66
4. 31 34 31.68
5. 31 32 31.64
Readings by Micrometer screw gauge for dimension d1
No. of
readings
Main scale
reading
(MSR)
mm
Circular
scale
reading
(CSR)
mm
Total
Reading
mm
1. 9.5 47 9.97
2. 9.5 46 9.96
3. 9.5 46 9.96
4. 9.5 47 9.97
5. 9.5 46 9.96
Sample calculation for
micrometer
Total reading = MSR + (
LC* CSR )
Total reading = 9.5 + (
0.01* 47)
Total reading = 9.97 mm
Readings by Profile Projector for Major diameter
Sr
.
no
R1 co-
ordinate
mm
R4 co-
ordinate
mm
Major diameter =
R4 - R1
mm
1. 2.71 12.34 9.63
2. 2.65 12.34 9.67
3. 2.58 12.34 9.76
4. 2.68 12.33 9.65
5. 2.65 12.34 9.67
Sample Calculation for profile Projector
At R1 co-ordinate the main scale reading (MSR) for micrometer = 2.5 mm
and circular scale reading (CSR) is = 21mm
R1 = MSR + (LC * CSR)
R1= 2.5 + (0.01 * 21)
R1= 2.71 mm
Similarly for R4,
At R1 co-ordinate the main scale reading (MSR) for micrometer = 12
mm
And circular scale reading (CSR) is = 34mm
so,
R4 = MSR + (LC * CSR)
R4= 12 + (0.01 * 34)
R4= 12.34 mm
So,
Major diameter = R4 - R1
Major diameter = 12.34 – 2.71
Major diameter = 9.63 mm
Readings by Profile Projector for Minor diameter
Sr.
no
R2 co-
ordinate
mm
R3 co-
ordinate
mm
Minor diameter =
R3 – R2
mm
1. 3.38 11.51 8.13
2. 3.39 11.54 8.15
3. 3.37 11.99 8.62
4. 3.96 12.10 8.14
5. 3.39 11.54 8.15
Readings by Profile Projector for Pitch
Sr.
no
P1 co-
ordinate
mm
P2co-
ordinate
mm
Pitch = P2 – P1
mm
1. 14.82 15.29 0.47
2. 11.67 12.20 0.53
3. 11.49 11.99 0.50
4. 11.58 12.10 0.52
5. 11.08 11.54 0.46
Pi and bar charts by vernier caliper for dimension
5.9
6
6.1
6.2
6.3
6.4
6.5
1 2 3 4 5
Readings
in
mm
No of Reading
Vernier Caliper
Series1
Readings by vernier caliper for dimension b
20%
20%
20%
20%
20%
Vernier Caliper
1 2 3 4 5
Readings by Micrometer screw gauge for dimension d1
20%
20%
20%
20%
20%
Micrometer Screw Gauge
1 2 3 4 5
9.954
9.956
9.958
9.96
9.962
9.964
9.966
9.968
9.97
1 2 3 4 5
Series1, 9.96
Readings
in
mm
No of redings
Micrometer Screw Gauge
Readings by Profile Projector for Major diameter
20%
20%
20%
20%
20%
Profile Projector
1
2
3
4
5
9.56
9.58
9.6
9.62
9.64
9.66
9.68
9.7
9.72
9.74
9.76
1 2 3 4 5
Series1, 9.67
Readings
in
mm
No of reading
Profile Projector
Readings by Profile Projector for Minor diameter
19%
20%
21%
20%
20%
Profile Projector
1
2
3
4
5
7.8
7.9
8
8.1
8.2
8.3
8.4
8.5
8.6
8.7
1 2 3 4 5
Series1, 8.15
Readings
in
mm
No of reading
Profile Projector
Readings by Profile Projector for Pitch
19%
21%
20%
21%
19%
Profile Projector
1
2
3
4
5
0.42
0.44
0.46
0.48
0.5
0.52
0.54
1 2 3 4 5
Series1, 0.46
Axis
Title
Axis Title
Profile Projector

Metrology and Quality Control.pptx

  • 1.
    Department of MechanicalEngineering Metrology and Quality Control Topic-Application of Metrology instruments to measure 5 features of any one component available in our PROJECT LAB (each feature measurement 5 times). Present the data in the form of bar-chart and pi-chart. Present by-
  • 2.
    Content Introduction  Instruments usedin case study  Research Case Study  Sample Calculation for profile Projector  Pie and bar charts  Conclusion  References
  • 3.
    Introduction Linear measuring instrumentsare designed either for line measurements or end Measurements. In end measuring instruments, the measurement is taken between two end surfaces as in micrometer, slip gauge. Linear measurement applied to measurement applies to measurement of lengths, diameters heights and thickness including external and internal measurements. The instruments used for linear measurement can be classified as 1. Direct measuring instrument. 2. Indirect measuring instruments The direct measuring instruments are of two types- (i) Graduated (ii) Non- graduated  The graduated instruments include rules, vernier caliper, vernier height gauge, vernier depth gauge, micrometer, dial indicator etc.  The non-graduated instruments includes calipers trammels, telescope gauge, surface gauge, straight edges, wire gauge, screw pitch gauges, etc.
  • 4.
    1. Vernier caliper Verniercaliper is linear measuring instrument which has of two scale one is fixed and other is movable. the zero of the vernier scale coincides with zero of main scale. For precise setting of the movable jaw an adjustment screw is provided. Also arrangement screw is provided to lock the sliding scale on the fixed main scale. Vernier calipers are employed for both internal and external measurements. Instruments used in this case study Least count of vernier caliper is 0.02mm Smallest division on main scale 1 Least count = -------------------------------------------- = -------------- No. of divisions on vernier scale 50 Least count = 0.02 mm
  • 5.
    2.Micrometer  It consistsof an accurate screw with about 10 or 20 threads per cm revolving in a fixed nut.  The accuracy of micrometer depends upon the accuracy of the spindle screw threads.  Ratchet- It controls the pressure applied for accurate measurement.  Barrel- It has fixed graduations which are clearly engraved on it and blackened for reading  Anvil- When the spindle touches the anvil then thimble cannot be rotated further in forward direction least count. The thimble which is the moveable or circular scale is divided into 50 equal parts. Every graduation is numbered from 0 to 50. Principle- It works on the principle of movement of a nut and a screw both of which have accurately cut threads. Least count of Micrometer is 0.01mm Smallest division on main scale 0.5 Least count = ----------------------------------------------- = --------------------- Total no. of division on circular scale. 50 Least count = 0.01 mm
  • 6.
    3. Profile Projector Profile projectors (optical comparators) are a type of optical measuring instrument.  The measurement principle is similar to that of optical microscopes.  The target is placed on the stage, and a light is shined on the target from underneath.  This causes the target's profile, or shadow, to be projected on the screen.  An optical system called a "telecentric optical system" is used in the profile projector so that it can be projected with accurate magnification from any position on the stage.  Telecentric lenses, on the contrary, project the same size for near and far objects.
  • 7.
    Research Case Study Fig.a)Object Fig.b) Thread Terminology Fig.c) Dimensions of object
  • 8.
    Readings by verniercaliper for dimension k No. of readings Main scale reading (MSR) mm Vernier scale reading (VSR) mm Total Reading mm 1. 6 18 6.36 2. 6 10 6.20 3. 6 5 6.10 4. 6 19 6.38 5. 6 23 6.46 Sample Calculation for vernier caliper Total reading = MSR+ (LC * VSR) Total reading = 6+ (0.02*18) Total reading = 6.36 mm
  • 9.
    Readings by verniercaliper for dimension S No. of readings Main scale reading (MSR) mm Vernier scale reading (VSR) mm Total Reading mm 1. 16 24 16.48 2. 16 24 16.48 3. 16 23 16.46 4. 16 24 16.48 5. 16 23 16.46 Readings by vernier caliper for dimension b No. of readings Main scale reading (MSR) mm Vernier scale reading (VSR) mm Total Reading mm 1. 31 34 31.68 2. 31 20 31.40 3. 31 33 31.66 4. 31 34 31.68 5. 31 32 31.64
  • 10.
    Readings by Micrometerscrew gauge for dimension d1 No. of readings Main scale reading (MSR) mm Circular scale reading (CSR) mm Total Reading mm 1. 9.5 47 9.97 2. 9.5 46 9.96 3. 9.5 46 9.96 4. 9.5 47 9.97 5. 9.5 46 9.96 Sample calculation for micrometer Total reading = MSR + ( LC* CSR ) Total reading = 9.5 + ( 0.01* 47) Total reading = 9.97 mm
  • 11.
    Readings by ProfileProjector for Major diameter Sr . no R1 co- ordinate mm R4 co- ordinate mm Major diameter = R4 - R1 mm 1. 2.71 12.34 9.63 2. 2.65 12.34 9.67 3. 2.58 12.34 9.76 4. 2.68 12.33 9.65 5. 2.65 12.34 9.67 Sample Calculation for profile Projector At R1 co-ordinate the main scale reading (MSR) for micrometer = 2.5 mm and circular scale reading (CSR) is = 21mm R1 = MSR + (LC * CSR) R1= 2.5 + (0.01 * 21) R1= 2.71 mm Similarly for R4, At R1 co-ordinate the main scale reading (MSR) for micrometer = 12 mm And circular scale reading (CSR) is = 34mm so, R4 = MSR + (LC * CSR) R4= 12 + (0.01 * 34) R4= 12.34 mm So, Major diameter = R4 - R1 Major diameter = 12.34 – 2.71 Major diameter = 9.63 mm
  • 12.
    Readings by ProfileProjector for Minor diameter Sr. no R2 co- ordinate mm R3 co- ordinate mm Minor diameter = R3 – R2 mm 1. 3.38 11.51 8.13 2. 3.39 11.54 8.15 3. 3.37 11.99 8.62 4. 3.96 12.10 8.14 5. 3.39 11.54 8.15 Readings by Profile Projector for Pitch Sr. no P1 co- ordinate mm P2co- ordinate mm Pitch = P2 – P1 mm 1. 14.82 15.29 0.47 2. 11.67 12.20 0.53 3. 11.49 11.99 0.50 4. 11.58 12.10 0.52 5. 11.08 11.54 0.46
  • 13.
    Pi and barcharts by vernier caliper for dimension 5.9 6 6.1 6.2 6.3 6.4 6.5 1 2 3 4 5 Readings in mm No of Reading Vernier Caliper Series1
  • 14.
    Readings by verniercaliper for dimension b
  • 15.
    Readings by verniercaliper for dimension b 20% 20% 20% 20% 20% Vernier Caliper 1 2 3 4 5
  • 16.
    Readings by Micrometerscrew gauge for dimension d1 20% 20% 20% 20% 20% Micrometer Screw Gauge 1 2 3 4 5 9.954 9.956 9.958 9.96 9.962 9.964 9.966 9.968 9.97 1 2 3 4 5 Series1, 9.96 Readings in mm No of redings Micrometer Screw Gauge
  • 17.
    Readings by ProfileProjector for Major diameter 20% 20% 20% 20% 20% Profile Projector 1 2 3 4 5 9.56 9.58 9.6 9.62 9.64 9.66 9.68 9.7 9.72 9.74 9.76 1 2 3 4 5 Series1, 9.67 Readings in mm No of reading Profile Projector
  • 18.
    Readings by ProfileProjector for Minor diameter 19% 20% 21% 20% 20% Profile Projector 1 2 3 4 5 7.8 7.9 8 8.1 8.2 8.3 8.4 8.5 8.6 8.7 1 2 3 4 5 Series1, 8.15 Readings in mm No of reading Profile Projector
  • 19.
    Readings by ProfileProjector for Pitch 19% 21% 20% 21% 19% Profile Projector 1 2 3 4 5 0.42 0.44 0.46 0.48 0.5 0.52 0.54 1 2 3 4 5 Series1, 0.46 Axis Title Axis Title Profile Projector