SlideShare a Scribd company logo
1 of 60
Metrology laboratory
SYLLABUS OF METROLOGYLAB PRESCRIBED BYJNTUK
Note: MINIMUM OF 8 EXPERIMENTS TO BE DONE
1. Measurement of lengths, heights, diameters by vernier calipers, micrometers etc.
2. Measurement of bores by internal micrometers and dial bore indicators.
3. Use of gear tooth vernier caliper for tooth thickness inspection and flange micro meter
for checking the chordal thickness of spur gear.
4. Machine tool alignment test on the lathe.
5. Machine tool alignment test on drilling machine.
6. Machine tool alignment test on milling machine.
7. Angle and taper measurements with bevel protractor, Sine bars, rollers and balls.
8. Use of spirit level in finding the straightness of a bed and flatness of a surface.
9. Thread inspection with two wire/ three wire method & tool makers microscope.
10. Surface roughness measurement with roughness measuring instrument.
AVEV
Page 1
Metrology laboratory
LIST OF EXPERIMENTS
1. Calibration of Precision Measuring Instruments & Measurement of lengths,
heights, diameters by vernier calipers, micrometers etc
2. Measurement of Bore Using Inside Micrometer & Dial Bore Indicator
3. Angle Measurement Using Bevel Protactor & Sine Bar
4. Measurement of Gear Tooth Thickness By Gear Tooth Vernier Calliper
5. Measurement of Screw & Gear Terminology Using Tool-Maker’s Microscope
6. Surface Roughness Measurement
7. Machine Tool Alignment Tests on Lathe
8. Use of spirit level in finding the straightness of a bed and flatness of a surface.
9. Vibration Measurement of Machines (Additional Experiment)
AVEV Page 2
Metrology laboratory
CALIBRATION OF PRECISION MEASURING INSTRUMENTS
AIM:
To calibrate Vernier calipers, vernier height gauge & Micrometer and to measure
lengths, heights and diameters by these instruments.
APPARATUS :
Vernier callipers, vernier height gauge, Micrometer, Slip gauges & Surface plate,
OBJECTIVES:
1. To know about calibration, precision & accuracy
2. To know about least count of any precise instrument.
3. To know the difference between line standard and end standard
SPECIFICATION:
Vernier calipers: Range: L. C:
vernier height gauge: Range: L. C:
Micrometer: Range: L. C:
THEORY:
CALIBRATION:
It is the process of determining true values by comparison with an accurate standard. It is
the process of framing the scale of the instrument by applying some standards. Calibration is a
pre measurement process, generally carried out by manufacturers. During the course of use, due
to friction and lack of proper maintenance, errors enter into the instruments and these should be
properly accounted for when taking measurements. If the accuracy is to be maintained,
periodical calibration is essential.
AVEV Page 3
Metrology laboratory
1) VERNIER CALIPER:
PRINCIPLE
The Vernier caliper has one ‘L’ shaped frame with a fixed jaw on which Vernier scale is
attached. The principle of Vernier is that when two scales or divisions slightly different in size
are used, the difference between them can be utilized to enhance the accuracy of measurement.
LEAST COUNT
Least Count is the smallest length that can be measured accurately and is equal to the
difference between a main scale division and a Vernier scale division.
LEAST COUNT = 1 MSD – 1 VSD (OR) = 1MSD/no of vernier scale divisons
Fig 1. Vernier Callipers
1. Outside jaws: used to measure external diameter or width of an object
2. Inside jaws: used to measure internal diameter of an object
3. Depth probe: used to measure depths of an object or a hole
4. Main scale: gives measurements of up to one decimal place (in cm).
5. Main scale: gives measurements in fraction(in inch)
6. Vernier gives measurements up to two decimal places(in cm)
7. Vernier gives measurements in fraction(in inch)
AVEV Page 4
Metrology laboratory
USES:
It is used to measure the external diameter, the internal diameter and the length of the
given specimen.
2) MICROMETER:
PRINCIPLE
Micrometer works on the principle of screw and nut. A screw moves when it is rotated
through a nut. The relation between number of rotations and the distance moved is used for
measuring the dimensions.
LEAST COUNT
The micrometer essentially consists of U shaped frame. The component to be measured is
held between fixed anvil and movable spindle. The spindle can be moved with the help of
thimble. There are two scales on micrometer, a main scale and a circular scale. The barrel is
graduated in unit of 0.5 mm whereas thimble has got 50 divisions around its periphery. One
revolution of thimble moves 0.5 mm which is the lead of the screw and also the pitch.
Least Count = Pitch of the spindle screw ÷ Number of divisions on the thimble
Fig 2. Micrometer Screw Gauge
AVEV Page 5
Metrology laboratory
USES:
1. Outside micrometer is used to measure the diameter of solid cylinder.
2. Inside micrometer is used to measure the internal diameters of hollow cylinders and
spheres.
3) VERNIER HEIGHT GAUGE
Vernier height gauge is similar to vernier caliper but in this instrument the
graduated bar is held in a vertical position and it is used in conjunction with a surface
plate.
The vernier height gauge is designed for accurate measurements and marking of
vertical heights above a surface plate datum. It can also be used to measure differences in
heights by taking the vernier scale readings at each height and determining the difference
by subtraction. The vernier height gauge is read in the same way as vernier calipers.
Fig 3. Vernier Height Gauge
AVEV Page 6
Metrology laboratory
4) SLIP GAUGES:
They are rectangular blocks hardened and carefully stabilized. The surfaces are highly
polished to enhance wringing. It is used as a reference standard for transferring the dimensions of
unit of length from primary standard. It is generally made up of high carbon, high chromium
hardened steel.
USES:
These are accurate and used as comparator.
5) SURFACE PLATE:
The foundation of all geometric accuracy and indeed of all dimensional measurement
in workshop is surface plate. It is a flat smooth surface sometimes with leveling screws at the
bottom.
USES:
It is used as a base in all measurements.
PROCEDURE FOR CALIBRATION:
1.) The range of the instruments is noted down.
2.) Within that range, slip gauges are selected in steps of 2mm .
3.) The measuring instrument is placed on the surface plate and set for zero and the slip gauges are
placed one by one between the measuring points (jaws of the instruments.)
4.) The slip gauge (actual) readings and the corresponding (observed) readings in the measuring
instruments are noted down and tabulated.
CALIBRATION OF VERNIER CALLIPERS
S.No Slip M.S.R VC LC Measured Error
Gauge reading ( Measured
Reading MSR+(VCXL.C) reading- Actual)
(mm)
AVEV Page 7
Metrology laboratory
MEASUREMENT OF LENGTH BY VERNIER CALLIPERS
S.No M.S.R VC LC Measured Error Final
reading Reading
MSR+(VCXL.C)
Average reading
CALIBRATION OF MICROMETER
S.No Slip M.S.R C.S.C LC Measured reading Error
Gauge MSR+(CSCXL.C) ( Measured
Reading reading- Actual)
(Actual)
AVEV Page 8
Metrology laboratory
MEASUREMENT OF DIAMETER BY MICROMETER
S.No M.S.R CSC LC Measured Error Final Reading
reading
MSR+(CSCXL.C)
Average reading
CALIBRATION OF VERNIER HEIGHT GAUGE
S.No Slip M.S.R VC LC Measured Error
Gauge reading ( Measured
Reading MSR+(VCXL.C) reading- Actual)
(Actual)
Mm
AVEV Page 9
Metrology laboratory
MEASUREMENT OF HEIGHT BY VERNIER HEIGHT GAUGE
S.No M.S.R VC LC Measured Error Final Reading
reading
MSR+(VCXL.C)
Average reading
GRAPHS:
Calibration graphs are then drawn for all measuring instruments between
1.) Actual value and Observed value.
ANALYSIS:
AVEV Page 10
Metrology laboratory
RESULT:
CONCLUSION:
AVEV Page 11
Metrology laboratory
VIVA-VOCE:
1. What is measurement?
2. Define the term calibration.
3. Define precision and accuracy.
4. List the various linear measuring instruments.
5. What is sensitivity?
6. What is meant by least count of an instrument?
7. Define Zero reading of a Micrometer?
8. Specify the term Backlash of a micrometer?
9. What is the principle of vernier calipers and Micrometer screw gauge?
10. What is the difference between line and end standard?
11. What is the function and principle of a ratchet drive in case of a micrometer?
AVEV Page 12
Metrology laboratory
MEASUREMENTOF BORE USING INSIDE MICROMETER& DIAL
BORE INDICATOR
AIM:
To measure the bore diameter using inside micrometer and dial bore indicator
APPARATUS:
Inside micrometer , dial bore indicator, scale, vernier calipers
OBJECTIVES:
1. To know the working principle of inside micrometer
2. To know the working principle of dial bore gauge
3. To know about different types of gauges
THEORY:
INSIDE MICROMETER CALIPERS
The inside micrometer is intended for internal measurement to an accuracy of 0.01mm. In
principle, it is similar to an external micrometer and is used for measuring holes in the range of
5-30mm.
Fig 1. Inside Micrometer Calipers
The instrument shown in fig. 1 comprises measuring tips constituted by jaws. One of the
jaws is held stationary and the second one moves by the movement of thimble. A lock nut is
provided for locking of spindle. It is also provided with a ratchet stop for applying constant
force.
AVEV Page 13
Metrology laboratory
DIAL BORE GAUGE
The instrument basically consists of a hollow tube into which is contained a lever pivoted
about its intermediate support. One end of the lever is linked to the movable contact point of the
instrument and the other end of the lever actuates the dial indicator. Interchangeable rods and
washers can be used in order to broaden the range of measurement.
Fig 2. Dial bore gauge
AVEV Page 14
Metrology laboratory
Fig 3. Set of Interchangeable rods
PROCEDURE:
INSIDE MICROMETER CALIPERS
1. First the diameter of the bore is measured approximately by a scale.
2. The micrometer is then adjusted at a dimension slightly smaller than the diameter of the
bore.
3. One tip is held against the bore and the other is adjusted by moving the thimble till the
correct feel is sensed.
4. The micrometer is then removed and reading is taken.
S.No M.S.R(a) THIMBLE TOTAL READING
READING(b) a + (LC * b)
Average reading
AVEV Page 15
Metrology laboratory
DIAL BORE GAUGE
1. For the required measuring dimension select the appropriate interchangeable rod and/or
washers and set them on the main unit.
2. Diameter is obtained automatically from the guide. To adjust the instrument to measure
diameter , search for a position where the bore gauge reading is maximized by tilting the
bore gauge back and forth .
3. The indicator reading is recorded to get the required diameter.
S.No BORE GAUGE READING
Average Bore Diameter =
PRECAUT IONS:
1. One contact surface must always be moved sideways in order to ensure that
diameter is being measured and not chord.
ANALYSIS:
AVEV Page 16
Metrology laboratory
RESULT:
1. Bore diameter measured by using inside micrometer =
2. Bore diameter indicated by dial bore indicator =
CONCLUSION:
Department of Mechanical Engineering Page 17
Metrology laboratory
VIVA-VOCE:
1. What is the working principle of inside micrometer?
2. What is the working principle of dial bore gauge?
3. What is a comparator?
4. What are the limitations of comparators?
5. Name the three materials commonly used for gauges.
AVEV Page 18
Metrology laboratory
ANGLE MEASUREMENTUSING BEVEL PROTACTOR& SINE BAR
AIM:
To determine the angle of the given wedge using Since bar & Bevel Protractor
APPARATUS:
1. Sine bar 2. Dial Gauge 3. Slip gauges 4. Bevel Protractor. 5. Surface plate
OBJECTIVES:
1. To know the working principle of sine bar & bevel protractor
2. To know about the wringing of slip gauges
THEORY:
SINE BAR:
It is a simple instrument used for setting and measuring angles. It consists of a flat bar
and two rollers attached to the bar at each end. The axes of these rollers are parallel to each other
and also to the upper surface of the sine bar. The distance between the centres of the rollers is
fixed for a particular sine bar and the same is always written on the bar.
Fig 1. Sine Bar
The principle of the sine bar is shown in figure 2. The sine bar is always used in conjunction with
a true surface (surface plate). If ‘h’ is the height of the combination slip gauges and ‘l’ is the
distance between the roller centres , then the angle of the setting is given as,
θ =Sin-1(h/l)
AVEV Page 19
Metrology laboratory
The angle to be measured is determined by an indirect method, as a function of sine. For this
reason, device is called as ‘sine bar’.
Fig 2. Measurement of parallelism of the upper surface of the workpiece using dial gauge
PROCEDURE:
1. For measuring unknown angle it is necessary to first find the angle approximately with
the help of a bevel protractor.
2. The sine bar is then set up at that nominal(approximate) angle on a surface plate by suitable
combination of slip gauges.
3. The component to be checked is placed over the surface of the sine bar.(if necessary the
component may be clamped with the angle plate)
4. The dial gauge is then set at one end of the work and moved along the upper surface of the
component.
5. If there is any variation in parallelism of the upper surface of the component and the surface
plate, it is indicated by the dial gauge.
6. The combination of the slip gauges is so adjusted that the upper surface is truly parallel
with the surface plate.
7. Than note down the height of the combination of slip gauges.
AVEV Page 20
Metrology laboratory
8. Then angle of the component is Calculated by the relation , θ =Sin-1(h/l)
9. Repeat the procedure 3 or 4 times and take the average.
OBSERVATIONS:
S. No Height of Slip Gauge Length of The Sine Bar (l) Angle
Blocks (h)
Average Reading:
BEVEL PROTRACTOR:
The simple bevel protractor can be extended in its accuracy by the application of a
circular vernier scale and this instrument is known as vernier bevel protractor. It consists of a
base plate attached to the main body and an adjustable blade which is attached to the circular
plate containing vernier scale. The adjustable blade can be set at any angle with the base plate
and can be locked.
The main scale on the disc is graduated in degrees. The vernier scale has 12 divisons on
each side of the center zero. These are marked 0-60 minutes of arc, so that each divison equals
1/12 of 60, that is 5 minutes of arc. These 12 divisons occupy the same space as 23° on the main
scale. Therefore each divison of the vernier is equal to 1/12 of 23° or 5 minutes of arc. Thus the
least count of the instrument is 5 minutes.
AVEV Page 21
Metrology laboratory
Fig 3. Bevel Protractor.
The graduations are read to the right and left on both the main scale and the vernier scale.
When the main scale is read to the right of the zero of the main scale, the vernier is also read to
the right of zero of the vernier scale.
Fig 4. Enlarged View of Vernier Scale of Bevel Protractor
The reading shown above gives
AVEV Page 22
Metrology laboratory
a) The largest whole degree on the main scale indicated by the vernier zero divison ie
28°
b) The reading on the vernier scale in line with a main scale divison is 3*5ꞌ = 15ꞌ
c) Hence the vernier bevel protractor reads 28° + 15 ꞌ = 28°15 ꞌ
OBSERVATIONS:
Least count of Bevel Protractor =
S.No Main scale Vernier Coincidence(VC) Total Reading
reading(MSR) MSR + (VC*LC)
1
2
3
Average Reading:
PRECAUTIONS:
1. The sine bar should not be used for angle greater than 60° because any possible error
in construction is accentuated at this limit.
2. A compound angle should not be formed by mis-aligning of work piece with the sine bar.
This can be avoided by attaching the sine bar and work against an angle plate.
3. As far as possible longer sine bar should be used since using longer sine bars reduces many
errors.
ANALYSIS:
AVEV Page 23
Metrology laboratory
RESULT:
The angle of the given specimen measured with the sine bar is…………….
The angle of the given specimen measured with the Bevel Protractor is………….
CONCLUSION:
AVEV Page 24
Metrology laboratory
VIVA-VOCE:
1. List various angular measuring instruments.
2. What are the sources of errors in sine bars?
3. What is the working principle of sine bar & bevel protractor
4. What are the advantages of slip gauges?
5. Why sine bar is not preferred for generating angles larger than 45°.
6. What is least count of bevel protractor?
AVEV Page 25
Metrology laboratory
MEASUREMENTOF GEAR TOOTHTHICKNESS BY GEAR TOOTH
VERNIER CALLIPER
AIM:
1. To determine the width of the tooth at pitch circle.
2. To determine the height of the tooth above pitch circle.
3. To check the width of the tooth at pitch circle using gear tooth vernier caliper
APPARATUS :
Gear tooth Vernier caliper, Spur gear of known module, Surface plate
OBJECTIVES:
1.To know about gear terminology
2. To find the chordal thickness of the gear tooth by theoretical methods
THEORY:
Brief description of different characteristics of measuring of tooth thickness by gear tooth
vernier is given. It consists of a horizontal and a vertical vernier scale. It is based on the principle
of vernier scale. The thickness of a tooth at pitch line and the addendum is measured by an
independent tongue each of which is adjusted independently by adjusting the slide screws on
graduated beams.
TERMINOLOGY OF GEAR TOOTH
(i) Pitch circle diameter (PCD): It is the diameter of a circle which by pure rolling action would
produce the same motion on the toothed gear wheel. It is equal to D = (T X OD)/ (T+2) where
OD = outside diameter T = number of teeth
(ii) MODULE: It is defined as the length of the pitch circle diameter per tooth. Module m=D/T
and is expressed in mm.
(iii) CIRCULAR PITCH (CP): It is the arc distance measured around the pitch circle from the
flank of one tooth to a similar flank in the next tooth and is given by CP==ΠD/T=Πm.
(iv) ADDENDUM: This is the radial distance from the pitch circle to the tip of the tooth. It is
equal to one module.
(v)Clearance: This is the radial distance from the tip of a tooth to the bottom of the mating tooth
space when the teeth are symmetrically engaged. Its standard value is 0.157m or 0.25m.
AVEV Page 26
Metrology laboratory
(vi) DEDENDUM: This is the radial distance from the pitch circle to the bottom of tooth space.
Dedendum = Addendum +Clearance = m +0.157m =1 .157m.=1.25m (metric gearing system)
vii) TOOTH THICKNESS: This is the arc distance measured along the pitchcircle from the
intercepts with one flank to the intercepts with the other flank of the same tooth. It is given by
mT Sin(90/T)
Fig 1. Vernier Gear Tooth Callipers
AVEV Page 27
Metrology laboratory
Fig 2. GEAR TOOTH DETAILS
PROCEDURE:
For finding PCD, module, addendum, dedendum and clearance:
1. First find the blank diameter, OD by a vernier calliper and also count the number of teeth T of
the spur gear.
2. Next calculate pitch circle diameter D=(TxOD)/(T+2)
3. Find addendum, clearance, pitch, module and dedendum as per the
formulae given in the theory.
FOR CHORDAL TOOTH THICKNESS (using gear tooth calliper):
1. Set the chordal depth (addendum) on the vertical slide of the gear tooth vernier and then
insert the jaws of the instrument on the tooth to be measured.
2. Adjust the horizontal vernier slide by the fine adjusting screw so that the jaws just touch
the tooth.
3. Read the horizontal vernier slide and note the reading. It gives the chordal thickness of tooth.
4. Repeat the observations for the different teeth.
5. Compare the values of different characteristics with the standard value and set the
percentage error.
AVEV Page 28
Metrology laboratory
OBSERVATION:
1. Least count of caliper = mm
2. Number of teeth =
CHORDAL THICKNESS:
S.NO M.S.R V.S.R CHORDAL
THICKNESS
(M.S.R+V.S.R*L.C)
CALCULATIONS:
1. Pitch circle diameter, D=(TxOD)/(T+2) =
2. module, m=D/T mm =
3. Pitch(p) =m*π
4. depth = 0.7p
3. Addendum= 0.3p =
4. Dedendum= 0.4p =
5. Theoritical Chordal Thickness = mT Sin(90/T)= p/2
ANALYSIS:
AVEV Page 29
Metrology laboratory
RESULT:
1. Theoritical Chordal Thickness =
2. Theoritical Chordal addendum =
3. Chordal thickness measured by gear tooth vernier calipers =
CONCLUSION:
AVEV Page 30
Metrology laboratory
VIVA-VOCE:
1. Define chordal thickness of a gear.
2. Define the terms pitch circle and base circle of a gear.
3. Define module, addendum and dedundum.
4. What is pressure angle of a gear.
5. What is back lash.
6. What is helix angle.
7. What is lead angle.
AVEV Page 31
Metrology laboratory
MEASUREMENTOF SCREW TERMINOLOGYUSING
TOOL-MAKER’S MICROSCOPE
AIM:
Measurement of screw thread parameters like pitch & flank angle using tool
maker's microscope.
APPARATUS:
Tool makers microscope & screw thread specimen
OBJECTIVES:
1.To know the working principle of Tool makers microscope
2. To know about the terminology of screw tread
THEORY:
Tool maker's microscope is based on principle of optics. A general view of the
toolmaker’s microscope giving its optical system is shown in fig 1. This is designed for
measurements on parts of complex forms e.g. profile of external threads, tools etc. It can also be
used to measure centre-to-centre distances of holes in any planes.
Basically it consists of the optical head, which can be adjusted vertically along the ways
of a supporting column. This optical head can be clamped in any position by a screw. The
working table on which the parts to be inspected are placed, is secured on a heavy hollow base.
The table has longitudinal and lateral movements. These movements are controlled by accurate
micrometer screws having thimble scales and verniers. A light source is arranged at the back of
the base. The source of light provides a horizontal beam of light, which is reflected from a mirror
by 90° upwards towards the table. This beam of light passes through a transparent glass on which
flat parts to be checked, are placed. A shadow image of the outline of contour of the part passes
through the objective of the optical head and is projected by a system of three prisms to a ground
glass screen. Observations are made through the eyepiece of the optical head.
Cross lines are engraved on the ground glass screen, which can be rotated through 360°,
and the measurements are made by these cross lines. The angle of rotation of screen can be read
through an auxiliary eyepiece provided on the optical head. The eyepiece field of view contains
an illuminated circular scale with a divison value of 1 minute. The optical head tube is adjusted
AVEV Page 32
Metrology laboratory
in height for focusing purposes, till a sharp image of the projected contour is seen on the ground
glass screen.
Fig 1.Toolmaker’s Microscope
AVEV Page 33
Metrology laboratory
PROCEDURE:
MEASUREMENT OF SCREW THREAD PITCH:
1) To measure the screw pitch, the screw is mounted on the table.
2) The microscope is focused (by adjusting the height of the optical head) until a sharp
image of the projected contour of the screw is seen of the ground glass screen.
3) The contour is set so that some point on the contour coincides with the cross line on the
screen. The reading on the thimble of the longitudinal micrometer screw is noted.
4) Then the table is moved by the same screw until a corresponding point on the contour
(profile) of the next thread coincides with the cross line. The reading is again noted and
the difference in two reading gives the screw pitch.
MEASUREMENT OF ANGLE OF THE THREAD:
1) To determine the thread angle, the screen is rotated until a line on the screen coincides
with one flank of the thread profile.
2) Then the angle of the screen rotation is noted.
3) The screen is further rotated until the same line coincides with the other flank of the
thread. The angle is noted again and the difference in two angular readings gives the
actual angle of the screw.
S. Description Initial Final Actual Theoritical % Error
No reading reading Experimental value
reading
1 Pitch of the
screw
2 Depth
3 thickness
4 Thread angle
CALCULATIONS:
AVEV Page 34
Metrology laboratory
RESULTS:
1) Pitch of the screw =
2) depth of the screw =
3) thickness of the screw =
4) Angle of the thread =
PRECAUTIONS:
1) Obtain clean picture of cross line and the cross thread seen through the eyepiece.
2) For angular measurements lines must remain parallel to flank edge of the tooth.
ANALYSIS:
AVEV Page 35
Metrology laboratory
CONCLUSIONS:
VIVA-VOCE:
1. What is pitch of a screw thread.
2. What is flank angle of a screw thread.
3. What are the applications of toolmaker's microscope?
4. What is the ‘best size’ wire?
AVEV Page 36
Metrology laboratory
SURFACE ROUGHNESS MEASUREMENT
AIM:
To measure the surface roughness of a machined part using handysurf
APPARATUS:
HANDYSURF E-35A/B
OBJECTIVES:
1. To know about the terms like surface roughness, waviness, lay & profile
2. To know about the different methods of surface roughness measurement
3. To know about the working principle of Handysurf
SURFACE TEXTURE:
Surface topography is of great importance in specifying the function of a surface. A
significant proportion of component failure starts at the surface due to either an isolated
manufacturing discontinuity or gradual deterioration of the surface quality. Typical of the former
is the laps and folds which cause fatigue failures and of the latter is the grinding damage due to
the use of a worn wheel resulting in stress corrosion and fatigue failure. The most important
parameter describing surface integrity is surface roughness. In the manufacturing industry,
surface must be within certain limits of roughness. Therefore, measuring surface roughness is
vital to quality control of machining work piece. Below are the definition of surface roughness
and its main measurement methods. From a knowledge of the roughness amplitude and
wavelength values expected from the surface, it is possible to select the appropriate instrument
settings for a reliable roughness measurement.
Fig 1 Elements of surface character of a machined surface
DEFINITIONS:
SURFACE TEXTURE is the local deviations of a surface from its ideal shape e.g perfect flat
shape, perfect cylinderical shape, sherical shape etc. The measure of the surface texture is
generally determined in terms of its roughness, waviness and Form . In surface texture there are
many factors that, when combined, characterise a surface’s profile. For example:
AVEV Page 37
Metrology laboratory
• the microstructure of the material
• the action of the cutting tool
• the instability of the cutting tool on the material
• errors in the machine tool guideways
• Mainly, what affects the surface texture could be summarized in the speed of the cutting tool,
feed rate & the depth of cut.
ROUGHNESS – a quantitative measure of the process marks produced during the creation of
the surface and other factors such as the structure of the material. The action of the cutting tool,
chemical action, polishing, lapping, and the structure of the material all contribute to the
roughness of the surface.
WAVINESS – a longer wavelength variation in surface away from its basic form (e.g. straight
line or arc). . It may result from such factors as machine or work deflection, vibration, chatter,
heat treatment, or warping strains
**Because both process and machine induced irregularities occur simultaneously, roughness is
superimposed over waviness.
LAY refers to the predominant direction of the surface texture. Ordinarily lay is determined by
the particular production method and geometry used.Turning, milling, drilling, grinding, and
other cutting tool machining processes usually produce a surface that has lay
PROFILE is, mathematically, the line of intersection of a surface with a sectioning plane which
is (ordinarily) perpendicular to the surface. It is a two-dimensional slice of the threedimensional
surface. Almost always profiles are measured across the surface in a direction perpendicular to
the lay of the surface. Shortly saying, it's the graphical representation of the surface.
AVEV Page 38
Metrology laboratory
Fig 2. Profile generation by the intersection of sectioning plane with the surface
CENTER LINE (Mean line) : mathematically it's poisoned in such a way that within the
sampling length the sum of areas enclosed by the profile above & below the center line are equal.
FORM of a surface is the profile of the surface under consideration ignoring variations due to
roughness and waviness. Deviations from the desired form result from clamping marks or sliding
marks machining guide errors etc.
ARITHMETICAL MEAN ROUGHNESS (Ra)
Arithmetic mean deviation from the mean line of the profile (Ra) is defines as the average value
of the ordinates (y1, y2, y3……,yn) from the mean line.
Fig 3. Arithmetic mean deviation
Where l = Sampling length, f(x) indicates height of a point chosen from the profile with respect
to the center line .
AVEV Page 39
Metrology laboratory
Ra readings serve well for surface finish control in most instances. It may be mentioned that Ra
provides an average reading and several different surfaces can have the same average. Thus,
more knowledge of the surface texture is required.
TEN-POINT MEAN ROUGHNESS (RZ)
A section of standard length is sampled from the mean line on the roughness chart. The
distance between the peaks and valleys of the sampled line is measured in the y direction. Then,
the average peak is obtained among 5 tallest peaks(Yp), as is the average valley between 5
lowest valleys(Yv). The sum of these two values is expressed in micrometer( µm).
Fig 4. Ten point height of irregularities
The R.M.S value (Rq) is defined as the square root of the mean of the squares of the
ordinates of the surface measured from the mean line
FILTERS are electronic or mathematical methods or algorithms which separate out different
wavelengths and allow us to see only the wavelengths we are interested in.
CUT-OFF is a filter and is used as a means of separating or filtering the wavelengths of a
component. Cut-offs have a numerical value that when selected will reduce or remove the
unwanted wavelengths on the surface. For example, a roughness filter cut-off with a numeric
value of 0.8mm will allow wavelengths below 0.8mm to be assessed with wavelengths above
0.8mm being reduced in amplitude; the greater the wavelength, the more severe the reduction.
For a waviness filter cut-off with a numeric value of 0.8mm, wavelengths above 0.8mm will be
assessed with wavelengths below 0.8mm being reduced in amplitude.
AVEV Page 40
Metrology laboratory
SAMPLE LENGTH : after the data has been filtered with a cut –off, we then sample it.
Sampling is done by breaking the data into equal sample lengths. The sample lengths have the
same numeric value as the cut-off. In other words, if you use a 0.8mm cut-off, then the filtered
data will be broken down into 0.8mm sample lengths. These sample lengths are chosen in such a
way that a good statistical analysis can be made of the surface. In most cases, five sample lengths
are used for analysis.
Fig.5 : Sample of surface profile
Rsk –(it's an amplitude parameter which's a measure of the vertical characteristics of the surface
deviations). Rsk : is a measurement of skewness and will indicate whether the surface consists of
mainly peaks, valleys or an equal combination of both. It is the measure of the symmetry of the
profile about the mean line. A surface with predominant peaks will be considered as 'positive
skew' and a surface with predominant valleys will be considered as 'negative skew'
RSm (it's a spacing parameter- which's a measure of the horizontal characteristics of the surface
deviations). Rsm is the mean spacing between profile peaks as they pass through the mean line
(spacing is the distance between points that cross the mean line within a sample length in an
upward direction).
*note - almost all parameters are defined over 1 sample length, however in practice more than 1
sample length is assessed (usually 5) and the mean calculated. This provides a better statistical
estimate of the parameter's measured value
THE TRACER METHOD : Which uses a stylus that's dragged across the surface. This method
is the most common for obtaining quantitative results.
AVEV Page 41
Metrology laboratory
HANDYSURF E-35A/B:
This equipment measures parameters of amplitude of surface profiles like Arithmetic
mean deviation of profile (Ra), Root mean square deviation of profile(Rq) & Maximum height
(Ry, Rmax, Rt, Rz, Rzmax, Pt) by scanning a mechanical stylus across the sample. A modern
typical surface measuring instrument will consist of a stylus with a small tip (diamond) a gauge
or transducer, a traverse datum and a processor. The surface is measured by moving the stylus
across the surface. As the stylus moves up and down along the surface, the transducer converts
this movement into a signal which is then exported to a processor which converts this into a
number and usually a visual profile. (The stylus must be moved in a straight line to give accurate
readings)
PROCEDURE:
1. Place the driving unit of handysurf on the workpiece in such a way that the bottom of the driving
unit is in contact with the workpiece for which the measurement will be made.
2. If the workpiece is smaller in size then set the adjuster to a groove at the rear side of the tracing
driver, and adjust the height of the tracing driver to become parallel between the workpiece
surface and the tracing driver. Then fix it with screw.
3. Press the ON• PRT•▼ button to turn the power of the amplification indicator on.
4. Press the SEL• ALT button shortly for about 0.5 second and select the cutoff value screen
5. Select the required cutoff value by pressing the ON• PRT•▼ button or MEAS•▲button.
6. Press the SEL•ALT button shortly for about 0.5 second and indicate the Ra screen.
7. Press the MEAS•▲ button and the measurement will start.
Department of Mechanical Engineering Page 42
Metrology laboratory
Fig 6 . Stylus operation
RESULTS:
S.No Type of workpiece Ra Rz Rq
1
2
3
ANALYSIS:
Department of Mechanical Engineering Page 43
Metrology laboratory
CONCLUSIONS:
AVEV Page 44
Metrology laboratory
VIVA-VOCE:
1. What is surface finish (or) roughness?
2. Why surface finish is important in engineering applications?
3. What is the unit of surface roughness.
4. How do you classify geometrical irregularities.
5. What is the working principle of Talysurf.
AVEV Page 45
Metrology laboratory
MACHINE TOOL ALIGNMENT TEST ON LATHE
AIM: To conduct alignment tests on lathe machine & To find straightness of a bed and flatness
of a surface using spirit level.
APPARATUS:
A lathe in good working condition with all standard accessories, i.e. live and dead
centers, sleeve etc, Dial indicator, Dial stand 'with magnetic base, Flexible dial stand, Parallel
blocks, Straight edge, Straight bar, Standard mandrel, Straight spirit level, Box type spirit level,
Alignment microscope, Taut wire, Set of spanners, Mandrel and centre draw bar.
OBJECTIVES:
1. To know about the different alignment tests of lathe
2. To know the use of spirit level & dial gauge in alignment tests
THEORY:
For metrology purposes the term alignment refers to two axes merged in each other or
where one axis extends beyond the other. Two lines or axes are said to be in alignment when
their distance apart at several points over a given length is measured and this distance does not
exceed a given standard tolerance. The dimensions of a gauge, its surface finish, geometry and
accurate production of components/parts depend upon the inherent quality and accuracy of the
machine tool used for its manufacture.
1. The alignment test is carried out to check the grade of manufacturing accuracy of the machine
tool. It consists of checking the relationship between various machine elements (such as bed,
table, spindle etc) when the machine tool is idle and unloaded.
2. The various tests applied to any machine tool could be grouped as below :
(a) Tests for the level of installation of machine in horizontal and vertical planes,
(b) Tests for flatness of machine bed and for straightness and parallelism of bed ways or bearing
surfaces,
(c) Tests for perpendicularity of guide ways to other guide ways or bearing surfaces,
(d) Tests for true running of the main spindle and its axial movements,
(e) Tests for parallelism of spindle axis to guideways or bearing surfaces.
AVEV Page 46
Metrology laboratory
(f) Tests for the line of movement of various members, e.g., saddle and table cross slides etc.
along their ways,
(g) Performance tests in which some test pieces are machined and their accuracy and finish is
checked.
Levelling of the Machine.
Before the various tests on any machine tool are carried out, it is very essential that it
should be installed in truly horizontal and vertical planes. In horizontal plane, both longitudinal
and transverse directions are equally important. If, say, any long lathe bed is not installed truly
horizontal the bed will undergo a deflection, thereby producing a simple bend and undesirable
stresses will be introduced. If the bed is not installed truly horizontal in transverse direction,
twist will be introduced. Thus the movement of the saddle can’t be in a straight line and true
geometric cylinder can’t be generated.
For proper installation and maintenance of its accuracy, a special concrete foundation of
considerable depth must be prepared. Also this must be insulated from the surrounding floor by
introducing some form of damping.
The level of the machine bed in longitudinal and transverse directions is generally tested
by a sensitive spirit level. The saddle is kept approximately in the centre of the bed support feet.
The spirit level is then placed at a-a (Fig. 1), to ensure the level in the longitudinal direction. It is
then traversed along the length of bed and readings at various places noted down. For test in
transverse direction the level is placed on a bridge piece to span the front and rear guideways and
then reading is noted. It is preferable to take two readings in lon-gitudinal and transverse
directions simultaneously so that the effect of adjustments in one direction may also be observed
in the other.
AVEV Page 47
Metrology laboratory
Fig 1 level of installation
The readings in transverse direction reveal any twist or wind in the bed. It may be noted
that the two guideways may be perfectly levelled in longitudinal direction, but might not be
parallel to each other. This is revealed by the test in transverse direction. The straightness of bed
in longitudinal direction for the long beds can also be determined by other methods, e.g., using
straight edges, autocollimators or by taut wire method. But the test in transverse direction can be
carried out only by spirit level. It is desired that the front guideway should be convex only as the
cutting forces and the weight of carriage act downward on it. If the front guideways are concave,
then the effect will be comulative. The tendency of the carriage, under cutting forces is to lift
upwards from the rear and this is prevented by a gib placed underneath the guideways. With the
result, an upward force acts on the rear guideways ; which must, therefore, be made concave.
Transverse level may be in any direction, but no twist can be tolerated.
True Running of Locating Cylinder of Main Spindle.
Locating cylinder is provided to locate the chuck or face plate. However locating surface can’t be
threaded one as threads get worn out soon and thus introducing play in face plate or chuck. Thus
locating surface is cylindrical and this must run truly; for only then the face plate etc., can run
truly. The dial indicator is fixed to the carriage (or any other fixed member) and the feeler of the
indicator touches the locating surface (fig 2). The surface is then rotated on its axis and indictor
should not show any movement of needle.
AVEV Page 48
Metrology laboratory
Fig 2 Fig 3
Axial Slip of Main Spindle and True Running of Shoulder Face of Spindle Nose
Let us first distinguish between the axial play and the axial slip. Axial play means the
indispensable freedom of spindle movement in axial direction to prevent it from seizing by
heating. The spindle is supported between two bearings. Due to running of spindle, there will be
a rise in temperature and thermal expansion of spindle would be there. If no axial play is
allowed, it would try to bend. Thus there will be no adverse effect of axial play if the direction of
cutting forces remains same. If the direction of cutting force changes, there would be some error
introduced due to movement of spindle axially in either direction. Under such conditions,
therefore, it is advisable to cut threads in one direction only.
Axial slip is defined as the axial spindle movement which follows the same pattern and is
due to the manufacturing error. Actually this test is meant to check this error. To test this the
feeler of the dial gauge rests on the face of the locating spindle shoulder and the dial gauge
holder is clamped to the bed (Fig 3). The locating cylinder is then rotated and the change in
reading noted down. The readings are taken at two diametrically opposite points. The total error
indicated by the movement of the pointer includes three main sources of errors.
(i) Axial slip due to error in bearings supporting the locating shoulder, i.e., the bearings are not
AVEV Page 49
Metrology laboratory
perpendicular to the axis of rotation and due to it a point on the shoulder will move axially in and
out at diametrically opposite points.
(ii) Face of the locating shoulder not in a plane perpendicular to axis of rotation. (Hi)
Irregularities of front face. Due to axial slip, in screw cutting, the pitch will not be uniform due
to periodic movement of the spindle. This, however, is not important while turning.
True Running of Headstock Centre.
Headstock centre is live centre and the workpiece has to rotate with this centre. If it is not
true with the axis of movement of the spindle, eccentricity will be caused while turning a work,
as the job axis would not coincide with the axis of rotation of main spindle. For testing this error,
the feeler of the dial indicator is pressed perpendicular to the taper surface of the centre (Fig. 4),
and the spindle is rotated. The deviation indicated by the dial gauge gives the trueness of the
centre.
Fig 4 Fig 5
Parallelism of the Main Spindle to Saddle Movement.
This has to be checked in both vertical and horizontal planes. In this we require the use of
mandrel. An important precaution in the use of mandrels and dial indicator is mentioned here.
The mandrel must be so proportioned that its overhang does not produce appreciable sag, or else
AVEV Page 50
Metrology laboratory
the sag must be calculated and accounted for. The rigidity indicator set up is also very important
and must be carefully watched. Otherwise variations in readings are recorded by pointer may be
solely due to deflection of the indicator mounting in different positions and it becomes very
difficult to detect and isolate the spurious deflection from the true variations. If axis of the
spindle is not parallel to bed in horizontal direction, a tapered surface is produced. Any deviation
from parallelism of spindle axis from bed in vertical axis will produce a hyperboloid surface. For
this test, a mandrel is fitted in the taper socket of the spindle. Mandrel has a concentric taper
shank which is close fit to the spindle nose taper. The feeler of the dial indicator is pressed on the
mandrel and the carriage is moved. The indication in horizontal plane is given by dial (b) and in
vertical plane by dial (a) (Fig. 5). In vertical plane the mandrel should be rising towards the free
end in order to counteract the weight of mandrel and job. But for counter-acting cutting forces, it
should be lower towards free end. In horizontal plane, mandrel should be inclined in a direction
opposite to the direction of tool pressure.
True running of taper socket in main spindle.
If the axis of tapered hole of the socket is not concentric with the main spindle axis, eccentric
and tapered jobs will be produced. To test it, a mandrel is fitted into the tapered hole and
readings at two extremes of the mandrel are taken by means of a dial indicator as shown in Fig.
6.
Fig 6 Fig 7
Parallelism of tailstock guideways with the movement of carriage.
Sometimes the job is held between head-stock and tail stock centre for turning. In that
case the job axis must coincide with the tailstock centre. If the tailstock guideways are not
AVEV Page 51
Metrology laboratory
parallel with the carriage movement there will be some offset of the tailstock centre and this
results in taper turning.
To check the parallelism of tailstock guideways in both the planes i.e., horizontal and vertical, a
block is placed on the guideways as shown in Fig.7 and the feeler of the indicator is touched on
the horizontal and vertical surfaces of the block. The dial indicator is held in the carriage and
carriage is moved. Any error is indicted by the pointer of dial indicator.
Movement of upper slide parallel with main spindle in vertical plane.
The dial indicator if fixed in the tool post as shown in fig 8. A mandrel is fitted in the spindle.
The feeler of the dial gauge is pressed against the mandrel in vertical plane and the upper slide is
moved longitudinally. This error is not tested in horizontal plane because there is swivelling
arrangement for taper turning.
Fig 8 Fig 9
Parallelism of tailstock sleeve to saddle movement.
If the tailstock sleeve is not parallel to the saddle movement, the height of dead centre
would vary as varying lengths of sleeve are taken out. For the jobs held between two centres, it is
necessary that the central axis of the dead centre be coaxial with the job axis in both the planes.
If it is not so, the job may be tilted up or down or in sideways due to the support of the dead
centre. The test is carried out by fixing the dial indicator on the tool post and pressing the
plunger against the sleeves first in vertical and then in horizontal plane (Fig. 9). The carriage is
moved along the full length of the sleeve and deviations as indicated by dial indicator are noted
AVEV Page 52
Metrology laboratory
down. Tailstock sleeve should be rising towards the free end in vertical plane and should be
inclined towards the tool pressure in horizontal plane.
Parallelism of tailstock sleeve taper socket to saddle movement.
A mandrel is put in the sleeve socket. The dial gauge is fixed on the tool post and
plunger is pressed against the mandrel and saddle is moved from one side to the other. This test
is carried out in both the horizontal and vertical planes.
Alignment of both the centres in vertical plane.
Besides testing the parallelism of the axes individually (main spindle axis and tailstock
axis) it is-necessary to check the relative position of the axes also. Both the axes may be parallel
to carriage movement but they may not be coinciding. So when a job is fitted between the
centres, the axis of the job will not be parallel to the carriage movement. This test is to be carried
out in vertical plane only. A mandrel is fitted between the two centres and dial gauge on the
carriage. The feeler of the dial gauge is pressed against the mandrel in vertical plane as shown in
Fig. 10 and the carriage is moved and the error noted down.
Fig 10
PROCEDURE:
1. Clean all surfaces perfectly on which alignment tests are to be performed,
2. Follow the following test chart for performing different alignment tests.
AVEV Page 53
Metrology laboratory
ALIGNMENT TABLE:
S. OBJECT MEASURING PERMISSIBLE ERROR ACTUAL
No INSTRUMENT ERROR
1 Test for level of Spirit level, Front guide ways
installation Gauge block to 0.02mm/metre convex only.
a) In longitudinal suite the guide Rear guide ways 0.01 to
direction ways of the lathe 0.02mm/metre convexity.
b) In transverse bed Bed level in crosswise
direction direction ± 0.02mm/metres.
Tailstock guide ways
parallel with the movement
of carriage 0.02mm/m.
2 Straightness of saddle in Cylindrical test 0.02mm over 600mm length
horizontal plane mandril(600mm of mandrel.
long), Dial
gauge
3 Alignment of both the Cylindrical test 0.02mm over 600mm length
centres in vertical plane mandril(600mm of mandrel.
long), Dial
gauge
4 True running of taper Test mandrel Position A, 0.01mm,
socket in main spindle with taper shank position B 0.02mm.
& 300mm long
cylindrical
measuring part,
Dial gauge
5 Parallelism of main Test mandrel a) 0.02/300 mm
spindle to saddle with taper shank mandrel rising
movement & 300mm long towards free end
a) In vertical plane cylindrical only.
b) In horizontal measuring part, b) 0.02/300 mm
plane Dial gauge mandrel inclined at
free end towards tool
pressure only.
6 Movement of upper slide Test mandrel 0.02 mm over total
parallel with main spindle with taper shank movement of the slide
in vertical plane & 300mm long
cylindrical
measuring part,
Dial gauge
7 True running of loacating Dial gauge 0.01mm/revolution of the
cylinder of main spindle spindle.
AVEV Page 54
Metrology laboratory
8 True running of head Dial gauge 0.01mm/revolution of the
stock centre spindle.
9 Parallelism of tail stock Dial gauge a) 0.01/100 mm( tail
sleeve to saddle stock sleeve inclined
movement towards tool pressure
a) In vertical plane only)
b) In horizontal b) 0.01/100mm
plane (Tailstock sleeve
rising towards free
end only)
10 Parallelism of tail stock Test mandrel a) 0.03/300 mm,
sleeve taper socket to with taper shank mandrel rising
saddle movement & 300mm long towards free end
a) In vertical plane cylindrical only.
b) In horizontal measuring part, b) 0.03/300 mm,
plane Dial gauge mandrel inclined at
free end towards tool
pressure only.
ANALYSIS:
AVEV Page 55
Metrology laboratory
CONCLUSION:
VIVA-VOCE:
1. What is the need of machine alignment test?
2. What is the use of spirit level & dial gauge in alignment tests
3. Distinguish between alignment test and performance test of a machine tool.
AVEV Page 56
Metrology laboratory
VIBRATION MEASUREMENT OF MACHINES
AIM:
To measure machine Vibration using single axis accelerometer
APPARATUS :
Accelerometer(10 mv/g), A/D Converter, Computer with Labview software
OBJECTIVES:
1 To know about different methods of condition monitoring
2 To know about sensitivity of sensor
3 To know the difference between time wave and frequency spectrum
SPECIFICATIONS:
1. Sampling frequency: 51.2 KHz
2. Frequency range: 0 – 25600 Hz
3. Sensitivity of ICP accelerometer: 10 mV/g
THEORY:
Vibration analysis one type of condition monitoring techniques being used in industries
for many years. Machines and engines contain components which has reciprocating and rotary
motions and hence it produce vibration. The causes for machine vibration are unbalance,
looseness, bearing faults, misalignment, gear tooth problem. Machine vibration is measured by
mounting the accelerometer on top of the component for which vibration is going to be
measured. Labview programming language is used to write the program for data acquisition in
the form of time waves and to convert them into frequency spectrums. Time wave forms are used
to find the overall vibration of the machine which measures the condition of a machine.
Frequency spectrums will be used to know the different sources of vibration and its
corresponding amplitudes.
DATA ACQUISITION SYSTEM & IT’S COMPONENTS
Data acquisition system (DAQ) consists of Vibration sensor, filter, amplifier, A/D
Converter & computer. Vibration sensor is connected to amplifier and A/D Converter to convert
the analog signal into digital signal which can be stored in a computer. The fundamental task of a
AVEV Page 57
Metrology laboratory
DAQ system is the measurement or generation of real-world physical signals. Before a
computer-based system can measure a physical signal, a sensor or transducer must convert the
physical signal into an electrical signal such as voltage or current. Often, the plug-in DAQ board
is considered to
Fig 1. Diesel Engine with vibration measurement setup
be the entire DAQ system. However, the board is only one of the system components. Unlike
most stand-alone instruments, sometimes you cannot directly connect signals to a plug-in DAQ
board. A signal conditioning accessory must condition the signals before the plug-in DAQ board
converts them to digital information. Finally, software controls the DAQ system—acquiring the
rawdata, analyzing the data, and presenting the results.
Vibration severety chart
AVEV Page 58
Metrology laboratory
DATA ACQUISITION PROCEDURE
Fig 1 displays the method of connection of the power supply, accelerometers, A/D converter and
computer. For acquiring vibration signals of the engine, general purpose ICP® accelerometer
with sensitivity of 10 mV/g is used. This accelerometer is used to measure frequencies from 0.5
to 26500 Hz. Accelerometer is connected to NI 9234 A/D converter with specifications (4-
channel, ±5V, 24-Bit Software –Selectable IEPE and AC/DC analog input module).
Accelerometer was used for measuring vibration of engine head in vertical direction and the
sampling frequency of converter is 51.2 kHz. The data acquisition system (DAQ) is shown in fig
1. Finally, collected data are transferred by a cable to the USB port of PC for recording. Data
acquisition duration for each test was 60s. A laptop was used for recording the data.
OBSERVATIONS:
S. No Position of the Overall vibration Overall Vibration
accelerometer level (RMS) or acceleration(m/s2)
vibration
velocity(mm/s)
AVEV Page 59
Metrology laboratory
ANALYSIS:
CONCLUSION:
AVEV Page 60

More Related Content

What's hot

Measuring Instruments (Measurements) lec 08 Talal Khan
Measuring Instruments (Measurements) lec 08 Talal KhanMeasuring Instruments (Measurements) lec 08 Talal Khan
Measuring Instruments (Measurements) lec 08 Talal KhanTalal Khan
 
Linear measurements vernier and micro meter
Linear measurements vernier and micro meterLinear measurements vernier and micro meter
Linear measurements vernier and micro meterGLA UNIVERSITY MATHURA
 
Linear & angular measurement
Linear  & angular measurementLinear  & angular measurement
Linear & angular measurementDigvijaysinh Gohil
 
The Micrometer Presentation
The Micrometer PresentationThe Micrometer Presentation
The Micrometer PresentationFraser Mateer
 
Linear measurements
Linear measurementsLinear measurements
Linear measurementsMamta Patel
 
METROLOGY LAB MANUAL 26 12-16
METROLOGY LAB MANUAL 26 12-16METROLOGY LAB MANUAL 26 12-16
METROLOGY LAB MANUAL 26 12-16Dr B Sudarshan
 
To understand construction of outside micrometer and calculate its least count
To understand construction of outside micrometer and calculate its least countTo understand construction of outside micrometer and calculate its least count
To understand construction of outside micrometer and calculate its least countSalman Jailani
 
Screw thread measurement
Screw thread measurementScrew thread measurement
Screw thread measurementnmahi96
 
Auto collimator angle dekkor
Auto collimator angle dekkorAuto collimator angle dekkor
Auto collimator angle dekkorNaman Dave
 
Linear measurements
Linear measurementsLinear measurements
Linear measurementsNaman Dave
 

What's hot (20)

Measuring Instruments (Measurements) lec 08 Talal Khan
Measuring Instruments (Measurements) lec 08 Talal KhanMeasuring Instruments (Measurements) lec 08 Talal Khan
Measuring Instruments (Measurements) lec 08 Talal Khan
 
Linear measurements vernier and micro meter
Linear measurements vernier and micro meterLinear measurements vernier and micro meter
Linear measurements vernier and micro meter
 
Metrology and Measuremenrt
Metrology and MeasuremenrtMetrology and Measuremenrt
Metrology and Measuremenrt
 
Linear & angular measurement
Linear  & angular measurementLinear  & angular measurement
Linear & angular measurement
 
Linear measurement
Linear measurementLinear measurement
Linear measurement
 
The Micrometer Presentation
The Micrometer PresentationThe Micrometer Presentation
The Micrometer Presentation
 
Linear measurements
Linear measurementsLinear measurements
Linear measurements
 
METROLOGY LAB MANUAL 26 12-16
METROLOGY LAB MANUAL 26 12-16METROLOGY LAB MANUAL 26 12-16
METROLOGY LAB MANUAL 26 12-16
 
Unit IV form measurements
Unit IV  form measurements Unit IV  form measurements
Unit IV form measurements
 
Unit II
Unit IIUnit II
Unit II
 
To understand construction of outside micrometer and calculate its least count
To understand construction of outside micrometer and calculate its least countTo understand construction of outside micrometer and calculate its least count
To understand construction of outside micrometer and calculate its least count
 
Screw thread measurement
Screw thread measurementScrew thread measurement
Screw thread measurement
 
Vernier caliper
Vernier caliperVernier caliper
Vernier caliper
 
Height gauge
Height gaugeHeight gauge
Height gauge
 
Threading - MMM
Threading - MMMThreading - MMM
Threading - MMM
 
Angular measurements
Angular measurementsAngular measurements
Angular measurements
 
Auto collimator angle dekkor
Auto collimator angle dekkorAuto collimator angle dekkor
Auto collimator angle dekkor
 
Autocollimator
AutocollimatorAutocollimator
Autocollimator
 
Bevel Protractor
Bevel ProtractorBevel Protractor
Bevel Protractor
 
Linear measurements
Linear measurementsLinear measurements
Linear measurements
 

Similar to Metrology lab manual for marine engineering

Production technoloy lab 012110045519 1
Production technoloy lab 012110045519 1Production technoloy lab 012110045519 1
Production technoloy lab 012110045519 1Ravi Sivaprakash
 
17036 vernier caliper and micrometer
17036 vernier caliper and micrometer17036 vernier caliper and micrometer
17036 vernier caliper and micrometerEshank Gupta
 
Linear measurement
Linear measurementLinear measurement
Linear measurementShrey Patel
 
Physics M1 Vernier Caliper & Micrometer
Physics M1 Vernier Caliper & Micrometer Physics M1 Vernier Caliper & Micrometer
Physics M1 Vernier Caliper & Micrometer eLearningJa
 
UNIT II MEASUREMENT OF LINEAR, ANGULAR DIMENSIONS, ASSEMBLY AND TRANSMISSION ...
UNIT II MEASUREMENT OF LINEAR, ANGULAR DIMENSIONS, ASSEMBLY AND TRANSMISSION ...UNIT II MEASUREMENT OF LINEAR, ANGULAR DIMENSIONS, ASSEMBLY AND TRANSMISSION ...
UNIT II MEASUREMENT OF LINEAR, ANGULAR DIMENSIONS, ASSEMBLY AND TRANSMISSION ...prakashPrAkAsH143
 
Metrology and instrumentation lab manual
Metrology and instrumentation lab manualMetrology and instrumentation lab manual
Metrology and instrumentation lab manualsuresh kumar
 
Mechanical Engineering Technical Interview Q & A Metrology and precision inst...
Mechanical Engineering Technical Interview Q & A Metrology and precision inst...Mechanical Engineering Technical Interview Q & A Metrology and precision inst...
Mechanical Engineering Technical Interview Q & A Metrology and precision inst...Er. Bade Bhausaheb
 
metrology and measurement CORE TRAINING-M&M.pptx
metrology and measurement CORE TRAINING-M&M.pptxmetrology and measurement CORE TRAINING-M&M.pptx
metrology and measurement CORE TRAINING-M&M.pptxjohn tamil selvan
 
metrology and measurement CORE TRAINING-M&M.pptx
metrology and measurement CORE TRAINING-M&M.pptxmetrology and measurement CORE TRAINING-M&M.pptx
metrology and measurement CORE TRAINING-M&M.pptxjohn tamil selvan
 
Ch 25 measurement of lines & surfaces
Ch 25 measurement of lines & surfacesCh 25 measurement of lines & surfaces
Ch 25 measurement of lines & surfacesNandan Choudhary
 
Metrology lab mannual 15 5-14
Metrology lab mannual 15 5-14Metrology lab mannual 15 5-14
Metrology lab mannual 15 5-14Dr B Sudarshan
 
Ted 111Tools and their Uses
Ted 111Tools and their Uses Ted 111Tools and their Uses
Ted 111Tools and their Uses Ahmed Issa
 
Lecture 11 linear measurements
Lecture 11 linear measurementsLecture 11 linear measurements
Lecture 11 linear measurementsramesh11220
 
Module 4 review-questions_solved
Module 4 review-questions_solvedModule 4 review-questions_solved
Module 4 review-questions_solvedIbrahim AboKhalil
 

Similar to Metrology lab manual for marine engineering (20)

Production technoloy lab 012110045519 1
Production technoloy lab 012110045519 1Production technoloy lab 012110045519 1
Production technoloy lab 012110045519 1
 
17036 vernier caliper and micrometer
17036 vernier caliper and micrometer17036 vernier caliper and micrometer
17036 vernier caliper and micrometer
 
Linear measurement
Linear measurementLinear measurement
Linear measurement
 
Linear measurement
Linear measurementLinear measurement
Linear measurement
 
Physics M1 Vernier Caliper & Micrometer
Physics M1 Vernier Caliper & Micrometer Physics M1 Vernier Caliper & Micrometer
Physics M1 Vernier Caliper & Micrometer
 
UNIT - 2 - MM MOD - Copy.pptx
UNIT - 2 - MM MOD - Copy.pptxUNIT - 2 - MM MOD - Copy.pptx
UNIT - 2 - MM MOD - Copy.pptx
 
UNIT II MEASUREMENT OF LINEAR, ANGULAR DIMENSIONS, ASSEMBLY AND TRANSMISSION ...
UNIT II MEASUREMENT OF LINEAR, ANGULAR DIMENSIONS, ASSEMBLY AND TRANSMISSION ...UNIT II MEASUREMENT OF LINEAR, ANGULAR DIMENSIONS, ASSEMBLY AND TRANSMISSION ...
UNIT II MEASUREMENT OF LINEAR, ANGULAR DIMENSIONS, ASSEMBLY AND TRANSMISSION ...
 
M&M.pptx
M&M.pptxM&M.pptx
M&M.pptx
 
Metrology and instrumentation lab manual
Metrology and instrumentation lab manualMetrology and instrumentation lab manual
Metrology and instrumentation lab manual
 
Mechanical Engineering Technical Interview Q & A Metrology and precision inst...
Mechanical Engineering Technical Interview Q & A Metrology and precision inst...Mechanical Engineering Technical Interview Q & A Metrology and precision inst...
Mechanical Engineering Technical Interview Q & A Metrology and precision inst...
 
Presentation1
Presentation1Presentation1
Presentation1
 
metrology and measurement CORE TRAINING-M&M.pptx
metrology and measurement CORE TRAINING-M&M.pptxmetrology and measurement CORE TRAINING-M&M.pptx
metrology and measurement CORE TRAINING-M&M.pptx
 
metrology and measurement CORE TRAINING-M&M.pptx
metrology and measurement CORE TRAINING-M&M.pptxmetrology and measurement CORE TRAINING-M&M.pptx
metrology and measurement CORE TRAINING-M&M.pptx
 
5_6073126710511927557.pptx
5_6073126710511927557.pptx5_6073126710511927557.pptx
5_6073126710511927557.pptx
 
Ch 25 measurement of lines & surfaces
Ch 25 measurement of lines & surfacesCh 25 measurement of lines & surfaces
Ch 25 measurement of lines & surfaces
 
Metrology lab mannual 15 5-14
Metrology lab mannual 15 5-14Metrology lab mannual 15 5-14
Metrology lab mannual 15 5-14
 
Ted 111Tools and their Uses
Ted 111Tools and their Uses Ted 111Tools and their Uses
Ted 111Tools and their Uses
 
unit-2.ppt
unit-2.pptunit-2.ppt
unit-2.ppt
 
Lecture 11 linear measurements
Lecture 11 linear measurementsLecture 11 linear measurements
Lecture 11 linear measurements
 
Module 4 review-questions_solved
Module 4 review-questions_solvedModule 4 review-questions_solved
Module 4 review-questions_solved
 

Recently uploaded

High Profile Call Girls Nagpur Isha Call 7001035870 Meet With Nagpur Escorts
High Profile Call Girls Nagpur Isha Call 7001035870 Meet With Nagpur EscortsHigh Profile Call Girls Nagpur Isha Call 7001035870 Meet With Nagpur Escorts
High Profile Call Girls Nagpur Isha Call 7001035870 Meet With Nagpur Escortsranjana rawat
 
Architect Hassan Khalil Portfolio for 2024
Architect Hassan Khalil Portfolio for 2024Architect Hassan Khalil Portfolio for 2024
Architect Hassan Khalil Portfolio for 2024hassan khalil
 
microprocessor 8085 and its interfacing
microprocessor 8085  and its interfacingmicroprocessor 8085  and its interfacing
microprocessor 8085 and its interfacingjaychoudhary37
 
Past, Present and Future of Generative AI
Past, Present and Future of Generative AIPast, Present and Future of Generative AI
Past, Present and Future of Generative AIabhishek36461
 
IVE Industry Focused Event - Defence Sector 2024
IVE Industry Focused Event - Defence Sector 2024IVE Industry Focused Event - Defence Sector 2024
IVE Industry Focused Event - Defence Sector 2024Mark Billinghurst
 
SPICE PARK APR2024 ( 6,793 SPICE Models )
SPICE PARK APR2024 ( 6,793 SPICE Models )SPICE PARK APR2024 ( 6,793 SPICE Models )
SPICE PARK APR2024 ( 6,793 SPICE Models )Tsuyoshi Horigome
 
(ANVI) Koregaon Park Call Girls Just Call 7001035870 [ Cash on Delivery ] Pun...
(ANVI) Koregaon Park Call Girls Just Call 7001035870 [ Cash on Delivery ] Pun...(ANVI) Koregaon Park Call Girls Just Call 7001035870 [ Cash on Delivery ] Pun...
(ANVI) Koregaon Park Call Girls Just Call 7001035870 [ Cash on Delivery ] Pun...ranjana rawat
 
(MEERA) Dapodi Call Girls Just Call 7001035870 [ Cash on Delivery ] Pune Escorts
(MEERA) Dapodi Call Girls Just Call 7001035870 [ Cash on Delivery ] Pune Escorts(MEERA) Dapodi Call Girls Just Call 7001035870 [ Cash on Delivery ] Pune Escorts
(MEERA) Dapodi Call Girls Just Call 7001035870 [ Cash on Delivery ] Pune Escortsranjana rawat
 
Biology for Computer Engineers Course Handout.pptx
Biology for Computer Engineers Course Handout.pptxBiology for Computer Engineers Course Handout.pptx
Biology for Computer Engineers Course Handout.pptxDeepakSakkari2
 
HARMONY IN THE NATURE AND EXISTENCE - Unit-IV
HARMONY IN THE NATURE AND EXISTENCE - Unit-IVHARMONY IN THE NATURE AND EXISTENCE - Unit-IV
HARMONY IN THE NATURE AND EXISTENCE - Unit-IVRajaP95
 
OSVC_Meta-Data based Simulation Automation to overcome Verification Challenge...
OSVC_Meta-Data based Simulation Automation to overcome Verification Challenge...OSVC_Meta-Data based Simulation Automation to overcome Verification Challenge...
OSVC_Meta-Data based Simulation Automation to overcome Verification Challenge...Soham Mondal
 
main PPT.pptx of girls hostel security using rfid
main PPT.pptx of girls hostel security using rfidmain PPT.pptx of girls hostel security using rfid
main PPT.pptx of girls hostel security using rfidNikhilNagaraju
 
GDSC ASEB Gen AI study jams presentation
GDSC ASEB Gen AI study jams presentationGDSC ASEB Gen AI study jams presentation
GDSC ASEB Gen AI study jams presentationGDSCAESB
 
Gfe Mayur Vihar Call Girls Service WhatsApp -> 9999965857 Available 24x7 ^ De...
Gfe Mayur Vihar Call Girls Service WhatsApp -> 9999965857 Available 24x7 ^ De...Gfe Mayur Vihar Call Girls Service WhatsApp -> 9999965857 Available 24x7 ^ De...
Gfe Mayur Vihar Call Girls Service WhatsApp -> 9999965857 Available 24x7 ^ De...srsj9000
 
Call Girls Delhi {Jodhpur} 9711199012 high profile service
Call Girls Delhi {Jodhpur} 9711199012 high profile serviceCall Girls Delhi {Jodhpur} 9711199012 high profile service
Call Girls Delhi {Jodhpur} 9711199012 high profile servicerehmti665
 
ZXCTN 5804 / ZTE PTN / ZTE POTN / ZTE 5804 PTN / ZTE POTN 5804 ( 100/200 GE Z...
ZXCTN 5804 / ZTE PTN / ZTE POTN / ZTE 5804 PTN / ZTE POTN 5804 ( 100/200 GE Z...ZXCTN 5804 / ZTE PTN / ZTE POTN / ZTE 5804 PTN / ZTE POTN 5804 ( 100/200 GE Z...
ZXCTN 5804 / ZTE PTN / ZTE POTN / ZTE 5804 PTN / ZTE POTN 5804 ( 100/200 GE Z...ZTE
 
Study on Air-Water & Water-Water Heat Exchange in a Finned Tube Exchanger
Study on Air-Water & Water-Water Heat Exchange in a Finned Tube ExchangerStudy on Air-Water & Water-Water Heat Exchange in a Finned Tube Exchanger
Study on Air-Water & Water-Water Heat Exchange in a Finned Tube ExchangerAnamika Sarkar
 
What are the advantages and disadvantages of membrane structures.pptx
What are the advantages and disadvantages of membrane structures.pptxWhat are the advantages and disadvantages of membrane structures.pptx
What are the advantages and disadvantages of membrane structures.pptxwendy cai
 

Recently uploaded (20)

High Profile Call Girls Nagpur Isha Call 7001035870 Meet With Nagpur Escorts
High Profile Call Girls Nagpur Isha Call 7001035870 Meet With Nagpur EscortsHigh Profile Call Girls Nagpur Isha Call 7001035870 Meet With Nagpur Escorts
High Profile Call Girls Nagpur Isha Call 7001035870 Meet With Nagpur Escorts
 
Architect Hassan Khalil Portfolio for 2024
Architect Hassan Khalil Portfolio for 2024Architect Hassan Khalil Portfolio for 2024
Architect Hassan Khalil Portfolio for 2024
 
microprocessor 8085 and its interfacing
microprocessor 8085  and its interfacingmicroprocessor 8085  and its interfacing
microprocessor 8085 and its interfacing
 
Past, Present and Future of Generative AI
Past, Present and Future of Generative AIPast, Present and Future of Generative AI
Past, Present and Future of Generative AI
 
IVE Industry Focused Event - Defence Sector 2024
IVE Industry Focused Event - Defence Sector 2024IVE Industry Focused Event - Defence Sector 2024
IVE Industry Focused Event - Defence Sector 2024
 
Exploring_Network_Security_with_JA3_by_Rakesh Seal.pptx
Exploring_Network_Security_with_JA3_by_Rakesh Seal.pptxExploring_Network_Security_with_JA3_by_Rakesh Seal.pptx
Exploring_Network_Security_with_JA3_by_Rakesh Seal.pptx
 
SPICE PARK APR2024 ( 6,793 SPICE Models )
SPICE PARK APR2024 ( 6,793 SPICE Models )SPICE PARK APR2024 ( 6,793 SPICE Models )
SPICE PARK APR2024 ( 6,793 SPICE Models )
 
(ANVI) Koregaon Park Call Girls Just Call 7001035870 [ Cash on Delivery ] Pun...
(ANVI) Koregaon Park Call Girls Just Call 7001035870 [ Cash on Delivery ] Pun...(ANVI) Koregaon Park Call Girls Just Call 7001035870 [ Cash on Delivery ] Pun...
(ANVI) Koregaon Park Call Girls Just Call 7001035870 [ Cash on Delivery ] Pun...
 
(MEERA) Dapodi Call Girls Just Call 7001035870 [ Cash on Delivery ] Pune Escorts
(MEERA) Dapodi Call Girls Just Call 7001035870 [ Cash on Delivery ] Pune Escorts(MEERA) Dapodi Call Girls Just Call 7001035870 [ Cash on Delivery ] Pune Escorts
(MEERA) Dapodi Call Girls Just Call 7001035870 [ Cash on Delivery ] Pune Escorts
 
Biology for Computer Engineers Course Handout.pptx
Biology for Computer Engineers Course Handout.pptxBiology for Computer Engineers Course Handout.pptx
Biology for Computer Engineers Course Handout.pptx
 
HARMONY IN THE NATURE AND EXISTENCE - Unit-IV
HARMONY IN THE NATURE AND EXISTENCE - Unit-IVHARMONY IN THE NATURE AND EXISTENCE - Unit-IV
HARMONY IN THE NATURE AND EXISTENCE - Unit-IV
 
OSVC_Meta-Data based Simulation Automation to overcome Verification Challenge...
OSVC_Meta-Data based Simulation Automation to overcome Verification Challenge...OSVC_Meta-Data based Simulation Automation to overcome Verification Challenge...
OSVC_Meta-Data based Simulation Automation to overcome Verification Challenge...
 
main PPT.pptx of girls hostel security using rfid
main PPT.pptx of girls hostel security using rfidmain PPT.pptx of girls hostel security using rfid
main PPT.pptx of girls hostel security using rfid
 
GDSC ASEB Gen AI study jams presentation
GDSC ASEB Gen AI study jams presentationGDSC ASEB Gen AI study jams presentation
GDSC ASEB Gen AI study jams presentation
 
Gfe Mayur Vihar Call Girls Service WhatsApp -> 9999965857 Available 24x7 ^ De...
Gfe Mayur Vihar Call Girls Service WhatsApp -> 9999965857 Available 24x7 ^ De...Gfe Mayur Vihar Call Girls Service WhatsApp -> 9999965857 Available 24x7 ^ De...
Gfe Mayur Vihar Call Girls Service WhatsApp -> 9999965857 Available 24x7 ^ De...
 
Call Girls Delhi {Jodhpur} 9711199012 high profile service
Call Girls Delhi {Jodhpur} 9711199012 high profile serviceCall Girls Delhi {Jodhpur} 9711199012 high profile service
Call Girls Delhi {Jodhpur} 9711199012 high profile service
 
ZXCTN 5804 / ZTE PTN / ZTE POTN / ZTE 5804 PTN / ZTE POTN 5804 ( 100/200 GE Z...
ZXCTN 5804 / ZTE PTN / ZTE POTN / ZTE 5804 PTN / ZTE POTN 5804 ( 100/200 GE Z...ZXCTN 5804 / ZTE PTN / ZTE POTN / ZTE 5804 PTN / ZTE POTN 5804 ( 100/200 GE Z...
ZXCTN 5804 / ZTE PTN / ZTE POTN / ZTE 5804 PTN / ZTE POTN 5804 ( 100/200 GE Z...
 
Study on Air-Water & Water-Water Heat Exchange in a Finned Tube Exchanger
Study on Air-Water & Water-Water Heat Exchange in a Finned Tube ExchangerStudy on Air-Water & Water-Water Heat Exchange in a Finned Tube Exchanger
Study on Air-Water & Water-Water Heat Exchange in a Finned Tube Exchanger
 
What are the advantages and disadvantages of membrane structures.pptx
What are the advantages and disadvantages of membrane structures.pptxWhat are the advantages and disadvantages of membrane structures.pptx
What are the advantages and disadvantages of membrane structures.pptx
 
9953056974 Call Girls In South Ex, Escorts (Delhi) NCR.pdf
9953056974 Call Girls In South Ex, Escorts (Delhi) NCR.pdf9953056974 Call Girls In South Ex, Escorts (Delhi) NCR.pdf
9953056974 Call Girls In South Ex, Escorts (Delhi) NCR.pdf
 

Metrology lab manual for marine engineering

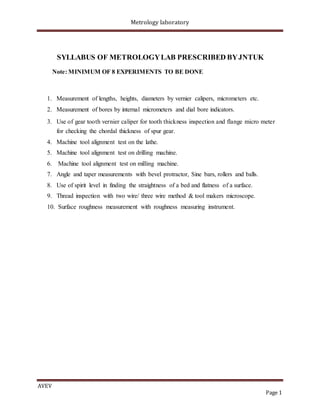
  • 1. Metrology laboratory SYLLABUS OF METROLOGYLAB PRESCRIBED BYJNTUK Note: MINIMUM OF 8 EXPERIMENTS TO BE DONE 1. Measurement of lengths, heights, diameters by vernier calipers, micrometers etc. 2. Measurement of bores by internal micrometers and dial bore indicators. 3. Use of gear tooth vernier caliper for tooth thickness inspection and flange micro meter for checking the chordal thickness of spur gear. 4. Machine tool alignment test on the lathe. 5. Machine tool alignment test on drilling machine. 6. Machine tool alignment test on milling machine. 7. Angle and taper measurements with bevel protractor, Sine bars, rollers and balls. 8. Use of spirit level in finding the straightness of a bed and flatness of a surface. 9. Thread inspection with two wire/ three wire method & tool makers microscope. 10. Surface roughness measurement with roughness measuring instrument. AVEV Page 1
  • 2. Metrology laboratory LIST OF EXPERIMENTS 1. Calibration of Precision Measuring Instruments & Measurement of lengths, heights, diameters by vernier calipers, micrometers etc 2. Measurement of Bore Using Inside Micrometer & Dial Bore Indicator 3. Angle Measurement Using Bevel Protactor & Sine Bar 4. Measurement of Gear Tooth Thickness By Gear Tooth Vernier Calliper 5. Measurement of Screw & Gear Terminology Using Tool-Maker’s Microscope 6. Surface Roughness Measurement 7. Machine Tool Alignment Tests on Lathe 8. Use of spirit level in finding the straightness of a bed and flatness of a surface. 9. Vibration Measurement of Machines (Additional Experiment) AVEV Page 2
  • 3. Metrology laboratory CALIBRATION OF PRECISION MEASURING INSTRUMENTS AIM: To calibrate Vernier calipers, vernier height gauge & Micrometer and to measure lengths, heights and diameters by these instruments. APPARATUS : Vernier callipers, vernier height gauge, Micrometer, Slip gauges & Surface plate, OBJECTIVES: 1. To know about calibration, precision & accuracy 2. To know about least count of any precise instrument. 3. To know the difference between line standard and end standard SPECIFICATION: Vernier calipers: Range: L. C: vernier height gauge: Range: L. C: Micrometer: Range: L. C: THEORY: CALIBRATION: It is the process of determining true values by comparison with an accurate standard. It is the process of framing the scale of the instrument by applying some standards. Calibration is a pre measurement process, generally carried out by manufacturers. During the course of use, due to friction and lack of proper maintenance, errors enter into the instruments and these should be properly accounted for when taking measurements. If the accuracy is to be maintained, periodical calibration is essential. AVEV Page 3
  • 4. Metrology laboratory 1) VERNIER CALIPER: PRINCIPLE The Vernier caliper has one ‘L’ shaped frame with a fixed jaw on which Vernier scale is attached. The principle of Vernier is that when two scales or divisions slightly different in size are used, the difference between them can be utilized to enhance the accuracy of measurement. LEAST COUNT Least Count is the smallest length that can be measured accurately and is equal to the difference between a main scale division and a Vernier scale division. LEAST COUNT = 1 MSD – 1 VSD (OR) = 1MSD/no of vernier scale divisons Fig 1. Vernier Callipers 1. Outside jaws: used to measure external diameter or width of an object 2. Inside jaws: used to measure internal diameter of an object 3. Depth probe: used to measure depths of an object or a hole 4. Main scale: gives measurements of up to one decimal place (in cm). 5. Main scale: gives measurements in fraction(in inch) 6. Vernier gives measurements up to two decimal places(in cm) 7. Vernier gives measurements in fraction(in inch) AVEV Page 4
  • 5. Metrology laboratory USES: It is used to measure the external diameter, the internal diameter and the length of the given specimen. 2) MICROMETER: PRINCIPLE Micrometer works on the principle of screw and nut. A screw moves when it is rotated through a nut. The relation between number of rotations and the distance moved is used for measuring the dimensions. LEAST COUNT The micrometer essentially consists of U shaped frame. The component to be measured is held between fixed anvil and movable spindle. The spindle can be moved with the help of thimble. There are two scales on micrometer, a main scale and a circular scale. The barrel is graduated in unit of 0.5 mm whereas thimble has got 50 divisions around its periphery. One revolution of thimble moves 0.5 mm which is the lead of the screw and also the pitch. Least Count = Pitch of the spindle screw ÷ Number of divisions on the thimble Fig 2. Micrometer Screw Gauge AVEV Page 5
  • 6. Metrology laboratory USES: 1. Outside micrometer is used to measure the diameter of solid cylinder. 2. Inside micrometer is used to measure the internal diameters of hollow cylinders and spheres. 3) VERNIER HEIGHT GAUGE Vernier height gauge is similar to vernier caliper but in this instrument the graduated bar is held in a vertical position and it is used in conjunction with a surface plate. The vernier height gauge is designed for accurate measurements and marking of vertical heights above a surface plate datum. It can also be used to measure differences in heights by taking the vernier scale readings at each height and determining the difference by subtraction. The vernier height gauge is read in the same way as vernier calipers. Fig 3. Vernier Height Gauge AVEV Page 6
  • 7. Metrology laboratory 4) SLIP GAUGES: They are rectangular blocks hardened and carefully stabilized. The surfaces are highly polished to enhance wringing. It is used as a reference standard for transferring the dimensions of unit of length from primary standard. It is generally made up of high carbon, high chromium hardened steel. USES: These are accurate and used as comparator. 5) SURFACE PLATE: The foundation of all geometric accuracy and indeed of all dimensional measurement in workshop is surface plate. It is a flat smooth surface sometimes with leveling screws at the bottom. USES: It is used as a base in all measurements. PROCEDURE FOR CALIBRATION: 1.) The range of the instruments is noted down. 2.) Within that range, slip gauges are selected in steps of 2mm . 3.) The measuring instrument is placed on the surface plate and set for zero and the slip gauges are placed one by one between the measuring points (jaws of the instruments.) 4.) The slip gauge (actual) readings and the corresponding (observed) readings in the measuring instruments are noted down and tabulated. CALIBRATION OF VERNIER CALLIPERS S.No Slip M.S.R VC LC Measured Error Gauge reading ( Measured Reading MSR+(VCXL.C) reading- Actual) (mm) AVEV Page 7
  • 8. Metrology laboratory MEASUREMENT OF LENGTH BY VERNIER CALLIPERS S.No M.S.R VC LC Measured Error Final reading Reading MSR+(VCXL.C) Average reading CALIBRATION OF MICROMETER S.No Slip M.S.R C.S.C LC Measured reading Error Gauge MSR+(CSCXL.C) ( Measured Reading reading- Actual) (Actual) AVEV Page 8
  • 9. Metrology laboratory MEASUREMENT OF DIAMETER BY MICROMETER S.No M.S.R CSC LC Measured Error Final Reading reading MSR+(CSCXL.C) Average reading CALIBRATION OF VERNIER HEIGHT GAUGE S.No Slip M.S.R VC LC Measured Error Gauge reading ( Measured Reading MSR+(VCXL.C) reading- Actual) (Actual) Mm AVEV Page 9
  • 10. Metrology laboratory MEASUREMENT OF HEIGHT BY VERNIER HEIGHT GAUGE S.No M.S.R VC LC Measured Error Final Reading reading MSR+(VCXL.C) Average reading GRAPHS: Calibration graphs are then drawn for all measuring instruments between 1.) Actual value and Observed value. ANALYSIS: AVEV Page 10
  • 12. Metrology laboratory VIVA-VOCE: 1. What is measurement? 2. Define the term calibration. 3. Define precision and accuracy. 4. List the various linear measuring instruments. 5. What is sensitivity? 6. What is meant by least count of an instrument? 7. Define Zero reading of a Micrometer? 8. Specify the term Backlash of a micrometer? 9. What is the principle of vernier calipers and Micrometer screw gauge? 10. What is the difference between line and end standard? 11. What is the function and principle of a ratchet drive in case of a micrometer? AVEV Page 12
  • 13. Metrology laboratory MEASUREMENTOF BORE USING INSIDE MICROMETER& DIAL BORE INDICATOR AIM: To measure the bore diameter using inside micrometer and dial bore indicator APPARATUS: Inside micrometer , dial bore indicator, scale, vernier calipers OBJECTIVES: 1. To know the working principle of inside micrometer 2. To know the working principle of dial bore gauge 3. To know about different types of gauges THEORY: INSIDE MICROMETER CALIPERS The inside micrometer is intended for internal measurement to an accuracy of 0.01mm. In principle, it is similar to an external micrometer and is used for measuring holes in the range of 5-30mm. Fig 1. Inside Micrometer Calipers The instrument shown in fig. 1 comprises measuring tips constituted by jaws. One of the jaws is held stationary and the second one moves by the movement of thimble. A lock nut is provided for locking of spindle. It is also provided with a ratchet stop for applying constant force. AVEV Page 13
  • 14. Metrology laboratory DIAL BORE GAUGE The instrument basically consists of a hollow tube into which is contained a lever pivoted about its intermediate support. One end of the lever is linked to the movable contact point of the instrument and the other end of the lever actuates the dial indicator. Interchangeable rods and washers can be used in order to broaden the range of measurement. Fig 2. Dial bore gauge AVEV Page 14
  • 15. Metrology laboratory Fig 3. Set of Interchangeable rods PROCEDURE: INSIDE MICROMETER CALIPERS 1. First the diameter of the bore is measured approximately by a scale. 2. The micrometer is then adjusted at a dimension slightly smaller than the diameter of the bore. 3. One tip is held against the bore and the other is adjusted by moving the thimble till the correct feel is sensed. 4. The micrometer is then removed and reading is taken. S.No M.S.R(a) THIMBLE TOTAL READING READING(b) a + (LC * b) Average reading AVEV Page 15
  • 16. Metrology laboratory DIAL BORE GAUGE 1. For the required measuring dimension select the appropriate interchangeable rod and/or washers and set them on the main unit. 2. Diameter is obtained automatically from the guide. To adjust the instrument to measure diameter , search for a position where the bore gauge reading is maximized by tilting the bore gauge back and forth . 3. The indicator reading is recorded to get the required diameter. S.No BORE GAUGE READING Average Bore Diameter = PRECAUT IONS: 1. One contact surface must always be moved sideways in order to ensure that diameter is being measured and not chord. ANALYSIS: AVEV Page 16
  • 17. Metrology laboratory RESULT: 1. Bore diameter measured by using inside micrometer = 2. Bore diameter indicated by dial bore indicator = CONCLUSION: Department of Mechanical Engineering Page 17
  • 18. Metrology laboratory VIVA-VOCE: 1. What is the working principle of inside micrometer? 2. What is the working principle of dial bore gauge? 3. What is a comparator? 4. What are the limitations of comparators? 5. Name the three materials commonly used for gauges. AVEV Page 18
  • 19. Metrology laboratory ANGLE MEASUREMENTUSING BEVEL PROTACTOR& SINE BAR AIM: To determine the angle of the given wedge using Since bar & Bevel Protractor APPARATUS: 1. Sine bar 2. Dial Gauge 3. Slip gauges 4. Bevel Protractor. 5. Surface plate OBJECTIVES: 1. To know the working principle of sine bar & bevel protractor 2. To know about the wringing of slip gauges THEORY: SINE BAR: It is a simple instrument used for setting and measuring angles. It consists of a flat bar and two rollers attached to the bar at each end. The axes of these rollers are parallel to each other and also to the upper surface of the sine bar. The distance between the centres of the rollers is fixed for a particular sine bar and the same is always written on the bar. Fig 1. Sine Bar The principle of the sine bar is shown in figure 2. The sine bar is always used in conjunction with a true surface (surface plate). If ‘h’ is the height of the combination slip gauges and ‘l’ is the distance between the roller centres , then the angle of the setting is given as, θ =Sin-1(h/l) AVEV Page 19
  • 20. Metrology laboratory The angle to be measured is determined by an indirect method, as a function of sine. For this reason, device is called as ‘sine bar’. Fig 2. Measurement of parallelism of the upper surface of the workpiece using dial gauge PROCEDURE: 1. For measuring unknown angle it is necessary to first find the angle approximately with the help of a bevel protractor. 2. The sine bar is then set up at that nominal(approximate) angle on a surface plate by suitable combination of slip gauges. 3. The component to be checked is placed over the surface of the sine bar.(if necessary the component may be clamped with the angle plate) 4. The dial gauge is then set at one end of the work and moved along the upper surface of the component. 5. If there is any variation in parallelism of the upper surface of the component and the surface plate, it is indicated by the dial gauge. 6. The combination of the slip gauges is so adjusted that the upper surface is truly parallel with the surface plate. 7. Than note down the height of the combination of slip gauges. AVEV Page 20
  • 21. Metrology laboratory 8. Then angle of the component is Calculated by the relation , θ =Sin-1(h/l) 9. Repeat the procedure 3 or 4 times and take the average. OBSERVATIONS: S. No Height of Slip Gauge Length of The Sine Bar (l) Angle Blocks (h) Average Reading: BEVEL PROTRACTOR: The simple bevel protractor can be extended in its accuracy by the application of a circular vernier scale and this instrument is known as vernier bevel protractor. It consists of a base plate attached to the main body and an adjustable blade which is attached to the circular plate containing vernier scale. The adjustable blade can be set at any angle with the base plate and can be locked. The main scale on the disc is graduated in degrees. The vernier scale has 12 divisons on each side of the center zero. These are marked 0-60 minutes of arc, so that each divison equals 1/12 of 60, that is 5 minutes of arc. These 12 divisons occupy the same space as 23° on the main scale. Therefore each divison of the vernier is equal to 1/12 of 23° or 5 minutes of arc. Thus the least count of the instrument is 5 minutes. AVEV Page 21
  • 22. Metrology laboratory Fig 3. Bevel Protractor. The graduations are read to the right and left on both the main scale and the vernier scale. When the main scale is read to the right of the zero of the main scale, the vernier is also read to the right of zero of the vernier scale. Fig 4. Enlarged View of Vernier Scale of Bevel Protractor The reading shown above gives AVEV Page 22
  • 23. Metrology laboratory a) The largest whole degree on the main scale indicated by the vernier zero divison ie 28° b) The reading on the vernier scale in line with a main scale divison is 3*5ꞌ = 15ꞌ c) Hence the vernier bevel protractor reads 28° + 15 ꞌ = 28°15 ꞌ OBSERVATIONS: Least count of Bevel Protractor = S.No Main scale Vernier Coincidence(VC) Total Reading reading(MSR) MSR + (VC*LC) 1 2 3 Average Reading: PRECAUTIONS: 1. The sine bar should not be used for angle greater than 60° because any possible error in construction is accentuated at this limit. 2. A compound angle should not be formed by mis-aligning of work piece with the sine bar. This can be avoided by attaching the sine bar and work against an angle plate. 3. As far as possible longer sine bar should be used since using longer sine bars reduces many errors. ANALYSIS: AVEV Page 23
  • 24. Metrology laboratory RESULT: The angle of the given specimen measured with the sine bar is……………. The angle of the given specimen measured with the Bevel Protractor is…………. CONCLUSION: AVEV Page 24
  • 25. Metrology laboratory VIVA-VOCE: 1. List various angular measuring instruments. 2. What are the sources of errors in sine bars? 3. What is the working principle of sine bar & bevel protractor 4. What are the advantages of slip gauges? 5. Why sine bar is not preferred for generating angles larger than 45°. 6. What is least count of bevel protractor? AVEV Page 25
  • 26. Metrology laboratory MEASUREMENTOF GEAR TOOTHTHICKNESS BY GEAR TOOTH VERNIER CALLIPER AIM: 1. To determine the width of the tooth at pitch circle. 2. To determine the height of the tooth above pitch circle. 3. To check the width of the tooth at pitch circle using gear tooth vernier caliper APPARATUS : Gear tooth Vernier caliper, Spur gear of known module, Surface plate OBJECTIVES: 1.To know about gear terminology 2. To find the chordal thickness of the gear tooth by theoretical methods THEORY: Brief description of different characteristics of measuring of tooth thickness by gear tooth vernier is given. It consists of a horizontal and a vertical vernier scale. It is based on the principle of vernier scale. The thickness of a tooth at pitch line and the addendum is measured by an independent tongue each of which is adjusted independently by adjusting the slide screws on graduated beams. TERMINOLOGY OF GEAR TOOTH (i) Pitch circle diameter (PCD): It is the diameter of a circle which by pure rolling action would produce the same motion on the toothed gear wheel. It is equal to D = (T X OD)/ (T+2) where OD = outside diameter T = number of teeth (ii) MODULE: It is defined as the length of the pitch circle diameter per tooth. Module m=D/T and is expressed in mm. (iii) CIRCULAR PITCH (CP): It is the arc distance measured around the pitch circle from the flank of one tooth to a similar flank in the next tooth and is given by CP==ΠD/T=Πm. (iv) ADDENDUM: This is the radial distance from the pitch circle to the tip of the tooth. It is equal to one module. (v)Clearance: This is the radial distance from the tip of a tooth to the bottom of the mating tooth space when the teeth are symmetrically engaged. Its standard value is 0.157m or 0.25m. AVEV Page 26
  • 27. Metrology laboratory (vi) DEDENDUM: This is the radial distance from the pitch circle to the bottom of tooth space. Dedendum = Addendum +Clearance = m +0.157m =1 .157m.=1.25m (metric gearing system) vii) TOOTH THICKNESS: This is the arc distance measured along the pitchcircle from the intercepts with one flank to the intercepts with the other flank of the same tooth. It is given by mT Sin(90/T) Fig 1. Vernier Gear Tooth Callipers AVEV Page 27
  • 28. Metrology laboratory Fig 2. GEAR TOOTH DETAILS PROCEDURE: For finding PCD, module, addendum, dedendum and clearance: 1. First find the blank diameter, OD by a vernier calliper and also count the number of teeth T of the spur gear. 2. Next calculate pitch circle diameter D=(TxOD)/(T+2) 3. Find addendum, clearance, pitch, module and dedendum as per the formulae given in the theory. FOR CHORDAL TOOTH THICKNESS (using gear tooth calliper): 1. Set the chordal depth (addendum) on the vertical slide of the gear tooth vernier and then insert the jaws of the instrument on the tooth to be measured. 2. Adjust the horizontal vernier slide by the fine adjusting screw so that the jaws just touch the tooth. 3. Read the horizontal vernier slide and note the reading. It gives the chordal thickness of tooth. 4. Repeat the observations for the different teeth. 5. Compare the values of different characteristics with the standard value and set the percentage error. AVEV Page 28
  • 29. Metrology laboratory OBSERVATION: 1. Least count of caliper = mm 2. Number of teeth = CHORDAL THICKNESS: S.NO M.S.R V.S.R CHORDAL THICKNESS (M.S.R+V.S.R*L.C) CALCULATIONS: 1. Pitch circle diameter, D=(TxOD)/(T+2) = 2. module, m=D/T mm = 3. Pitch(p) =m*π 4. depth = 0.7p 3. Addendum= 0.3p = 4. Dedendum= 0.4p = 5. Theoritical Chordal Thickness = mT Sin(90/T)= p/2 ANALYSIS: AVEV Page 29
  • 30. Metrology laboratory RESULT: 1. Theoritical Chordal Thickness = 2. Theoritical Chordal addendum = 3. Chordal thickness measured by gear tooth vernier calipers = CONCLUSION: AVEV Page 30
  • 31. Metrology laboratory VIVA-VOCE: 1. Define chordal thickness of a gear. 2. Define the terms pitch circle and base circle of a gear. 3. Define module, addendum and dedundum. 4. What is pressure angle of a gear. 5. What is back lash. 6. What is helix angle. 7. What is lead angle. AVEV Page 31
  • 32. Metrology laboratory MEASUREMENTOF SCREW TERMINOLOGYUSING TOOL-MAKER’S MICROSCOPE AIM: Measurement of screw thread parameters like pitch & flank angle using tool maker's microscope. APPARATUS: Tool makers microscope & screw thread specimen OBJECTIVES: 1.To know the working principle of Tool makers microscope 2. To know about the terminology of screw tread THEORY: Tool maker's microscope is based on principle of optics. A general view of the toolmaker’s microscope giving its optical system is shown in fig 1. This is designed for measurements on parts of complex forms e.g. profile of external threads, tools etc. It can also be used to measure centre-to-centre distances of holes in any planes. Basically it consists of the optical head, which can be adjusted vertically along the ways of a supporting column. This optical head can be clamped in any position by a screw. The working table on which the parts to be inspected are placed, is secured on a heavy hollow base. The table has longitudinal and lateral movements. These movements are controlled by accurate micrometer screws having thimble scales and verniers. A light source is arranged at the back of the base. The source of light provides a horizontal beam of light, which is reflected from a mirror by 90° upwards towards the table. This beam of light passes through a transparent glass on which flat parts to be checked, are placed. A shadow image of the outline of contour of the part passes through the objective of the optical head and is projected by a system of three prisms to a ground glass screen. Observations are made through the eyepiece of the optical head. Cross lines are engraved on the ground glass screen, which can be rotated through 360°, and the measurements are made by these cross lines. The angle of rotation of screen can be read through an auxiliary eyepiece provided on the optical head. The eyepiece field of view contains an illuminated circular scale with a divison value of 1 minute. The optical head tube is adjusted AVEV Page 32
  • 33. Metrology laboratory in height for focusing purposes, till a sharp image of the projected contour is seen on the ground glass screen. Fig 1.Toolmaker’s Microscope AVEV Page 33
  • 34. Metrology laboratory PROCEDURE: MEASUREMENT OF SCREW THREAD PITCH: 1) To measure the screw pitch, the screw is mounted on the table. 2) The microscope is focused (by adjusting the height of the optical head) until a sharp image of the projected contour of the screw is seen of the ground glass screen. 3) The contour is set so that some point on the contour coincides with the cross line on the screen. The reading on the thimble of the longitudinal micrometer screw is noted. 4) Then the table is moved by the same screw until a corresponding point on the contour (profile) of the next thread coincides with the cross line. The reading is again noted and the difference in two reading gives the screw pitch. MEASUREMENT OF ANGLE OF THE THREAD: 1) To determine the thread angle, the screen is rotated until a line on the screen coincides with one flank of the thread profile. 2) Then the angle of the screen rotation is noted. 3) The screen is further rotated until the same line coincides with the other flank of the thread. The angle is noted again and the difference in two angular readings gives the actual angle of the screw. S. Description Initial Final Actual Theoritical % Error No reading reading Experimental value reading 1 Pitch of the screw 2 Depth 3 thickness 4 Thread angle CALCULATIONS: AVEV Page 34
  • 35. Metrology laboratory RESULTS: 1) Pitch of the screw = 2) depth of the screw = 3) thickness of the screw = 4) Angle of the thread = PRECAUTIONS: 1) Obtain clean picture of cross line and the cross thread seen through the eyepiece. 2) For angular measurements lines must remain parallel to flank edge of the tooth. ANALYSIS: AVEV Page 35
  • 36. Metrology laboratory CONCLUSIONS: VIVA-VOCE: 1. What is pitch of a screw thread. 2. What is flank angle of a screw thread. 3. What are the applications of toolmaker's microscope? 4. What is the ‘best size’ wire? AVEV Page 36
  • 37. Metrology laboratory SURFACE ROUGHNESS MEASUREMENT AIM: To measure the surface roughness of a machined part using handysurf APPARATUS: HANDYSURF E-35A/B OBJECTIVES: 1. To know about the terms like surface roughness, waviness, lay & profile 2. To know about the different methods of surface roughness measurement 3. To know about the working principle of Handysurf SURFACE TEXTURE: Surface topography is of great importance in specifying the function of a surface. A significant proportion of component failure starts at the surface due to either an isolated manufacturing discontinuity or gradual deterioration of the surface quality. Typical of the former is the laps and folds which cause fatigue failures and of the latter is the grinding damage due to the use of a worn wheel resulting in stress corrosion and fatigue failure. The most important parameter describing surface integrity is surface roughness. In the manufacturing industry, surface must be within certain limits of roughness. Therefore, measuring surface roughness is vital to quality control of machining work piece. Below are the definition of surface roughness and its main measurement methods. From a knowledge of the roughness amplitude and wavelength values expected from the surface, it is possible to select the appropriate instrument settings for a reliable roughness measurement. Fig 1 Elements of surface character of a machined surface DEFINITIONS: SURFACE TEXTURE is the local deviations of a surface from its ideal shape e.g perfect flat shape, perfect cylinderical shape, sherical shape etc. The measure of the surface texture is generally determined in terms of its roughness, waviness and Form . In surface texture there are many factors that, when combined, characterise a surface’s profile. For example: AVEV Page 37
  • 38. Metrology laboratory • the microstructure of the material • the action of the cutting tool • the instability of the cutting tool on the material • errors in the machine tool guideways • Mainly, what affects the surface texture could be summarized in the speed of the cutting tool, feed rate & the depth of cut. ROUGHNESS – a quantitative measure of the process marks produced during the creation of the surface and other factors such as the structure of the material. The action of the cutting tool, chemical action, polishing, lapping, and the structure of the material all contribute to the roughness of the surface. WAVINESS – a longer wavelength variation in surface away from its basic form (e.g. straight line or arc). . It may result from such factors as machine or work deflection, vibration, chatter, heat treatment, or warping strains **Because both process and machine induced irregularities occur simultaneously, roughness is superimposed over waviness. LAY refers to the predominant direction of the surface texture. Ordinarily lay is determined by the particular production method and geometry used.Turning, milling, drilling, grinding, and other cutting tool machining processes usually produce a surface that has lay PROFILE is, mathematically, the line of intersection of a surface with a sectioning plane which is (ordinarily) perpendicular to the surface. It is a two-dimensional slice of the threedimensional surface. Almost always profiles are measured across the surface in a direction perpendicular to the lay of the surface. Shortly saying, it's the graphical representation of the surface. AVEV Page 38
  • 39. Metrology laboratory Fig 2. Profile generation by the intersection of sectioning plane with the surface CENTER LINE (Mean line) : mathematically it's poisoned in such a way that within the sampling length the sum of areas enclosed by the profile above & below the center line are equal. FORM of a surface is the profile of the surface under consideration ignoring variations due to roughness and waviness. Deviations from the desired form result from clamping marks or sliding marks machining guide errors etc. ARITHMETICAL MEAN ROUGHNESS (Ra) Arithmetic mean deviation from the mean line of the profile (Ra) is defines as the average value of the ordinates (y1, y2, y3……,yn) from the mean line. Fig 3. Arithmetic mean deviation Where l = Sampling length, f(x) indicates height of a point chosen from the profile with respect to the center line . AVEV Page 39
  • 40. Metrology laboratory Ra readings serve well for surface finish control in most instances. It may be mentioned that Ra provides an average reading and several different surfaces can have the same average. Thus, more knowledge of the surface texture is required. TEN-POINT MEAN ROUGHNESS (RZ) A section of standard length is sampled from the mean line on the roughness chart. The distance between the peaks and valleys of the sampled line is measured in the y direction. Then, the average peak is obtained among 5 tallest peaks(Yp), as is the average valley between 5 lowest valleys(Yv). The sum of these two values is expressed in micrometer( µm). Fig 4. Ten point height of irregularities The R.M.S value (Rq) is defined as the square root of the mean of the squares of the ordinates of the surface measured from the mean line FILTERS are electronic or mathematical methods or algorithms which separate out different wavelengths and allow us to see only the wavelengths we are interested in. CUT-OFF is a filter and is used as a means of separating or filtering the wavelengths of a component. Cut-offs have a numerical value that when selected will reduce or remove the unwanted wavelengths on the surface. For example, a roughness filter cut-off with a numeric value of 0.8mm will allow wavelengths below 0.8mm to be assessed with wavelengths above 0.8mm being reduced in amplitude; the greater the wavelength, the more severe the reduction. For a waviness filter cut-off with a numeric value of 0.8mm, wavelengths above 0.8mm will be assessed with wavelengths below 0.8mm being reduced in amplitude. AVEV Page 40
  • 41. Metrology laboratory SAMPLE LENGTH : after the data has been filtered with a cut –off, we then sample it. Sampling is done by breaking the data into equal sample lengths. The sample lengths have the same numeric value as the cut-off. In other words, if you use a 0.8mm cut-off, then the filtered data will be broken down into 0.8mm sample lengths. These sample lengths are chosen in such a way that a good statistical analysis can be made of the surface. In most cases, five sample lengths are used for analysis. Fig.5 : Sample of surface profile Rsk –(it's an amplitude parameter which's a measure of the vertical characteristics of the surface deviations). Rsk : is a measurement of skewness and will indicate whether the surface consists of mainly peaks, valleys or an equal combination of both. It is the measure of the symmetry of the profile about the mean line. A surface with predominant peaks will be considered as 'positive skew' and a surface with predominant valleys will be considered as 'negative skew' RSm (it's a spacing parameter- which's a measure of the horizontal characteristics of the surface deviations). Rsm is the mean spacing between profile peaks as they pass through the mean line (spacing is the distance between points that cross the mean line within a sample length in an upward direction). *note - almost all parameters are defined over 1 sample length, however in practice more than 1 sample length is assessed (usually 5) and the mean calculated. This provides a better statistical estimate of the parameter's measured value THE TRACER METHOD : Which uses a stylus that's dragged across the surface. This method is the most common for obtaining quantitative results. AVEV Page 41
  • 42. Metrology laboratory HANDYSURF E-35A/B: This equipment measures parameters of amplitude of surface profiles like Arithmetic mean deviation of profile (Ra), Root mean square deviation of profile(Rq) & Maximum height (Ry, Rmax, Rt, Rz, Rzmax, Pt) by scanning a mechanical stylus across the sample. A modern typical surface measuring instrument will consist of a stylus with a small tip (diamond) a gauge or transducer, a traverse datum and a processor. The surface is measured by moving the stylus across the surface. As the stylus moves up and down along the surface, the transducer converts this movement into a signal which is then exported to a processor which converts this into a number and usually a visual profile. (The stylus must be moved in a straight line to give accurate readings) PROCEDURE: 1. Place the driving unit of handysurf on the workpiece in such a way that the bottom of the driving unit is in contact with the workpiece for which the measurement will be made. 2. If the workpiece is smaller in size then set the adjuster to a groove at the rear side of the tracing driver, and adjust the height of the tracing driver to become parallel between the workpiece surface and the tracing driver. Then fix it with screw. 3. Press the ON• PRT•▼ button to turn the power of the amplification indicator on. 4. Press the SEL• ALT button shortly for about 0.5 second and select the cutoff value screen 5. Select the required cutoff value by pressing the ON• PRT•▼ button or MEAS•▲button. 6. Press the SEL•ALT button shortly for about 0.5 second and indicate the Ra screen. 7. Press the MEAS•▲ button and the measurement will start. Department of Mechanical Engineering Page 42
  • 43. Metrology laboratory Fig 6 . Stylus operation RESULTS: S.No Type of workpiece Ra Rz Rq 1 2 3 ANALYSIS: Department of Mechanical Engineering Page 43
  • 45. Metrology laboratory VIVA-VOCE: 1. What is surface finish (or) roughness? 2. Why surface finish is important in engineering applications? 3. What is the unit of surface roughness. 4. How do you classify geometrical irregularities. 5. What is the working principle of Talysurf. AVEV Page 45
  • 46. Metrology laboratory MACHINE TOOL ALIGNMENT TEST ON LATHE AIM: To conduct alignment tests on lathe machine & To find straightness of a bed and flatness of a surface using spirit level. APPARATUS: A lathe in good working condition with all standard accessories, i.e. live and dead centers, sleeve etc, Dial indicator, Dial stand 'with magnetic base, Flexible dial stand, Parallel blocks, Straight edge, Straight bar, Standard mandrel, Straight spirit level, Box type spirit level, Alignment microscope, Taut wire, Set of spanners, Mandrel and centre draw bar. OBJECTIVES: 1. To know about the different alignment tests of lathe 2. To know the use of spirit level & dial gauge in alignment tests THEORY: For metrology purposes the term alignment refers to two axes merged in each other or where one axis extends beyond the other. Two lines or axes are said to be in alignment when their distance apart at several points over a given length is measured and this distance does not exceed a given standard tolerance. The dimensions of a gauge, its surface finish, geometry and accurate production of components/parts depend upon the inherent quality and accuracy of the machine tool used for its manufacture. 1. The alignment test is carried out to check the grade of manufacturing accuracy of the machine tool. It consists of checking the relationship between various machine elements (such as bed, table, spindle etc) when the machine tool is idle and unloaded. 2. The various tests applied to any machine tool could be grouped as below : (a) Tests for the level of installation of machine in horizontal and vertical planes, (b) Tests for flatness of machine bed and for straightness and parallelism of bed ways or bearing surfaces, (c) Tests for perpendicularity of guide ways to other guide ways or bearing surfaces, (d) Tests for true running of the main spindle and its axial movements, (e) Tests for parallelism of spindle axis to guideways or bearing surfaces. AVEV Page 46
  • 47. Metrology laboratory (f) Tests for the line of movement of various members, e.g., saddle and table cross slides etc. along their ways, (g) Performance tests in which some test pieces are machined and their accuracy and finish is checked. Levelling of the Machine. Before the various tests on any machine tool are carried out, it is very essential that it should be installed in truly horizontal and vertical planes. In horizontal plane, both longitudinal and transverse directions are equally important. If, say, any long lathe bed is not installed truly horizontal the bed will undergo a deflection, thereby producing a simple bend and undesirable stresses will be introduced. If the bed is not installed truly horizontal in transverse direction, twist will be introduced. Thus the movement of the saddle can’t be in a straight line and true geometric cylinder can’t be generated. For proper installation and maintenance of its accuracy, a special concrete foundation of considerable depth must be prepared. Also this must be insulated from the surrounding floor by introducing some form of damping. The level of the machine bed in longitudinal and transverse directions is generally tested by a sensitive spirit level. The saddle is kept approximately in the centre of the bed support feet. The spirit level is then placed at a-a (Fig. 1), to ensure the level in the longitudinal direction. It is then traversed along the length of bed and readings at various places noted down. For test in transverse direction the level is placed on a bridge piece to span the front and rear guideways and then reading is noted. It is preferable to take two readings in lon-gitudinal and transverse directions simultaneously so that the effect of adjustments in one direction may also be observed in the other. AVEV Page 47
  • 48. Metrology laboratory Fig 1 level of installation The readings in transverse direction reveal any twist or wind in the bed. It may be noted that the two guideways may be perfectly levelled in longitudinal direction, but might not be parallel to each other. This is revealed by the test in transverse direction. The straightness of bed in longitudinal direction for the long beds can also be determined by other methods, e.g., using straight edges, autocollimators or by taut wire method. But the test in transverse direction can be carried out only by spirit level. It is desired that the front guideway should be convex only as the cutting forces and the weight of carriage act downward on it. If the front guideways are concave, then the effect will be comulative. The tendency of the carriage, under cutting forces is to lift upwards from the rear and this is prevented by a gib placed underneath the guideways. With the result, an upward force acts on the rear guideways ; which must, therefore, be made concave. Transverse level may be in any direction, but no twist can be tolerated. True Running of Locating Cylinder of Main Spindle. Locating cylinder is provided to locate the chuck or face plate. However locating surface can’t be threaded one as threads get worn out soon and thus introducing play in face plate or chuck. Thus locating surface is cylindrical and this must run truly; for only then the face plate etc., can run truly. The dial indicator is fixed to the carriage (or any other fixed member) and the feeler of the indicator touches the locating surface (fig 2). The surface is then rotated on its axis and indictor should not show any movement of needle. AVEV Page 48
  • 49. Metrology laboratory Fig 2 Fig 3 Axial Slip of Main Spindle and True Running of Shoulder Face of Spindle Nose Let us first distinguish between the axial play and the axial slip. Axial play means the indispensable freedom of spindle movement in axial direction to prevent it from seizing by heating. The spindle is supported between two bearings. Due to running of spindle, there will be a rise in temperature and thermal expansion of spindle would be there. If no axial play is allowed, it would try to bend. Thus there will be no adverse effect of axial play if the direction of cutting forces remains same. If the direction of cutting force changes, there would be some error introduced due to movement of spindle axially in either direction. Under such conditions, therefore, it is advisable to cut threads in one direction only. Axial slip is defined as the axial spindle movement which follows the same pattern and is due to the manufacturing error. Actually this test is meant to check this error. To test this the feeler of the dial gauge rests on the face of the locating spindle shoulder and the dial gauge holder is clamped to the bed (Fig 3). The locating cylinder is then rotated and the change in reading noted down. The readings are taken at two diametrically opposite points. The total error indicated by the movement of the pointer includes three main sources of errors. (i) Axial slip due to error in bearings supporting the locating shoulder, i.e., the bearings are not AVEV Page 49
  • 50. Metrology laboratory perpendicular to the axis of rotation and due to it a point on the shoulder will move axially in and out at diametrically opposite points. (ii) Face of the locating shoulder not in a plane perpendicular to axis of rotation. (Hi) Irregularities of front face. Due to axial slip, in screw cutting, the pitch will not be uniform due to periodic movement of the spindle. This, however, is not important while turning. True Running of Headstock Centre. Headstock centre is live centre and the workpiece has to rotate with this centre. If it is not true with the axis of movement of the spindle, eccentricity will be caused while turning a work, as the job axis would not coincide with the axis of rotation of main spindle. For testing this error, the feeler of the dial indicator is pressed perpendicular to the taper surface of the centre (Fig. 4), and the spindle is rotated. The deviation indicated by the dial gauge gives the trueness of the centre. Fig 4 Fig 5 Parallelism of the Main Spindle to Saddle Movement. This has to be checked in both vertical and horizontal planes. In this we require the use of mandrel. An important precaution in the use of mandrels and dial indicator is mentioned here. The mandrel must be so proportioned that its overhang does not produce appreciable sag, or else AVEV Page 50
  • 51. Metrology laboratory the sag must be calculated and accounted for. The rigidity indicator set up is also very important and must be carefully watched. Otherwise variations in readings are recorded by pointer may be solely due to deflection of the indicator mounting in different positions and it becomes very difficult to detect and isolate the spurious deflection from the true variations. If axis of the spindle is not parallel to bed in horizontal direction, a tapered surface is produced. Any deviation from parallelism of spindle axis from bed in vertical axis will produce a hyperboloid surface. For this test, a mandrel is fitted in the taper socket of the spindle. Mandrel has a concentric taper shank which is close fit to the spindle nose taper. The feeler of the dial indicator is pressed on the mandrel and the carriage is moved. The indication in horizontal plane is given by dial (b) and in vertical plane by dial (a) (Fig. 5). In vertical plane the mandrel should be rising towards the free end in order to counteract the weight of mandrel and job. But for counter-acting cutting forces, it should be lower towards free end. In horizontal plane, mandrel should be inclined in a direction opposite to the direction of tool pressure. True running of taper socket in main spindle. If the axis of tapered hole of the socket is not concentric with the main spindle axis, eccentric and tapered jobs will be produced. To test it, a mandrel is fitted into the tapered hole and readings at two extremes of the mandrel are taken by means of a dial indicator as shown in Fig. 6. Fig 6 Fig 7 Parallelism of tailstock guideways with the movement of carriage. Sometimes the job is held between head-stock and tail stock centre for turning. In that case the job axis must coincide with the tailstock centre. If the tailstock guideways are not AVEV Page 51
  • 52. Metrology laboratory parallel with the carriage movement there will be some offset of the tailstock centre and this results in taper turning. To check the parallelism of tailstock guideways in both the planes i.e., horizontal and vertical, a block is placed on the guideways as shown in Fig.7 and the feeler of the indicator is touched on the horizontal and vertical surfaces of the block. The dial indicator is held in the carriage and carriage is moved. Any error is indicted by the pointer of dial indicator. Movement of upper slide parallel with main spindle in vertical plane. The dial indicator if fixed in the tool post as shown in fig 8. A mandrel is fitted in the spindle. The feeler of the dial gauge is pressed against the mandrel in vertical plane and the upper slide is moved longitudinally. This error is not tested in horizontal plane because there is swivelling arrangement for taper turning. Fig 8 Fig 9 Parallelism of tailstock sleeve to saddle movement. If the tailstock sleeve is not parallel to the saddle movement, the height of dead centre would vary as varying lengths of sleeve are taken out. For the jobs held between two centres, it is necessary that the central axis of the dead centre be coaxial with the job axis in both the planes. If it is not so, the job may be tilted up or down or in sideways due to the support of the dead centre. The test is carried out by fixing the dial indicator on the tool post and pressing the plunger against the sleeves first in vertical and then in horizontal plane (Fig. 9). The carriage is moved along the full length of the sleeve and deviations as indicated by dial indicator are noted AVEV Page 52
  • 53. Metrology laboratory down. Tailstock sleeve should be rising towards the free end in vertical plane and should be inclined towards the tool pressure in horizontal plane. Parallelism of tailstock sleeve taper socket to saddle movement. A mandrel is put in the sleeve socket. The dial gauge is fixed on the tool post and plunger is pressed against the mandrel and saddle is moved from one side to the other. This test is carried out in both the horizontal and vertical planes. Alignment of both the centres in vertical plane. Besides testing the parallelism of the axes individually (main spindle axis and tailstock axis) it is-necessary to check the relative position of the axes also. Both the axes may be parallel to carriage movement but they may not be coinciding. So when a job is fitted between the centres, the axis of the job will not be parallel to the carriage movement. This test is to be carried out in vertical plane only. A mandrel is fitted between the two centres and dial gauge on the carriage. The feeler of the dial gauge is pressed against the mandrel in vertical plane as shown in Fig. 10 and the carriage is moved and the error noted down. Fig 10 PROCEDURE: 1. Clean all surfaces perfectly on which alignment tests are to be performed, 2. Follow the following test chart for performing different alignment tests. AVEV Page 53
  • 54. Metrology laboratory ALIGNMENT TABLE: S. OBJECT MEASURING PERMISSIBLE ERROR ACTUAL No INSTRUMENT ERROR 1 Test for level of Spirit level, Front guide ways installation Gauge block to 0.02mm/metre convex only. a) In longitudinal suite the guide Rear guide ways 0.01 to direction ways of the lathe 0.02mm/metre convexity. b) In transverse bed Bed level in crosswise direction direction ± 0.02mm/metres. Tailstock guide ways parallel with the movement of carriage 0.02mm/m. 2 Straightness of saddle in Cylindrical test 0.02mm over 600mm length horizontal plane mandril(600mm of mandrel. long), Dial gauge 3 Alignment of both the Cylindrical test 0.02mm over 600mm length centres in vertical plane mandril(600mm of mandrel. long), Dial gauge 4 True running of taper Test mandrel Position A, 0.01mm, socket in main spindle with taper shank position B 0.02mm. & 300mm long cylindrical measuring part, Dial gauge 5 Parallelism of main Test mandrel a) 0.02/300 mm spindle to saddle with taper shank mandrel rising movement & 300mm long towards free end a) In vertical plane cylindrical only. b) In horizontal measuring part, b) 0.02/300 mm plane Dial gauge mandrel inclined at free end towards tool pressure only. 6 Movement of upper slide Test mandrel 0.02 mm over total parallel with main spindle with taper shank movement of the slide in vertical plane & 300mm long cylindrical measuring part, Dial gauge 7 True running of loacating Dial gauge 0.01mm/revolution of the cylinder of main spindle spindle. AVEV Page 54
  • 55. Metrology laboratory 8 True running of head Dial gauge 0.01mm/revolution of the stock centre spindle. 9 Parallelism of tail stock Dial gauge a) 0.01/100 mm( tail sleeve to saddle stock sleeve inclined movement towards tool pressure a) In vertical plane only) b) In horizontal b) 0.01/100mm plane (Tailstock sleeve rising towards free end only) 10 Parallelism of tail stock Test mandrel a) 0.03/300 mm, sleeve taper socket to with taper shank mandrel rising saddle movement & 300mm long towards free end a) In vertical plane cylindrical only. b) In horizontal measuring part, b) 0.03/300 mm, plane Dial gauge mandrel inclined at free end towards tool pressure only. ANALYSIS: AVEV Page 55
  • 56. Metrology laboratory CONCLUSION: VIVA-VOCE: 1. What is the need of machine alignment test? 2. What is the use of spirit level & dial gauge in alignment tests 3. Distinguish between alignment test and performance test of a machine tool. AVEV Page 56
  • 57. Metrology laboratory VIBRATION MEASUREMENT OF MACHINES AIM: To measure machine Vibration using single axis accelerometer APPARATUS : Accelerometer(10 mv/g), A/D Converter, Computer with Labview software OBJECTIVES: 1 To know about different methods of condition monitoring 2 To know about sensitivity of sensor 3 To know the difference between time wave and frequency spectrum SPECIFICATIONS: 1. Sampling frequency: 51.2 KHz 2. Frequency range: 0 – 25600 Hz 3. Sensitivity of ICP accelerometer: 10 mV/g THEORY: Vibration analysis one type of condition monitoring techniques being used in industries for many years. Machines and engines contain components which has reciprocating and rotary motions and hence it produce vibration. The causes for machine vibration are unbalance, looseness, bearing faults, misalignment, gear tooth problem. Machine vibration is measured by mounting the accelerometer on top of the component for which vibration is going to be measured. Labview programming language is used to write the program for data acquisition in the form of time waves and to convert them into frequency spectrums. Time wave forms are used to find the overall vibration of the machine which measures the condition of a machine. Frequency spectrums will be used to know the different sources of vibration and its corresponding amplitudes. DATA ACQUISITION SYSTEM & IT’S COMPONENTS Data acquisition system (DAQ) consists of Vibration sensor, filter, amplifier, A/D Converter & computer. Vibration sensor is connected to amplifier and A/D Converter to convert the analog signal into digital signal which can be stored in a computer. The fundamental task of a AVEV Page 57
  • 58. Metrology laboratory DAQ system is the measurement or generation of real-world physical signals. Before a computer-based system can measure a physical signal, a sensor or transducer must convert the physical signal into an electrical signal such as voltage or current. Often, the plug-in DAQ board is considered to Fig 1. Diesel Engine with vibration measurement setup be the entire DAQ system. However, the board is only one of the system components. Unlike most stand-alone instruments, sometimes you cannot directly connect signals to a plug-in DAQ board. A signal conditioning accessory must condition the signals before the plug-in DAQ board converts them to digital information. Finally, software controls the DAQ system—acquiring the rawdata, analyzing the data, and presenting the results. Vibration severety chart AVEV Page 58
  • 59. Metrology laboratory DATA ACQUISITION PROCEDURE Fig 1 displays the method of connection of the power supply, accelerometers, A/D converter and computer. For acquiring vibration signals of the engine, general purpose ICP® accelerometer with sensitivity of 10 mV/g is used. This accelerometer is used to measure frequencies from 0.5 to 26500 Hz. Accelerometer is connected to NI 9234 A/D converter with specifications (4- channel, ±5V, 24-Bit Software –Selectable IEPE and AC/DC analog input module). Accelerometer was used for measuring vibration of engine head in vertical direction and the sampling frequency of converter is 51.2 kHz. The data acquisition system (DAQ) is shown in fig 1. Finally, collected data are transferred by a cable to the USB port of PC for recording. Data acquisition duration for each test was 60s. A laptop was used for recording the data. OBSERVATIONS: S. No Position of the Overall vibration Overall Vibration accelerometer level (RMS) or acceleration(m/s2) vibration velocity(mm/s) AVEV Page 59