Downloaded 39 times
![Makerbot Replicator 2X
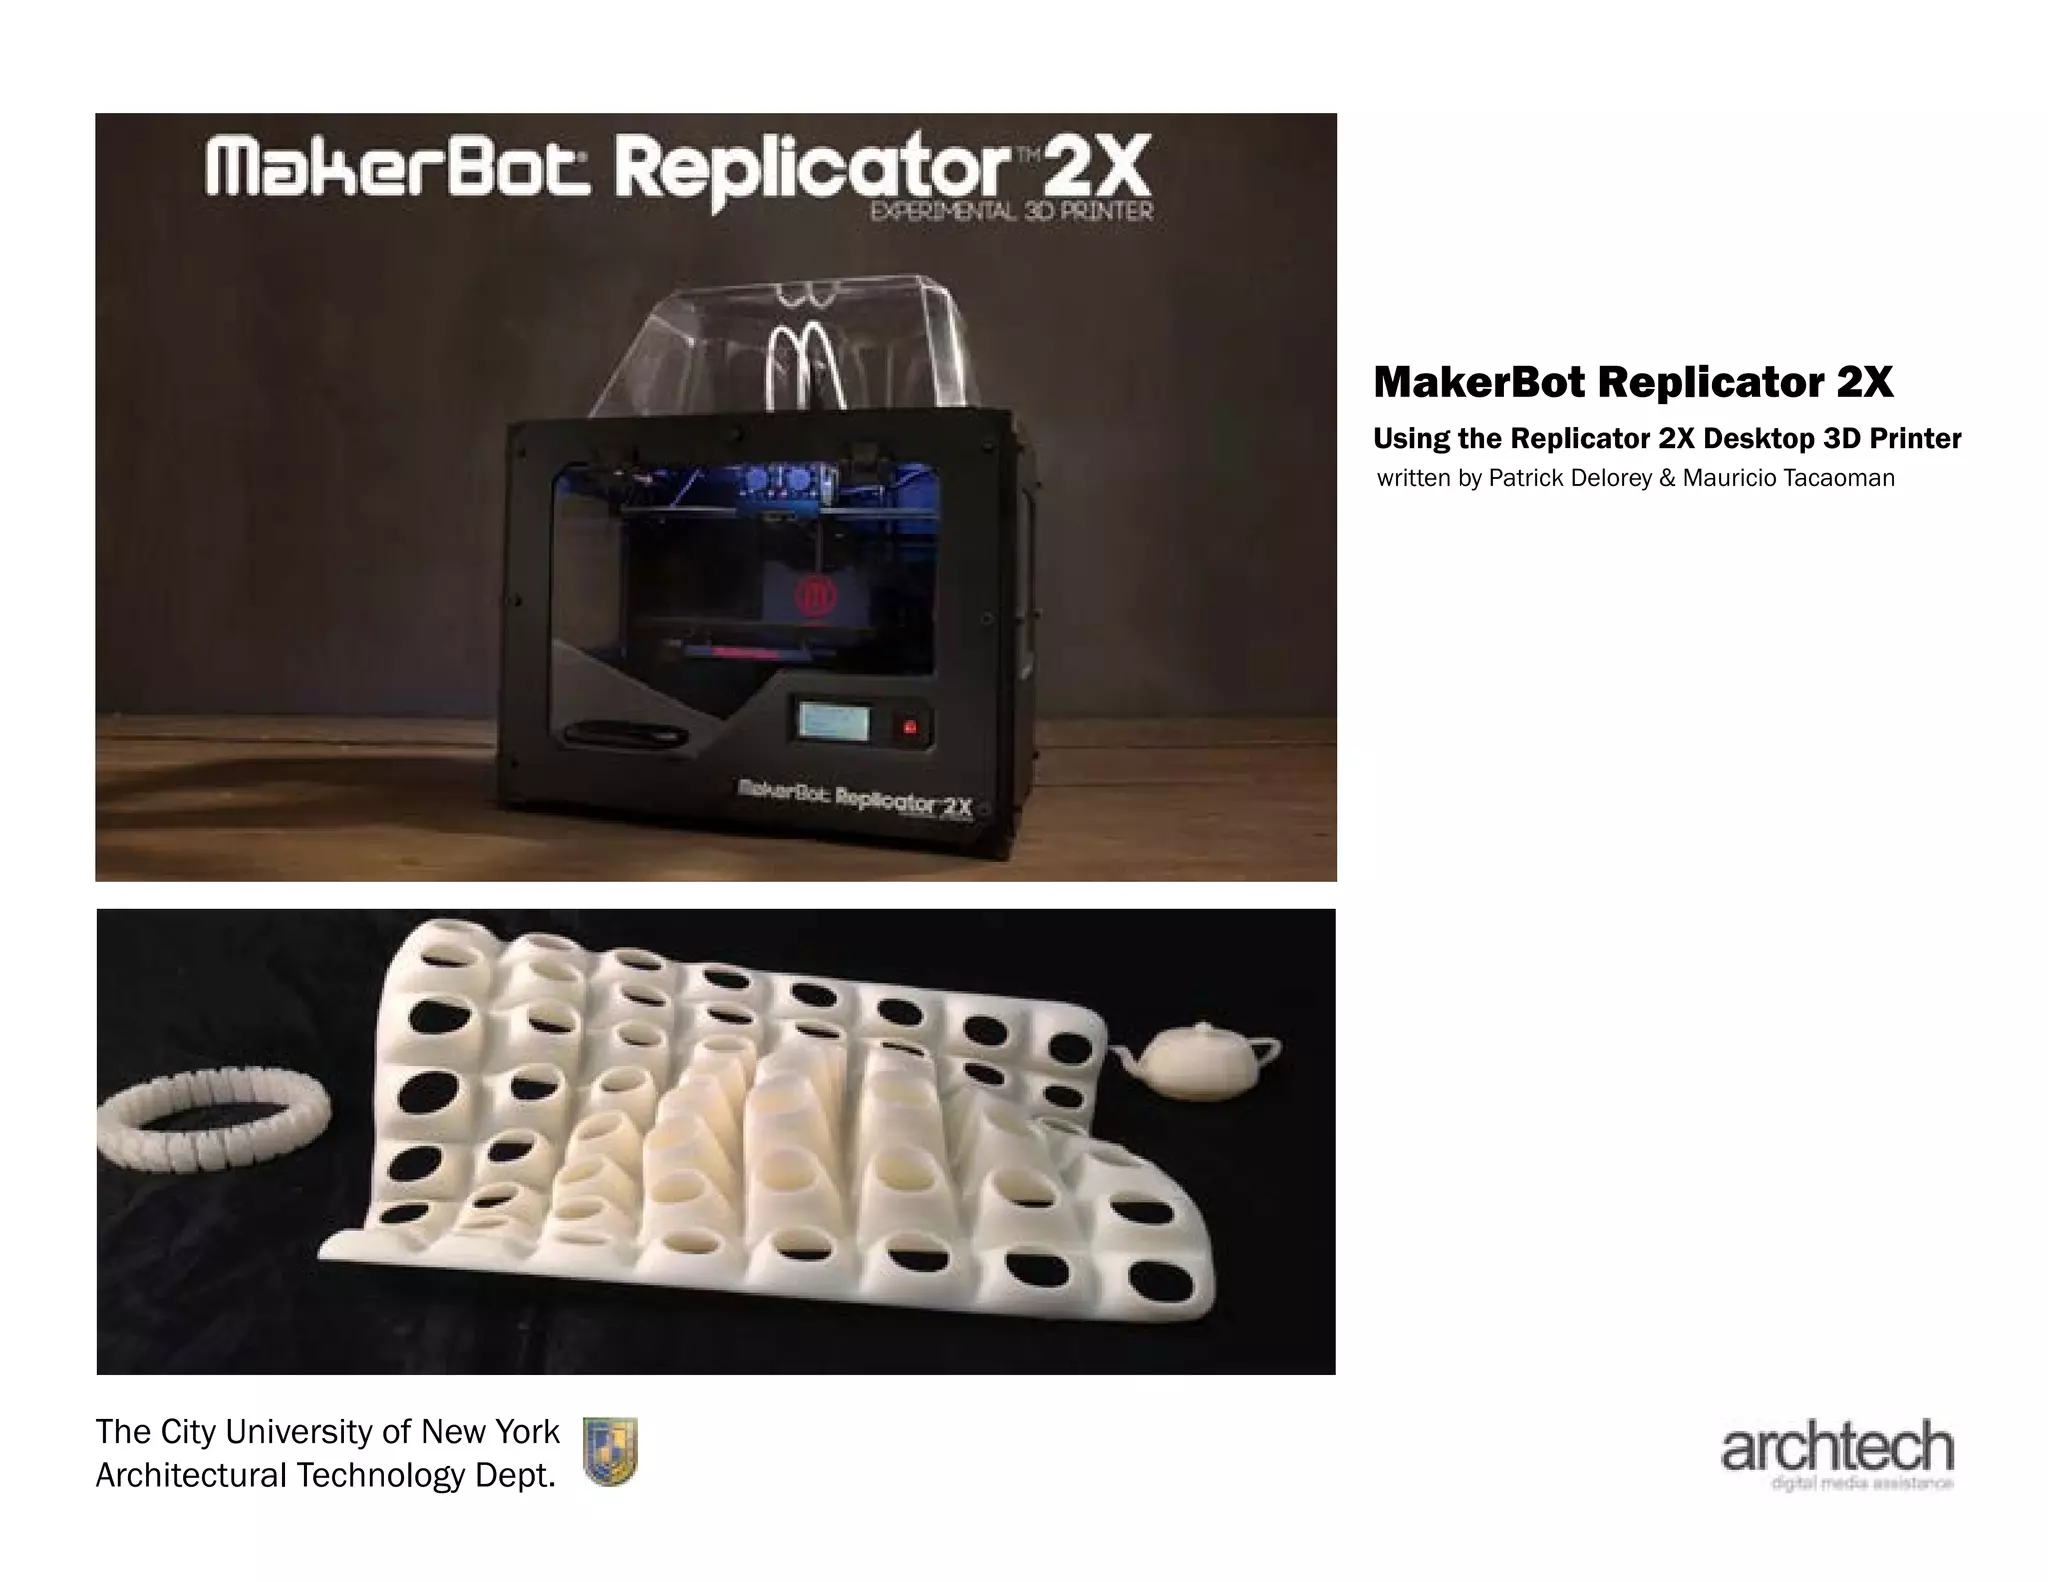
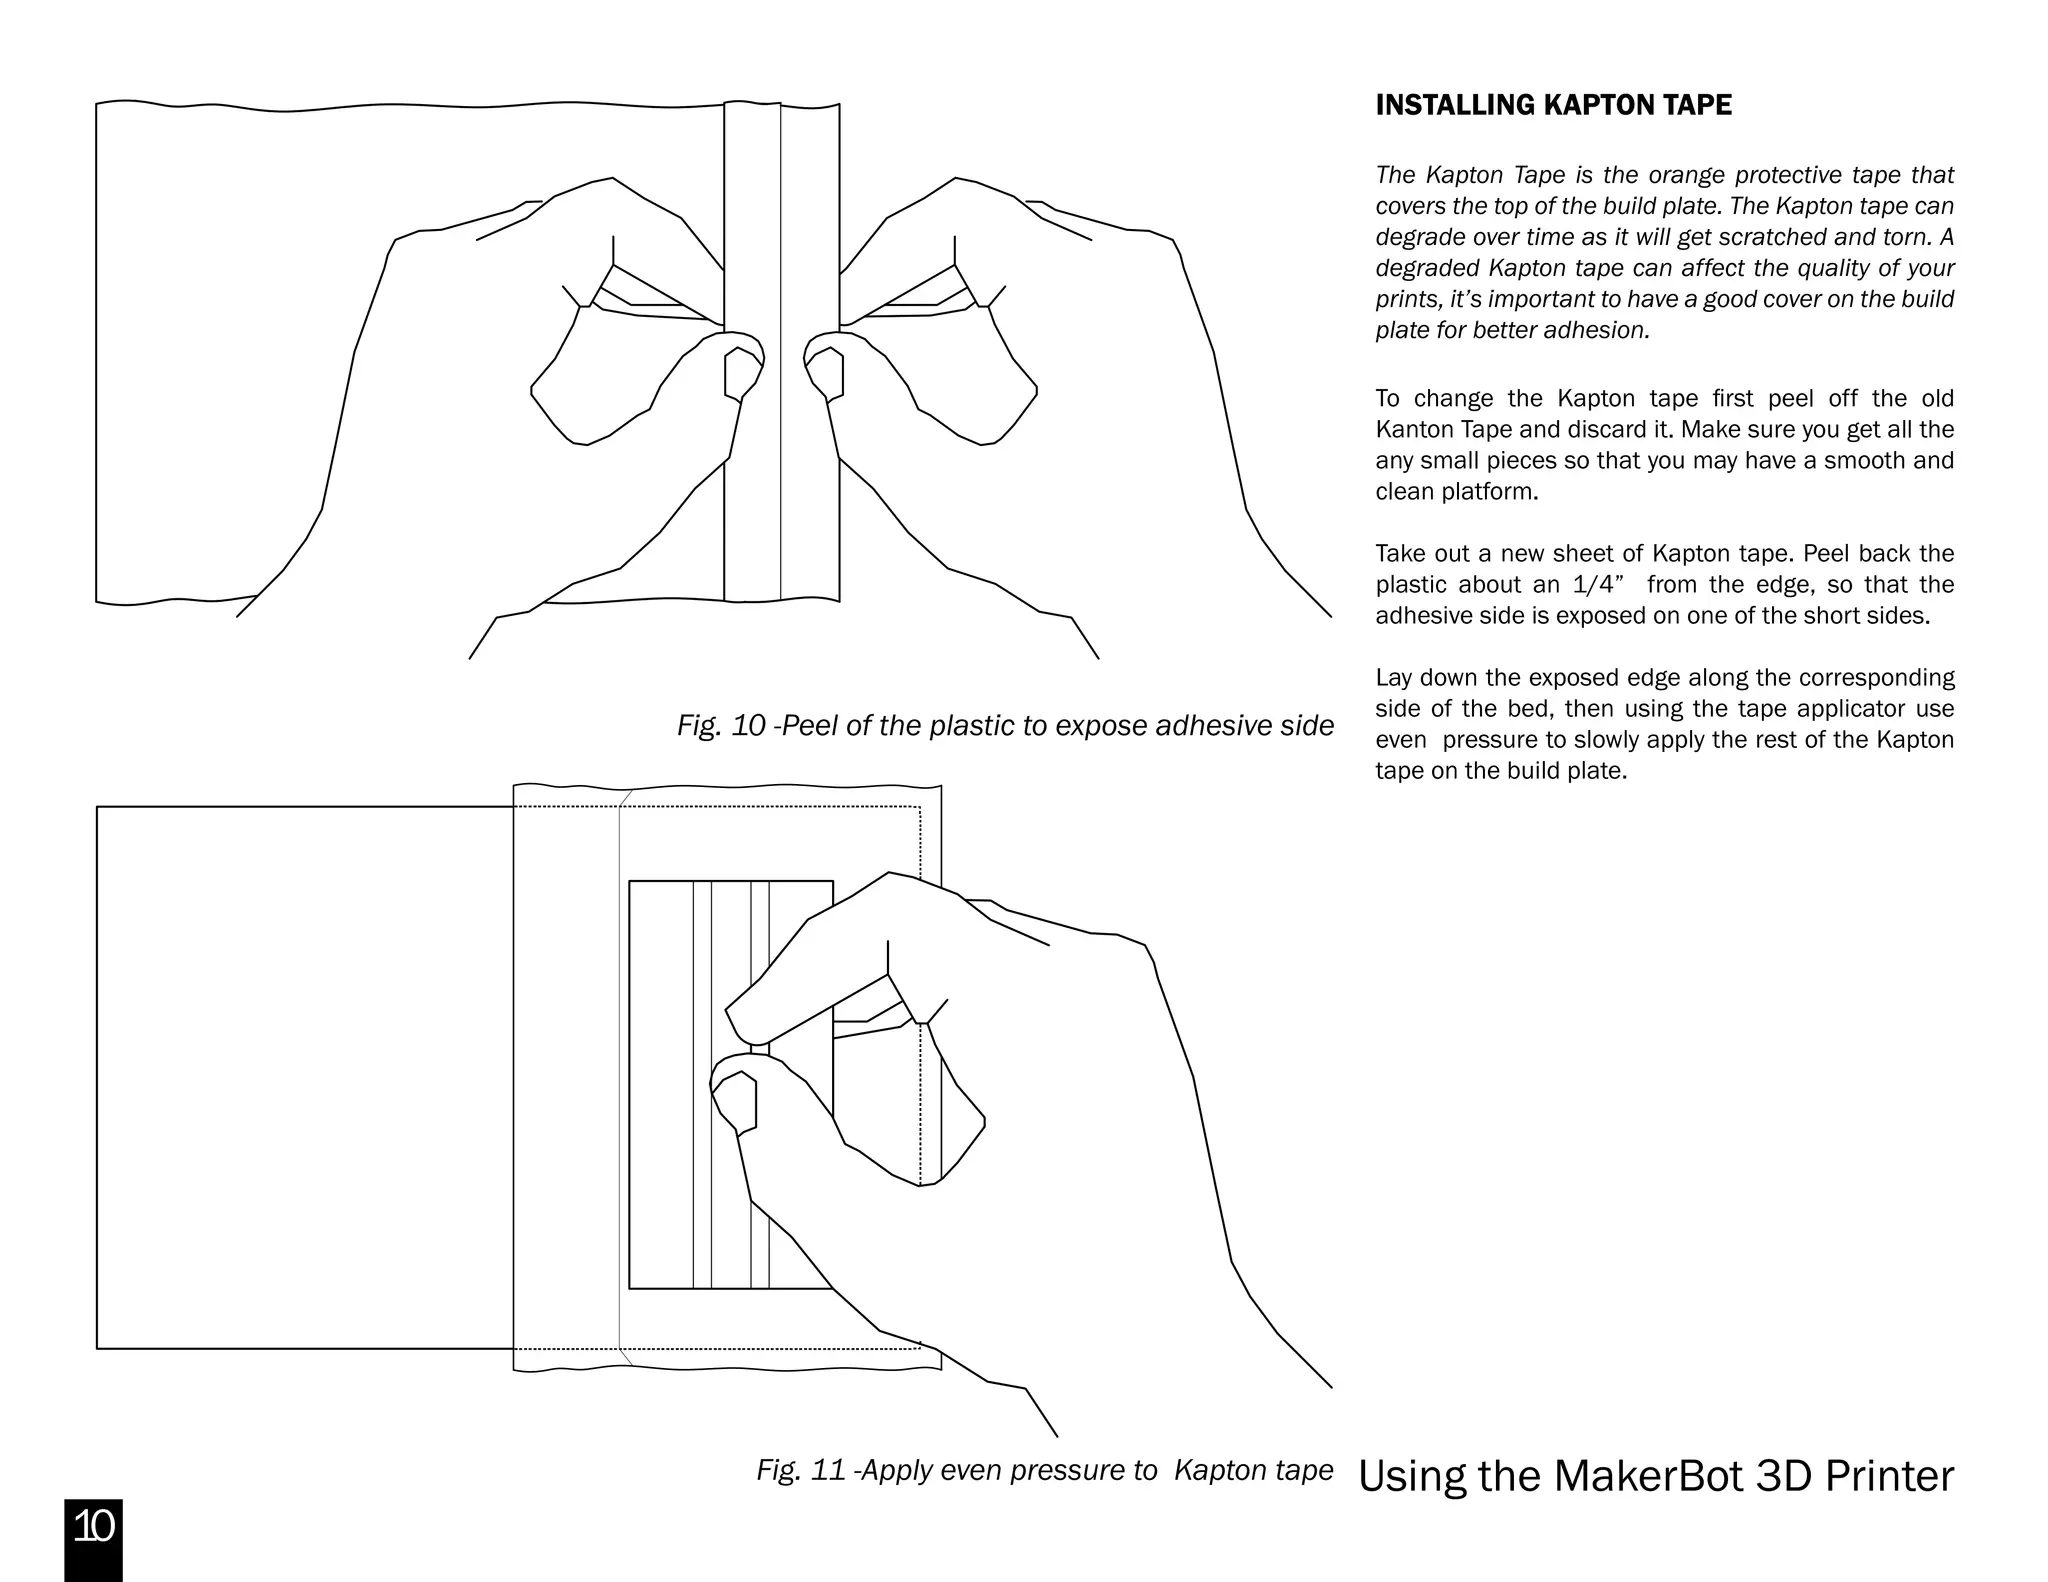
LEVELING THE BUILD PLATE
Leveling the build plate will ensure that the filament
adheres to the plate evenly across its surface. Don’t
take this step for granted. An out-of-level build plate is
the #1 reason for failed builds. The knobs allow you
to be extremely precise in your leveling. Make use of
them!
Leveling Routine
To level the build plate, select Utilities in the main
menu on the MakerBot LCD screen and then select
Level Build Plate.
The LCD keypad will then prompt you to adjust the
bed at three different points using the three knobs
located underneath the build platform. Tightening
the knobs (to the right) moves the build plate away
from the nozzles. Conversely, loosening the knobs (to
the left) moves the build plate closer to the extruder
nozzles. The distance of the build plate should be the
thickness of a piece of paper, or approx. 0.1 mm.
Adjust the knobs at all three points so that the piece
of paper can slide between the plate and the nozzles.
Note that you should still feel the slightest bit of
friction. You will be asked to do this twice, once closer
to the middle of the bed, and once toward the edges.
After leveling the plate, the LCD panel will ask you to
confirm the adjustments in the center of the platform.
Once satisfied with the adjustment, you are ready to
load the desired filament.
Don’t just walk away immediately when you’ve
released a print. Pay attention, especially during the
first layer. If the build plate is too far from the heads,
the filament might not stick to the plate. If too close,
the extruder nozzles can scratch/tear the Kapton
tape. Additionally, if the plate is not level, the head can
collide with the part causing it to detach from the bed.
A little caution early can prevent hours of wasted time
and potential damage to your print or the machine.
3
1
2
5
4
[1] Heated Build Panel
[2] Leveling Knobs
[3] Exturders
[4] Filament Guide Tubes
[5] LCD Panel
[6] SD Card Slot
3
Fig. 1 -MakerBot Front
6](https://image.slidesharecdn.com/makerbotreplicator2x-140324125719-phpapp01/75/MakerBot-Replicator-2x-Primer-3-2048.jpg)
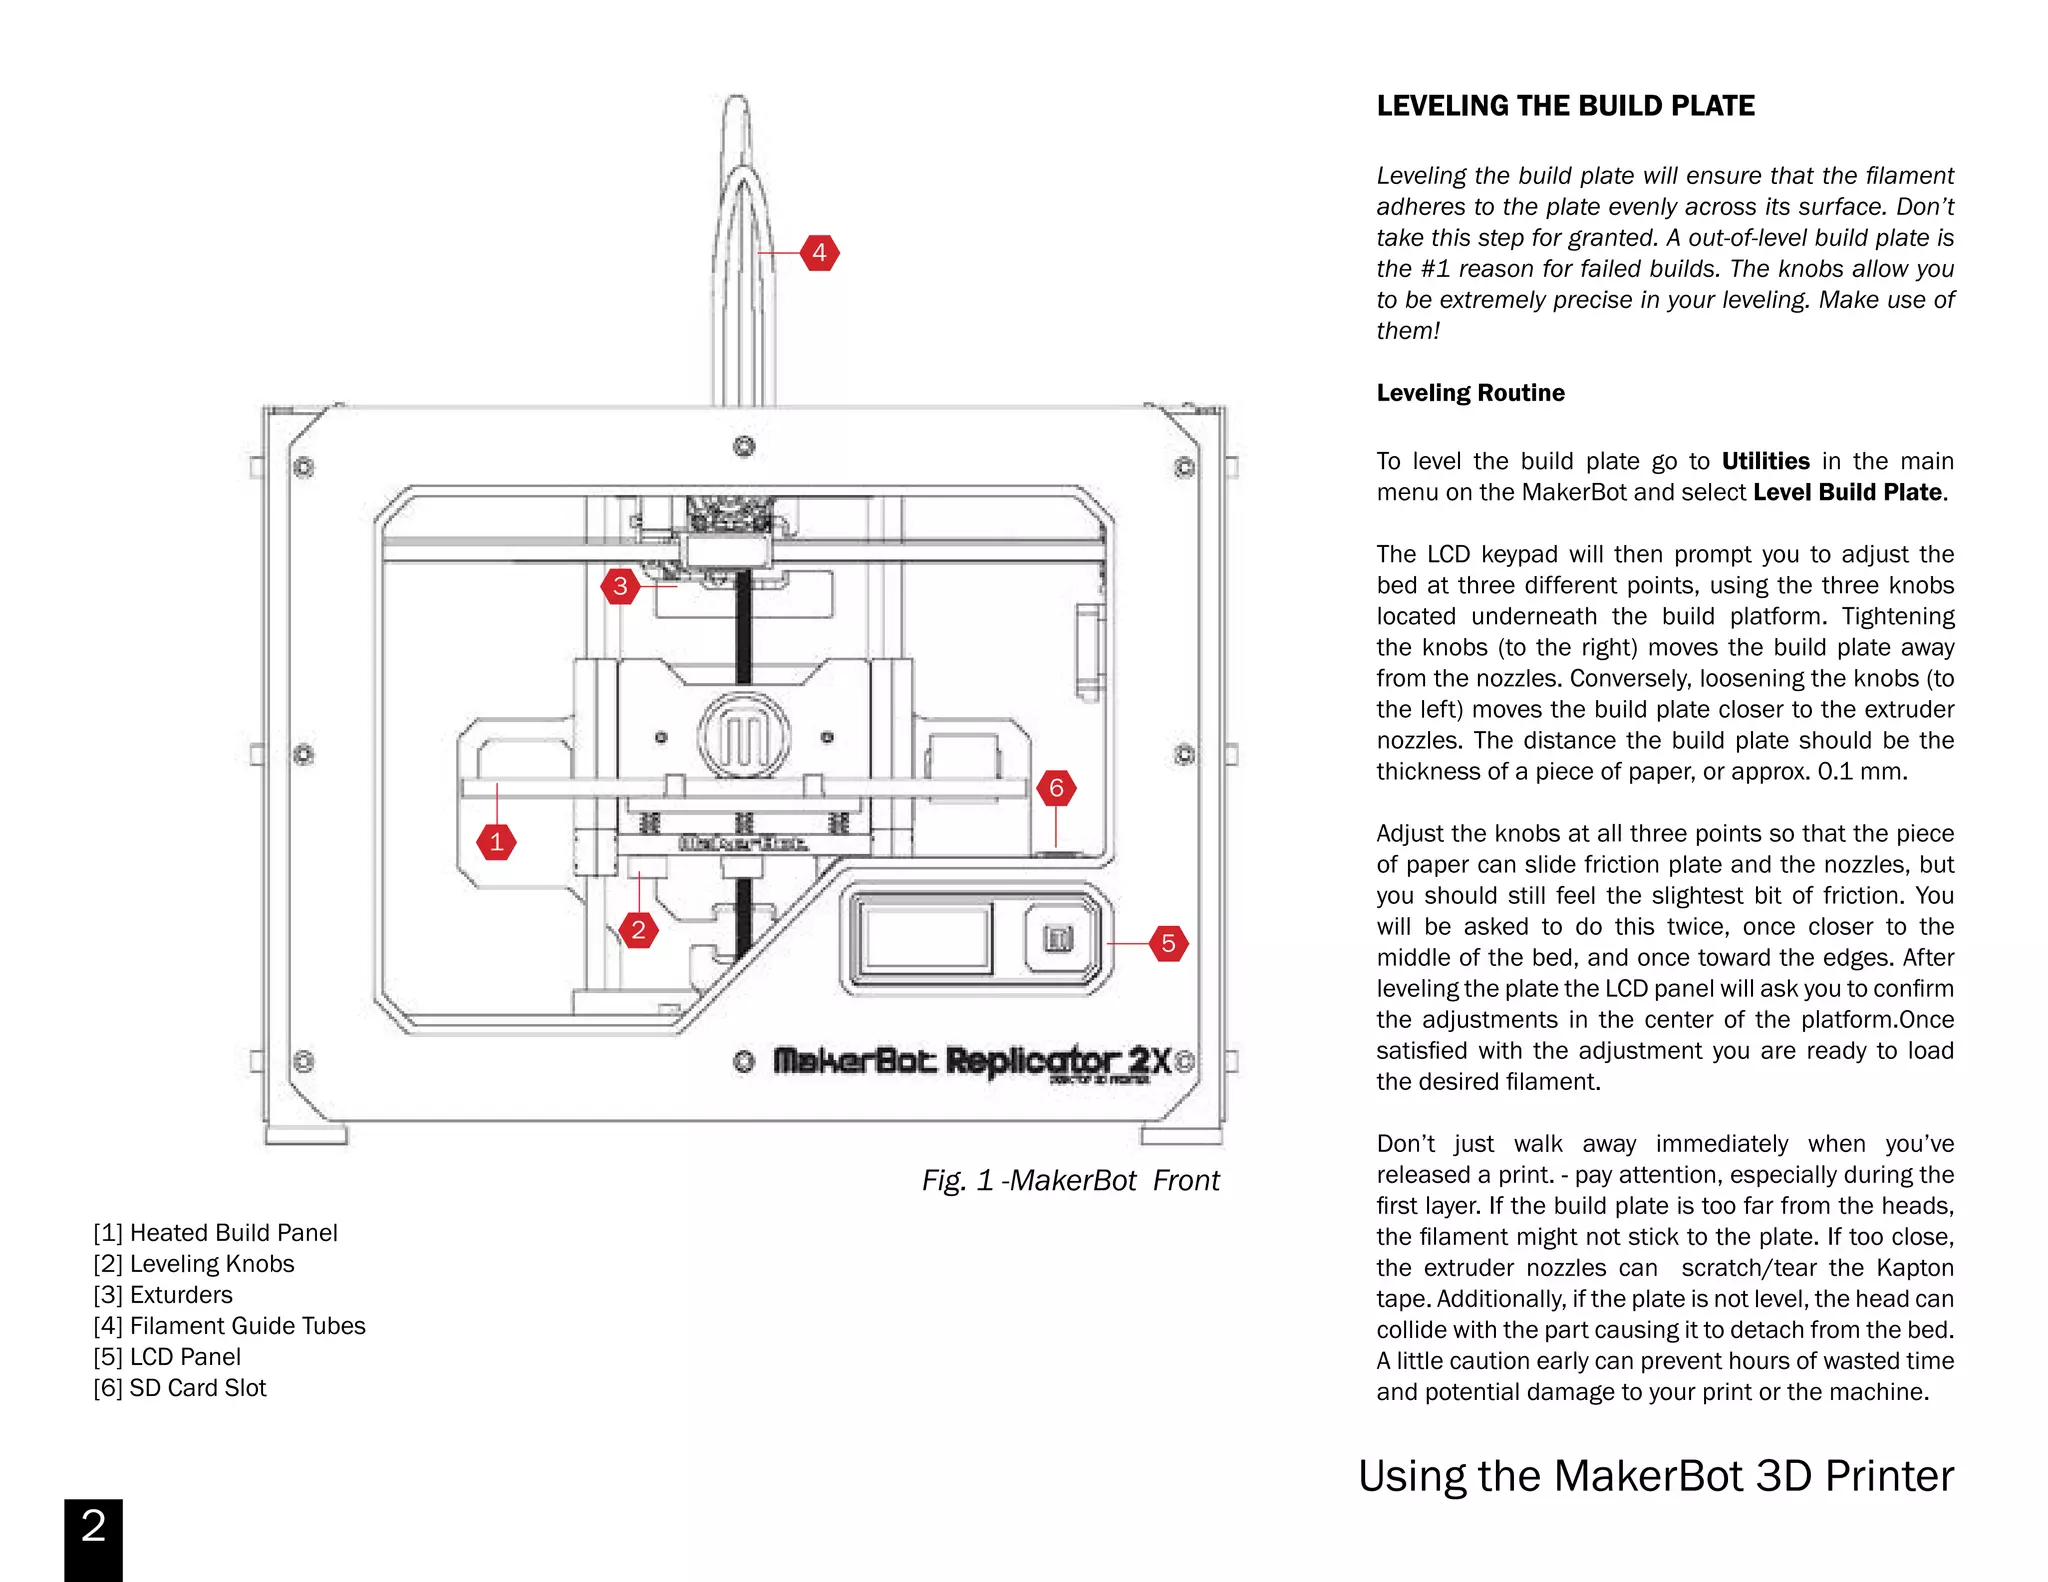
![4
LOADING AND UNLOADING THE FILAMENT
The Replicator 2X features dual extrusion capability,
meaning that two different types of filament can be
loaded and printed together. This allows you to print
in different colors and materials in the same part.
Check NYCCTfab website for the student guide for
purchasing filament and then load your desired spool.
www.NYCCTfab.com
To unload the existing filament, select Utilities >
Filament Options > Unload.
You will have to wait for the nozzle to reach the
appropriate temperature. Once the nozzle has
reached the correct temperature, unload the
filament by moving the lever away from the extruder
and pulling the filament out of the the extruder.
To load the filament go to Utilities > Filament Options
> Load.
1. Remove Enclosure Lid & Detach Guide Tubes
2. Feed Filament Through Guide Tube
Cut the end of the filament with scissors to get
a clean edge if it does not have one already.
Feed the filament through the guide tube until
it comes out the opposite side. To avoid jams,
it is best to feed the filament from the bottom
of the spool toward the top. Load the filament
counterclockwise for the left and clockwise for
the right.
3. Load New Filament Into Extruder
The LCD monitor will ask you to load the filament.
Wait for the nozzle to reach the appropriate
temperature. Once the nozzle has reached the
correct temperature, load the filament on top of
the extruder gently pushing filament downward
until you feel the motor grab and start pulling the
filament. Wait until it extrudes a few inches of
filament, then press the ‘M’ button to stop the
3
1
2
[1] Extruder Cable
[2] Extruder Motor
[3] Filament Guide Tubes
[4] Filament Spools
[5] Lever
Fig. 2 -MakerBot Back
4
5
Makerbot Replicator 2X](https://image.slidesharecdn.com/makerbotreplicator2x-140324125719-phpapp01/75/MakerBot-Replicator-2x-Primer-4-2048.jpg)
![5
Fig. 3 - MakerWare User Interface
USING MAKERWARE
MakerWare is used to generate the machine code
to run the Replicator 2X. It can open .STL, .OBJ and
.THING files.
Import your desired file by using the ‘Add’ button at
the top of the screen.
Scale
Bydefault,MakerWareoperatesinunitsofmillimeters.
If your model was created in inches, it may ask you
to re-scale your part. If it doesn’t, select your part by
clicking it, then clicking the ‘Scale’ tool from the menu
at the left. Then click ‘inches -> mm’. Your part will be
scaled correctly.
Orientation
You should always try to print your model in the most
stable orientation (usually with the largest amount
of material in contact with the bed). Orient your part
accordingly by selecting your part, then using the
‘Rotate’ tool.
When importing, MakerWare may also ask to move
your model to the build bed. If you need to re-orient
your model to gain stability, you can always re-position
your model on the build bed by selecting your part,
then selecting the ‘Move’ tool. In that menu, there will
be an option to position the part on the build bed.
Lastly, consider how overhangs will be printed. While
support material can be used to print overhangs, it
uses extra material and machine time, and can leave
artifacts on your finished print. By optimizing the
orientation of your part, you can often avoid this.
1
2
3
4
5
6
7 8
[1] CAMERA: HOME - to reset default view : +/- to zoom in / out.
[2] LOOK- Rotate the plate and the object. Click the icon again to change the view to Top, Side or Front view.
[3] MOVE- Click and drag with your mouse the object around the plate. Click the icon again to change the position
on center, on platform or reset. Alternatively, you can change the position of the object relative to the x, y or z axis.
[4] ROTATE- Click and drag with your mouse to rotate the object. Additionally you can rotate by a specified amount
on the x, y and z axis.
[5] SCALE- Change dimensions by clicking and dragging with your mouse or by using the panel to change the
dimension of the objects in the x, y and/or z axis. You may also choose to scale uniformly (which is recommended).
You also have the option to scale by a percentage or to scale to the maximum size allowed.
[6} OBJECT- This function will allow you to view additional information on the object selected, such as the extruder
to be used.
[7] ADD- Click open and add an object to the current build plate.
[8] MAKE- Click to specify print resolution and export object to 3D print.
Makerbot Replicator 2X](https://image.slidesharecdn.com/makerbotreplicator2x-140324125719-phpapp01/75/MakerBot-Replicator-2x-Primer-5-2048.jpg)
![7
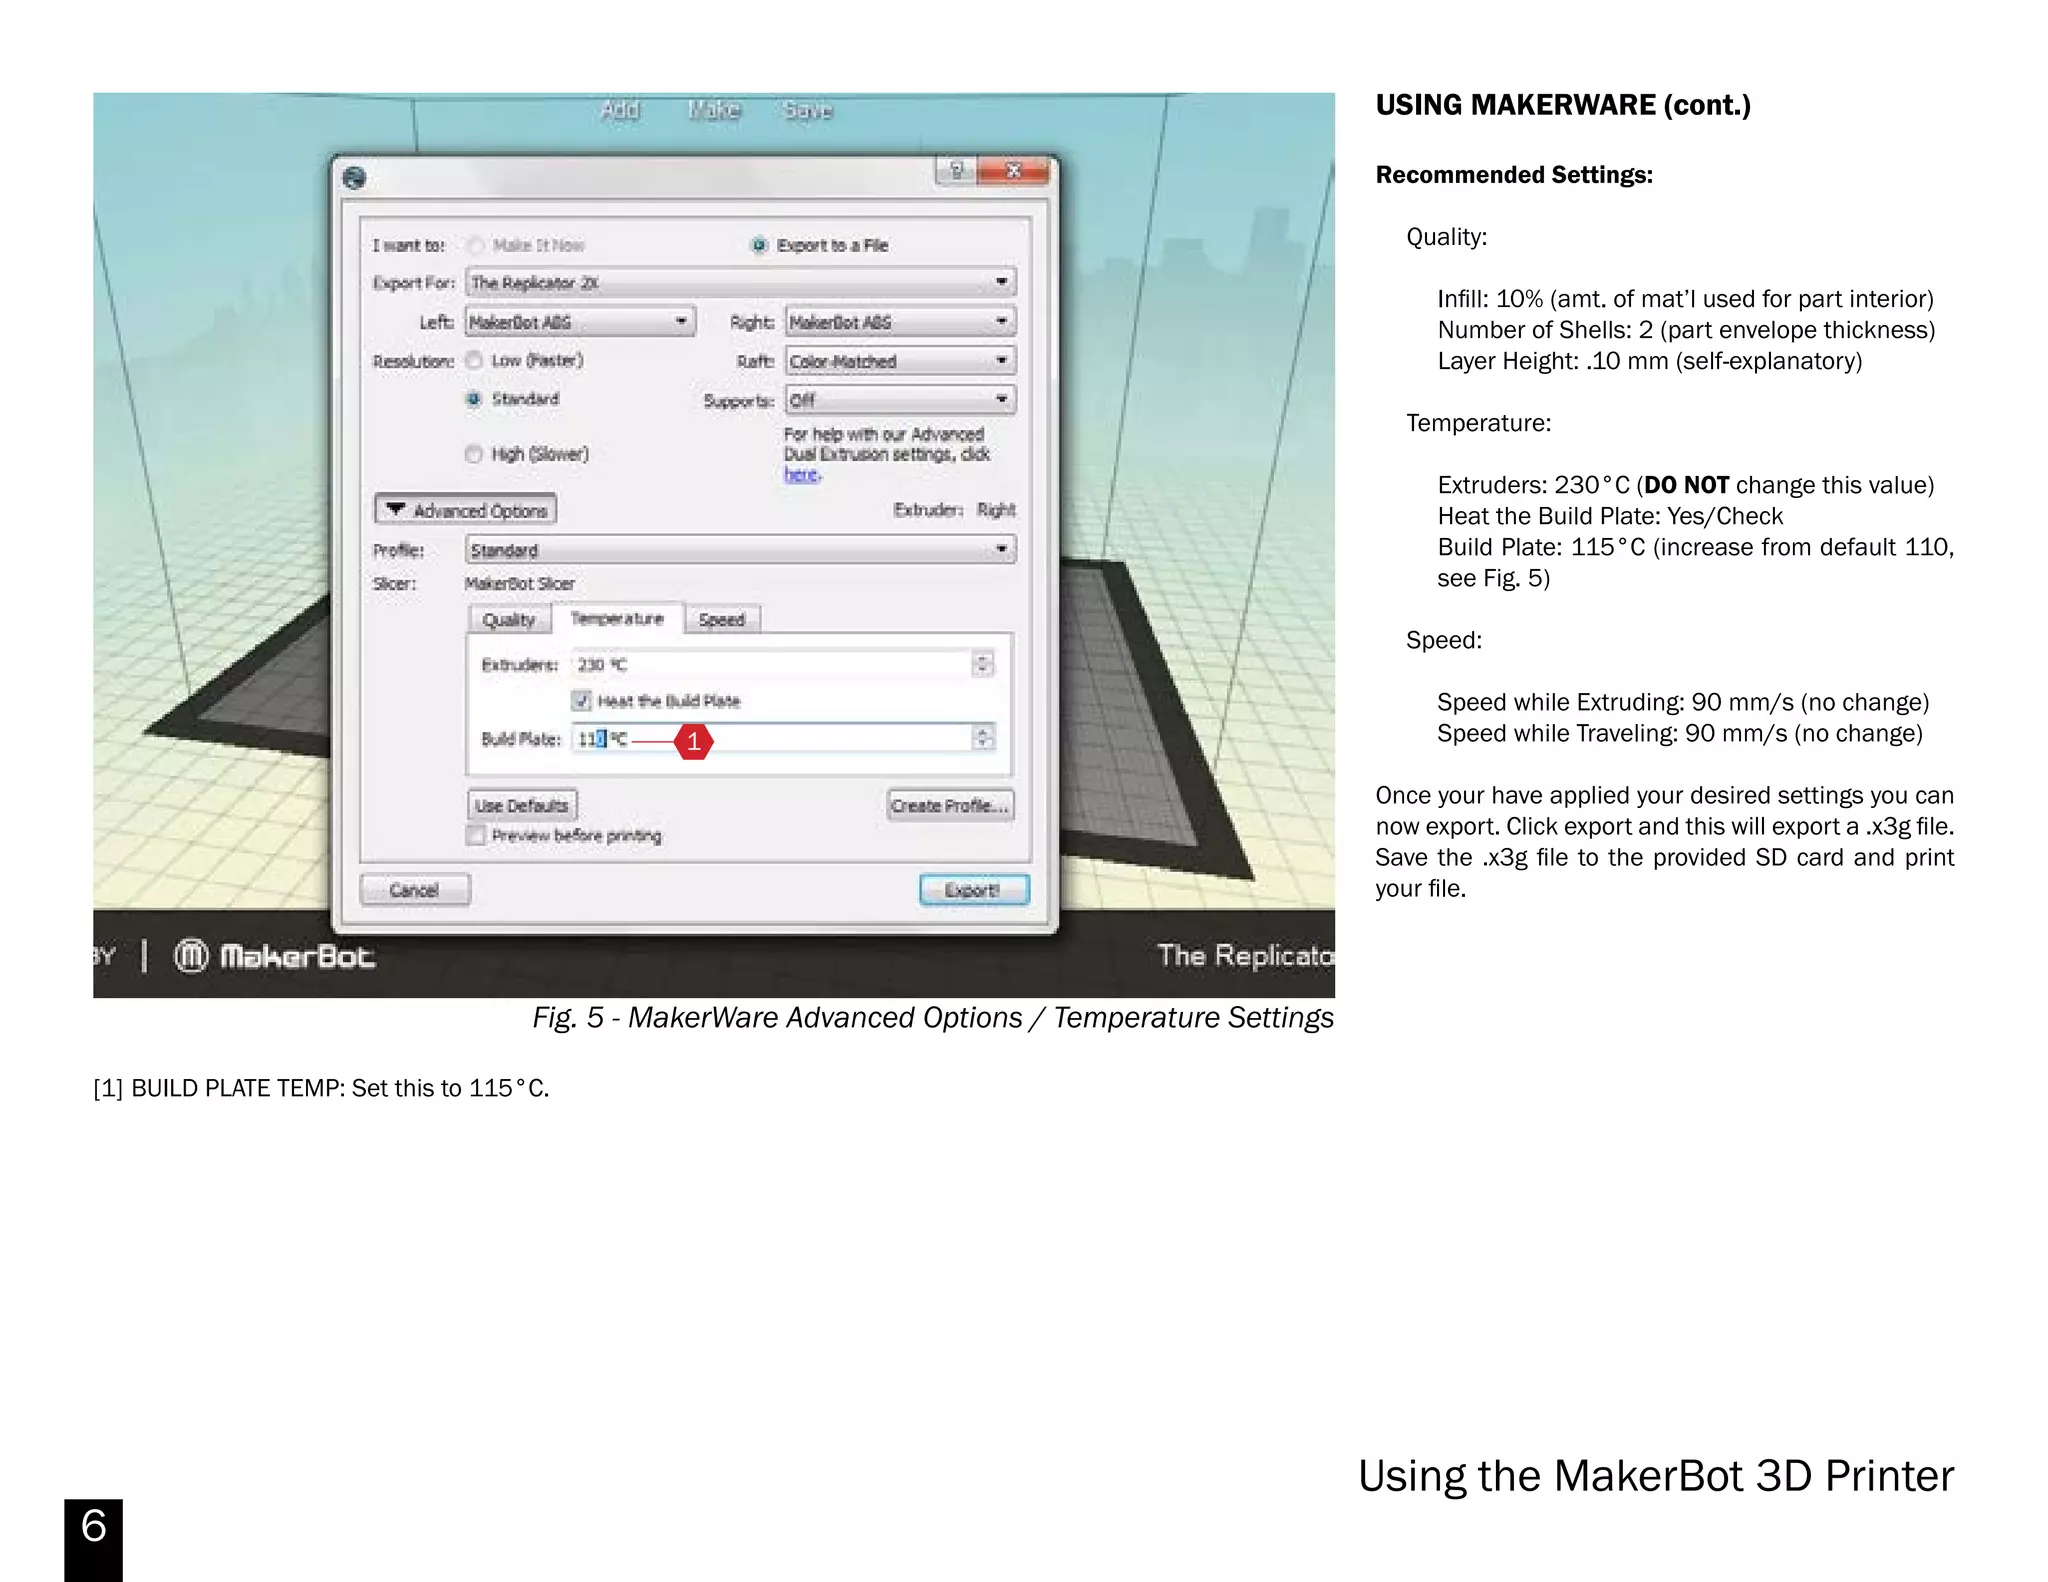
Fig. 5 - MakerWare Advanced Options / Temperature Settings
USING MAKERWARE (cont.)
Recommended Settings:
Quality:
Infill: 10% (amt. of mat’l used for part interior)
Number of Shells: 2 (part envelope thickness)
Layer Height: .10 mm (self-explanatory)
Temperature:
Extruders: 230°C (DO NOT change this value)
Heat the Build Plate: Yes/Check
Build Plate: 115°C (increase from default 110,
see Fig. 5)
Speed:
Speed while Extruding: 90 mm/s (no change)
Speed while Traveling: 90 mm/s (no change)
Once your have applied your desired settings you can
now export. Click export and this will export a .x3g file.
Save the .x3g file to the provided SD card and print
your file.
1
[1] BUILD PLATE TEMP: Set this to 115°C.
Makerbot Replicator 2X](https://image.slidesharecdn.com/makerbotreplicator2x-140324125719-phpapp01/75/MakerBot-Replicator-2x-Primer-7-2048.jpg)
![8
Fig. 6 -Dual Extrusion on MakerWare User Interface
DUAL EXTRUSION
Dual extrusion can be used to print objects of two
distinct colors or materials. Be aware that dual
extrusion can take considerably longer to output a
cut-file and to print compared to single extrusion.
First make sure to check that the MakerBot Replicator
2X is selected as current printer on the bottom right
corner of the user interface. If you don’t have the
Replicator 2X as the current printer, on the top menu
of MakerWare, go to MakerBots > Type of MakerBot
> Replicator 2X.
Once the Replicator 2X is selected as current printer,
you can import the objects to be printed.
Importing
Objects you wish to print as separate colors or
materials must be imported as separate files (.stl,
.obj, etc.). For example, to print the teapot in Fig. 6,
the lid must be exported separately from the body.
Objects exported from other modeling software (such
as Rhino) maintain their position in space when
brought into MakerWare. For instance, one could
model the whole teapot in Fig. 6, then export the lid
and body separately to allow the parts to be colored
differently.
When you begin the importing process, be sure not to
move, scale or rotate any parts you intend to position
together. If MakerWare asks if you would like to adjust
units or reposition the parts, choose not to do so
immediately. Instead, import all your parts and then
select everything together, and perform the necessary
1 3
4
2
[1] Object Dropdown Menu - Select which extruder will print the
selected object.
[2] Save - Use the save icon to save any changes. This feature
is especially important in dual extrusion since it will save the
position and extruder selection as a .thing file.
[3] Object to be printed by Left extruder
[4] Object to be printed by Right extruder.
Additionally, you can change the object display color of the
extruder by going to the top menu of MakerWare under
Edit>Setting.
Changing the display color will not change the color of the
filament extrusion. To change the color you must change the
spool to the available colors.
Note: A portion of the model should always touch the base.
Makerbot Replicator 2X](https://image.slidesharecdn.com/makerbotreplicator2x-140324125719-phpapp01/75/MakerBot-Replicator-2x-Primer-8-2048.jpg)
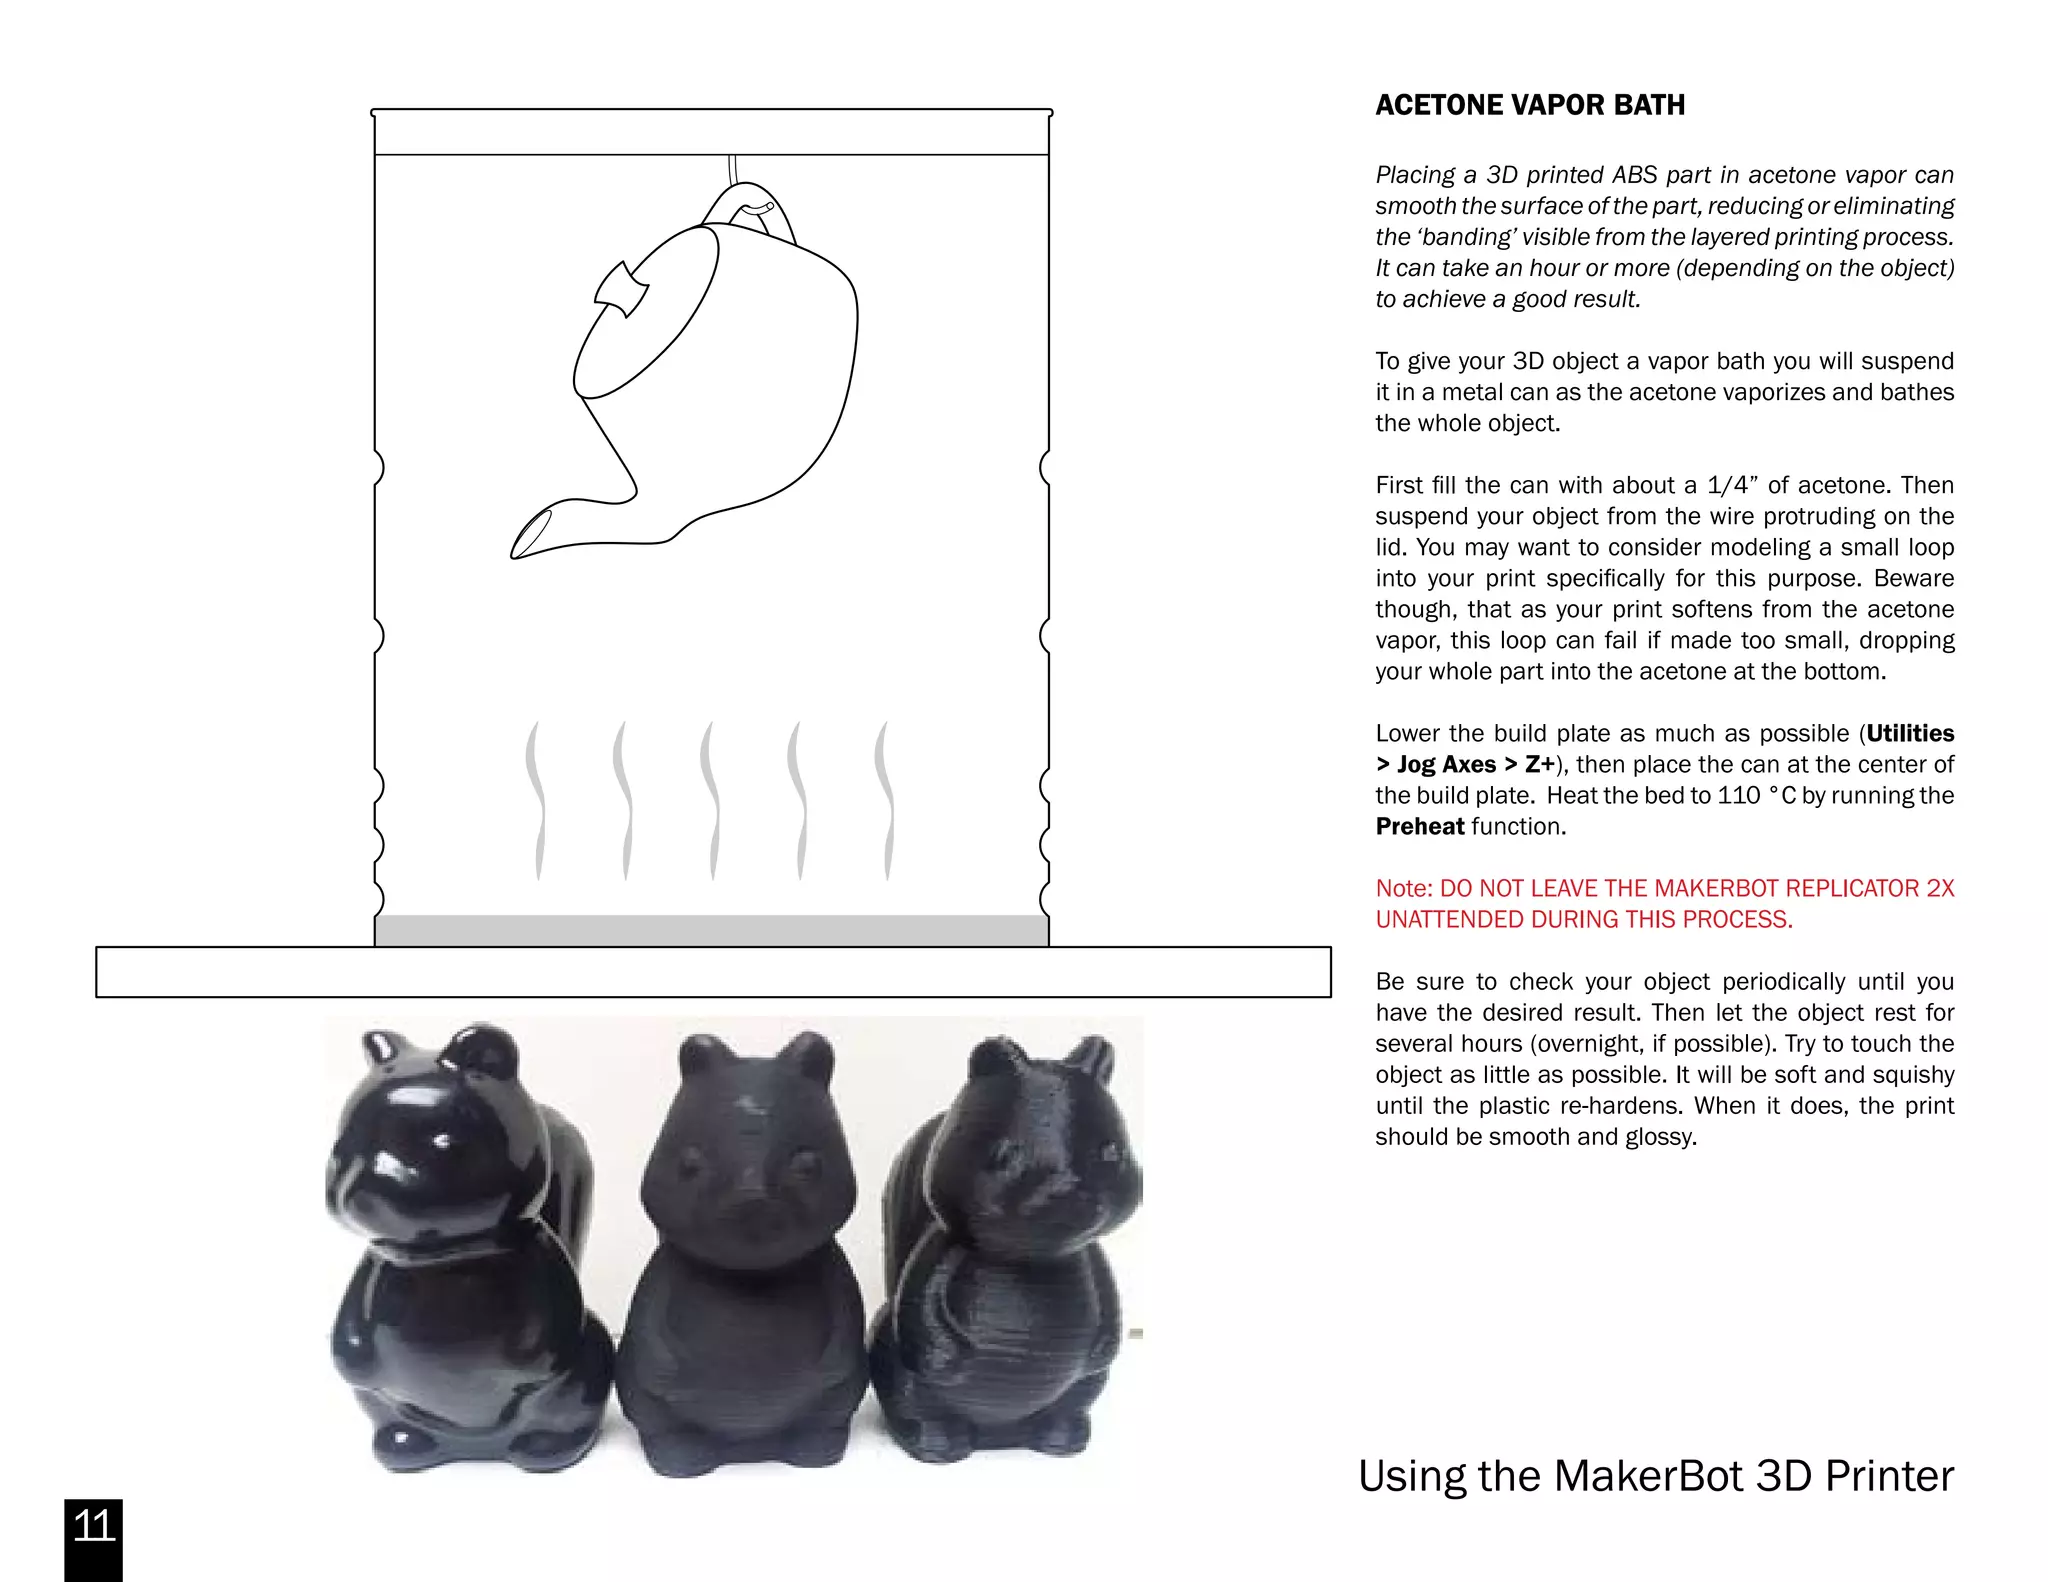


The document provides instructions for using a Makerbot Replicator 2X 3D printer. It describes how to level the build plate, load and unload filament, use the Makerware software to prepare files for printing including orientation, scaling and dual extrusion. It also provides tips for prepping the build surface with ABS slurry, removing prints, installing new Kapton tape, and using an acetone vapor bath to smooth prints.


![Coded Agents – with UiPath SDK + LangGraph [Virtual Hands-on Workshop]](https://cdn.slidesharecdn.com/ss_thumbnails/codedagentsdeck-251215155422-5497c599-thumbnail.jpg?width=640&height=640&fit=bounds)


