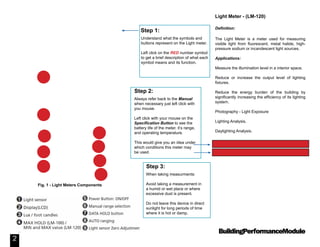
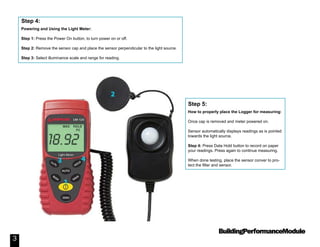
BuildingPerformanceModule
The City University of New York
New York City College Of Technology
Architectural Technology Department
written by Felix Rodriguez
Light Meter - (LM-120)
March 29, 2015
BuildingPerformanceModule
2
Understand what the symbols and
buttons represent on the Light meter.
Left click on the RED number symbol
to get a brief description of what each
symbol means and its function.
Step 1:
When taking measurments:
Avoid taking a measurement in
a humid or wet place or where
excessive dust is present.
Do not leave this device in direct
sunlight for long periods of time
where it is hot or damp.
Step 3:
Always refer back to the Manual
when necessary just left click with
you mouse.
Left click with your mouse on the
Specification Button to see the
battery life of the meter, it’s range,
and operating temperature.
This would give you an idea under
which conditions this meter may
be used.
Step 2:
Fig. 1 - Light Meters Components
Light Meter - (LM-120)
Definition:
The Light Meter is a meter used for measuring
visible light from fluorescent, metal halide, high-
pressure sodium or incandescent light sources.
Applications:
Measure the illumination level in a interior space.
Reduce or increase the output level of lighting
fixtures.
Reduce the energy burden of the building by
significantly increasing the efficiency of its lighting
system.
Photography - Light Exposure
Lighting Analysis.
Daylighting Analysis.
1
2
8 Manual: LM-120 Light Meter
Specs: LM-120 Specifications
3
4
5
6
7
9
BuildingPerformanceModule
3
Powering and Using the Light Meter:
Step 1: Press the Power On button, to turn power on or off.
Step 2: Remove the sensor cap and place the sensor perpendicular to the light source.
Step 3: Select illuminance scale and range for reading.
Step 4:
How to properly place the Logger for measuring:
Once cap is removed and meter powered on.
Sensor automatically displays readings as is pointed
towards the light source.
Step 4: Press Data Hold button to record on paper
your readings. Press again to continue measuring.
When done testing, place the sensor conver to pro-
tect the filter and sensor.
Step 5:
BuildingPerformanceModule
4
Information:
Residential and Commercial Property - Lux Level Chart
Identify if your rooms have the standard lux level.

Light Meter (LM-120)

  • 1.
    BuildingPerformanceModule The City Universityof New York New York City College Of Technology Architectural Technology Department written by Felix Rodriguez Light Meter - (LM-120) March 29, 2015
  • 2.
    BuildingPerformanceModule 2 Understand what thesymbols and buttons represent on the Light meter. Left click on the RED number symbol to get a brief description of what each symbol means and its function. Step 1: When taking measurments: Avoid taking a measurement in a humid or wet place or where excessive dust is present. Do not leave this device in direct sunlight for long periods of time where it is hot or damp. Step 3: Always refer back to the Manual when necessary just left click with you mouse. Left click with your mouse on the Specification Button to see the battery life of the meter, it’s range, and operating temperature. This would give you an idea under which conditions this meter may be used. Step 2: Fig. 1 - Light Meters Components Light Meter - (LM-120) Definition: The Light Meter is a meter used for measuring visible light from fluorescent, metal halide, high- pressure sodium or incandescent light sources. Applications: Measure the illumination level in a interior space. Reduce or increase the output level of lighting fixtures. Reduce the energy burden of the building by significantly increasing the efficiency of its lighting system. Photography - Light Exposure Lighting Analysis. Daylighting Analysis. 1 2 8 Manual: LM-120 Light Meter Specs: LM-120 Specifications 3 4 5 6 7 9
  • 3.
    BuildingPerformanceModule 3 Powering and Usingthe Light Meter: Step 1: Press the Power On button, to turn power on or off. Step 2: Remove the sensor cap and place the sensor perpendicular to the light source. Step 3: Select illuminance scale and range for reading. Step 4: How to properly place the Logger for measuring: Once cap is removed and meter powered on. Sensor automatically displays readings as is pointed towards the light source. Step 4: Press Data Hold button to record on paper your readings. Press again to continue measuring. When done testing, place the sensor conver to pro- tect the filter and sensor. Step 5:
  • 4.
    BuildingPerformanceModule 4 Information: Residential and CommercialProperty - Lux Level Chart Identify if your rooms have the standard lux level.