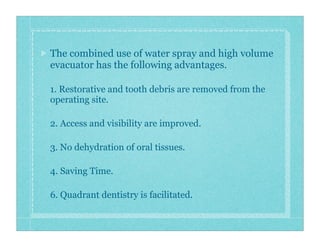
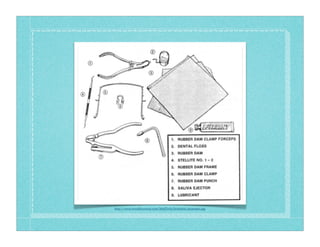
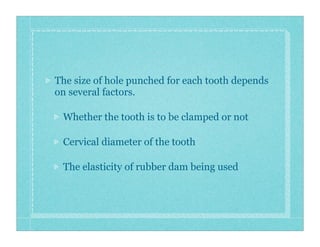
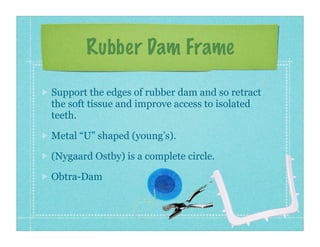
Dr. Rasha Alsheikh
COD,UOD
Field Isolation and
Moisture Control
4th Year Operative Program
Isolation
1. Moisture control
2. Retraction
3. Harm prevention
http://livingnetwork.co.za/wp-content/uploads/2009/08/rubber_dam_1.jpg
Oral Environment
Contain the following items
Saliva
Tongue, Lips & Check
The periodontium
The contacting teeth and restoration
The sulci, floor of the mouth and palate
Respiratory moisture
Moisture Control
Excluding sulcular fluid,
saliva and gingival bleeding
from the operative field.
And preventing the
inspiration of debris, hand
piece spray and any other
objects.
http://livingnetwork.co.za/wp-content/uploads/2009/08/rubber_dam_1.jpg
Advantages
Dry clean operating field
Access and visibility
Improved properties of dental materials
Protection of patient and operator
Operating efficiency
Absorbents
Absorbents such as cotton
rolls and cellulose wafer are
useful for short periods of
isolation example for
examination, polishing etc.
Where rubber dam
application may not be
possible.
High Volume Evacuators
High volume evacuators are
preferred for suctioning water and
debris from the mouth when high
speed hand-pice is used.
The tips for these may be
1. Plastic Disposable
2. Metallic auto cleavable
The combined use of water spray and high volume
evacuator has the following advantages.
1. Restorative and tooth debris are removed from the
operating site.
2. Access and visibility are improved.
3. No dehydration of oral tissues.
4. Saving Time.
6. Quadrant dentistry is facilitated.
1. The tip should be as near as possible to the
tooth to be operated upon just distal to it.
2. It should not obstruct the operators view.
3. It should not be so close as to direct the water
spray away from the rotary instrument
Precautions
Saliva Ejectors
The saliva ejector removes saliva that collects on
the floor of the mouth. It is used in conjunctions
with sponges cotton rolls and the rubber dam.
Should not interfere with the operator view or
movement.
Advantages
A – adequate access and visibility
B – better patient protection and management
C – control of moisture in operating field
D – decreased operating time of rubber dam i.e.
Rubber Dam
Rubber Dam
was first described over 120 years by Dr. Sanford
Barnum.
In 1879 the Rubber dam punch was introduced.
By the time G.V. Black produced his seminal text
“Operative Dentistry” in 1908, the use of rubber
dam was firmly established.
Advantages
1) Dry clean operating field.
2) Access and visibility.
3) Improved properties of dental materials.
4) Protection of patient and operator.
5) Operating Efficiency
Drawbacks
1) Time consumption and
patient objection.
2) Minor damages can occur
to marginal gingival and
cervical cemetnum.
3) Damage to the restorations
such as metal crown margins.
4) Accidental aspiration of
the clamps.
5) Certain conditions which
interfere with the use of
rubber dam
e.g:Malpositioned teeth or
partially erupted tooth.
6) Patient suffering from
respiratory diseases
7) Contact allergy to latex
rubber dam sheet.
Materials and Instruments
Rubber dam sheet
Rubber dam Punch
Clamps
Clap holder
Rubber dam frame
Rubber dam napkin
http://www.sweethaven02.com/MedTech/Dental02/5030200.jpg
Rubber Dam Sheet
Rubber dam material is made from
natural latex rubber.
They are manufactured as:
Continuous rolls available in two
widths (125 mm or 150 mm)
Pre-cut form
Shelf life:- Rubber dam material has
shelf life of about 9 months at room
Rubber Dam Punch
Two types of holes are made:-
Single hole
Multihole: 0.5 to 2.5mm in
diameter.
The size of hole punched for each tooth depends
on several factors.
Whether the tooth is to be clamped or not
Cervical diameter of the tooth
The elasticity of rubber dam being used
Three widely used designs are:-
ash or stokes pattern: notched and pointed tips.
Ivory pattern: notched and pointed tips,
stabilizers.
University of Washington pattern: have notches
near the tips of their beaks.
Rubber Dam Forceps
Rubber Dam Frame
Support the edges of rubber dam and so retract
the soft tissue and improve access to isolated
teeth.
Metal “U” shaped (young’s).
(Nygaard Ostby) is a complete circle.
Obtra-Dam
Clamps can be divided
into two main groups
Bland: jaws which
are flat and points
directly towards each
other
Winged
Wingless
Retentive: have jaws
which are directed
more gingivally
Winged
Wingless
http://shop.aluro.co.nz/catalog/images/prodimg/img468.jpg
Metal Vs Non-metal clamps.
To be secure a clamp must fit around the tooth
below the level of maximum crown width.
The points of the jaws of the clamps must all
contact the crown below this level in four areas.
‘Four Point Contact’.
The jaws should not extend the mesial and distal
line angles of tooth:
They may interfere with the placement of
matrix and wedge
Gingival trauma is more likely to occur
Complete seal around the anchor tooth is
more difficult to achieve
Specialized clamps / retainer:
Clamps with the extended bows e.g: extended
distally
Modified bow clamps designed to deal with
problems e.g: third molar.
a clamp can be modified by heating then bending
Cervical retainer e.g: Ferrier 212
Alternatives to clamps:
Employs the area beneath the interdental
contacts for retention.
ligatures of dental floss tied around the neck
of the tooth or elastic rings.
Before a clamp is placed on any tooth, the dental
floss should be tried.
The clamp is carried to the tooth using clamp
forceps. The clamp engaged in the beaks of forcep
by means of holes in the jaws.
The clamp is placed on the tooth by opening it
sufficiently to pass over the maximum coronal
diameter.
Clamp placement:
The lingual (or palatal) jaw is placed first in
contact with lingual surface of the anchor
tooth. Then the clamp tilted bucally until
buccal jaw below maxillary coronal
diameter.
The tension of clamp is released slowly as
the buccal jaw is placed.
Rubber Dam Napkin
It prevents skin contact with rubber
to reduce the possibility of allergies
Absorbs saliva seeping at the corners
of mouth
Act as cushion
Provides a convenient method of
wiping the patient’s lips on removal of
dam
Lubricant
A water soluble lubricant applied in the area of
punched holes facilitates the passing of dam
septae through the proximal contacts.
Commercially available lubricants.
shaving cream or soap slurry
petroleum jelly may be applied at the coroners of
patient’s mouth to prevent irritation
Hole-Positioning Guides
Teeth as a guide.
Template.
Rubber dam stamp
Guide Lines for positioning
the holes:
1. When operating on incisors or mesial of canine
isolate from first premolar to 1st premolar. Metal
retainer are not required for this isolation.
2.When operating on canine, it is preferable to
isolate from 1st molar to opposite lateral incisor.
3.When operating posterior teeth, isolate
anteriorly to lateral incisor of opposite side.
4.When operating premolar punch holes to include
two teeth distally and extend anterior up to
opposite lateral incisor.
5.When operating molars, punch holes as far
distally as possible and extend anteriorly to
include opposite lateral incisors.
6.Isolation of minimum of three teeth
recommended except in endodotnic therapy in
which the tooth to be treated is isolated.
7.The distance between holes is equal to the distance
from the center of one tooth to the center of adjacent
tooth measured at the level of gingival tissue. It is
generally 1/4 inch (6.3 mm).
8.When the rubber dam is applied to the maxillary
teeth the first holes are punched of central incisors
which are placed approximately 1 inch (25mm) from
the upper border so that sufficient material to cover
upper lip.
9.When the rubber dam is applied to mandibular
tooth, the first hole punched is for the post anchor
tooth that receives the retainer.
10.When a cervical retainer is applied to isolate a
class V lesion, a heavier rubber dam is usually
recommended for better tissue retraction and the
hole should be punched slightly facially to the
arch form to compensate for the extension of the
dam to the cervical area.
11.When a thinner dam is used, smaller holes must
be punched to achieve an adequate seal around
the teeth because the thin dam greatly elastic.
Patient’s mouth is
examined carefully for
calculus deposits, and
sharp edges on
restoration.
All contact points in
operating field are
checked with dental
floss.
All roughness and
deposits present
interdentally must be
removed toallow free
passage of rubber dam
and prevent tearing.
Anaesthetize the
gingiva when indicated
Rinse an dry the
operating field.
Application Techniques:
Technique 1: Clamp
placement prior to rubber
1:- Testing and
lubricating the
proximal contacts
2:- Punching the
holes after assessing
the arch and teeth
3:- Lubricating the
dam
4:- Selecting the
retainer and trying it
5:- Testing retainer
stability and retention
6:- Positioning the
dam over the retainer,
using four fingers to
stretch the dam sheet
Technique 1 cont.
7:- Applying and
positioning the
Napkin
8:- Attaching the
frame
9:- Passing the tooth
to distal contact
10:- optional,
applying compound
or anterior anchor
11:-Passing the septa
through contacts
12:-Inverting the dam
interproximally then
faciolingually
13:-Using a saliva ejector
14:- Confirming a properly applied rubber dam
15:- Checking for access and visibility
16:- Inserting the wedges
Winged/ clamps are
used in this technique
Place the retainer in
hole punched for the
anchor tooth by
stretching the dam to
engage these wings
Technique 2: Applying dam
and retainer simultaneously
Technique 3: Applying dam
before the retainer
The dam may be stretched over the anchor tooth
before the retainer is placed.
It is recommended for anterior teeth perhaps
including first premolar.
Preferred technique when double bow or
butterfly clamps are selected.
Multiple tooth isolation
Whenever possible clamps should not be
placed on the tooth which requires
restoration of proximal surfaces.
When several teeth require treatment the
operating field is extended mesially or
across the arch
The more teeth included the better the
retraction of lips, cheek and tongue and
better the access.
Removal of Rubber Dam
Before removal of rubber dam, rinse and suction
away any debris that may have collected.
1: Cutting the septa
2:- Removing the retainer
3: Removing the dam
4:- Wiping the lips
5:- Rinsing the mouth and managing the tissue
Endodontics: essential to ensure the patient’s safety
during treatment and best prognosis
Soft tissue control
Cavity preparation
Fixed bridge isolation: A blunted curved suture
needle with dental floss attached is threadedfrom
the facial aspect through the hole from the anterior
abutment and bask through the same hole on
lingual side.
Rubber dam in clinical
restorative procedures
Errors in Application and
Removal
Off center arch form It can result in excess of
material superiorly that may occlude the
patient’s nasal airway
Inappropriate distance between the holes, in the
other hand too much distance causes wrinkles
between the teeth.
Incorrect arch form of holes
Inappropriate retainers:-
a. If too small, resulting in occasional breakage
when jaws are overspread.
b. Unstable on anchor tooth
c. Impinge on soft tissue
d. Impede wedge placement
Retainer pinched tissue
Incorrect location of hole for class V lesion
Sharp tips on No.212 retainer
Incorrect technique for cutting septa
Alternative isolation aids
Retraction cord when properly applied can be
used for isolation and retraction in the direct
procedures of treatment of cervical lesions in
facial veneering as well as in indirect veneers.
Help prevent abrasion of gingival tissue during
cavity preparation
Anti-salivary drugs
To control salivation is rarely indicated
Operator should be familiar with its indications
contra indications and side effects of the drug to
be used.
Some Anti histaminics cause dryness of mouth
due to anti cholinergic action
QUESTIONS?

Isolation and moisture control

  • 1.
    Dr. Rasha Alsheikh COD,UOD FieldIsolation and Moisture Control 4th Year Operative Program
  • 2.
    Isolation 1. Moisture control 2.Retraction 3. Harm prevention http://livingnetwork.co.za/wp-content/uploads/2009/08/rubber_dam_1.jpg
  • 3.
    Oral Environment Contain thefollowing items Saliva Tongue, Lips & Check The periodontium The contacting teeth and restoration The sulci, floor of the mouth and palate Respiratory moisture
  • 4.
    Moisture Control Excluding sulcularfluid, saliva and gingival bleeding from the operative field. And preventing the inspiration of debris, hand piece spray and any other objects. http://livingnetwork.co.za/wp-content/uploads/2009/08/rubber_dam_1.jpg
  • 5.
    Advantages Dry clean operatingfield Access and visibility Improved properties of dental materials Protection of patient and operator Operating efficiency
  • 6.
    Absorbents Absorbents such ascotton rolls and cellulose wafer are useful for short periods of isolation example for examination, polishing etc. Where rubber dam application may not be possible.
  • 7.
    High Volume Evacuators Highvolume evacuators are preferred for suctioning water and debris from the mouth when high speed hand-pice is used. The tips for these may be 1. Plastic Disposable 2. Metallic auto cleavable
  • 8.
    The combined useof water spray and high volume evacuator has the following advantages. 1. Restorative and tooth debris are removed from the operating site. 2. Access and visibility are improved. 3. No dehydration of oral tissues. 4. Saving Time. 6. Quadrant dentistry is facilitated.
  • 9.
    1. The tipshould be as near as possible to the tooth to be operated upon just distal to it. 2. It should not obstruct the operators view. 3. It should not be so close as to direct the water spray away from the rotary instrument Precautions
  • 10.
    Saliva Ejectors The salivaejector removes saliva that collects on the floor of the mouth. It is used in conjunctions with sponges cotton rolls and the rubber dam. Should not interfere with the operator view or movement.
  • 11.
    Advantages A – adequateaccess and visibility B – better patient protection and management C – control of moisture in operating field D – decreased operating time of rubber dam i.e.
  • 12.
  • 13.
    Rubber Dam was firstdescribed over 120 years by Dr. Sanford Barnum. In 1879 the Rubber dam punch was introduced. By the time G.V. Black produced his seminal text “Operative Dentistry” in 1908, the use of rubber dam was firmly established.
  • 14.
    Advantages 1) Dry cleanoperating field. 2) Access and visibility. 3) Improved properties of dental materials. 4) Protection of patient and operator. 5) Operating Efficiency
  • 15.
    Drawbacks 1) Time consumptionand patient objection. 2) Minor damages can occur to marginal gingival and cervical cemetnum. 3) Damage to the restorations such as metal crown margins. 4) Accidental aspiration of the clamps. 5) Certain conditions which interfere with the use of rubber dam e.g:Malpositioned teeth or partially erupted tooth. 6) Patient suffering from respiratory diseases 7) Contact allergy to latex rubber dam sheet.
  • 16.
    Materials and Instruments Rubberdam sheet Rubber dam Punch Clamps Clap holder Rubber dam frame Rubber dam napkin
  • 17.
  • 18.
    Rubber Dam Sheet Rubberdam material is made from natural latex rubber. They are manufactured as: Continuous rolls available in two widths (125 mm or 150 mm) Pre-cut form Shelf life:- Rubber dam material has shelf life of about 9 months at room
  • 19.
    Rubber Dam Punch Twotypes of holes are made:- Single hole Multihole: 0.5 to 2.5mm in diameter.
  • 20.
    The size ofhole punched for each tooth depends on several factors. Whether the tooth is to be clamped or not Cervical diameter of the tooth The elasticity of rubber dam being used
  • 21.
    Three widely useddesigns are:- ash or stokes pattern: notched and pointed tips. Ivory pattern: notched and pointed tips, stabilizers. University of Washington pattern: have notches near the tips of their beaks. Rubber Dam Forceps
  • 22.
    Rubber Dam Frame Supportthe edges of rubber dam and so retract the soft tissue and improve access to isolated teeth. Metal “U” shaped (young’s). (Nygaard Ostby) is a complete circle. Obtra-Dam
  • 23.
    Clamps can bedivided into two main groups Bland: jaws which are flat and points directly towards each other Winged Wingless Retentive: have jaws which are directed more gingivally Winged Wingless
  • 24.
  • 25.
    Metal Vs Non-metalclamps. To be secure a clamp must fit around the tooth below the level of maximum crown width. The points of the jaws of the clamps must all contact the crown below this level in four areas. ‘Four Point Contact’.
  • 26.
    The jaws shouldnot extend the mesial and distal line angles of tooth: They may interfere with the placement of matrix and wedge Gingival trauma is more likely to occur Complete seal around the anchor tooth is more difficult to achieve
  • 27.
    Specialized clamps /retainer: Clamps with the extended bows e.g: extended distally Modified bow clamps designed to deal with problems e.g: third molar. a clamp can be modified by heating then bending Cervical retainer e.g: Ferrier 212
  • 28.
    Alternatives to clamps: Employsthe area beneath the interdental contacts for retention. ligatures of dental floss tied around the neck of the tooth or elastic rings.
  • 29.
    Before a clampis placed on any tooth, the dental floss should be tried. The clamp is carried to the tooth using clamp forceps. The clamp engaged in the beaks of forcep by means of holes in the jaws. The clamp is placed on the tooth by opening it sufficiently to pass over the maximum coronal diameter. Clamp placement:
  • 30.
    The lingual (orpalatal) jaw is placed first in contact with lingual surface of the anchor tooth. Then the clamp tilted bucally until buccal jaw below maxillary coronal diameter. The tension of clamp is released slowly as the buccal jaw is placed.
  • 31.
    Rubber Dam Napkin Itprevents skin contact with rubber to reduce the possibility of allergies Absorbs saliva seeping at the corners of mouth Act as cushion Provides a convenient method of wiping the patient’s lips on removal of dam
  • 32.
    Lubricant A water solublelubricant applied in the area of punched holes facilitates the passing of dam septae through the proximal contacts. Commercially available lubricants. shaving cream or soap slurry petroleum jelly may be applied at the coroners of patient’s mouth to prevent irritation
  • 33.
    Hole-Positioning Guides Teeth asa guide. Template. Rubber dam stamp
  • 34.
    Guide Lines forpositioning the holes: 1. When operating on incisors or mesial of canine isolate from first premolar to 1st premolar. Metal retainer are not required for this isolation. 2.When operating on canine, it is preferable to isolate from 1st molar to opposite lateral incisor. 3.When operating posterior teeth, isolate anteriorly to lateral incisor of opposite side.
  • 35.
    4.When operating premolarpunch holes to include two teeth distally and extend anterior up to opposite lateral incisor. 5.When operating molars, punch holes as far distally as possible and extend anteriorly to include opposite lateral incisors. 6.Isolation of minimum of three teeth recommended except in endodotnic therapy in which the tooth to be treated is isolated.
  • 36.
    7.The distance betweenholes is equal to the distance from the center of one tooth to the center of adjacent tooth measured at the level of gingival tissue. It is generally 1/4 inch (6.3 mm). 8.When the rubber dam is applied to the maxillary teeth the first holes are punched of central incisors which are placed approximately 1 inch (25mm) from the upper border so that sufficient material to cover upper lip. 9.When the rubber dam is applied to mandibular tooth, the first hole punched is for the post anchor tooth that receives the retainer.
  • 37.
    10.When a cervicalretainer is applied to isolate a class V lesion, a heavier rubber dam is usually recommended for better tissue retraction and the hole should be punched slightly facially to the arch form to compensate for the extension of the dam to the cervical area. 11.When a thinner dam is used, smaller holes must be punched to achieve an adequate seal around the teeth because the thin dam greatly elastic.
  • 38.
    Patient’s mouth is examinedcarefully for calculus deposits, and sharp edges on restoration. All contact points in operating field are checked with dental floss. All roughness and deposits present interdentally must be removed toallow free passage of rubber dam and prevent tearing. Anaesthetize the gingiva when indicated Rinse an dry the operating field. Application Techniques:
  • 39.
    Technique 1: Clamp placementprior to rubber 1:- Testing and lubricating the proximal contacts 2:- Punching the holes after assessing the arch and teeth 3:- Lubricating the dam 4:- Selecting the retainer and trying it 5:- Testing retainer stability and retention 6:- Positioning the dam over the retainer, using four fingers to stretch the dam sheet
  • 40.
    Technique 1 cont. 7:-Applying and positioning the Napkin 8:- Attaching the frame 9:- Passing the tooth to distal contact 10:- optional, applying compound or anterior anchor 11:-Passing the septa through contacts 12:-Inverting the dam interproximally then faciolingually
  • 41.
    13:-Using a salivaejector 14:- Confirming a properly applied rubber dam 15:- Checking for access and visibility 16:- Inserting the wedges
  • 42.
    Winged/ clamps are usedin this technique Place the retainer in hole punched for the anchor tooth by stretching the dam to engage these wings Technique 2: Applying dam and retainer simultaneously
  • 43.
    Technique 3: Applyingdam before the retainer The dam may be stretched over the anchor tooth before the retainer is placed. It is recommended for anterior teeth perhaps including first premolar. Preferred technique when double bow or butterfly clamps are selected.
  • 44.
    Multiple tooth isolation Wheneverpossible clamps should not be placed on the tooth which requires restoration of proximal surfaces. When several teeth require treatment the operating field is extended mesially or across the arch The more teeth included the better the retraction of lips, cheek and tongue and better the access.
  • 45.
    Removal of RubberDam Before removal of rubber dam, rinse and suction away any debris that may have collected.
  • 46.
    1: Cutting thesepta 2:- Removing the retainer 3: Removing the dam 4:- Wiping the lips 5:- Rinsing the mouth and managing the tissue
  • 47.
    Endodontics: essential toensure the patient’s safety during treatment and best prognosis Soft tissue control Cavity preparation Fixed bridge isolation: A blunted curved suture needle with dental floss attached is threadedfrom the facial aspect through the hole from the anterior abutment and bask through the same hole on lingual side. Rubber dam in clinical restorative procedures
  • 48.
    Errors in Applicationand Removal Off center arch form It can result in excess of material superiorly that may occlude the patient’s nasal airway Inappropriate distance between the holes, in the other hand too much distance causes wrinkles between the teeth. Incorrect arch form of holes
  • 49.
    Inappropriate retainers:- a. Iftoo small, resulting in occasional breakage when jaws are overspread. b. Unstable on anchor tooth c. Impinge on soft tissue d. Impede wedge placement
  • 50.
    Retainer pinched tissue Incorrectlocation of hole for class V lesion Sharp tips on No.212 retainer Incorrect technique for cutting septa
  • 51.
    Alternative isolation aids Retractioncord when properly applied can be used for isolation and retraction in the direct procedures of treatment of cervical lesions in facial veneering as well as in indirect veneers. Help prevent abrasion of gingival tissue during cavity preparation
  • 52.
    Anti-salivary drugs To controlsalivation is rarely indicated Operator should be familiar with its indications contra indications and side effects of the drug to be used. Some Anti histaminics cause dryness of mouth due to anti cholinergic action
  • 53.