SlideShare a Scribd company logo
Introduction to Computers and C++ Programming
Department of Computer Systems Engineering (Mehran, UET)
Lab 01: Getting familiar with basic computer
hardware: peripheral devices
Upon successful completion of this lab the students will be able to:
โ€ข To get familiar with basic computer hardware.
โ€ข Understand how computer processes data in to information.
โ€ข To get familiar with different input devices and their working mechanism.
โ€ข To get familiar with different output devices and their working mechanism.
1.1 Tools
โ€ข Different peripheral devices: Input and Output.
โ€ข Screw driver.
1.2 Background
1.2.1 Computer Defined
The computer is an electronic device, which is capable of receiving input, processing the data
according to the given set of instructions, producing output and capable of storing huge
amount of data permanently.
1.2.2 Basic task of a computer
No matter what type or size of the computer is, the basic task of any computer is to convert raw
data (useless data) into information (useful data).
1.2.3 Information Processing Cycle
Information processing cycle is a set of steps that converts data in to the information. Each step
of this process requires one or more components of the computer. Information processing cycle
contains four steps:
INPUT: During this step, the computer accepts the input from the user via any input device like
keyboard or mouse.
PROCESS: During this step the processing devices (Microprocessor) of the computer performs
some processing on the inputted data according to the given set of instructions and converts the
data into information.
OUTPUT: During this process, the computer presents the result of processed data on some sort
of output devices like monitor or printer.
STORAGE: During this step the computer permanently stores the processed data on any storage
device like hard disk, floppy or USB.
Introduction to Computers and C++ Programming
Department of Computer Systems Engineering (Mehran, UET)
Figure 1.1: Information Processing Cycle
1.2.4 Input Devices
The input devices are used to enter the data into the computer (system unit) to instruct it to work
accordingly. The input devices are considered as the interface between the user and the computer.
List of some of the input devices is given below:
โ€ข Keyboard
โ€ข Mouse
โ€ข Trackball
โ€ข Trackpad
โ€ข Joystick
โ€ข Game Controller
โ€ข Microphone
โ€ข Digital Camera
โ€ข Web Cam
โ€ข Barcode Reader
โ€ข Scanner
โ€ข Finger Print Reader
1.2.4.1 Keyboard
Keyboard is primary input device it is used to input text, numbers and commands. It is just like a
typewriter which works as a communicator between the user and the computer. Most commonly
used keyboard is IBM Enhanced Keyboard designed by IBM, contains about 100 keys. These keys
are arranged in to the five groups namely,
โ€ข Alphanumeric Keys
โ€ข Modifier Keys
1.2.4.2 Mouse
โ€ข Numeric Keypad
โ€ข Function Keys
โ€ข Cursor-Movement Keys
It is a pointing device used to control the cursor on the screen. The mouse can have at least two
buttons one is called left mouse button and the other is called right mouse button. The left mouse
button is used for functions like clicking, double-clicking and dragging and right mouse button is
used for right-clicking. It also contains a scrolling wheel, located between right and left mouse
button, used to scroll around a large documents or web pages quickly. There are two types of
mouse:
1. Mechanical Mouse 2. Optical Mouse
Introduction to Computers and C++ Programming
Department of Computer Systems Engineering (Mehran, UET)
Figure 1.2: Keyboard Figure 1.3: Mouse
โ€ข Mechanical Mouse
This is a traditional mouse, which works on mechanical movement, containing a rubber ball which
protrudes from the back of the mouse casing through a hole. It also contains a pair of rollers and
sensors. When you move the mouse the ball at the bottom moves and with it the roller that are in
contact with the ball also rolls then the sensors send the signals to the computer telling it the
distance, direction and speed of the move. Then the computer uses its stored data to set the cursor
on the screen so in this way the position of the cursor is controlled on the screen.
โ€ข Optical Mouse
Optical mouse is the newest development in the mouse sometimes also called lesser mouse,
because the laser is at the heart of this mouse. This mouse contains a built-in lesser instead of a
heavy rubber ball. When you move this mouse the lesser emits the beam of lesser light and with
the help of reflected rays it identifies the distance, direction and speed of the move and sends the
signal to the computer.
Figure 1.4: Mechanical Mouse Figure 1.5: Optical Mouse Figure 1.6: Trackball
1.2.4.3 Trackball
Track ball is a pointing device. Like mouse it is also used to control the cursor on the screen. It is
just like up-side down mouse. It contains a rubber ball on the top of it and two or more buttons.
To use this device, you have to place your thumb or index finger on the ball and other fingers on
the buttons.
1.2.4.4 Trackpad
Track Pad is a pointing device also called touch pad. It is used to control the cursor on the screen.
To use this device, you have to move your index finger on the pad and the motion of your finger
is then translated into the cursorโ€™s movement.
Introduction to Computers and C++ Programming
Department of Computer Systems Engineering (Mehran, UET)
1.2.4.5 Joystick
Joystick is a type of game controller which looks like a carโ€™s gear contains a lever and some buttons.
The lever is used to control the direction and motion of the object in the game and other buttons
perform some specific functions. The joystick is ideal for playing racing and flying games.
1.2.4.6 Game Pad
Gamepad, also called joypad or control pad, is a type of game controller held in the hand, where
the digits (especially thumbs) are used to provide input. Gamepads generally feature a set of action
buttons handled with the right thumb and a direction controller handled with the left.
Figure 1.5: Trackpad Figure 1.6: Joystick Figure 1.7: Game controller
1.2.4.7 Microphone
It is an input device used for sound input. It catches the analog signals of sound and sends them
to the sound card which converts those analog signals into the digital form that the computer can
understand.
1.2.4.8 Digital Camera
It is again an input devices used to input the still images into the computer. It is very much identical
to the traditional camera found in the hands of a professional photographer.
1.2.4.9 Web Camera
Web camera usually known as Web Cam is an input device used to input videos (moving pictures).
The difference between this device and a digital camera is that the digital camera captures only
still image whereas this device can capture moving pictures usually known as videos.
Figure 1.8: Microphone Figure 1.9: Digital Camera Figure 1.10: Web Camera
Introduction to Computers and C++ Programming
Department of Computer Systems Engineering (Mehran, UET)
1.2.4.10 Barcode Reader
A barcode reader (or barcode scanner) is a computer peripheral for reading barcodes printed on
various surfaces. Like a flatbed scanner, it generally consists of a light source, a lens and a photo
conductor translating optical impulses into electrical ones.
1.2.4.11 Scanner
A scanner is an input device used to input the soft copy of a printed document. The image scanner
or simply scanner converts a printed document in to digital form by shinning the lesser light on
the image and with the help of reflected rays of light it identifies the colors and intensity of the
colors. The color scanner uses RGB (Red, Green and Blue) color scheme.
Figure 1.11: Barcode Figure 1.12: Barcode Reader Figure 1.13: Scanner
1.2.4.12 Finger Print Reader
It is a device which captures the finger print by striking the laser light over the finger and the
reflected light is captured through sensors and is translated in to digital images (finger print).
Fingerprint scanning is a standard biometric method that authenticates a userโ€™s identity based
upon who they are.
Figure 1.14: Finger Imprint Figure 1.15: Finger Print Reader
1.2.5 Output Devices
The output devices are used to present the result of processed data (information). Some of the
output devices are listed below:
โ€ข Monitor
โ€ข Printer
โ€ข Plotters
โ€ข Speakers
โ€ข Projector
Introduction to Computers and C++ Programming
Department of Computer Systems Engineering (Mehran, UET)
1.2.5.1 Monitor
A computer monitor, usually called simply a monitor, is a piece of electrical equipment which
displays viewable images generated by a computer without producing a permanent record. Along
with the mouse and keyboard, the video display (monitor) is a vital part of the user interface of
any computer. There are two basic types of monitors:
1. CRT (Cathode Ray Tube) 2. FPD (Flat Panel Display)
The video subsystem of a PC consists of two main components:
Monitor (or video display): The monitor can be either a CRT (Cathode Ray Tube) or an FPD (Flat
Panel Display).
Video adapter (also called the video card or graphics adapter): On many recent low-cost systems,
video might be built into the motherboard or included as part of this motherboard's chipset.
โ€ข CRT (Cathode Ray Tube)
The CRT monitors are the monitors which rely on Cathode Ray Tube for displaying the images.
The CRT or Cathode Ray Tube is the picture tube of a monitor. The back of the tube has a
negatively charged cathode. CRTs consist of a vacuum tube enclosed in glass. One end of the tube
contains an electron gun assembly that projects three electron beams, one each for the red, green,
and blue phosphors used to create the colors you see onscreen; the other end contains a screen
with a phosphorous coating.
Figure 1.16: CRT Monitor Figure 1.17: Flat Panel Display Monitor
โ€ข FPD (Flat Panel Display)
Flat panel displays encompass a growing number of technologies enabling video displays that are
lighter and much thinner than traditional television and video displays that use cathode ray tubes,
and are usually less than 4 inches (100 mm) thick. These flat panel displays has given the birth to
the number of technologies which include:
โ€ข Digital Light Processing (DLP)
โ€ข Plasma Display Panels (PDPs)
โ€ข Liquid Crystal Displays (LCDs)
โ€ข Organic Light-Emitting Diode Displays
(OLEDs)
โ€ข Light-Emitting Diode Display (LED)
โ€ข Electroluminescent Displays (ELDs)
โ€ข Surface-Conduction Electron-Emitter
Displays (SEDs)
โ€ข Field Emission Displays (FEDs)
โ€ข Nano-Emissive Display (NEDs)
Introduction to Computers and C++ Programming
Department of Computer Systems Engineering (Mehran, UET)
1.2.5.2 Printer
A printer is an output device, which produces a hard copy (permanent human-readable text and/or
graphics) of documents stored in electronic form, usually on physical print media such as paper
or transparencies.
1.2.5.3 Plotters
A plotter is a vector graphics printing device which prints its output by moving a pen across the
surface of a piece of paper. This means that plotters are restricted to line art, rather than raster
graphics as with other printers. They can draw complex line art, including text, but do so very
slowly because of the mechanical movement of the pens.
Figure 1.18: Printer Figure 1.19: Plotter
1.2.5.4 Speaker
Speaker is an output device which produces sound. The internal amplifiers require an external
power source, usually an AC adapter. More sophisticated computer speakers can have a subwoofer
unit, to enhance bass output, and these units usually include the power amplifiers both for the
bass speaker, and the small satellite speakers.
1.2.5.5 Speaker Channels
The sound systems have different number of channels which determine the number of speakers
that can be connected to that system known as channels. Three of the sound channels types are:
1. Mono 2. Stereo 3. Surround Sound
The mono sound contains only 1 channel. The stereo sound contains 2 channels and the
surround sound contains more than 2 channels (usually 5, 6, 7, 8, 9, or 10 channels).
Figure 1.20: Speakers Figure 1.21: Mono and Stereo Jacks
Department of Computer Systems Engineering (Mehran, UET)
Lab 01: Getting familiar with basic computer hardware: peripheral devices | 8
1.2.5.6 Variants of speakers
Other variants of speakers are Headphones and Earphones.
1.2.5.7 Projector
An image projector is an Optical device that projects an image (or moving images) onto a
surface, commonly a projection screen.
Most projectors create an image by shining a light through a small transparent image, but
some newer types of projectors can project the image directly, by using lasers. The most
common type of projector used today is called a video projector.
Figure 1.22: Headphones Figure 1.23: Earphones Figure 1.24: Projector
1.2.6 Looking inside a standard keyboard
When we open a switched keyboard, we will find a set of components as: Keyboard controller,
Mesh of traces printed on a pair of plastic papers and Rubber domes.
When you press a key from the keyboard, the rubber dome under that key closes the switch
of that key on printed trace which causes an electric signal to pass to the keyboard controller.
Then the keyboard controller stores the scan code of the pressed key in the keyboardโ€™s
temporary storage area called keyboard buffer and sends the signal to the computerโ€™s
operating system telling it that some action has been performed at the keyboard.
Figure 1.25: Keyboard controller Figure 1.26: Traces printed circuit
Department of Computer Systems Engineering (Mehran, UET)
Lab 01: Getting familiar with basic computer hardware: peripheral devices | 9
1.2.7 Looking inside a mechanical mouse
When we open a mechanical mouse keyboard, we will find a set of components as: Mouse
controller, plastic rollers, infrared emitters, photo diodes and a rubber ball.
When you move the mouse, the rubber ball moves the two rollers between infrared emitters
and photo diodes for controlling horizontal and vertical displacement. The signal is then send
to mouse controller, which digitizes and sends the command to the system unit.
Figure 1.27: Rubber Domes Figure 1.28: Inside a mechanical mouse
1.3 Procedure
1.3.1 Unscrewing and screwing a standard keyboard
Step 01: Take a standard keyboard and unplug it from system unit.
Step 02: Turn it upside down and find screws and unscrew them.
Step 03: Carefully remove the back cover.
Step 04: Draw the internal structure of keyboard along with all the components.
Step 05: Remove plastic circuit board, rubber domes and keyboard controller.
Step 06: Place plastic circuit board, rubber domes and controller in their proper places.
Step 07: Screw the back cover.
1.3.2 Unscrew and screwing a mechanical mouse
Step 01: Take a mechanical mouse and unplug it from system unit.
Step 02: Turn it upside down and find a screw under a seal and unscrew it.
Step 03: Carefully remove the top cover.
Step 04: Draw the internal structure of mouse along with all the components.
Step 05: Remove mouse controller, rubber ball and rollers.
Step 06: Place mouse controller, rubber ball and rollers in their proper places.
Step 07: Screw the back cover.
Department of Computer Systems Engineering (Mehran, UET)
Lab 01: Getting familiar with basic computer hardware: peripheral devices | 10
EXERCISE
Exercise 1.1: What different input and output devices you found in the lab. For each of the
device fill in the following format:
Device Name Brand Name Type/Mechanism Type of Data Input/Output
Device Name = Name of Input or Output device.
Brand Name = Company Name device manufactured by.
Type/Mechanism = Type of device or working mechanism. For example: For mouse specify whether it is
optical or mechanical, for monitor specify whether it is Cathode Ray Tube or Flat panel Display.
Type of Data = Specify the type of data, the device inputs or output. For example: Image, Text, or Sound.
Input / Output = Specify whether the device is an input device or output device.
Exercise 1.2: For each of the following devices list few names of the software applications that
use them intensively:
โ€ข Keyboard
โ€ข Mouse
โ€ข Microphone
โ€ข Scanner
โ€ข Digital Camera
โ€ข Printer
โ€ข Speaker
โ€ข Webcam
โ€ข Joystick
Exercise 1.3: Unscrew the mechanical mouse and with the help of a diagram describe its
working mechanism.
Exercise 1.4: Unscrew the optical mouse and with the help of a diagram describe its working
mechanism.
Exercise 1.5: Unscrew a standard keyboard and with the help of a diagram describe its working
mechanism.
Introduction to Computers and C++ Programming
Department of Chemical Engineering (Mehran, UET)
Lab 02: Getting Familiar with Microsoft Word
Upon successful completion of this lab, the students will be able to:
โ€ข Get familiar with MS Word user interface.
โ€ข Create and edit documents in MS Word.
โ€ข Understand text-formatting commands in MS Word.
3.1 Tools
โ€ข PC with MS Word (Version: 2016, 2013, 2010 or 2007)
3.2 Background
3.2.1 Microsoft Word
When you use a computer program to create, edit, and format text documents, you are
performing a task known as word processing. Part of the Microsoft Office suite of programs,
Microsoft Word, is one of the most sophisticated word-processing programs available.
By using Word, it is easy to create a wide range of business and personal documents efficiently,
from the simplest letter to the most complex report.
3.2.2 Microsoft Word 2013 Interface
When you open Word 2013 for the first time, the Word Start Screen will appear. From here,
you will be able to create a new document, choose a template, or access your recently edited
documents.
From the Word Start Screen, locate and select Blank document to access the Word interface.
Figure 3.1: MS Word Start Screen
Introduction to Computers and C++ Programming
Department of Chemical Engineering (Mehran, UET)
Figure 3.2: MS Word Interface
Quick Access Toolbar: Located just above the Ribbon, the Quick Access toolbar lets you access
common commands no matter which tab is selected.
The Ruler: Located at the top and to the left of your document. It makes it easier to adjust your
document with precision.
Document Views: Change how your document is displayed. You can choose to view your
document in Read Mode, Print Layout, or Web Layout.
The Ribbon: Contains all the commands you will need to perform common tasks in Word. It
has multiple tabs, each with several groups of commands.
Command Group: Each group contains a series of different commands. Simply click any
command to apply it. Some groups also have an arrow in the bottom-right corner, which you
can click to see even more commands.
Status Bar: Shows the status of document i.e. number of pages, current page number, word
count, spelling and grammatical errors. It also presents the documents view controls and zoom
controller.
Introduction to Computers and C++ Programming
Department of Chemical Engineering (Mehran, UET)
3.2.2.1 Home Tabs
The Home tab gives you access to some of the commonly used commands.
Figure 3.3: Home Tab
3.2.2.2 Insert Tabs
The Insert tab allows you to insert pictures, charts, tables, shapes, cover pages, and more to
your document.
Figure 3.4: Insert Tab
3.3 Formatting Text
Formatted text can draw the reader's attention to specific parts of a document and emphasize
important information. In Word, you have many options for adjusting the font of your text,
including size, color, and inserting special symbols. You can also adjust the alignment of the
text to change how it is displayed on the page.
3.4 Procedure
3.4.1. Creating a blank document
Step 01: Select the File tab, backstage view will appear.
Step 02: Select New, then click Blank document.
Step 03: A new blank document will appear.
3.4.2 Changing the font of text
Step 01: Select the text you wish to modify.
Step 02: On the Home tab, click the drop-down arrow next to the Font box. A menu of font
styles will appear.
Step 03: Move the mouse over the various font styles. A live preview of the font will appear in
the document. Select the font style you wish to use.
Introduction to Computers and C++ Programming
Department of Chemical Engineering (Mehran, UET)
3.4.3 Changing the font size
Step 01: Select the text you wish to modify.
Step 02: Select the desired font size formatting option:
Font size drop-down arrow: On the Home tab, click the Font size drop-down arrow. A menu of
font sizes will appear. When you move the mouse over the various font sizes, a live preview of
the font size will appear in the document.
Font size box: When the font size you need is not available in the Font size drop-down arrow,
you can click the Font size box and type the desired font size. Then press Enter.
3.4.4 Changing the font color
Step 01: Select the text you wish to modify.
Step 02: On Home tab, click the Font Color drop-down arrow. The Font Color menu appears.
Step 03: Select the font color you wish to use.
3.4.5 Using the Bold, Italic, and Underline commands
Step 01: Select the text you wish to modify.
Step 02: On Home tab, click the Bold (B), Italic (I), or Underline (U) command in the Font group.
3.4.6 Changing the text case
Step 01: Select the text you wish to modify.
Step 02: On Home tab, click, Change Case in the Font group.
Step 03: A drop-down menu will appear. Select the desired case
option from the menu.
3.4.7 Changing the text alignment
Step 01: Select the text you wish to modify.
Step 02: On Home tab, select one of the four alignment options from the Paragraph group.
Introduction to Computers and C++ Programming
Department of Chemical Engineering (Mehran, UET)
3.4.8 Changing line spacing
Step 01: Select the text you wish to modify.
Step 02: On Home tab, click the Line and Paragraph Spacing command. A drop-down menu
will appear.
Step 03: Move the mouse over the various options. A live preview of the line spacing will appear
in the document. Select the line spacing you wish to use.
3.4.9 Changing paragraph spacing
Step 01: Select the paragraph or paragraphs you wish to format.
Step 02: On Home tab, click the Line and Paragraph Spacing command. Hover the mouse over
Add Space before Paragraph or Remove Space after Paragraph from the drop-down menu.
Step 03: Select the paragraph spacing you wish to use.
3.4.10 Changing paragraph indent
Step 01: Select the text you wish to indent.
Step 02: On the Home tab, click the desired Indent command:
Increase Indent: Increases the indent by increments of 1/2 inch.
Decrease Indent: Decreases the indent by increments of 1/2 inch.
3.4.11 Creating bulleted list
Step 01: Select the text you wish to format as a list.
Step 02: On the Home tab, click the drop-down arrow
next to the Bullets command. A menu of bullet styles
will appear.
Step 03: Move the mouse over the various bullet styles.
A live preview of the bullet style will appear in the
document.
Step 04: Select the bullet style you wish to use.
Introduction to Computers and C++ Programming
Department of Chemical Engineering (Mehran, UET)
3.4.12 Creating numbered list
Step 01: Select the text you wish to format as a list.
Step 02: On the Home tab, click the drop-down arrow next to
the Numbering command. A menu of numbering styles will
appear.
Step 03: Move the mouse over the various numbering styles.
A live preview of the numbering style will appear in the
document.
Step 04: Select the numbering style you wish to use.
3.4.13 Creating multilevel list
Step 01: Create a bulleted or numbered list.
Step 02: Place the insertion point at the beginning of the line
you wish to move to right.
Step 03: Press the Tab key to increase the indent level of the line. The line will move to the
right.
Step 04: To increase the indent by more than one level, place the insertion point at the
beginning of the line and press the Tab key until the desired level is reached.
Step 05: To decrease the indent level, place the insertion point at the beginning of the line,
then hold the Shift key and press the Tab key.
3.4.14 Creating header and footer
Step 01: Double-click anywhere on the top or bottom margin of your document.
Step 02: The header or footer will open, and a Design tab will appear on the right side of the
Ribbon. The insertion point will appear in the header or footer.
Step 03: Type the desired information into the header or footer.
Step 04: When you are finished, click Close Header and Footer. Alternatively, you can press the
Esc key.
3.4.15 Adding page number to a document
Step 01: Double-click anywhere on the header or footer to unlock it.
Step 02: Click the Page Number command from design tab. In the menu that appears, hover
the mouse over Current Position and select the desired page numbering style.
Introduction to Computers and C++ Programming
Department of Chemical Engineering (Mehran, UET)
3.4.16 Inserting a picture from a file
Step 01: Place the insertion point where you want the image to appear.
Step 02: Select the Insert tab on the Ribbon, and then click the Pictures command.
Step 03: The Insert Picture dialog box will appear. Select the desired image file, then click Insert.
Step 04: To resize an image, click and drag one of the corner sizing handles . The image will
change size while keeping the same proportions. If you want to stretch it horizontally or
vertically, you can use the side sizing handles.
3.4.17 Wrapping text around an image
Step 01: Select the image you want to wrap text around. The Format tab will appear on the
right side of the Ribbon.
Step 02: On the Format tab, click the Wrap Text command in the Arrange group. A drop-down
menu will appear.
Step 03: Hover the mouse over the various text wrapping options. A live preview of the text
wrapping will appear in the document. When you've found the text wrapping option you want
to use, click on it. Alternatively, you can select More Layout Options... to fine tune the layout.
Step 04: The text will wrap around the image. You can now move the image if desired. Just
click, hold, and drag it to the desired location. As you move it, alignment guides will appear
to help you align the image on the page.
Step 05: Alternatively, you can access text-wrapping options by selecting the image and clicking
the Layout Options button that appears.
Introduction to Computers and C++ Programming
Department of Chemical Engineering (Mehran, UET)
EXERCISE
Exercise 3.1: Create and format the following MS WORD document page:
Introduction to Computers and C++ Programming
Department of Chemical Engineering (Mehran, UET)
Exercise 3.2: Create and format the following MS WORD document page:
Exercise 3.3: Create and format the following MS WORD document page:
Introduction to Computers and C++ Programming
Department of Chemical Engineering (Mehran, UET)
Exercise 3.4: Create the following lists in MS WORD:
โ€ข Classification of Computers
o On the basis of Purpose
o On the basis of Size
o On the basis of Working Mechanism
โ€ข Classification of Computers (Purpose)
o General Purpose
o Special Purpose
โ€ข Classification of Computers (Size)
o Super Computers
o Mainframe Computers
o Mini Computers
o Micro Computers
๏‚ง Desktop Computers
๏‚ง Workstations
๏‚ง Notebook Computers
๏‚ง Tablet PCs
๏‚ง Handheld Computers
๏‚ง Smartphones
โ€ข Classification of Computers (Working Mechanism)
o Analog Computers
o Digital Computers
o Hybrid Computers
1. Software
2. Types of Software
a. System Software
i. System Management
ii. System Support
iii. System Development
b. Application Software
i. General Purpose
ii. Application Specific
Introduction to Computers and C++ Programming
Department of Chemical Engineering (Mehran, UET)
Lab 03: Creating documents with advance
formatting operations of Microsoft Word
Upon successful completion of this lab the students will be able to:
โ€ข Insert, format and design the tables in MS Word.
โ€ข Insert and format smart art in MS Word.
โ€ข Insert symbols and design equations in MS Word.
4.1 Tools
โ€ข PC with MS Word (Version: 2016, 2013, 2010 or 2007)
4.2 Background
4.2.1 Tables in MS Word
A table is a grid of cells arranged in rows and columns. Tables are useful for various tasks such
as presenting text information and numerical data. MS Word allows you to create and design
any type of table. Once created you can merge multiple cells whether in column or rows to
create table with different number of columns in each row. You can insert a table in word
document from Insert tab.
4.2.2 Smart Art
SmartArt allows you to communicate information with graphics instead of just using text. There
are a variety of styles to choose from, which you can use to illustrate many different types of
ideas.
4.2.1 Symbols
Sometimes you may find that you need to add a symbol to your text, such as the Copyright
symbol, ยฉ. Word offers a large collection of symbols for currency, languages, mathematics,
and more.
4.2.2 Equations
MS Equation Editor allows you to design any form of mathematical equation. It contains many
place holders for different operations and bundle of symbols.
Figure 10.1: MS Equation Editor
Introduction to Computers and C++ Programming
Department of Chemical Engineering (Mehran, UET)
4.3 Procedure
4.3.1 Creating a blank table
Step 01: Place your insertion point where you want the table,
then select the Insert tab.
Step 02: Click the Table command.
Step 03: A drop-down menu containing a grid of squares will
appear. Hover the mouse over the grid to select the number of
columns and rows in the table.
Step 04: Click the mouse, and the table will appear in the
document.
Step 05: You can now place the insertion point anywhere in the
table to add text.
4.3.2 Modifying tables
4.3.2.1 To add a row or column
Step 01: Hover the mouse near the location where you wish to
add a row or column and click the plus sign that appears.
Step 02: A new row or column will appear in the table.
Step 03: Alternatively, you can right-click the table, then hover the mouse over Insert to see
various row and column options.
4.3.2.2 To delete a row or column
Step 01: Place the insertion point in the row or column you want to delete.
Step 02: Right-click the mouse, then select Delete Cells... from the menu that appears.
Step 03: A dialog box will appear. Select Delete entire row or Delete entire column, then click
OK.
4.3.2.3 To apply a table style
Step 01: Click anywhere on the table, then click the Design tab on the right side of the Ribbon.
Step 02: Locate the Table Styles group, then click the More drop-down arrow to see all available
table styles.
Step 03: Select the desired style.
Introduction to Computers and C++ Programming
Department of Chemical Engineering (Mehran, UET)
4.3.2.4 Merge and Split Cells
Some tables require a layout that doesn't conform to the standard grid. In those cases, you
may need to merge or split cells.
Merging
Step 01: Bring your mouse pointer position inside the first cell that you want to merge.
Step 02: Now press the Shift key and click the cells around the cell which you want to merge
into the first cell. This will highlight the cells which you click and they will be ready to be
merged.
Step 03: Now click the Layout tab and then click the Merge Cells button which will merge all
the selected cells.
Splitting
Step 01: Bring your mouse pointer position inside the cell that has to be divided into multiple
cells.
Step 02: Now click the Layout tab and then click the Split Cells button; this will display a dialog
box asking for the number of rows and columns to be created from the selected cell.
Step 03: Select the desired number of rows and columns that have to go into the resultant cell
and finally click the OK button to apply the result.
4.3.2.5 Splitting a table
Step 01: Bring your mouse pointer position anywhere in the row that should appear as the first
row of the new table.
Step 02: Now click the Layout tab and then click the Split Table button which will split the table
into two tables and the selected row will become the first row of the lower table.
4.3.3 To insert a SmartArt graphic
Step 01: Place insertion point in the document where you want the SmartArt graphic to appear.
Step 02: From the Insert tab, select the SmartArt command in the Illustrations group.
Step 03: A dialog box will appear. Select a category on the left, choose the desired SmartArt
graphic, then click OK.
Introduction to Computers and C++ Programming
Department of Chemical Engineering (Mehran, UET)
4.3.3.1 To add text to a SmartArt graphic
Step 01: Select the SmartArt graphic. The SmartArt task pane will appear to the left.
Step 02: Enter text next to each bullet in the task pane. The text will appear in the graphic and
will resize to fit inside the shape.
Step 03: To add a new shape, press Enter. A new bullet will appear in the task pane, and a new
shape will appear in the graphic. You can delete any bullets you're not using to remove the
shapes.
4.3.3.2 To change the SmartArt layout
Step 01: Select the SmartArt graphic, then select the Design tab.
Step 02: In the Layouts group, click the More drop-down arrow.
Step 03: Select the desired layout, or click More Layouts... to see even more SmartArt options.
Introduction to Computers and C++ Programming
Department of Chemical Engineering (Mehran, UET)
4.3.4 To insert a symbol
Step 01: Place the insertion point in the location where you want to insert a symbol.
Step 02: On the Insert tab, click the Symbol drop-down arrow. A menu of symbols will appear.
Step 03: Select the desired symbol or click More Symbolsโ€ฆ if you donโ€™t find symbol.
10.3.4 To insert an equation
Step 01: Place the insertion point in the location where you want to insert a symbol.
Step 02: On the Insert tab, click the Equation drop-down arrow. A menu of equations will
appear.
Step 03: Select the desired equation or click Insert New Equation to create it.
Step 04: Click on desired structures and symbols to create the equation.
Step 05: Press enter key when done.
Introduction to Computers and C++ Programming
Department of Chemical Engineering (Mehran, UET)
EXERCISE
Exercise 10.1: Create the following tables in MS Word:
Shopping Bill
Customer Name: Ali
Customer Number: CN2501
S. #. Item Brand Price/Unit Units Price
1 Dress Pants
Oxford Rs. 4500 2 Rs. 9000
Dinners Rs. 2200 1 Rs. 2200
2 Jeans Levis Rs. 5100 2 Rs. 1200
3 Tie Dinners Rs. 550 3 Rs. 1650
4 Shirt
Oxford Rs. 3500 1 Rs. 3500
Dinners Rs. 1850 1 Rs. 1850
Cambridge Rs. 4000 1 Rs. 4000
5 Belt Cambridge Rs. 1800 2 Rs. 3600
Total Price Rs. 27000
Discount Rs. 3500
Net Bill Rs. 23500
PROVISIONAL LIST OF CLASS ATTENDANCE
DEPARTMENT OF COMPUTER SYSTEMS ENGINEERING - I
S.#
Roll #
C.F A.C F.E ES. ENG B.E.E
T.L
Conducted
Percentage
Dr. Sammer
Zai
Mr.
Ayaz
Siyal
Mr.
Jam
Khan
Ms. Saba
Baloch
Mr. Aijaz
Rajpar
T.Lec T.Prac T.Lec T.Lec T.Lec T.Prac T.Lec T.Prac
31 24 29 31 29 33 31 30 238
31 30 29 31 29 33 31 27 241
L. Att P. Att L. Att L. Att L. Att P. Att L. Att P. Att T.L Att
1 17CS01 30 24 29 31 29 30 31 30 234 98
2 17CS05 30 24 29 31 29 30 31 30 234 98
3 17CS07 30 24 28 29 29 30 31 30 231 97
4 17CS09 28 24 25 27 26 24 31 30 215 90
5 17CS11 30 24 23 28 24 30 30 27 216 91
Introduction to Computers and C++ Programming
Department of Chemical Engineering (Mehran, UET)
General Purpose
Purpose
Special Purpose
Super
Desktop
Mainframe
Classification of
Computers
Size Workstation
Mini
Notebook
Micro
Tablet
Analog
Type of
Data/Working
Mechanism
Handheld
Digital
Smart Phone
Hybrid
Exercise 10.2: Create the following smart art graphics in MS Word:
Introduction to Computers and C++ Programming
Department of Chemical Engineering (Mehran, UET)
Exercise 10.3: Insert the following equations in MS Word document:
๐‘ฅ๐‘ฅ =
3
โˆšsin cos ๐›ฝ๐›ฝ โˆ’ sin ๐›ฝ๐›ฝ cos ๐›ผ๐›ผ
๐›ผ๐›ผ2 + ๐›ฝ๐›ฝ2
(๐‘ฅ๐‘ฅ + ๐‘Ž๐‘Ž)๐‘›๐‘›
= ๏ฟฝ ๏ฟฝ
๐‘›๐‘›
๐‘˜๐‘˜
๏ฟฝ ๐‘ฅ๐‘ฅ๐‘˜๐‘˜
๐‘Ž๐‘Ž๐‘›๐‘›โˆ’๐‘˜๐‘˜
๐‘›๐‘›
๐‘˜๐‘˜=0
๐‘‘๐‘‘
๐‘‘๐‘‘๐‘ก๐‘ก
๐œ•๐œ•๐ฟ๐ฟ
( ) =
๐œ•๐œ•๐œ•๐œ•๐œ•
๐œ•๐œ•๐ฟ๐ฟ
๐œ•๐œ•๐œ•๐œ•๐œ•
(๐‘ข๐‘ข) = โˆซ (1 + |๐›ป๐›ป๐‘ข๐‘ข|2)
1โ„2 ๐‘‘๐‘‘๐‘ฅ๐‘ฅ , โ€ฆ ๐‘‘๐‘‘๐‘ฅ๐‘ฅ๐‘›๐‘›
ฮฉ
๐‘ก๐‘กโ€ฒ =
1
โˆš1 โˆ’
๐‘ฃ๐‘ฃ2
๐‘๐‘2
cos ๐‘ฅ๐‘ฅ = ๐‘…๐‘…๐‘’๐‘’{๐‘’๐‘’๐‘–๐‘–๐‘ฅ๐‘ฅ} =
๐‘’๐‘’๐‘–๐‘–๐‘ฅ๐‘ฅ
+ ๐‘’๐‘’โˆ’๐‘–๐‘–๐‘ฅ๐‘ฅ
2
๐ฌ๐ฌ๐ข๐ข๐ง๐ง ๐’™๐’™ = ๐‘ฐ๐‘ฐ๐’Ž๐’Ž{๐’†๐’†๐’Š๐’Š๐’™๐’™} =
Exercise 10.4: Write down any paragrapgh from
your Maths book that includes text and
mathematical equations.
Exercise 10.5: Design time table of your class.
๐’†๐’†๐’Š๐’Š๐’™๐’™ โˆ’ ๐’†๐’†โˆ’๐’Š๐’Š๐’™๐’™
๐Ÿ๐Ÿ๐’Š๐’Š
1
Department of Chemical Engineering (Mehran, UET)
Introduction to Computers and C++ Programming
Lab 04: Creating and editing multimedia
presentations with Microsoft PowerPoint
Upon successful completion of this lab the students will be able to:
โ€ข Get familiar with MS PowerPoint user interface.
โ€ข Create and edit multimedia presentations in MS PowerPoint.
โ€ข Insert images, audio, video, WordArt, shapes, tables and charts in PowerPoint
presentation.
โ€ข Apply animations to text and objects.
4.1 Tools
โ€ข PC with MS PowerPoint (Version: 2016, 2013, 2010 or 2007)
4.2 Background
4.2.1 MS PowerPoint
PowerPoint 2013 is a presentation software that allows you to create dynamic slide
presentations. Slideshows can include animation, narration, images, videos, and much more.
Microsoft Office product that provides users with an interface to design multimedia slides to
be displayed on a projection system or personal computer. The software incorporates images,
sounds, videos, text, and charts to create an interactive presentation. Microsoft PowerPoint
interacts with other Office products such as Microsoft Word and Excel, and is included with
most Microsoft Office packages.
4.2.2 The PowerPoint 2013 Interface
If you've previously used PowerPoint 2010 or 2007, PowerPoint 2013 will feel familiar. It
continues to use features like the Ribbon and the Quick Access toolbar, where you will find
commands to perform common tasks in PowerPoint, as well as Backstage view.
Figure 4.1: MS PowerPoint Interface
Department of Chemical Engineering (Mehran, UET)
Introduction to Computers and C++ Programming
4.2.3 The Ribbon
PowerPoint 2013 uses a tabbed Ribbon system instead of traditional menus. The Ribbon
contains multiple tabs, each with several groups of commands. You will use these tabs to
perform the most common tasks in PowerPoint.
4.2.3.1 Home Tab
He Home tab gives you access to the most commonly used commands, including copy and
paste, formatting, and the New Slide command.
Figure 4.2: Home Tab
4.2.3.2 Insert Tab
The Insert tab allows you to insert pictures, charts, tables, shapes, videos and more, which can
help you communicate information visually and add style to your presentation.
Figure 4.3: Insert Tab
4.2.3.3 Design Tab
The Design tab allows you to apply themes. A theme is a predefined combination of colors,
fonts, and effects that can quickly change the look and feel of your entire slide show.
Figure 4.4: Design Tab
4.2.3.4 Transitions Tab
The Transitions tab allows you to apply slide transitions. Transitions are the movements you
see between slides when presenting your slide show.
Department of Chemical Engineering (Mehran, UET)
Introduction to Computers and C++ Programming
Figure 4.5: Transitions Tab
4.2.3.5 Animations Tab
The Animations tab allows you to animate text and objects such as clip art, shapes and pictures.
Animation can be used to draw attention to specific content or make the slide easier to read.
Figure 4.6: Animations Tab
4.2.4 Backstage view
Backstage view gives you various options for saving, opening, printing, and sharing your
presentations.
Figure 4.7: Backstage View
Department of Chemical Engineering (Mehran, UET)
Introduction to Computers and C++ Programming
4.2.5 Slide Basics
PowerPoint presentations are made up of a series of slides. Slides contain the information you
will present to your audience. This might include text, pictures, charts, and more.
Slides have several different layouts for placeholders, depending on the kind of information
you want to include.
Figure 4.8: Basic Slide Figure 4.9: Slide Layouts
4.2.6 Themes
A theme is a predefined combination of colors, fonts, and effects. Different themes also use
different slide layouts. Elements of theme are:
Theme Colors: There are 10 theme colors, along with darker and lighter variations, available
from every Color menu.
Theme Fonts: There are two theme fonts available at the top of the Font menu under Theme
Fonts.
Theme Effects: These affect the preset shape styles. You can find shape styles on the Format
tab whenever you select a shape or SmartArt graphic.
4.2.7 Transitions
Transitions are the movements you see between slides when presenting your slide show. A
transition can be as simple as fading to the next slide, or it can be a flashy, eye-catching effect.
PowerPoint makes it easy to apply transitions to some or all your slides, giving your
presentation a polished, professional look.
There are three categories of unique transitions to choose from, all of which can be found on
the Transitions tab:
Department of Chemical Engineering (Mehran, UET)
Introduction to Computers and C++ Programming
Subtle: These are the most basic types of transitions. They use simple animations to move
between slides.
Figure 4.10: Subtle Transitions
Exciting: These use more complex animations to transition between slides. While they're more
visually interesting than Subtle transitions, adding too many can make your presentation look
less professional.
Figure 4.11: Exciting Transitions
Dynamic Content: If you're transitioning between two slides that use similar slide layouts,
dynamic transitions will move only the placeholders, not the slides themselves. When used
correctly, dynamic transitions can help to unify your slides and add a further level of polish to
your presentation.
Figure 4.12: Dynamic Content Transitions
4.3 Procedure
4.3.1 Creating a new presentation
Step 01: Select the File tab to go to Backstage view
Step 02: Select New on the left side of the window, then click Blank Presentation or choose a
theme.
Step 03: A new presentation will appear.
Department of Chemical Engineering (Mehran, UET)
Introduction to Computers and C++ Programming
4.3.2 Inserting new slide
Step 01: From the Home tab, click the bottom half of the New Slide command.
Step 02: Choose the desired slide layout from the menu that appears.
Step 03: The new slide will appear. Click any placeholder and begin typing to add text. You can
also click an icon to add other types of content, like a picture or a chart.
Step 04: To change the layout of an existing slide, click the Layout command, then choose the
desired layout.
4.3.2.1 Managing slides
Step 01: To duplicate slides, select the slide you wish to duplicate, right-click the mouse, and
choose Duplicate Slide from the menu that appears.
Step 02: To move a slide just click, hold, and drag the desired slide in the Slide Navigation pane
to the desired position.
Step 03: To delete a slide simply select the slide you wish to delete, then press the Delete or
Backspace key on your keyboard.
4.3.2.2 Customizing slides
Step 01: To change the slide size, select the Design tab, then click the Slide Size command.
Choose the desired slide size from the menu that appears (Widescreen 16-by-9 or standard 4-
by-3)
Step 02: To format slide background, select the Design tab, then click the Format Background
command. Finally select the desired fill options
Step 03: To apply a theme, select the Design tab on the Ribbon, then click the More drop-
down arrow to see all the available themes. Select the desired theme.
4.3.2.3 Applying Transitions
Step 01: Select the desired slide from the Slide Navigation pane. This is the slide that will appear
after the transition.
Step 02: Click the Transitions tab, then locate the Transition to This Slide group. By default,
None is applied to each slide.
Step 03: Click the More drop-down arrow to display all transitions.
Step 04: Click a transition to apply it to the selected slide. This will automatically preview the
transition.
Department of Chemical Engineering (Mehran, UET)
Introduction to Computers and C++ Programming
4.4.1 Word Art
PowerPoint allows you to add effects to the text inside of a text box, which is known as
WordArt. For the most part, the types of effects you can add are the same as the ones you can
add to shapes and text boxes (shadow, bevel, etc.). However, with WordArt, you can also
Transform the text to give it a wavy, slanted, or inflated look.
4.4.2 Chart
A chart is a tool you can use to communicate data graphically. Including a chart in a
presentation allows your audience to see the meaning behind the numbers, which makes it
easy to visualize comparisons and trends.
4.4.3 Animating Text and Objects
In PowerPoint, you can animate text and objects such as clip art, shapes, and pictures.
Animationโ€”or movementโ€”on the slide can be used to draw the audience's attention to
specific content or to make the slide easier to read.
There are many different animation effects, you can choose from, and they are organized into
four types:
Entrance: These control how the object enters the slide. For example, with the Bounce
animation the object will "fall" onto the slide and then bounce several times.
Figure 4.13: Entrance Animations
Emphasis: These animations occur while the object is on the slide, often triggered by a mouse
click. For example, you can set an object to Spin when you click the mouse.
Figure 4.14: Emphasis Animations
Exit: These control how the object exits the slide. For example, with the Fade animation the
object will simply fade away.
Figure 4.15: Exit Animations
Motion Paths: These are similar to Emphasis effects, except that the object moves within the
slide along a predetermined path, like a circle.
Department of Chemical Engineering (Mehran, UET)
Introduction to Computers and C++ Programming
Figure 4.16: Motion Paths Animations
4.5 Procedure
4.5.1 Inserting a picture
Step 01: Select the Insert tab, then click the Pictures command in the Images group.
Step 02: A dialog box will appear. Locate and select the desired image file, then click Insert.
Step 03: You can also click the Pictures command in a placeholder to insert images.
4.5.2 Applying WordArt style to a text
Step 01: Select a text box, or select some text inside of the
text box.
Step 02: On the Format tab, click the More drop-down arrow
in the WordArt Styles group.
Step 03: A drop-down menu of WordArt Styles will appear.
Select the style you want to use.
4.5.3 Inserting a shape
Step 01: Select the Insert tab, then click the Shapes command in the Illustrations group. A drop-
down menu of shapes will appear.
Step 02: Select the desired shape.
Step 03: Click, hold, and drag in the desired location to add the shape to the slide.
4.5.4 Inserting an audio
Step 01: From the Insert tab, click the Audio drop-down arrow, then select Audio on My PC.
Step 02: Locate and select the desired audio file, then click Insert.
4.5.5 Inserting an video
Step 01: From the Insert tab, click the Video drop-down arrow, then select Video on My PC,
trim the video's length, add a fade in, and much more.
Step 02: Locate and select the desired video file, then click Insert.
Department of Chemical Engineering (Mehran, UET)
Introduction to Computers and C++ Programming
4.5.6 Inserting a blank table
Step 01: From the Insert tab, click the Table command.
Step 02: A drop-down menu containing a grid of squares will appear. Hover the mouse over
the grid to select the number of columns and rows in the table.
Step 03: Click on the slide where you want to place the table. The table will appear.
Step 04: Click anywhere in the table, and begin typing to add text.
Step 05: You can now place the insertion point anywhere in the table to add text.
4.5.7 Modifying tables
4.5.7.1 To add a row or column
Step 01: Click a cell adjacent to the location where you wish to add a row or column.
Step 02: Click the Layout tab on the right side of the Ribbon.
Step 03: Locate the Rows & Columns group. If you want to insert a new row, select either Insert
Above or Insert Below. If you want to insert a new column, select either Insert Left or Insert
Right.
4.5.7.2 To delete a row or column
Step 01: Select the desired row or column by clicking any cell in that row or column, then select
the Layout tab.
Step 02: In the Rows & Columns group, click the Delete command, then select Delete Rows or
Delete Columns from the menu that appears.
4.5.8 To insert a chart
Step 01: Select the Insert tab, then click the Chart command in the Illustrations group.
Step 02: A dialog box will appear. Select a category from the left pane, and review the charts
that appear in the right pane.
Step 03: Select the desired chart, then click OK.
Department of Chemical Engineering (Mehran, UET)
Introduction to Computers and C++ Programming
Step 04: A chart and a spreadsheet will appear. The data that appears in the spreadsheet is
placeholder source data you will replace with your own information. The source data is used
to create the chart.
Department of Chemical Engineering (Mehran, UET)
Introduction to Computers and C++ Programming
Step 05: Enter data into the worksheet.
Step 06: When you're done, click the X to close the spreadsheet.
4.5.8.1 To apply an animation to an object
Step 01: Select the object you want to animate.
Step 02: On the Animations tab, click the More drop-down arrow in the Animation group.
Step 03: A drop-down menu of animation effects will appear. Select the desired effect.
Step 04: The effect will apply to the object. The object will have a small number next to it to
show that it has an animation. In the Slide pane, a star symbol also will appear next to the
slide.
4.5.8.2 To add multiple animations to an object
Step 01: Select an object.
Step 02: Click the Animations tab.
Department of Chemical Engineering (Mehran, UET)
Introduction to Computers and C++ Programming
Step 03: In the Advanced Animation group, click the Add Animation command to view the
available animations.
Step 04: Select the desired animation effect.
4.5.8.3 To open the Animation Pane
Step 01: From the Animations tab, click the Animation Pane command.
Step 02: The Animation Pane will open on the right side of the window. It will show all of the
effects for the current slide in the order in which they will appear.
Step 03: If you have several animated objects, it may help to rename the objects before
reordering them in the Animation Pane. You can rename them in the Selection Pane. Toopen
the Selection Pane, click an object, then from the Format tab click Selection Pane. Double-click
the name of an object to rename it.
4.5.8.4 To change an effect's start option
Step 01: On the Animation Pane, click and drag an effect up or down.
Step 02: The effects will reorder themselves.
Department of Chemical Engineering (Mehran, UET)
Introduction to Computers and C++ Programming
EXERCISE
Exercise 5.1: Create the following presentation in MS PowerPoint, use animations and transitions as
well.
Department of Chemical Engineering (Mehran, UET)
Introduction to Computers and C++ Programming
Department of Chemical Engineering (Mehran, UET)
Introduction to Computers and C++ Programming
Lab 06: To become familiar with C++ Program and
IDE Environment
Upon successful completion of this lab the students will be able to:
โ€ข Basic structure of C++ Program
โ€ข Codeblock as IDE
6.1 Tools
โ€ข PC
6.2 Background
6.2.1 Introducing IDE (Integrated Development Environment)
For C++ Program, in this subject we will make use of CodeBlocks. CodeBlocks is an open-
Source Cross platform IDE (Integrated Development environment), which is the graphical user
environment as it offers the capability of the mouse. It includes GCC, MSVC (Microsoft Visual
C Compiler), and also include many other compilers. Like many application CodeBlocks IDE is
a window with work area and formatting tool bar at the top. The text editor is the area where
the user writes source code (program). The following figure shows the IDE of CodeBlocks.
Figure 6.2.1.1: IDE Environment
The formatting bar at the top works same as in many other applications. To create a new
Project, open File menu -> New and click Project. You can also make use of create a new
project wizard. The wizard can be activated by clicking the โ€œCreate a New Projectโ€ option as
shown by highlighted black box in figure 6.2.1.1. That would open a welcome dialog box as
shown in figure 6.2.1.2. From this dialog box, we can choose project type from a list of variety
of projects.
Figure 6.2.1.2: Project Template Dialog Box
C++ is normally being used to create Console applications, therefore, we will select console
application and then click Go. Next, Project wizard will ask you to select the language that will
be used to program the project. CodeBlock by default support two languages to create console
applications as shows in the figure 6.2.1.3.
Figure 6.2.1.3: Language Selection Dialog Box
Upon pressing next, the wizard will ask to provide project name and to choose default
directories to save all project related files, as shown in figure 6.2.1.4.
Figure 6.2.1.4: Dialog Box for project related details
Finally the wizard will ask to choose the compiler that will be used for compilation and
execution of console applications. Among multiple compilers as supported by CodeBlocks, for
the time being selecting GCC compiler would be enough for basic C++ Programs as shown in
figure 6.2.1.5.
Figure 6.2.1.5: Compiler selection dialog box
Every C++ Project created by CodeBlock will by default have a single (.cpp) source file with a
very simple program which will print a single line of text as shown in figure 6.2.1.6.
Figure 6.2.1.6: Example Program (main.cpp)
The code is normally written in a text editor where every code statement is numbered. In
CodeBlocks text editor you can copy, paste, cut or delete certain block of code with some
hotkeys. Hotkeys for copy, paste, cut and delete are Ctrl+Insert, Shift+Insert, Shift+Delete,
Ctrl+Delete respectively.
6.2.2 Description of Basic C++ Program
Whenever you start any objective you first deal with the basics because the basics are roots
through which you can gain command on that objective. So here also we will start with a basic
source program. You can write any C++ source program into the CodeBlocks editor or any
other text editor like, Notepad or WordPad. Remember one thing that all the C++ source files
have the extension โ€œ.cppโ€. Let us examine this simple C++ source program named (main.cpp):
The program starts with the line containing a pound sign (#) and the keyword include. This
line is known as preprocessor directive. The preprocessor directives are the instructions to the
part of the compiler known as preprocessor which includes some extra files (codes) to the
basic source program. The files iostream.h is known as the header files which contain the
definitions of some functions. The iostream.h header file contains the definition of standard
input/output streams like, cout and cin. As the computer is just a dumb machine and cannot
understand anything until you instruct it and the keywords cout, cin are not understandable
to the computer so the header files tells the compile that cout is this thing and whenever used
do this. The words cout, are not known to the computer but the definitions of these codes are
written in header files and these definitions tell the computer how to deal with the words cout.
Simply speaking the preprocessor directive #include is responsible for including the contents
of the header files into the source file.
The main() is the function as the function is always along with the parentheses. The main()
function is the first executable function in any C++ program. No matter where the main()
function is located always the first precedence goes to the main() function and its contents.
The contents of main function are enclosed in curly braces. The ing before the main function
says that the function main has integer return type value and at the end of the function main()
will return a single integer value.
The braces โ€œ{ and }โ€ also known as curly braces, enclose the block of code present in any
function. โ€œ{โ€œ is known as the opening brace and โ€}โ€ is known as closing brace. Opening brace
shows the starting of the main or any function and closing brace shows the ending of the main
or any function. The code of each and every function is always enclosed in the curly braces.
The cout<<โ€Hello Word!โ€ tells the computer to print the string constant โ€œHello World!โ€ on the
console screen. However a computer cannot understand what cout is but the coding written
in iostream.h header file for cout makes the computer understand what does cout mean. The
cout is the standard output stream which directs the flow of data to the console screen. What
ever written in the double quotations in cout statement is printed as it is on the console screen.
The output of main.cpp on the console screen may look like as shown in figure 6.2.2.1;
Figure 6.2.2.1: Output of Example Program (main.cpp)
Lab 07: Getting familiar with Variables, Data Types
and Constants
Upon successful completion of this lab the students will be able to:
โ€ข Create Variables and constants of various data types in programs.
7.1 Tools
โ€ข PC
7.2 Background
7.2.1 Variables
The basic definition of the variable says that the variables are those memory locations whose
value can be varied/altered according to the particular situations. Like in other programming
languages variables are one of the major building blocks of C++ programming language. The
variables set the location into the memory and give it certain name so you can store certain
value and access the particular location of memory. The name given to the variable is known as
identifier. It is so called because it identifies/indicates certain memory location. In C++
programming language there are certain rules for identifiers so, being in the boundary of those
you can declare an identifier.
Some of the rules are given as:
1. The identifier can contain letters form a-z, numbers form 0-9 and an underscore sign.
2. The identifier can be in upper or lower case but the variable in upper case will differ from
the variable in lower i.e. ANS is not same as ans or Ans.
3. The first character of the identifier must be letter or an underscore sign.
4. The identifier should not contain any space (white space) within it.
5. You can also give underscore sign in the middle of the identifier as a space for your ease
for example, square inch.
6. The identifier must not be same as the keywordsโ€”the words predefined in C++ which
have their own specific meaning and function. Like, main, void, and return, cout, cin etc.
are keywords so the identifier should not be like them.
7. The identifier can be as long as you like, but only the first 247 characters (in Visual C++) or
250 characters (in C++ Builder) will be recognized.
8. The identifier must be unique throughout the program i.e. if you have declared the
identifier Var1 so, to access or call it you must give its same name i.e. Var1.
Some valid identifiers are:
Var, var, VAR, Var1, VAR1, Var_one, _Var1, _Var_one_of_one etc.
Some of invalid identifiers are:
1Var, 1_var, void, cout, etc.
7.2.2 Declaring and Defining a Variable
You might think that the two words declaring and defining are equivalent but in fact there is a lot
of difference between both of them. The declaring is the process of giving a name to the variable
and its data type. The data type means that which type of value will be stored in that variable
whereas the name of the variable must follow the identifier rules of C++.
int var1;
The above line is an example of declaring a variable in which the variable is given the name var1
and integer data type declared for it which tells the computer that the value stored in the variable
var1 must be an integer.
Whereas the process of initializing certain value to the variable at the time of declaration is referred
to as defining a variable. The line below illustrated the concept of defining a variable:
int var1=50;
In above line the variable var1 is initialized with the integer value 50.
In defining a variable we set/initialize some values to the variable before the compiling.
var1 var1
Variable Declared Variable Defined
int var1; int var1=50;
Examine the below program (Var.cpp) which initializes and declares some variables:
Program (Var.cpp)
#include <iostream.h>
#include <conio.h>
int main()
{
clrscr();
int mixture;
int ethane=5, methane=8, propane=2;
mixture=(ethane + methane + propane);
cout<<โ€There are โ€<<ethane<<โ€ dm cube of ethaneโ€<<endl;
cout<<โ€There are โ€<<methane<<โ€ dm cube of methaneโ€<<endl;
cout<<โ€There are โ€<<propane<<โ€ dm cube of propaneโ€<<endl;
50
Memory Memory
Empty
cout<<โ€There are โ€<<mixture<<โ€ dm cube cubes of mixtureโ€;
return 0;
}
The above program starts with two preprocessor directives which include two header files which
contain definitions of some functions and keywords as, cout and clrscr(). Then in main function
one variable mixture is declared and three variables ethane, methane and propane are defined.
The first variable mixture is only declared as it is only given the name and its data type and no
value is set in the memory location of the variable. Where as in the second variable initialization
statement the memory location is set for the three variables and a certain value is initialized to the
memory location of the variables. The last four cout statements prints the values of the variable
stored in to them on the console screen with some strings.
7.2.3 Data Type
A The variables are the fundamental building blocks of C++ as discussed earlier, which set the
memory location by giving them certain names. The variables can store certain data/values into
those memory locations but the data/values stored in to the variables are of different types and
occupy different sizes of memories.
7.2.3.1 Integer Data Type
The numeric data having no fractional/decimal part is known as integer data. The integer data
type variables can only store and represent integer data. The integer data type is of three types
i.e. type int, type short and type long.
Type int occupies 4 bytes (32 bits) of memory. In type int you can store the integers with in the
rage of -2,147,483,648 to 2,147,483,647. To define or declare a type int variable use the keyword
int before the variable name like,
int var1= 100000000;
Type short occupies 2 bytes (16 bits) of memory. In type short you can store the integers within
the range of -32,768 to 32,767. To define or declare a type short variable use the keyword short
before the variable name like,
short var1=10;
Type long occupies 4 bytes (32 bits) of memory. In type long you can store the integers with in
the rage of -2,147,483,648 to 2,147,483,647. To define or declare a type long variable use the
keyword long before the variable name and place the letter L after the integer constant like,
long var1=100000000L;
Program (integer.cpp)
#include <iostream.h>
int main()
{
int a=10000;
long b=20000;
short c=5;
cout<<โ€Integer = โ€<<a<<endl;
cout<<โ€Long = โ€<<b<<endl;
cout<<โ€Short = โ€<<c;
return 0;
}
7.2.3.2 Floating Point Data Type
The numeric data having fractional/decimal part is known as floating point data. The floating point
data type variables can store and represent floating point data. The floating point data type is of
three types i.e. type float, type double and type long double.
Type float occupies 4 bytes (32 bits) of memory. In type float you can store the floating point
values within the range of 3.8 x 10-38 to 3.8 x 1038 with the precision of seven (7) digits. To define
or declare a type float variable use the keyword float before the variable name and place the letter
F after the floating point constant like,
float PI=3.1415F; but placing F is optional.
The other two floating point data types are same as type float but they offer wider range of values
and precisions.
Type double occupies 8 bytes (64 bits) of memory. In type double you can store the floating point
values within the range of 1.7 x 10-308 to 1.7 x 10308 with the precision of fifteen (15) digits. To
define or declare a type double variable use the keyword double before the variable name like,
double PI=3.141592654;
Type long double occupies 10 bytes (80 bits) of memory. In type long double you can store the
floating point values within the range of 1.2 x 10-4932 to 1.2 x 104932 with the precision of
nineteen (19) digits. To define or declare a type long double variable use the keyword long double
before the variable name and place the letter L after the floating point constant like,
long double PI=3.141592654546845348645454L; but placing L is optional.
In floating point data types you can write the floating point constants using exponential notation,
which is the way to write very large or very small numbers in the power of ten. Like instead of
writing 2,000,000,0 you can write 1.0E7 in exponential notation. Similarly for 52347.2 you can write
5.2E4 and for 0.0000006024 you can write 6.02E-7.
double atoms=6.02E-7;
If you want to define a floating point variable then in type float place a letter F in the end of the
constant number, in type double you donโ€™t have to identify the complier that it is a constant value
it considers it as default but in type long double you have to place the letter L after the constant
number. But placing F and L is optional.
float PI=3.1415F;
double PI=3.141592654;
long double PI=3.141592654546845348645454L;
You can also make the value of the floating point variable constant throughout the function by
using the constant qualifier i.e. const. To define a constant floating point variable place the
keyword const before the data type of the variable as in:
const float PI=3.1415F;
const double PI=3.141592654;
const long double PI=3.141592654546845348645454L;
Examine the following program:
Program (area.cpp)
#include <iostream.h>
int main()
{
const float PI=3.14F;
int radius;
float area;
cout<<โ€Enter the radius of the circle: โ€;
cin>>radius;
area=PI*(radius*radius);
cout<<โ€The area of the circle is: โ€<<area;
return 0;
}
This program defines the constant value of the variable PI and declares the integer variable radius
and a type float variable area. The program gets the value of radius during the run-time in integer
type and then puts it in the expression area=PI*(radius*radius) and calculates the value of area
and finally shows the value of area.
7.2.3.3 Character Data Type
The data containing individual characters is known as character data. The character data type
variables can only store and represent the characters. The character data type variables can only
store single character at a time in a single variable.
Type char occupies 1byte (eight bits) of the memory. In type char you can store the characters
within the range of integers -128 to 127, whereas the integers -128 to 127 represent the ASCII
equivalents to the characters. To declare a character data type use keyword char before the
variable name as in,
char ch;
The above declaration indicates that the variable ch is a character type data variable and in the
program it will only store the characters. And to define a variable you can either give the character
in single quotation marks or you can give the ASCII equivalent to that character. For example if we
want to store the character A (capital A letter) in the variable ch then we can write as in,
char ch=โ€™Aโ€™;
char ch=65;
In first line the character A is enclosed in single quotation marks so the character A will be store in
the variable ch where as in second line the number 65 is the ASCII equivalent to the character A
so the computer will translate it in to character A and will store it in the variable ch. No matter
which method you perform the aim of both the methods is same.
Examine the following program:
Program (char.cpp)
#include <iostream.h>
int main()
{
char ch;
cout<<โ€Enter any character: โ€;
cin>>ch;
cout<<โ€you have entered:โ€<<ch;
return 0;
}
Table 7.2.3.3.1: Data Type Ranges
Numerical Range Digits of Bytes of
Keyword Low High Precision Memory
char -128 127 n/a 1
short -32,768 32,767 n/a 2
int -2,147,483,648 2,147,483,647 n/a 4
long -2,147,483,648 2,147,483,647 n/a 4
float 3.4 x 10-38
3.4 x 1038
7 4
double 1.7 x 10-308
1.7 x 10308
15 8
long double 1.2 x 10-4932
1.2 x 104932
19 10
7.2.3.4 Unsigned Data Type
The data types int, short, long and char have their range with in which they can store certain
values and these ranges start from some negative number to positive number. So by eliminating
negative numbers we can extend the size of the data types. Doing this will make the data types to
store large values as twice as the signed data types do.
The unsigned data types are used when we are dealing with only positive numbers. To convert a
signed data type into an unsigned data type place the keyword unsigned before the data type as
in,
unsigned int var1=12000;
Type unsigned char occupies 1 byte (8 bits) of memory. In type unsigned char you can store the
characters within the range of integers 0 to 255, where as the integers 0 to 255 represent the ASCII
equivalents to the characters. To declare an unsigned char data type variable use keywords
unsigned char before the variable name as in,
unsigned char ch=250;
Type unsigned short occupies 2 bytes (16 bits) of memory. In type unsigned short you can store
the integers within the range of 0 to 65,535. To declare an unsigned short data type variable use
the keywords unsigned short before the variable name as in,
unsigned short var1=50;
Type unsigned int and type unsigned long occupy 4 bytes (32 bits) of memory. In both the data
types you can store the integers within the range of 0 to 4,294,967,295. To declare an unsigned
int and unsigned long data type use the keywords unsigned int and unsigned long respectively
before the variable names as in,
unsigned int var1=10000;
unsigned long var1=10000;
Table 7.2.3.4.1: Unsigned data types and their ranges
Numerical Range Bytes of
Keywords Low High Memory
char 0 255 1
short 0 65,535 2
int 0 4,294,967,295 4
long 0 4,294,967,295 4
7.2.3.5 The Const Qualifier
The keyword const is known as the constant qualifier. It specifies that the value of the variable will
remain constant and will not be altered throughout the function. If any attempt is made to alter
the value of the variable the compiler will give the error. It is always placed before the data type
of the variable as in,
const float PI=3.1415F;
It specifies that the variable PI stores the floating point number 3.1415 and this value will not be
altered and will remain constant.
Examine the following program:
Program (const.cpp)
#include <iostream.h>
int main()
{
const int a=15;
int b=10,c;
b=b+1;
c=a+b;
cout<<c;
return 0;
}
Lab 08: Getting familiar with Operators in C++
Upon successful completion of this lab the students will be able to:
โ€ข Use different operators in C++ Programs.
8.1 Tools
โ€ข PC
8.2 Background
8.2.1 Arithmetic Operators
The arithmetic operators are those who perform some arithmetic operations on the numbers.
There are five arithmetic operators +, -, *, / and %. These are used for addition, subtraction,
multiplication, division and remainder respectively. They have the same purpose in C++ as in other
languages. The first four operators have the same functionality as they posses in algebra. The fifth
operator is known as remainder operator it finds the remainder when one number divides another.
It is also known as modulus operator. It is denoted by % percentage sign. The first four arithmetic
operators work on all data types but the remainder operator only works on integer variable (type
short, type int, type long).
Program (arith.cpp)
#include <iostream.h>
#include <conio.h>
void main()
{
int a=10, b=5;
cout<<(a+b)<<endl; // 15
cout<<(a-b)<<endl; // 5
cout<<(a*b)<<endl; // 50
cout<<(a/b)<<endl; // 2
cout<<(a%b)<<endl; // 0
getch();
}
In the first cout statement the variables a and b are added, in second the variables are subtracted,
in third the variables are multiplied, in fourth the variables are divided and in fifth the variable are
remaindered. The output of this program is:
15
5
50
2
0
8.2.2 Arithmetic Assignment Operators
The operators used in assignment statements to shorten and clarify the code are known as
arithmetic assignment operators. They are +=, -=, *=, /= and %=. In some situation probably you
would have faced some statements like,
a=a+b;
b=b-10;
var1=var1*50;
var1=var1/var2;
In these statements a certain value is given to a variable by performing some arithmetic operation
but one variable is used twice in the statements which is really stretching therefore C++ also offer
other approach to shorten and make the assignment statements more clearer. In this approach
you can use the arithmetic assignment operators +=, -=, *=, /= and %= which have the same
effects as above.
In C++ a=a+1; and a+=1; have the same effects. Some other equivalents are,
electrons += 1; is same as electrons=electrons+1;
electrons -= 1; is same as electrons=electrons-1;
electrons *= 1; is same as electrons=electrons*1;
electrons /= 1; is same as electrons=electrons/1;
electrons %= 1; is same as electrons=electrons%1;
Program (arithassign.cpp)
#include <iostream.h>
int main()
{
int boxes=40;
cout<<boxes<<endl;
boxes += 10; //boxes = 50
cout<<boxes<<endl;
boxes -= 20; //boxes = 30
cout<<boxes<<endl;
boxes *= 2; //boxes = 60
cout<<boxes<<endl;
boxes /= 5; //boxes = 12
cout<<boxes<<endl;
boxes %= 5; //boxes = 2
cout<<boxes;
return 0;
}
8.2.3 Relational Operators
The relational operators are the operators which compares the operands. There are only two
possible values that the relational operators can give after performing the operation on the
operands i.e. 0 or 1. If the condition becomes true when the operands are compared with relational
operators we get the value 1. On the other hand if the condition becomes false when the operands
are compared with relational operators we get the value 0. There are six relational operators they
are, Greater than >, Less than <, Equal to =, Not equal to !=, Greater than or equal to >=, Less
than or equal to <=.
Program (relat.cpp)
#include <iostream.h>
int main()
{
int a=10, b=5;
cout<<โ€a>b is โ€<<(a>b)<<endl; // 1
cout<<โ€a<b is โ€<<(a<b)<<endl; // 0
cout<<โ€a==b is โ€<<(a==b)<<endl; // 0
cout<<โ€a!=b is โ€<<(a!=b)<<endl; // 1
cout<<โ€a>=b is โ€<<(a>=b)<<endl; // 1
cout<<โ€a<=b is โ€<<(a<=b)<<endl; // 0
return 0;
}
Table 8.2.3.1: List of Relational Operators
Operator Meaning
> Greater than
< Less than
== Equal to
!= Not equal to
>= Greater than or equal to
<= Less than or equal to
8.2.4 Logical Operators
Logical operators logically combine the Boolean variables (0 and 1). There are three logical
operators And &&, OR || and Not !. They have wide scope when used with relational operators.
They combine the Boolean value obtained by relational operators. Like in relational operators we
can only compare two operands and get the true or false value of only single comparison but if
we want to make the condition satisfied only when the two or more comparison are satisfied then
we use logical operators.
And && operator combines the Boolean values and makes the condition satisfied only when all
the comparisons are satisfied as,
(a>b && a>c && a>d)
OR || operator combines the Boolean values and makes the condition satisfied when atleast one
comparison becomes true as,
(a>b || a>c || a>d)
Not ! operator combines the Boolean values and makes the condition satisfied only when all the
comparisons become false as,
(!(a>b)&& !(a>c)&& !(a>d))
Program (logic.cpp)
#include <iostream.h>
#include <conio.h>
void main()
{
int a=2, b=3, c=4;
cout<<(a>b && a>c)<<endl; // 0
cout<<(a>b || a>c)<<endl; // 0
cout<<(b>a || c>b)<<endl; // 1
cout<<(!(a>b) && !(a>c)); // 1
getch();
}
Table 8.2.4.1: List of Logical Operators
Operator Effect
&& Logical AND
|| Logical OR
! Logical NOT
Exercise
1. Write a program that will compute the area of a circle. The user must enter the radius of the
circle. Use the following formula for area A=3.14*R^2?
2. Write a program that will solve for the power dissipation of a resistor when the voltage across
the resistor and the current in the resistor are known. The relationship for the power
dissipation is: P=I^2*R?
3. Develop a program that will convert the temperature from degree Celsius to degree
Fahrenheit. User input the temperature in Celsius. The relation is F=5/9*C+32?
Test Expression
Lab 09: To become familiar with Decision making
statements in C++
Upon successful completion of this lab the students will be able to:
โ€ข Use decision making statements in program applications.
9.1 Tools
โ€ข PC
9.2 Background
9.2.1 Decision Making statements
Decision making statements are the statements which take the decisions to make the conditions
satisfied and execute their body. If the condition is satisfied (True) then the statement will cause
its body to be executed and if the condition is not satisfied (False) then the control will be
transferred to the next condition or to the first statement after the body of the conditional
statement. There are three types of decision making statement also known as conditional
statements. These are so called conditional statements because they depend on certain conditions.
They are,
1. The if Statement
2. The if-else Statement
3. The switch Statement
9.2.2.1 The If Statement
It is the simplest decision making/conditional statement. The if statement contains the keyword if
which is predefined in C++ followed by the condition in the parentheses () with some relational
and logical operators. If the condition is satisfied then the body of the if statement will be executed
else the control will be transferred to the first existing statement after the if statement. If the body
of the if statement contains only single statement then you donโ€™t have to enclose that statement
in the braces but in case of multiple statements you should enclose the block of code in the curly
braces. The syntax of the if statement is given below;
Test expression
if (a>b && a>c)
statement; Single Statement if body
if (a>b && a>c)
{
statement;
statement; Multiple Statement if body
statement;
}
Figure 9.2.2.1.1: Flow chart of If Statement
Program (If.cpp)
#include <iostream.h>
#include <conio.h>
void main()
{
int Age1=20, Age2=15, Age3=7;
if(Age1>Age2&&Age1>Age3)
{
cout<<โ€Person with Age1 is elderโ€<<endl;
cout<<โ€Persons with Age2 and Age3 are youngerโ€;
}
getch();
}
9.2.2.2 The If Statement
The if-else statement is another decision making statement. The if-else statement contains the
keywords if and else which are predefined in C++. The condition is contained in the parentheses
() after the keyword if. If the condition is satisfied then the block of code after the keyword if is
executed while if the condition is not satisfied then the control is transferred to the else and the
block of code contained after it is executed. If you want to execute the single statement if the
condition is either satisfied or not then you donโ€™t have to enclose it in the curly braces but if you
want to execute certain block of code (multiple statements) then you have to enclose the block of
code in the curly braces. The syntax of the if-else statement is given below;
Test
Expression
Body of if
False
True
Exit
Test Expression
Test Expression
if (a>b && a>c)
statement; Single Statement if body
else
statement; Single Statement else body
if (a>b && a>c)
{
statement;
statement; Multiple Statement if body
statement;
}
else
{
statement;
statement; Multiple Statement else body
statement;
}
Test
Expression
Body of if
Exit
False
True
Body of else
Figure 9.2.2.2.1: Flow chart of If-else statement
Integer or character variable
Note: no semicolon here
Integer or character constant
First case body
Causes exit from switch
Second case body
Program (IfElse.cpp)
#include <iostream.h>
#include <conio.h>
int main()
{
int num1=100, num2=50;
if(num1>num2)
{
cout<<โ€First number is greaterโ€<<endl;
cout<<โ€Second number is smallerโ€;
}
else
{
cout<<โ€First number is smallerโ€<<endl;
cout<<โ€Second number is greaterโ€;
}
return 0;
}
9.2.2.3 The switch statement
The switch statement is also the decision making statement like if statement and if-else statement.
The switch statement is used when the bunch of decisions depend on the same variable. It works
as if and if-else statements but it is somewhat clearer and easily understandable at glance. The
switch statement starts with the keyword switch (lower case) followed by the variable in the
parentheses (). The switch statement takes the decision according to the values of the variable in
the parenthesis. The whole body of the switch statement is enclosed by curly braces. Then the
switch statement matches the values of the variable with the cases in its body. The keyword case
followed by the choice and the colon makes the block of code below it to be executed if the value
of the switch variable matches with the choice in the case. You can give multiple cases in the switch
statement and the switch statement will try to match the value of the variable with the cases and
if no case is matched the control is returned to the default. The key word default followed by the
colon causes the block of code below it to be executed if the switch statement does not match
any of the case. The break statement is used after the block of code in each case, which causes the
control to be transferred out of the switch statement whenever the case executes its block of code.
The syntax of the switch statement is given below;
switch (ch)
{
case 1:
statement;
statement;
break;
case 2:
statement;
Third case body
Default case body
Note: no semicolon here
statement;
break;
case 3:
statement;
statement;
break;
default:
statement;
statement;
}
True
True
True
Switch variable
equals 1st case
constant
1st
case body
False
Switch variable
equals 2nd case
constant
Switch variable
equals 3rd case
constant
2nd
case body
3rd
case body
Default body
False
False
Exit
Figure 9.2.2.3.1: Flow chart of the switch statement
Program (Switch.cpp)
#include <iostream.h>
#include <conio.h>
int main()
{
int a, b;
char ch;
cout<<โ€Enter first number: โ€œ;
cin>>a;
cout<<โ€Enter second number: โ€œ;
cin>>b;
cout<<โ€Enter the operator: โ€œ;
ch=getche();
cout<<endl;
switch(ch)
{
case โ€˜+โ€™:
cout<<โ€a + b = โ€<<a+b;
break;
case โ€˜-โ€™:
cout<<โ€a - b = โ€<<a-b;
break;
case โ€˜*โ€™:
cout<<โ€a * b = โ€<<a*b;
break;
case โ€˜/โ€™:
cout<<โ€a / b = โ€<<a/b;
break;
default:
cout<<โ€You have entered the wrong operatorโ€;
}
return 0;
}
Exercise
1. Write a program that determines the year entered by user is leap year or not?
2. Write a program which gives the following output
Enter age>>
And prints the following:
If Age is greater than 45 then prints the message โ€œYou are old stay at home and wait for callโ€
If Age is greater than 30 and less than 45 then prints โ€œHey! man enjoy your life with your kidsโ€
If Age is greater than 20 and less than 30 then prints โ€œCool! have a search for your best suitโ€
If Age is greater than 10 and less than 20 then prints โ€œWork hard! Your days to studyโ€
If Age is less than 10 then prints the message โ€œOh! Kid your days to cryโ€
Use if-else statement.
3. Write the above program #02 by using the switch statement?
4. Develop a C++ program which will compute the power dissipation of a resistor, when the user
inputs current value and the resistance. Program warns the user if power dissipation is above
1 watt. The power dissipation is measured by P=I2R.

More Related Content

What's hot

Project input devices
Project input devicesProject input devices
Project input devices
sumudusampath
ย 
Hardware performance
Hardware performanceHardware performance
Hardware performance
BeeducatorComputer
ย 
Cs chapter 3
Cs   chapter 3Cs   chapter 3
Cs chapter 3
Manula Jayasundara
ย 
Output devices
Output devicesOutput devices
Output devices
Raul Correa
ย 
Input output devices (saniya shaikh)
Input output devices (saniya shaikh)Input output devices (saniya shaikh)
Input output devices (saniya shaikh)
Saniya shaikh
ย 
Working of input and output devices
Working of input and output devicesWorking of input and output devices
Working of input and output devicesDevika Rangnekar
ย 
Input a-nd-output-devices2883
Input a-nd-output-devices2883Input a-nd-output-devices2883
Input a-nd-output-devices2883
Rahul Sajnani
ย 
Input devices, Output devices , It's Types and CPU
Input devices, Output devices  , It's Types and CPUInput devices, Output devices  , It's Types and CPU
Input devices, Output devices , It's Types and CPU
ArpitaVajpayee
ย 
Unit 1 two part hw sw os app sw
Unit 1 two part hw sw os app swUnit 1 two part hw sw os app sw
Unit 1 two part hw sw os app sw
Neha Kurale
ย 
Basic components
Basic componentsBasic components
Basic components
Raul Correa
ย 
Introduction to Computer
Introduction to Computer Introduction to Computer
Introduction to Computer Sarah Abdussalam
ย 
information technology
information technologyinformation technology
information technology
akash gupta
ย 
Introduction to Computers Slides
Introduction to Computers SlidesIntroduction to Computers Slides
Introduction to Computers Slides
Saide OER Africa
ย 
Presentation on input devices...
Presentation on input devices... Presentation on input devices...
Presentation on input devices...
simmi khera
ย 
INPUT and OUTPUT facts
INPUT and OUTPUT factsINPUT and OUTPUT facts
INPUT and OUTPUT facts
Angelique Lopez
ย 
Input and output devices ppt
Input and output devices pptInput and output devices ppt
Input and output devices ppt
bjslides
ย 
project on input output devie
project on input output devieproject on input output devie
project on input output devieRaunak Sodhi
ย 
Introduction To Computer
Introduction To ComputerIntroduction To Computer
Introduction To Computer
Abu Bakar Soomro
ย 
Input / Output Devices
Input / Output DevicesInput / Output Devices

What's hot (20)

Project input devices
Project input devicesProject input devices
Project input devices
ย 
Hardware performance
Hardware performanceHardware performance
Hardware performance
ย 
Cs chapter 3
Cs   chapter 3Cs   chapter 3
Cs chapter 3
ย 
Output devices
Output devicesOutput devices
Output devices
ย 
Input output devices (saniya shaikh)
Input output devices (saniya shaikh)Input output devices (saniya shaikh)
Input output devices (saniya shaikh)
ย 
Input
InputInput
Input
ย 
Working of input and output devices
Working of input and output devicesWorking of input and output devices
Working of input and output devices
ย 
Input a-nd-output-devices2883
Input a-nd-output-devices2883Input a-nd-output-devices2883
Input a-nd-output-devices2883
ย 
Input devices, Output devices , It's Types and CPU
Input devices, Output devices  , It's Types and CPUInput devices, Output devices  , It's Types and CPU
Input devices, Output devices , It's Types and CPU
ย 
Unit 1 two part hw sw os app sw
Unit 1 two part hw sw os app swUnit 1 two part hw sw os app sw
Unit 1 two part hw sw os app sw
ย 
Basic components
Basic componentsBasic components
Basic components
ย 
Introduction to Computer
Introduction to Computer Introduction to Computer
Introduction to Computer
ย 
information technology
information technologyinformation technology
information technology
ย 
Introduction to Computers Slides
Introduction to Computers SlidesIntroduction to Computers Slides
Introduction to Computers Slides
ย 
Presentation on input devices...
Presentation on input devices... Presentation on input devices...
Presentation on input devices...
ย 
INPUT and OUTPUT facts
INPUT and OUTPUT factsINPUT and OUTPUT facts
INPUT and OUTPUT facts
ย 
Input and output devices ppt
Input and output devices pptInput and output devices ppt
Input and output devices ppt
ย 
project on input output devie
project on input output devieproject on input output devie
project on input output devie
ย 
Introduction To Computer
Introduction To ComputerIntroduction To Computer
Introduction To Computer
ย 
Input / Output Devices
Input / Output DevicesInput / Output Devices
Input / Output Devices
ย 

Similar to Introduction of Computers & C++ Programming

Cs input and output devices
Cs input and output devicesCs input and output devices
Cs input and output devices
Sweta Kumari Barnwal
ย 
Input and output devices
Input and output devicesInput and output devices
Input and output devices
Aamna Haneef
ย 
Input and output devices.pdf
Input and output devices.pdfInput and output devices.pdf
Input and output devices.pdf
AyeshaIftikhar67
ย 
Computer hardware-peripherals compress
Computer hardware-peripherals compressComputer hardware-peripherals compress
Computer hardware-peripherals compress
Kefyalew Temesgen
ย 
computerComputer
computerComputercomputerComputer
computerComputer
Prajwal Kodoth
ย 
Unit 2 Basic Computer Organization and Computer Peripherals By Sulav Acharya
Unit 2 Basic Computer Organization and Computer Peripherals By Sulav AcharyaUnit 2 Basic Computer Organization and Computer Peripherals By Sulav Acharya
Unit 2 Basic Computer Organization and Computer Peripherals By Sulav Acharya
AchSulav
ย 
Introduction to Computer System-ppt-converted.pptx
Introduction to Computer System-ppt-converted.pptxIntroduction to Computer System-ppt-converted.pptx
Introduction to Computer System-ppt-converted.pptx
ShivanjaliChaurasia1
ย 
Organizationofacomputer and components
Organizationofacomputer and componentsOrganizationofacomputer and components
Organizationofacomputer and components
Ramakrishna Reddy Bijjam
ย 
Random 120507151041-phpapp02
Random 120507151041-phpapp02Random 120507151041-phpapp02
Random 120507151041-phpapp02Yazeed Khalid
ย 
Presentation(Input,output,stoarage)
Presentation(Input,output,stoarage)Presentation(Input,output,stoarage)
Presentation(Input,output,stoarage)
Maribel subteniente
ย 
Lec # 06 Computer Hardware (IO Devices)-1.pdf
Lec # 06 Computer Hardware (IO Devices)-1.pdfLec # 06 Computer Hardware (IO Devices)-1.pdf
Lec # 06 Computer Hardware (IO Devices)-1.pdf
farantouqeer8
ย 
Lec # 06 Computer Hardware (IO Devices)-1.pptx
Lec # 06 Computer Hardware (IO Devices)-1.pptxLec # 06 Computer Hardware (IO Devices)-1.pptx
Lec # 06 Computer Hardware (IO Devices)-1.pptx
tayyab181034
ย 
inputandoutputdevices-170914200150.pdf
inputandoutputdevices-170914200150.pdfinputandoutputdevices-170914200150.pdf
inputandoutputdevices-170914200150.pdf
JohnPeterPaulGarces
ย 
Input and output devices
Input and output devicesInput and output devices
Input and output devices
Danyal Ahmad
ย 
Input and output devices
Input and output devices Input and output devices
Input and output devices
AMZAD KHAN
ย 
Components of digital computer
Components of digital computerComponents of digital computer
Components of digital computer
Vanitha Kumari
ย 
Computer fundamentals
Computer fundamentalsComputer fundamentals
Computer fundamentals
christeena francis
ย 
chapter 2.pptx
chapter 2.pptxchapter 2.pptx
chapter 2.pptx
Eyersu Selemon
ย 
Week-2_CSS9.pptx
Week-2_CSS9.pptxWeek-2_CSS9.pptx
Week-2_CSS9.pptx
EdelmarBenosa3
ย 
Peripheral devices
Peripheral devicesPeripheral devices
Peripheral devices
Burhan Ahmed
ย 

Similar to Introduction of Computers & C++ Programming (20)

Cs input and output devices
Cs input and output devicesCs input and output devices
Cs input and output devices
ย 
Input and output devices
Input and output devicesInput and output devices
Input and output devices
ย 
Input and output devices.pdf
Input and output devices.pdfInput and output devices.pdf
Input and output devices.pdf
ย 
Computer hardware-peripherals compress
Computer hardware-peripherals compressComputer hardware-peripherals compress
Computer hardware-peripherals compress
ย 
computerComputer
computerComputercomputerComputer
computerComputer
ย 
Unit 2 Basic Computer Organization and Computer Peripherals By Sulav Acharya
Unit 2 Basic Computer Organization and Computer Peripherals By Sulav AcharyaUnit 2 Basic Computer Organization and Computer Peripherals By Sulav Acharya
Unit 2 Basic Computer Organization and Computer Peripherals By Sulav Acharya
ย 
Introduction to Computer System-ppt-converted.pptx
Introduction to Computer System-ppt-converted.pptxIntroduction to Computer System-ppt-converted.pptx
Introduction to Computer System-ppt-converted.pptx
ย 
Organizationofacomputer and components
Organizationofacomputer and componentsOrganizationofacomputer and components
Organizationofacomputer and components
ย 
Random 120507151041-phpapp02
Random 120507151041-phpapp02Random 120507151041-phpapp02
Random 120507151041-phpapp02
ย 
Presentation(Input,output,stoarage)
Presentation(Input,output,stoarage)Presentation(Input,output,stoarage)
Presentation(Input,output,stoarage)
ย 
Lec # 06 Computer Hardware (IO Devices)-1.pdf
Lec # 06 Computer Hardware (IO Devices)-1.pdfLec # 06 Computer Hardware (IO Devices)-1.pdf
Lec # 06 Computer Hardware (IO Devices)-1.pdf
ย 
Lec # 06 Computer Hardware (IO Devices)-1.pptx
Lec # 06 Computer Hardware (IO Devices)-1.pptxLec # 06 Computer Hardware (IO Devices)-1.pptx
Lec # 06 Computer Hardware (IO Devices)-1.pptx
ย 
inputandoutputdevices-170914200150.pdf
inputandoutputdevices-170914200150.pdfinputandoutputdevices-170914200150.pdf
inputandoutputdevices-170914200150.pdf
ย 
Input and output devices
Input and output devicesInput and output devices
Input and output devices
ย 
Input and output devices
Input and output devices Input and output devices
Input and output devices
ย 
Components of digital computer
Components of digital computerComponents of digital computer
Components of digital computer
ย 
Computer fundamentals
Computer fundamentalsComputer fundamentals
Computer fundamentals
ย 
chapter 2.pptx
chapter 2.pptxchapter 2.pptx
chapter 2.pptx
ย 
Week-2_CSS9.pptx
Week-2_CSS9.pptxWeek-2_CSS9.pptx
Week-2_CSS9.pptx
ย 
Peripheral devices
Peripheral devicesPeripheral devices
Peripheral devices
ย 

More from Mujeeb UR Rahman

Shell Energy Balance
Shell Energy BalanceShell Energy Balance
Shell Energy Balance
Mujeeb UR Rahman
ย 
Transport Phenomena
Transport PhenomenaTransport Phenomena
Transport Phenomena
Mujeeb UR Rahman
ย 
Transport phenomena (Continuity Equation)
Transport phenomena (Continuity Equation)Transport phenomena (Continuity Equation)
Transport phenomena (Continuity Equation)
Mujeeb UR Rahman
ย 
MS PowerPoint
MS PowerPointMS PowerPoint
MS PowerPoint
Mujeeb UR Rahman
ย 
Introduction Microsoft PowerPoint
Introduction Microsoft PowerPointIntroduction Microsoft PowerPoint
Introduction Microsoft PowerPoint
Mujeeb UR Rahman
ย 
Introduction Microsoft Word
Introduction Microsoft WordIntroduction Microsoft Word
Introduction Microsoft Word
Mujeeb UR Rahman
ย 
Liquid-Liquid Extraction Report
Liquid-Liquid Extraction ReportLiquid-Liquid Extraction Report
Liquid-Liquid Extraction Report
Mujeeb UR Rahman
ย 
Pollution Control Engineering
Pollution Control EngineeringPollution Control Engineering
Pollution Control Engineering
Mujeeb UR Rahman
ย 
Thin Layer Chromatography
Thin Layer ChromatographyThin Layer Chromatography
Thin Layer Chromatography
Mujeeb UR Rahman
ย 
NACA Regula Falsi Method
 NACA Regula Falsi Method NACA Regula Falsi Method
NACA Regula Falsi Method
Mujeeb UR Rahman
ย 
Quality Control in Glycerin
Quality Control in GlycerinQuality Control in Glycerin
Quality Control in Glycerin
Mujeeb UR Rahman
ย 
Quality Control in Milk
Quality Control in MilkQuality Control in Milk
Quality Control in Milk
Mujeeb UR Rahman
ย 
Numerical Analysis and Computer Applications
Numerical Analysis and Computer ApplicationsNumerical Analysis and Computer Applications
Numerical Analysis and Computer Applications
Mujeeb UR Rahman
ย 
Chemical engineering department
Chemical engineering departmentChemical engineering department
Chemical engineering department
Mujeeb UR Rahman
ย 
Basic commands in C++
Basic commands in C++Basic commands in C++
Basic commands in C++
Mujeeb UR Rahman
ย 
Urea Manufacturing Process PFD
Urea Manufacturing Process PFDUrea Manufacturing Process PFD
Urea Manufacturing Process PFD
Mujeeb UR Rahman
ย 
Chemical Reaction Engineering
Chemical Reaction EngineeringChemical Reaction Engineering
Chemical Reaction Engineering
Mujeeb UR Rahman
ย 
Thermodynemics
ThermodynemicsThermodynemics
Thermodynemics
Mujeeb UR Rahman
ย 
Renewable energy
Renewable energyRenewable energy
Renewable energy
Mujeeb UR Rahman
ย 
Mass transfer lab equipment's
Mass transfer lab equipment'sMass transfer lab equipment's
Mass transfer lab equipment's
Mujeeb UR Rahman
ย 

More from Mujeeb UR Rahman (20)

Shell Energy Balance
Shell Energy BalanceShell Energy Balance
Shell Energy Balance
ย 
Transport Phenomena
Transport PhenomenaTransport Phenomena
Transport Phenomena
ย 
Transport phenomena (Continuity Equation)
Transport phenomena (Continuity Equation)Transport phenomena (Continuity Equation)
Transport phenomena (Continuity Equation)
ย 
MS PowerPoint
MS PowerPointMS PowerPoint
MS PowerPoint
ย 
Introduction Microsoft PowerPoint
Introduction Microsoft PowerPointIntroduction Microsoft PowerPoint
Introduction Microsoft PowerPoint
ย 
Introduction Microsoft Word
Introduction Microsoft WordIntroduction Microsoft Word
Introduction Microsoft Word
ย 
Liquid-Liquid Extraction Report
Liquid-Liquid Extraction ReportLiquid-Liquid Extraction Report
Liquid-Liquid Extraction Report
ย 
Pollution Control Engineering
Pollution Control EngineeringPollution Control Engineering
Pollution Control Engineering
ย 
Thin Layer Chromatography
Thin Layer ChromatographyThin Layer Chromatography
Thin Layer Chromatography
ย 
NACA Regula Falsi Method
 NACA Regula Falsi Method NACA Regula Falsi Method
NACA Regula Falsi Method
ย 
Quality Control in Glycerin
Quality Control in GlycerinQuality Control in Glycerin
Quality Control in Glycerin
ย 
Quality Control in Milk
Quality Control in MilkQuality Control in Milk
Quality Control in Milk
ย 
Numerical Analysis and Computer Applications
Numerical Analysis and Computer ApplicationsNumerical Analysis and Computer Applications
Numerical Analysis and Computer Applications
ย 
Chemical engineering department
Chemical engineering departmentChemical engineering department
Chemical engineering department
ย 
Basic commands in C++
Basic commands in C++Basic commands in C++
Basic commands in C++
ย 
Urea Manufacturing Process PFD
Urea Manufacturing Process PFDUrea Manufacturing Process PFD
Urea Manufacturing Process PFD
ย 
Chemical Reaction Engineering
Chemical Reaction EngineeringChemical Reaction Engineering
Chemical Reaction Engineering
ย 
Thermodynemics
ThermodynemicsThermodynemics
Thermodynemics
ย 
Renewable energy
Renewable energyRenewable energy
Renewable energy
ย 
Mass transfer lab equipment's
Mass transfer lab equipment'sMass transfer lab equipment's
Mass transfer lab equipment's
ย 

Recently uploaded

CME397 Surface Engineering- Professional Elective
CME397 Surface Engineering- Professional ElectiveCME397 Surface Engineering- Professional Elective
CME397 Surface Engineering- Professional Elective
karthi keyan
ย 
Vaccine management system project report documentation..pdf
Vaccine management system project report documentation..pdfVaccine management system project report documentation..pdf
Vaccine management system project report documentation..pdf
Kamal Acharya
ย 
NO1 Uk best vashikaran specialist in delhi vashikaran baba near me online vas...
NO1 Uk best vashikaran specialist in delhi vashikaran baba near me online vas...NO1 Uk best vashikaran specialist in delhi vashikaran baba near me online vas...
NO1 Uk best vashikaran specialist in delhi vashikaran baba near me online vas...
Amil Baba Dawood bangali
ย 
addressing modes in computer architecture
addressing modes  in computer architectureaddressing modes  in computer architecture
addressing modes in computer architecture
ShahidSultan24
ย 
Cosmetic shop management system project report.pdf
Cosmetic shop management system project report.pdfCosmetic shop management system project report.pdf
Cosmetic shop management system project report.pdf
Kamal Acharya
ย 
Nuclear Power Economics and Structuring 2024
Nuclear Power Economics and Structuring 2024Nuclear Power Economics and Structuring 2024
Nuclear Power Economics and Structuring 2024
Massimo Talia
ย 
Quality defects in TMT Bars, Possible causes and Potential Solutions.
Quality defects in TMT Bars, Possible causes and Potential Solutions.Quality defects in TMT Bars, Possible causes and Potential Solutions.
Quality defects in TMT Bars, Possible causes and Potential Solutions.
PrashantGoswami42
ย 
Water Industry Process Automation and Control Monthly - May 2024.pdf
Water Industry Process Automation and Control Monthly - May 2024.pdfWater Industry Process Automation and Control Monthly - May 2024.pdf
Water Industry Process Automation and Control Monthly - May 2024.pdf
Water Industry Process Automation & Control
ย 
Immunizing Image Classifiers Against Localized Adversary Attacks
Immunizing Image Classifiers Against Localized Adversary AttacksImmunizing Image Classifiers Against Localized Adversary Attacks
Immunizing Image Classifiers Against Localized Adversary Attacks
gerogepatton
ย 
COLLEGE BUS MANAGEMENT SYSTEM PROJECT REPORT.pdf
COLLEGE BUS MANAGEMENT SYSTEM PROJECT REPORT.pdfCOLLEGE BUS MANAGEMENT SYSTEM PROJECT REPORT.pdf
COLLEGE BUS MANAGEMENT SYSTEM PROJECT REPORT.pdf
Kamal Acharya
ย 
Automobile Management System Project Report.pdf
Automobile Management System Project Report.pdfAutomobile Management System Project Report.pdf
Automobile Management System Project Report.pdf
Kamal Acharya
ย 
Sachpazis:Terzaghi Bearing Capacity Estimation in simple terms with Calculati...
Sachpazis:Terzaghi Bearing Capacity Estimation in simple terms with Calculati...Sachpazis:Terzaghi Bearing Capacity Estimation in simple terms with Calculati...
Sachpazis:Terzaghi Bearing Capacity Estimation in simple terms with Calculati...
Dr.Costas Sachpazis
ย 
Hybrid optimization of pumped hydro system and solar- Engr. Abdul-Azeez.pdf
Hybrid optimization of pumped hydro system and solar- Engr. Abdul-Azeez.pdfHybrid optimization of pumped hydro system and solar- Engr. Abdul-Azeez.pdf
Hybrid optimization of pumped hydro system and solar- Engr. Abdul-Azeez.pdf
fxintegritypublishin
ย 
road safety engineering r s e unit 3.pdf
road safety engineering  r s e unit 3.pdfroad safety engineering  r s e unit 3.pdf
road safety engineering r s e unit 3.pdf
VENKATESHvenky89705
ย 
Pile Foundation by Venkatesh Taduvai (Sub Geotechnical Engineering II)-conver...
Pile Foundation by Venkatesh Taduvai (Sub Geotechnical Engineering II)-conver...Pile Foundation by Venkatesh Taduvai (Sub Geotechnical Engineering II)-conver...
Pile Foundation by Venkatesh Taduvai (Sub Geotechnical Engineering II)-conver...
AJAYKUMARPUND1
ย 
DESIGN A COTTON SEED SEPARATION MACHINE.docx
DESIGN A COTTON SEED SEPARATION MACHINE.docxDESIGN A COTTON SEED SEPARATION MACHINE.docx
DESIGN A COTTON SEED SEPARATION MACHINE.docx
FluxPrime1
ย 
Industrial Training at Shahjalal Fertilizer Company Limited (SFCL)
Industrial Training at Shahjalal Fertilizer Company Limited (SFCL)Industrial Training at Shahjalal Fertilizer Company Limited (SFCL)
Industrial Training at Shahjalal Fertilizer Company Limited (SFCL)
MdTanvirMahtab2
ย 
block diagram and signal flow graph representation
block diagram and signal flow graph representationblock diagram and signal flow graph representation
block diagram and signal flow graph representation
Divya Somashekar
ย 
MCQ Soil mechanics questions (Soil shear strength).pdf
MCQ Soil mechanics questions (Soil shear strength).pdfMCQ Soil mechanics questions (Soil shear strength).pdf
MCQ Soil mechanics questions (Soil shear strength).pdf
Osamah Alsalih
ย 
ethical hacking-mobile hacking methods.ppt
ethical hacking-mobile hacking methods.pptethical hacking-mobile hacking methods.ppt
ethical hacking-mobile hacking methods.ppt
Jayaprasanna4
ย 

Recently uploaded (20)

CME397 Surface Engineering- Professional Elective
CME397 Surface Engineering- Professional ElectiveCME397 Surface Engineering- Professional Elective
CME397 Surface Engineering- Professional Elective
ย 
Vaccine management system project report documentation..pdf
Vaccine management system project report documentation..pdfVaccine management system project report documentation..pdf
Vaccine management system project report documentation..pdf
ย 
NO1 Uk best vashikaran specialist in delhi vashikaran baba near me online vas...
NO1 Uk best vashikaran specialist in delhi vashikaran baba near me online vas...NO1 Uk best vashikaran specialist in delhi vashikaran baba near me online vas...
NO1 Uk best vashikaran specialist in delhi vashikaran baba near me online vas...
ย 
addressing modes in computer architecture
addressing modes  in computer architectureaddressing modes  in computer architecture
addressing modes in computer architecture
ย 
Cosmetic shop management system project report.pdf
Cosmetic shop management system project report.pdfCosmetic shop management system project report.pdf
Cosmetic shop management system project report.pdf
ย 
Nuclear Power Economics and Structuring 2024
Nuclear Power Economics and Structuring 2024Nuclear Power Economics and Structuring 2024
Nuclear Power Economics and Structuring 2024
ย 
Quality defects in TMT Bars, Possible causes and Potential Solutions.
Quality defects in TMT Bars, Possible causes and Potential Solutions.Quality defects in TMT Bars, Possible causes and Potential Solutions.
Quality defects in TMT Bars, Possible causes and Potential Solutions.
ย 
Water Industry Process Automation and Control Monthly - May 2024.pdf
Water Industry Process Automation and Control Monthly - May 2024.pdfWater Industry Process Automation and Control Monthly - May 2024.pdf
Water Industry Process Automation and Control Monthly - May 2024.pdf
ย 
Immunizing Image Classifiers Against Localized Adversary Attacks
Immunizing Image Classifiers Against Localized Adversary AttacksImmunizing Image Classifiers Against Localized Adversary Attacks
Immunizing Image Classifiers Against Localized Adversary Attacks
ย 
COLLEGE BUS MANAGEMENT SYSTEM PROJECT REPORT.pdf
COLLEGE BUS MANAGEMENT SYSTEM PROJECT REPORT.pdfCOLLEGE BUS MANAGEMENT SYSTEM PROJECT REPORT.pdf
COLLEGE BUS MANAGEMENT SYSTEM PROJECT REPORT.pdf
ย 
Automobile Management System Project Report.pdf
Automobile Management System Project Report.pdfAutomobile Management System Project Report.pdf
Automobile Management System Project Report.pdf
ย 
Sachpazis:Terzaghi Bearing Capacity Estimation in simple terms with Calculati...
Sachpazis:Terzaghi Bearing Capacity Estimation in simple terms with Calculati...Sachpazis:Terzaghi Bearing Capacity Estimation in simple terms with Calculati...
Sachpazis:Terzaghi Bearing Capacity Estimation in simple terms with Calculati...
ย 
Hybrid optimization of pumped hydro system and solar- Engr. Abdul-Azeez.pdf
Hybrid optimization of pumped hydro system and solar- Engr. Abdul-Azeez.pdfHybrid optimization of pumped hydro system and solar- Engr. Abdul-Azeez.pdf
Hybrid optimization of pumped hydro system and solar- Engr. Abdul-Azeez.pdf
ย 
road safety engineering r s e unit 3.pdf
road safety engineering  r s e unit 3.pdfroad safety engineering  r s e unit 3.pdf
road safety engineering r s e unit 3.pdf
ย 
Pile Foundation by Venkatesh Taduvai (Sub Geotechnical Engineering II)-conver...
Pile Foundation by Venkatesh Taduvai (Sub Geotechnical Engineering II)-conver...Pile Foundation by Venkatesh Taduvai (Sub Geotechnical Engineering II)-conver...
Pile Foundation by Venkatesh Taduvai (Sub Geotechnical Engineering II)-conver...
ย 
DESIGN A COTTON SEED SEPARATION MACHINE.docx
DESIGN A COTTON SEED SEPARATION MACHINE.docxDESIGN A COTTON SEED SEPARATION MACHINE.docx
DESIGN A COTTON SEED SEPARATION MACHINE.docx
ย 
Industrial Training at Shahjalal Fertilizer Company Limited (SFCL)
Industrial Training at Shahjalal Fertilizer Company Limited (SFCL)Industrial Training at Shahjalal Fertilizer Company Limited (SFCL)
Industrial Training at Shahjalal Fertilizer Company Limited (SFCL)
ย 
block diagram and signal flow graph representation
block diagram and signal flow graph representationblock diagram and signal flow graph representation
block diagram and signal flow graph representation
ย 
MCQ Soil mechanics questions (Soil shear strength).pdf
MCQ Soil mechanics questions (Soil shear strength).pdfMCQ Soil mechanics questions (Soil shear strength).pdf
MCQ Soil mechanics questions (Soil shear strength).pdf
ย 
ethical hacking-mobile hacking methods.ppt
ethical hacking-mobile hacking methods.pptethical hacking-mobile hacking methods.ppt
ethical hacking-mobile hacking methods.ppt
ย 

Introduction of Computers & C++ Programming

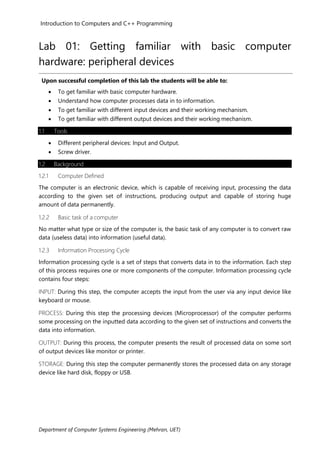
  • 1. Introduction to Computers and C++ Programming Department of Computer Systems Engineering (Mehran, UET) Lab 01: Getting familiar with basic computer hardware: peripheral devices Upon successful completion of this lab the students will be able to: โ€ข To get familiar with basic computer hardware. โ€ข Understand how computer processes data in to information. โ€ข To get familiar with different input devices and their working mechanism. โ€ข To get familiar with different output devices and their working mechanism. 1.1 Tools โ€ข Different peripheral devices: Input and Output. โ€ข Screw driver. 1.2 Background 1.2.1 Computer Defined The computer is an electronic device, which is capable of receiving input, processing the data according to the given set of instructions, producing output and capable of storing huge amount of data permanently. 1.2.2 Basic task of a computer No matter what type or size of the computer is, the basic task of any computer is to convert raw data (useless data) into information (useful data). 1.2.3 Information Processing Cycle Information processing cycle is a set of steps that converts data in to the information. Each step of this process requires one or more components of the computer. Information processing cycle contains four steps: INPUT: During this step, the computer accepts the input from the user via any input device like keyboard or mouse. PROCESS: During this step the processing devices (Microprocessor) of the computer performs some processing on the inputted data according to the given set of instructions and converts the data into information. OUTPUT: During this process, the computer presents the result of processed data on some sort of output devices like monitor or printer. STORAGE: During this step the computer permanently stores the processed data on any storage device like hard disk, floppy or USB.
  • 2. Introduction to Computers and C++ Programming Department of Computer Systems Engineering (Mehran, UET) Figure 1.1: Information Processing Cycle 1.2.4 Input Devices The input devices are used to enter the data into the computer (system unit) to instruct it to work accordingly. The input devices are considered as the interface between the user and the computer. List of some of the input devices is given below: โ€ข Keyboard โ€ข Mouse โ€ข Trackball โ€ข Trackpad โ€ข Joystick โ€ข Game Controller โ€ข Microphone โ€ข Digital Camera โ€ข Web Cam โ€ข Barcode Reader โ€ข Scanner โ€ข Finger Print Reader 1.2.4.1 Keyboard Keyboard is primary input device it is used to input text, numbers and commands. It is just like a typewriter which works as a communicator between the user and the computer. Most commonly used keyboard is IBM Enhanced Keyboard designed by IBM, contains about 100 keys. These keys are arranged in to the five groups namely, โ€ข Alphanumeric Keys โ€ข Modifier Keys 1.2.4.2 Mouse โ€ข Numeric Keypad โ€ข Function Keys โ€ข Cursor-Movement Keys It is a pointing device used to control the cursor on the screen. The mouse can have at least two buttons one is called left mouse button and the other is called right mouse button. The left mouse button is used for functions like clicking, double-clicking and dragging and right mouse button is used for right-clicking. It also contains a scrolling wheel, located between right and left mouse button, used to scroll around a large documents or web pages quickly. There are two types of mouse: 1. Mechanical Mouse 2. Optical Mouse
  • 3. Introduction to Computers and C++ Programming Department of Computer Systems Engineering (Mehran, UET) Figure 1.2: Keyboard Figure 1.3: Mouse โ€ข Mechanical Mouse This is a traditional mouse, which works on mechanical movement, containing a rubber ball which protrudes from the back of the mouse casing through a hole. It also contains a pair of rollers and sensors. When you move the mouse the ball at the bottom moves and with it the roller that are in contact with the ball also rolls then the sensors send the signals to the computer telling it the distance, direction and speed of the move. Then the computer uses its stored data to set the cursor on the screen so in this way the position of the cursor is controlled on the screen. โ€ข Optical Mouse Optical mouse is the newest development in the mouse sometimes also called lesser mouse, because the laser is at the heart of this mouse. This mouse contains a built-in lesser instead of a heavy rubber ball. When you move this mouse the lesser emits the beam of lesser light and with the help of reflected rays it identifies the distance, direction and speed of the move and sends the signal to the computer. Figure 1.4: Mechanical Mouse Figure 1.5: Optical Mouse Figure 1.6: Trackball 1.2.4.3 Trackball Track ball is a pointing device. Like mouse it is also used to control the cursor on the screen. It is just like up-side down mouse. It contains a rubber ball on the top of it and two or more buttons. To use this device, you have to place your thumb or index finger on the ball and other fingers on the buttons. 1.2.4.4 Trackpad Track Pad is a pointing device also called touch pad. It is used to control the cursor on the screen. To use this device, you have to move your index finger on the pad and the motion of your finger is then translated into the cursorโ€™s movement.
  • 4. Introduction to Computers and C++ Programming Department of Computer Systems Engineering (Mehran, UET) 1.2.4.5 Joystick Joystick is a type of game controller which looks like a carโ€™s gear contains a lever and some buttons. The lever is used to control the direction and motion of the object in the game and other buttons perform some specific functions. The joystick is ideal for playing racing and flying games. 1.2.4.6 Game Pad Gamepad, also called joypad or control pad, is a type of game controller held in the hand, where the digits (especially thumbs) are used to provide input. Gamepads generally feature a set of action buttons handled with the right thumb and a direction controller handled with the left. Figure 1.5: Trackpad Figure 1.6: Joystick Figure 1.7: Game controller 1.2.4.7 Microphone It is an input device used for sound input. It catches the analog signals of sound and sends them to the sound card which converts those analog signals into the digital form that the computer can understand. 1.2.4.8 Digital Camera It is again an input devices used to input the still images into the computer. It is very much identical to the traditional camera found in the hands of a professional photographer. 1.2.4.9 Web Camera Web camera usually known as Web Cam is an input device used to input videos (moving pictures). The difference between this device and a digital camera is that the digital camera captures only still image whereas this device can capture moving pictures usually known as videos. Figure 1.8: Microphone Figure 1.9: Digital Camera Figure 1.10: Web Camera
  • 5. Introduction to Computers and C++ Programming Department of Computer Systems Engineering (Mehran, UET) 1.2.4.10 Barcode Reader A barcode reader (or barcode scanner) is a computer peripheral for reading barcodes printed on various surfaces. Like a flatbed scanner, it generally consists of a light source, a lens and a photo conductor translating optical impulses into electrical ones. 1.2.4.11 Scanner A scanner is an input device used to input the soft copy of a printed document. The image scanner or simply scanner converts a printed document in to digital form by shinning the lesser light on the image and with the help of reflected rays of light it identifies the colors and intensity of the colors. The color scanner uses RGB (Red, Green and Blue) color scheme. Figure 1.11: Barcode Figure 1.12: Barcode Reader Figure 1.13: Scanner 1.2.4.12 Finger Print Reader It is a device which captures the finger print by striking the laser light over the finger and the reflected light is captured through sensors and is translated in to digital images (finger print). Fingerprint scanning is a standard biometric method that authenticates a userโ€™s identity based upon who they are. Figure 1.14: Finger Imprint Figure 1.15: Finger Print Reader 1.2.5 Output Devices The output devices are used to present the result of processed data (information). Some of the output devices are listed below: โ€ข Monitor โ€ข Printer โ€ข Plotters โ€ข Speakers โ€ข Projector
  • 6. Introduction to Computers and C++ Programming Department of Computer Systems Engineering (Mehran, UET) 1.2.5.1 Monitor A computer monitor, usually called simply a monitor, is a piece of electrical equipment which displays viewable images generated by a computer without producing a permanent record. Along with the mouse and keyboard, the video display (monitor) is a vital part of the user interface of any computer. There are two basic types of monitors: 1. CRT (Cathode Ray Tube) 2. FPD (Flat Panel Display) The video subsystem of a PC consists of two main components: Monitor (or video display): The monitor can be either a CRT (Cathode Ray Tube) or an FPD (Flat Panel Display). Video adapter (also called the video card or graphics adapter): On many recent low-cost systems, video might be built into the motherboard or included as part of this motherboard's chipset. โ€ข CRT (Cathode Ray Tube) The CRT monitors are the monitors which rely on Cathode Ray Tube for displaying the images. The CRT or Cathode Ray Tube is the picture tube of a monitor. The back of the tube has a negatively charged cathode. CRTs consist of a vacuum tube enclosed in glass. One end of the tube contains an electron gun assembly that projects three electron beams, one each for the red, green, and blue phosphors used to create the colors you see onscreen; the other end contains a screen with a phosphorous coating. Figure 1.16: CRT Monitor Figure 1.17: Flat Panel Display Monitor โ€ข FPD (Flat Panel Display) Flat panel displays encompass a growing number of technologies enabling video displays that are lighter and much thinner than traditional television and video displays that use cathode ray tubes, and are usually less than 4 inches (100 mm) thick. These flat panel displays has given the birth to the number of technologies which include: โ€ข Digital Light Processing (DLP) โ€ข Plasma Display Panels (PDPs) โ€ข Liquid Crystal Displays (LCDs) โ€ข Organic Light-Emitting Diode Displays (OLEDs) โ€ข Light-Emitting Diode Display (LED) โ€ข Electroluminescent Displays (ELDs) โ€ข Surface-Conduction Electron-Emitter Displays (SEDs) โ€ข Field Emission Displays (FEDs) โ€ข Nano-Emissive Display (NEDs)
  • 7. Introduction to Computers and C++ Programming Department of Computer Systems Engineering (Mehran, UET) 1.2.5.2 Printer A printer is an output device, which produces a hard copy (permanent human-readable text and/or graphics) of documents stored in electronic form, usually on physical print media such as paper or transparencies. 1.2.5.3 Plotters A plotter is a vector graphics printing device which prints its output by moving a pen across the surface of a piece of paper. This means that plotters are restricted to line art, rather than raster graphics as with other printers. They can draw complex line art, including text, but do so very slowly because of the mechanical movement of the pens. Figure 1.18: Printer Figure 1.19: Plotter 1.2.5.4 Speaker Speaker is an output device which produces sound. The internal amplifiers require an external power source, usually an AC adapter. More sophisticated computer speakers can have a subwoofer unit, to enhance bass output, and these units usually include the power amplifiers both for the bass speaker, and the small satellite speakers. 1.2.5.5 Speaker Channels The sound systems have different number of channels which determine the number of speakers that can be connected to that system known as channels. Three of the sound channels types are: 1. Mono 2. Stereo 3. Surround Sound The mono sound contains only 1 channel. The stereo sound contains 2 channels and the surround sound contains more than 2 channels (usually 5, 6, 7, 8, 9, or 10 channels). Figure 1.20: Speakers Figure 1.21: Mono and Stereo Jacks
  • 8. Department of Computer Systems Engineering (Mehran, UET) Lab 01: Getting familiar with basic computer hardware: peripheral devices | 8 1.2.5.6 Variants of speakers Other variants of speakers are Headphones and Earphones. 1.2.5.7 Projector An image projector is an Optical device that projects an image (or moving images) onto a surface, commonly a projection screen. Most projectors create an image by shining a light through a small transparent image, but some newer types of projectors can project the image directly, by using lasers. The most common type of projector used today is called a video projector. Figure 1.22: Headphones Figure 1.23: Earphones Figure 1.24: Projector 1.2.6 Looking inside a standard keyboard When we open a switched keyboard, we will find a set of components as: Keyboard controller, Mesh of traces printed on a pair of plastic papers and Rubber domes. When you press a key from the keyboard, the rubber dome under that key closes the switch of that key on printed trace which causes an electric signal to pass to the keyboard controller. Then the keyboard controller stores the scan code of the pressed key in the keyboardโ€™s temporary storage area called keyboard buffer and sends the signal to the computerโ€™s operating system telling it that some action has been performed at the keyboard. Figure 1.25: Keyboard controller Figure 1.26: Traces printed circuit
  • 9. Department of Computer Systems Engineering (Mehran, UET) Lab 01: Getting familiar with basic computer hardware: peripheral devices | 9 1.2.7 Looking inside a mechanical mouse When we open a mechanical mouse keyboard, we will find a set of components as: Mouse controller, plastic rollers, infrared emitters, photo diodes and a rubber ball. When you move the mouse, the rubber ball moves the two rollers between infrared emitters and photo diodes for controlling horizontal and vertical displacement. The signal is then send to mouse controller, which digitizes and sends the command to the system unit. Figure 1.27: Rubber Domes Figure 1.28: Inside a mechanical mouse 1.3 Procedure 1.3.1 Unscrewing and screwing a standard keyboard Step 01: Take a standard keyboard and unplug it from system unit. Step 02: Turn it upside down and find screws and unscrew them. Step 03: Carefully remove the back cover. Step 04: Draw the internal structure of keyboard along with all the components. Step 05: Remove plastic circuit board, rubber domes and keyboard controller. Step 06: Place plastic circuit board, rubber domes and controller in their proper places. Step 07: Screw the back cover. 1.3.2 Unscrew and screwing a mechanical mouse Step 01: Take a mechanical mouse and unplug it from system unit. Step 02: Turn it upside down and find a screw under a seal and unscrew it. Step 03: Carefully remove the top cover. Step 04: Draw the internal structure of mouse along with all the components. Step 05: Remove mouse controller, rubber ball and rollers. Step 06: Place mouse controller, rubber ball and rollers in their proper places. Step 07: Screw the back cover.
  • 10. Department of Computer Systems Engineering (Mehran, UET) Lab 01: Getting familiar with basic computer hardware: peripheral devices | 10 EXERCISE Exercise 1.1: What different input and output devices you found in the lab. For each of the device fill in the following format: Device Name Brand Name Type/Mechanism Type of Data Input/Output Device Name = Name of Input or Output device. Brand Name = Company Name device manufactured by. Type/Mechanism = Type of device or working mechanism. For example: For mouse specify whether it is optical or mechanical, for monitor specify whether it is Cathode Ray Tube or Flat panel Display. Type of Data = Specify the type of data, the device inputs or output. For example: Image, Text, or Sound. Input / Output = Specify whether the device is an input device or output device. Exercise 1.2: For each of the following devices list few names of the software applications that use them intensively: โ€ข Keyboard โ€ข Mouse โ€ข Microphone โ€ข Scanner โ€ข Digital Camera โ€ข Printer โ€ข Speaker โ€ข Webcam โ€ข Joystick Exercise 1.3: Unscrew the mechanical mouse and with the help of a diagram describe its working mechanism. Exercise 1.4: Unscrew the optical mouse and with the help of a diagram describe its working mechanism. Exercise 1.5: Unscrew a standard keyboard and with the help of a diagram describe its working mechanism.
  • 11. Introduction to Computers and C++ Programming Department of Chemical Engineering (Mehran, UET) Lab 02: Getting Familiar with Microsoft Word Upon successful completion of this lab, the students will be able to: โ€ข Get familiar with MS Word user interface. โ€ข Create and edit documents in MS Word. โ€ข Understand text-formatting commands in MS Word. 3.1 Tools โ€ข PC with MS Word (Version: 2016, 2013, 2010 or 2007) 3.2 Background 3.2.1 Microsoft Word When you use a computer program to create, edit, and format text documents, you are performing a task known as word processing. Part of the Microsoft Office suite of programs, Microsoft Word, is one of the most sophisticated word-processing programs available. By using Word, it is easy to create a wide range of business and personal documents efficiently, from the simplest letter to the most complex report. 3.2.2 Microsoft Word 2013 Interface When you open Word 2013 for the first time, the Word Start Screen will appear. From here, you will be able to create a new document, choose a template, or access your recently edited documents. From the Word Start Screen, locate and select Blank document to access the Word interface. Figure 3.1: MS Word Start Screen
  • 12. Introduction to Computers and C++ Programming Department of Chemical Engineering (Mehran, UET) Figure 3.2: MS Word Interface Quick Access Toolbar: Located just above the Ribbon, the Quick Access toolbar lets you access common commands no matter which tab is selected. The Ruler: Located at the top and to the left of your document. It makes it easier to adjust your document with precision. Document Views: Change how your document is displayed. You can choose to view your document in Read Mode, Print Layout, or Web Layout. The Ribbon: Contains all the commands you will need to perform common tasks in Word. It has multiple tabs, each with several groups of commands. Command Group: Each group contains a series of different commands. Simply click any command to apply it. Some groups also have an arrow in the bottom-right corner, which you can click to see even more commands. Status Bar: Shows the status of document i.e. number of pages, current page number, word count, spelling and grammatical errors. It also presents the documents view controls and zoom controller.
  • 13. Introduction to Computers and C++ Programming Department of Chemical Engineering (Mehran, UET) 3.2.2.1 Home Tabs The Home tab gives you access to some of the commonly used commands. Figure 3.3: Home Tab 3.2.2.2 Insert Tabs The Insert tab allows you to insert pictures, charts, tables, shapes, cover pages, and more to your document. Figure 3.4: Insert Tab 3.3 Formatting Text Formatted text can draw the reader's attention to specific parts of a document and emphasize important information. In Word, you have many options for adjusting the font of your text, including size, color, and inserting special symbols. You can also adjust the alignment of the text to change how it is displayed on the page. 3.4 Procedure 3.4.1. Creating a blank document Step 01: Select the File tab, backstage view will appear. Step 02: Select New, then click Blank document. Step 03: A new blank document will appear. 3.4.2 Changing the font of text Step 01: Select the text you wish to modify. Step 02: On the Home tab, click the drop-down arrow next to the Font box. A menu of font styles will appear. Step 03: Move the mouse over the various font styles. A live preview of the font will appear in the document. Select the font style you wish to use.
  • 14. Introduction to Computers and C++ Programming Department of Chemical Engineering (Mehran, UET) 3.4.3 Changing the font size Step 01: Select the text you wish to modify. Step 02: Select the desired font size formatting option: Font size drop-down arrow: On the Home tab, click the Font size drop-down arrow. A menu of font sizes will appear. When you move the mouse over the various font sizes, a live preview of the font size will appear in the document. Font size box: When the font size you need is not available in the Font size drop-down arrow, you can click the Font size box and type the desired font size. Then press Enter. 3.4.4 Changing the font color Step 01: Select the text you wish to modify. Step 02: On Home tab, click the Font Color drop-down arrow. The Font Color menu appears. Step 03: Select the font color you wish to use. 3.4.5 Using the Bold, Italic, and Underline commands Step 01: Select the text you wish to modify. Step 02: On Home tab, click the Bold (B), Italic (I), or Underline (U) command in the Font group. 3.4.6 Changing the text case Step 01: Select the text you wish to modify. Step 02: On Home tab, click, Change Case in the Font group. Step 03: A drop-down menu will appear. Select the desired case option from the menu. 3.4.7 Changing the text alignment Step 01: Select the text you wish to modify. Step 02: On Home tab, select one of the four alignment options from the Paragraph group.
  • 15. Introduction to Computers and C++ Programming Department of Chemical Engineering (Mehran, UET) 3.4.8 Changing line spacing Step 01: Select the text you wish to modify. Step 02: On Home tab, click the Line and Paragraph Spacing command. A drop-down menu will appear. Step 03: Move the mouse over the various options. A live preview of the line spacing will appear in the document. Select the line spacing you wish to use. 3.4.9 Changing paragraph spacing Step 01: Select the paragraph or paragraphs you wish to format. Step 02: On Home tab, click the Line and Paragraph Spacing command. Hover the mouse over Add Space before Paragraph or Remove Space after Paragraph from the drop-down menu. Step 03: Select the paragraph spacing you wish to use. 3.4.10 Changing paragraph indent Step 01: Select the text you wish to indent. Step 02: On the Home tab, click the desired Indent command: Increase Indent: Increases the indent by increments of 1/2 inch. Decrease Indent: Decreases the indent by increments of 1/2 inch. 3.4.11 Creating bulleted list Step 01: Select the text you wish to format as a list. Step 02: On the Home tab, click the drop-down arrow next to the Bullets command. A menu of bullet styles will appear. Step 03: Move the mouse over the various bullet styles. A live preview of the bullet style will appear in the document. Step 04: Select the bullet style you wish to use.
  • 16. Introduction to Computers and C++ Programming Department of Chemical Engineering (Mehran, UET) 3.4.12 Creating numbered list Step 01: Select the text you wish to format as a list. Step 02: On the Home tab, click the drop-down arrow next to the Numbering command. A menu of numbering styles will appear. Step 03: Move the mouse over the various numbering styles. A live preview of the numbering style will appear in the document. Step 04: Select the numbering style you wish to use. 3.4.13 Creating multilevel list Step 01: Create a bulleted or numbered list. Step 02: Place the insertion point at the beginning of the line you wish to move to right. Step 03: Press the Tab key to increase the indent level of the line. The line will move to the right. Step 04: To increase the indent by more than one level, place the insertion point at the beginning of the line and press the Tab key until the desired level is reached. Step 05: To decrease the indent level, place the insertion point at the beginning of the line, then hold the Shift key and press the Tab key. 3.4.14 Creating header and footer Step 01: Double-click anywhere on the top or bottom margin of your document. Step 02: The header or footer will open, and a Design tab will appear on the right side of the Ribbon. The insertion point will appear in the header or footer. Step 03: Type the desired information into the header or footer. Step 04: When you are finished, click Close Header and Footer. Alternatively, you can press the Esc key. 3.4.15 Adding page number to a document Step 01: Double-click anywhere on the header or footer to unlock it. Step 02: Click the Page Number command from design tab. In the menu that appears, hover the mouse over Current Position and select the desired page numbering style.
  • 17. Introduction to Computers and C++ Programming Department of Chemical Engineering (Mehran, UET) 3.4.16 Inserting a picture from a file Step 01: Place the insertion point where you want the image to appear. Step 02: Select the Insert tab on the Ribbon, and then click the Pictures command. Step 03: The Insert Picture dialog box will appear. Select the desired image file, then click Insert. Step 04: To resize an image, click and drag one of the corner sizing handles . The image will change size while keeping the same proportions. If you want to stretch it horizontally or vertically, you can use the side sizing handles. 3.4.17 Wrapping text around an image Step 01: Select the image you want to wrap text around. The Format tab will appear on the right side of the Ribbon. Step 02: On the Format tab, click the Wrap Text command in the Arrange group. A drop-down menu will appear. Step 03: Hover the mouse over the various text wrapping options. A live preview of the text wrapping will appear in the document. When you've found the text wrapping option you want to use, click on it. Alternatively, you can select More Layout Options... to fine tune the layout. Step 04: The text will wrap around the image. You can now move the image if desired. Just click, hold, and drag it to the desired location. As you move it, alignment guides will appear to help you align the image on the page. Step 05: Alternatively, you can access text-wrapping options by selecting the image and clicking the Layout Options button that appears.
  • 18. Introduction to Computers and C++ Programming Department of Chemical Engineering (Mehran, UET) EXERCISE Exercise 3.1: Create and format the following MS WORD document page:
  • 19. Introduction to Computers and C++ Programming Department of Chemical Engineering (Mehran, UET) Exercise 3.2: Create and format the following MS WORD document page: Exercise 3.3: Create and format the following MS WORD document page:
  • 20. Introduction to Computers and C++ Programming Department of Chemical Engineering (Mehran, UET) Exercise 3.4: Create the following lists in MS WORD: โ€ข Classification of Computers o On the basis of Purpose o On the basis of Size o On the basis of Working Mechanism โ€ข Classification of Computers (Purpose) o General Purpose o Special Purpose โ€ข Classification of Computers (Size) o Super Computers o Mainframe Computers o Mini Computers o Micro Computers ๏‚ง Desktop Computers ๏‚ง Workstations ๏‚ง Notebook Computers ๏‚ง Tablet PCs ๏‚ง Handheld Computers ๏‚ง Smartphones โ€ข Classification of Computers (Working Mechanism) o Analog Computers o Digital Computers o Hybrid Computers 1. Software 2. Types of Software a. System Software i. System Management ii. System Support iii. System Development b. Application Software i. General Purpose ii. Application Specific
  • 21. Introduction to Computers and C++ Programming Department of Chemical Engineering (Mehran, UET) Lab 03: Creating documents with advance formatting operations of Microsoft Word Upon successful completion of this lab the students will be able to: โ€ข Insert, format and design the tables in MS Word. โ€ข Insert and format smart art in MS Word. โ€ข Insert symbols and design equations in MS Word. 4.1 Tools โ€ข PC with MS Word (Version: 2016, 2013, 2010 or 2007) 4.2 Background 4.2.1 Tables in MS Word A table is a grid of cells arranged in rows and columns. Tables are useful for various tasks such as presenting text information and numerical data. MS Word allows you to create and design any type of table. Once created you can merge multiple cells whether in column or rows to create table with different number of columns in each row. You can insert a table in word document from Insert tab. 4.2.2 Smart Art SmartArt allows you to communicate information with graphics instead of just using text. There are a variety of styles to choose from, which you can use to illustrate many different types of ideas. 4.2.1 Symbols Sometimes you may find that you need to add a symbol to your text, such as the Copyright symbol, ยฉ. Word offers a large collection of symbols for currency, languages, mathematics, and more. 4.2.2 Equations MS Equation Editor allows you to design any form of mathematical equation. It contains many place holders for different operations and bundle of symbols. Figure 10.1: MS Equation Editor
  • 22. Introduction to Computers and C++ Programming Department of Chemical Engineering (Mehran, UET) 4.3 Procedure 4.3.1 Creating a blank table Step 01: Place your insertion point where you want the table, then select the Insert tab. Step 02: Click the Table command. Step 03: A drop-down menu containing a grid of squares will appear. Hover the mouse over the grid to select the number of columns and rows in the table. Step 04: Click the mouse, and the table will appear in the document. Step 05: You can now place the insertion point anywhere in the table to add text. 4.3.2 Modifying tables 4.3.2.1 To add a row or column Step 01: Hover the mouse near the location where you wish to add a row or column and click the plus sign that appears. Step 02: A new row or column will appear in the table. Step 03: Alternatively, you can right-click the table, then hover the mouse over Insert to see various row and column options. 4.3.2.2 To delete a row or column Step 01: Place the insertion point in the row or column you want to delete. Step 02: Right-click the mouse, then select Delete Cells... from the menu that appears. Step 03: A dialog box will appear. Select Delete entire row or Delete entire column, then click OK. 4.3.2.3 To apply a table style Step 01: Click anywhere on the table, then click the Design tab on the right side of the Ribbon. Step 02: Locate the Table Styles group, then click the More drop-down arrow to see all available table styles. Step 03: Select the desired style.
  • 23. Introduction to Computers and C++ Programming Department of Chemical Engineering (Mehran, UET) 4.3.2.4 Merge and Split Cells Some tables require a layout that doesn't conform to the standard grid. In those cases, you may need to merge or split cells. Merging Step 01: Bring your mouse pointer position inside the first cell that you want to merge. Step 02: Now press the Shift key and click the cells around the cell which you want to merge into the first cell. This will highlight the cells which you click and they will be ready to be merged. Step 03: Now click the Layout tab and then click the Merge Cells button which will merge all the selected cells. Splitting Step 01: Bring your mouse pointer position inside the cell that has to be divided into multiple cells. Step 02: Now click the Layout tab and then click the Split Cells button; this will display a dialog box asking for the number of rows and columns to be created from the selected cell. Step 03: Select the desired number of rows and columns that have to go into the resultant cell and finally click the OK button to apply the result. 4.3.2.5 Splitting a table Step 01: Bring your mouse pointer position anywhere in the row that should appear as the first row of the new table. Step 02: Now click the Layout tab and then click the Split Table button which will split the table into two tables and the selected row will become the first row of the lower table. 4.3.3 To insert a SmartArt graphic Step 01: Place insertion point in the document where you want the SmartArt graphic to appear. Step 02: From the Insert tab, select the SmartArt command in the Illustrations group. Step 03: A dialog box will appear. Select a category on the left, choose the desired SmartArt graphic, then click OK.
  • 24. Introduction to Computers and C++ Programming Department of Chemical Engineering (Mehran, UET) 4.3.3.1 To add text to a SmartArt graphic Step 01: Select the SmartArt graphic. The SmartArt task pane will appear to the left. Step 02: Enter text next to each bullet in the task pane. The text will appear in the graphic and will resize to fit inside the shape. Step 03: To add a new shape, press Enter. A new bullet will appear in the task pane, and a new shape will appear in the graphic. You can delete any bullets you're not using to remove the shapes. 4.3.3.2 To change the SmartArt layout Step 01: Select the SmartArt graphic, then select the Design tab. Step 02: In the Layouts group, click the More drop-down arrow. Step 03: Select the desired layout, or click More Layouts... to see even more SmartArt options.
  • 25. Introduction to Computers and C++ Programming Department of Chemical Engineering (Mehran, UET) 4.3.4 To insert a symbol Step 01: Place the insertion point in the location where you want to insert a symbol. Step 02: On the Insert tab, click the Symbol drop-down arrow. A menu of symbols will appear. Step 03: Select the desired symbol or click More Symbolsโ€ฆ if you donโ€™t find symbol. 10.3.4 To insert an equation Step 01: Place the insertion point in the location where you want to insert a symbol. Step 02: On the Insert tab, click the Equation drop-down arrow. A menu of equations will appear. Step 03: Select the desired equation or click Insert New Equation to create it. Step 04: Click on desired structures and symbols to create the equation. Step 05: Press enter key when done.
  • 26. Introduction to Computers and C++ Programming Department of Chemical Engineering (Mehran, UET) EXERCISE Exercise 10.1: Create the following tables in MS Word: Shopping Bill Customer Name: Ali Customer Number: CN2501 S. #. Item Brand Price/Unit Units Price 1 Dress Pants Oxford Rs. 4500 2 Rs. 9000 Dinners Rs. 2200 1 Rs. 2200 2 Jeans Levis Rs. 5100 2 Rs. 1200 3 Tie Dinners Rs. 550 3 Rs. 1650 4 Shirt Oxford Rs. 3500 1 Rs. 3500 Dinners Rs. 1850 1 Rs. 1850 Cambridge Rs. 4000 1 Rs. 4000 5 Belt Cambridge Rs. 1800 2 Rs. 3600 Total Price Rs. 27000 Discount Rs. 3500 Net Bill Rs. 23500 PROVISIONAL LIST OF CLASS ATTENDANCE DEPARTMENT OF COMPUTER SYSTEMS ENGINEERING - I S.# Roll # C.F A.C F.E ES. ENG B.E.E T.L Conducted Percentage Dr. Sammer Zai Mr. Ayaz Siyal Mr. Jam Khan Ms. Saba Baloch Mr. Aijaz Rajpar T.Lec T.Prac T.Lec T.Lec T.Lec T.Prac T.Lec T.Prac 31 24 29 31 29 33 31 30 238 31 30 29 31 29 33 31 27 241 L. Att P. Att L. Att L. Att L. Att P. Att L. Att P. Att T.L Att 1 17CS01 30 24 29 31 29 30 31 30 234 98 2 17CS05 30 24 29 31 29 30 31 30 234 98 3 17CS07 30 24 28 29 29 30 31 30 231 97 4 17CS09 28 24 25 27 26 24 31 30 215 90 5 17CS11 30 24 23 28 24 30 30 27 216 91
  • 27. Introduction to Computers and C++ Programming Department of Chemical Engineering (Mehran, UET) General Purpose Purpose Special Purpose Super Desktop Mainframe Classification of Computers Size Workstation Mini Notebook Micro Tablet Analog Type of Data/Working Mechanism Handheld Digital Smart Phone Hybrid Exercise 10.2: Create the following smart art graphics in MS Word:
  • 28. Introduction to Computers and C++ Programming Department of Chemical Engineering (Mehran, UET) Exercise 10.3: Insert the following equations in MS Word document: ๐‘ฅ๐‘ฅ = 3 โˆšsin cos ๐›ฝ๐›ฝ โˆ’ sin ๐›ฝ๐›ฝ cos ๐›ผ๐›ผ ๐›ผ๐›ผ2 + ๐›ฝ๐›ฝ2 (๐‘ฅ๐‘ฅ + ๐‘Ž๐‘Ž)๐‘›๐‘› = ๏ฟฝ ๏ฟฝ ๐‘›๐‘› ๐‘˜๐‘˜ ๏ฟฝ ๐‘ฅ๐‘ฅ๐‘˜๐‘˜ ๐‘Ž๐‘Ž๐‘›๐‘›โˆ’๐‘˜๐‘˜ ๐‘›๐‘› ๐‘˜๐‘˜=0 ๐‘‘๐‘‘ ๐‘‘๐‘‘๐‘ก๐‘ก ๐œ•๐œ•๐ฟ๐ฟ ( ) = ๐œ•๐œ•๐œ•๐œ•๐œ• ๐œ•๐œ•๐ฟ๐ฟ ๐œ•๐œ•๐œ•๐œ•๐œ• (๐‘ข๐‘ข) = โˆซ (1 + |๐›ป๐›ป๐‘ข๐‘ข|2) 1โ„2 ๐‘‘๐‘‘๐‘ฅ๐‘ฅ , โ€ฆ ๐‘‘๐‘‘๐‘ฅ๐‘ฅ๐‘›๐‘› ฮฉ ๐‘ก๐‘กโ€ฒ = 1 โˆš1 โˆ’ ๐‘ฃ๐‘ฃ2 ๐‘๐‘2 cos ๐‘ฅ๐‘ฅ = ๐‘…๐‘…๐‘’๐‘’{๐‘’๐‘’๐‘–๐‘–๐‘ฅ๐‘ฅ} = ๐‘’๐‘’๐‘–๐‘–๐‘ฅ๐‘ฅ + ๐‘’๐‘’โˆ’๐‘–๐‘–๐‘ฅ๐‘ฅ 2 ๐ฌ๐ฌ๐ข๐ข๐ง๐ง ๐’™๐’™ = ๐‘ฐ๐‘ฐ๐’Ž๐’Ž{๐’†๐’†๐’Š๐’Š๐’™๐’™} = Exercise 10.4: Write down any paragrapgh from your Maths book that includes text and mathematical equations. Exercise 10.5: Design time table of your class. ๐’†๐’†๐’Š๐’Š๐’™๐’™ โˆ’ ๐’†๐’†โˆ’๐’Š๐’Š๐’™๐’™ ๐Ÿ๐Ÿ๐’Š๐’Š 1
  • 29. Department of Chemical Engineering (Mehran, UET) Introduction to Computers and C++ Programming Lab 04: Creating and editing multimedia presentations with Microsoft PowerPoint Upon successful completion of this lab the students will be able to: โ€ข Get familiar with MS PowerPoint user interface. โ€ข Create and edit multimedia presentations in MS PowerPoint. โ€ข Insert images, audio, video, WordArt, shapes, tables and charts in PowerPoint presentation. โ€ข Apply animations to text and objects. 4.1 Tools โ€ข PC with MS PowerPoint (Version: 2016, 2013, 2010 or 2007) 4.2 Background 4.2.1 MS PowerPoint PowerPoint 2013 is a presentation software that allows you to create dynamic slide presentations. Slideshows can include animation, narration, images, videos, and much more. Microsoft Office product that provides users with an interface to design multimedia slides to be displayed on a projection system or personal computer. The software incorporates images, sounds, videos, text, and charts to create an interactive presentation. Microsoft PowerPoint interacts with other Office products such as Microsoft Word and Excel, and is included with most Microsoft Office packages. 4.2.2 The PowerPoint 2013 Interface If you've previously used PowerPoint 2010 or 2007, PowerPoint 2013 will feel familiar. It continues to use features like the Ribbon and the Quick Access toolbar, where you will find commands to perform common tasks in PowerPoint, as well as Backstage view. Figure 4.1: MS PowerPoint Interface
  • 30. Department of Chemical Engineering (Mehran, UET) Introduction to Computers and C++ Programming 4.2.3 The Ribbon PowerPoint 2013 uses a tabbed Ribbon system instead of traditional menus. The Ribbon contains multiple tabs, each with several groups of commands. You will use these tabs to perform the most common tasks in PowerPoint. 4.2.3.1 Home Tab He Home tab gives you access to the most commonly used commands, including copy and paste, formatting, and the New Slide command. Figure 4.2: Home Tab 4.2.3.2 Insert Tab The Insert tab allows you to insert pictures, charts, tables, shapes, videos and more, which can help you communicate information visually and add style to your presentation. Figure 4.3: Insert Tab 4.2.3.3 Design Tab The Design tab allows you to apply themes. A theme is a predefined combination of colors, fonts, and effects that can quickly change the look and feel of your entire slide show. Figure 4.4: Design Tab 4.2.3.4 Transitions Tab The Transitions tab allows you to apply slide transitions. Transitions are the movements you see between slides when presenting your slide show.
  • 31. Department of Chemical Engineering (Mehran, UET) Introduction to Computers and C++ Programming Figure 4.5: Transitions Tab 4.2.3.5 Animations Tab The Animations tab allows you to animate text and objects such as clip art, shapes and pictures. Animation can be used to draw attention to specific content or make the slide easier to read. Figure 4.6: Animations Tab 4.2.4 Backstage view Backstage view gives you various options for saving, opening, printing, and sharing your presentations. Figure 4.7: Backstage View
  • 32. Department of Chemical Engineering (Mehran, UET) Introduction to Computers and C++ Programming 4.2.5 Slide Basics PowerPoint presentations are made up of a series of slides. Slides contain the information you will present to your audience. This might include text, pictures, charts, and more. Slides have several different layouts for placeholders, depending on the kind of information you want to include. Figure 4.8: Basic Slide Figure 4.9: Slide Layouts 4.2.6 Themes A theme is a predefined combination of colors, fonts, and effects. Different themes also use different slide layouts. Elements of theme are: Theme Colors: There are 10 theme colors, along with darker and lighter variations, available from every Color menu. Theme Fonts: There are two theme fonts available at the top of the Font menu under Theme Fonts. Theme Effects: These affect the preset shape styles. You can find shape styles on the Format tab whenever you select a shape or SmartArt graphic. 4.2.7 Transitions Transitions are the movements you see between slides when presenting your slide show. A transition can be as simple as fading to the next slide, or it can be a flashy, eye-catching effect. PowerPoint makes it easy to apply transitions to some or all your slides, giving your presentation a polished, professional look. There are three categories of unique transitions to choose from, all of which can be found on the Transitions tab:
  • 33. Department of Chemical Engineering (Mehran, UET) Introduction to Computers and C++ Programming Subtle: These are the most basic types of transitions. They use simple animations to move between slides. Figure 4.10: Subtle Transitions Exciting: These use more complex animations to transition between slides. While they're more visually interesting than Subtle transitions, adding too many can make your presentation look less professional. Figure 4.11: Exciting Transitions Dynamic Content: If you're transitioning between two slides that use similar slide layouts, dynamic transitions will move only the placeholders, not the slides themselves. When used correctly, dynamic transitions can help to unify your slides and add a further level of polish to your presentation. Figure 4.12: Dynamic Content Transitions 4.3 Procedure 4.3.1 Creating a new presentation Step 01: Select the File tab to go to Backstage view Step 02: Select New on the left side of the window, then click Blank Presentation or choose a theme. Step 03: A new presentation will appear.
  • 34. Department of Chemical Engineering (Mehran, UET) Introduction to Computers and C++ Programming 4.3.2 Inserting new slide Step 01: From the Home tab, click the bottom half of the New Slide command. Step 02: Choose the desired slide layout from the menu that appears. Step 03: The new slide will appear. Click any placeholder and begin typing to add text. You can also click an icon to add other types of content, like a picture or a chart. Step 04: To change the layout of an existing slide, click the Layout command, then choose the desired layout. 4.3.2.1 Managing slides Step 01: To duplicate slides, select the slide you wish to duplicate, right-click the mouse, and choose Duplicate Slide from the menu that appears. Step 02: To move a slide just click, hold, and drag the desired slide in the Slide Navigation pane to the desired position. Step 03: To delete a slide simply select the slide you wish to delete, then press the Delete or Backspace key on your keyboard. 4.3.2.2 Customizing slides Step 01: To change the slide size, select the Design tab, then click the Slide Size command. Choose the desired slide size from the menu that appears (Widescreen 16-by-9 or standard 4- by-3) Step 02: To format slide background, select the Design tab, then click the Format Background command. Finally select the desired fill options Step 03: To apply a theme, select the Design tab on the Ribbon, then click the More drop- down arrow to see all the available themes. Select the desired theme. 4.3.2.3 Applying Transitions Step 01: Select the desired slide from the Slide Navigation pane. This is the slide that will appear after the transition. Step 02: Click the Transitions tab, then locate the Transition to This Slide group. By default, None is applied to each slide. Step 03: Click the More drop-down arrow to display all transitions. Step 04: Click a transition to apply it to the selected slide. This will automatically preview the transition.
  • 35. Department of Chemical Engineering (Mehran, UET) Introduction to Computers and C++ Programming 4.4.1 Word Art PowerPoint allows you to add effects to the text inside of a text box, which is known as WordArt. For the most part, the types of effects you can add are the same as the ones you can add to shapes and text boxes (shadow, bevel, etc.). However, with WordArt, you can also Transform the text to give it a wavy, slanted, or inflated look. 4.4.2 Chart A chart is a tool you can use to communicate data graphically. Including a chart in a presentation allows your audience to see the meaning behind the numbers, which makes it easy to visualize comparisons and trends. 4.4.3 Animating Text and Objects In PowerPoint, you can animate text and objects such as clip art, shapes, and pictures. Animationโ€”or movementโ€”on the slide can be used to draw the audience's attention to specific content or to make the slide easier to read. There are many different animation effects, you can choose from, and they are organized into four types: Entrance: These control how the object enters the slide. For example, with the Bounce animation the object will "fall" onto the slide and then bounce several times. Figure 4.13: Entrance Animations Emphasis: These animations occur while the object is on the slide, often triggered by a mouse click. For example, you can set an object to Spin when you click the mouse. Figure 4.14: Emphasis Animations Exit: These control how the object exits the slide. For example, with the Fade animation the object will simply fade away. Figure 4.15: Exit Animations Motion Paths: These are similar to Emphasis effects, except that the object moves within the slide along a predetermined path, like a circle.
  • 36. Department of Chemical Engineering (Mehran, UET) Introduction to Computers and C++ Programming Figure 4.16: Motion Paths Animations 4.5 Procedure 4.5.1 Inserting a picture Step 01: Select the Insert tab, then click the Pictures command in the Images group. Step 02: A dialog box will appear. Locate and select the desired image file, then click Insert. Step 03: You can also click the Pictures command in a placeholder to insert images. 4.5.2 Applying WordArt style to a text Step 01: Select a text box, or select some text inside of the text box. Step 02: On the Format tab, click the More drop-down arrow in the WordArt Styles group. Step 03: A drop-down menu of WordArt Styles will appear. Select the style you want to use. 4.5.3 Inserting a shape Step 01: Select the Insert tab, then click the Shapes command in the Illustrations group. A drop- down menu of shapes will appear. Step 02: Select the desired shape. Step 03: Click, hold, and drag in the desired location to add the shape to the slide. 4.5.4 Inserting an audio Step 01: From the Insert tab, click the Audio drop-down arrow, then select Audio on My PC. Step 02: Locate and select the desired audio file, then click Insert. 4.5.5 Inserting an video Step 01: From the Insert tab, click the Video drop-down arrow, then select Video on My PC, trim the video's length, add a fade in, and much more. Step 02: Locate and select the desired video file, then click Insert.
  • 37. Department of Chemical Engineering (Mehran, UET) Introduction to Computers and C++ Programming 4.5.6 Inserting a blank table Step 01: From the Insert tab, click the Table command. Step 02: A drop-down menu containing a grid of squares will appear. Hover the mouse over the grid to select the number of columns and rows in the table. Step 03: Click on the slide where you want to place the table. The table will appear. Step 04: Click anywhere in the table, and begin typing to add text. Step 05: You can now place the insertion point anywhere in the table to add text. 4.5.7 Modifying tables 4.5.7.1 To add a row or column Step 01: Click a cell adjacent to the location where you wish to add a row or column. Step 02: Click the Layout tab on the right side of the Ribbon. Step 03: Locate the Rows & Columns group. If you want to insert a new row, select either Insert Above or Insert Below. If you want to insert a new column, select either Insert Left or Insert Right. 4.5.7.2 To delete a row or column Step 01: Select the desired row or column by clicking any cell in that row or column, then select the Layout tab. Step 02: In the Rows & Columns group, click the Delete command, then select Delete Rows or Delete Columns from the menu that appears. 4.5.8 To insert a chart Step 01: Select the Insert tab, then click the Chart command in the Illustrations group. Step 02: A dialog box will appear. Select a category from the left pane, and review the charts that appear in the right pane. Step 03: Select the desired chart, then click OK.
  • 38. Department of Chemical Engineering (Mehran, UET) Introduction to Computers and C++ Programming Step 04: A chart and a spreadsheet will appear. The data that appears in the spreadsheet is placeholder source data you will replace with your own information. The source data is used to create the chart.
  • 39. Department of Chemical Engineering (Mehran, UET) Introduction to Computers and C++ Programming Step 05: Enter data into the worksheet. Step 06: When you're done, click the X to close the spreadsheet. 4.5.8.1 To apply an animation to an object Step 01: Select the object you want to animate. Step 02: On the Animations tab, click the More drop-down arrow in the Animation group. Step 03: A drop-down menu of animation effects will appear. Select the desired effect. Step 04: The effect will apply to the object. The object will have a small number next to it to show that it has an animation. In the Slide pane, a star symbol also will appear next to the slide. 4.5.8.2 To add multiple animations to an object Step 01: Select an object. Step 02: Click the Animations tab.
  • 40. Department of Chemical Engineering (Mehran, UET) Introduction to Computers and C++ Programming Step 03: In the Advanced Animation group, click the Add Animation command to view the available animations. Step 04: Select the desired animation effect. 4.5.8.3 To open the Animation Pane Step 01: From the Animations tab, click the Animation Pane command. Step 02: The Animation Pane will open on the right side of the window. It will show all of the effects for the current slide in the order in which they will appear. Step 03: If you have several animated objects, it may help to rename the objects before reordering them in the Animation Pane. You can rename them in the Selection Pane. Toopen the Selection Pane, click an object, then from the Format tab click Selection Pane. Double-click the name of an object to rename it. 4.5.8.4 To change an effect's start option Step 01: On the Animation Pane, click and drag an effect up or down. Step 02: The effects will reorder themselves.
  • 41. Department of Chemical Engineering (Mehran, UET) Introduction to Computers and C++ Programming EXERCISE Exercise 5.1: Create the following presentation in MS PowerPoint, use animations and transitions as well.
  • 42. Department of Chemical Engineering (Mehran, UET) Introduction to Computers and C++ Programming
  • 43. Department of Chemical Engineering (Mehran, UET) Introduction to Computers and C++ Programming
  • 44. Lab 06: To become familiar with C++ Program and IDE Environment Upon successful completion of this lab the students will be able to: โ€ข Basic structure of C++ Program โ€ข Codeblock as IDE 6.1 Tools โ€ข PC 6.2 Background 6.2.1 Introducing IDE (Integrated Development Environment) For C++ Program, in this subject we will make use of CodeBlocks. CodeBlocks is an open- Source Cross platform IDE (Integrated Development environment), which is the graphical user environment as it offers the capability of the mouse. It includes GCC, MSVC (Microsoft Visual C Compiler), and also include many other compilers. Like many application CodeBlocks IDE is a window with work area and formatting tool bar at the top. The text editor is the area where the user writes source code (program). The following figure shows the IDE of CodeBlocks. Figure 6.2.1.1: IDE Environment The formatting bar at the top works same as in many other applications. To create a new Project, open File menu -> New and click Project. You can also make use of create a new project wizard. The wizard can be activated by clicking the โ€œCreate a New Projectโ€ option as shown by highlighted black box in figure 6.2.1.1. That would open a welcome dialog box as shown in figure 6.2.1.2. From this dialog box, we can choose project type from a list of variety of projects.
  • 45. Figure 6.2.1.2: Project Template Dialog Box C++ is normally being used to create Console applications, therefore, we will select console application and then click Go. Next, Project wizard will ask you to select the language that will be used to program the project. CodeBlock by default support two languages to create console applications as shows in the figure 6.2.1.3. Figure 6.2.1.3: Language Selection Dialog Box
  • 46. Upon pressing next, the wizard will ask to provide project name and to choose default directories to save all project related files, as shown in figure 6.2.1.4. Figure 6.2.1.4: Dialog Box for project related details Finally the wizard will ask to choose the compiler that will be used for compilation and execution of console applications. Among multiple compilers as supported by CodeBlocks, for the time being selecting GCC compiler would be enough for basic C++ Programs as shown in figure 6.2.1.5. Figure 6.2.1.5: Compiler selection dialog box
  • 47. Every C++ Project created by CodeBlock will by default have a single (.cpp) source file with a very simple program which will print a single line of text as shown in figure 6.2.1.6. Figure 6.2.1.6: Example Program (main.cpp) The code is normally written in a text editor where every code statement is numbered. In CodeBlocks text editor you can copy, paste, cut or delete certain block of code with some hotkeys. Hotkeys for copy, paste, cut and delete are Ctrl+Insert, Shift+Insert, Shift+Delete, Ctrl+Delete respectively. 6.2.2 Description of Basic C++ Program Whenever you start any objective you first deal with the basics because the basics are roots through which you can gain command on that objective. So here also we will start with a basic source program. You can write any C++ source program into the CodeBlocks editor or any other text editor like, Notepad or WordPad. Remember one thing that all the C++ source files have the extension โ€œ.cppโ€. Let us examine this simple C++ source program named (main.cpp): The program starts with the line containing a pound sign (#) and the keyword include. This line is known as preprocessor directive. The preprocessor directives are the instructions to the part of the compiler known as preprocessor which includes some extra files (codes) to the basic source program. The files iostream.h is known as the header files which contain the definitions of some functions. The iostream.h header file contains the definition of standard input/output streams like, cout and cin. As the computer is just a dumb machine and cannot understand anything until you instruct it and the keywords cout, cin are not understandable to the computer so the header files tells the compile that cout is this thing and whenever used do this. The words cout, are not known to the computer but the definitions of these codes are written in header files and these definitions tell the computer how to deal with the words cout. Simply speaking the preprocessor directive #include is responsible for including the contents of the header files into the source file. The main() is the function as the function is always along with the parentheses. The main()
  • 48. function is the first executable function in any C++ program. No matter where the main() function is located always the first precedence goes to the main() function and its contents. The contents of main function are enclosed in curly braces. The ing before the main function says that the function main has integer return type value and at the end of the function main() will return a single integer value. The braces โ€œ{ and }โ€ also known as curly braces, enclose the block of code present in any function. โ€œ{โ€œ is known as the opening brace and โ€}โ€ is known as closing brace. Opening brace shows the starting of the main or any function and closing brace shows the ending of the main or any function. The code of each and every function is always enclosed in the curly braces. The cout<<โ€Hello Word!โ€ tells the computer to print the string constant โ€œHello World!โ€ on the console screen. However a computer cannot understand what cout is but the coding written in iostream.h header file for cout makes the computer understand what does cout mean. The cout is the standard output stream which directs the flow of data to the console screen. What ever written in the double quotations in cout statement is printed as it is on the console screen. The output of main.cpp on the console screen may look like as shown in figure 6.2.2.1; Figure 6.2.2.1: Output of Example Program (main.cpp)
  • 49. Lab 07: Getting familiar with Variables, Data Types and Constants Upon successful completion of this lab the students will be able to: โ€ข Create Variables and constants of various data types in programs. 7.1 Tools โ€ข PC 7.2 Background 7.2.1 Variables The basic definition of the variable says that the variables are those memory locations whose value can be varied/altered according to the particular situations. Like in other programming languages variables are one of the major building blocks of C++ programming language. The variables set the location into the memory and give it certain name so you can store certain value and access the particular location of memory. The name given to the variable is known as identifier. It is so called because it identifies/indicates certain memory location. In C++ programming language there are certain rules for identifiers so, being in the boundary of those you can declare an identifier. Some of the rules are given as: 1. The identifier can contain letters form a-z, numbers form 0-9 and an underscore sign. 2. The identifier can be in upper or lower case but the variable in upper case will differ from the variable in lower i.e. ANS is not same as ans or Ans. 3. The first character of the identifier must be letter or an underscore sign. 4. The identifier should not contain any space (white space) within it. 5. You can also give underscore sign in the middle of the identifier as a space for your ease for example, square inch. 6. The identifier must not be same as the keywordsโ€”the words predefined in C++ which have their own specific meaning and function. Like, main, void, and return, cout, cin etc. are keywords so the identifier should not be like them. 7. The identifier can be as long as you like, but only the first 247 characters (in Visual C++) or 250 characters (in C++ Builder) will be recognized. 8. The identifier must be unique throughout the program i.e. if you have declared the identifier Var1 so, to access or call it you must give its same name i.e. Var1. Some valid identifiers are: Var, var, VAR, Var1, VAR1, Var_one, _Var1, _Var_one_of_one etc.
  • 50. Some of invalid identifiers are: 1Var, 1_var, void, cout, etc. 7.2.2 Declaring and Defining a Variable You might think that the two words declaring and defining are equivalent but in fact there is a lot of difference between both of them. The declaring is the process of giving a name to the variable and its data type. The data type means that which type of value will be stored in that variable whereas the name of the variable must follow the identifier rules of C++. int var1; The above line is an example of declaring a variable in which the variable is given the name var1 and integer data type declared for it which tells the computer that the value stored in the variable var1 must be an integer. Whereas the process of initializing certain value to the variable at the time of declaration is referred to as defining a variable. The line below illustrated the concept of defining a variable: int var1=50; In above line the variable var1 is initialized with the integer value 50. In defining a variable we set/initialize some values to the variable before the compiling. var1 var1 Variable Declared Variable Defined int var1; int var1=50; Examine the below program (Var.cpp) which initializes and declares some variables: Program (Var.cpp) #include <iostream.h> #include <conio.h> int main() { clrscr(); int mixture; int ethane=5, methane=8, propane=2; mixture=(ethane + methane + propane); cout<<โ€There are โ€<<ethane<<โ€ dm cube of ethaneโ€<<endl; cout<<โ€There are โ€<<methane<<โ€ dm cube of methaneโ€<<endl; cout<<โ€There are โ€<<propane<<โ€ dm cube of propaneโ€<<endl; 50 Memory Memory Empty
  • 51. cout<<โ€There are โ€<<mixture<<โ€ dm cube cubes of mixtureโ€; return 0; } The above program starts with two preprocessor directives which include two header files which contain definitions of some functions and keywords as, cout and clrscr(). Then in main function one variable mixture is declared and three variables ethane, methane and propane are defined. The first variable mixture is only declared as it is only given the name and its data type and no value is set in the memory location of the variable. Where as in the second variable initialization statement the memory location is set for the three variables and a certain value is initialized to the memory location of the variables. The last four cout statements prints the values of the variable stored in to them on the console screen with some strings. 7.2.3 Data Type A The variables are the fundamental building blocks of C++ as discussed earlier, which set the memory location by giving them certain names. The variables can store certain data/values into those memory locations but the data/values stored in to the variables are of different types and occupy different sizes of memories. 7.2.3.1 Integer Data Type The numeric data having no fractional/decimal part is known as integer data. The integer data type variables can only store and represent integer data. The integer data type is of three types i.e. type int, type short and type long. Type int occupies 4 bytes (32 bits) of memory. In type int you can store the integers with in the rage of -2,147,483,648 to 2,147,483,647. To define or declare a type int variable use the keyword int before the variable name like, int var1= 100000000; Type short occupies 2 bytes (16 bits) of memory. In type short you can store the integers within the range of -32,768 to 32,767. To define or declare a type short variable use the keyword short before the variable name like, short var1=10; Type long occupies 4 bytes (32 bits) of memory. In type long you can store the integers with in the rage of -2,147,483,648 to 2,147,483,647. To define or declare a type long variable use the keyword long before the variable name and place the letter L after the integer constant like, long var1=100000000L;
  • 52. Program (integer.cpp) #include <iostream.h> int main() { int a=10000; long b=20000; short c=5; cout<<โ€Integer = โ€<<a<<endl; cout<<โ€Long = โ€<<b<<endl; cout<<โ€Short = โ€<<c; return 0; } 7.2.3.2 Floating Point Data Type The numeric data having fractional/decimal part is known as floating point data. The floating point data type variables can store and represent floating point data. The floating point data type is of three types i.e. type float, type double and type long double. Type float occupies 4 bytes (32 bits) of memory. In type float you can store the floating point values within the range of 3.8 x 10-38 to 3.8 x 1038 with the precision of seven (7) digits. To define or declare a type float variable use the keyword float before the variable name and place the letter F after the floating point constant like, float PI=3.1415F; but placing F is optional. The other two floating point data types are same as type float but they offer wider range of values and precisions. Type double occupies 8 bytes (64 bits) of memory. In type double you can store the floating point values within the range of 1.7 x 10-308 to 1.7 x 10308 with the precision of fifteen (15) digits. To define or declare a type double variable use the keyword double before the variable name like, double PI=3.141592654; Type long double occupies 10 bytes (80 bits) of memory. In type long double you can store the floating point values within the range of 1.2 x 10-4932 to 1.2 x 104932 with the precision of nineteen (19) digits. To define or declare a type long double variable use the keyword long double before the variable name and place the letter L after the floating point constant like, long double PI=3.141592654546845348645454L; but placing L is optional. In floating point data types you can write the floating point constants using exponential notation, which is the way to write very large or very small numbers in the power of ten. Like instead of writing 2,000,000,0 you can write 1.0E7 in exponential notation. Similarly for 52347.2 you can write 5.2E4 and for 0.0000006024 you can write 6.02E-7. double atoms=6.02E-7; If you want to define a floating point variable then in type float place a letter F in the end of the constant number, in type double you donโ€™t have to identify the complier that it is a constant value it considers it as default but in type long double you have to place the letter L after the constant
  • 53. number. But placing F and L is optional. float PI=3.1415F; double PI=3.141592654; long double PI=3.141592654546845348645454L; You can also make the value of the floating point variable constant throughout the function by using the constant qualifier i.e. const. To define a constant floating point variable place the keyword const before the data type of the variable as in: const float PI=3.1415F; const double PI=3.141592654; const long double PI=3.141592654546845348645454L; Examine the following program: Program (area.cpp) #include <iostream.h> int main() { const float PI=3.14F; int radius; float area; cout<<โ€Enter the radius of the circle: โ€; cin>>radius; area=PI*(radius*radius); cout<<โ€The area of the circle is: โ€<<area; return 0; } This program defines the constant value of the variable PI and declares the integer variable radius and a type float variable area. The program gets the value of radius during the run-time in integer type and then puts it in the expression area=PI*(radius*radius) and calculates the value of area and finally shows the value of area. 7.2.3.3 Character Data Type The data containing individual characters is known as character data. The character data type variables can only store and represent the characters. The character data type variables can only store single character at a time in a single variable. Type char occupies 1byte (eight bits) of the memory. In type char you can store the characters within the range of integers -128 to 127, whereas the integers -128 to 127 represent the ASCII equivalents to the characters. To declare a character data type use keyword char before the variable name as in,
  • 54. char ch; The above declaration indicates that the variable ch is a character type data variable and in the program it will only store the characters. And to define a variable you can either give the character in single quotation marks or you can give the ASCII equivalent to that character. For example if we want to store the character A (capital A letter) in the variable ch then we can write as in, char ch=โ€™Aโ€™; char ch=65; In first line the character A is enclosed in single quotation marks so the character A will be store in the variable ch where as in second line the number 65 is the ASCII equivalent to the character A so the computer will translate it in to character A and will store it in the variable ch. No matter which method you perform the aim of both the methods is same. Examine the following program: Program (char.cpp) #include <iostream.h> int main() { char ch; cout<<โ€Enter any character: โ€; cin>>ch; cout<<โ€you have entered:โ€<<ch; return 0; } Table 7.2.3.3.1: Data Type Ranges Numerical Range Digits of Bytes of Keyword Low High Precision Memory char -128 127 n/a 1 short -32,768 32,767 n/a 2 int -2,147,483,648 2,147,483,647 n/a 4 long -2,147,483,648 2,147,483,647 n/a 4 float 3.4 x 10-38 3.4 x 1038 7 4 double 1.7 x 10-308 1.7 x 10308 15 8 long double 1.2 x 10-4932 1.2 x 104932 19 10
  • 55. 7.2.3.4 Unsigned Data Type The data types int, short, long and char have their range with in which they can store certain values and these ranges start from some negative number to positive number. So by eliminating negative numbers we can extend the size of the data types. Doing this will make the data types to store large values as twice as the signed data types do. The unsigned data types are used when we are dealing with only positive numbers. To convert a signed data type into an unsigned data type place the keyword unsigned before the data type as in, unsigned int var1=12000; Type unsigned char occupies 1 byte (8 bits) of memory. In type unsigned char you can store the characters within the range of integers 0 to 255, where as the integers 0 to 255 represent the ASCII equivalents to the characters. To declare an unsigned char data type variable use keywords unsigned char before the variable name as in, unsigned char ch=250; Type unsigned short occupies 2 bytes (16 bits) of memory. In type unsigned short you can store the integers within the range of 0 to 65,535. To declare an unsigned short data type variable use the keywords unsigned short before the variable name as in, unsigned short var1=50; Type unsigned int and type unsigned long occupy 4 bytes (32 bits) of memory. In both the data types you can store the integers within the range of 0 to 4,294,967,295. To declare an unsigned int and unsigned long data type use the keywords unsigned int and unsigned long respectively before the variable names as in, unsigned int var1=10000; unsigned long var1=10000; Table 7.2.3.4.1: Unsigned data types and their ranges Numerical Range Bytes of Keywords Low High Memory char 0 255 1 short 0 65,535 2 int 0 4,294,967,295 4 long 0 4,294,967,295 4 7.2.3.5 The Const Qualifier The keyword const is known as the constant qualifier. It specifies that the value of the variable will remain constant and will not be altered throughout the function. If any attempt is made to alter the value of the variable the compiler will give the error. It is always placed before the data type of the variable as in, const float PI=3.1415F; It specifies that the variable PI stores the floating point number 3.1415 and this value will not be altered and will remain constant.
  • 56. Examine the following program: Program (const.cpp) #include <iostream.h> int main() { const int a=15; int b=10,c; b=b+1; c=a+b; cout<<c; return 0; }
  • 57. Lab 08: Getting familiar with Operators in C++ Upon successful completion of this lab the students will be able to: โ€ข Use different operators in C++ Programs. 8.1 Tools โ€ข PC 8.2 Background 8.2.1 Arithmetic Operators The arithmetic operators are those who perform some arithmetic operations on the numbers. There are five arithmetic operators +, -, *, / and %. These are used for addition, subtraction, multiplication, division and remainder respectively. They have the same purpose in C++ as in other languages. The first four operators have the same functionality as they posses in algebra. The fifth operator is known as remainder operator it finds the remainder when one number divides another. It is also known as modulus operator. It is denoted by % percentage sign. The first four arithmetic operators work on all data types but the remainder operator only works on integer variable (type short, type int, type long). Program (arith.cpp) #include <iostream.h> #include <conio.h> void main() { int a=10, b=5; cout<<(a+b)<<endl; // 15 cout<<(a-b)<<endl; // 5 cout<<(a*b)<<endl; // 50 cout<<(a/b)<<endl; // 2 cout<<(a%b)<<endl; // 0 getch(); } In the first cout statement the variables a and b are added, in second the variables are subtracted, in third the variables are multiplied, in fourth the variables are divided and in fifth the variable are remaindered. The output of this program is: 15 5 50 2 0
  • 58. 8.2.2 Arithmetic Assignment Operators The operators used in assignment statements to shorten and clarify the code are known as arithmetic assignment operators. They are +=, -=, *=, /= and %=. In some situation probably you would have faced some statements like, a=a+b; b=b-10; var1=var1*50; var1=var1/var2; In these statements a certain value is given to a variable by performing some arithmetic operation but one variable is used twice in the statements which is really stretching therefore C++ also offer other approach to shorten and make the assignment statements more clearer. In this approach you can use the arithmetic assignment operators +=, -=, *=, /= and %= which have the same effects as above. In C++ a=a+1; and a+=1; have the same effects. Some other equivalents are, electrons += 1; is same as electrons=electrons+1; electrons -= 1; is same as electrons=electrons-1; electrons *= 1; is same as electrons=electrons*1; electrons /= 1; is same as electrons=electrons/1; electrons %= 1; is same as electrons=electrons%1; Program (arithassign.cpp) #include <iostream.h> int main() { int boxes=40; cout<<boxes<<endl; boxes += 10; //boxes = 50 cout<<boxes<<endl; boxes -= 20; //boxes = 30 cout<<boxes<<endl; boxes *= 2; //boxes = 60 cout<<boxes<<endl; boxes /= 5; //boxes = 12 cout<<boxes<<endl; boxes %= 5; //boxes = 2 cout<<boxes; return 0; } 8.2.3 Relational Operators The relational operators are the operators which compares the operands. There are only two possible values that the relational operators can give after performing the operation on the operands i.e. 0 or 1. If the condition becomes true when the operands are compared with relational operators we get the value 1. On the other hand if the condition becomes false when the operands are compared with relational operators we get the value 0. There are six relational operators they
  • 59. are, Greater than >, Less than <, Equal to =, Not equal to !=, Greater than or equal to >=, Less than or equal to <=. Program (relat.cpp) #include <iostream.h> int main() { int a=10, b=5; cout<<โ€a>b is โ€<<(a>b)<<endl; // 1 cout<<โ€a<b is โ€<<(a<b)<<endl; // 0 cout<<โ€a==b is โ€<<(a==b)<<endl; // 0 cout<<โ€a!=b is โ€<<(a!=b)<<endl; // 1 cout<<โ€a>=b is โ€<<(a>=b)<<endl; // 1 cout<<โ€a<=b is โ€<<(a<=b)<<endl; // 0 return 0; } Table 8.2.3.1: List of Relational Operators Operator Meaning > Greater than < Less than == Equal to != Not equal to >= Greater than or equal to <= Less than or equal to 8.2.4 Logical Operators Logical operators logically combine the Boolean variables (0 and 1). There are three logical operators And &&, OR || and Not !. They have wide scope when used with relational operators. They combine the Boolean value obtained by relational operators. Like in relational operators we can only compare two operands and get the true or false value of only single comparison but if we want to make the condition satisfied only when the two or more comparison are satisfied then we use logical operators. And && operator combines the Boolean values and makes the condition satisfied only when all the comparisons are satisfied as, (a>b && a>c && a>d) OR || operator combines the Boolean values and makes the condition satisfied when atleast one comparison becomes true as,
  • 60. (a>b || a>c || a>d) Not ! operator combines the Boolean values and makes the condition satisfied only when all the comparisons become false as, (!(a>b)&& !(a>c)&& !(a>d)) Program (logic.cpp) #include <iostream.h> #include <conio.h> void main() { int a=2, b=3, c=4; cout<<(a>b && a>c)<<endl; // 0 cout<<(a>b || a>c)<<endl; // 0 cout<<(b>a || c>b)<<endl; // 1 cout<<(!(a>b) && !(a>c)); // 1 getch(); } Table 8.2.4.1: List of Logical Operators Operator Effect && Logical AND || Logical OR ! Logical NOT Exercise 1. Write a program that will compute the area of a circle. The user must enter the radius of the circle. Use the following formula for area A=3.14*R^2? 2. Write a program that will solve for the power dissipation of a resistor when the voltage across the resistor and the current in the resistor are known. The relationship for the power dissipation is: P=I^2*R? 3. Develop a program that will convert the temperature from degree Celsius to degree Fahrenheit. User input the temperature in Celsius. The relation is F=5/9*C+32?
  • 61. Test Expression Lab 09: To become familiar with Decision making statements in C++ Upon successful completion of this lab the students will be able to: โ€ข Use decision making statements in program applications. 9.1 Tools โ€ข PC 9.2 Background 9.2.1 Decision Making statements Decision making statements are the statements which take the decisions to make the conditions satisfied and execute their body. If the condition is satisfied (True) then the statement will cause its body to be executed and if the condition is not satisfied (False) then the control will be transferred to the next condition or to the first statement after the body of the conditional statement. There are three types of decision making statement also known as conditional statements. These are so called conditional statements because they depend on certain conditions. They are, 1. The if Statement 2. The if-else Statement 3. The switch Statement 9.2.2.1 The If Statement It is the simplest decision making/conditional statement. The if statement contains the keyword if which is predefined in C++ followed by the condition in the parentheses () with some relational and logical operators. If the condition is satisfied then the body of the if statement will be executed else the control will be transferred to the first existing statement after the if statement. If the body of the if statement contains only single statement then you donโ€™t have to enclose that statement in the braces but in case of multiple statements you should enclose the block of code in the curly braces. The syntax of the if statement is given below; Test expression if (a>b && a>c) statement; Single Statement if body if (a>b && a>c) { statement; statement; Multiple Statement if body statement;
  • 62. } Figure 9.2.2.1.1: Flow chart of If Statement Program (If.cpp) #include <iostream.h> #include <conio.h> void main() { int Age1=20, Age2=15, Age3=7; if(Age1>Age2&&Age1>Age3) { cout<<โ€Person with Age1 is elderโ€<<endl; cout<<โ€Persons with Age2 and Age3 are youngerโ€; } getch(); } 9.2.2.2 The If Statement The if-else statement is another decision making statement. The if-else statement contains the keywords if and else which are predefined in C++. The condition is contained in the parentheses () after the keyword if. If the condition is satisfied then the block of code after the keyword if is executed while if the condition is not satisfied then the control is transferred to the else and the block of code contained after it is executed. If you want to execute the single statement if the condition is either satisfied or not then you donโ€™t have to enclose it in the curly braces but if you want to execute certain block of code (multiple statements) then you have to enclose the block of code in the curly braces. The syntax of the if-else statement is given below; Test Expression Body of if False True Exit
  • 63. Test Expression Test Expression if (a>b && a>c) statement; Single Statement if body else statement; Single Statement else body if (a>b && a>c) { statement; statement; Multiple Statement if body statement; } else { statement; statement; Multiple Statement else body statement; } Test Expression Body of if Exit False True Body of else Figure 9.2.2.2.1: Flow chart of If-else statement
  • 64. Integer or character variable Note: no semicolon here Integer or character constant First case body Causes exit from switch Second case body Program (IfElse.cpp) #include <iostream.h> #include <conio.h> int main() { int num1=100, num2=50; if(num1>num2) { cout<<โ€First number is greaterโ€<<endl; cout<<โ€Second number is smallerโ€; } else { cout<<โ€First number is smallerโ€<<endl; cout<<โ€Second number is greaterโ€; } return 0; } 9.2.2.3 The switch statement The switch statement is also the decision making statement like if statement and if-else statement. The switch statement is used when the bunch of decisions depend on the same variable. It works as if and if-else statements but it is somewhat clearer and easily understandable at glance. The switch statement starts with the keyword switch (lower case) followed by the variable in the parentheses (). The switch statement takes the decision according to the values of the variable in the parenthesis. The whole body of the switch statement is enclosed by curly braces. Then the switch statement matches the values of the variable with the cases in its body. The keyword case followed by the choice and the colon makes the block of code below it to be executed if the value of the switch variable matches with the choice in the case. You can give multiple cases in the switch statement and the switch statement will try to match the value of the variable with the cases and if no case is matched the control is returned to the default. The key word default followed by the colon causes the block of code below it to be executed if the switch statement does not match any of the case. The break statement is used after the block of code in each case, which causes the control to be transferred out of the switch statement whenever the case executes its block of code. The syntax of the switch statement is given below; switch (ch) { case 1: statement; statement; break; case 2: statement;
  • 65. Third case body Default case body Note: no semicolon here statement; break; case 3: statement; statement; break; default: statement; statement; } True True True Switch variable equals 1st case constant 1st case body False Switch variable equals 2nd case constant Switch variable equals 3rd case constant 2nd case body 3rd case body Default body False False Exit Figure 9.2.2.3.1: Flow chart of the switch statement
  • 66. Program (Switch.cpp) #include <iostream.h> #include <conio.h> int main() { int a, b; char ch; cout<<โ€Enter first number: โ€œ; cin>>a; cout<<โ€Enter second number: โ€œ; cin>>b; cout<<โ€Enter the operator: โ€œ; ch=getche(); cout<<endl; switch(ch) { case โ€˜+โ€™: cout<<โ€a + b = โ€<<a+b; break; case โ€˜-โ€™: cout<<โ€a - b = โ€<<a-b; break; case โ€˜*โ€™: cout<<โ€a * b = โ€<<a*b; break; case โ€˜/โ€™: cout<<โ€a / b = โ€<<a/b; break; default: cout<<โ€You have entered the wrong operatorโ€; } return 0; }
  • 67. Exercise 1. Write a program that determines the year entered by user is leap year or not? 2. Write a program which gives the following output Enter age>> And prints the following: If Age is greater than 45 then prints the message โ€œYou are old stay at home and wait for callโ€ If Age is greater than 30 and less than 45 then prints โ€œHey! man enjoy your life with your kidsโ€ If Age is greater than 20 and less than 30 then prints โ€œCool! have a search for your best suitโ€ If Age is greater than 10 and less than 20 then prints โ€œWork hard! Your days to studyโ€ If Age is less than 10 then prints the message โ€œOh! Kid your days to cryโ€ Use if-else statement. 3. Write the above program #02 by using the switch statement? 4. Develop a C++ program which will compute the power dissipation of a resistor, when the user inputs current value and the resistance. Program warns the user if power dissipation is above 1 watt. The power dissipation is measured by P=I2R.