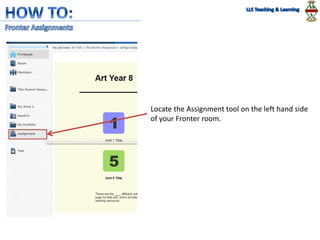
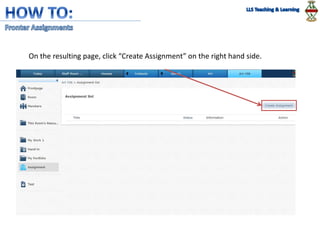
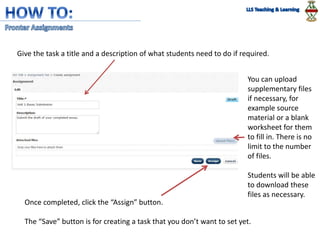
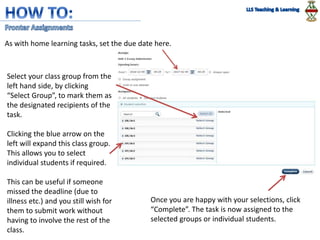
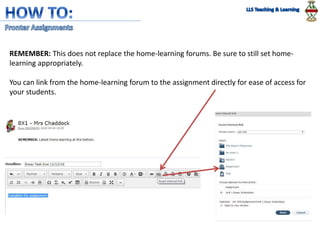
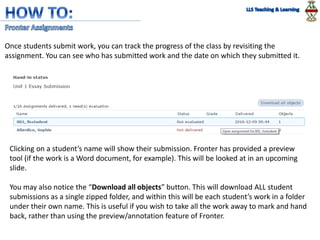
Fronter
“ ” Tool
The assignment tool is a new
feature of Fronter that allows for a
more interactive and electronic
way of setting tasks and receiving
the work electronically.
Locate the Assignment tool on the left hand side
of your Fronter room.
On the resulting page, click “Create Assignment” on the right hand side.
Give the task a title and a description of what students need to do if required.
You can upload
supplementary files
if necessary, for
example source
material or a blank
worksheet for them
to fill in. There is no
limit to the number
of files.
Students will be able
to download these
files as necessary.
Once completed, click the “Assign” button.
The “Save” button is for creating a task that you don’t want to set yet.
As with home learning tasks, set the due date here.
Select your class group from the
left hand side, by clicking
“Select Group”, to mark them as
the designated recipients of the
task.
Clicking the blue arrow on the
left will expand this class group.
This allows you to select
individual students if required.
This can be useful if someone
missed the deadline (due to
illness etc.) and you still wish for
them to submit work without
having to involve the rest of the
class.
Once you are happy with your selections, click
“Complete”. The task is now assigned to the
selected groups or individual students.
REMEMBER: This does not replace the home-learning forums. Be sure to still set home-
learning appropriately.
You can link from the home-learning forum to the assignment directly for ease of access for
your students.
Once students submit work, you can track the progress of the class by revisiting the
assignment. You can see who has submitted work and the date on which they submitted it.
Clicking on a student’s name will show their submission. Fronter has provided a preview
tool (if the work is a Word document, for example). This will be looked at in an upcoming
slide.
You may also notice the “Download all objects” button. This will download ALL student
submissions as a single zipped folder, and within this will be each student’s work in a folder
under their own name. This is useful if you wish to take all the work away to mark and hand
back, rather than using the preview/annotation feature of Fronter.
Once work has been reviewed/graded, you can supply a comment and (if relevant) a grade in the boxes. Ticking the “Set
status to evaluated” box will mark the student’s assignment as completed and they will be notified of the grade and
comments.
You can also attach documents here, such as a separately annotated piece of work, for the students to look at. “Add
content” allows you to record audio if you wish to give verbal feedback.
Here you can see
the name of the
student and the
file(s) they’ve
submitted.
Clicking the file
name will open it
in the Fronter
preview window
(image on next
slide).
While unlikely to be
used, the
“Add/remove files”
button allows you to
upload work on
behalf of the
student. An example
scenario would be if
they’ve handed to
you via USB drive
and you wish to
submit it for them
electronically.
The preview feature is still in development and is rudimentary at best, but provides a quick
look at a student’s written submission.
Highlighting a part of text will bring up the “Annotate” popup, which allows you to write a
comment about a particular part of the work. Any annotations will be viewable by the
students when they revisit the assignment. This can be useful for quick feedback.
For more in-depth feedback it is recommended that files be downloaded and marked
separately using the more advances features of word-processing packages.
Of course work can be printed and marked by hand, following the school’s marking
policies.
Unlike the use of home-learning forums, this feature is not mandatory in any way.
This how-to presentation is designed to highlight this feature to you, how you wish to
adapt it to fit in with your home-learning and scheme of work is up to you. It has different
applications for different year groups. A few notable examples;
• In a class where the task is to complete a worksheet (such as ‘fill in the blanks), the
blank worksheet can be uploaded as an assignment. Students then receive the
assignment, fill in the worksheet and submit it electronically.
• The assignment tool is particularly effective for older students where the bulk of work
involves word-processed essays. A batch of essays can be downloaded and taken away
to mark at your leisure, then distributed back to the students via the tool.
• Subjects using audio (Music, Foreign Languages) can upload a particular audio file as
part of the assignment. Students can then download/listen to this file in order to
complete a task or worksheet.
Providing you don’t delete assignment tasks, they will be there for future reference to be
revisited by either you or your students.
This tool should supersede the “Hand-in” tool (for those of you still using it).
One-to-one or department training can be available if you wish.

Fronter assignment tool

  • 1.
  • 2.
    The assignment toolis a new feature of Fronter that allows for a more interactive and electronic way of setting tasks and receiving the work electronically.
  • 3.
    Locate the Assignmenttool on the left hand side of your Fronter room.
  • 4.
    On the resultingpage, click “Create Assignment” on the right hand side.
  • 5.
    Give the taska title and a description of what students need to do if required. You can upload supplementary files if necessary, for example source material or a blank worksheet for them to fill in. There is no limit to the number of files. Students will be able to download these files as necessary. Once completed, click the “Assign” button. The “Save” button is for creating a task that you don’t want to set yet.
  • 6.
    As with homelearning tasks, set the due date here. Select your class group from the left hand side, by clicking “Select Group”, to mark them as the designated recipients of the task. Clicking the blue arrow on the left will expand this class group. This allows you to select individual students if required. This can be useful if someone missed the deadline (due to illness etc.) and you still wish for them to submit work without having to involve the rest of the class. Once you are happy with your selections, click “Complete”. The task is now assigned to the selected groups or individual students.
  • 7.
    REMEMBER: This doesnot replace the home-learning forums. Be sure to still set home- learning appropriately. You can link from the home-learning forum to the assignment directly for ease of access for your students.
  • 8.
    Once students submitwork, you can track the progress of the class by revisiting the assignment. You can see who has submitted work and the date on which they submitted it. Clicking on a student’s name will show their submission. Fronter has provided a preview tool (if the work is a Word document, for example). This will be looked at in an upcoming slide. You may also notice the “Download all objects” button. This will download ALL student submissions as a single zipped folder, and within this will be each student’s work in a folder under their own name. This is useful if you wish to take all the work away to mark and hand back, rather than using the preview/annotation feature of Fronter.
  • 9.
    Once work hasbeen reviewed/graded, you can supply a comment and (if relevant) a grade in the boxes. Ticking the “Set status to evaluated” box will mark the student’s assignment as completed and they will be notified of the grade and comments. You can also attach documents here, such as a separately annotated piece of work, for the students to look at. “Add content” allows you to record audio if you wish to give verbal feedback. Here you can see the name of the student and the file(s) they’ve submitted. Clicking the file name will open it in the Fronter preview window (image on next slide). While unlikely to be used, the “Add/remove files” button allows you to upload work on behalf of the student. An example scenario would be if they’ve handed to you via USB drive and you wish to submit it for them electronically.
  • 10.
    The preview featureis still in development and is rudimentary at best, but provides a quick look at a student’s written submission. Highlighting a part of text will bring up the “Annotate” popup, which allows you to write a comment about a particular part of the work. Any annotations will be viewable by the students when they revisit the assignment. This can be useful for quick feedback. For more in-depth feedback it is recommended that files be downloaded and marked separately using the more advances features of word-processing packages. Of course work can be printed and marked by hand, following the school’s marking policies.
  • 11.
    Unlike the useof home-learning forums, this feature is not mandatory in any way. This how-to presentation is designed to highlight this feature to you, how you wish to adapt it to fit in with your home-learning and scheme of work is up to you. It has different applications for different year groups. A few notable examples; • In a class where the task is to complete a worksheet (such as ‘fill in the blanks), the blank worksheet can be uploaded as an assignment. Students then receive the assignment, fill in the worksheet and submit it electronically. • The assignment tool is particularly effective for older students where the bulk of work involves word-processed essays. A batch of essays can be downloaded and taken away to mark at your leisure, then distributed back to the students via the tool. • Subjects using audio (Music, Foreign Languages) can upload a particular audio file as part of the assignment. Students can then download/listen to this file in order to complete a task or worksheet.
  • 12.
    Providing you don’tdelete assignment tasks, they will be there for future reference to be revisited by either you or your students. This tool should supersede the “Hand-in” tool (for those of you still using it). One-to-one or department training can be available if you wish.