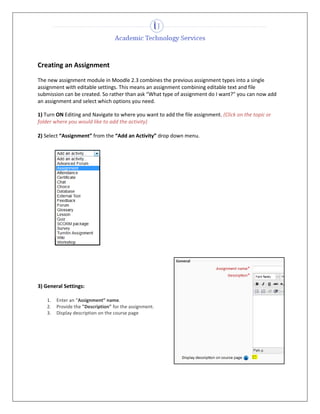
1. Creating an Assignment
The new assignment module in Moodle 2.3 combines the previous assignment types into a single
assignment with editable settings. This means an assignment combining editable text and file
submission can be created. So rather than ask “What type of assignment do I want?” you can now add
an assignment and select which options you need.
1) Turn ON Editing and Navigate to where you want to add the file assignment. (Click on the topic or
folder where you would like to add the activity)
2) Select “Assignment” from the “Add an Activity” drop down menu.
3) General Settings:
1. Enter an “Assignment” name.
2. Provide the "Description" for the assignment.
3. Display description on the course page
2. 2
4) Assignment Settings
1. Choose availability/due dates: Be sure to check the enable button to activate.
2. Choose whether late submissions will be accepted or not.
3. Choose whether you will require students to click a submit button.
4. Notify graders about submissions, If enabled, graders (usually teachers) receive a message whenever a
student submits an assignment, early, on time and late.
5. Notify graders about late submissions If enabled, graders (usually teachers) receive a message whenever a
student submits an assignment late.
5) Submission Settings
1. Online Text - If enabled, students are
able to type rich text directly into an
editor field for their submission.
2. File submissions - If enabled, students
are able to upload one or more files as
their submission.
3. Maximum number of uploaded files - If
file submissions are enabled, each
student will be able to upload up to this number of files for their submission.
4. Submission Size – Files uploaded by students may be up to this size.
5. Submission Comments - If enabled, students can leave comments on their own submission. This can be
used to let students alert the marker about which files the master file is in cases of inter-linked files, for
instance.
6) Feedback Settings
1. Feedback Comments - If enabled, the marker can
leave feedback comments for each submission.
2. Feedback Files - If enabled, the teacher will be able
to upload files with feedback when marking the
assignments. These files may be, but are not limited
to marked up student submissions, documents with
comments or spoken audio feedback.
3. 3
7) Grade Settings
1. Choose your grade points or grading scale.
2. Choose grade methods - Choose the advanced
grading method that should be used for
calculating grades in the given context. To disable
advanced grading and switch back to the default
grading mechanism, choose 'Simple direct
grading'.
3. Choose the Grade Category - This setting controls the category in which this activity's grades are placed in
the gradebook.
8) Common Module Settings:
1. Choose one of the group types that you want applied to the activity.
2. Choose whether the activity should be visible or not to participants.
3. Choose an ID for the activity, for the purposes of using the ID in
gradebook calculations.
Setting an ID number provides a way of identifying the activity for
grade calculation purposes. If the activity is not included in any grade
calculation then the ID number field can be left blank.
9) Restrict Access
1. Access from/to dates to determine when
students can access the activity via a link on
the course page.
2. This setting determines any grade
conditions which must be met in order to
access the activity. Multiple grade conditions
may be set if desired. If so, the activity will
only allow access when ALL grade conditions
are met.
10) Save/Cancel Settings:
1. "Save and return to course" this view will take you back to the front page of your course where you can
see the link to the assignment.
2. “Save and display” this view will show you what the assignment looks like to the participants.
3. “Cancel” will stop the activity from being created and all settings you choose to be lost.
4. 4
View Submissions and Give Feedback
Once a file has been submitted for marking you can view this file, give feedback and return the file to the student.
Follow these steps:
1. Locate the assignment in your course and click on it.
2. The following window will appear. This will give you a grading summary of the assignment.
3. Click on View/grade all submissions.
5. 5
4. To grade the assignment, Click on the icon in the grade column to grade the submission or check off the Quick
Grading option below to grade the whole column.
6. After you click on the grading icon, you can view submission status. Click on the document to open and place a
grade in the area at the bottom.
7. Scroll down to add Feedback Comments
6. 6
8. Attach a response file if needed by dropping and dragging it into the proper location
9. Save Changes or Save and show next if you have another student to view.