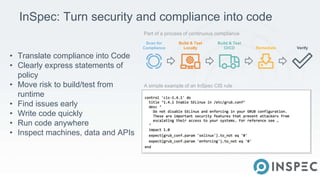
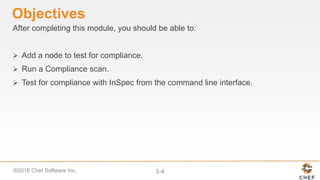
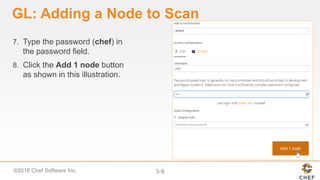
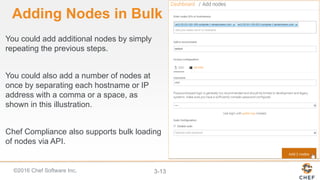
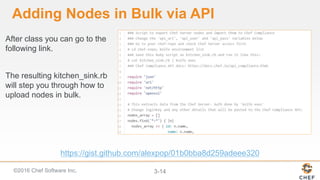
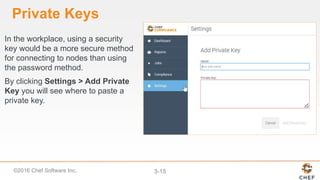
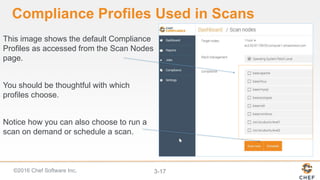
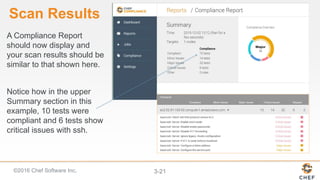
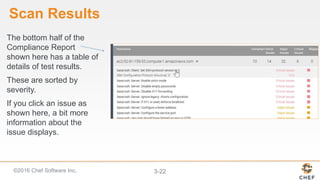
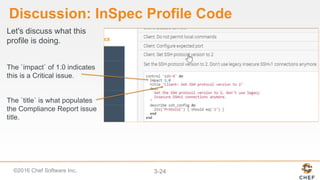
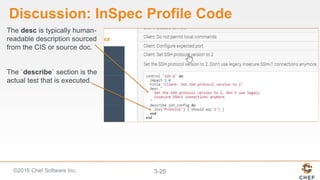
Getting Started with Compliance
Automation
Running Scans
InSpec: Turn security and compliance into code
• Translate compliance into Code
• Clearly express statements of
policy
• Move risk to build/test from
runtime
• Find issues early
• Write code quickly
• Run code anywhere
• Inspect machines, data and APIs
A simple example of an InSpec CIS rule
Part of a process of continuous compliance
Scan for
Compliance
Build & Test
Locally
Build & Test
CI/CD Remediate Verify
©2016 Chef Software Inc. 3-4
Objectives
After completing this module, you should be able to:
 Add a node to test for compliance.
 Run a Compliance scan.
 Test for compliance with InSpec from the command line interface.
©2016 Chef Software Inc. 3-5
Adding a Node to Scan
To add a node you'll need:
• The IP address or FQDN of the nodes to be tested.
• Access configuration (ssh or WinRM).
• The node's username and password OR
• The node's username plus security key pair.
©2016 Chef Software Inc. 3-6
Objective:
Group Lab: Adding a Node to Scan
 Add a Linux Node to Scan
 Test connectivity
Note: In the next module you will perform the same exercises as in this module but using
a Windows node as your target node.
©2016 Chef Software Inc. 3-7
GL: Adding a Node to Scan
1. From your Chef Compliance
Dashboard, click Add Node.
©2016 Chef Software Inc. 3-8
GL: Adding a Node
2. From the resulting page, enter the
node's FQDN or IP address.
3. Leave environment blank. A
ā€˜default’ environment will be used
4. Accept the default SSH Access
configuration
5. Type chef in the username field.
6. Click the password link as shown
in this illustration.
©2016 Chef Software Inc. 3-9
GL: Adding a Node to Scan
7. Type the password (chef) in
the password field.
8. Click the Add 1 node button
as shown in this illustration.
©2016 Chef Software Inc. 3-10
GL: Adding a Node to Scan
At this point your Compliance Dashboard should list the node you just added.
©2016 Chef Software Inc. 3-11
GL: Testing Connectivity to Your Node
1. Click the check box next to your node and then click the Connectivity button.
©2016 Chef Software Inc. 3-12
GL: Testing Connectivity to Your Node
The Status column of you node should now indicate Connection established.
©2016 Chef Software Inc. 3-13
Adding Nodes in Bulk
You could add additional nodes by simply
repeating the previous steps.
You could also add a number of nodes at
once by separating each hostname or IP
address with a comma or a space, as
shown in this illustration.
Chef Compliance also supports bulk loading
of nodes via API.
©2016 Chef Software Inc. 3-14
Adding Nodes in Bulk via API
After class you can go to the
following link.
The resulting kitchen_sink.rb
will step you through how to
upload nodes in bulk.
https://gist.github.com/alexpop/01b0bba8d259adeee320
©2016 Chef Software Inc. 3-15
Private Keys
In the workplace, using a security
key would be a more secure method
for connecting to nodes than using
the password method.
By clicking Settings > Add Private
Key you will see where to paste a
private key.
©2016 Chef Software Inc. 3-16
Running Compliance Scans
You can run Compliance scans on demand or schedule them to run at a later
time.
Chef Compliance maintains profiles as a collection of individual controls that
comprise a complete audit.
As mentioned previously, Chef Compliance comes with a few reference
profiles of various compliance policies that you can leverage or use as
examples to create your own.
©2016 Chef Software Inc. 3-17
Compliance Profiles Used in Scans
This image shows the default Compliance
Profiles as accessed from the Scan Nodes
page.
You should be thoughtful with which
profiles choose.
Notice how you can also choose to run a
scan on demand or schedule a scan.
©2016 Chef Software Inc. 3-18
Objective:
Group Lab: Running a Scan
 Run a Compliance scan.
 View the output of a scan.
©2016 Chef Software Inc. 3-19
GL: Running a Scan
1. Click the check box
next to your node and
then click the Scan
button.
©2016 Chef Software Inc. 3-20
GL: Running a Scan
2. From the resulting
page, check the
base/ssh profile and
uncheck any other
check boxes.
3. Click the Scan now
button.
©2016 Chef Software Inc. 3-21
Scan Results
A Compliance Report
should now display and
your scan results should be
similar to that shown here.
Notice how in the upper
Summary section in this
example, 10 tests were
compliant and 6 tests show
critical issues with ssh.
©2016 Chef Software Inc. 3-22
Scan Results
The bottom half of the
Compliance Report
shown here has a table of
details of test results.
These are sorted by
severity.
If you click an issue as
shown here, a bit more
information about the
issue displays.
©2016 Chef Software Inc. 3-23
GL: Profile
To view the InSpec code
that comprises this
profile, do the following:
1. Click the Compliance
button.
2. Click the relevant
profile (Basic SSH).
3. Scroll down and click
the `Set SSH protocol
version to 2` profile.
©2016 Chef Software Inc. 3-24
Discussion: InSpec Profile Code
Let's discuss what this
profile is doing.
The `impact` of 1.0 indicates
this is a Critical issue.
The `title` is what populates
the Compliance Report issue
title.
©2016 Chef Software Inc. 3-25
Discussion: InSpec Profile Code
The desc is typically human-
readable description sourced
from the CIS or source doc.
The `describe` section is the
actual test that is executed.
©2016 Chef Software Inc. 3-26
Compliance Profile Severity Mapping
The table below shows the current mapping
of Compliance Profile impact numbering
to severity.
Impact Numbering Severity Designation
0.7 - 1.0 Critical Issues
0.4 - <0.7 Major Issues
0 - <0.4 Minor Issues
https://nvd.nist.gov/cvss.cfm
©2016 Chef Software Inc. 3-27
Run InSpec from the Command Line
control 'sshd-11' do
impact 1.0
title 'Server: Set protocol version to SSHv2'
desc "
Set the SSH protocol version to 2. Don't use legacy
insecure SSHv1 connections anymore.
"
describe sshd_config do
its('Protocol') { should eq('2') }
end
end
©2016 Chef Software Inc. 3-28
Run InSpec from the Command Line
Test Locally:
$ inspec exec test.rb
©2016 Chef Software Inc. 3-29
Run InSpec from the Command Line
Remote via SSH:
$ inspec exec test.rb -t ssh://54.163.150.246 --user=chef --
password=chef.io
©2016 Chef Software Inc. 3-30
Run InSpec from the Command Line
Docker Container
$ inspec exec test.rb -t docker://3dda08e75838
Running Scans

Compliance Automation with Inspec Part 3

  • 1.
    Getting Started withCompliance Automation
  • 2.
  • 3.
    InSpec: Turn securityand compliance into code • Translate compliance into Code • Clearly express statements of policy • Move risk to build/test from runtime • Find issues early • Write code quickly • Run code anywhere • Inspect machines, data and APIs A simple example of an InSpec CIS rule Part of a process of continuous compliance Scan for Compliance Build & Test Locally Build & Test CI/CD Remediate Verify
  • 4.
    ©2016 Chef SoftwareInc. 3-4 Objectives After completing this module, you should be able to:  Add a node to test for compliance.  Run a Compliance scan.  Test for compliance with InSpec from the command line interface.
  • 5.
    Ā©2016 Chef SoftwareInc. 3-5 Adding a Node to Scan To add a node you'll need: • The IP address or FQDN of the nodes to be tested. • Access configuration (ssh or WinRM). • The node's username and password OR • The node's username plus security key pair.
  • 6.
    ©2016 Chef SoftwareInc. 3-6 Objective: Group Lab: Adding a Node to Scan  Add a Linux Node to Scan  Test connectivity Note: In the next module you will perform the same exercises as in this module but using a Windows node as your target node.
  • 7.
    ©2016 Chef SoftwareInc. 3-7 GL: Adding a Node to Scan 1. From your Chef Compliance Dashboard, click Add Node.
  • 8.
    Ā©2016 Chef SoftwareInc. 3-8 GL: Adding a Node 2. From the resulting page, enter the node's FQDN or IP address. 3. Leave environment blank. A ā€˜default’ environment will be used 4. Accept the default SSH Access configuration 5. Type chef in the username field. 6. Click the password link as shown in this illustration.
  • 9.
    ©2016 Chef SoftwareInc. 3-9 GL: Adding a Node to Scan 7. Type the password (chef) in the password field. 8. Click the Add 1 node button as shown in this illustration.
  • 10.
    ©2016 Chef SoftwareInc. 3-10 GL: Adding a Node to Scan At this point your Compliance Dashboard should list the node you just added.
  • 11.
    ©2016 Chef SoftwareInc. 3-11 GL: Testing Connectivity to Your Node 1. Click the check box next to your node and then click the Connectivity button.
  • 12.
    ©2016 Chef SoftwareInc. 3-12 GL: Testing Connectivity to Your Node The Status column of you node should now indicate Connection established.
  • 13.
    ©2016 Chef SoftwareInc. 3-13 Adding Nodes in Bulk You could add additional nodes by simply repeating the previous steps. You could also add a number of nodes at once by separating each hostname or IP address with a comma or a space, as shown in this illustration. Chef Compliance also supports bulk loading of nodes via API.
  • 14.
    ©2016 Chef SoftwareInc. 3-14 Adding Nodes in Bulk via API After class you can go to the following link. The resulting kitchen_sink.rb will step you through how to upload nodes in bulk. https://gist.github.com/alexpop/01b0bba8d259adeee320
  • 15.
    ©2016 Chef SoftwareInc. 3-15 Private Keys In the workplace, using a security key would be a more secure method for connecting to nodes than using the password method. By clicking Settings > Add Private Key you will see where to paste a private key.
  • 16.
    ©2016 Chef SoftwareInc. 3-16 Running Compliance Scans You can run Compliance scans on demand or schedule them to run at a later time. Chef Compliance maintains profiles as a collection of individual controls that comprise a complete audit. As mentioned previously, Chef Compliance comes with a few reference profiles of various compliance policies that you can leverage or use as examples to create your own.
  • 17.
    ©2016 Chef SoftwareInc. 3-17 Compliance Profiles Used in Scans This image shows the default Compliance Profiles as accessed from the Scan Nodes page. You should be thoughtful with which profiles choose. Notice how you can also choose to run a scan on demand or schedule a scan.
  • 18.
    ©2016 Chef SoftwareInc. 3-18 Objective: Group Lab: Running a Scan  Run a Compliance scan.  View the output of a scan.
  • 19.
    ©2016 Chef SoftwareInc. 3-19 GL: Running a Scan 1. Click the check box next to your node and then click the Scan button.
  • 20.
    ©2016 Chef SoftwareInc. 3-20 GL: Running a Scan 2. From the resulting page, check the base/ssh profile and uncheck any other check boxes. 3. Click the Scan now button.
  • 21.
    ©2016 Chef SoftwareInc. 3-21 Scan Results A Compliance Report should now display and your scan results should be similar to that shown here. Notice how in the upper Summary section in this example, 10 tests were compliant and 6 tests show critical issues with ssh.
  • 22.
    ©2016 Chef SoftwareInc. 3-22 Scan Results The bottom half of the Compliance Report shown here has a table of details of test results. These are sorted by severity. If you click an issue as shown here, a bit more information about the issue displays.
  • 23.
    ©2016 Chef SoftwareInc. 3-23 GL: Profile To view the InSpec code that comprises this profile, do the following: 1. Click the Compliance button. 2. Click the relevant profile (Basic SSH). 3. Scroll down and click the `Set SSH protocol version to 2` profile.
  • 24.
    ©2016 Chef SoftwareInc. 3-24 Discussion: InSpec Profile Code Let's discuss what this profile is doing. The `impact` of 1.0 indicates this is a Critical issue. The `title` is what populates the Compliance Report issue title.
  • 25.
    ©2016 Chef SoftwareInc. 3-25 Discussion: InSpec Profile Code The desc is typically human- readable description sourced from the CIS or source doc. The `describe` section is the actual test that is executed.
  • 26.
    ©2016 Chef SoftwareInc. 3-26 Compliance Profile Severity Mapping The table below shows the current mapping of Compliance Profile impact numbering to severity. Impact Numbering Severity Designation 0.7 - 1.0 Critical Issues 0.4 - <0.7 Major Issues 0 - <0.4 Minor Issues https://nvd.nist.gov/cvss.cfm
  • 27.
    ©2016 Chef SoftwareInc. 3-27 Run InSpec from the Command Line control 'sshd-11' do impact 1.0 title 'Server: Set protocol version to SSHv2' desc " Set the SSH protocol version to 2. Don't use legacy insecure SSHv1 connections anymore. " describe sshd_config do its('Protocol') { should eq('2') } end end
  • 28.
    ©2016 Chef SoftwareInc. 3-28 Run InSpec from the Command Line Test Locally: $ inspec exec test.rb
  • 29.
    ©2016 Chef SoftwareInc. 3-29 Run InSpec from the Command Line Remote via SSH: $ inspec exec test.rb -t ssh://54.163.150.246 --user=chef -- password=chef.io
  • 30.
    ©2016 Chef SoftwareInc. 3-30 Run InSpec from the Command Line Docker Container $ inspec exec test.rb -t docker://3dda08e75838
  • 31.

Editor's Notes

  • #4Ā  Integrate compliance and security requirements into your automated deployment pipeline. The InSpec language lets you specify those requirements as code. When compliance is code, you can identify issues during development and not after the fact. Test large-scale environments while still moving at velocity.Ā  Ā  Translate compliance into code. InSpec is an open-source testing framework with a human- and machine-readable language for specifying compliance, security and policy requirements. When compliance is expressed as code, you can integrate it into your deployment pipeline and automatically test for adherence to security policies. Ā  Clearly express statements of policy. When compliance is code, rules are unambiguous and can be understood by everyone on the team. Developers know what standards they're expected to meet and auditors know exactly what is being tested. Replace spreadsheets filled with abstract descriptions with tangible tests that have a clear intent. Ā  Find issues early. Automated compliance tests can start at the beginning of the development cycle. You'll detect any issues well before your code goes into production, when problems are expensive and time consuming to fix. Ā  Write code quickly. The InSpec language includes a collection of resources that help you write audit controls quickly and easily. You can also create custom resources for your own particular situations. Run code anywhere. InSpec code can run in multiple platforms. You can execute the same set of tests locally, with remote commands that use SSH or WinRM, or with external mechanisms such as the Docker API. Ā  Inspect machines, data, and APIs. Knowing that your physical servers are in compliance is, of course, essential. But your applications rely on more than just server configurations. With InSpec, you can assess data in a database or inspect the configuration of virtual resources by using their API. For example, you can check security group settings on your IaaS infrastructure. Compliance as Code The speed and collaboration of DevOps for security & compliance Security documents as executable code Compliance is assured from the start of the development cycle Security-focused framework DSL that helps you get started writing audit controls quickly & easily Inspec works the same way everywhere: locally, remotely, or executed via API Tailored to the needs of security professionals Flexible and extensible Easily create custom resources, if needed Create and share profiles for code reuse and modularity Inspect machine state, data state, and API configurations
  • #9Ā Be sure you are using the hostname of the target node that you noted previously in class. In the workplace, the target node's username and password will likely be different than shown in this example. We'll discuss using key pair access later in the module.
  • #10Ā Instructor Note: If a Linux target node's image has /etc/sudoers Ā `Defaults Ā  Ā requiretty` uncommented, then the Compliance server won't be able to connect to the target node unless we disable sudo on this page. Once the issue is fixed it should not matter if the target node /etc/sudoers Ā `Defaults Ā  requiretty` is uncommented. The Linux AMI used in this course has /etc/sudoers Ā `Defaults Ā  Ā requiretty` commented so no worries."
  • #13Ā If your Status column does not indicate `Connection established`, please notify the instructor.
  • #14Ā As you may have noticed, you could add additional nodes by simply repeating the previous steps. You could also add a number of nodes at once by separating each hostname or IP address with a comma or a space, as shown in this illustration. Chef Compliance also supports bulk loading of nodes via API.
  • #15Ā  Instructor Note: If you have extra time, you can walk the participants through this file.
  • #16Ā In the workplace, using security key pairs would be a more secure method for connecting to nodes than using the password method we are using in class. By clicking `Settings > Add New Key Pair` you will see where to paste your private key.
  • #18Ā This image shows the default Compliance Profiles as accessed from the Scan Nodes page. This page displays when you select nodes to scan and then click the Scan button. You'll access the profiles in a moment. These profiles determine what will be scanned on your nodes. You should be thoughtful with which profiles choose since the more you choose to run, the longer it will take to execute the scan. Notice how you can also choose to run a scan on demand (Scan now) or schedule a scan to run at a later time.
  • #22Ā There are also 6 critical issues related to ssh on the target node. Your results may be slightly different than this example. Instructor Note: This and the following slide should be used for a discussion of the scan results. The group exercise continues after that.
  • #23Ā The bottom half of the Compliance Report has a table of details of test results. These are sorted by severity so the critical issues are listed at the top and the compliant items are at the bottom of the list. If you click an issue as shown here, a bit more information about the issue displays, but that's not really telling us much.
  • #24Ā Instructor Note: Now we continue the group Lab but you should stop as needed to explain what this code means.
  • #25Ā Let's discuss what this profile is doing. The impact of 1.0 indicates this is a critical issue if it the scanned node violates what is in this code. We'll discuss severity mapping in a moment.
  • #26Ā The desc is typically human-readable description sourced from the CIS or source doc. The describe value is the actual test. In this case, this is saying the protocol for `ssh_config` Protocol should be `2`. If the actual value from the node is not Protocol 2, the Critical issue is reported as in this case. So when you run a scan, the Compliance Server connects to the node using the configuration we specified, in this case ssh, and then it will run this set of code, this InSpec control, on that node. The Compliance Server translates the InSpec code into ssh commands when it transmits across the wire. No agent or client is required to be running on the target node for this work.
  • #27Ā Here is the current mapping of Compliance Profile impact numbering to severity. The image at the top-right shows a Compliance Profile's impact numbering. The table at the bottom-left shows the current mapping of Compliance Profile impact numbering to severity. The image at the bottom-right is an example of the severities listed in the reports in the Compliance web UI. The mapping is currently analogous to the Common Vulnerability Scoring System (CVSS) framework, which can be viewed via the link at the bottom of this slide. This mapping will be made configurable in the future.