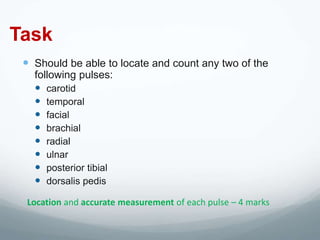
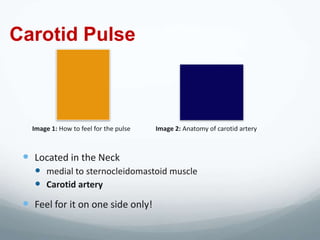
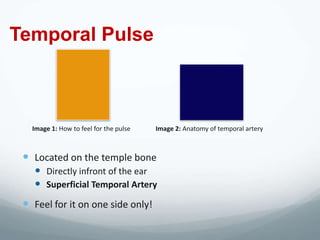
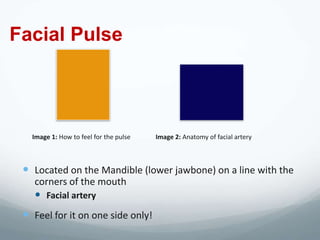
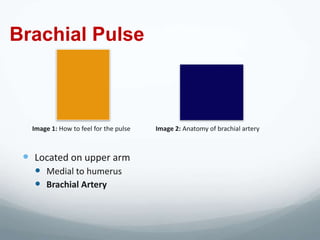
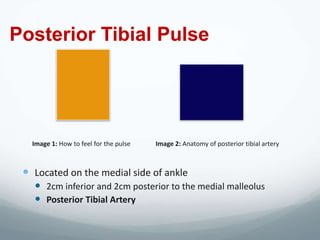
Blood Pressure
  and Pulses
Measuring
Blood Pressure
Task
 Estimate systolic blood pressure by
 palpation. Measure systolic and diastolic
 blood pressure by auscultation

   Preparation – 4 marks
   Palpation – 2 marks
   Auscultation – 4 marks
Setting up
  Alcohol Gel
    Clean your hands
    Make it visible to the examiner
  Introduce yourself
    “Hello. Good morning. My name is YOUR NAME. I’m a first year
      medical student from University of Manchester”

  Confirm
    “May I please confirm your name?”
    “How would you like me to call you today?”
Setting up (cont’d)
  Informed Consent – explain what is involved
    EXPLAIN
       “Alright PATIENT NAME. I have been asked to check your blood
        pressure. This will involve me putting this cuff around your arm
        and inflating it”
       “This might feel a bit tight but it shouldn’t hurt”
       “I will inflate the cuff twice, or more if needed”
       “If at anytime you feel uncomfortable please let me know”
    CONSENT
       “Is that okay with you?”
       “Do you have a preference as to which arm I use?
    Check :
              IV lines / cannulas
              Female pt. ask for birth control implants
Preparation
  “ Could you please roll up your sleeves to about here” (show
   the patient how up you’d like them)
    “would you like any help with that?”
  Check Equipment
    Sphygmomanometer
      Cuff is fully deflated
      Dial is at zero
    Stethoscope
      Put the stethoscope on with the earpieces pointing forwards
      Gently tap the diaphragm and make sure you can hear a sound, if
         you can’t then turn the tap on
Preparation (Cont’d)
  Make sure the Sphygmomanometer is away from patient’s
    view

  Look for brachial artery
       Rest Pt. arm on the bench
       Ask them to bend their elbow
       Feel for the Biceps tendon
       Brachial artery medial to tendon

  Deflate the cuff and wrap it around pt. arm (according to the
    arrow)
Estimating Systolic BP
  To examiner: “ I will first get an estimate for the Pt. systolic
    blood pressure by palpating for their radial pulse”

  Find Pt. radial pulse
     Located lateral of forearm
  Inflate the cuff
     Up to 200mmHg
     Usually, up to this point the pulse is no longer palpable
  Deflate the cuff slowly
     To the point where the pulse becomes palpable again
     This is your estimated systolic blood pressure
Estimating Systolic BP


   Report: “The patient’s systolic blood pressure is ______
                           mmHg.
Systolic & Diastolic BP
  Make the sure the sphygmomanometer is at 0.
  Put the stethoscope on
    Place the diaphragm on patients brachial artery
       located on the upper arm medial to the humerus

  Inflate the cuff 30mmHg above your estimated systolic
   pressure value

  Deflate the cuff slowly
    First sound you hear = systolic pressure
    When this sound disappears = diastolic pressure
Systolic & Diastolic BP


   Report:
   “The patient’s systolic blood pressure is ______ mmHg
   and diastolic pressure is ______ mmHg, accurate up to 2
   mmHg”
Pulses
Examination
Task
  Should be able to locate and count any two of the
   following pulses:
    carotid
    temporal
    facial
    brachial
    radial
    ulnar
    posterior tibial
    dorsalis pedis
 Location and accurate measurement of each pulse – 4 marks
Carotid Pulse


   Image 1: How to feel for the pulse   Image 2: Anatomy of carotid artery


  Located in the Neck
    medial to sternocleidomastoid muscle
    Carotid artery
  Feel for it on one side only!
Temporal Pulse


   Image 1: How to feel for the pulse   Image 2: Anatomy of temporal artery


  Located on the temple bone
    Directly infront of the ear
    Superficial Temporal Artery
  Feel for it on one side only!
Facial Pulse


   Image 1: How to feel for the pulse   Image 2: Anatomy of facial artery


  Located on the Mandible (lower jawbone) on a line with the
   corners of the mouth
    Facial artery
  Feel for it on one side only!
Brachial Pulse


  Image 1: How to feel for the pulse   Image 2: Anatomy of brachial artery


  Located on upper arm
    Medial to humerus
    Brachial Artery
Radial Pulse


   Image 1: How to feel for the pulse   Image 2: Anatomy of radial artery


  Located on the lateral of the wrist
    Radial Artery
Ulnar Pulse


   Image 1: How to feel for the pulse   Image 2: Anatomy of ulnar artery


  Located on the medial of the wrist
    Ulnar Artery
Posterior Tibial Pulse


   Image 1: How to feel for the pulse   Image 2: Anatomy of posterior tibial artery


  Located on the medial side of ankle
    2cm inferior and 2cm posterior to the medial malleolus
    Posterior Tibial Artery
Dorsalis Pedis Pulse


   Image 1: How to feel for the pulse   Image 2: Anatomy of dorsal pedis artery


  Located on the top of the foot
    Immediately lateral to the extensor hallucis longus
    Dorsal Pedis Artey
Thank you
Questions?

Blood pressure and pulses

  • 1.
    Blood Pressure and Pulses
  • 2.
  • 3.
    Task Estimate systolicblood pressure by palpation. Measure systolic and diastolic blood pressure by auscultation  Preparation – 4 marks  Palpation – 2 marks  Auscultation – 4 marks
  • 4.
    Setting up Alcohol Gel  Clean your hands  Make it visible to the examiner  Introduce yourself  “Hello. Good morning. My name is YOUR NAME. I’m a first year medical student from University of Manchester”  Confirm  “May I please confirm your name?”  “How would you like me to call you today?”
  • 5.
    Setting up (cont’d)  Informed Consent – explain what is involved  EXPLAIN  “Alright PATIENT NAME. I have been asked to check your blood pressure. This will involve me putting this cuff around your arm and inflating it”  “This might feel a bit tight but it shouldn’t hurt”  “I will inflate the cuff twice, or more if needed”  “If at anytime you feel uncomfortable please let me know”  CONSENT  “Is that okay with you?”  “Do you have a preference as to which arm I use? Check : IV lines / cannulas Female pt. ask for birth control implants
  • 6.
    Preparation  “Could you please roll up your sleeves to about here” (show the patient how up you’d like them)  “would you like any help with that?”  Check Equipment  Sphygmomanometer  Cuff is fully deflated  Dial is at zero  Stethoscope  Put the stethoscope on with the earpieces pointing forwards  Gently tap the diaphragm and make sure you can hear a sound, if you can’t then turn the tap on
  • 7.
    Preparation (Cont’d) Make sure the Sphygmomanometer is away from patient’s view  Look for brachial artery  Rest Pt. arm on the bench  Ask them to bend their elbow  Feel for the Biceps tendon  Brachial artery medial to tendon  Deflate the cuff and wrap it around pt. arm (according to the arrow)
  • 8.
    Estimating Systolic BP  To examiner: “ I will first get an estimate for the Pt. systolic blood pressure by palpating for their radial pulse”  Find Pt. radial pulse  Located lateral of forearm  Inflate the cuff  Up to 200mmHg  Usually, up to this point the pulse is no longer palpable  Deflate the cuff slowly  To the point where the pulse becomes palpable again  This is your estimated systolic blood pressure
  • 9.
    Estimating Systolic BP Report: “The patient’s systolic blood pressure is ______ mmHg.
  • 10.
    Systolic & DiastolicBP  Make the sure the sphygmomanometer is at 0.  Put the stethoscope on  Place the diaphragm on patients brachial artery  located on the upper arm medial to the humerus  Inflate the cuff 30mmHg above your estimated systolic pressure value  Deflate the cuff slowly  First sound you hear = systolic pressure  When this sound disappears = diastolic pressure
  • 11.
    Systolic & DiastolicBP Report: “The patient’s systolic blood pressure is ______ mmHg and diastolic pressure is ______ mmHg, accurate up to 2 mmHg”
  • 12.
  • 13.
    Task  Shouldbe able to locate and count any two of the following pulses:  carotid  temporal  facial  brachial  radial  ulnar  posterior tibial  dorsalis pedis Location and accurate measurement of each pulse – 4 marks
  • 14.
    Carotid Pulse Image 1: How to feel for the pulse Image 2: Anatomy of carotid artery  Located in the Neck  medial to sternocleidomastoid muscle  Carotid artery  Feel for it on one side only!
  • 15.
    Temporal Pulse Image 1: How to feel for the pulse Image 2: Anatomy of temporal artery  Located on the temple bone  Directly infront of the ear  Superficial Temporal Artery  Feel for it on one side only!
  • 16.
    Facial Pulse Image 1: How to feel for the pulse Image 2: Anatomy of facial artery  Located on the Mandible (lower jawbone) on a line with the corners of the mouth  Facial artery  Feel for it on one side only!
  • 17.
    Brachial Pulse Image 1: How to feel for the pulse Image 2: Anatomy of brachial artery  Located on upper arm  Medial to humerus  Brachial Artery
  • 18.
    Radial Pulse Image 1: How to feel for the pulse Image 2: Anatomy of radial artery  Located on the lateral of the wrist  Radial Artery
  • 19.
    Ulnar Pulse Image 1: How to feel for the pulse Image 2: Anatomy of ulnar artery  Located on the medial of the wrist  Ulnar Artery
  • 20.
    Posterior Tibial Pulse Image 1: How to feel for the pulse Image 2: Anatomy of posterior tibial artery  Located on the medial side of ankle  2cm inferior and 2cm posterior to the medial malleolus  Posterior Tibial Artery
  • 21.
    Dorsalis Pedis Pulse Image 1: How to feel for the pulse Image 2: Anatomy of dorsal pedis artery  Located on the top of the foot  Immediately lateral to the extensor hallucis longus  Dorsal Pedis Artey
  • 22.