Downloaded 60 times


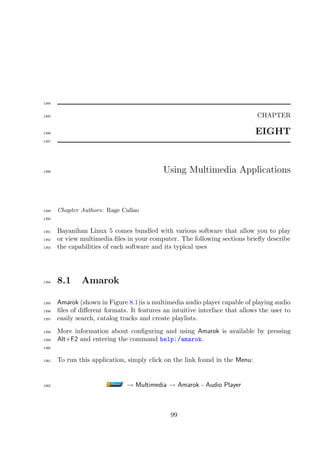
![99
100 CHAPTER
101 ONE
102
103 Installing the Bayanihan Linux OS
104 Chapter Author : Rage Callao
105
106 The system uses the Debian Installer[8], a software developed by the Debian
107 Project1 . This version features a fully graphical installation as well as console,
108 expert and rescue modes. The following sections will describe the stages and
109 options available for each of these modes.
110 1.1 Getting the installer
111 Bayanihan Linux is freely downloadable as an ISO image from the Bayanihan
112 Linux website at http://bayanihan.gov.ph or can be obtained as a CD from
113 the Advanced Science and Technology Institute office.
114 After downloading the ISO image, please verify that the image was downloaded
115 correctly by using a file integrity checking software such as md5sum.exe or
116 sha256sum.exe and compare the generated values with those posted at our
117 website.
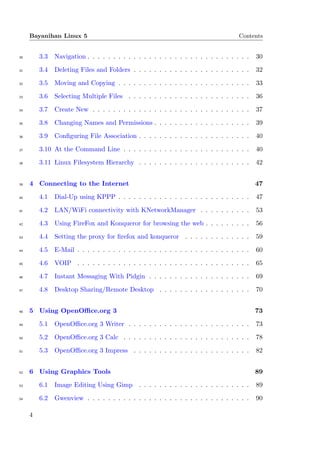
118 If the ISO image integrity check is successful, use a CD burning software and select
119 the Burn as image option to burn the ISO image to a blank CD. This process will
120 produce a bootable Bayanihan Linux CDROM Installer. Then insert the disc
1 http://www.debian.org
9](https://image.slidesharecdn.com/bayanihanlinux5manual-130106185429-phpapp01/85/Bayanihan-linux-5_manual-9-320.jpg)


![238
239 CHAPTER
240 THREE
241
242 Working with Files and Folders
243 Chapter Author : Aileen Cruzado
244 After having been able to successfully install Bayanihan Linux in your system,
245 what now should you expect from it?
246 When moving from Windows to Linux, you must first understand how Linux
247 view files varies from how Windows handle files. In this chapter, you will have an
248 overview of the Linux file system and how important it is to make Linux work.
249 Here, you will learn that under Linux, everything is a file[4]. In addition to data
250 and executable files, Linux treat folders and even the various components of your
251 computer as a file. This means that there are files that represent your keyboard,
252 terminal, printer, CD-ROM, and even your system’s RAM. These special files are
253 called devices. When Linux needs to talk to physical hardware device, it does so
254 by simply reading from or writing to one of these special files1 . In this chapter,
255 you will be introduced to elementary concepts such as basics of creating new files,
256 changing ownerships and permissions and the principal method of accessing them
257 via the Konqueror file manager.
258 Additionally, you will learn about the fundamentals of configuring file associations;
259 working at the command line level; and the Linux Filesystem Heirarchy.
1 http://lowfatlinux.com/linux-files.html
25](https://image.slidesharecdn.com/bayanihanlinux5manual-130106185429-phpapp01/85/Bayanihan-linux-5_manual-25-320.jpg)
![Bayanihan Linux 5 Chapter 3. Working with Files and Folders
260 3.1 Folders and Paths
261 In UNIX and Linux all folders are arranged in a simple inverted tree structure
262 descending and branching down from a single top level folder[5]. This means that
263 you can get from any folder to any other by going “up” until you reach a common
264 point then “down” through the appropriate subfolders until you reach your target.
265 The position of any file or folder in the tree can be described by its “path”, which
266 is a simple list of the folders you would have to descend through to get to the
267 target folder or file. For example, /home/aileen is the subfolder /aileen of the
268 subfolder /home of the top level folder, and /home/aileen/words.txt is the file
269 words.txt in that subfolder. The leading “/” in these paths represents the top
270 level folder.
271 Every folder accessible by your system including those on other hard disk par-
272 titions, your floppy and CD-ROM will appear in the tree descending from “/”,
273 their exact paths will depend on how your system was set up. See Section 3.3.
274 Every user on a UNIX / Linux system has their own “home” folder to hold their
275 personal files and settings; for example /home/russel and /home/mariesonn.
276 The tilde symbol (∼) is often used to represent the user’s home folder, so that
277 ∼/letter.txt refers to the file letter.txt in my /home folder.
278 Note that the term “directory” is often used instead of “folder”.
279 3.2 Introduction to Konqueror
280 All operating systems come with a so-called “file manager” which is an application
281 that helps you view files and folders as well as navigate graphically through the
282 entire filesystem tree. The file manager bundled with Bayanihan Linux is called
283 Konqueror.
284 To run this application, simply click on the link found in the Menu. You can also
285 click on the Home icon your desktop or the taskbar.
286 → Home – Personal Files
287 From help:/konqueror/index.html:
288 Konqueror is an advanced file manager for the K Desktop Environ-
289 ment, providing file management functions ranging from simple cut/copy
290 and paste operations to advanced local and remote network file brows-
291 ing. Folder contents can be displayed in a variety of text and icon view
26](https://image.slidesharecdn.com/bayanihanlinux5manual-130106185429-phpapp01/85/Bayanihan-linux-5_manual-26-320.jpg)


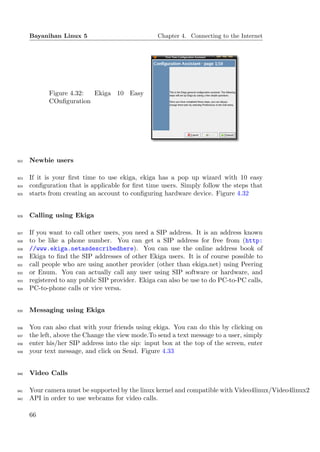
![Bayanihan Linux 5 Chapter 3. Working with Files and Folders
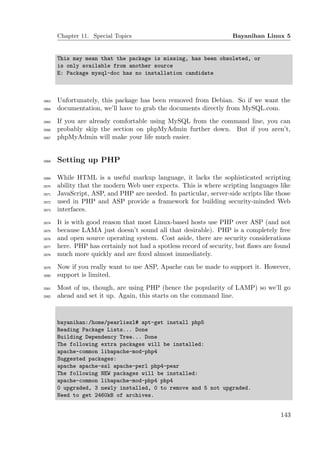
624 3.11 Linux Filesystem Hierarchy
625 The first thing that most new users shifting from Windows will find confusing is
626 navigating the Linux filesystem[6]. The Linux filesystem does things a lot more
627 differently than the Windows filesystem3 . To put it simply, it can be visualized as
628 a tree with its roots and all[3]. At the top of the hierarchy is invariably the root
629 path which is represented by ‘‘/’’. All other directories are created beneath this
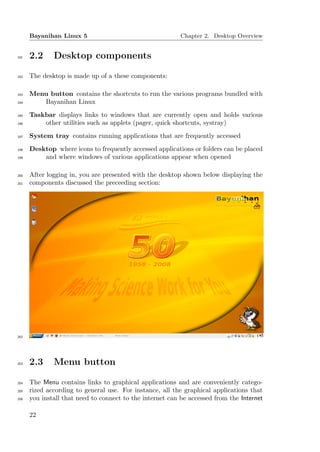
630 root path. And each of the sub directories have a specific purpose. For example,
631 ‘‘/etc’’ contain the configuration files, the ‘‘/opt’’ directory is used to install
632 third party software, ‘‘/boot’’ contain the grub files and the Linux kernel and
633 so on4 .
634 In the Filesystem Hierarchy Standard (FHS), all files and directories appear under
635 the root directory ‘‘/’’, even if they are stored on different physical devices[2].
636 Note however that some of these directories may or may not be present on a UNIX
637 system depending on whether certain subsystems, such as the X Window System,
638 are installed.
639 The majority of these directories exist in all UNIX operating systems and are
640 generally used in much the same way; however, the descriptions here are those
641 used specifically for the FHS, and are not considered authoritative for platforms
642 other than Linux5 .
643 / This is the base, or root, of the file system. Everything in the Linux system is
644 housed in this directory[1].
645 /bin This directory contains a number of essential commands that are available
646 to unprivileged users (such as cat, chmod, chown, etc). The /bin directory
647 also houses the shells (such as bash).
648 /boot This directory contains everything necessary for the boot process. With-
649 out the /boot directory, your machine would not be able to boot up.
650 /dev This directory contains all of the special and device files. With Linux all
651 devices and drives have a name. Hard drives tend be labeled as hda, hdb,
652 hdc. Special devices such as external usb devices can be labeled as sda,
653 sdb, sdc. If you look in the /dev directory you will see quite a few files that
654 can be associated with devices. Most of the devices found here are either
655 block or character devices. Block devices hold data (such as a hard drive)
656 and character devices transmit data (such as a mouse).
3 http://www.freeos.com/articles/3102/
4 http://linuxhelp.blogspot.com/2008/05/linux-file-system-hierarchy-fun-easy.
html
5 http://en.wikipedia.org/wiki/Filesystem_Hierarchy_Standard
42](https://image.slidesharecdn.com/bayanihanlinux5manual-130106185429-phpapp01/85/Bayanihan-linux-5_manual-42-320.jpg)
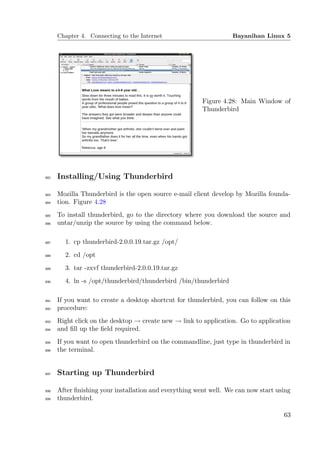
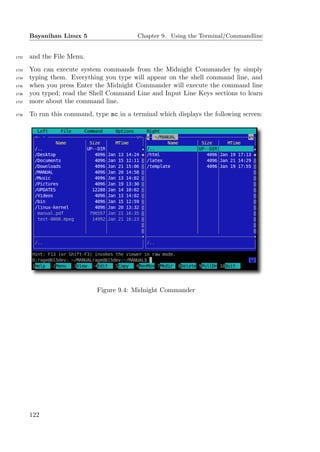
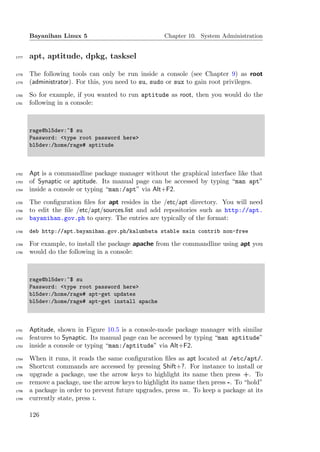
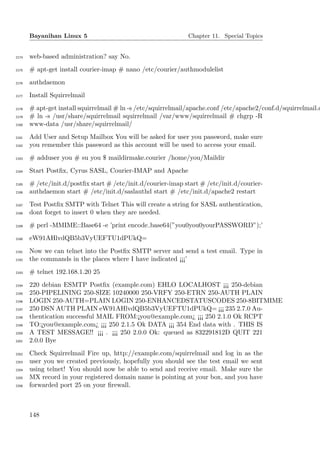
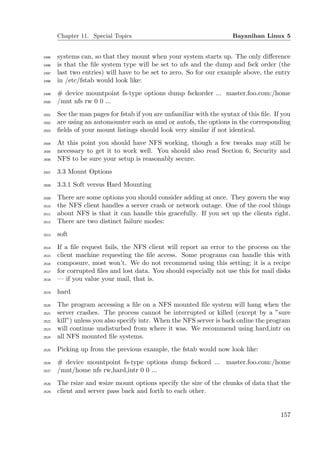
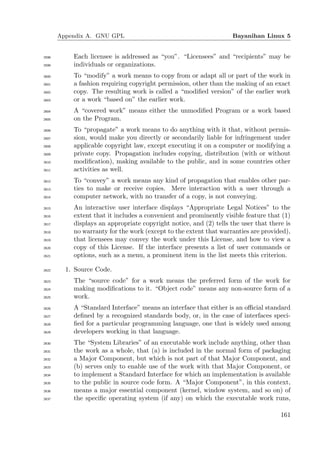
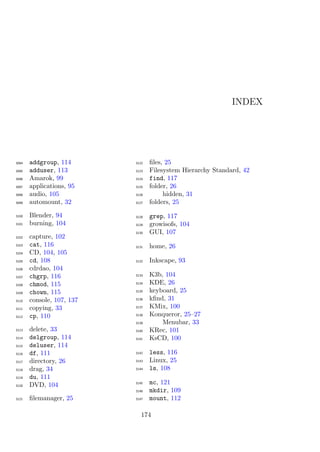
![Chapter 3. Working with Files and Folders Bayanihan Linux 5
7
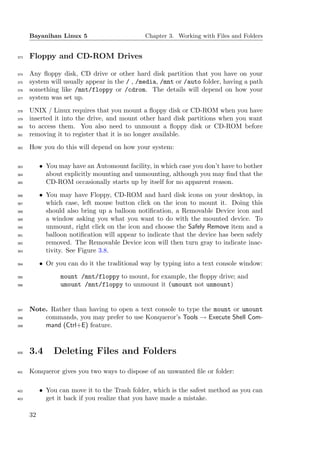
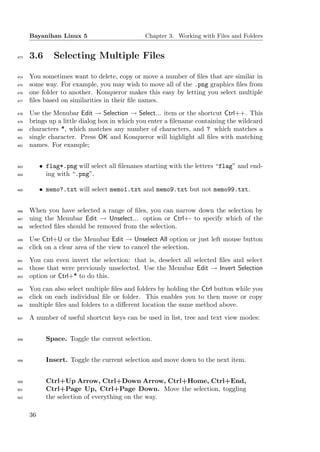
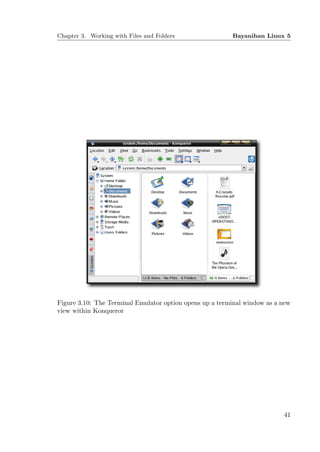
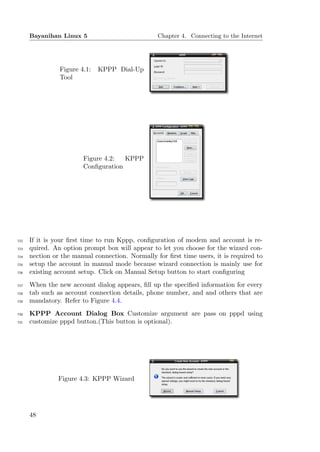
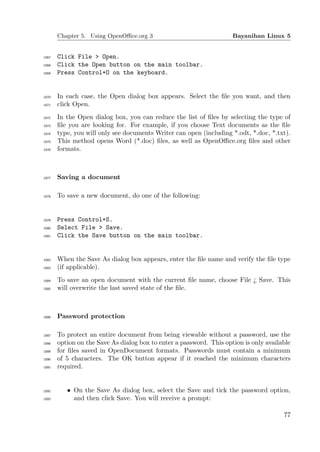
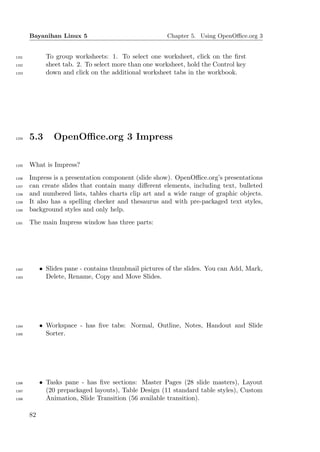
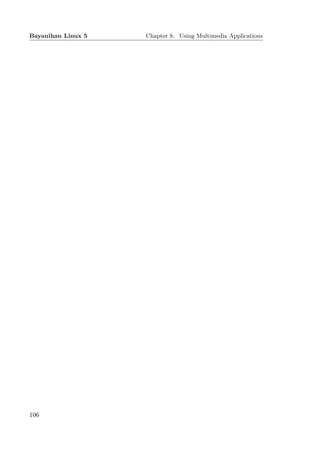
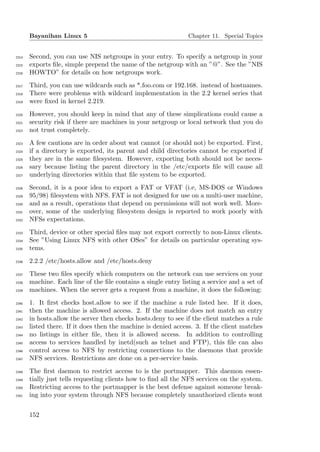
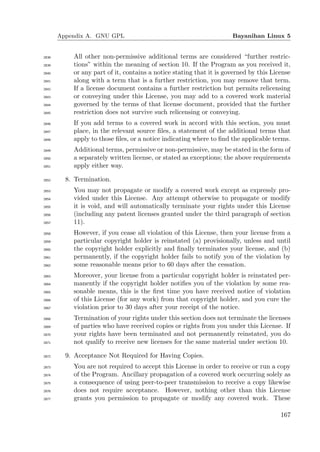
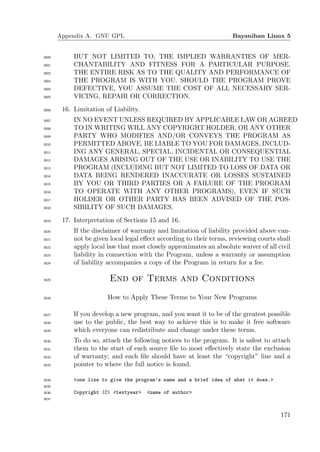
Figure 3.11: The diagram represents (part of) a Linux file system know as
Filesystem Hierarchy Standard[7]. A line from one node to a node on its
right indicates containment. For example, the student directory is contained
within the home directory.
45](https://image.slidesharecdn.com/bayanihanlinux5manual-130106185429-phpapp01/85/Bayanihan-linux-5_manual-45-320.jpg)

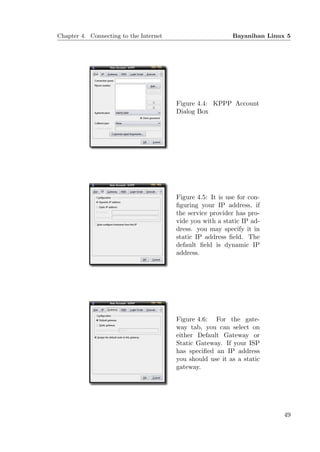
![Bayanihan Linux 5 Chapter 4. Connecting to the Internet
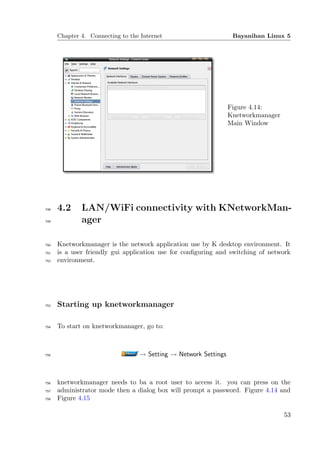
Figure 4.19: If you
have a different
ethernet settings
you can load your
network profile that
would fit on your
network setup for
your ethernet.
759 4.3 Using FireFox and Konqueror for browsing
760 the web
761 FireFoxTM (shown in Figure ??) is a popular open-source web browser developed
762 by the Mozilla Foundation.
763 Starting firefox
764 To run this application, simply click on the link found at the Menu:
765 → Internet → FireFox - Web Browser
766 Opening, Selecting and Closing tabs
767 A tabs can be found below the bookmark toolbars, it allows firefox to use multiple
768 firefox window taskbar to be open one at a time.
769 By pressing on [Ctrl]+[t] or you may choose to click
770 File → New Tab
771 ,
56](https://image.slidesharecdn.com/bayanihanlinux5manual-130106185429-phpapp01/85/Bayanihan-linux-5_manual-56-320.jpg)
![Chapter 4. Connecting to the Internet Bayanihan Linux 5
Figure 4.20: Multiple Tabs
for Firefox
Figure 4.21: Miscellaneous Pref-
erence Dialog on Firefox Which lets
you customize and configure your
firefox browser
772 Using the Konqueror for Browsing the Web
773 Konqueror is a web browser, file manager and file viewer designed as a core part
774 of the K Desktop Environment. It is developed by volunteers and can run on most
775 Unix-like operating systems. Konqueror, along with the rest of the components in
776 the KDEBase package, is licensed and distributed under the GNU General Public
777 License. This section will describe the use of konqueror as a web browser.Figure ??
778 Starting konqueror
779 To start konqueror, go to .
780 → Internet → konqueror
781 Creating, Opening and Closing tabs
782 tabs in konqueror are found underneath the location toolbar, same as the func-
783 tionality of firefox, it allows for a multiple access of konqueror windows. You can
784 also press [Ctrl] + [t] or go to
Figure 4.22: Multiple Tabs
57](https://image.slidesharecdn.com/bayanihanlinux5manual-130106185429-phpapp01/85/Bayanihan-linux-5_manual-57-320.jpg)
![Bayanihan Linux 5 Chapter 4. Connecting to the Internet
Figure 4.23:
Quick Search on
Konqueror
Figure 4.24: Find Tool-
bars on Konqueror
785 Bookmarks
786 You can bookmark a page on konqueror by going to
787 Bookmark → Add Bookmark
788 Quick Search
789 You can find the quick search on konqueror at the upper right beside the location
790 toolbar Figure 4.23
791 Find Toolbar
792 The find toolbar on konqueror are found on
793 Edit → Find
794 or you can type [Ctrl] + [f] Figure 4.24
795 Miscellaneous
796 You con configure konqueror by going to
797 Settings → Configure Konqueror
798 Figure 4.25
58](https://image.slidesharecdn.com/bayanihanlinux5manual-130106185429-phpapp01/85/Bayanihan-linux-5_manual-58-320.jpg)

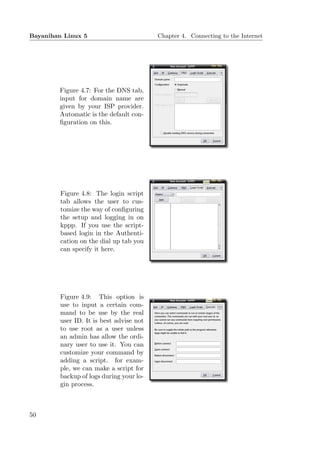
![Chapter 4. Connecting to the Internet Bayanihan Linux 5
Figure 4.37:
Logging in to
Skype
Figure 4.38:
Pidgin Main
Window
966 4.7 Instant Messaging With Pidgin
967 Pidgin is an instant messaging client that support different account on other
968 instant messaging applications. It supports AIM, ICQ, Jabber/XMPP, MSN,
969 Yahoo!, Bonjour, Gadu-Gadu, IRC, QQ, SILC, Simple.
970 Pidgin can log you to different account but you must be register on a specifi
971 account before you login to pidgin. Figure 4.38
972 Add an Account on Pidgin
973 You can go to Accounts → Manage or click on [ctrl] + [a]. Then click on the add
974 button, then you can choose which account that you want. Figure 4.39
69](https://image.slidesharecdn.com/bayanihanlinux5manual-130106185429-phpapp01/85/Bayanihan-linux-5_manual-69-320.jpg)


![Bayanihan Linux 5 Chapter 9. Using the Terminal/Commandline
Figure 9.1: Konsole
1465 9.2 File and Folder Navigation
1466 ls - List
1467 The ls command lists the content of a directory. It is one of the most used Linux
1468 command.
1469 Syntax: ls [options] [file/directory]
1470 Typical Options:
-a shows ALL the files, including hidden files.
-l gives a long listing format. This option gives a more detailed result, it
shows owner, size, date last modified, etc.
1471
-R traverses the directories recursively. This option shows files of all the
directories within the specified directory.
-h shows filesizes “human readable” format.
1472
1473 Typical Usage:
ls - shows the files in the current directory.
ls - shows files in the home directory.
ls / - shows files in the root directory.
1474 ls /path/to/files/ - shows files in the directory /path/to/files/.
ls -lah - shows a long listing of all the files in the current
directory with a “human readable” format.
ls /home/ - displays the contents of /home/ directory.
1475
1476 cd - Change Directory
1477 The cd command is used to change to another directory.
108](https://image.slidesharecdn.com/bayanihanlinux5manual-130106185429-phpapp01/85/Bayanihan-linux-5_manual-108-320.jpg)
![Chapter 9. Using the Terminal/Commandline Bayanihan Linux 5
1478 Syntax: cd [directory]
1479 Typical Usage:
cd - changes to the home directory of the current user.
cd ../ - changes to the parent directory.
1480
cd / - changes to the root directory.
cd /path/to/mydirectory/ - changes to the directory /path/to/mydirectory/.
1481
1482 mkdir - Make Directory
1483 The mkdir command is used to create a directory.
1484 Syntax: mkdir [options] [/path/to]directoryname
1485 Typical Options:
1486 -p create directory including parent directory.
1487
1488 Typical Usage:
mkdir mydirectory - creates a directory named mydirectory in
the current directory.
mkdir /path/to/mydirectory - creates a directory named mydirectory in
1489 the /path/to/ directory.
mkdir -p /path/to/mydirectory - creates a directory named mydirectory in-
cluding the parent directories if they don’t ex-
ist.
1490
1491 rmdir - Remove Directory
1492 The rmdir command is used to remove a directory. Note that it can only remove
1493 an empty directory.
1494 Syntax: rmdir [/path/to]directoryname
1495 Typical Usage:
rmdir mydirectory - deletes the directory named mydirectory in the
current directory.
1496
rmdir /path/to/mydirectory - deletes the directory named myirectory in the
/path/to/ directory.
1497
109](https://image.slidesharecdn.com/bayanihanlinux5manual-130106185429-phpapp01/85/Bayanihan-linux-5_manual-109-320.jpg)
![Bayanihan Linux 5 Chapter 9. Using the Terminal/Commandline
1498 cp - Copy
1499 The cp command is used to copy files and directories.
1500 Syntax: cp [options] [source] [destination]
1501 Typical Options:
-a archive; copies recursively, preserving file attributes, and does not follow
symbolic links.
-b backup; backs up existing destination files.
-f force; forces copy, overwriting existing files without promting the user.
-i interactive; prompts user before overwriting existing files.
1502 -p preserve; preserves file attributes if possible.
-r recursive; copies files and subdirectories recursively.
-s symbolic link; makes symbolic link instead of copying.
-u update; copies the SOURCE only when it is newer or when the DES-
TINATION does not exist.
-v verbose; shows details while performing copy.
1503
1504 Typical Usage:
cp myfile1 myfile2 - copies (duplicates) myfile1 to myfile2
in the current directory.
cp myfile mydirectory/ - copies myfile to the mydirectory in the
current directory.
cp -f myfile1 myfile2 - duplicates myfile1 if myfile2 doesn’t ex-
ist, otherwise overwrites it.
cp -u mydirectory1/* mydirectory2/ - copies newer files from mydirectory1 to
1505 mydirectory2.
cp myfile1 myfile2 mydirectory/ - copies the files myfile1 and myfile2 to
mydirectory.
cp -s myfile /path/to/mylink - creates a symbolic link of myfile named
mylink in the /path/to/ directory.
cp -rv mydirectory1/ mydirectory2/ - copies mydirectory1 to mydirectory2,
including subdirectories and displays some
details.
1506
1507 rm - Remove
1508 The rm command is used to remove files and directories.
1509 Syntax: rm [options] [target]
110](https://image.slidesharecdn.com/bayanihanlinux5manual-130106185429-phpapp01/85/Bayanihan-linux-5_manual-110-320.jpg)
![Chapter 9. Using the Terminal/Commandline Bayanihan Linux 5
1510 Typical Options:
-f force; forces removal of target files without promting the user.
-i interactive; prompts user before removing existing files.
1511
-r or -R recursive; removes files and subdirectories recursively.
-v verbose; shows details while performing removal.
1512
1513 Typical Usage:
rm myfile - deletes myfile in the current directory.
rm -rfv mydirectory - verbosely deletes the directory named mydirectory in
1514
the current directory, including its subdirectories, without
prompting the user.
1515
1516 9.3 Filesystem Tools
1517 df - Disk Free
1518 The df command is used to report system free disk space and usage.
1519 Syntax: df [options] [target]
1520 Typical Options:
-a includes all dummy/virtual filesystems in the report.
1521 -h prints filesystem sizes in “human readable” format.
-l limits list to local filesystems only.
1522
1523 Typical Usage:
df -h - shows disk usage in “human readable” format.
df -lh /home - shows disk usage of filesystem where /home resides.
1524
df -ah - shows disk usage of all filesystems, including dummy/virtual
filesystems.
1525
1526 du - Disk Usage
1527 The du command is used to report disk space usage size of each file for directories
1528 recursively.
1529 Syntax: du [options] [target]
1530 Typical Options:
111](https://image.slidesharecdn.com/bayanihanlinux5manual-130106185429-phpapp01/85/Bayanihan-linux-5_manual-111-320.jpg)
![Bayanihan Linux 5 Chapter 9. Using the Terminal/Commandline
-a reports sizes of all files, not just directories.
-c prints a grand total at the end of the report.
1531
-h prints in “human readable” format.
-s displays only the total for each argument.
1532
1533 Typical Usage:
du -ch - prints sizes in “human readable” format and a grand total of
the current directory.
1534
du -ah /home - shows sizes of all files in /home.
du -chs /tmp - shows the summary of sizes of /tmp directory.
1535
1536 mount - Mount
1537 The mount command is used to mount a filesystem. Note that only the root
1538 account can mount filesystems and not ordinary users. Ordinary users should use
1539 pmount instead.
1540 Syntax: mount [options] [filesystem] [mountpoint]
1541 Typical Options:
-a - mounts all filesystems specified in /etc/fstab.
-o option1, option2, .. - specifies the options to be used when mounting the
1542
filesystem.
-t filesystemtype - indicates the filesystem type to be mounted.
1543
1544 Typical Usage:
mount -a - especially useful when changes to
/etc/fstab have been made.
mount /mnt/mymount - works only if /mnt/mymount exists
in /etc/fstab.
mount /dev/sdb1 /mnt/mymount - mounts the filesystem /dev/sdb1
to the mountpoint /mnt/mymount.
1545 mount -o loop CDImage.iso /mnt/mymount - mounts the CD image as a loop
device.
mount -t cifs - mounts a WindowsTM share
-o username=myuser,password=mypassword with account credits.
//10.10.5.5/MyShare /mnt/mymount
mount -o uid=1000 /dev/sdb1 /mnt/mymount - mounts the /dev/sdb1 as the ac-
count with user ID 1000.
1546
112](https://image.slidesharecdn.com/bayanihanlinux5manual-130106185429-phpapp01/85/Bayanihan-linux-5_manual-112-320.jpg)
![Chapter 9. Using the Terminal/Commandline Bayanihan Linux 5
1547 umount - Unmount
1548 The umount command is used to unmount a filesystem. Note that only the root
1549 account can unmount filesystems and not ordinary users. Ordinary users should
1550 use pumount instead.
1551 Syntax: umount [mountpoint|filesystem]
1552 Typical Usage:
umount /mnt/mymount - unmounts the mountpoint /mnt/mymount.
1553
umount /dev/sdb3 - unmounts the device /dev/sdb3.
1554
1555 pmount - Policy Mount
1556 The pmount command is used to mount hotpluggable devices as ordinary user.
1557 Syntax: pmount [filesystem] [mountname]
1558 Typical Usage:
pmount /dev/sdb1 myflashdrive - mounts the filesystem /dev/sdb1 to the mount-
1559
point /media/myflashdrive.
1560
1561 pumount - Policy Unmount
1562 The pumount command is used to unmount hotpluggable devices as ordinary user.
1563 Syntax: pumount [mountpoint|filesystem]
1564 Typical Usage:
pumount /mnt/mymount - unmounts the mountpoint /mnt/mymount.
1565
pumount /dev/sdb3 - unmounts the device /dev/sdb3.
1566
1567 9.4 User-related Tools
1568 adduser - Add User
1569 The adduser command is used to add a system account. It sets up the user’s
1570 home directory and group memberships. Note that this tool can only be used by
113](https://image.slidesharecdn.com/bayanihanlinux5manual-130106185429-phpapp01/85/Bayanihan-linux-5_manual-113-320.jpg)
![Bayanihan Linux 5 Chapter 9. Using the Terminal/Commandline
1571 the root account.
1572 Syntax: adduser [username]
1573 Typical Usage:
adduser myuser - starts the interactive tool that sets up the account’s user envi-
1574
ronment and group memberships.
1575
1576 deluser - Delete User
1577 The deluser command is used to remove a system account. Note that this can
1578 only be used by the root account.
1579 Syntax: deluser [username]
1580 Typical Usage:
deluser myuser - removes the account myuser.
1581
deluser - lets you specify the user account to be removed.
1582
1583 addgroup - Add Group
1584 The addgroup command is used to add a system group. Note that this tool can
1585 only be used by the root account.
1586 Syntax: addgroup [groupname]
1587 Typical Usage:
1588 addgroup mygroup - creates a group called mygroup.
1589
1590 delgroup - Delete Group
1591 The delgroup command is used to remove a system group. Note that this tool
1592 can only be used by the root account.
1593 Syntax: delgroup [groupname]
1594 Typical Usage:
delgroup mygroup - removes the group mygroup.
1595
delgroup - lets you specify the group to be removed.
1596
114](https://image.slidesharecdn.com/bayanihanlinux5manual-130106185429-phpapp01/85/Bayanihan-linux-5_manual-114-320.jpg)
![Chapter 9. Using the Terminal/Commandline Bayanihan Linux 5
1597 9.5 File Permissions
1598 chown - Change Owner
1599 The chown command is used to change file ownership. Note that this tool can
1600 only be used by the root account.
1601 Syntax: chown [options] [owner][:][group] [target]
1602 Typical Options:
-c - shows the changes made during the operation.
1603 -R - recursively changes the owner of the files in the current directory in-
cluding subdirectories.
1604
1605 Typical Usage:
chown myuser * - changes the file ownership to myuser
of the files in the current directory.
1606 chown -R myuser1:mygroup /home/myuser2 - changes the file ownership to myuser1
with group mygroup of the files in the
directory /home/myuser2.
1607
1608 chmod - Change Mode Bits
1609 The chmod command is used to change file permissions. Note that this tool can
1610 only be used by the root account.
1611 Syntax: chown [options] [a|u|g|o][+|-][permissions] [target]
1612 Typical Options:
-c - shows the changes made during the operation.
1613 -R - recursively changes the permissions of the files in the current directory
including subdirectories.
1614
1615 Typical Usage:
chmod o-rwx * - removes access to the files in the current directory by users
other than the owner.
1616
chmod -R +x RunMe.sh - makes the file RunMe.sh executable.
chmod +s myfile - sets the set user ID bit of the file myfile.
1617
115](https://image.slidesharecdn.com/bayanihanlinux5manual-130106185429-phpapp01/85/Bayanihan-linux-5_manual-115-320.jpg)
![Bayanihan Linux 5 Chapter 9. Using the Terminal/Commandline
1618 chgrp - Change Group
1619 The chgrp command is used to change group ownership. Note that this tool can
1620 only be used by the root account.
1621 Syntax: chgrp [options] [group] [target]
1622 Typical Options:
-c - shows the changes made during the operation.
1623 -R - recursively changes the owner of the files in the current direc-
tory including subdirectories.
1624
1625 Typical Usage:
chgrp mygroup * - changes the group ownership of the files in the
current directory to mygroup.
1626
chgrp -R mygroup /home/myuser2 - changes the group ownership of the files in the
directory /home/myuser2 to mygroup.
1627
1628 9.6 Other Essential Commandline Tools
1629 cat
1630 The cat command is used to display the contents of a file.
1631 Syntax: cat [file/s]
1632 Typical Usage:
cat myfile - displays the contents of myfile to standard output.
1633
cat myfile1 myfile2 - displays the contents of myfile1 and myfile2.
1634
1635 less
1636 The less is a tool used to display the contents of a file which can be browsed.
1637 Some commands are based on vi.
1638 Syntax: less [file]
1639
116](https://image.slidesharecdn.com/bayanihanlinux5manual-130106185429-phpapp01/85/Bayanihan-linux-5_manual-116-320.jpg)
![Chapter 9. Using the Terminal/Commandline Bayanihan Linux 5
1640 find
1641 This command is used to search for files.
1642 Syntax: find [options] [path/s] [expression]
1643 Typical Options for Expression:
-delete - removes searched files.
-exec [command] - executes the given command on the files that were found.
1644 -name [pattern] - searches for files with the given pattern.
-mtime [n*24hours] - matches files that were last modified n*24hours ago.
-executable - matches files that are executable.
1645
1646 Typical Usage:
find /home/myuser -name *.mp3 - searches the home directory of myuser for
.mp3 files.
find /var/tmp /tmp -name *.bak - searches for .bak files in the /var/tmp
1647
-exec /bin/rm -fv ’{}’ ; and /tmp directories and then deletes them.
find ./ -mtime 0 - searches the current directory for modified
files within the last 24 hours.
1648
1649 grep
1650 This command is used to print lines that match a given pattern.
1651 Syntax: grep [options] [pattern] [file]
1652 Typical Options:
-a - treats a binary file as if it were a text file.
-i - makes the match case-insensitive.
1653
-n - also prints line number for each output.
-v - prints non-matching lines.
1654
1655 Typical Usage:
grep -i sd /var/log/messages - outputs the lines with the characters “sd”,
1656 regardless of case.
grep -v list /home/myuser/myfile - outputs the lines without the word “list”.
1657
117](https://image.slidesharecdn.com/bayanihanlinux5manual-130106185429-phpapp01/85/Bayanihan-linux-5_manual-117-320.jpg)
![Bayanihan Linux 5 Chapter 9. Using the Terminal/Commandline
1658 sed
1659 This tool edits or transforms text from a stream.
1660 Syntax: sed ’[command]’ [input]
1661 Typical commands:
s/texttofind/texttoreplace/ - replaces the instance of “texttofind” with “text-
toreplace”.
1662
n,md - deletes the lines from n to m.
n,mp - prohibits the display of the lines from n to m.
1663
1664 Typical Usage:
sed ’3,10d’ myfile - outputs the contents of myfile but with lines 3-
10 deleted.
1665
sed ’s/hello/goodbye/’ myfile - outputs the contents of myfile but with the first
occurrence of “hello” to “goodbye”.
1666
1667 The Pipe Character
1668 The pipe character “|” is used to put commands in a “pipeline”. The output of
1669 the previous command is passed on to the next.
1670 Typical Usage:
grep EE /var/log/Xorg.0.log | less - generates a list of lines with the char-
acters “EE” in /var/log/Xorg.0.log that
1671 can be browsed.
cat myfile | sed ’s/hello/hi/g’ - outputs the contents of myfile but
changes all instances of “hello” to “hi”.
1672
1673 Redirecting Outputs
1674 Outputs of commands can be redirected into a file using the greater than (>)
1675 character.
1676 Typical Usage:
118](https://image.slidesharecdn.com/bayanihanlinux5manual-130106185429-phpapp01/85/Bayanihan-linux-5_manual-118-320.jpg)
![Chapter 9. Using the Terminal/Commandline Bayanihan Linux 5
grep EE /var/log/Xorg.0.log > XorgErrors - creates a file called
XorgErrors with contents
from the output of the grep
command. If the file already
1677 exists, it simply overwrites it.
grep WW /var/log/Xorg.0.log >> XorgWarnings - appends the file XorgWarnings
with the output of the grep com-
mand. If the file doesn’t exist, it
creates it.
1678
1679 man - The Manual Pages
1680 More information about these and other commands can be obtained by using the
1681 man command. This invokes the reference manuals for each command.
1682 Syntax: man [command]
1683 The TAB Key
1684 The TAB key is the command completion key. Pressing the TAB once after the
1685 first few letters are typed on the console completes the command. In case when
1686 more than one command share the same first few letters, pressing the TAB twice
1687 shows a list of the commands that share common first letters.
1688
1689 The ALT+. Key Combination
1690 The combination of ALT + . (dot) keys invokes the last argument of the last
1691 command. If repeatedly pressed, it scrolls through the last argument of the pre-
1692 vious commands.
1693
1694 9.7 Text Editors
1695 Vim
1696 From the manual page at man:/vim
1697
119](https://image.slidesharecdn.com/bayanihanlinux5manual-130106185429-phpapp01/85/Bayanihan-linux-5_manual-119-320.jpg)
![Chapter 10. System Administration Bayanihan Linux 5
1841 → Office → Adobe Reader 8 - PDF Viewer
1842 Installing Flash Player Plugin
1843 Athough, gnash, a free and open source flash player is shipped with Bayanihan,
1844 there are many websites that require the Adobe Flash Player plugin to be in-
1845 stalled. To install this plugin, go to http://www.adobe.com and click Download
1846 Flash Player. You will be prompted to accept the license. Once you accept, save
1847 the file into your /home folder and extract its contents by right-clicking on the file
1848 in Konqueror and selecting Extract → Extract here. Then copy the file libflash-
1849 player.so into ∼/.mozilla/plugins folder. Restart FireFox for this change to take
1850 effect.
1851 Installing Java Plugin
1852 Go to http://www.java.com and download the self-extracting archive. Open a
1853 console, change into the directory where the downloaded file is kept and run the
1854 commands below. After that restart FireFox for the changes to take effect.
rage@bl5dev:~$ su
Password: <type root password here>
bl5dev:/home/rage# cd Downloads
bl5dev:/home/rage/Downloads# sh jre-6u11-linux-i586.bin
<Press Enter at the more prompt to scroll to the end.>
Please enter "yes" or "no".
Do you agree to the above license terms? [yes or no]
<Type yes then press Enter>
bl5dev:/home/rage/Downloads# mkdir -p /usr/lib/java
bl5dev:/home/rage/Downloads# mv jre1.6.0_11 /usr/lib/java/
bl5dev:/home/rage/Downloads# <Press Ctrl-D to leave root>
rage@bl5dev:~/Downloads$ cd ../
rage@bl5dev:~$ ln -sf /usr/lib/java/jre1.6.0_11/plugin/i386/
ns7/libjavaplugin_oji.so ~/.mozilla/plugins/
1855 Installing Mozilla FireFox
1856 Bayanihan Linux is bundled with the latest version of the Mozilla FireFox web
1857 browser. This section describes how you can manually download the latest version
129](https://image.slidesharecdn.com/bayanihanlinux5manual-130106185429-phpapp01/85/Bayanihan-linux-5_manual-129-320.jpg)


![Bayanihan Linux 5 Chapter 11. Special Topics
2019 Either shell or connecting remotely, we’ll start by checking for updates to the
2020 Debian package lists. This will require root access.
2021 The package lists are updated, we’ll tell Linux to go grab Apache. To fully install
2022 Apache, we’ll need more than one package. Thanks to Debian’s APT, we’ll be
2023 able to download and install all those dependencies with minimal work.
bayanihan:/home/pearliezl# apt-get install apache2
Reading Package Lists... Done
Building Dependency Tree... Done
The following extra packages will be installed:
apache2-common apache2-mpm-worker apache2-utils
Suggested packages:
apache2-doc lynx www-browser
The following NEW packages will be installed:
apache2 apache2-common apache2-mpm-worker apache2-utils
0 upgraded, 4 newly installed, 0 to remove and 5 not upgraded.
Need to get 1097kB/1131kB of archives.
After unpacking 4018kB of additional disk space will be used.
Do you want to continue? [Y/n] y
2024 Although it isn’t a requirement, APT suggested installing the Apache documen-
2025 tation. So we’ll go ahead and install that just in case. It suggested Lynx too but
2026 we probably won’t be needing that.
bayanihan:/home/pearliezl# apt-get install apache2-doc
Reading Package Lists... Done
Building Dependency Tree... Done
The following NEW packages will be installed:
apache2-doc
0 upgraded, 1 newly installed, 0 to remove and 5 not upgraded.
Need to get 0B/3861kB of archives.
2027 Now we’ll do a quick check to verify Apache is running.
bayanihan:/home/pearliezl# /etc/init.d/apache2 start
Starting web server: Apache2httpd (pid 11205) already running
140](https://image.slidesharecdn.com/bayanihanlinux5manual-130106185429-phpapp01/85/Bayanihan-linux-5_manual-140-320.jpg)
![Bayanihan Linux 5 Chapter 11. Special Topics
2050 Setting up MySQL
2051 There are plenty of Apache-friendly database servers available, but MySQL is
2052 certainly a popular option. Again, this one is free and open source.
2053 We’ll start by installing MySQL in a manner similar to the way we installed
2054 Apache.
bayanihan:/home/pearliezl# apt-get install mysql-server
The following extra packages will be installed:
libdbd-mysql-perl libmysqlclient12 mysql-client mysql-common
Suggested packages:
mysql-doc
The following NEW packages will be installed:
libdbd-mysql-perl libmysqlclient12 mysql-client mysql-common mysql-server
0 upgraded, 5 newly installed, 0 to remove and 5 not upgraded.
Need to get 4523kB of archives.
After unpacking 10.5MB of additional disk space will be used.
Do you want to continue? [Y/n] y
2055 Once MySQL begins to install, we’ll get a brief warning screen. This is mainly to
2056 fill us in a little on how passwords will work. By default, the root user MySQL
2057 has no password (something you will want to change for a public server).
2058 Before moving on, we’ll make sure the MySQL service is running.
bayanihan:/home/pearliezl# /etc/init.d/mysql start
Starting MySQL database server: mysqld...already running.
2059 If you’d like to change some of MySQL’s settings from their default values, take
2060 a look at the files located in /etc/mysql.
2061 As with Apache, APT suggests we install the MySQL documentation. Just to be
2062 safe, we’ll go ahead and do that.
bayanihan:/home/pearliezl# apt-get install mysql-doc
Reading Package Lists... Done
Building Dependency Tree... Done
Package mysql-doc is not available, but is referred to by another package.
142](https://image.slidesharecdn.com/bayanihanlinux5manual-130106185429-phpapp01/85/Bayanihan-linux-5_manual-142-320.jpg)
![Bayanihan Linux 5 Chapter 11. Special Topics
After unpacking 6357kB of additional disk space will be used.
Do you want to continue? [Y/n] y
2083 Since we will be using both PHP and MySQL on our server, we’ll go ahead and
2084 install the PHP’s MySQL module to help them play together better. We’ll also
2085 install PHP’s Pear extensions since so many packages will require it.
bayanihan:/home/pearliezl# apt-get install php5-mysql php5-pear
Reading Package Lists... Done
Building Dependency Tree... Done
The following extra packages will be installed:
php5-cli
Suggested packages:
php5-dev
The following NEW packages will be installed:
php5-cli php5-mysql php5-pear
0 upgraded, 3 newly installed, 0 to remove and 5 not upgraded.
Need to get 1860kB/1882kB of archives.
After unpacking 5095kB of additional disk space will be used.
Do you want to continue? [Y/n] y
2086 There are a few other packages we’ll need to install to get Apache working with
2087 PHP.
bayanihan:/home/pearliezl# apt-get install libapache2-mod-php5 php5-cgi
Reading Package Lists... Done
Building Dependency Tree... Done
The following extra packages will be installed:
apache2-mpm-prefork
The following packages will be REMOVED:
apache2-mpm-worker
The following NEW packages will be installed:
apache2-mpm-prefork libapache2-mod-php4 php4-cgi
0 upgraded, 3 newly installed, 1 to remove and 5 not upgraded.
Need to get 5024kB of archives.
After unpacking 9441kB of additional disk space will be used.
Do you want to continue? [Y/n] y
2088 All the necessary packages are installed, but we aren’t quite done yet. Using your
2089 favorite text editor, we’ll need to make some changes to /etc/apache2/apache2.conf.
144](https://image.slidesharecdn.com/bayanihanlinux5manual-130106185429-phpapp01/85/Bayanihan-linux-5_manual-144-320.jpg)
![Chapter 11. Special Topics Bayanihan Linux 5
2352 know where to find the NFS daemons. However, there are two things to watch out
2353 for. First, restricting portmapper will also restrict requests to NIS. That should
2354 usually be harmless since you usually want to restrict NFS and IS in a similar
2355 way but just be cautioned. (Running NIS is generally a good idea if you are
2356 running NFS, because the client machines need a way of knowing who owns what
2357 files on the exported volumes. OF course there are other ways of doing this such
2358 as syncing password files. See the ”NIS HOWTO” for information on setting up
2359 NIS.)
2360 In general it is a good idea with NFS (as with most internet services) to explicitly
2361 deny access to IP addresses that you dont need to allow access to.
2362 The first step in doing this is to add the following entry to /etc/hosts.deny:
2363 portmap:ALL
2364 Starting with nfs-utils 0.2.0, you can be a bit more carefule by controlling access
2365 to individual daemons. It’s a good precaution since an intruder will often be able
2366 to weasel around the portmapper. If you have a newer version of nfs-utils, add
2367 entries for each of the NFS daemons.
2368 lockd:ALL mountd:ALL rquotad:ALL statd:ALL
2369 Even if you have an older version of nfs-utils, adding these entries is at worst
2370 harmless and at best will save you some trouble when you upgrade. Some sys
2371 admins choose to put the entry ALL:ALL in the file /etc/hosts.deny, which causes
2372 any service that looks at these files to deny access to all hosts unless it is explicitly
2373 allowed. While this is more secure behavior, it may also get you in trouble when
2374 you are installing new services. you forget you put it there and you cant figure
2375 out for the life of you why they wont work.
2376 Next, we need to add an entry to hosts.allow to give any hosts access that we
2377 want to have access. (If we just leave the above lines in hosts.deny then nobody
2378 will have access to NFS.) Entries in hosts.allow follow the format:
2379 service: host[or network/netmask] , host [or network/netmask]
2380 Here, host is IP address of a potential client; it may be possible in some versions
2381 to use the DNS name of the host, but it is strongly discouraged.
2382 Suppose we have the setup above and we just want to allow access to slave1.foo.com
2383 and slave2.foo.com, and suppose that the IP addresses of these machines are
2384 192.168.0.1 and 192.168.0.2, respectively. We could add the following entry to
2385 /etc/hosts.allow:
2386 portmap: 192.168.0.1 , 192.168.0.2
2387 For recent nfs-utils versions, we would also add the following (again, these entries
153](https://image.slidesharecdn.com/bayanihanlinux5manual-130106185429-phpapp01/85/Bayanihan-linux-5_manual-153-320.jpg)
![3072 BIBLIOGRAPHY
3073 [1] jack. Get to Know Linux: File System Hierarchy.
3074 Martin Brinkmann, http://www.ghacks.net/2008/12/11/
3075 get-to-know-linux-file-system-hierarchy/, 2005-2008.
3076 [2] GNU Free Documentation License. Filesystem Hierarchy Standard. Wikimedia
3077 Foundation, Inc, http://en.wikipedia.org/wiki/Filesystem_Hierarchy_
3078 Standard, January 22, 2009.
3079 [3] PAT. Linux filesystem heirarchy - the fun easy way. Ravi, http://linuxhelp.
3080 blogspot.com/2008/05/linux-file-system-hierarchy-fun-easy.html,
3081 May 04, 2008.
3082 [4] Bob Rankin. How Does The Linux File System Work? Bob Rankin, http:
3083 //lowfatlinux.com/linux-files.html, 2009.
3084 [5] Pamela Roberts. The Konqueror Handbook. Erwan Loisant, Pamela
3085 Roberts, http://docs.kde.org/stable/en/kdebase-apps/konqueror/
3086 filemanager.html#dirfolders, 2000, 2002.
3087 [6] Mayank Sarup. The Linux filesystem explained. FreeOS Technologies (I) Pvt.
3088 Ltd., http://www.freeos.com/articles/3102/, 1998-2004.
3089 [7] Andrew Solomon. Filesystem Basics. Linux Config Wiki, http://www.
3090 linuxconfig.org/Filesystem_Basics, March 13, 2008.
3091 [8] Debian Installer Team. Debian GNU/Linux Installation Guide. Debian In-
3092 staller team, http://www.debian.org/releases/lenny/i386/, 2004, 2005,
3093 2006, 2007, 2008.
173](https://image.slidesharecdn.com/bayanihanlinux5manual-130106185429-phpapp01/85/Bayanihan-linux-5_manual-173-320.jpg)

This chapter discusses installing the Bayanihan Linux operating system. It describes downloading the installation ISO image, verifying the image integrity, booting from the installation media, and performing the graphical installation. Advanced installation options like expert mode and rescue mode are also mentioned. The chapter provides guidance on checking the installation media for errors before beginning the installation process.