


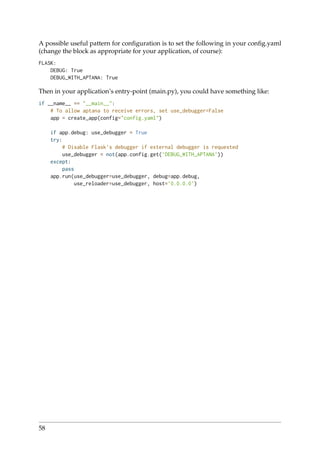
![2. URL building will handle escaping of special characters and Unicode data trans-
parently for you, so you don’t have to deal with them.
3. If your application is placed outside the URL root (say, in /myapplication instead
of /), url_for() will handle that properly for you.
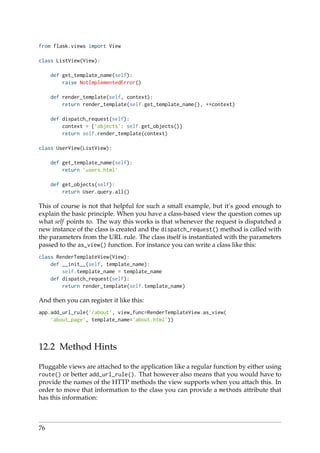
4.3.3 HTTP Methods
HTTP (the protocol web applications are speaking) knows different methods for ac-
cessing URLs. By default, a route only answers to GET requests, but that can be
changed by providing the methods argument to the route() decorator. Here are some
examples:
@app.route(’/login’, methods=[’GET’, ’POST’])
def login():
if request.method == ’POST’:
do_the_login()
else:
show_the_login_form()
If GET is present, HEAD will be added automatically for you. You don’t have to deal
with that. It will also make sure that HEAD requests are handled as the HTTP RFC (the
document describing the HTTP protocol) demands, so you can completely ignore that
part of the HTTP specification. Likewise, as of Flask 0.6, OPTIONS is implemented for
you automatically as well.
You have no idea what an HTTP method is? Worry not, here is a quick introduction to
HTTP methods and why they matter:
The HTTP method (also often called “the verb”) tells the server what the clients wants
to do with the requested page. The following methods are very common:
GET The browser tells the server to just get the information stored on that page and
send it. This is probably the most common method.
HEAD The browser tells the server to get the information, but it is only interested in
the headers, not the content of the page. An application is supposed to handle
that as if a GET request was received but to not deliver the actual content. In
Flask you don’t have to deal with that at all, the underlying Werkzeug library
handles that for you.
POST The browser tells the server that it wants to post some new information to that
URL and that the server must ensure the data is stored and only stored once.
This is how HTML forms usually transmit data to the server.
PUT Similar to POST but the server might trigger the store procedure multiple times
by overwriting the old values more than once. Now you might be asking why
this is useful, but there are some good reasons to do it this way. Consider that
the connection is lost during transmission: in this situation a system between the
browser and the server might receive the request safely a second time without
breaking things. With POST that would not be possible because it must only be
triggered once.
16](https://image.slidesharecdn.com/flask-docs-140615143817-phpapp01/85/Flask-docs-26-320.jpg)


![4.6.2 The Request Object
The request object is documented in the API section and we will not cover it here in
detail (see request). Here is a broad overview of some of the most common operations.
First of all you have to import it from the flask module:
from flask import request
The current request method is available by using the method attribute. To access form
data (data transmitted in a POST or PUT request) you can use the form attribute. Here
is a full example of the two attributes mentioned above:
@app.route(’/login’, methods=[’POST’, ’GET’])
def login():
error = None
if request.method == ’POST’:
if valid_login(request.form[’username’],
request.form[’password’]):
return log_the_user_in(request.form[’username’])
else:
error = ’Invalid username/password’
# the code below is executed if the request method
# was GET or the credentials were invalid
return render_template(’login.html’, error=error)
What happens if the key does not exist in the form attribute? In that case a special
KeyError is raised. You can catch it like a standard KeyError but if you don’t do that, a
HTTP 400 Bad Request error page is shown instead. So for many situations you don’t
have to deal with that problem.
To access parameters submitted in the URL (?key=value) you can use the args at-
tribute:
searchword = request.args.get(’key’, ’’)
We recommend accessing URL parameters with get or by catching the KeyError be-
cause users might change the URL and presenting them a 400 bad request page in that
case is not user friendly.
For a full list of methods and attributes of the request object, head over to the request
documentation.
4.6.3 File Uploads
You can handle uploaded files with Flask easily. Just make sure not to forget to
set the enctype="multipart/form-data" attribute on your HTML form, otherwise the
browser will not transmit your files at all.
Uploaded files are stored in memory or at a temporary location on the filesystem. You
can access those files by looking at the files attribute on the request object. Each
uploaded file is stored in that dictionary. It behaves just like a standard Python file
20](https://image.slidesharecdn.com/flask-docs-140615143817-phpapp01/85/Flask-docs-30-320.jpg)
![object, but it also has a save() method that allows you to store that file on the filesys-
tem of the server. Here is a simple example showing how that works:
from flask import request
@app.route(’/upload’, methods=[’GET’, ’POST’])
def upload_file():
if request.method == ’POST’:
f = request.files[’the_file’]
f.save(’/var/www/uploads/uploaded_file.txt’)
...
If you want to know how the file was named on the client before it was uploaded to
your application, you can access the filename attribute. However please keep in mind
that this value can be forged so never ever trust that value. If you want to use the file-
name of the client to store the file on the server, pass it through the secure_filename()
function that Werkzeug provides for you:
from flask import request
from werkzeug import secure_filename
@app.route(’/upload’, methods=[’GET’, ’POST’])
def upload_file():
if request.method == ’POST’:
f = request.files[’the_file’]
f.save(’/var/www/uploads/’ + secure_filename(f.filename))
...
For some better examples, checkout the Uploading Files pattern.
4.6.4 Cookies
To access cookies you can use the cookies attribute. To set cookies you can use the
set_cookie method of response objects. The cookies attribute of request objects is a
dictionary with all the cookies the client transmits. If you want to use sessions, do not
use the cookies directly but instead use the Sessions in Flask that add some security on
top of cookies for you.
Reading cookies:
from flask import request
@app.route(’/’)
def index():
username = request.cookies.get(’username’)
# use cookies.get(key) instead of cookies[key] to not get a
# KeyError if the cookie is missing.
Storing cookies:
21](https://image.slidesharecdn.com/flask-docs-140615143817-phpapp01/85/Flask-docs-31-320.jpg)
![4.8 About Responses
The return value from a view function is automatically converted into a response ob-
ject for you. If the return value is a string it’s converted into a response object with the
string as response body, a 200 OK status code and a text/html mimetype. The logic
that Flask applies to converting return values into response objects is as follows:
1. If a response object of the correct type is returned it’s directly returned from the
view.
2. If it’s a string, a response object is created with that data and the default param-
eters.
3. If a tuple is returned the items in the tuple can provide extra information.
Such tuples have to be in the form (response, status, headers) or (response,
headers) where at least one item has to be in the tuple. The status value will over-
ride the status code and headers can be a list or dictionary of additional header
values.
4. If none of that works, Flask will assume the return value is a valid WSGI appli-
cation and convert that into a response object.
If you want to get hold of the resulting response object inside the view you can use the
make_response() function.
Imagine you have a view like this:
@app.errorhandler(404)
def not_found(error):
return render_template(’error.html’), 404
You just need to wrap the return expression with make_response() and get the re-
sponse object to modify it, then return it:
@app.errorhandler(404)
def not_found(error):
resp = make_response(render_template(’error.html’), 404)
resp.headers[’X-Something’] = ’A value’
return resp
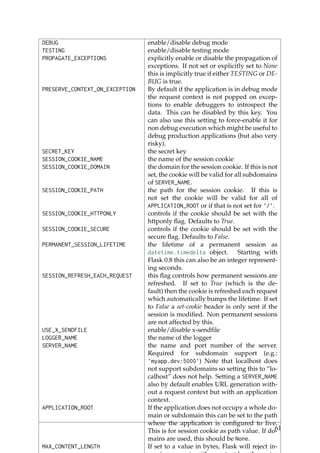
4.9 Sessions
In addition to the request object there is also a second object called session which
allows you to store information specific to a user from one request to the next. This is
implemented on top of cookies for you and signs the cookies cryptographically. What
this means is that the user could look at the contents of your cookie but not modify it,
unless they know the secret key used for signing.
In order to use sessions you have to set a secret key. Here is how sessions work:
23](https://image.slidesharecdn.com/flask-docs-140615143817-phpapp01/85/Flask-docs-33-320.jpg)
![from flask import Flask, session, redirect, url_for, escape, request
app = Flask(__name__)
@app.route(’/’)
def index():
if ’username’ in session:
return ’Logged in as %s’ % escape(session[’username’])
return ’You are not logged in’
@app.route(’/login’, methods=[’GET’, ’POST’])
def login():
if request.method == ’POST’:
session[’username’] = request.form[’username’]
return redirect(url_for(’index’))
return ’’’
<form action="" method="post">
<p><input type=text name=username>
<p><input type=submit value=Login>
</form>
’’’
@app.route(’/logout’)
def logout():
# remove the username from the session if it’s there
session.pop(’username’, None)
return redirect(url_for(’index’))
# set the secret key. keep this really secret:
app.secret_key = ’A0Zr98j/3yX R~XHH!jmN]LWX/,?RT’
The escape() mentioned here does escaping for you if you are not using the template
engine (as in this example).
How to generate good secret keys
The problem with random is that it’s hard to judge what is truly random. And a secret
key should be as random as possible. Your operating system has ways to generate
pretty random stuff based on a cryptographic random generator which can be used to
get such a key:
>>> import os
>>> os.urandom(24)
’xfd{Hxe5<x95xf9xe3x96.5xd1x01O<!xd5xa2xa0x9fR"xa1xa8’
Just take that thing and copy/paste it into your code and you’re done.
A note on cookie-based sessions: Flask will take the values you put into the session
object and serialize them into a cookie. If you are finding some values do not per-
sist across requests, cookies are indeed enabled, and you are not getting a clear error
message, check the size of the cookie in your page responses compared to the size
24](https://image.slidesharecdn.com/flask-docs-140615143817-phpapp01/85/Flask-docs-34-320.jpg)


![PASSWORD=’default’
))
app.config.from_envvar(’FLASKR_SETTINGS’, silent=True)
The Config object works similar to a dictionary so we can update it with new values.
Database Path
Operating systems know the concept of a current working directory for each process.
Unfortunately you cannot depend on this in web applications because you might have
more than one application in the same process.
For this reason the app.root_path attribute can be used to get the path to the applica-
tion. Together with the os.path module files can then easily be found. In this example
we place the database right next to it.
For a real-work application it’s recommended to use Instance Folders instead.
Usually, it is a good idea to load a separate, environment specific configuration file.
Flask allows you to import multiple configurations and it will use the setting defined
in the last import. This enables robust configuration setups. from_envvar() can help
achieve this.
app.config.from_envvar(‘FLASKR_SETTINGS’, silent=True)
Simply define the environment variable FLASKR_SETTINGS that points to a config file to
be loaded. The silent switch just tells Flask to not complain if no such environment
key is set.
In addition to that you can use the from_object() method on the config object and
provide it with an import name of a module. Flask will the initialize the variable
from that module. Note that in all cases only variable names that are uppercase are
considered.
The SECRET_KEY is needed to keep the client-side sessions secure. Choose that key
wisely and as hard to guess and complex as possible. The debug flag enables or dis-
ables the interactive debugger. Never leave debug mode activated in a production system,
because it will allow users to execute code on the server!
We will also add a method that allows for easily connecting to the specified database.
This can be used to open a connection on request and also from the interactive Python
shell or a script. This will come in handy later. We create a simple database connection
through SQLite and then tell it to use the sqlite3.Row object to represent rows. This
allows us to treat the rows as if they were dictionaries instead of tuples.
def connect_db():
"""Connects to the specific database."""
rv = sqlite3.connect(app.config[’DATABASE’])
rv.row_factory = sqlite3.Row
return rv
Finally we just add a line to the bottom of the file that fires up the server if we want to
run that file as a standalone application:
30](https://image.slidesharecdn.com/flask-docs-140615143817-phpapp01/85/Flask-docs-40-320.jpg)


![5.7 Step 5: The View Functions
Now that the database connections are working we can start writing the view func-
tions. We will need four of them:
5.7.1 Show Entries
This view shows all the entries stored in the database. It listens on the root of the
application and will select title and text from the database. The one with the highest
id (the newest entry) will be on top. The rows returned from the cursor look a bit like
tuples because we are using the sqlite3.Row row factory.
The view function will pass the entries as dicts to the show_entries.html template and
return the rendered one:
@app.route(’/’)
def show_entries():
db = get_db()
cur = db.execute(’select title, text from entries order by id desc’)
entries = cur.fetchall()
return render_template(’show_entries.html’, entries=entries)
5.7.2 Add New Entry
This view lets the user add new entries if they are logged in. This only responds
to POST requests, the actual form is shown on the show_entries page. If everything
worked out well we will flash() an information message to the next request and redi-
rect back to the show_entries page:
@app.route(’/add’, methods=[’POST’])
def add_entry():
if not session.get(’logged_in’):
abort(401)
db = get_db()
db.execute(’insert into entries (title, text) values (?, ?)’,
[request.form[’title’], request.form[’text’]])
db.commit()
flash(’New entry was successfully posted’)
return redirect(url_for(’show_entries’))
Note that we check that the user is logged in here (the logged_in key is present in the
session and True).
Security Note
Be sure to use question marks when building SQL statements, as done in the example
above. Otherwise, your app will be vulnerable to SQL injection when you use string
formatting to build SQL statements. See Using SQLite 3 with Flask for more.
34](https://image.slidesharecdn.com/flask-docs-140615143817-phpapp01/85/Flask-docs-44-320.jpg)
![5.7.3 Login and Logout
These functions are used to sign the user in and out. Login checks the username and
password against the ones from the configuration and sets the logged_in key in the ses-
sion. If the user logged in successfully, that key is set to True, and the user is redirected
back to the show_entries page. In addition, a message is flashed that informs the user
that he or she was logged in successfully. If an error occurred, the template is notified
about that, and the user is asked again:
@app.route(’/login’, methods=[’GET’, ’POST’])
def login():
error = None
if request.method == ’POST’:
if request.form[’username’] != app.config[’USERNAME’]:
error = ’Invalid username’
elif request.form[’password’] != app.config[’PASSWORD’]:
error = ’Invalid password’
else:
session[’logged_in’] = True
flash(’You were logged in’)
return redirect(url_for(’show_entries’))
return render_template(’login.html’, error=error)
The logout function, on the other hand, removes that key from the session again. We
use a neat trick here: if you use the pop() method of the dict and pass a second param-
eter to it (the default), the method will delete the key from the dictionary if present or
do nothing when that key is not in there. This is helpful because now we don’t have
to check if the user was logged in.
@app.route(’/logout’)
def logout():
session.pop(’logged_in’, None)
flash(’You were logged out’)
return redirect(url_for(’show_entries’))
Continue with Step 6: The Templates.
5.8 Step 6: The Templates
Now we should start working on the templates. If we request the URLs now we would
only get an exception that Flask cannot find the templates. The templates are using
Jinja2 syntax and have autoescaping enabled by default. This means that unless you
mark a value in the code with Markup or with the |safe filter in the template, Jinja2 will
ensure that special characters such as < or > are escaped with their XML equivalents.
We are also using template inheritance which makes it possible to reuse the layout of
the website in all pages.
Put the following templates into the templates folder:
35](https://image.slidesharecdn.com/flask-docs-140615143817-phpapp01/85/Flask-docs-45-320.jpg)

![6.4 Controlling Autoescaping
Autoescaping is the concept of automatically escaping special characters of you. Spe-
cial characters in the sense of HTML (or XML, and thus XHTML) are &, >, <, " as well
as ’. Because these characters carry specific meanings in documents on their own you
have to replace them by so called “entities” if you want to use them for text. Not doing
so would not only cause user frustration by the inability to use these characters in text,
but can also lead to security problems. (see Cross-Site Scripting (XSS))
Sometimes however you will need to disable autoescaping in templates. This can be
the case if you want to explicitly inject HTML into pages, for example if they come
from a system that generate secure HTML like a markdown to HTML converter.
There are three ways to accomplish that:
• In the Python code, wrap the HTML string in a Markup object before passing it to
the template. This is in general the recommended way.
• Inside the template, use the |safe filter to explicitly mark a string as safe HTML
({{ myvariable|safe }})
• Temporarily disable the autoescape system altogether.
To disable the autoescape system in templates, you can use the {% autoescape %}
block:
{% autoescape false %}
<p>autoescaping is disabled here
<p>{{ will_not_be_escaped }}
{% endautoescape %}
Whenever you do this, please be very cautious about the variables you are using in
this block.
6.5 Registering Filters
If you want to register your own filters in Jinja2 you have two ways to do that.
You can either put them by hand into the jinja_env of the application or use the
template_filter() decorator.
The two following examples work the same and both reverse an object:
@app.template_filter(’reverse’)
def reverse_filter(s):
return s[::-1]
def reverse_filter(s):
return s[::-1]
app.jinja_env.filters[’reverse’] = reverse_filter
41](https://image.slidesharecdn.com/flask-docs-140615143817-phpapp01/85/Flask-docs-51-320.jpg)
![CHAPTER
SEVEN
TESTING FLASK APPLICATIONS
Something that is untested is broken.
The origin of this quote is unknown and while it is not entirely correct, it is also not
far from the truth. Untested applications make it hard to improve existing code and
developers of untested applications tend to become pretty paranoid. If an application
has automated tests, you can safely make changes and instantly know if anything
breaks.
Flask provides a way to test your application by exposing the Werkzeug test Client
and handling the context locals for you. You can then use that with your favourite
testing solution. In this documentation we will use the unittest package that comes
pre-installed with Python.
7.1 The Application
First, we need an application to test; we will use the application from the Tutorial. If
you don’t have that application yet, get the sources from the examples.
7.2 The Testing Skeleton
In order to test the application, we add a second module (flaskr_tests.py) and create a
unittest skeleton there:
import os
import flaskr
import unittest
import tempfile
class FlaskrTestCase(unittest.TestCase):
def setUp(self):
self.db_fd, flaskr.app.config[’DATABASE’] = tempfile.mkstemp()
flaskr.app.config[’TESTING’] = True
self.app = flaskr.app.test_client()
43](https://image.slidesharecdn.com/flask-docs-140615143817-phpapp01/85/Flask-docs-53-320.jpg)
![flaskr.init_db()
def tearDown(self):
os.close(self.db_fd)
os.unlink(flaskr.app.config[’DATABASE’])
if __name__ == ’__main__’:
unittest.main()
The code in the setUp() method creates a new test client and initializes a new database.
This function is called before each individual test function is run. To delete the
database after the test, we close the file and remove it from the filesystem in the
tearDown() method. Additionally during setup the TESTING config flag is activated.
What it does is disabling the error catching during request handling so that you get
better error reports when performing test requests against the application.
This test client will give us a simple interface to the application. We can trigger test
requests to the application, and the client will also keep track of cookies for us.
Because SQLite3 is filesystem-based we can easily use the tempfile module to create a
temporary database and initialize it. The mkstemp() function does two things for us: it
returns a low-level file handle and a random file name, the latter we use as database
name. We just have to keep the db_fd around so that we can use the os.close() func-
tion to close the file.
If we now run the test suite, we should see the following output:
$ python flaskr_tests.py
----------------------------------------------------------------------
Ran 0 tests in 0.000s
OK
Even though it did not run any actual tests, we already know that our flaskr applica-
tion is syntactically valid, otherwise the import would have died with an exception.
7.3 The First Test
Now it’s time to start testing the functionality of the application. Let’s check that the
application shows “No entries here so far” if we access the root of the application (/).
To do this, we add a new test method to our class, like this:
class FlaskrTestCase(unittest.TestCase):
def setUp(self):
self.db_fd, flaskr.app.config[’DATABASE’] = tempfile.mkstemp()
self.app = flaskr.app.test_client()
flaskr.init_db()
44](https://image.slidesharecdn.com/flask-docs-140615143817-phpapp01/85/Flask-docs-54-320.jpg)
![def tearDown(self):
os.close(self.db_fd)
os.unlink(flaskr.app.config[’DATABASE’])
def test_empty_db(self):
rv = self.app.get(’/’)
assert ’No entries here so far’ in rv.data
Notice that our test functions begin with the word test; this allows unittest to auto-
matically identify the method as a test to run.
By using self.app.get we can send an HTTP GET request to the application with the
given path. The return value will be a response_class object. We can now use the
data attribute to inspect the return value (as string) from the application. In this case,
we ensure that ’No entries here so far’ is part of the output.
Run it again and you should see one passing test:
$ python flaskr_tests.py
.
----------------------------------------------------------------------
Ran 1 test in 0.034s
OK
7.4 Logging In and Out
The majority of the functionality of our application is only available for the adminis-
trative user, so we need a way to log our test client in and out of the application. To do
this, we fire some requests to the login and logout pages with the required form data
(username and password). And because the login and logout pages redirect, we tell
the client to follow_redirects.
Add the following two methods to your FlaskrTestCase class:
def login(self, username, password):
return self.app.post(’/login’, data=dict(
username=username,
password=password
), follow_redirects=True)
def logout(self):
return self.app.get(’/logout’, follow_redirects=True)
Now we can easily test that logging in and out works and that it fails with invalid
credentials. Add this new test to the class:
def test_login_logout(self):
rv = self.login(’admin’, ’default’)
assert ’You were logged in’ in rv.data
45](https://image.slidesharecdn.com/flask-docs-140615143817-phpapp01/85/Flask-docs-55-320.jpg)
![rv = self.logout()
assert ’You were logged out’ in rv.data
rv = self.login(’adminx’, ’default’)
assert ’Invalid username’ in rv.data
rv = self.login(’admin’, ’defaultx’)
assert ’Invalid password’ in rv.data
7.5 Test Adding Messages
We should also test that adding messages works. Add a new test method like this:
def test_messages(self):
self.login(’admin’, ’default’)
rv = self.app.post(’/add’, data=dict(
title=’<Hello>’,
text=’<strong>HTML</strong> allowed here’
), follow_redirects=True)
assert ’No entries here so far’ not in rv.data
assert ’<Hello>’ in rv.data
assert ’<strong>HTML</strong> allowed here’ in rv.data
Here we check that HTML is allowed in the text but not in the title, which is the in-
tended behavior.
Running that should now give us three passing tests:
$ python flaskr_tests.py
...
----------------------------------------------------------------------
Ran 3 tests in 0.332s
OK
For more complex tests with headers and status codes, check out the MiniTwit Exam-
ple from the sources which contains a larger test suite.
7.6 Other Testing Tricks
Besides using the test client as shown above, there is also the test_request_context()
method that can be used in combination with the with statement to activate a request
context temporarily. With this you can access the request, g and session objects like
in view functions. Here is a full example that demonstrates this approach:
app = flask.Flask(__name__)
with app.test_request_context(’/?name=Peter’):
assert flask.request.path == ’/’
assert flask.request.args[’name’] == ’Peter’
46](https://image.slidesharecdn.com/flask-docs-140615143817-phpapp01/85/Flask-docs-56-320.jpg)

![For a test it would be nice to override this user from the outside without hav-
ing to change some code. This can trivially be accomplished with hooking the
flask.appcontext_pushed signal:
from contextlib import contextmanager
from flask import appcontext_pushed
@contextmanager
def user_set(app, user):
def handler(sender, **kwargs):
g.user = user
with appcontext_pushed.connected_to(handler, app):
yield
And then to use it:
from flask import json, jsonify
@app.route(’/users/me’)
def users_me():
return jsonify(username=g.user.username)
with user_set(app, my_user):
with app.test_client() as c:
resp = c.get(’/users/me’)
data = json.loads(resp.data)
self.assert_equal(data[’username’], my_user.username)
7.8 Keeping the Context Around
New in version 0.4.
Sometimes it is helpful to trigger a regular request but still keep the context around
for a little longer so that additional introspection can happen. With Flask 0.4 this is
possible by using the test_client() with a with block:
app = flask.Flask(__name__)
with app.test_client() as c:
rv = c.get(’/?tequila=42’)
assert request.args[’tequila’] == ’42’
If you were to use just the test_client() without the with block, the assert would fail
with an error because request is no longer available (because you are trying to use it
outside of the actual request).
48](https://image.slidesharecdn.com/flask-docs-140615143817-phpapp01/85/Flask-docs-58-320.jpg)
![7.9 Accessing and Modifying Sessions
New in version 0.8.
Sometimes it can be very helpful to access or modify the sessions from the test client.
Generally there are two ways for this. If you just want to ensure that a session has
certain keys set to certain values you can just keep the context around and access
flask.session:
with app.test_client() as c:
rv = c.get(’/’)
assert flask.session[’foo’] == 42
This however does not make it possible to also modify the session or to access the ses-
sion before a request was fired. Starting with Flask 0.8 we provide a so called “session
transaction” which simulates the appropriate calls to open a session in the context of
the test client and to modify it. At the end of the transaction the session is stored. This
works independently of the session backend used:
with app.test_client() as c:
with c.session_transaction() as sess:
sess[’a_key’] = ’a value’
# once this is reached the session was stored
Note that in this case you have to use the sess object instead of the flask.session
proxy. The object however itself will provide the same interface.
49](https://image.slidesharecdn.com/flask-docs-140615143817-phpapp01/85/Flask-docs-59-320.jpg)

![What you want instead is a mail the second the exception happened. Then you get an
alert and you can do something about it.
Flask uses the Python builtin logging system, and it can actually send you mails for
errors which is probably what you want. Here is how you can configure the Flask
logger to send you mails for exceptions:
ADMINS = [’yourname@example.com’]
if not app.debug:
import logging
from logging.handlers import SMTPHandler
mail_handler = SMTPHandler(’127.0.0.1’,
’server-error@example.com’,
ADMINS, ’YourApplication Failed’)
mail_handler.setLevel(logging.ERROR)
app.logger.addHandler(mail_handler)
So what just happened? We created a new SMTPHandler that will send mails with
the mail server listening on 127.0.0.1 to all the ADMINS from the address server-
error@example.com with the subject “YourApplication Failed”. If your mail server re-
quires credentials, these can also be provided. For that check out the documentation
for the SMTPHandler.
We also tell the handler to only send errors and more critical messages. Because we
certainly don’t want to get a mail for warnings or other useless logs that might happen
during request handling.
Before you run that in production, please also look at Controlling the Log Format to put
more information into that error mail. That will save you from a lot of frustration.
8.2 Logging to a File
Even if you get mails, you probably also want to log warnings. It’s a good idea to keep
as much information around that might be required to debug a problem. Please note
that Flask itself will not issue any warnings in the core system, so it’s your responsi-
bility to warn in the code if something seems odd.
There are a couple of handlers provided by the logging system out of the box but not
all of them are useful for basic error logging. The most interesting are probably the
following:
• FileHandler - logs messages to a file on the filesystem.
• RotatingFileHandler - logs messages to a file on the filesystem and will rotate
after a certain number of messages.
• NTEventLogHandler - will log to the system event log of a Windows system. If
you are deploying on a Windows box, this is what you want to use.
• SysLogHandler - sends logs to a UNIX syslog.
52](https://image.slidesharecdn.com/flask-docs-140615143817-phpapp01/85/Flask-docs-62-320.jpg)
![Once you picked your log handler, do like you did with the SMTP handler above, just
make sure to use a lower setting (I would recommend WARNING):
if not app.debug:
import logging
from themodule import TheHandlerYouWant
file_handler = TheHandlerYouWant(...)
file_handler.setLevel(logging.WARNING)
app.logger.addHandler(file_handler)
8.3 Controlling the Log Format
By default a handler will only write the message string into a file or send you that
message as mail. A log record stores more information, and it makes a lot of sense to
configure your logger to also contain that information so that you have a better idea
of why that error happened, and more importantly, where it did.
A formatter can be instantiated with a format string. Note that tracebacks are ap-
pended to the log entry automatically. You don’t have to do that in the log formatter
format string.
Here some example setups:
8.3.1 Email
from logging import Formatter
mail_handler.setFormatter(Formatter(’’’
Message type: %(levelname)s
Location: %(pathname)s:%(lineno)d
Module: %(module)s
Function: %(funcName)s
Time: %(asctime)s
Message:
%(message)s
’’’))
8.3.2 File logging
from logging import Formatter
file_handler.setFormatter(Formatter(
’%(asctime)s %(levelname)s: %(message)s ’
’[in %(pathname)s:%(lineno)d]’
))
53](https://image.slidesharecdn.com/flask-docs-140615143817-phpapp01/85/Flask-docs-63-320.jpg)
![getLogger(’otherlibrary’)]
for logger in loggers:
logger.addHandler(mail_handler)
logger.addHandler(file_handler)
55](https://image.slidesharecdn.com/flask-docs-140615143817-phpapp01/85/Flask-docs-65-320.jpg)

![CHAPTER
TEN
CONFIGURATION HANDLING
New in version 0.3.
Applications need some kind of configuration. There are different settings you might
want to change depending on the application environment like toggling the debug
mode, setting the secret key, and other such environment-specific things.
The way Flask is designed usually requires the configuration to be available when the
application starts up. You can hardcode the configuration in the code, which for many
small applications is not actually that bad, but there are better ways.
Independent of how you load your config, there is a config object available which
holds the loaded configuration values: The config attribute of the Flask object. This
is the place where Flask itself puts certain configuration values and also where exten-
sions can put their configuration values. But this is also where you can have your own
configuration.
10.1 Configuration Basics
The config is actually a subclass of a dictionary and can be modified just like any
dictionary:
app = Flask(__name__)
app.config[’DEBUG’] = True
Certain configuration values are also forwarded to the Flask object so you can read
and write them from there:
app.debug = True
To update multiple keys at once you can use the dict.update() method:
app.config.update(
DEBUG=True,
SECRET_KEY=’...’
)
59](https://image.slidesharecdn.com/flask-docs-140615143817-phpapp01/85/Flask-docs-69-320.jpg)


![Here for example a helper context manager that can be used to figure out in a unittest
which templates were rendered and what variables were passed to the template:
from flask import template_rendered
from contextlib import contextmanager
@contextmanager
def captured_templates(app):
recorded = []
def record(sender, template, context, **extra):
recorded.append((template, context))
template_rendered.connect(record, app)
try:
yield recorded
finally:
template_rendered.disconnect(record, app)
This can now easily be paired with a test client:
with captured_templates(app) as templates:
rv = app.test_client().get(’/’)
assert rv.status_code == 200
assert len(templates) == 1
template, context = templates[0]
assert template.name == ’index.html’
assert len(context[’items’]) == 10
Make sure to subscribe with an extra **extra argument so that your calls don’t fail if
Flask introduces new arguments to the signals.
All the template rendering in the code issued by the application app in the body of
the with block will now be recorded in the templates variable. Whenever a template is
rendered, the template object as well as context are appended to it.
Additionally there is a convenient helper method (connected_to()). that allows you
to temporarily subscribe a function to a signal with a context manager on its own.
Because the return value of the context manager cannot be specified that way one has
to pass the list in as argument:
from flask import template_rendered
def captured_templates(app, recorded, **extra):
def record(sender, template, context):
recorded.append((template, context))
return template_rendered.connected_to(record, app)
The example above would then look like this:
templates = []
with captured_templates(app, templates, **extra):
...
template, context = templates[0]
68](https://image.slidesharecdn.com/flask-docs-140615143817-phpapp01/85/Flask-docs-78-320.jpg)

![def close_db_connection(sender, **extra):
session.close()
from flask import appcontext_tearing_down
appcontext_tearing_down.connect(close_db_connection, app)
This will also be passed an exc keyword argument that has a reference to the
exception that caused the teardown if there was one.
flask.appcontext_pushed
This signal is sent when an application context is pushed. The sender is the
application. This is usually useful for unittests in order to temporarily hook in
information. For instance it can be used to set a resource early onto the g object.
Example usage:
from contextlib import contextmanager
from flask import appcontext_pushed
@contextmanager
def user_set(app, user):
def handler(sender, **kwargs):
g.user = user
with appcontext_pushed.connected_to(handler, app):
yield
And in the testcode:
def test_user_me(self):
with user_set(app, ’john’):
c = app.test_client()
resp = c.get(’/users/me’)
assert resp.data == ’username=john’
New in version 0.10.
flask.appcontext_popped
This signal is sent when an application context is popped. The sender is the
application. This usually falls in line with the appcontext_tearing_down signal.
New in version 0.10.
flask.message_flashed
This signal is sent when the application is flashing a message. The messages is
sent as message keyword argument and the category as category.
Example subscriber:
recorded = []
def record(sender, message, category, **extra):
recorded.append((message, category))
from flask import message_flashed
message_flashed.connect(record, app)
72](https://image.slidesharecdn.com/flask-docs-140615143817-phpapp01/85/Flask-docs-82-320.jpg)


![class MyView(View):
methods = [’GET’, ’POST’]
def dispatch_request(self):
if request.method == ’POST’:
...
...
app.add_url_rule(’/myview’, view_func=MyView.as_view(’myview’))
12.3 Method Based Dispatching
For RESTful APIs it’s especially helpful to execute a different function for each HTTP
method. With the flask.views.MethodView you can easily do that. Each HTTP method
maps to a function with the same name (just in lowercase):
from flask.views import MethodView
class UserAPI(MethodView):
def get(self):
users = User.query.all()
...
def post(self):
user = User.from_form_data(request.form)
...
app.add_url_rule(’/users/’, view_func=UserAPI.as_view(’users’))
That way you also don’t have to provide the methods attribute. It’s automatically set
based on the methods defined in the class.
12.4 Decorating Views
Since the view class itself is not the view function that is added to the routing system
it does not make much sense to decorate the class itself. Instead you either have to
decorate the return value of as_view() by hand:
def user_required(f):
"""Checks whether user is logged in or raises error 401."""
def decorator(*args, **kwargs):
if not g.user:
abort(401)
return f(*args, **kwargs)
return decorator
77](https://image.slidesharecdn.com/flask-docs-140615143817-phpapp01/85/Flask-docs-87-320.jpg)
![view = user_required(UserAPI.as_view(’users’))
app.add_url_rule(’/users/’, view_func=view)
Starting with Flask 0.8 there is also an alternative way where you can specify a list of
decorators to apply in the class declaration:
class UserAPI(MethodView):
decorators = [user_required]
Due to the implicit self from the caller’s perspective you cannot use regular view dec-
orators on the individual methods of the view however, keep this in mind.
12.5 Method Views for APIs
Web APIs are often working very closely with HTTP verbs so it makes a lot of sense
to implement such an API based on the MethodView. That said, you will notice that the
API will require different URL rules that go to the same method view most of the time.
For instance consider that you are exposing a user object on the web:
URL Method Description
/users/ GET Gives a list of all users
/users/ POST Creates a new user
/users/<id> GET Shows a single user
/users/<id> PUT Updates a single user
/users/<id> DELETE Deletes a single user
So how would you go about doing that with the MethodView? The trick is to take
advantage of the fact that you can provide multiple rules to the same view.
Let’s assume for the moment the view would look like this:
class UserAPI(MethodView):
def get(self, user_id):
if user_id is None:
# return a list of users
pass
else:
# expose a single user
pass
def post(self):
# create a new user
pass
def delete(self, user_id):
# delete a single user
pass
def put(self, user_id):
78](https://image.slidesharecdn.com/flask-docs-140615143817-phpapp01/85/Flask-docs-88-320.jpg)
![# update a single user
pass
So how do we hook this up with the routing system? By adding two rules and explic-
itly mentioning the methods for each:
user_view = UserAPI.as_view(’user_api’)
app.add_url_rule(’/users/’, defaults={’user_id’: None},
view_func=user_view, methods=[’GET’,])
app.add_url_rule(’/users/’, view_func=user_view, methods=[’POST’,])
app.add_url_rule(’/users/<int:user_id>’, view_func=user_view,
methods=[’GET’, ’PUT’, ’DELETE’])
If you have a lot of APIs that look similar you can refactor that registration code:
def register_api(view, endpoint, url, pk=’id’, pk_type=’int’):
view_func = view.as_view(endpoint)
app.add_url_rule(url, defaults={pk: None},
view_func=view_func, methods=[’GET’,])
app.add_url_rule(url, view_func=view_func, methods=[’POST’,])
app.add_url_rule(’%s<%s:%s>’ % (url, pk_type, pk), view_func=view_func,
methods=[’GET’, ’PUT’, ’DELETE’])
register_api(UserAPI, ’user_api’, ’/users/’, pk=’user_id’)
79](https://image.slidesharecdn.com/flask-docs-140615143817-phpapp01/85/Flask-docs-89-320.jpg)


![If you check the rules registered on the application, you will find these:
[<Rule ’/static/<filename>’ (HEAD, OPTIONS, GET) -> static>,
<Rule ’/<page>’ (HEAD, OPTIONS, GET) -> simple_page.show>,
<Rule ’/’ (HEAD, OPTIONS, GET) -> simple_page.show>]
The first one is obviously from the application ifself for the static files. The other two
are for the show function of the simple_page blueprint. As you can see, they are also
prefixed with the name of the blueprint and separated by a dot (.).
Blueprints however can also be mounted at different locations:
app.register_blueprint(simple_page, url_prefix=’/pages’)
And sure enough, these are the generated rules:
[<Rule ’/static/<filename>’ (HEAD, OPTIONS, GET) -> static>,
<Rule ’/pages/<page>’ (HEAD, OPTIONS, GET) -> simple_page.show>,
<Rule ’/pages/’ (HEAD, OPTIONS, GET) -> simple_page.show>]
On top of that you can register blueprints multiple times though not every blueprint
might respond properly to that. In fact it depends on how the blueprint is imple-
mented if it can be mounted more than once.
15.5 Blueprint Resources
Blueprints can provide resources as well. Sometimes you might want to introduce a
blueprint only for the resources it provides.
15.5.1 Blueprint Resource Folder
Like for regular applications, blueprints are considered to be contained in a folder.
While multiple blueprints can originate from the same folder, it does not have to be
the case and it’s usually not recommended.
The folder is inferred from the second argument to Blueprint which is usually
__name__. This argument specifies what logical Python module or package corre-
sponds to the blueprint. If it points to an actual Python package that package (which is
a folder on the filesystem) is the resource folder. If it’s a module, the package the mod-
ule is contained in will be the resource folder. You can access the Blueprint.root_path
property to see what the resource folder is:
>>> simple_page.root_path
’/Users/username/TestProject/yourapplication’
To quickly open sources from this folder you can use the open_resource() function:
with simple_page.open_resource(’static/style.css’) as f:
code = f.read()
93](https://image.slidesharecdn.com/flask-docs-140615143817-phpapp01/85/Flask-docs-103-320.jpg)


![17.2 Firing Before/After Request
By just creating a request context, you still don’t have run the code that is normally
run before a request. This might result in your database being unavailable if you are
connecting to the database in a before-request callback or the current user not being
stored on the g object etc.
This however can easily be done yourself. Just call preprocess_request():
>>> ctx = app.test_request_context()
>>> ctx.push()
>>> app.preprocess_request()
Keep in mind that the preprocess_request() function might return a response object,
in that case just ignore it.
To shutdown a request, you need to trick a bit before the after request functions (trig-
gered by process_response()) operate on a response object:
>>> app.process_response(app.response_class())
<Response 0 bytes [200 OK]>
>>> ctx.pop()
The functions registered as teardown_request() are automatically called when the
context is popped. So this is the perfect place to automatically tear down resources
that were needed by the request context (such as database connections).
17.3 Further Improving the Shell Experience
If you like the idea of experimenting in a shell, create yourself a module with stuff you
want to star import into your interactive session. There you could also define some
more helper methods for common things such as initializing the database, dropping
tables etc.
Just put them into a module (like shelltools and import from there):
>>> from shelltools import *
100](https://image.slidesharecdn.com/flask-docs-140615143817-phpapp01/85/Flask-docs-110-320.jpg)


![def create_app(config_filename):
app = Flask(__name__)
app.config.from_pyfile(config_filename)
from yourapplication.model import db
db.init_app(app)
from yourapplication.views.admin import admin
from yourapplication.views.frontend import frontend
app.register_blueprint(admin)
app.register_blueprint(frontend)
return app
The downside is that you cannot use the application object in the blueprints at import
time. You can however use it from within a request. How do you get access to the
application with the config? Use current_app:
from flask import current_app, Blueprint, render_template
admin = Blueprint(’admin’, __name__, url_prefix=’/admin’)
@admin.route(’/’)
def index():
return render_template(current_app.config[’INDEX_TEMPLATE’])
Here we look up the name of a template in the config.
Extension objects are not initially bound to an application. Using db.init_app, the
app gets configured for the extension. No application-specific state is stored on the
extension object, so one extension object can be used for multiple apps. For more
information about the design of extensions refer to Flask Extension Development.
Your model.py might look like this when using Flask-SQLAlchemy:
from flask.ext.sqlalchemy import SQLAlchemy
# no app object passed! Instead we use use db.init_app in the factory.
db = SQLAlchemy()
# create some models
18.2.2 Using Applications
So to use such an application you then have to create the application first. Here an
example run.py file that runs such an application:
from yourapplication import create_app
app = create_app(’/path/to/config.cfg’)
app.run()
104](https://image.slidesharecdn.com/flask-docs-140615143817-phpapp01/85/Flask-docs-114-320.jpg)


![class SubdomainDispatcher(object):
def __init__(self, domain, create_app):
self.domain = domain
self.create_app = create_app
self.lock = Lock()
self.instances = {}
def get_application(self, host):
host = host.split(’:’)[0]
assert host.endswith(self.domain), ’Configuration error’
subdomain = host[:-len(self.domain)].rstrip(’.’)
with self.lock:
app = self.instances.get(subdomain)
if app is None:
app = self.create_app(subdomain)
self.instances[subdomain] = app
return app
def __call__(self, environ, start_response):
app = self.get_application(environ[’HTTP_HOST’])
return app(environ, start_response)
This dispatcher can then be used like this:
from myapplication import create_app, get_user_for_subdomain
from werkzeug.exceptions import NotFound
def make_app(subdomain):
user = get_user_for_subdomain(subdomain)
if user is None:
# if there is no user for that subdomain we still have
# to return a WSGI application that handles that request.
# We can then just return the NotFound() exception as
# application which will render a default 404 page.
# You might also redirect the user to the main page then
return NotFound()
# otherwise create the application for the specific user
return create_app(user)
application = SubdomainDispatcher(’example.com’, make_app)
18.3.4 Dispatch by Path
Dispatching by a path on the URL is very similar. Instead of looking at the Host header
to figure out the subdomain one simply looks at the request path up to the first slash:
107](https://image.slidesharecdn.com/flask-docs-140615143817-phpapp01/85/Flask-docs-117-320.jpg)
![from threading import Lock
from werkzeug.wsgi import pop_path_info, peek_path_info
class PathDispatcher(object):
def __init__(self, default_app, create_app):
self.default_app = default_app
self.create_app = create_app
self.lock = Lock()
self.instances = {}
def get_application(self, prefix):
with self.lock:
app = self.instances.get(prefix)
if app is None:
app = self.create_app(prefix)
if app is not None:
self.instances[prefix] = app
return app
def __call__(self, environ, start_response):
app = self.get_application(peek_path_info(environ))
if app is not None:
pop_path_info(environ)
else:
app = self.default_app
return app(environ, start_response)
The big difference between this and the subdomain one is that this one falls back to
another application if the creator function returns None:
from myapplication import create_app, default_app, get_user_for_prefix
def make_app(prefix):
user = get_user_for_prefix(prefix)
if user is not None:
return create_app(user)
application = PathDispatcher(default_app, make_app)
18.4 Implementing API Exceptions
It’s very common to implement RESTful APIs on top of Flask. One of the first thing
that developers run into is the realization that the builtin exceptions are not expressive
enough for APIs and that the content type of text/html they are emitting is not very
useful for API consumers.
The better solution than using abort to signal errors for invalid API usage is to im-
plement your own exception type and install an error handler for it that produces the
108](https://image.slidesharecdn.com/flask-docs-140615143817-phpapp01/85/Flask-docs-118-320.jpg)
![errors in the format the user is expecting.
18.4.1 Simple Exception Class
The basic idea is to introduce a new exception that can take a proper human readable
message, a status code for the error and some optional payload to give more context
for the error.
This is a simple example:
from flask import jsonify
class InvalidUsage(Exception):
status_code = 400
def __init__(self, message, status_code=None, payload=None):
Exception.__init__(self)
self.message = message
if status_code is not None:
self.status_code = status_code
self.payload = payload
def to_dict(self):
rv = dict(self.payload or ())
rv[’message’] = self.message
return rv
A view can now raise that exception with an error message. Additionally some extra
payload can be provided as a dictionary through the payload parameter.
18.4.2 Registering an Error Handler
At that point views can raise that error, but it would immediately result in an internal
server error. The reason for this is that there is no handler registered for this error
class. That however is easy to add:
@app.errorhandler(InvalidUsage)
def handle_invalid_usage(error):
response = jsonify(error.to_dict())
response.status_code = error.status_code
return response
18.4.3 Usage in Views
Here is how a view can use that functionality:
109](https://image.slidesharecdn.com/flask-docs-140615143817-phpapp01/85/Flask-docs-119-320.jpg)
![if app.url_map.is_endpoint_expecting(endpoint, ’lang_code’):
values[’lang_code’] = g.lang_code
The method is_endpoint_expecting() of the URL map can be used to figure out if it
would make sense to provide a language code for the given endpoint.
The reverse of that function are url_value_preprocessor()s. They are executed right
after the request was matched and can execute code based on the URL values. The
idea is that they pull information out of the values dictionary and put it somewhere
else:
@app.url_value_preprocessor
def pull_lang_code(endpoint, values):
g.lang_code = values.pop(’lang_code’, None)
That way you no longer have to do the lang_code assignment to g in every function.
You can further improve that by writing your own decorator that prefixes URLs with
the language code, but the more beautiful solution is using a blueprint. Once the
’lang_code’ is popped from the values dictionary and it will no longer be forwarded
to the view function reducing the code to this:
from flask import Flask, g
app = Flask(__name__)
@app.url_defaults
def add_language_code(endpoint, values):
if ’lang_code’ in values or not g.lang_code:
return
if app.url_map.is_endpoint_expecting(endpoint, ’lang_code’):
values[’lang_code’] = g.lang_code
@app.url_value_preprocessor
def pull_lang_code(endpoint, values):
g.lang_code = values.pop(’lang_code’, None)
@app.route(’/<lang_code>/’)
def index():
...
@app.route(’/<lang_code>/about’)
def about():
...
18.5.2 Internationalized Blueprint URLs
Because blueprints can automatically prefix all URLs with a common string it’s easy
to automatically do that for every function. Furthermore blueprints can have per-
blueprint URL processors which removes a whole lot of logic from the url_defaults()
111](https://image.slidesharecdn.com/flask-docs-140615143817-phpapp01/85/Flask-docs-121-320.jpg)
![your application into a package, head over to the Larger Applications pattern to see how
this can be done.
A working deployment with distribute is the first step into more complex and more
automated deployment scenarios. If you want to fully automate the process, also read
the Deploying with Fabric chapter.
18.6.1 Basic Setup Script
Because you have Flask running, you either have setuptools or distribute available on
your system anyways. If you do not, fear not, there is a script to install it for you:
distribute_setup.py. Just download and run with your Python interpreter.
Standard disclaimer applies: you better use a virtualenv.
Your setup code always goes into a file named setup.py next to your application. The
name of the file is only convention, but because everybody will look for a file with that
name, you better not change it.
Yes, even if you are using distribute, you are importing from a package called setuptools.
distribute is fully backwards compatible with setuptools, so it also uses the same import
name.
A basic setup.py file for a Flask application looks like this:
from setuptools import setup
setup(
name=’Your Application’,
version=’1.0’,
long_description=__doc__,
packages=[’yourapplication’],
include_package_data=True,
zip_safe=False,
install_requires=[’Flask’]
)
Please keep in mind that you have to list subpackages explicitly. If you want distribute
to lookup the packages for you automatically, you can use the find_packages function:
from setuptools import setup, find_packages
setup(
...
packages=find_packages()
)
Most parameters to the setup function should be self explanatory, include_package_data
and zip_safe might not be. include_package_data tells distribute to look for a MANI-
FEST.in file and install all the entries that match as package data. We will use this to
distribute the static files and templates along with the Python module (see Distribut-
ing Resources). The zip_safe flag can be used to force or prevent zip Archive creation.
113](https://image.slidesharecdn.com/flask-docs-140615143817-phpapp01/85/Flask-docs-123-320.jpg)
![In general you probably don’t want your packages to be installed as zip files because
some tools do not support them and they make debugging a lot harder.
18.6.2 Distributing Resources
If you try to install the package you just created, you will notice that folders like static
or templates are not installed for you. The reason for this is that distribute does not
know which files to add for you. What you should do, is to create a MANIFEST.in file
next to your setup.py file. This file lists all the files that should be added to your tarball:
recursive-include yourapplication/templates *
recursive-include yourapplication/static *
Don’t forget that even if you enlist them in your MANIFEST.in file, they won’t be
installed for you unless you set the include_package_data parameter of the setup function
to True!
18.6.3 Declaring Dependencies
Dependencies are declared in the install_requires parameter as list. Each item in that list
is the name of a package that should be pulled from PyPI on installation. By default
it will always use the most recent version, but you can also provide minimum and
maximum version requirements. Here some examples:
install_requires=[
’Flask>=0.2’,
’SQLAlchemy>=0.6’,
’BrokenPackage>=0.7,<=1.0’
]
I mentioned earlier that dependencies are pulled from PyPI. What if you want to de-
pend on a package that cannot be found on PyPI and won’t be because it is an internal
package you don’t want to share with anyone? Just still do as if there was a PyPI en-
try for it and provide a list of alternative locations where distribute should look for
tarballs:
dependency_links=[’http://example.com/yourfiles’]
Make sure that page has a directory listing and the links on the page are pointing to
the actual tarballs with their correct filenames as this is how distribute will find the
files. If you have an internal company server that contains the packages, provide the
URL to that server there.
18.6.4 Installing / Developing
To install your application (ideally into a virtualenv) just run the setup.py script with
the install parameter. It will install your application into the virtualenv’s site-packages
folder and also download and install all dependencies:
114](https://image.slidesharecdn.com/flask-docs-140615143817-phpapp01/85/Flask-docs-124-320.jpg)
![$ python setup.py install
If you are developing on the package and also want the requirements to be installed,
you can use the develop command instead:
$ python setup.py develop
This has the advantage of just installing a link to the site-packages folder instead of
copying the data over. You can then continue to work on the code without having to
run install again after each change.
18.7 Deploying with Fabric
Fabric is a tool for Python similar to Makefiles but with the ability to execute com-
mands on a remote server. In combination with a properly set up Python package
(Larger Applications) and a good concept for configurations (Configuration Handling) it
is very easy to deploy Flask applications to external servers.
Before we get started, here a quick checklist of things we have to ensure upfront:
• Fabric 1.0 has to be installed locally. This tutorial assumes the latest version of
Fabric.
• The application already has to be a package and requires a working setup.py file
(Deploying with Distribute).
• In the following example we are using mod_wsgi for the remote servers. You
can of course use your own favourite server there, but for this example we chose
Apache + mod_wsgi because it’s very easy to setup and has a simple way to reload
applications without root access.
18.7.1 Creating the first Fabfile
A fabfile is what controls what Fabric executes. It is named fabfile.py and executed by
the fab command. All the functions defined in that file will show up as fab subcom-
mands. They are executed on one or more hosts. These hosts can be defined either in
the fabfile or on the command line. In this case we will add them to the fabfile.
This is a basic first example that has the ability to upload the current sourcecode to the
server and install it into a pre-existing virtual environment:
from fabric.api import *
# the user to use for the remote commands
env.user = ’appuser’
# the servers where the commands are executed
env.hosts = [’server1.example.com’, ’server2.example.com’]
def pack():
115](https://image.slidesharecdn.com/flask-docs-140615143817-phpapp01/85/Flask-docs-125-320.jpg)
![$ fab -H newserver.example.com bootstrap
To setup a new server you would roughly do these steps:
1. Create the directory structure in /var/www:
$ mkdir /var/www/yourapplication
$ cd /var/www/yourapplication
$ virtualenv --distribute env
2. Upload a new application.wsgi file to the server and the configuration file for the
application (eg: application.cfg)
3. Create a new Apache config for yourapplication and activate it. Make sure to
activate watching for changes of the .wsgi file so that we can automatically reload
the application by touching it. (See mod_wsgi (Apache) for more information)
So now the question is, where do the application.wsgi and application.cfg files come
from?
18.7.3 The WSGI File
The WSGI file has to import the application and also to set an environment variable so
that the application knows where to look for the config. This is a short example that
does exactly that:
import os
os.environ[’YOURAPPLICATION_CONFIG’] = ’/var/www/yourapplication/application.cfg’
from yourapplication import app
The application itself then has to initialize itself like this to look for the config at that
environment variable:
app = Flask(__name__)
app.config.from_object(’yourapplication.default_config’)
app.config.from_envvar(’YOURAPPLICATION_CONFIG’)
This approach is explained in detail in the Configuration Handling section of the docu-
mentation.
18.7.4 The Configuration File
Now as mentioned above, the application will find the correct configuration file by
looking up the YOURAPPLICATION_CONFIG environment variable. So we have to
put the configuration in a place where the application will able to find it. Configura-
tion files have the unfriendly quality of being different on all computers, so you do not
version them usually.
A popular approach is to store configuration files for different servers in a sep-
arate version control repository and check them out on all servers. Then sym-
117](https://image.slidesharecdn.com/flask-docs-140615143817-phpapp01/85/Flask-docs-127-320.jpg)

![18.8.2 Easy Querying
Now in each request handling function you can access g.db to get the current open
database connection. To simplify working with SQLite, a row factory function is use-
ful. It is executed for every result returned from the database to convert the result.
For instance in order to get dictionaries instead of tuples this could be inserted into
get_db:
def make_dicts(cursor, row):
return dict((cursor.description[idx][0], value)
for idx, value in enumerate(row))
db.row_factory = make_dicts
Or even simpler:
db.row_factory = sqlite3.Row
Additionally it is a good idea to provide a query function that combines getting the
cursor, executing and fetching the results:
def query_db(query, args=(), one=False):
cur = get_db().execute(query, args)
rv = cur.fetchall()
cur.close()
return (rv[0] if rv else None) if one else rv
This handy little function in combination with a row factory makes working with the
database much more pleasant than it is by just using the raw cursor and connection
objects.
Here is how you can use it:
for user in query_db(’select * from users’):
print user[’username’], ’has the id’, user[’user_id’]
Or if you just want a single result:
user = query_db(’select * from users where username = ?’,
[the_username], one=True)
if user is None:
print ’No such user’
else:
print the_username, ’has the id’, user[’user_id’]
To pass variable parts to the SQL statement, use a question mark in the statement and
pass in the arguments as a list. Never directly add them to the SQL statement with
string formatting because this makes it possible to attack the application using SQL
Injections.
120](https://image.slidesharecdn.com/flask-docs-140615143817-phpapp01/85/Flask-docs-130-320.jpg)


![>>> from yourapplication.database import init_db
>>> init_db()
You can insert entries into the database like this:
>>> from yourapplication.database import db_session
>>> from yourapplication.models import User
>>> u = User(’admin’, ’admin@localhost’)
>>> db_session.add(u)
>>> db_session.commit()
Querying is simple as well:
>>> User.query.all()
[<User u’admin’>]
>>> User.query.filter(User.name == ’admin’).first()
<User u’admin’>
18.9.3 Manual Object Relational Mapping
Manual object relational mapping has a few upsides and a few downsides versus the
declarative approach from above. The main difference is that you define tables and
classes separately and map them together. It’s more flexible but a little more to type.
In general it works like the declarative approach, so make sure to also split up your
application into multiple modules in a package.
Here is an example database.py module for your application:
from sqlalchemy import create_engine, MetaData
from sqlalchemy.orm import scoped_session, sessionmaker
engine = create_engine(’sqlite:////tmp/test.db’, convert_unicode=True)
metadata = MetaData()
db_session = scoped_session(sessionmaker(autocommit=False,
autoflush=False,
bind=engine))
def init_db():
metadata.create_all(bind=engine)
As for the declarative approach you need to close the session after each request or
application context shutdown. Put this into your application module:
from yourapplication.database import db_session
@app.teardown_appcontext
def shutdown_session(exception=None):
db_session.remove()
Here is an example table and model (put this into models.py):
123](https://image.slidesharecdn.com/flask-docs-140615143817-phpapp01/85/Flask-docs-133-320.jpg)

![These results are also dict-like tuples:
>>> r = users.select(users.c.id == 1).execute().first()
>>> r[’name’]
u’admin’
You can also pass strings of SQL statements to the execute() method:
>>> engine.execute(’select * from users where id = :1’, [1]).first()
(1, u’admin’, u’admin@localhost’)
For more information about SQLAlchemy, head over to the website.
18.10 Uploading Files
Ah yes, the good old problem of file uploads. The basic idea of file uploads is actually
quite simple. It basically works like this:
1. A <form> tag is marked with enctype=multipart/form-data and an <input
type=file> is placed in that form.
2. The application accesses the file from the files dictionary on the request object.
3. use the save() method of the file to save the file permanently somewhere on the
filesystem.
18.10.1 A Gentle Introduction
Let’s start with a very basic application that uploads a file to a specific upload folder
and displays a file to the user. Let’s look at the bootstrapping code for our application:
import os
from flask import Flask, request, redirect, url_for
from werkzeug.utils import secure_filename
UPLOAD_FOLDER = ’/path/to/the/uploads’
ALLOWED_EXTENSIONS = set([’txt’, ’pdf’, ’png’, ’jpg’, ’jpeg’, ’gif’])
app = Flask(__name__)
app.config[’UPLOAD_FOLDER’] = UPLOAD_FOLDER
So first we need a couple of imports. Most should be straightforward, the
werkzeug.secure_filename() is explained a little bit later. The UPLOAD_FOLDER
is where we will store the uploaded files and the ALLOWED_EXTENSIONS is the set
of allowed file extensions. Then we add a URL rule by hand to the application. Now
usually we’re not doing that, so why here? The reasons is that we want the webserver
(or our development server) to serve these files for us and so we only need a rule to
generate the URL to these files.
125](https://image.slidesharecdn.com/flask-docs-140615143817-phpapp01/85/Flask-docs-135-320.jpg)
![Why do we limit the extensions that are allowed? You probably don’t want your users
to be able to upload everything there if the server is directly sending out the data to the
client. That way you can make sure that users are not able to upload HTML files that
would cause XSS problems (see Cross-Site Scripting (XSS)). Also make sure to disallow
.php files if the server executes them, but who has PHP installed on his server, right? :)
Next the functions that check if an extension is valid and that uploads the file and
redirects the user to the URL for the uploaded file:
def allowed_file(filename):
return ’.’ in filename and
filename.rsplit(’.’, 1)[1] in ALLOWED_EXTENSIONS
@app.route(’/’, methods=[’GET’, ’POST’])
def upload_file():
if request.method == ’POST’:
file = request.files[’file’]
if file and allowed_file(file.filename):
filename = secure_filename(file.filename)
file.save(os.path.join(app.config[’UPLOAD_FOLDER’], filename))
return redirect(url_for(’uploaded_file’,
filename=filename))
return ’’’
<!doctype html>
<title>Upload new File</title>
<h1>Upload new File</h1>
<form action="" method=post enctype=multipart/form-data>
<p><input type=file name=file>
<input type=submit value=Upload>
</form>
’’’
So what does that secure_filename() function actually do? Now the problem is that
there is that principle called “never trust user input”. This is also true for the filename
of an uploaded file. All submitted form data can be forged, and filenames can be dan-
gerous. For the moment just remember: always use that function to secure a filename
before storing it directly on the filesystem.
Information for the Pros
So you’re interested in what that secure_filename() function does and what the prob-
lem is if you’re not using it? So just imagine someone would send the following infor-
mation as filename to your application:
filename = "../../../../home/username/.bashrc"
Assuming the number of ../ is correct and you would join this with the UP-
LOAD_FOLDER the user might have the ability to modify a file on the server’s filesys-
tem he or she should not modify. This does require some knowledge about how the
application looks like, but trust me, hackers are patient :)
Now let’s look how that function works:
126](https://image.slidesharecdn.com/flask-docs-140615143817-phpapp01/85/Flask-docs-136-320.jpg)
![>>> secure_filename(’../../../../home/username/.bashrc’)
’home_username_.bashrc’
Now one last thing is missing: the serving of the uploaded files. As of Flask 0.5 we
can use a function that does that for us:
from flask import send_from_directory
@app.route(’/uploads/<filename>’)
def uploaded_file(filename):
return send_from_directory(app.config[’UPLOAD_FOLDER’],
filename)
Alternatively you can register uploaded_file as build_only rule and use the
SharedDataMiddleware. This also works with older versions of Flask:
from werkzeug import SharedDataMiddleware
app.add_url_rule(’/uploads/<filename>’, ’uploaded_file’,
build_only=True)
app.wsgi_app = SharedDataMiddleware(app.wsgi_app, {
’/uploads’: app.config[’UPLOAD_FOLDER’]
})
If you now run the application everything should work as expected.
18.10.2 Improving Uploads
New in version 0.6.
So how exactly does Flask handle uploads? Well it will store them in the webserver’s
memory if the files are reasonable small otherwise in a temporary location (as returned
by tempfile.gettempdir()). But how do you specify the maximum file size after
which an upload is aborted? By default Flask will happily accept file uploads to an un-
limited amount of memory, but you can limit that by setting the MAX_CONTENT_LENGTH
config key:
from flask import Flask, Request
app = Flask(__name__)
app.config[’MAX_CONTENT_LENGTH’] = 16 * 1024 * 1024
The code above will limited the maximum allowed payload to 16 megabytes. If a
larger file is transmitted, Flask will raise an RequestEntityTooLarge exception.
This feature was added in Flask 0.6 but can be achieved in older versions as well by
subclassing the request object. For more information on that consult the Werkzeug
documentation on file handling.
127](https://image.slidesharecdn.com/flask-docs-140615143817-phpapp01/85/Flask-docs-137-320.jpg)

![If you want to use memcached, make sure to have one of the memcache modules
supported (you get them from PyPI) and a memcached server running somewhere.
This is how you connect to such an memcached server then:
from werkzeug.contrib.cache import MemcachedCache
cache = MemcachedCache([’127.0.0.1:11211’])
If you are using App Engine, you can connect to the App Engine memcache server
easily:
from werkzeug.contrib.cache import GAEMemcachedCache
cache = GAEMemcachedCache()
18.11.2 Using a Cache
Now how can one use such a cache? There are two very important operations: get()
and set(). This is how to use them:
To get an item from the cache call get() with a string as key name. If something is in
the cache, it is returned. Otherwise that function will return None:
rv = cache.get(’my-item’)
To add items to the cache, use the set() method instead. The first argument is the
key and the second the value that should be set. Also a timeout can be provided after
which the cache will automatically remove item.
Here a full example how this looks like normally:
def get_my_item():
rv = cache.get(’my-item’)
if rv is None:
rv = calculate_value()
cache.set(’my-item’, rv, timeout=5 * 60)
return rv
18.12 View Decorators
Python has a really interesting feature called function decorators. This allow some
really neat things for web applications. Because each view in Flask is a function dec-
orators can be used to inject additional functionality to one or more functions. The
route() decorator is the one you probably used already. But there are use cases for
implementing your own decorator. For instance, imagine you have a view that should
only be used by people that are logged in to. If a user goes to the site and is not logged
in, they should be redirected to the login page. This is a good example of a use case
where a decorator is an excellent solution.
129](https://image.slidesharecdn.com/flask-docs-140615143817-phpapp01/85/Flask-docs-139-320.jpg)


![When you are working with WTForms you have to define your forms as classes first.
I recommend breaking up the application into multiple modules (Larger Applications)
for that and adding a separate module for the forms.
Getting most of WTForms with an Extension
The Flask-WTF extension expands on this pattern and adds a few handful little helpers
that make working with forms and Flask more fun. You can get it from PyPI.
18.13.1 The Forms
This is an example form for a typical registration page:
from wtforms import Form, BooleanField, TextField, PasswordField, validators
class RegistrationForm(Form):
username = TextField(’Username’, [validators.Length(min=4, max=25)])
email = TextField(’Email Address’, [validators.Length(min=6, max=35)])
password = PasswordField(’New Password’, [
validators.Required(),
validators.EqualTo(’confirm’, message=’Passwords must match’)
])
confirm = PasswordField(’Repeat Password’)
accept_tos = BooleanField(’I accept the TOS’, [validators.Required()])
18.13.2 In the View
In the view function, the usage of this form looks like this:
@app.route(’/register’, methods=[’GET’, ’POST’])
def register():
form = RegistrationForm(request.form)
if request.method == ’POST’ and form.validate():
user = User(form.username.data, form.email.data,
form.password.data)
db_session.add(user)
flash(’Thanks for registering’)
return redirect(url_for(’login’))
return render_template(’register.html’, form=form)
Notice that we are implying that the view is using SQLAlchemy here (SQLAlchemy in
Flask) but this is no requirement of course. Adapt the code as necessary.
Things to remember:
1. create the form from the request form value if the data is submitted via the HTTP
POST method and args if the data is submitted as GET.
2. to validate the data, call the validate() method which will return True if the data
validates, False otherwise.
133](https://image.slidesharecdn.com/flask-docs-140615143817-phpapp01/85/Flask-docs-143-320.jpg)


![{% endblock %}
{% block content %}
<h1>Index</h1>
<p class="important">
Welcome on my awesome homepage.
{% endblock %}
The {% extends %} tag is the key here. It tells the template engine that this template
“extends” another template. When the template system evaluates this template, first
it locates the parent. The extends tag must be the first tag in the template. To render
the contents of a block defined in the parent template, use {{ super() }}.
18.15 Message Flashing
Good applications and user interfaces are all about feedback. If the user does not get
enough feedback they will probably end up hating the application. Flask provides a
really simple way to give feedback to a user with the flashing system. The flashing
system basically makes it possible to record a message at the end of a request and
access it next request and only next request. This is usually combined with a layout
template that does this.
18.15.1 Simple Flashing
So here is a full example:
from flask import Flask, flash, redirect, render_template,
request, url_for
app = Flask(__name__)
app.secret_key = ’some_secret’
@app.route(’/’)
def index():
return render_template(’index.html’)
@app.route(’/login’, methods=[’GET’, ’POST’])
def login():
error = None
if request.method == ’POST’:
if request.form[’username’] != ’admin’ or
request.form[’password’] != ’secret’:
error = ’Invalid credentials’
else:
flash(’You were successfully logged in’)
return redirect(url_for(’index’))
return render_template(’login.html’, error=error)
136](https://image.slidesharecdn.com/flask-docs-140615143817-phpapp01/85/Flask-docs-146-320.jpg)
![It is also possible to provide categories when flashing a message. The default cate-
gory if nothing is provided is ’message’. Alternative categories can be used to give
the user better feedback. For example error messages could be displayed with a red
background.
To flash a message with a different category, just use the second argument to the
flash() function:
flash(u’Invalid password provided’, ’error’)
Inside the template you then have to tell the get_flashed_messages() function to also
return the categories. The loop looks slightly different in that situation then:
{% with messages = get_flashed_messages(with_categories=true) %}
{% if messages %}
<ul class=flashes>
{% for category, message in messages %}
<li class="{{ category }}">{{ message }}</li>
{% endfor %}
</ul>
{% endif %}
{% endwith %}
This is just one example of how to render these flashed messages. One might also use
the category to add a prefix such as <strong>Error:</strong> to the message.
18.15.3 Filtering Flash Messages
New in version 0.9.
Optionally you can pass a list of categories which filters the results of
get_flashed_messages(). This is useful if you wish to render each category in a sepa-
rate block.
{% with errors = get_flashed_messages(category_filter=["error"]) %}
{% if errors %}
<div class="alert-message block-message error">
<a class="close" href="#">×</a>
<ul>
{%- for msg in errors %}
<li>{{ msg }}</li>
{% endfor -%}
</ul>
</div>
{% endif %}
{% endwith %}
138](https://image.slidesharecdn.com/flask-docs-140615143817-phpapp01/85/Flask-docs-148-320.jpg)

![18.16.4 The HTML
Your index.html template either has to extend a layout.html template with jQuery
loaded and the $SCRIPT_ROOT variable set, or do that on the top. Here’s the HTML
code needed for our little application (index.html). Notice that we also drop the script
directly into the HTML here. It is usually a better idea to have that in a separate script
file:
<script type=text/javascript>
$(function() {
$(’a#calculate’).bind(’click’, function() {
$.getJSON($SCRIPT_ROOT + ’/_add_numbers’, {
a: $(’input[name="a"]’).val(),
b: $(’input[name="b"]’).val()
}, function(data) {
$("#result").text(data.result);
});
return false;
});
});
</script>
<h1>jQuery Example</h1>
<p><input type=text size=5 name=a> +
<input type=text size=5 name=b> =
<span id=result>?</span>
<p><a href=# id=calculate>calculate server side</a>
I won’t go into detail here about how jQuery works, just a very quick explanation of
the little bit of code above:
1. $(function() { ... }) specifies code that should run once the browser is done
loading the basic parts of the page.
2. $(’selector’) selects an element and lets you operate on it.
3. element.bind(’event’, func) specifies a function that should run when the user
clicked on the element. If that function returns false, the default behavior will not
kick in (in this case, navigate to the # URL).
4. $.getJSON(url, data, func) sends a GET request to url and will send the con-
tents of the data object as query parameters. Once the data arrived, it will call
the given function with the return value as argument. Note that we can use the
$SCRIPT_ROOT variable here that we set earlier.
If you don’t get the whole picture, download the sourcecode for this example from
github.
18.17 Custom Error Pages
Flask comes with a handy abort() function that aborts a request with an HTTP error
code early. It will also provide a plain black and white error page for you with a basic
141](https://image.slidesharecdn.com/flask-docs-140615143817-phpapp01/85/Flask-docs-151-320.jpg)


![url(’/’, ’views.index’)
url(’/user/<username>’, ’views.user’)
One thing to keep in mind is that before and after request handlers have to be in a file
that is imported upfront to work properly on the first request. The same goes for any
kind of remaining decorator.
18.19 MongoKit in Flask
Using a document database rather than a full DBMS gets more common these days.
This pattern shows how to use MongoKit, a document mapper library, to integrate
with MongoDB.
This pattern requires a running MongoDB server and the MongoKit library installed.
There are two very common ways to use MongoKit. I will outline each of them here:
18.19.1 Declarative
The default behavior of MongoKit is the declarative one that is based on common
ideas from Django or the SQLAlchemy declarative extension.
Here an example app.py module for your application:
from flask import Flask
from mongokit import Connection, Document
# configuration
MONGODB_HOST = ’localhost’
MONGODB_PORT = 27017
# create the little application object
app = Flask(__name__)
app.config.from_object(__name__)
# connect to the database
connection = Connection(app.config[’MONGODB_HOST’],
app.config[’MONGODB_PORT’])
To define your models, just subclass the Document class that is imported from Mon-
goKit. If you’ve seen the SQLAlchemy pattern you may wonder why we do not have
a session and even do not define a init_db function here. On the one hand, MongoKit
does not have something like a session. This sometimes makes it more to type but
also makes it blazingly fast. On the other hand, MongoDB is schemaless. This means
you can modify the data structure from one insert query to the next without any prob-
lem. MongoKit is just schemaless too, but implements some validation to ensure data
integrity.
Here is an example document (put this also into app.py, e.g.):
145](https://image.slidesharecdn.com/flask-docs-140615143817-phpapp01/85/Flask-docs-155-320.jpg)
![def max_length(length):
def validate(value):
if len(value) <= length:
return True
raise Exception(’%s must be at most %s characters long’ % length)
return validate
class User(Document):
structure = {
’name’: unicode,
’email’: unicode,
}
validators = {
’name’: max_length(50),
’email’: max_length(120)
}
use_dot_notation = True
def __repr__(self):
return ’<User %r>’ % (self.name)
# register the User document with our current connection
connection.register([User])
This example shows you how to define your schema (named structure), a valida-
tor for the maximum character length and uses a special MongoKit feature called
use_dot_notation. Per default MongoKit behaves like a python dictionary but with
use_dot_notation set to True you can use your documents like you use models in nearly
any other ORM by using dots to separate between attributes.
You can insert entries into the database like this:
>>> from yourapplication.database import connection
>>> from yourapplication.models import User
>>> collection = connection[’test’].users
>>> user = collection.User()
>>> user[’name’] = u’admin’
>>> user[’email’] = u’admin@localhost’
>>> user.save()
Note that MongoKit is kinda strict with used column types, you must not use a com-
mon str type for either name or email but unicode.
Querying is simple as well:
>>> list(collection.User.find())
[<User u’admin’>]
>>> collection.User.find_one({’name’: u’admin’})
<User u’admin’>
146](https://image.slidesharecdn.com/flask-docs-140615143817-phpapp01/85/Flask-docs-156-320.jpg)
![18.19.2 PyMongo Compatibility Layer
If you just want to use PyMongo, you can do that with MongoKit as well. You may
use this process if you need the best performance to get. Note that this example does
not show how to couple it with Flask, see the above MongoKit code for examples:
from MongoKit import Connection
connection = Connection()
To insert data you can use the insert method. We have to get a collection first, this is
somewhat the same as a table in the SQL world.
>>> collection = connection[’test’].users
>>> user = {’name’: u’admin’, ’email’: u’admin@localhost’}
>>> collection.insert(user)
MongoKit will automatically commit for us.
To query your database, you use the collection directly:
>>> list(collection.find())
[{u’_id’: ObjectId(’4c271729e13823182f000000’), u’name’: u’admin’, u’email’: u’admin@localhost’}
>>> collection.find_one({’name’: u’admin’})
{u’_id’: ObjectId(’4c271729e13823182f000000’), u’name’: u’admin’, u’email’: u’admin@localhost’}
These results are also dict-like objects:
>>> r = collection.find_one({’name’: u’admin’})
>>> r[’email’]
u’admin@localhost’
For more information about MongoKit, head over to the website.
18.20 Adding a favicon
A “favicon” is an icon used by browsers for tabs and bookmarks. This helps to distin-
guish your website and to give it a unique brand.
A common question is how to add a favicon to a flask application. First, of course,
you need an icon. It should be 16 × 16 pixels and in the ICO file format. This is not a
requirement but a de-facto standard supported by all relevant browsers. Put the icon
in your static directory as favicon.ico.
Now, to get browsers to find your icon, the correct way is to add a link tag in your
HTML. So, for example:
<link rel="shortcut icon" href="{{ url_for(’static’, filename=’favicon.ico’) }}">
That’s all you need for most browsers, however some really old ones do not support
this standard. The old de-facto standard is to serve this file, with this name, at the
website root. If your application is not mounted at the root path of the domain you
147](https://image.slidesharecdn.com/flask-docs-140615143817-phpapp01/85/Flask-docs-157-320.jpg)

![def generate():
yield ’Hello ’
yield request.args[’name’]
yield ’!’
return Response(stream_with_context(generate()))
Without the stream_with_context() function you would get a RuntimeError at that
point.
18.22 Deferred Request Callbacks
One of the design principles of Flask is that response objects are created and passed
down a chain of potential callbacks that can modify them or replace them. When the
request handling starts, there is no response object yet. It is created as necessary either
by a view function or by some other component in the system.
But what happens if you want to modify the response at a point where the response
does not exist yet? A common example for that would be a before-request function
that wants to set a cookie on the response object.
One way is to avoid the situation. Very often that is possible. For instance you can try
to move that logic into an after-request callback instead. Sometimes however moving
that code there is just not a very pleasant experience or makes code look very awk-
ward.
As an alternative possibility you can attach a bunch of callback functions to the g object
and call them at the end of the request. This way you can defer code execution from
anywhere in the application.
18.22.1 The Decorator
The following decorator is the key. It registers a function on a list on the g object:
from flask import g
def after_this_request(f):
if not hasattr(g, ’after_request_callbacks’):
g.after_request_callbacks = []
g.after_request_callbacks.append(f)
return f
18.22.2 Calling the Deferred
Now you can use the after_this_request decorator to mark a function to be called at the
end of the request. But we still need to call them. For this the following function needs
to be registered as after_request() callback:
150](https://image.slidesharecdn.com/flask-docs-140615143817-phpapp01/85/Flask-docs-160-320.jpg)
![@app.after_request
def call_after_request_callbacks(response):
for callback in getattr(g, ’after_request_callbacks’, ()):
callback(response)
return response
18.22.3 A Practical Example
Now we can easily at any point in time register a function to be called at the end of this
particular request. For example you can remember the current language of the user in
a cookie in the before-request function:
from flask import request
@app.before_request
def detect_user_language():
language = request.cookies.get(’user_lang’)
if language is None:
language = guess_language_from_request()
@after_this_request
def remember_language(response):
response.set_cookie(’user_lang’, language)
g.language = language
18.23 Adding HTTP Method Overrides
Some HTTP proxies do not support arbitrary HTTP methods or newer HTTP methods
(such as PATCH). In that case it’s possible to “proxy” HTTP methods through another
HTTP method in total violation of the protocol.
The way this works is by letting the client do an HTTP POST request and set the
X-HTTP-Method-Override header and set the value to the intended HTTP method (such
as PATCH).
This can easily be accomplished with an HTTP middleware:
class HTTPMethodOverrideMiddleware(object):
allowed_methods = frozenset([
’GET’,
’HEAD’,
’POST’,
’DELETE’,
’PUT’,
’PATCH’,
’OPTIONS’
])
bodyless_methods = frozenset([’GET’, ’HEAD’, ’OPTIONS’, ’DELETE’])
151](https://image.slidesharecdn.com/flask-docs-140615143817-phpapp01/85/Flask-docs-161-320.jpg)
![def __init__(self, app):
self.app = app
def __call__(self, environ, start_response):
method = environ.get(’HTTP_X_HTTP_METHOD_OVERRIDE’, ’’).upper()
if method in self.allowed_methods:
method = method.encode(’ascii’, ’replace’)
environ[’REQUEST_METHOD’] = method
if method in self.bodyless_methods:
environ[’CONTENT_LENGTH’] = ’0’
return self.app(environ, start_response)
To use this with Flask this is all that is necessary:
from flask import Flask
app = Flask(__name__)
app.wsgi_app = HTTPMethodOverrideMiddleware(app.wsgi_app)
18.24 Request Content Checksums
Various pieces of code can consume the request data and preprocess it. For instance
JSON data ends up on the request object already read and processed, form data ends
up there as well but goes through a different code path. This seems inconvenient when
you want to calculate the checksum of the incoming request data. This is necessary
sometimes for some APIs.
Fortunately this is however very simple to change by wrapping the input stream.
The following example calculates the SHA1 checksum of the incoming data as it gets
read and stores it in the WSGI environment:
import hashlib
class ChecksumCalcStream(object):
def __init__(self, stream):
self._stream = stream
self._hash = hashlib.sha1()
def read(self, bytes):
rv = self._stream.read(bytes)
self._hash.update(rv)
return rv
def readline(self, size_hint):
rv = self._stream.readline(size_hint)
self._hash.update(rv)
return rv
152](https://image.slidesharecdn.com/flask-docs-140615143817-phpapp01/85/Flask-docs-162-320.jpg)
![def generate_checksum(request):
env = request.environ
stream = ChecksumCalcStream(env[’wsgi.input’])
env[’wsgi.input’] = stream
return stream._hash
To use this, all you need to do is to hook the calculating stream in before the request
starts consuming data. (Eg: be careful accessing request.form or anything of that
nature. before_request_handlers for instance should be careful not to access it).
Example usage:
@app.route(’/special-api’, methods=[’POST’])
def special_api():
hash = generate_checksum(request)
# Accessing this parses the input stream
files = request.files
# At this point the hash is fully constructed.
checksum = hash.hexdigest()
return ’Hash was: %s’ % checksum
18.25 Celery Based Background Tasks
Celery is a task queue for Python with batteries included. It used to have a Flask inte-
gration but it became unnecessary after some restructuring of the internals of Celery
with Version 3. This guide fills in the blanks in how to properly use Celery with Flask
but assumes that you generally already read the First Steps with Celery guide in the
official Celery documentation.
18.25.1 Installing Celery
Celery is on the Python Package Index (PyPI), so it can be installed with standard
Python tools like pip or easy_install:
$ pip install celery
18.25.2 Configuring Celery
The first thing you need is a Celery instance, this is called the celery application. It
serves the same purpose as the Flask object in Flask, just for Celery. Since this instance
is used as the entry-point for everything you want to do in Celery, like creating tasks
and managing workers, it must be possible for other modules to import it.
For instance you can place this in a tasks module. While you can use Celery without
any reconfiguration with Flask, it becomes a bit nicer by subclassing tasks and adding
153](https://image.slidesharecdn.com/flask-docs-140615143817-phpapp01/85/Flask-docs-163-320.jpg)
![support for Flask’s application contexts and hooking it up with the Flask configura-
tion.
This is all that is necessary to properly integrate Celery with Flask:
from celery import Celery
def make_celery(app):
celery = Celery(app.import_name, broker=app.config[’CELERY_BROKER_URL’])
celery.conf.update(app.config)
TaskBase = celery.Task
class ContextTask(TaskBase):
abstract = True
def __call__(self, *args, **kwargs):
with app.app_context():
return TaskBase.__call__(self, *args, **kwargs)
celery.Task = ContextTask
return celery
The function creates a new Celery object, configures it with the broker from the ap-
plication config, updates the rest of the Celery config from the Flask config and then
creates a subclass of the task that wraps the task execution in an application context.
18.25.3 Minimal Example
With what we have above this is the minimal example of using Celery with Flask:
from flask import Flask
flask_app = Flask(__name__)
flask_app.config.update(
CELERY_BROKER_URL=’redis://localhost:6379’,
CELERY_RESULT_BACKEND=’redis://localhost:6379’
)
celery = make_celery(flask_app)
@celery.task()
def add_together(a, b):
return a + b
This task can now be called in the background:
>>> result = add_together.delay(23, 42)
>>> result.wait()
65
154](https://image.slidesharecdn.com/flask-docs-140615143817-phpapp01/85/Flask-docs-164-320.jpg)


![two problematic values in the WSGI environment usually are REMOTE_ADDR and
HTTP_HOST. You can configure your httpd to pass these headers, or you can fix them
in middleware. Werkzeug ships a fixer that will solve some common setups, but you
might want to write your own WSGI middleware for specific setups.
Here’s a simple nginx configuration which proxies to an application served on local-
host at port 8000, setting appropriate headers:
server {
listen 80;
server_name _;
access_log /var/log/nginx/access.log;
error_log /var/log/nginx/error.log;
location / {
proxy_pass http://127.0.0.1:8000/;
proxy_redirect off;
proxy_set_header Host $host;
proxy_set_header X-Real-IP $remote_addr;
proxy_set_header X-Forwarded-For $proxy_add_x_forwarded_for;
}
}
If your httpd is not providing these headers, the most common setup invokes the host
being set from X-Forwarded-Host and the remote address from X-Forwarded-For:
from werkzeug.contrib.fixers import ProxyFix
app.wsgi_app = ProxyFix(app.wsgi_app)
Trusting Headers
Please keep in mind that it is a security issue to use such a middleware in a non-proxy
setup because it will blindly trust the incoming headers which might be forged by
malicious clients.
If you want to rewrite the headers from another header, you might want to use a fixer
like this:
class CustomProxyFix(object):
def __init__(self, app):
self.app = app
def __call__(self, environ, start_response):
host = environ.get(’HTTP_X_FHOST’, ’’)
if host:
environ[’HTTP_HOST’] = host
return self.app(environ, start_response)
162](https://image.slidesharecdn.com/flask-docs-140615143817-phpapp01/85/Flask-docs-172-320.jpg)


![RewriteCond %{REQUEST_FILENAME} !-f
RewriteRule ^(.*)$ yourapplication.fcgi/$1 [QSA,L]
</IfModule>
Set yourapplication.fcgi:
#!/usr/bin/python
#: optional path to your local python site-packages folder
import sys
sys.path.insert(0, ’<your_local_path>/lib/python2.6/site-packages’)
from flup.server.fcgi import WSGIServer
from yourapplication import app
class ScriptNameStripper(object):
def __init__(self, app):
self.app = app
def __call__(self, environ, start_response):
environ[’SCRIPT_NAME’] = ’’
return self.app(environ, start_response)
app = ScriptNameStripper(app)
if __name__ == ’__main__’:
WSGIServer(app).run()
19.4.3 Configuring lighttpd
A basic FastCGI configuration for lighttpd looks like that:
fastcgi.server = ("/yourapplication.fcgi" =>
((
"socket" => "/tmp/yourapplication-fcgi.sock",
"bin-path" => "/var/www/yourapplication/yourapplication.fcgi",
"check-local" => "disable",
"max-procs" => 1
))
)
alias.url = (
"/static/" => "/path/to/your/static"
)
url.rewrite-once = (
"^(/static($|/.*))$" => "$1",
"^(/.*)$" => "/yourapplication.fcgi$1"
)
Remember to enable the FastCGI, alias and rewrite modules. This configuration binds
166](https://image.slidesharecdn.com/flask-docs-140615143817-phpapp01/85/Flask-docs-176-320.jpg)

![#!/usr/bin/python
from wsgiref.handlers import CGIHandler
from yourapplication import app
CGIHandler().run(app)
19.5.2 Server Setup
Usually there are two ways to configure the server. Either just copy the .cgi into a
cgi-bin (and use mod_rewrite or something similar to rewrite the URL) or let the server
point to the file directly.
In Apache for example you can put something like this into the config:
ScriptAlias /app /path/to/the/application.cgi
On shared webhosting, though, you might not have access to your Apache config. In
this case, a file called .htaccess, sitting in the public directory you want your app to be
available, works too but the ScriptAlias directive won’t work in that case:
RewriteEngine On
RewriteCond %{REQUEST_FILENAME} !-f # Don’t interfere with static files
RewriteRule ^(.*)$ /path/to/the/application.cgi/$1 [L]
For more information consult the documentation of your webserver.
169](https://image.slidesharecdn.com/flask-docs-140615143817-phpapp01/85/Flask-docs-179-320.jpg)


![For example if your application is defined in yourapplication/app.py you should
create it with one of the two versions below:
app = Flask(’yourapplication’)
app = Flask(__name__.split(’.’)[0])
Why is that? The application will work even with __name__, thanks to how re-
sources are looked up. However it will make debugging more painful. Certain
extensions can make assumptions based on the import name of your application.
For example the Flask-SQLAlchemy extension will look for the code in your ap-
plication that triggered an SQL query in debug mode. If the import name is not
properly set up, that debugging information is lost. (For example it would only
pick up SQL queries in yourapplication.app and not yourapplication.views.frontend)
New in version 0.7: The static_url_path, static_folder, and template_folder parame-
ters were added.
New in version 0.8: The instance_path and instance_relative_config parameters
were added.
Parameters
• import_name – the name of the application package
• static_url_path – can be used to specify a different path for the
static files on the web. Defaults to the name of the static_folder
folder.
• static_folder – the folder with static files that should be served
at static_url_path. Defaults to the ’static’ folder in the root
path of the application.
• template_folder – the folder that contains the templates that
should be used by the application. Defaults to ’templates’
folder in the root path of the application.
• instance_path – An alternative instance path for the applica-
tion. By default the folder ’instance’ next to the package or
module is assumed to be the instance path.
• instance_relative_config – if set to True relative filenames for
loading the config are assumed to be relative to the instance
path instead of the application root.
add_template_filter(*args, **kwargs)
Register a custom template filter. Works exactly like the template_filter()
decorator.
Parameters name – the optional name of the filter, otherwise the
function name will be used.
add_template_global(*args, **kwargs)
Register a custom template global function. Works exactly like the
template_global() decorator.
178](https://image.slidesharecdn.com/flask-docs-140615143817-phpapp01/85/Flask-docs-188-320.jpg)
![New in version 0.10.
Parameters name – the optional name of the global function, oth-
erwise the function name will be used.
add_template_test(*args, **kwargs)
Register a custom template test. Works exactly like the template_test()
decorator.
New in version 0.10.
Parameters name – the optional name of the test, otherwise the
function name will be used.
add_url_rule(*args, **kwargs)
Connects a URL rule. Works exactly like the route() decorator. If a
view_func is provided it will be registered with the endpoint.
Basically this example:
@app.route(’/’)
def index():
pass
Is equivalent to the following:
def index():
pass
app.add_url_rule(’/’, ’index’, index)
If the view_func is not provided you will need to connect the endpoint to a
view function like so:
app.view_functions[’index’] = index
Internally route() invokes add_url_rule() so if you want to customize the
behavior via subclassing you only need to change this method.
For more information refer to URL Route Registrations.
Changed in version 0.2: view_func parameter added.
Changed in version 0.6: OPTIONS is added automatically as method.
Parameters
• rule – the URL rule as string
• endpoint – the endpoint for the registered URL rule. Flask
itself assumes the name of the view function as endpoint
• view_func – the function to call when serving a request to the
provided endpoint
• options – the options to be forwarded to the underlying Rule
object. A change to Werkzeug is handling of method options.
methods is a list of methods this rule should be limited to
179](https://image.slidesharecdn.com/flask-docs-140615143817-phpapp01/85/Flask-docs-189-320.jpg)


![Changed in version 0.9: Added the exc argument. Previously this was al-
ways using the current exception information.
enable_modules = True
Enable the deprecated module support? This is active by default in 0.7 but
will be changed to False in 0.8. With Flask 1.0 modules will be removed in
favor of Blueprints
endpoint(*args, **kwargs)
A decorator to register a function as an endpoint. Example:
@app.endpoint(’example.endpoint’)
def example():
return "example"
Parameters endpoint – the name of the endpoint
error_handler_spec = None
A dictionary of all registered error handlers. The key is None for error
handlers active on the application, otherwise the key is the name of the
blueprint. Each key points to another dictionary where the key is the status
code of the http exception. The special key None points to a list of tuples
where the first item is the class for the instance check and the second the
error handler function.
To register a error handler, use the errorhandler() decorator.
errorhandler(*args, **kwargs)
A decorator that is used to register a function give a given error code. Ex-
ample:
@app.errorhandler(404)
def page_not_found(error):
return ’This page does not exist’, 404
You can also register handlers for arbitrary exceptions:
@app.errorhandler(DatabaseError)
def special_exception_handler(error):
return ’Database connection failed’, 500
You can also register a function as error handler without using the
errorhandler() decorator. The following example is equivalent to the one
above:
def page_not_found(error):
return ’This page does not exist’, 404
app.error_handler_spec[None][404] = page_not_found
Setting error handlers via assignments to error_handler_spec however is
discouraged as it requires fiddling with nested dictionaries and the special
case for arbitrary exception types.
183](https://image.slidesharecdn.com/flask-docs-140615143817-phpapp01/85/Flask-docs-193-320.jpg)
![The first None refers to the active blueprint. If the error handler should be
application wide None shall be used.
New in version 0.7: One can now additionally also register custom excep-
tion types that do not necessarily have to be a subclass of the HTTPException
class.
Parameters code – the code as integer for the handler
extensions = None
a place where extensions can store application specific state. For exam-
ple this is where an extension could store database engines and similar
things. For backwards compatibility extensions should register themselves
like this:
if not hasattr(app, ’extensions’):
app.extensions = {}
app.extensions[’extensionname’] = SomeObject()
The key must match the name of the extension module. For example in case
of a “Flask-Foo” extension in flask_foo, the key would be ’foo’.
New in version 0.7.
full_dispatch_request()
Dispatches the request and on top of that performs request pre and post-
processing as well as HTTP exception catching and error handling.
New in version 0.7.
get_send_file_max_age(filename)
Provides default cache_timeout for the send_file() functions.
By default, this function returns SEND_FILE_MAX_AGE_DEFAULT from the con-
figuration of current_app.
Static file functions such as send_from_directory() use this function,
and send_file() calls this function on current_app when the given
cache_timeout is None. If a cache_timeout is given in send_file(), that
timeout is used; otherwise, this method is called.
This allows subclasses to change the behavior when sending files based on
the filename. For example, to set the cache timeout for .js files to 60 seconds:
class MyFlask(flask.Flask):
def get_send_file_max_age(self, name):
if name.lower().endswith(’.js’):
return 60
return flask.Flask.get_send_file_max_age(self, name)
New in version 0.9.
got_first_request
This attribute is set to True if the application started handling the first re-
quest.
184](https://image.slidesharecdn.com/flask-docs-140615143817-phpapp01/85/Flask-docs-194-320.jpg)
![jinja_loader
The Jinja loader for this package bound object.
New in version 0.5.
jinja_options = ImmutableDict({‘extensions’: [’jinja2.ext.autoescape’, ‘jinja2.ext.with_’]})
Options that are passed directly to the Jinja2 environment.
json_decoder
The JSON decoder class to use. Defaults to JSONDecoder.
New in version 0.10.
alias of JSONDecoder
json_encoder
The JSON encoder class to use. Defaults to JSONEncoder.
New in version 0.10.
alias of JSONEncoder
log_exception(exc_info)
Logs an exception. This is called by handle_exception() if debugging is
disabled and right before the handler is called. The default implementation
logs the exception as error on the logger.
New in version 0.8.
logger
A logging.Logger object for this application. The default configuration is to
log to stderr if the application is in debug mode. This logger can be used to
(surprise) log messages. Here some examples:
app.logger.debug(’A value for debugging’)
app.logger.warning(’A warning occurred (%d apples)’, 42)
app.logger.error(’An error occurred’)
New in version 0.3.
logger_name
The name of the logger to use. By default the logger name is the package
name passed to the constructor.
New in version 0.4.
make_config(instance_relative=False)
Used to create the config attribute by the Flask constructor. The in-
stance_relative parameter is passed in from the constructor of Flask (there
named instance_relative_config) and indicates if the config should be relative
to the instance path or the root path of the application.
New in version 0.8.
make_default_options_response()
This method is called to create the default OPTIONS response. This can be
186](https://image.slidesharecdn.com/flask-docs-140615143817-phpapp01/85/Flask-docs-196-320.jpg)


![@app.template_filter()
def reverse(s):
return s[::-1]
Parameters name – the optional name of the filter, otherwise the
function name will be used.
template_global(*args, **kwargs)
A decorator that is used to register a custom template global function. You
can specify a name for the global function, otherwise the function name will
be used. Example:
@app.template_global()
def double(n):
return 2 * n
New in version 0.10.
Parameters name – the optional name of the global function, oth-
erwise the function name will be used.
template_test(*args, **kwargs)
A decorator that is used to register custom template test. You can specify a
name for the test, otherwise the function name will be used. Example:
@app.template_test()
def is_prime(n):
if n == 2:
return True
for i in range(2, int(math.ceil(math.sqrt(n))) + 1):
if n % i == 0:
return False
return True
New in version 0.10.
Parameters name – the optional name of the test, otherwise the
function name will be used.
test_client(use_cookies=True)
Creates a test client for this application. For information about unit testing
head over to Testing Flask Applications.
Note that if you are testing for assertions or exceptions in your application
code, you must set app.testing = True in order for the exceptions to prop-
agate to the test client. Otherwise, the exception will be handled by the
application (not visible to the test client) and the only indication of an As-
sertionError or other exception will be a 500 status code response to the test
client. See the testing attribute. For example:
app.testing = True
client = app.test_client()
194](https://image.slidesharecdn.com/flask-docs-140615143817-phpapp01/85/Flask-docs-204-320.jpg)
![The test client can be used in a with block to defer the closing down of the
context until the end of the with block. This is useful if you want to access
the context locals for testing:
with app.test_client() as c:
rv = c.get(’/?vodka=42’)
assert request.args[’vodka’] == ’42’
See FlaskClient for more information.
Changed in version 0.4: added support for with block usage for the client.
New in version 0.7: The use_cookies parameter was added as well as the
ability to override the client to be used by setting the test_client_class
attribute.
test_client_class = None
the test client that is used with when test_client is used.
New in version 0.7.
test_request_context(*args, **kwargs)
Creates a WSGI environment from the given values (see
werkzeug.test.EnvironBuilder for more information, this function ac-
cepts the same arguments).
testing
The testing flag. Set this to True to enable the test mode of Flask extensions
(and in the future probably also Flask itself). For example this might activate
unittest helpers that have an additional runtime cost which should not be
enabled by default.
If this is enabled and PROPAGATE_EXCEPTIONS is not changed from the
default it’s implicitly enabled.
This attribute can also be configured from the config with the TESTING con-
figuration key. Defaults to False.
trap_http_exception(e)
Checks if an HTTP exception should be trapped or not. By default
this will return False for all exceptions except for a bad request key er-
ror if TRAP_BAD_REQUEST_ERRORS is set to True. It also returns True if
TRAP_HTTP_EXCEPTIONS is set to True.
This is called for all HTTP exceptions raised by a view function. If it returns
True for any exception the error handler for this exception is not called and
it shows up as regular exception in the traceback. This is helpful for debug-
ging implicitly raised HTTP exceptions.
New in version 0.8.
update_template_context(context)
Update the template context with some commonly used variables. This in-
jects request, session, config and g into the template context as well as every-
thing template context processors want to inject. Note that the as of Flask
195](https://image.slidesharecdn.com/flask-docs-140615143817-phpapp01/85/Flask-docs-205-320.jpg)
![0.6, the original values in the context will not be overridden if a context
processor decides to return a value with the same key.
Parameters context – the context as a dictionary that is updated in
place to add extra variables.
url_build_error_handlers = None
A list of functions that are called when url_for() raises a BuildError. Each
function registered here is called with error, endpoint and values. If a function
returns None or raises a BuildError the next function is tried.
New in version 0.9.
url_default_functions = None
A dictionary with lists of functions that can be used as URL value prepro-
cessors. The key None here is used for application wide callbacks, otherwise
the key is the name of the blueprint. Each of these functions has the chance
to modify the dictionary of URL values before they are used as the key-
word arguments of the view function. For each function registered this one
should also provide a url_defaults() function that adds the parameters
automatically again that were removed that way.
New in version 0.7.
url_defaults(*args, **kwargs)
Callback function for URL defaults for all view functions of the applica-
tion. It’s called with the endpoint and values and should update the values
passed in place.
url_map = None
The Map for this instance. You can use this to change the routing converters
after the class was created but before any routes are connected. Example:
from werkzeug.routing import BaseConverter
class ListConverter(BaseConverter):
def to_python(self, value):
return value.split(’,’)
def to_url(self, values):
return ’,’.join(BaseConverter.to_url(value)
for value in values)
app = Flask(__name__)
app.url_map.converters[’list’] = ListConverter
url_rule_class
The rule object to use for URL rules created. This is used by add_url_rule().
Defaults to werkzeug.routing.Rule.
New in version 0.7.
alias of Rule
url_value_preprocessor(*args, **kwargs)
196](https://image.slidesharecdn.com/flask-docs-140615143817-phpapp01/85/Flask-docs-206-320.jpg)


![• value – the value of the cookie.
• max_age – should be a number of seconds, or None (default)
if the cookie should last only as long as the client’s browser
session.
• expires – should be a datetime object or UNIX timestamp.
• domain – if you want to set a cross-domain cookie. For exam-
ple, domain=".example.com" will set a cookie that is readable
by the domain www.example.com, foo.example.com etc. Oth-
erwise, a cookie will only be readable by the domain that set
it.
• path – limits the cookie to a given path, per default it will
span the whole domain.
21.5 Sessions
If you have the Flask.secret_key set you can use sessions in Flask applications. A
session basically makes it possible to remember information from one request to an-
other. The way Flask does this is by using a signed cookie. So the user can look at the
session contents, but not modify it unless they know the secret key, so make sure to
set that to something complex and unguessable.
To access the current session you can use the session object:
class flask.session
The session object works pretty much like an ordinary dict, with the difference
that it keeps track on modifications.
This is a proxy. See Notes On Proxies for more information.
The following attributes are interesting:
new
True if the session is new, False otherwise.
modified
True if the session object detected a modification. Be advised that modifica-
tions on mutable structures are not picked up automatically, in that situation
you have to explicitly set the attribute to True yourself. Here an example:
# this change is not picked up because a mutable object (here
# a list) is changed.
session[’objects’].append(42)
# so mark it as modified yourself
session.modified = True
permanent
If set to True the session lives for permanent_session_lifetime seconds. The
206](https://image.slidesharecdn.com/flask-docs-140615143817-phpapp01/85/Flask-docs-216-320.jpg)


![This object provides dumping and loading methods similar to simplejson but it
also tags certain builtin Python objects that commonly appear in sessions. Cur-
rently the following extended values are supported in the JSON it dumps:
•Markup objects
•UUID objects
•datetime objects
•tuples
Notice
The PERMANENT_SESSION_LIFETIME config key can also be an integer starting with Flask
0.8. Either catch this down yourself or use the permanent_session_lifetime attribute
on the app which converts the result to an integer automatically.
21.7 Test Client
class flask.testing.FlaskClient(application, response_wrapper=None,
use_cookies=True, al-
low_subdomain_redirects=False)
Works like a regular Werkzeug test client but has some knowledge about how
Flask works to defer the cleanup of the request context stack to the end of a with
body when used in a with statement. For general information about how to use
this class refer to werkzeug.test.Client.
Basic usage is outlined in the Testing Flask Applications chapter.
session_transaction(*args, **kwds)
When used in combination with a with statement this opens a session trans-
action. This can be used to modify the session that the test client uses. Once
the with block is left the session is stored back.
with client.session_transaction() as session: session[’value’] = 42
Internally this is implemented by going through a temporary test request
context and since session handling could depend on request variables this
function accepts the same arguments as test_request_context() which are
directly passed through.
21.8 Application Globals
To share data that is valid for one request only from one function to another, a global
variable is not good enough because it would break in threaded environments. Flask
provides you with a special object that ensures it is only valid for the active request
and that will return different values for each request. In a nutshell: it does the right
thing, like it does for request and session.
210](https://image.slidesharecdn.com/flask-docs-140615143817-phpapp01/85/Flask-docs-220-320.jpg)

![to the target location. Supported codes are 301, 302, 303, 305, and 307. 300 is not
supported because it’s not a real redirect and 304 because it’s the answer for a
request with a request with defined If-Modified-Since headers.
New in version 0.6: The location can now be a unicode string that is encoded
using the iri_to_uri() function.
Parameters
• location – the location the response should redirect to.
• code – the redirect status code. defaults to 302.
flask.make_response(*args)
Sometimes it is necessary to set additional headers in a view. Because views
do not have to return response objects but can return a value that is converted
into a response object by Flask itself, it becomes tricky to add headers to it. This
function can be called instead of using a return and you will get a response object
which you can use to attach headers.
If view looked like this and you want to add a new header:
def index():
return render_template(’index.html’, foo=42)
You can now do something like this:
def index():
response = make_response(render_template(’index.html’, foo=42))
response.headers[’X-Parachutes’] = ’parachutes are cool’
return response
This function accepts the very same arguments you can return from a view func-
tion. This for example creates a response with a 404 error code:
response = make_response(render_template(’not_found.html’), 404)
The other use case of this function is to force the return value of a view function
into a response which is helpful with view decorators:
response = make_response(view_function())
response.headers[’X-Parachutes’] = ’parachutes are cool’
Internally this function does the following things:
•if no arguments are passed, it creates a new response argument
•if one argument is passed, flask.Flask.make_response() is invoked with
it.
•if more than one argument is passed, the arguments are passed to the
flask.Flask.make_response() function as tuple.
New in version 0.6.
214](https://image.slidesharecdn.com/flask-docs-140615143817-phpapp01/85/Flask-docs-224-320.jpg)
![flask.after_this_request(f)
Executes a function after this request. This is useful to modify response objects.
The function is passed the response object and has to return the same or a new
one.
Example:
@app.route(’/’)
def index():
@after_this_request
def add_header(response):
response.headers[’X-Foo’] = ’Parachute’
return response
return ’Hello World!’
This is more useful if a function other than the view function wants to modify
a response. For instance think of a decorator that wants to add some headers
without converting the return value into a response object.
New in version 0.9.
flask.send_file(filename_or_fp, mimetype=None, as_attachment=False, attach-
ment_filename=None, add_etags=True, cache_timeout=None, con-
ditional=False)
Sends the contents of a file to the client. This will use the most efficient
method available and configured. By default it will try to use the WSGI
server’s file_wrapper support. Alternatively you can set the application’s
use_x_sendfile attribute to True to directly emit an X-Sendfile header. This how-
ever requires support of the underlying webserver for X-Sendfile.
By default it will try to guess the mimetype for you, but you can also explicitly
provide one. For extra security you probably want to send certain files as at-
tachment (HTML for instance). The mimetype guessing requires a filename or an
attachment_filename to be provided.
Please never pass filenames to this function from user sources without checking
them first. Something like this is usually sufficient to avoid security problems:
if ’..’ in filename or filename.startswith(’/’):
abort(404)
New in version 0.2.
New in version 0.5: The add_etags, cache_timeout and conditional parameters were
added. The default behavior is now to attach etags.
Changed in version 0.7: mimetype guessing and etag support for file objects was
deprecated because it was unreliable. Pass a filename if you are able to, otherwise
attach an etag yourself. This functionality will be removed in Flask 1.0
Changed in version 0.9: cache_timeout pulls its default from application config,
when None.
Parameters
215](https://image.slidesharecdn.com/flask-docs-140615143817-phpapp01/85/Flask-docs-225-320.jpg)
![• filename_or_fp – the filename of the file to send. This is rel-
ative to the root_path if a relative path is specified. Alterna-
tively a file object might be provided in which case X-Sendfile
might not work and fall back to the traditional method. Make
sure that the file pointer is positioned at the start of data to
send before calling send_file().
• mimetype – the mimetype of the file if provided, otherwise
auto detection happens.
• as_attachment – set to True if you want to send this file with a
Content-Disposition: attachment header.
• attachment_filename – the filename for the attachment if it dif-
fers from the file’s filename.
• add_etags – set to False to disable attaching of etags.
• conditional – set to True to enable conditional responses.
• cache_timeout – the timeout in seconds for the headers. When
None (default), this value is set by get_send_file_max_age() of
current_app.
flask.send_from_directory(directory, filename, **options)
Send a file from a given directory with send_file(). This is a secure way to
quickly expose static files from an upload folder or something similar.
Example usage:
@app.route(’/uploads/<path:filename>’)
def download_file(filename):
return send_from_directory(app.config[’UPLOAD_FOLDER’],
filename, as_attachment=True)
Sending files and Performance
It is strongly recommended to activate either X-Sendfile support in your web-
server or (if no authentication happens) to tell the webserver to serve files for
the given path on its own without calling into the web application for improved
performance.
New in version 0.5.
Parameters
• directory – the directory where all the files are stored.
• filename – the filename relative to that directory to download.
• options – optional keyword arguments that are directly for-
warded to send_file().
flask.safe_join(directory, filename)
Safely join directory and filename.
216](https://image.slidesharecdn.com/flask-docs-140615143817-phpapp01/85/Flask-docs-226-320.jpg)
![Example usage:
@app.route(’/wiki/<path:filename>’)
def wiki_page(filename):
filename = safe_join(app.config[’WIKI_FOLDER’], filename)
with open(filename, ’rb’) as fd:
content = fd.read() # Read and process the file content...
Parameters
• directory – the base directory.
• filename – the untrusted filename relative to that directory.
Raises NotFound if the resulting path would fall out of directory.
flask.escape(s)
Convert the characters &, <, >, ‘ and ” in string s to HTML-safe sequences. Use
this if you need to display text that might contain such characters in HTML.
Marks return value as markup string.
class flask.Markup
Marks a string as being safe for inclusion in HTML/XML output without need-
ing to be escaped. This implements the __html__ interface a couple of frame-
works and web applications use. Markup is a direct subclass of unicode and pro-
vides all the methods of unicode just that it escapes arguments passed and always
returns Markup.
The escape function returns markup objects so that double escaping can’t happen.
The constructor of the Markup class can be used for three different things: When
passed an unicode object it’s assumed to be safe, when passed an object with
an HTML representation (has an __html__ method) that representation is used,
otherwise the object passed is converted into a unicode string and then assumed
to be safe:
>>> Markup("Hello <em>World</em>!")
Markup(u’Hello <em>World</em>!’)
>>> class Foo(object):
... def __html__(self):
... return ’<a href="#">foo</a>’
...
>>> Markup(Foo())
Markup(u’<a href="#">foo</a>’)
If you want object passed being always treated as unsafe you can use the
escape() classmethod to create a Markup object:
>>> Markup.escape("Hello <em>World</em>!")
Markup(u’Hello <em>World</em>!’)
Operations on a markup string are markup aware which means that all argu-
ments are passed through the escape() function:
217](https://image.slidesharecdn.com/flask-docs-140615143817-phpapp01/85/Flask-docs-227-320.jpg)
![>>> em = Markup("<em>%s</em>")
>>> em % "foo & bar"
Markup(u’<em>foo & bar</em>’)
>>> strong = Markup("<strong>%(text)s</strong>")
>>> strong % {’text’: ’<blink>hacker here</blink>’}
Markup(u’<strong><blink>hacker here</blink></strong>’)
>>> Markup("<em>Hello</em> ") + "<foo>"
Markup(u’<em>Hello</em> <foo>’)
classmethod escape(s)
Escape the string. Works like escape() with the difference that for sub-
classes of Markup this function would return the correct subclass.
striptags()
Unescape markup into an unicode string and strip all tags. This also re-
solves known HTML4 and XHTML entities. Whitespace is normalized to
one:
>>> Markup("Main » <em>About</em>").striptags()
u’Main xbb About’
unescape()
Unescape markup again into an unicode string. This also resolves known
HTML4 and XHTML entities:
>>> Markup("Main » <em>About</em>").unescape()
u’Main xbb <em>About</em>’
21.10 Message Flashing
flask.flash(message, category=’message’)
Flashes a message to the next request. In order to remove the flashed mes-
sage from the session and to display it to the user, the template has to call
get_flashed_messages().
Changed in version 0.3: category parameter added.
Parameters
• message – the message to be flashed.
• category – the category for the message. The following values
are recommended: ’message’ for any kind of message, ’error’
for errors, ’info’ for information messages and ’warning’ for
warnings. However any kind of string can be used as category.
flask.get_flashed_messages(with_categories=False, category_filter=[])
Pulls all flashed messages from the session and returns them. Further calls in the
same request to the function will return the same messages. By default just the
messages are returned, but when with_categories is set to True, the return value
will be a list of tuples in the form (category, message) instead.
218](https://image.slidesharecdn.com/flask-docs-140615143817-phpapp01/85/Flask-docs-228-320.jpg)

![DEBUG = True
SECRET_KEY = ’development key’
app.config.from_object(__name__)
In both cases (loading from any Python file or loading from modules), only up-
percase keys are added to the config. This makes it possible to use lowercase
values in the config file for temporary values that are not added to the config or
to define the config keys in the same file that implements the application.
Probably the most interesting way to load configurations is from an environment
variable pointing to a file:
app.config.from_envvar(’YOURAPPLICATION_SETTINGS’)
In this case before launching the application you have to set this environment
variable to the file you want to use. On Linux and OS X use the export statement:
export YOURAPPLICATION_SETTINGS=’/path/to/config/file’
On windows use set instead.
Parameters
• root_path – path to which files are read relative from. When
the config object is created by the application, this is the appli-
cation’s root_path.
• defaults – an optional dictionary of default values
from_envvar(variable_name, silent=False)
Loads a configuration from an environment variable pointing to a configu-
ration file. This is basically just a shortcut with nicer error messages for this
line of code:
app.config.from_pyfile(os.environ[’YOURAPPLICATION_SETTINGS’])
Parameters
• variable_name – name of the environment variable
• silent – set to True if you want silent failure for missing files.
Returns bool. True if able to load config, False otherwise.
from_object(obj)
Updates the values from the given object. An object can be of one of the
following two types:
•a string: in this case the object with that name will be imported
•an actual object reference: that object is used directly
Objects are usually either modules or classes.
223](https://image.slidesharecdn.com/flask-docs-140615143817-phpapp01/85/Flask-docs-233-320.jpg)
![This function however can help you keep the context around for longer:
from flask import stream_with_context, request, Response
@app.route(’/stream’)
def streamed_response():
@stream_with_context
def generate():
yield ’Hello ’
yield request.args[’name’]
yield ’!’
return Response(generate())
Alternatively it can also be used around a specific generator:
from flask import stream_with_context, request, Response
@app.route(’/stream’)
def streamed_response():
def generate():
yield ’Hello ’
yield request.args[’name’]
yield ’!’
return Response(stream_with_context(generate()))
New in version 0.9.
21.16 Useful Internals
class flask.ctx.RequestContext(app, environ, request=None)
The request context contains all request relevant information. It is created at the
beginning of the request and pushed to the _request_ctx_stack and removed at
the end of it. It will create the URL adapter and request object for the WSGI
environment provided.
Do not attempt to use this class directly, instead use test_request_context()
and request_context() to create this object.
When the request context is popped, it will evaluate all the functions registered
on the application for teardown execution (teardown_request()).
The request context is automatically popped at the end of the request for you.
In debug mode the request context is kept around if exceptions happen so that
interactive debuggers have a chance to introspect the data. With 0.4 this can also
be forced for requests that did not fail and outside of DEBUG mode. By setting
’flask._preserve_context’ to True on the WSGI environment the context will
not pop itself at the end of the request. This is used by the test_client() for
example to implement the deferred cleanup functionality.
You might find this helpful for unittests where you need the information from
the context local around for a little longer. Make sure to properly pop() the stack
225](https://image.slidesharecdn.com/flask-docs-140615143817-phpapp01/85/Flask-docs-235-320.jpg)


![class flask.signals.Namespace
An alias for blinker.base.Namespace if blinker is available, otherwise a dummy
class that creates fake signals. This class is available for Flask extensions that
want to provide the same fallback system as Flask itself.
signal(name, doc=None)
Creates a new signal for this namespace if blinker is available, otherwise
returns a fake signal that has a send method that will do nothing but will
fail with a RuntimeError for all other operations, including connecting.
21.18 Class-Based Views
New in version 0.7.
class flask.views.View
Alternative way to use view functions. A subclass has to implement
dispatch_request() which is called with the view arguments from the URL rout-
ing system. If methods is provided the methods do not have to be passed to the
add_url_rule() method explicitly:
class MyView(View):
methods = [’GET’]
def dispatch_request(self, name):
return ’Hello %s!’ % name
app.add_url_rule(’/hello/<name>’, view_func=MyView.as_view(’myview’))
When you want to decorate a pluggable view you will have to either do that
when the view function is created (by wrapping the return value of as_view())
or you can use the decorators attribute:
class SecretView(View):
methods = [’GET’]
decorators = [superuser_required]
def dispatch_request(self):
...
The decorators stored in the decorators list are applied one after another when
the view function is created. Note that you can not use the class based decorators
since those would decorate the view class and not the generated view function!
classmethod as_view(name, *class_args, **class_kwargs)
Converts the class into an actual view function that can be used with the
routing system. Internally this generates a function on the fly which will in-
stantiate the View on each request and call the dispatch_request() method
on it.
The arguments passed to as_view() are forwarded to the constructor of the
class.
229](https://image.slidesharecdn.com/flask-docs-140615143817-phpapp01/85/Flask-docs-239-320.jpg)
![decorators = []
The canonical way to decorate class-based views is to decorate the return
value of as_view(). However since this moves parts of the logic from the
class declaration to the place where it’s hooked into the routing system.
You can place one or more decorators in this list and whenever the view
function is created the result is automatically decorated.
New in version 0.8.
dispatch_request()
Subclasses have to override this method to implement the actual view func-
tion code. This method is called with all the arguments from the URL rule.
methods = None
A for which methods this pluggable view can handle.
class flask.views.MethodView
Like a regular class-based view but that dispatches requests to particular meth-
ods. For instance if you implement a method called get() it means you will
response to ’GET’ requests and the dispatch_request() implementation will au-
tomatically forward your request to that. Also options is set for you automati-
cally:
class CounterAPI(MethodView):
def get(self):
return session.get(’counter’, 0)
def post(self):
session[’counter’] = session.get(’counter’, 0) + 1
return ’OK’
app.add_url_rule(’/counter’, view_func=CounterAPI.as_view(’counter’))
21.19 URL Route Registrations
Generally there are three ways to define rules for the routing system:
1. You can use the flask.Flask.route() decorator.
2. You can use the flask.Flask.add_url_rule() function.
3. You can directly access the underlying Werkzeug routing system which is ex-
posed as flask.Flask.url_map.
Variable parts in the route can be specified with angular brackets (/user/<username>).
By default a variable part in the URL accepts any string without a slash however a
different converter can be specified as well by using <converter:name>.
Variable parts are passed to the view function as keyword arguments.
The following converters are available:
230](https://image.slidesharecdn.com/flask-docs-140615143817-phpapp01/85/Flask-docs-240-320.jpg)
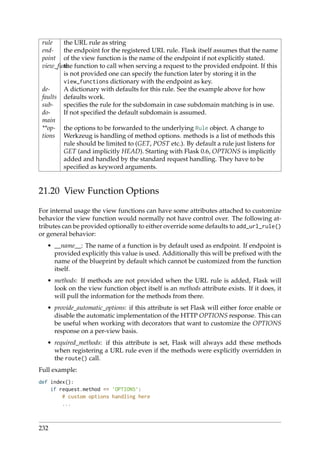
![return ’Hello World!’
index.provide_automatic_options = False
index.methods = [’GET’, ’OPTIONS’]
app.add_url_rule(’/’, index)
New in version 0.8: The provide_automatic_options functionality was added.
233](https://image.slidesharecdn.com/flask-docs-140615143817-phpapp01/85/Flask-docs-243-320.jpg)


![problems and the only thing that could possibly break are very large responses that
can cause some kind of denial of service at the receiver’s side.
However there is a catch. Due to how browsers work the CSRF issue comes up with
JSON unfortunately. Fortunately there is also a weird part of the JavaScript specifica-
tion that can be used to solve that problem easily and Flask is kinda doing that for you
by preventing you from doing dangerous stuff. Unfortunately that protection is only
there for jsonify() so you are still at risk when using other ways to generate JSON.
So what is the issue and how to avoid it? The problem are arrays at top-level in JSON.
Imagine you send the following data out in a JSON request. Say that’s exporting the
names and email addresses of all your friends for a part of the user interface that is
written in JavaScript. Not very uncommon:
[
{"username": "admin",
"email": "admin@localhost"}
]
And it is doing that of course only as long as you are logged in and only for you. And
it is doing that for all GET requests to a certain URL, say the URL for that request is
http://example.com/api/get_friends.json.
So now what happens if a clever hacker is embedding this to his website and social
engineers a victim to visiting his site:
<script type=text/javascript>
var captured = [];
var oldArray = Array;
function Array() {
var obj = this, id = 0, capture = function(value) {
obj.__defineSetter__(id++, capture);
if (value)
captured.push(value);
};
capture();
}
</script>
<script type=text/javascript
src=http://example.com/api/get_friends.json></script>
<script type=text/javascript>
Array = oldArray;
// now we have all the data in the captured array.
</script>
If you know a bit of JavaScript internals you might know that it’s possible to patch
constructors and register callbacks for setters. An attacker can use this (like above)
to get all the data you exported in your JSON file. The browser will totally ignore
the application/json mimetype if text/javascript is defined as content type in the
script tag and evaluate that as JavaScript. Because top-level array elements are allowed
(albeit useless) and we hooked in our own constructor, after that page loaded the data
from the JSON response is in the captured array.
247](https://image.slidesharecdn.com/flask-docs-140615143817-phpapp01/85/Flask-docs-257-320.jpg)


![Flask extensions must be licensed under a BSD, MIT or more liberal license to be able
to be enlisted in the Flask Extension Registry. Keep in mind that the Flask Extension
Registry is a moderated place and libraries will be reviewed upfront if they behave as
required.
26.2 “Hello Flaskext!”
So let’s get started with creating such a Flask extension. The extension we want to
create here will provide very basic support for SQLite3.
First we create the following folder structure:
flask-sqlite3/
flask_sqlite3.py
LICENSE
README
Here’s the contents of the most important files:
26.2.1 setup.py
The next file that is absolutely required is the setup.py file which is used to install your
Flask extension. The following contents are something you can work with:
"""
Flask-SQLite3
-------------
This is the description for that library
"""
from setuptools import setup
setup(
name=’Flask-SQLite3’,
version=’1.0’,
url=’http://example.com/flask-sqlite3/’,
license=’BSD’,
author=’Your Name’,
author_email=’your-email@example.com’,
description=’Very short description’,
long_description=__doc__,
py_modules=[’flask_sqlite3’],
# if you would be using a package instead use packages instead
# of py_modules:
# packages=[’flask_sqlite3’],
zip_safe=False,
include_package_data=True,
platforms=’any’,
254](https://image.slidesharecdn.com/flask-docs-140615143817-phpapp01/85/Flask-docs-264-320.jpg)
![install_requires=[
’Flask’
],
classifiers=[
’Environment :: Web Environment’,
’Intended Audience :: Developers’,
’License :: OSI Approved :: BSD License’,
’Operating System :: OS Independent’,
’Programming Language :: Python’,
’Topic :: Internet :: WWW/HTTP :: Dynamic Content’,
’Topic :: Software Development :: Libraries :: Python Modules’
]
)
That’s a lot of code but you can really just copy/paste that from existing extensions
and adapt.
26.2.2 flask_sqlite3.py
Now this is where your extension code goes. But how exactly should such an exten-
sion look like? What are the best practices? Continue reading for some insight.
26.3 Initializing Extensions
Many extensions will need some kind of initialization step. For example, consider an
application that’s currently connecting to SQLite like the documentation suggests (Us-
ing SQLite 3 with Flask). So how does the extension know the name of the application
object?
Quite simple: you pass it to it.
There are two recommended ways for an extension to initialize:
initialization functions:
If your extension is called helloworld you might have a function called
init_helloworld(app[, extra_args]) that initializes the extension for that
application. It could attach before / after handlers etc.
classes:
Classes work mostly like initialization functions but can later be used to
further change the behavior. For an example look at how the OAuth exten-
sion works: there is an OAuth object that provides some helper functions
like OAuth.remote_app to create a reference to a remote application that uses
OAuth.
What to use depends on what you have in mind. For the SQLite 3 extension we will
use the class-based approach because it will provide users with an object that handles
opening and closing database connections.
255](https://image.slidesharecdn.com/flask-docs-140615143817-phpapp01/85/Flask-docs-265-320.jpg)
![What’s important about classes is that they encourage to be shared around on mod-
ule level. In that case, the object itself must not under any circumstances store any
application specific state and must be shareable between different application.
26.4 The Extension Code
Here’s the contents of the flask_sqlite3.py for copy/paste:
import sqlite3
from flask import current_app
# Find the stack on which we want to store the database connection.
# Starting with Flask 0.9, the _app_ctx_stack is the correct one,
# before that we need to use the _request_ctx_stack.
try:
from flask import _app_ctx_stack as stack
except ImportError:
from flask import _request_ctx_stack as stack
class SQLite3(object):
def __init__(self, app=None):
self.app = app
if app is not None:
self.init_app(app)
def init_app(self, app):
app.config.setdefault(’SQLITE3_DATABASE’, ’:memory:’)
# Use the newstyle teardown_appcontext if it’s available,
# otherwise fall back to the request context
if hasattr(app, ’teardown_appcontext’):
app.teardown_appcontext(self.teardown)
else:
app.teardown_request(self.teardown)
def connect(self):
return sqlite3.connect(current_app.config[’SQLITE3_DATABASE’])
def teardown(self, exception):
ctx = stack.top
if hasattr(ctx, ’sqlite3_db’):
ctx.sqlite3_db.close()
@property
def connection(self):
ctx = stack.top
if ctx is not None:
if not hasattr(ctx, ’sqlite3_db’):
256](https://image.slidesharecdn.com/flask-docs-140615143817-phpapp01/85/Flask-docs-266-320.jpg)


![CHAPTER
TWENTYSEVEN
POCOO STYLEGUIDE
The Pocoo styleguide is the styleguide for all Pocoo Projects, including Flask. This
styleguide is a requirement for Patches to Flask and a recommendation for Flask ex-
tensions.
In general the Pocoo Styleguide closely follows PEP 8 with some small differences and
extensions.
27.1 General Layout
Indentation: 4 real spaces. No tabs, no exceptions.
Maximum line length: 79 characters with a soft limit for 84 if absolutely necessary.
Try to avoid too nested code by cleverly placing break, continue and return state-
ments.
Continuing long statements: To continue a statement you can use backslashes in
which case you should align the next line with the last dot or equal sign, or
indent four spaces:
this_is_a_very_long(function_call, ’with many parameters’)
.that_returns_an_object_with_an_attribute
MyModel.query.filter(MyModel.scalar > 120)
.order_by(MyModel.name.desc())
.limit(10)
If you break in a statement with parentheses or braces, align to the braces:
this_is_a_very_long(function_call, ’with many parameters’,
23, 42, ’and even more’)
For lists or tuples with many items, break immediately after the opening brace:
items = [
’this is the first’, ’set of items’, ’with more items’,
’to come in this line’, ’like this’
]
261](https://image.slidesharecdn.com/flask-docs-140615143817-phpapp01/85/Flask-docs-271-320.jpg)
![Blank lines: Top level functions and classes are separated by two lines, everything
else by one. Do not use too many blank lines to separate logical segments in
code. Example:
def hello(name):
print ’Hello %s!’ % name
def goodbye(name):
print ’See you %s.’ % name
class MyClass(object):
"""This is a simple docstring"""
def __init__(self, name):
self.name = name
def get_annoying_name(self):
return self.name.upper() + ’!!!!111’
27.2 Expressions and Statements
General whitespace rules:
• No whitespace for unary operators that are not words (e.g.: -, ~ etc.) as well
on the inner side of parentheses.
• Whitespace is placed between binary operators.
Good:
exp = -1.05
value = (item_value / item_count) * offset / exp
value = my_list[index]
value = my_dict[’key’]
Bad:
exp = - 1.05
value = ( item_value / item_count ) * offset / exp
value = (item_value/item_count)*offset/exp
value=( item_value/item_count ) * offset/exp
value = my_list[ index ]
value = my_dict [’key’]
Yoda statements are a no-go: Never compare constant with variable, always variable
with constant:
Good:
262](https://image.slidesharecdn.com/flask-docs-140615143817-phpapp01/85/Flask-docs-272-320.jpg)


![29.4.3 Manual Error Handler Attaching
While it is still possible to attach error handlers to Flask.error_handlers it’s discour-
aged to do so and in fact deprecated. In general we no longer recommend custom
error handler attaching via assignments to the underlying dictionary due to the more
complex internal handling to support arbitrary exception classes and blueprints. See
Flask.errorhandler() for more information.
The proper upgrade is to change this:
app.error_handlers[403] = handle_error
Into this:
app.register_error_handler(403, handle_error)
Alternatively you should just attach the function with a decorator:
@app.errorhandler(403)
def handle_error(e):
...
(Note that register_error_handler() is new in Flask 0.7)
29.4.4 Blueprint Support
Blueprints replace the previous concept of “Modules” in Flask. They provide better
semantics for various features and work better with large applications. The update
script provided should be able to upgrade your applications automatically, but there
might be some cases where it fails to upgrade. What changed?
• Blueprints need explicit names. Modules had an automatic name guesssing
scheme where the shortname for the module was taken from the last part of
the import module. The upgrade script tries to guess that name but it might fail
as this information could change at runtime.
• Blueprints have an inverse behavior for url_for(). Previously .foo told
url_for() that it should look for the endpoint foo on the application. Now it
means “relative to current module”. The script will inverse all calls to url_for()
automatically for you. It will do this in a very eager way so you might end up
with some unnecessary leading dots in your code if you’re not using modules.
• Blueprints do not automatically provide static folders. They will also no longer
automatically export templates from a folder called templates next to their loca-
tion however but it can be enabled from the constructor. Same with static files: if
you want to continue serving static files you need to tell the constructor explic-
itly the path to the static folder (which can be relative to the blueprint’s module
path).
• Rendering templates was simplified. Now the blueprints can provide template
folders which are added to a general template searchpath. This means that you
271](https://image.slidesharecdn.com/flask-docs-140615143817-phpapp01/85/Flask-docs-281-320.jpg)


This document is the Flask documentation, which provides information on how to use the Flask web framework. It covers topics like installation, basic usage, routing, templates, testing, debugging errors, configuration, signals, pluggable views, application and request contexts, modular applications with blueprints, extensions, and patterns for building larger Flask applications. The documentation contains tutorials, API references, and best practices for developing Flask applications.


![[English Version]Maker-Ray Product Brochure V3 .pdf](https://cdn.slidesharecdn.com/ss_thumbnails/englishversionmaker-rayproductbrochurev3-260113094444-0156dbdc-thumbnail.jpg?width=640&height=640&fit=bounds)


