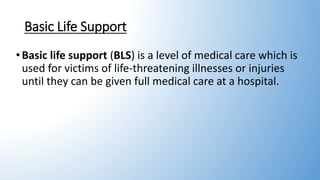
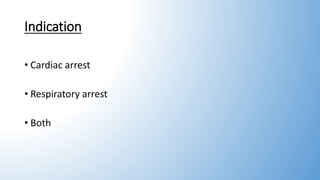
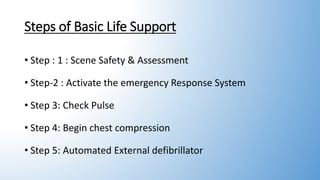
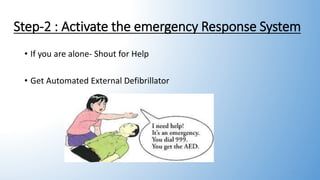
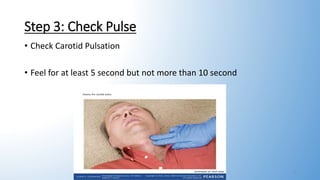
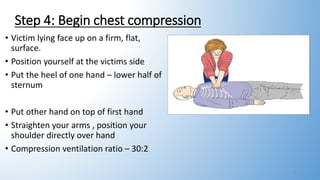
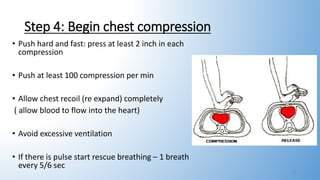
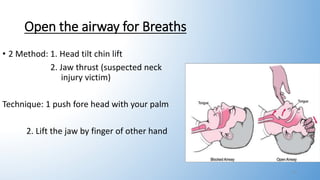
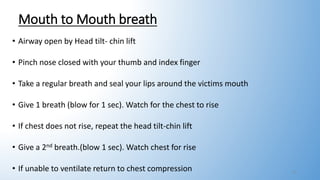
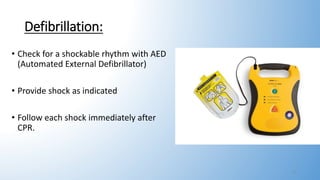
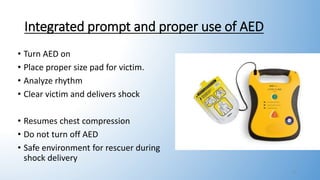
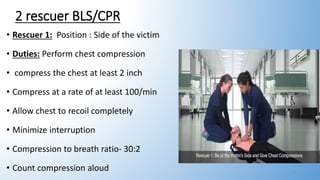
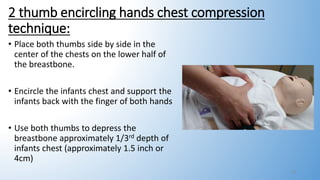
Basic Life Support
Dr. Mahmud Hussain
Assistant Professor
Department of Anesthesiology
1
Basic Life Support
•Basic life support (BLS) is a level of medical care which is
used for victims of life-threatening illnesses or injuries
until they can be given full medical care at a hospital.
2
Indication
• Cardiac arrest
• Respiratory arrest
• Both
3
Steps of Basic Life Support
• Dr’s ABC
• D= Danger
• R= Check Response
• ‘s= Shout for Help
• A= Airway Management
• B= Breathing Management
• C= Circulation
• D= Defibrillator
4
Steps of Basic Life Support
• Step : 1 : Scene Safety & Assessment
• Step-2 : Activate the emergency Response System
• Step 3: Check Pulse
• Step 4: Begin chest compression
• Step 5: Automated External defibrillator
5
Step : 1 : Scene Safety & Assessment
• The Scene is Safe : For both Provider & victim
• Check Responsiveness of Victim: Are you Alright?
• Check breathing – 1. Absent or no breathing
2. Gasping
6
Step-2 : Activate the emergency Response System
• If you are alone- Shout for Help
• Get Automated External Defibrillator
7
Step 3: Check Pulse
• Check Carotid Pulsation
• Feel for at least 5 second but not more than 10 second
8
Step 4: Begin chest compression
• Victim lying face up on a firm, flat,
surface.
• Position yourself at the victims side
• Put the heel of one hand – lower half of
sternum
• Put other hand on top of first hand
• Straighten your arms , position your
shoulder directly over hand
• Compression ventilation ratio – 30:2
9
Step 4: Begin chest compression
• Push hard and fast: press at least 2 inch in each
compression
• Push at least 100 compression per min
• Allow chest recoil (re expand) completely
( allow blood to flow into the heart)
• Avoid excessive ventilation
• If there is pulse start rescue breathing – 1 breath
every 5/6 sec
10
Open the airway for Breaths
• 2 Method: 1. Head tilt chin lift
2. Jaw thrust (suspected neck
injury victim)
Technique: 1 push fore head with your palm
2. Lift the jaw by finger of other hand
11
Mouth to Mouth breath
• Airway open by Head tilt- chin lift
• Pinch nose closed with your thumb and index finger
• Take a regular breath and seal your lips around the victims mouth
• Give 1 breath (blow for 1 sec). Watch for the chest to rise
• If chest does not rise, repeat the head tilt-chin lift
• Give a 2nd breath.(blow 1 sec). Watch chest for rise
• If unable to ventilate return to chest compression 12
Defibrillation:
• Check for a shockable rhythm with AED
(Automated External Defibrillator)
• Provide shock as indicated
• Follow each shock immediately after
CPR.
13
Integrated prompt and proper use of AED
• Turn AED on
• Place proper size pad for victim.
• Analyze rhythm
• Clear victim and delivers shock
• Resumes chest compression
• Do not turn off AED
• Safe environment for rescuer during
shock delivery
14
2 rescuer BLS/CPR
• Rescuer 1: Position : Side of the victim
• Duties: Perform chest compression
• compress the chest at least 2 inch
• Compress at a rate of at least 100/min
• Allow chest to recoil completely
• Minimize interruption
• Compression to breath ratio- 30:2
• Count compression aloud 15
2 rescuer BLS/CPR
• Rescuer : 2 : Position: At the victims Head
• Duties: Maintain open airway by head tilt chin up or jaw thrust
• Give breath and watch chest rise
• Switch duties with the first rescuer every 5 cycle or 2min.
• Take less than 5 sec to switch
16
BLS for Children (1 year and above)
• Check responsiveness & check breathing—No response- Shout for help
• Activate emergence response system & get AED
• Check pulse
• If no pulse despite sign oxygenation or heat rate <60 beats/min with sign of
poor perfusion ---- start chest compression
• After 5 cycle of chest compression -- get and use the AED
17
BLS for infant (Below 1 year)
• Check responsiveness & check breathing—No response- Shout for help
• Activate emergence response system & get AED
• Check infants brachial pulse
• If no pulse despite sign oxygenation or heat rate <60 beats/min with sign of
poor perfusion ---- start chest compression
• After 5 cycle of chest compression -- get and use the AED
18
2 finger chest compression technique
• Place the infant on a firm surface
• Place 2 fingers in the center of the infants chest, just
below the nipple line, Do not press on the bottom
of the breast bone
• Press the infants breast bone down one third the
depth of the chest (1.5 inch or 4cm).
19
2 thumb encircling hands chest compression
technique:
• Place both thumbs side by side in the
center of the chests on the lower half of
the breastbone.
• Encircle the infants chest and support the
infants back with the finger of both hands
• Use both thumbs to depress the
breastbone approximately 1/3rd depth of
infants chest (approximately 1.5 inch or
4cm)
20
21

basic life support or CPR

  • 1.
    Basic Life Support Dr.Mahmud Hussain Assistant Professor Department of Anesthesiology 1
  • 2.
    Basic Life Support •Basiclife support (BLS) is a level of medical care which is used for victims of life-threatening illnesses or injuries until they can be given full medical care at a hospital. 2
  • 3.
    Indication • Cardiac arrest •Respiratory arrest • Both 3
  • 4.
    Steps of BasicLife Support • Dr’s ABC • D= Danger • R= Check Response • ‘s= Shout for Help • A= Airway Management • B= Breathing Management • C= Circulation • D= Defibrillator 4
  • 5.
    Steps of BasicLife Support • Step : 1 : Scene Safety & Assessment • Step-2 : Activate the emergency Response System • Step 3: Check Pulse • Step 4: Begin chest compression • Step 5: Automated External defibrillator 5
  • 6.
    Step : 1: Scene Safety & Assessment • The Scene is Safe : For both Provider & victim • Check Responsiveness of Victim: Are you Alright? • Check breathing – 1. Absent or no breathing 2. Gasping 6
  • 7.
    Step-2 : Activatethe emergency Response System • If you are alone- Shout for Help • Get Automated External Defibrillator 7
  • 8.
    Step 3: CheckPulse • Check Carotid Pulsation • Feel for at least 5 second but not more than 10 second 8
  • 9.
    Step 4: Beginchest compression • Victim lying face up on a firm, flat, surface. • Position yourself at the victims side • Put the heel of one hand – lower half of sternum • Put other hand on top of first hand • Straighten your arms , position your shoulder directly over hand • Compression ventilation ratio – 30:2 9
  • 10.
    Step 4: Beginchest compression • Push hard and fast: press at least 2 inch in each compression • Push at least 100 compression per min • Allow chest recoil (re expand) completely ( allow blood to flow into the heart) • Avoid excessive ventilation • If there is pulse start rescue breathing – 1 breath every 5/6 sec 10
  • 11.
    Open the airwayfor Breaths • 2 Method: 1. Head tilt chin lift 2. Jaw thrust (suspected neck injury victim) Technique: 1 push fore head with your palm 2. Lift the jaw by finger of other hand 11
  • 12.
    Mouth to Mouthbreath • Airway open by Head tilt- chin lift • Pinch nose closed with your thumb and index finger • Take a regular breath and seal your lips around the victims mouth • Give 1 breath (blow for 1 sec). Watch for the chest to rise • If chest does not rise, repeat the head tilt-chin lift • Give a 2nd breath.(blow 1 sec). Watch chest for rise • If unable to ventilate return to chest compression 12
  • 13.
    Defibrillation: • Check fora shockable rhythm with AED (Automated External Defibrillator) • Provide shock as indicated • Follow each shock immediately after CPR. 13
  • 14.
    Integrated prompt andproper use of AED • Turn AED on • Place proper size pad for victim. • Analyze rhythm • Clear victim and delivers shock • Resumes chest compression • Do not turn off AED • Safe environment for rescuer during shock delivery 14
  • 15.
    2 rescuer BLS/CPR •Rescuer 1: Position : Side of the victim • Duties: Perform chest compression • compress the chest at least 2 inch • Compress at a rate of at least 100/min • Allow chest to recoil completely • Minimize interruption • Compression to breath ratio- 30:2 • Count compression aloud 15
  • 16.
    2 rescuer BLS/CPR •Rescuer : 2 : Position: At the victims Head • Duties: Maintain open airway by head tilt chin up or jaw thrust • Give breath and watch chest rise • Switch duties with the first rescuer every 5 cycle or 2min. • Take less than 5 sec to switch 16
  • 17.
    BLS for Children(1 year and above) • Check responsiveness & check breathing—No response- Shout for help • Activate emergence response system & get AED • Check pulse • If no pulse despite sign oxygenation or heat rate <60 beats/min with sign of poor perfusion ---- start chest compression • After 5 cycle of chest compression -- get and use the AED 17
  • 18.
    BLS for infant(Below 1 year) • Check responsiveness & check breathing—No response- Shout for help • Activate emergence response system & get AED • Check infants brachial pulse • If no pulse despite sign oxygenation or heat rate <60 beats/min with sign of poor perfusion ---- start chest compression • After 5 cycle of chest compression -- get and use the AED 18
  • 19.
    2 finger chestcompression technique • Place the infant on a firm surface • Place 2 fingers in the center of the infants chest, just below the nipple line, Do not press on the bottom of the breast bone • Press the infants breast bone down one third the depth of the chest (1.5 inch or 4cm). 19
  • 20.
    2 thumb encirclinghands chest compression technique: • Place both thumbs side by side in the center of the chests on the lower half of the breastbone. • Encircle the infants chest and support the infants back with the finger of both hands • Use both thumbs to depress the breastbone approximately 1/3rd depth of infants chest (approximately 1.5 inch or 4cm) 20
  • 21.