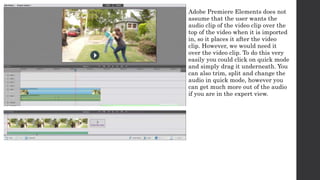
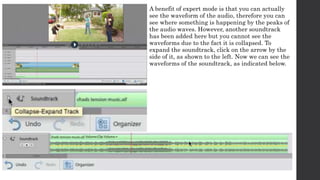
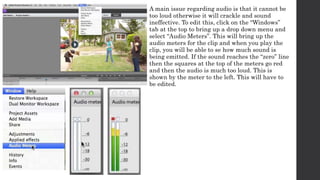
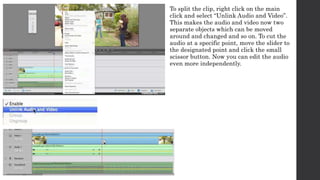
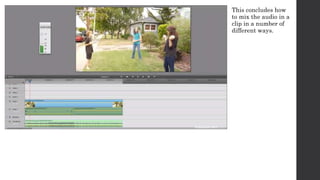
Audio Mixing 
James Evans
Adobe Premiere Elements does not 
assume that the user wants the 
audio clip of the video clip over the 
top of the video when it is imported 
in, so it places it after the video 
clip. However, we would need it 
over the video clip. To do this very 
easily you could click on quick mode 
and simply drag it underneath. You 
can also trim, split and change the 
audio in quick mode, however you 
can get much more out of the audio 
if you are in the expert view.
A benefit of expert mode is that you can actually 
see the waveform of the audio, therefore you can 
see where something is happening by the peaks of 
the audio waves. However, another soundtrack 
has been added here but you cannot see the 
waveforms due to the fact it is collapsed. To 
expand the soundtrack, click on the arrow by the 
side of it, as shown to the left. Now we can see the 
waveforms of the soundtrack, as indicated below.
A main issue regarding audio is that it cannot be 
too loud otherwise it will crackle and sound 
ineffective. To edit this, click on the “Windows” 
tab at the top to bring up a drop down menu and 
select “Audio Meters”. This will bring up the 
audio meters for the clip and when you play the 
clip, you will be able to se how much sound is 
being emitted. If the sound reaches the “zero” line 
then the squares at the top of the meters go red 
and then the audio is much too loud. This is 
shown by the meter to the left. This will have to 
be edited.
To split the clip, right click on the main 
click and select “Unlink Audio and Video”. 
This makes the audio and video now two 
separate objects which can be moved 
around and changed and so on. To cut the 
audio at a specific point, move the slider to 
the designated point and click the small 
scissor button. Now you can edit the audio 
even more independently.
To change the volume of the first 
audio clip, drag the yellow bar up 
and down to change the volume. In 
this case the volume needs to be 
lowered, so the bar was dragged to 
the bottom of the audio.
To also lower the audio, click on the tools 
button on the bottom right of the screen and 
scroll up to the “Audio Mixer” button. This 
brings up a box which has Audio 1, 
Narration and Soundtrack mixers to enable 
you to change the sound. You can reduce the 
sound of each part of audio by dragging the 
slider down to the intended volume.
Click on the audio and then click 
on “Adjustments” in the top right 
corner. This brings up this menu 
which can adjust the volume. To 
reduce the higher pitched tones, 
click on “Treble” and bring the 
slider to the left.
This concludes how 
to mix the audio in a 
clip in a number of 
different ways.

Audio Mixing

  • 1.
  • 2.
    Adobe Premiere Elementsdoes not assume that the user wants the audio clip of the video clip over the top of the video when it is imported in, so it places it after the video clip. However, we would need it over the video clip. To do this very easily you could click on quick mode and simply drag it underneath. You can also trim, split and change the audio in quick mode, however you can get much more out of the audio if you are in the expert view.
  • 3.
    A benefit ofexpert mode is that you can actually see the waveform of the audio, therefore you can see where something is happening by the peaks of the audio waves. However, another soundtrack has been added here but you cannot see the waveforms due to the fact it is collapsed. To expand the soundtrack, click on the arrow by the side of it, as shown to the left. Now we can see the waveforms of the soundtrack, as indicated below.
  • 4.
    A main issueregarding audio is that it cannot be too loud otherwise it will crackle and sound ineffective. To edit this, click on the “Windows” tab at the top to bring up a drop down menu and select “Audio Meters”. This will bring up the audio meters for the clip and when you play the clip, you will be able to se how much sound is being emitted. If the sound reaches the “zero” line then the squares at the top of the meters go red and then the audio is much too loud. This is shown by the meter to the left. This will have to be edited.
  • 5.
    To split theclip, right click on the main click and select “Unlink Audio and Video”. This makes the audio and video now two separate objects which can be moved around and changed and so on. To cut the audio at a specific point, move the slider to the designated point and click the small scissor button. Now you can edit the audio even more independently.
  • 6.
    To change thevolume of the first audio clip, drag the yellow bar up and down to change the volume. In this case the volume needs to be lowered, so the bar was dragged to the bottom of the audio.
  • 7.
    To also lowerthe audio, click on the tools button on the bottom right of the screen and scroll up to the “Audio Mixer” button. This brings up a box which has Audio 1, Narration and Soundtrack mixers to enable you to change the sound. You can reduce the sound of each part of audio by dragging the slider down to the intended volume.
  • 8.
    Click on theaudio and then click on “Adjustments” in the top right corner. This brings up this menu which can adjust the volume. To reduce the higher pitched tones, click on “Treble” and bring the slider to the left.
  • 9.
    This concludes how to mix the audio in a clip in a number of different ways.