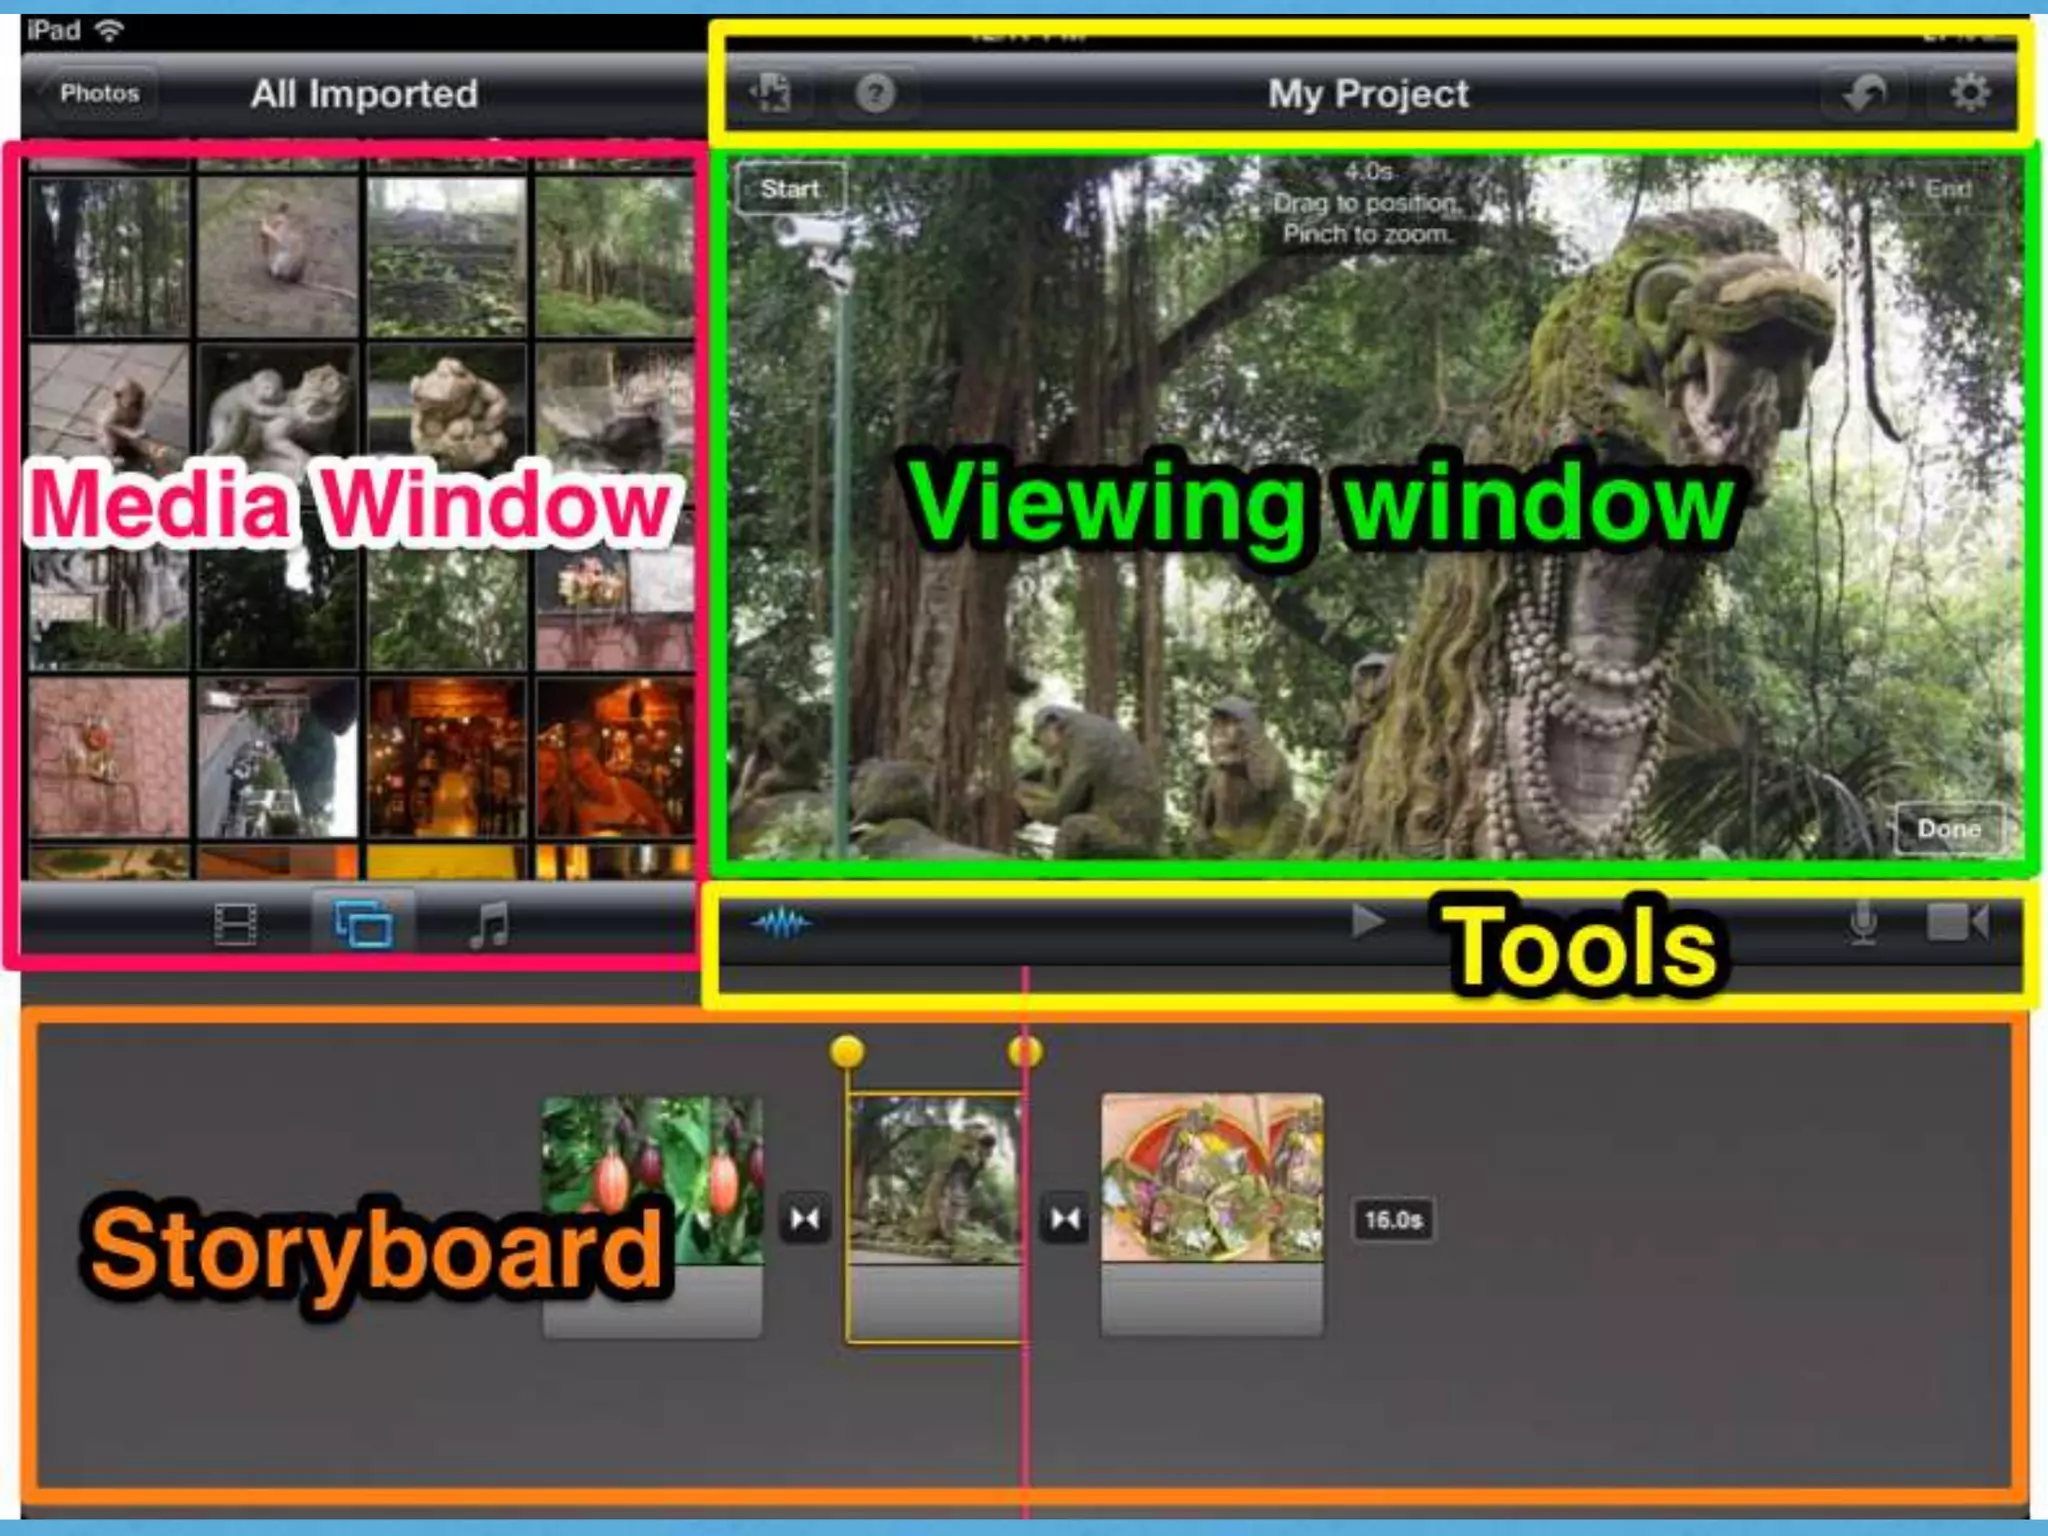
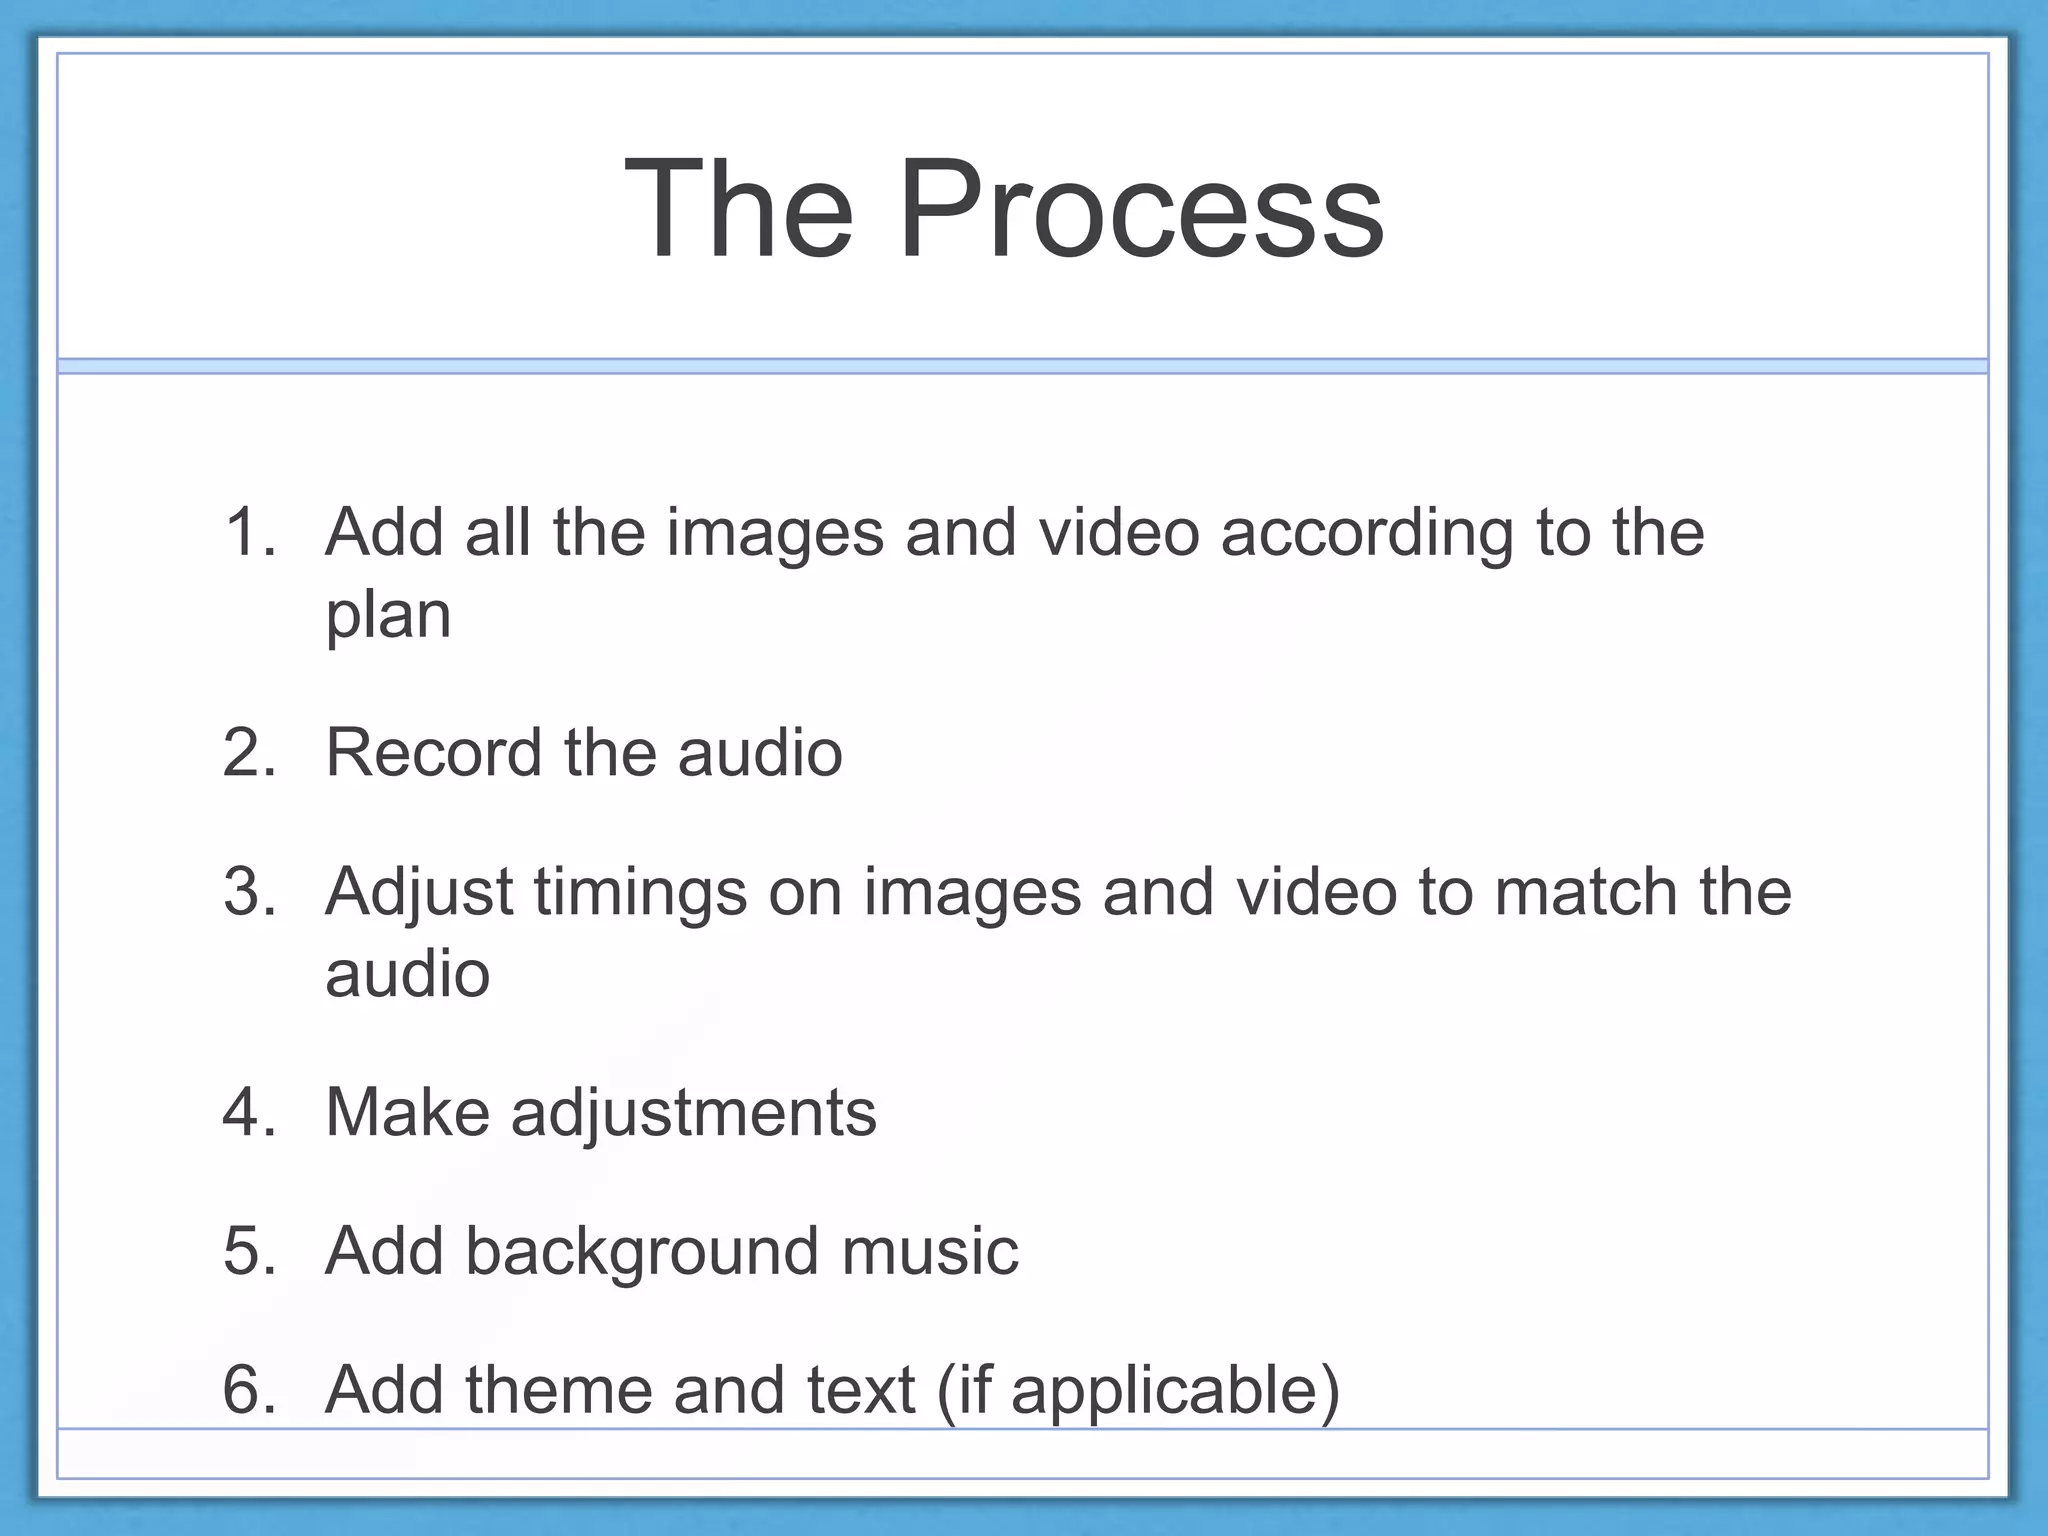
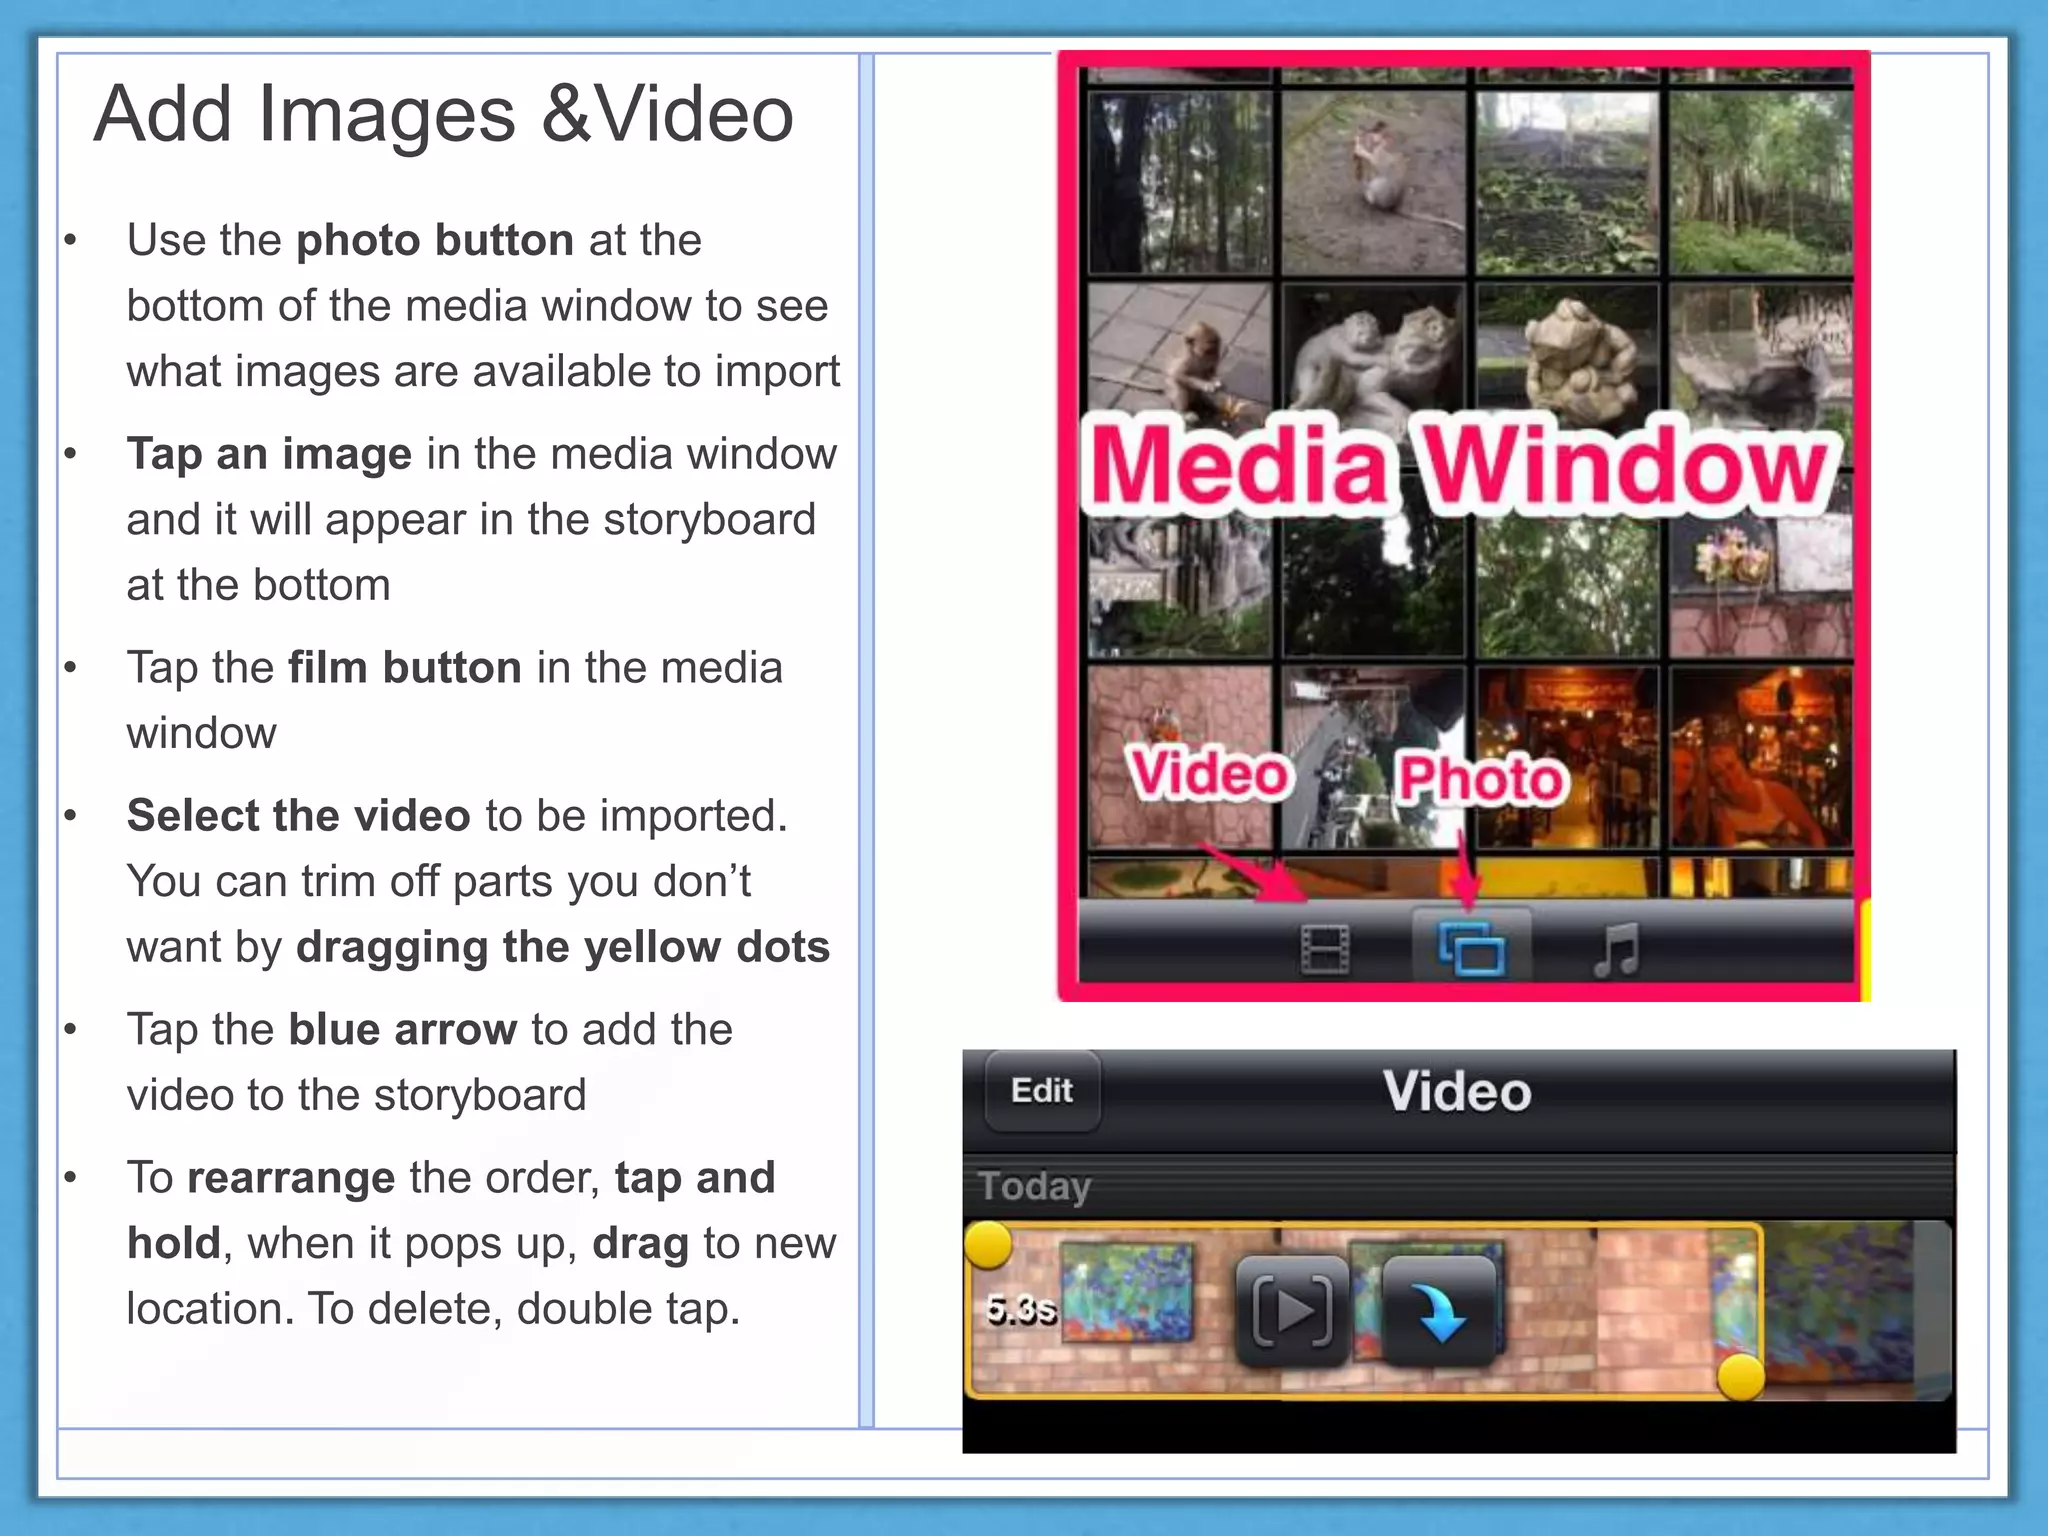
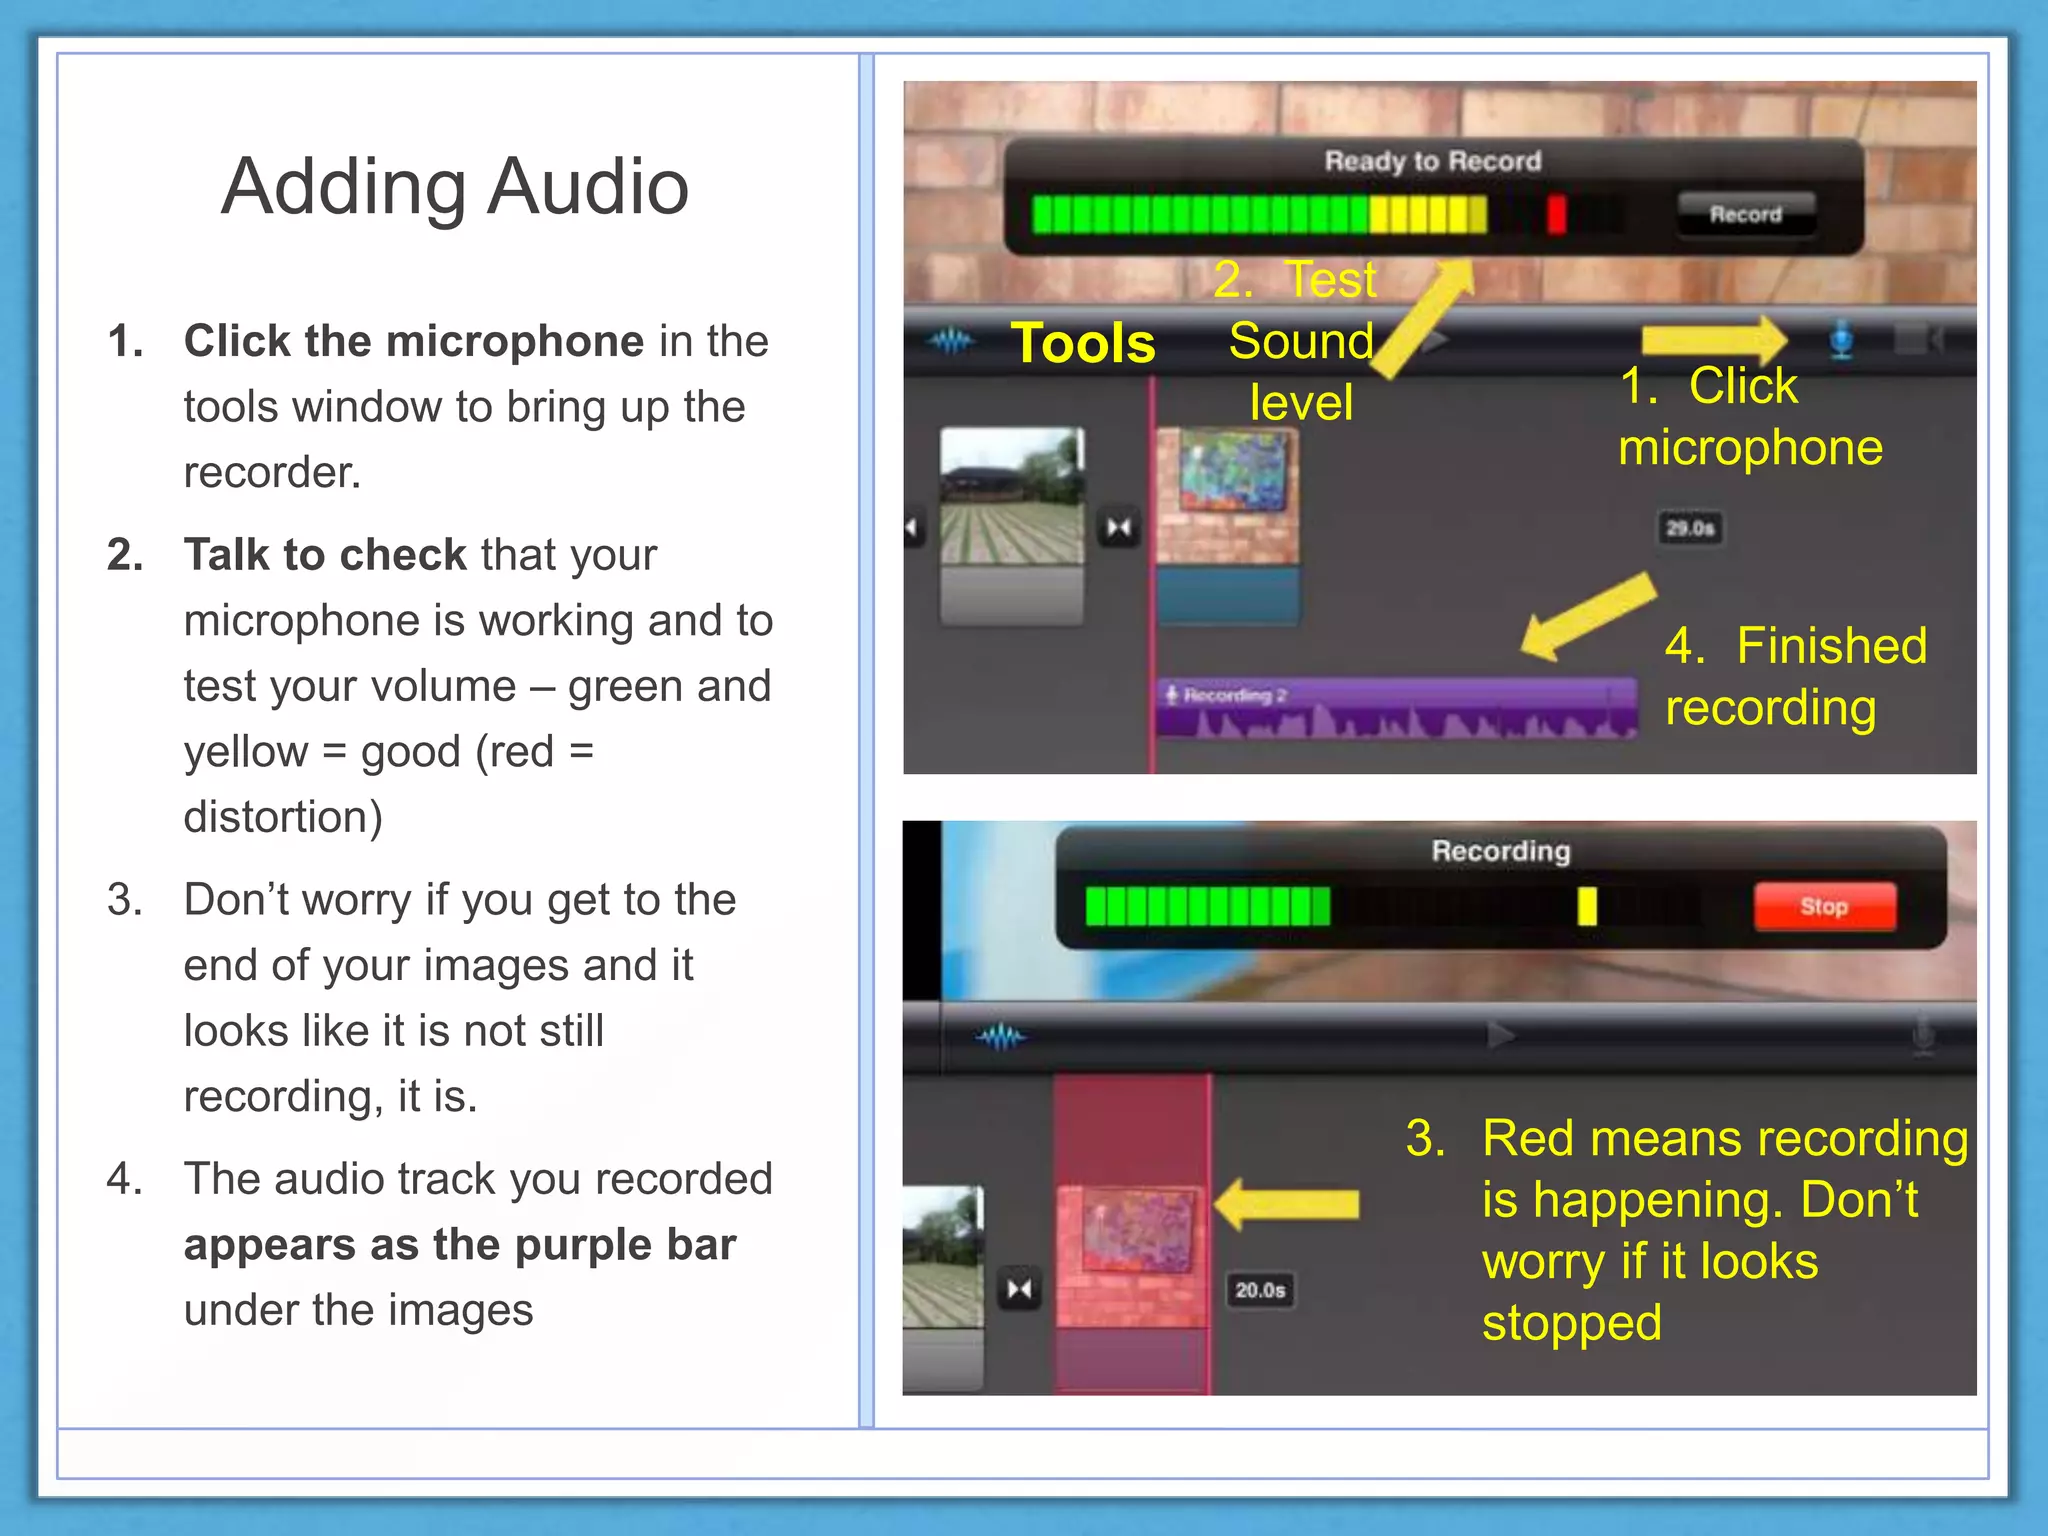
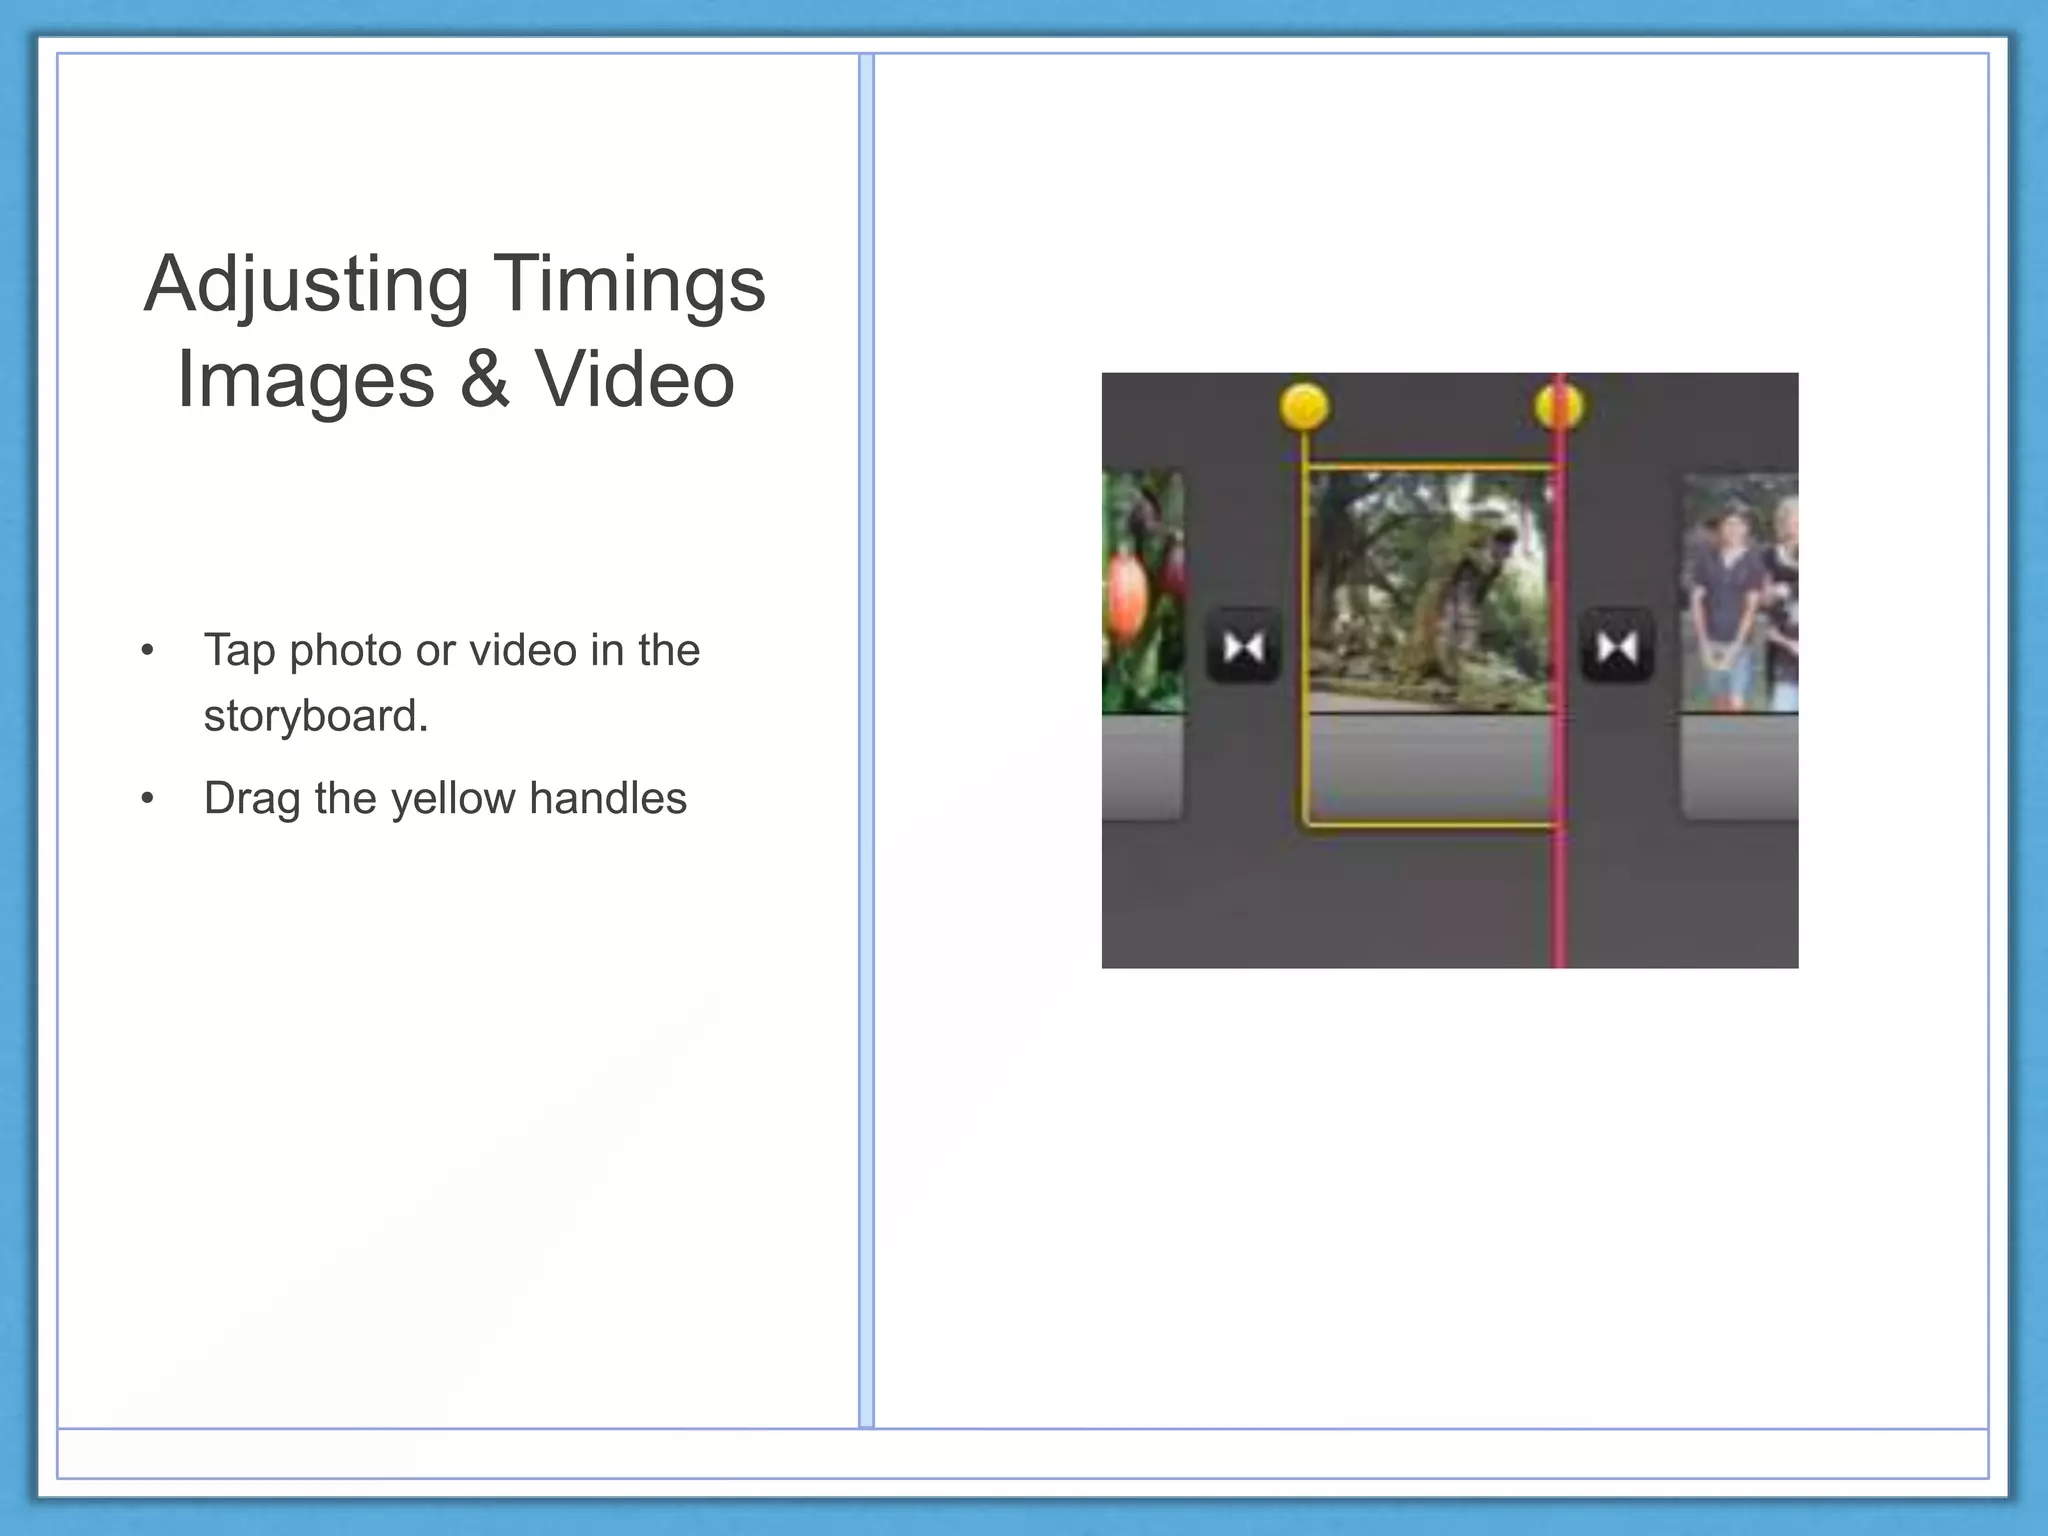
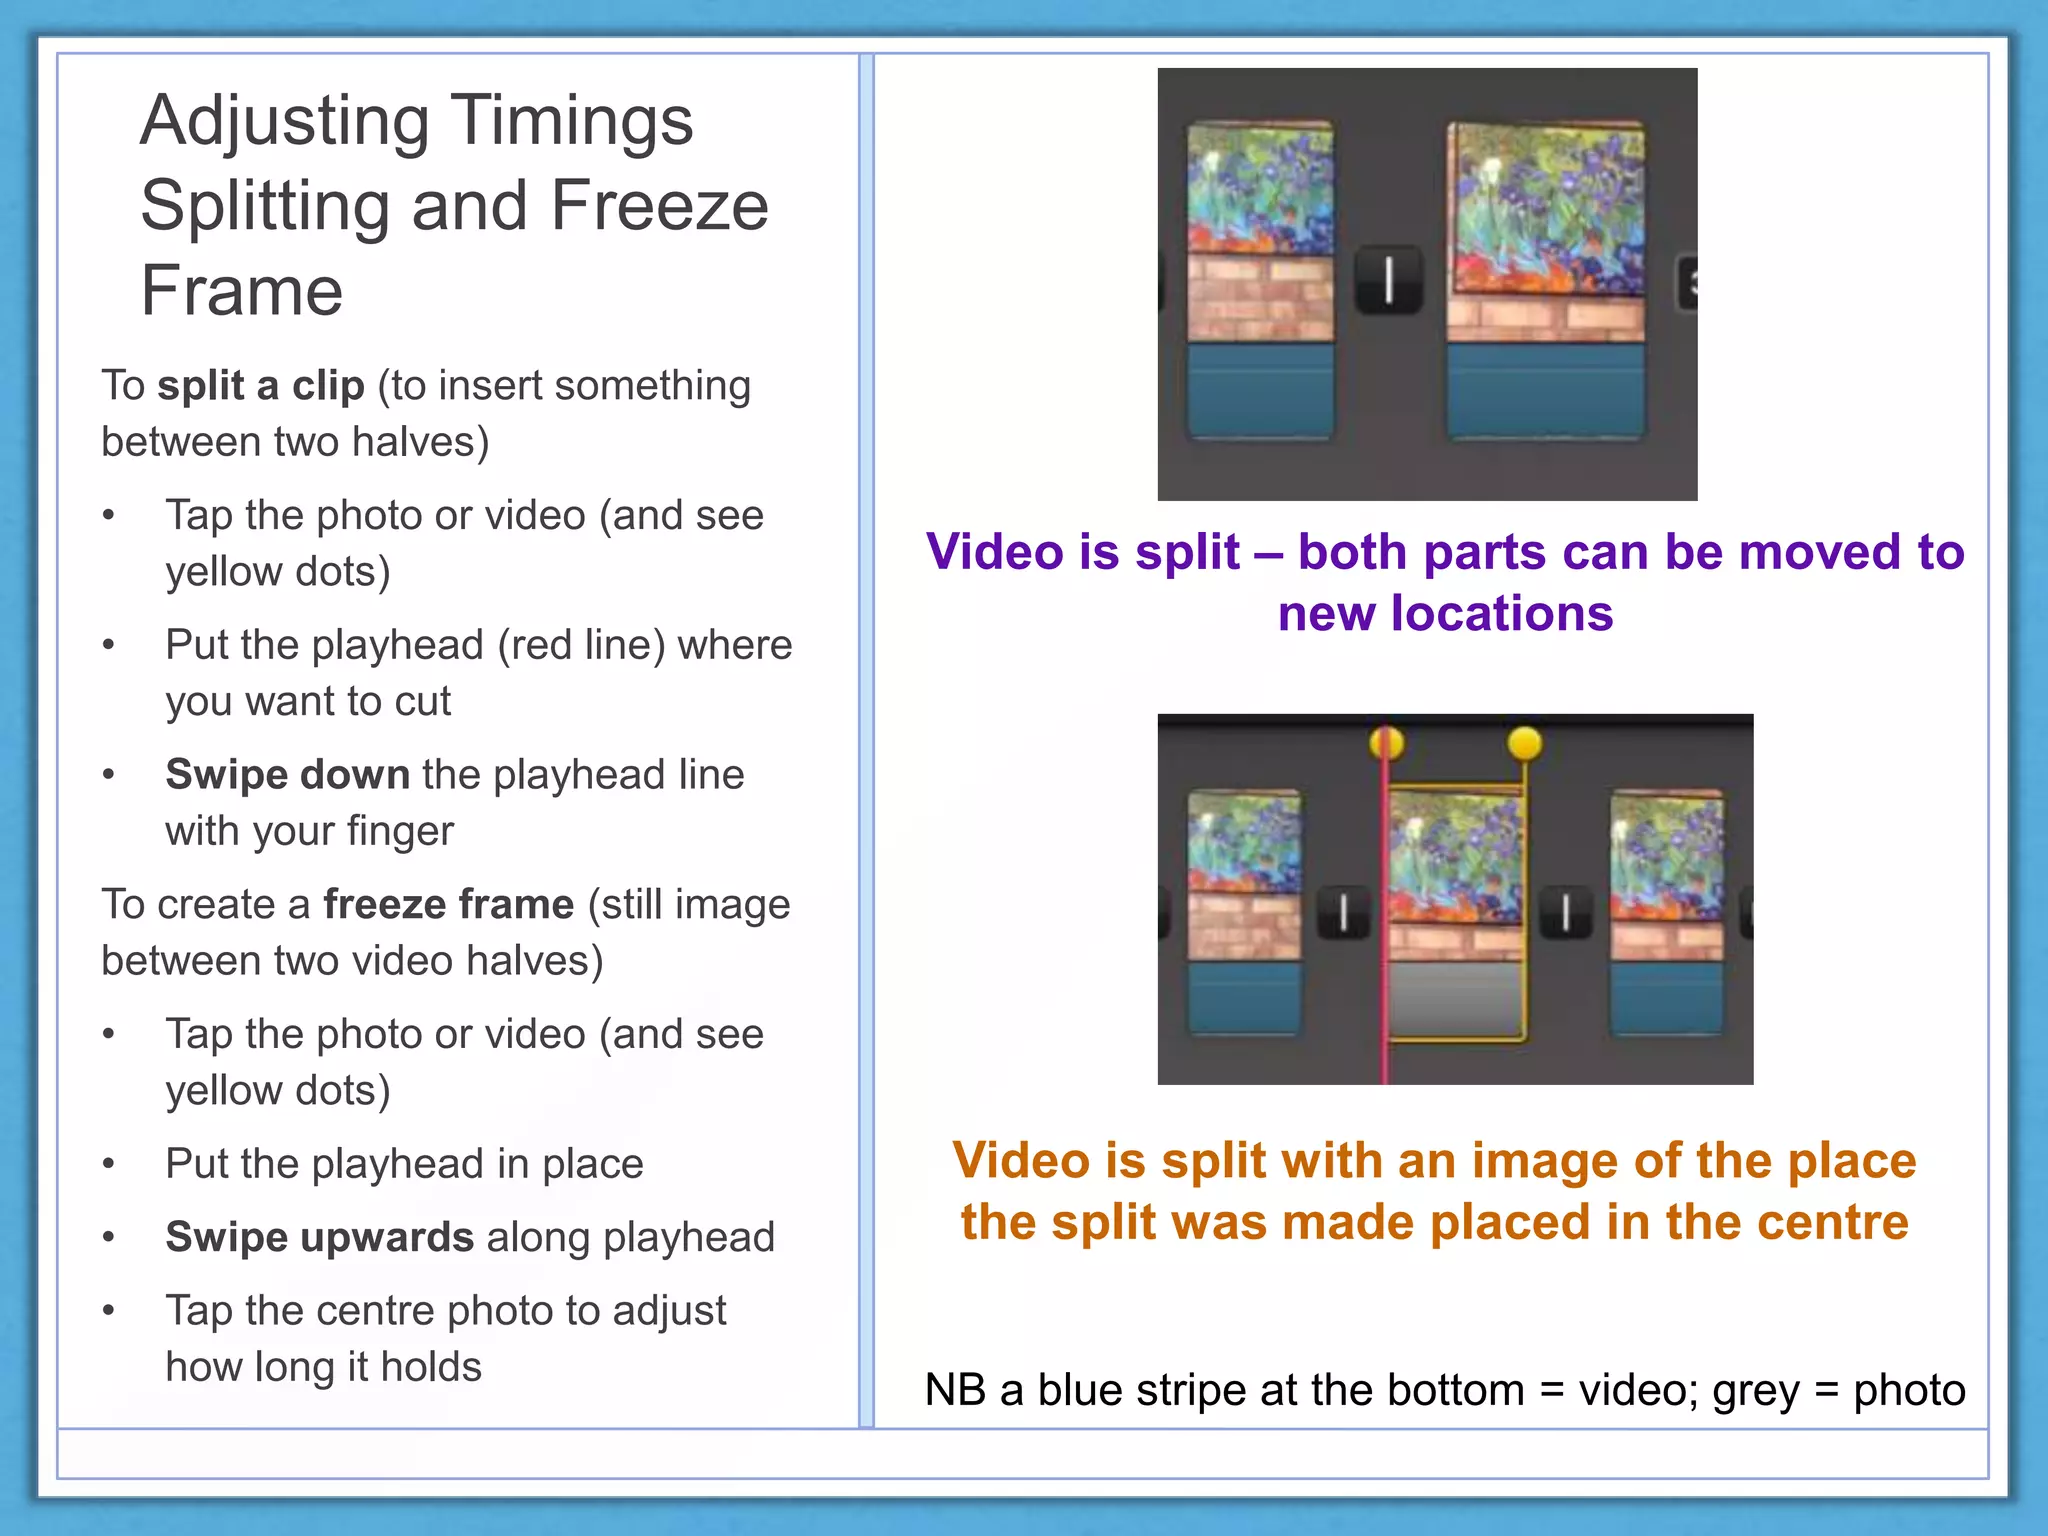
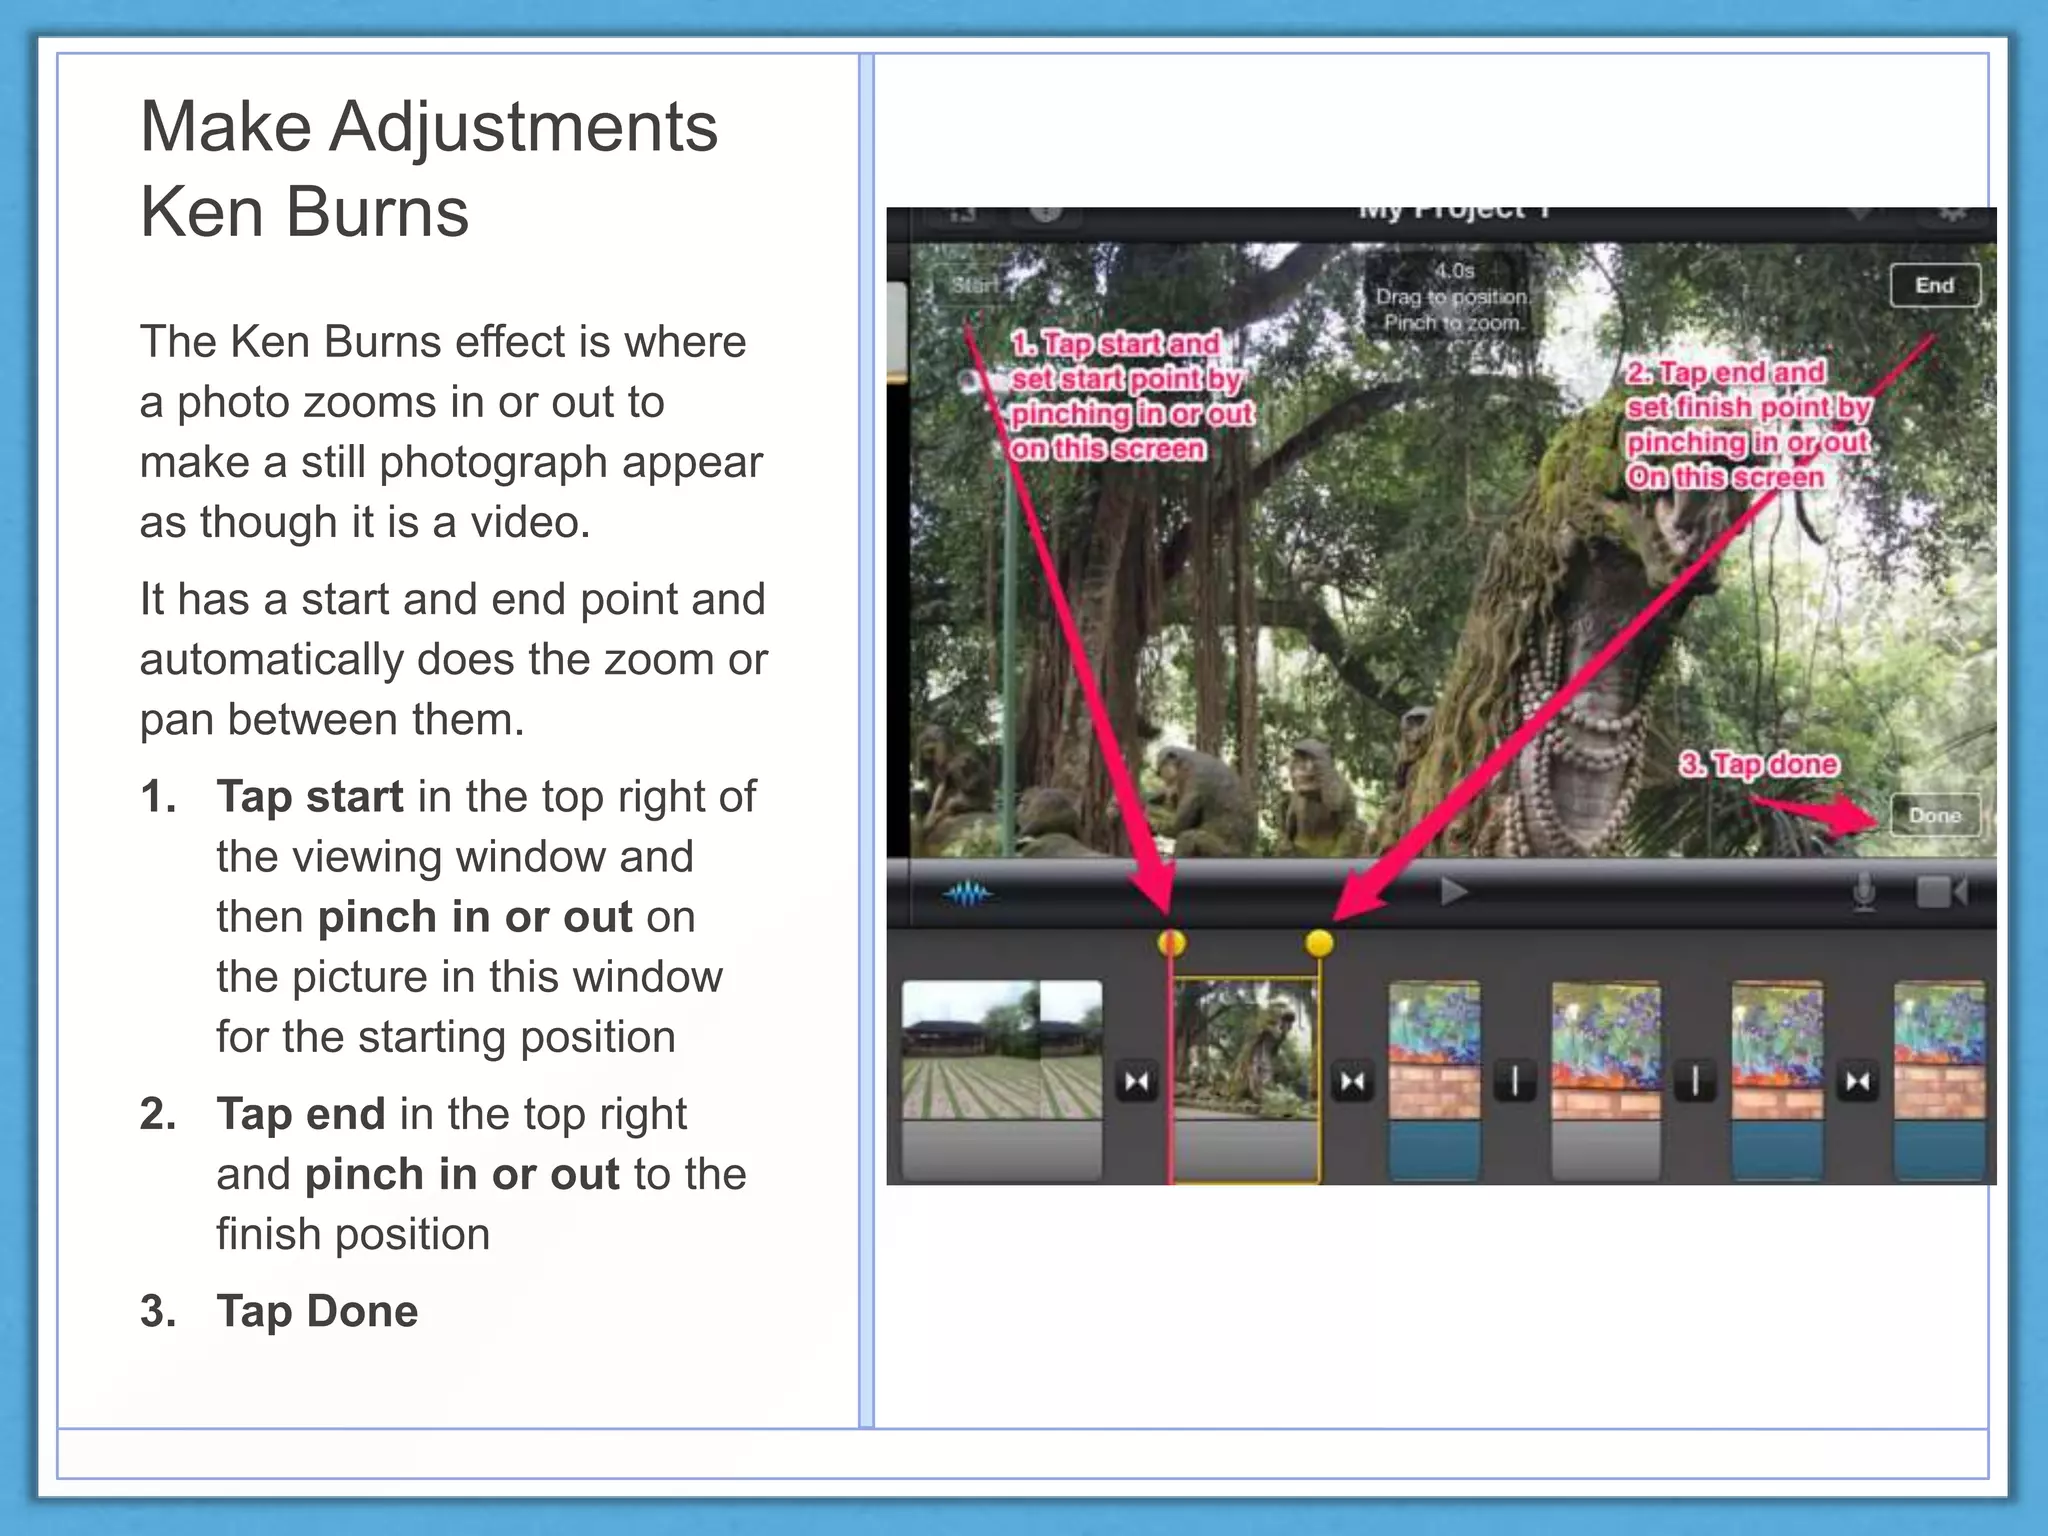
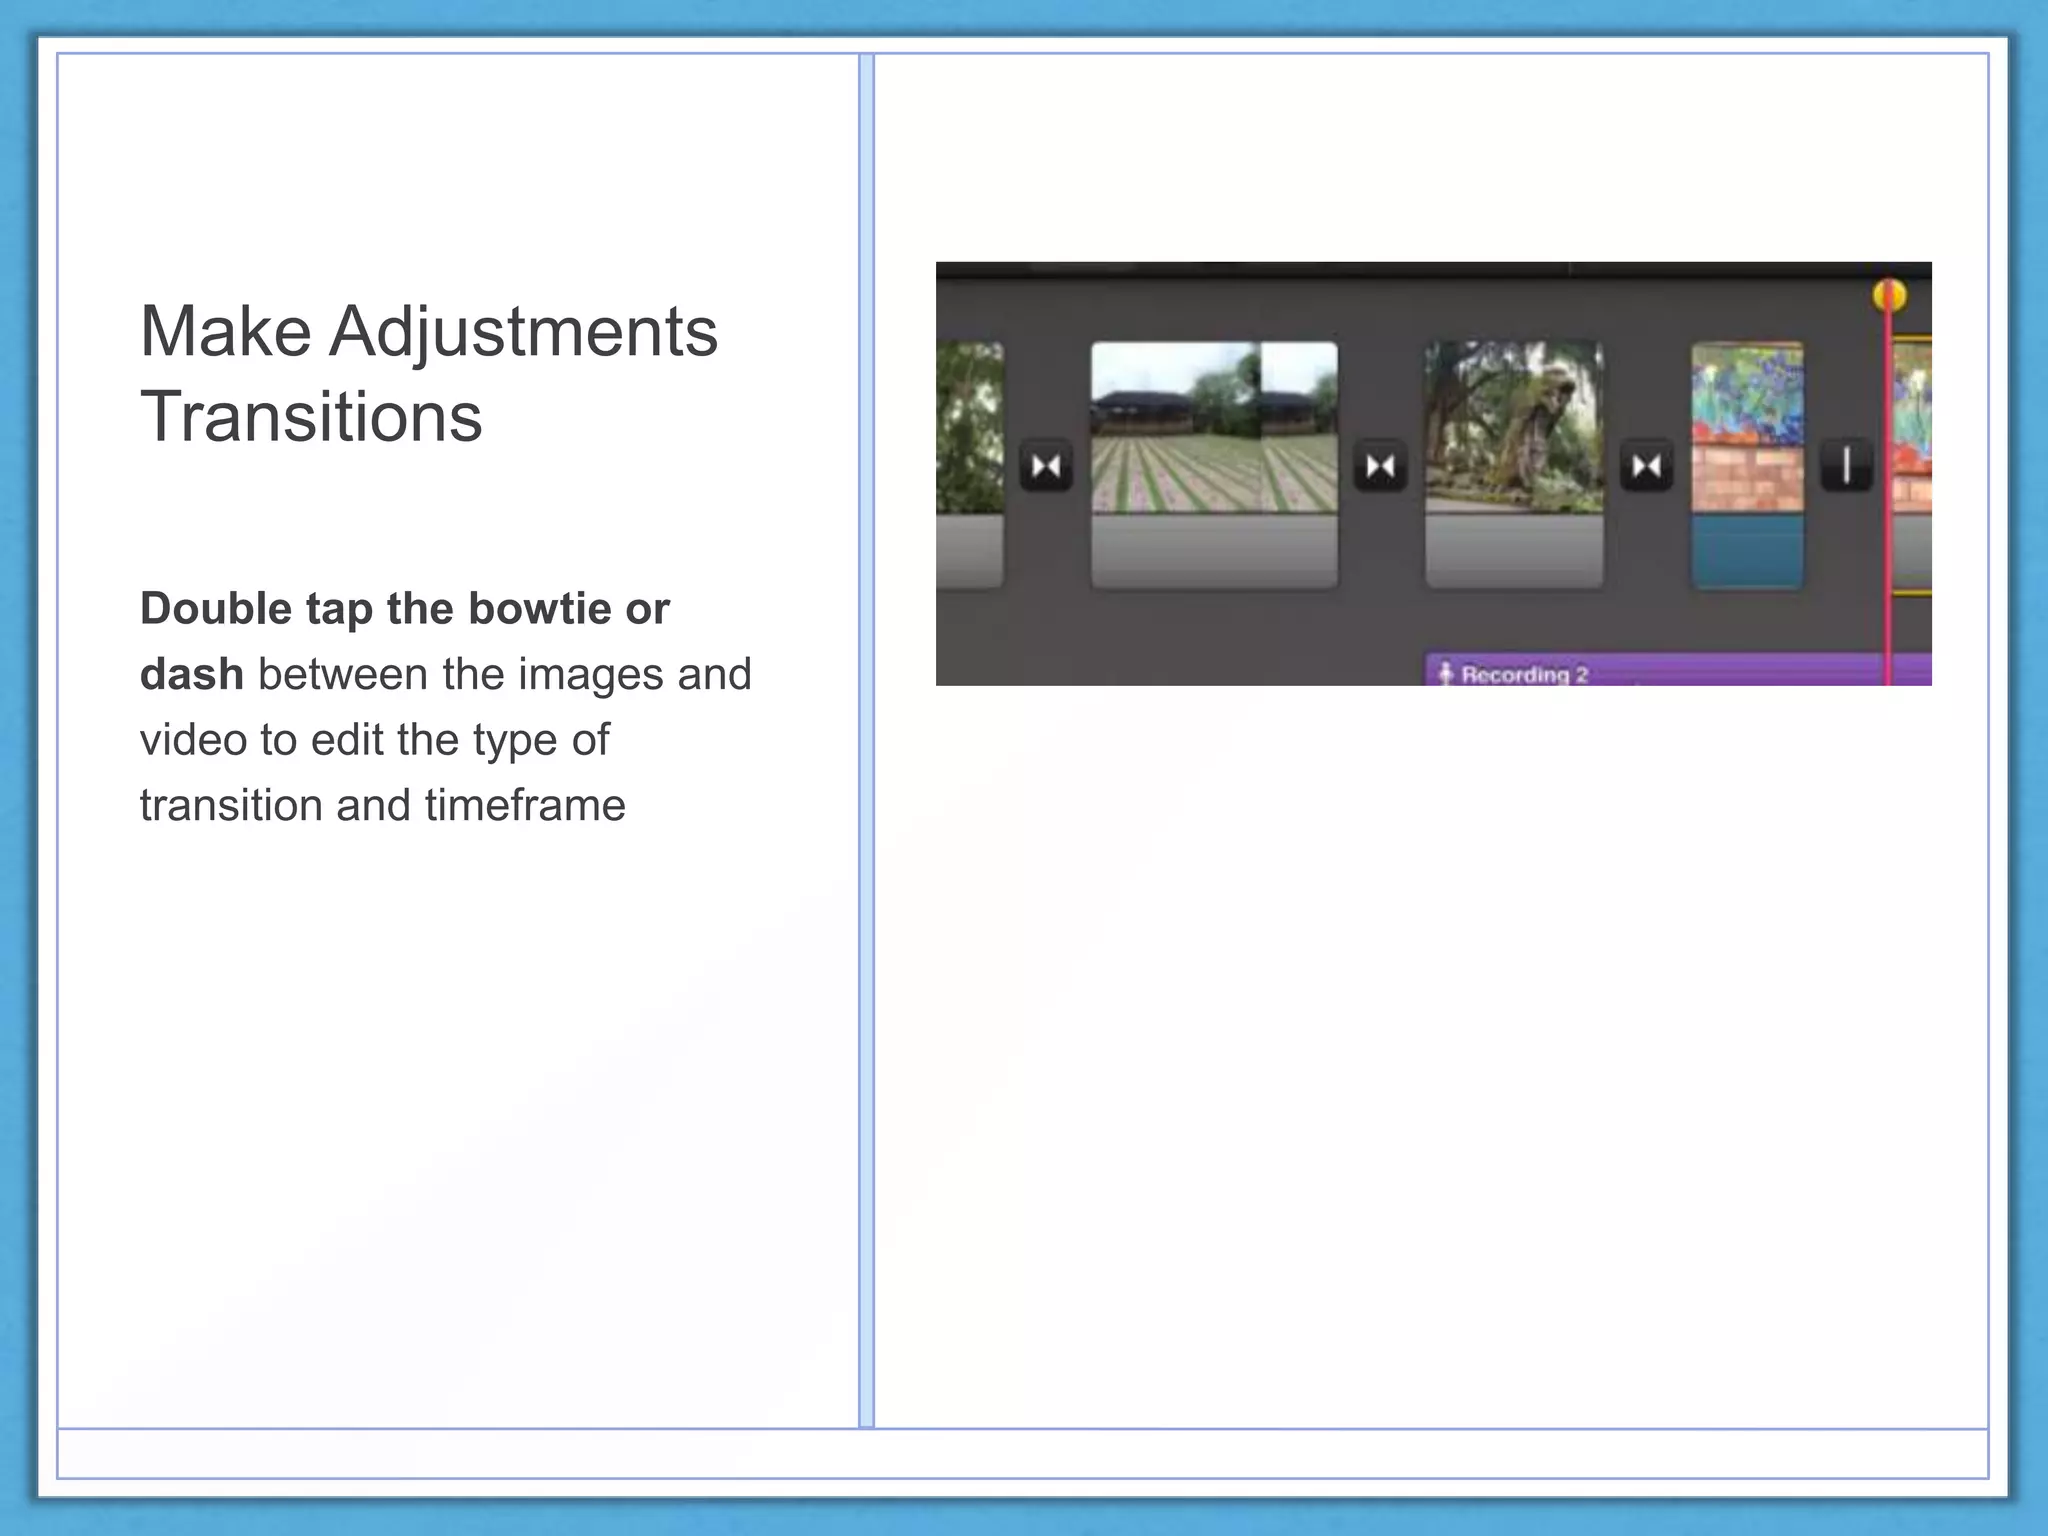
iMovie for iPad
Cheat Sheet
By Anita Garnsworthy
The Process
1. Add all the images and video according to the
plan
2. Record the audio
3. Adjust timings on images and video to match the
audio
4. Make adjustments
5. Add background music
6. Add theme and text (if applicable)
Add Images &Video
• Use the photo button at the
bottom of the media window to see
what images are available to import
• Tap an image in the media window
and it will appear in the storyboard
at the bottom
• Tap the film button in the media
window
• Select the video to be imported.
You can trim off parts you don’t
want by dragging the yellow dots
• Tap the blue arrow to add the
video to the storyboard
• To rearrange the order, tap and
hold, when it pops up, drag to new
location. To delete, double tap.
Adding Audio
1. Click the microphone in the
tools window to bring up the
recorder.
2. Talk to check that your
microphone is working and to
test your volume – green and
yellow = good (red =
distortion)
3. Don’t worry if you get to the
end of your images and it
looks like it is not still
recording, it is.
4. The audio track you recorded
appears as the purple bar
under the images
Tools
1. Click
microphone
4. Finished
recording
2. Test
Sound
level
3. Red means recording
is happening. Don’t
worry if it looks
stopped
Adjusting Timings
Images & Video
• Tap photo or video in the
storyboard.
• Drag the yellow handles
Adjusting Timings
Splitting and Freeze
Frame
To split a clip (to insert something
between two halves)
• Tap the photo or video (and see
yellow dots)
• Put the playhead (red line) where
you want to cut
• Swipe down the playhead line
with your finger
To create a freeze frame (still image
between two video halves)
• Tap the photo or video (and see
yellow dots)
• Put the playhead in place
• Swipe upwards along playhead
• Tap the centre photo to adjust
how long it holds
NB a blue stripe at the bottom = video; grey = photo
Video is split – both parts can be moved to
new locations
Video is split with an image of the place
the split was made placed in the centre
Make Adjustments
Ken Burns
The Ken Burns effect is where
a photo zooms in or out to
make a still photograph appear
as though it is a video.
It has a start and end point and
automatically does the zoom or
pan between them.
1. Tap start in the top right of
the viewing window and
then pinch in or out on
the picture in this window
for the starting position
2. Tap end in the top right
and pinch in or out to the
finish position
3. Tap Done
Make Adjustments
Transitions
Double tap the bowtie or
dash between the images and
video to edit the type of
transition and timeframe
Add Background
Music
1. Tap on the music button
at the bottom of the media
window
2. Choose theme music
3. Choose a piece of music
(NOTE: whilst you can access
your iTunes library, in most
cases using this music will
breach copyright)
Add a Theme
• Tap the Gear in the top
right
• Choose a theme
Add a Theme
Add Text
• Double tap an image
• Select Title Style
• Select the type - Opening,
Middle or Ending
• Tap into text box and type
the meaning

iMovie for iPad Tutorial

  • 1.
    iMovie for iPad CheatSheet By Anita Garnsworthy
  • 3.
    The Process 1. Addall the images and video according to the plan 2. Record the audio 3. Adjust timings on images and video to match the audio 4. Make adjustments 5. Add background music 6. Add theme and text (if applicable)
  • 4.
    Add Images &Video •Use the photo button at the bottom of the media window to see what images are available to import • Tap an image in the media window and it will appear in the storyboard at the bottom • Tap the film button in the media window • Select the video to be imported. You can trim off parts you don’t want by dragging the yellow dots • Tap the blue arrow to add the video to the storyboard • To rearrange the order, tap and hold, when it pops up, drag to new location. To delete, double tap.
  • 5.
    Adding Audio 1. Clickthe microphone in the tools window to bring up the recorder. 2. Talk to check that your microphone is working and to test your volume – green and yellow = good (red = distortion) 3. Don’t worry if you get to the end of your images and it looks like it is not still recording, it is. 4. The audio track you recorded appears as the purple bar under the images Tools 1. Click microphone 4. Finished recording 2. Test Sound level 3. Red means recording is happening. Don’t worry if it looks stopped
  • 6.
    Adjusting Timings Images &Video • Tap photo or video in the storyboard. • Drag the yellow handles
  • 7.
    Adjusting Timings Splitting andFreeze Frame To split a clip (to insert something between two halves) • Tap the photo or video (and see yellow dots) • Put the playhead (red line) where you want to cut • Swipe down the playhead line with your finger To create a freeze frame (still image between two video halves) • Tap the photo or video (and see yellow dots) • Put the playhead in place • Swipe upwards along playhead • Tap the centre photo to adjust how long it holds NB a blue stripe at the bottom = video; grey = photo Video is split – both parts can be moved to new locations Video is split with an image of the place the split was made placed in the centre
  • 8.
    Make Adjustments Ken Burns TheKen Burns effect is where a photo zooms in or out to make a still photograph appear as though it is a video. It has a start and end point and automatically does the zoom or pan between them. 1. Tap start in the top right of the viewing window and then pinch in or out on the picture in this window for the starting position 2. Tap end in the top right and pinch in or out to the finish position 3. Tap Done
  • 9.
    Make Adjustments Transitions Double tapthe bowtie or dash between the images and video to edit the type of transition and timeframe
  • 10.
    Add Background Music 1. Tapon the music button at the bottom of the media window 2. Choose theme music 3. Choose a piece of music (NOTE: whilst you can access your iTunes library, in most cases using this music will breach copyright)
  • 11.
    Add a Theme •Tap the Gear in the top right • Choose a theme
  • 12.
    Add a Theme AddText • Double tap an image • Select Title Style • Select the type - Opening, Middle or Ending • Tap into text box and type the meaning