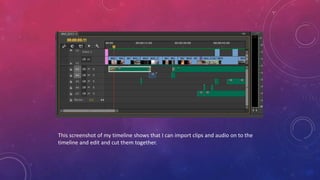
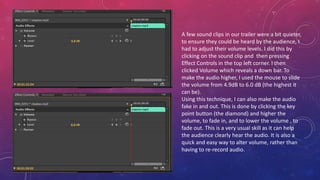
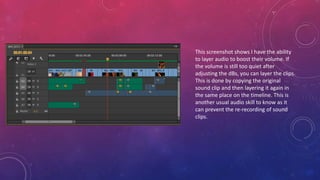
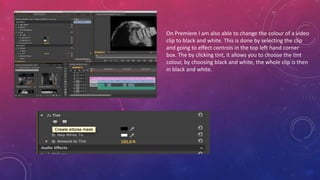
MEDIA TECHNOLOGY- MY
PREMIERE SKILLS
ALICE ATKINS
A2 ADVANCED MEDIA PORTFOLIO EVALUATION
To start of a new project in Adobe Premiere, I had to
open the programme and the select File, New, Project.
This is a very easy layout and it an easy skill to be
learnt.
It well then ask you to name the project and
choose where the files are saved to. Once you
have selected a location for the files, it is key to
clip on Scratch Disks and make sure they are
being saved in the same location.
A blank project will then be opened. To import clips , click the
box in the bottom left corner and then click media browser to
select the files you need to import. Then to import them, you
just click on the clip and drag it onto the timeline.
This screenshot of my timeline shows that I can import clips and audio on to the
timeline and edit and cut them together.
A few sound clips in our trailer were a bit quieter,
to ensure they could be heard by the audience, I
had to adjust their volume levels. I did this by
clicking on the sound clip and then pressing
Effect Controls in the top left corner. I then
clicked Volume which reveals a down bar. To
make the audio higher, I used the mouse to slide
the volume from 4.9dB to 6.0 dB (the highest it
can be).
Using this technique, I can also make the audio
fake in and out. This is done by clicking the key
point button (the diamond) and higher the
volume, to fade in, and to lower the volume , to
fade out. This is a very usual skill as it can help
the audience clearly hear the audio. It is also a
quick and easy way to alter volume, rather than
having to re-record audio.
This screenshot shows I have the ability
to layer audio to boost their volume. If
the volume is still too quiet after
adjusting the dBs, you can layer the clips.
This is done by copying the original
sound clip and then layering it again in
the same place on the timeline. This is
another usual audio skill to know as it
can prevent the re-recording of sound
clips.
On Premiere I am also able to change the colour of a video
clip to black and white. This is done by selecting the clip
and going to effect controls in the top left hand corner
box. The by clicking tint, it allows you to choose the tint
colour, by choosing black and white, the whole clip is then
in black and white.

Media Technology- Premiere Skills

  • 1.
    MEDIA TECHNOLOGY- MY PREMIERESKILLS ALICE ATKINS A2 ADVANCED MEDIA PORTFOLIO EVALUATION
  • 2.
    To start ofa new project in Adobe Premiere, I had to open the programme and the select File, New, Project. This is a very easy layout and it an easy skill to be learnt. It well then ask you to name the project and choose where the files are saved to. Once you have selected a location for the files, it is key to clip on Scratch Disks and make sure they are being saved in the same location.
  • 3.
    A blank projectwill then be opened. To import clips , click the box in the bottom left corner and then click media browser to select the files you need to import. Then to import them, you just click on the clip and drag it onto the timeline.
  • 4.
    This screenshot ofmy timeline shows that I can import clips and audio on to the timeline and edit and cut them together.
  • 5.
    A few soundclips in our trailer were a bit quieter, to ensure they could be heard by the audience, I had to adjust their volume levels. I did this by clicking on the sound clip and then pressing Effect Controls in the top left corner. I then clicked Volume which reveals a down bar. To make the audio higher, I used the mouse to slide the volume from 4.9dB to 6.0 dB (the highest it can be). Using this technique, I can also make the audio fake in and out. This is done by clicking the key point button (the diamond) and higher the volume, to fade in, and to lower the volume , to fade out. This is a very usual skill as it can help the audience clearly hear the audio. It is also a quick and easy way to alter volume, rather than having to re-record audio.
  • 6.
    This screenshot showsI have the ability to layer audio to boost their volume. If the volume is still too quiet after adjusting the dBs, you can layer the clips. This is done by copying the original sound clip and then layering it again in the same place on the timeline. This is another usual audio skill to know as it can prevent the re-recording of sound clips.
  • 7.
    On Premiere Iam also able to change the colour of a video clip to black and white. This is done by selecting the clip and going to effect controls in the top left hand corner box. The by clicking tint, it allows you to choose the tint colour, by choosing black and white, the whole clip is then in black and white.