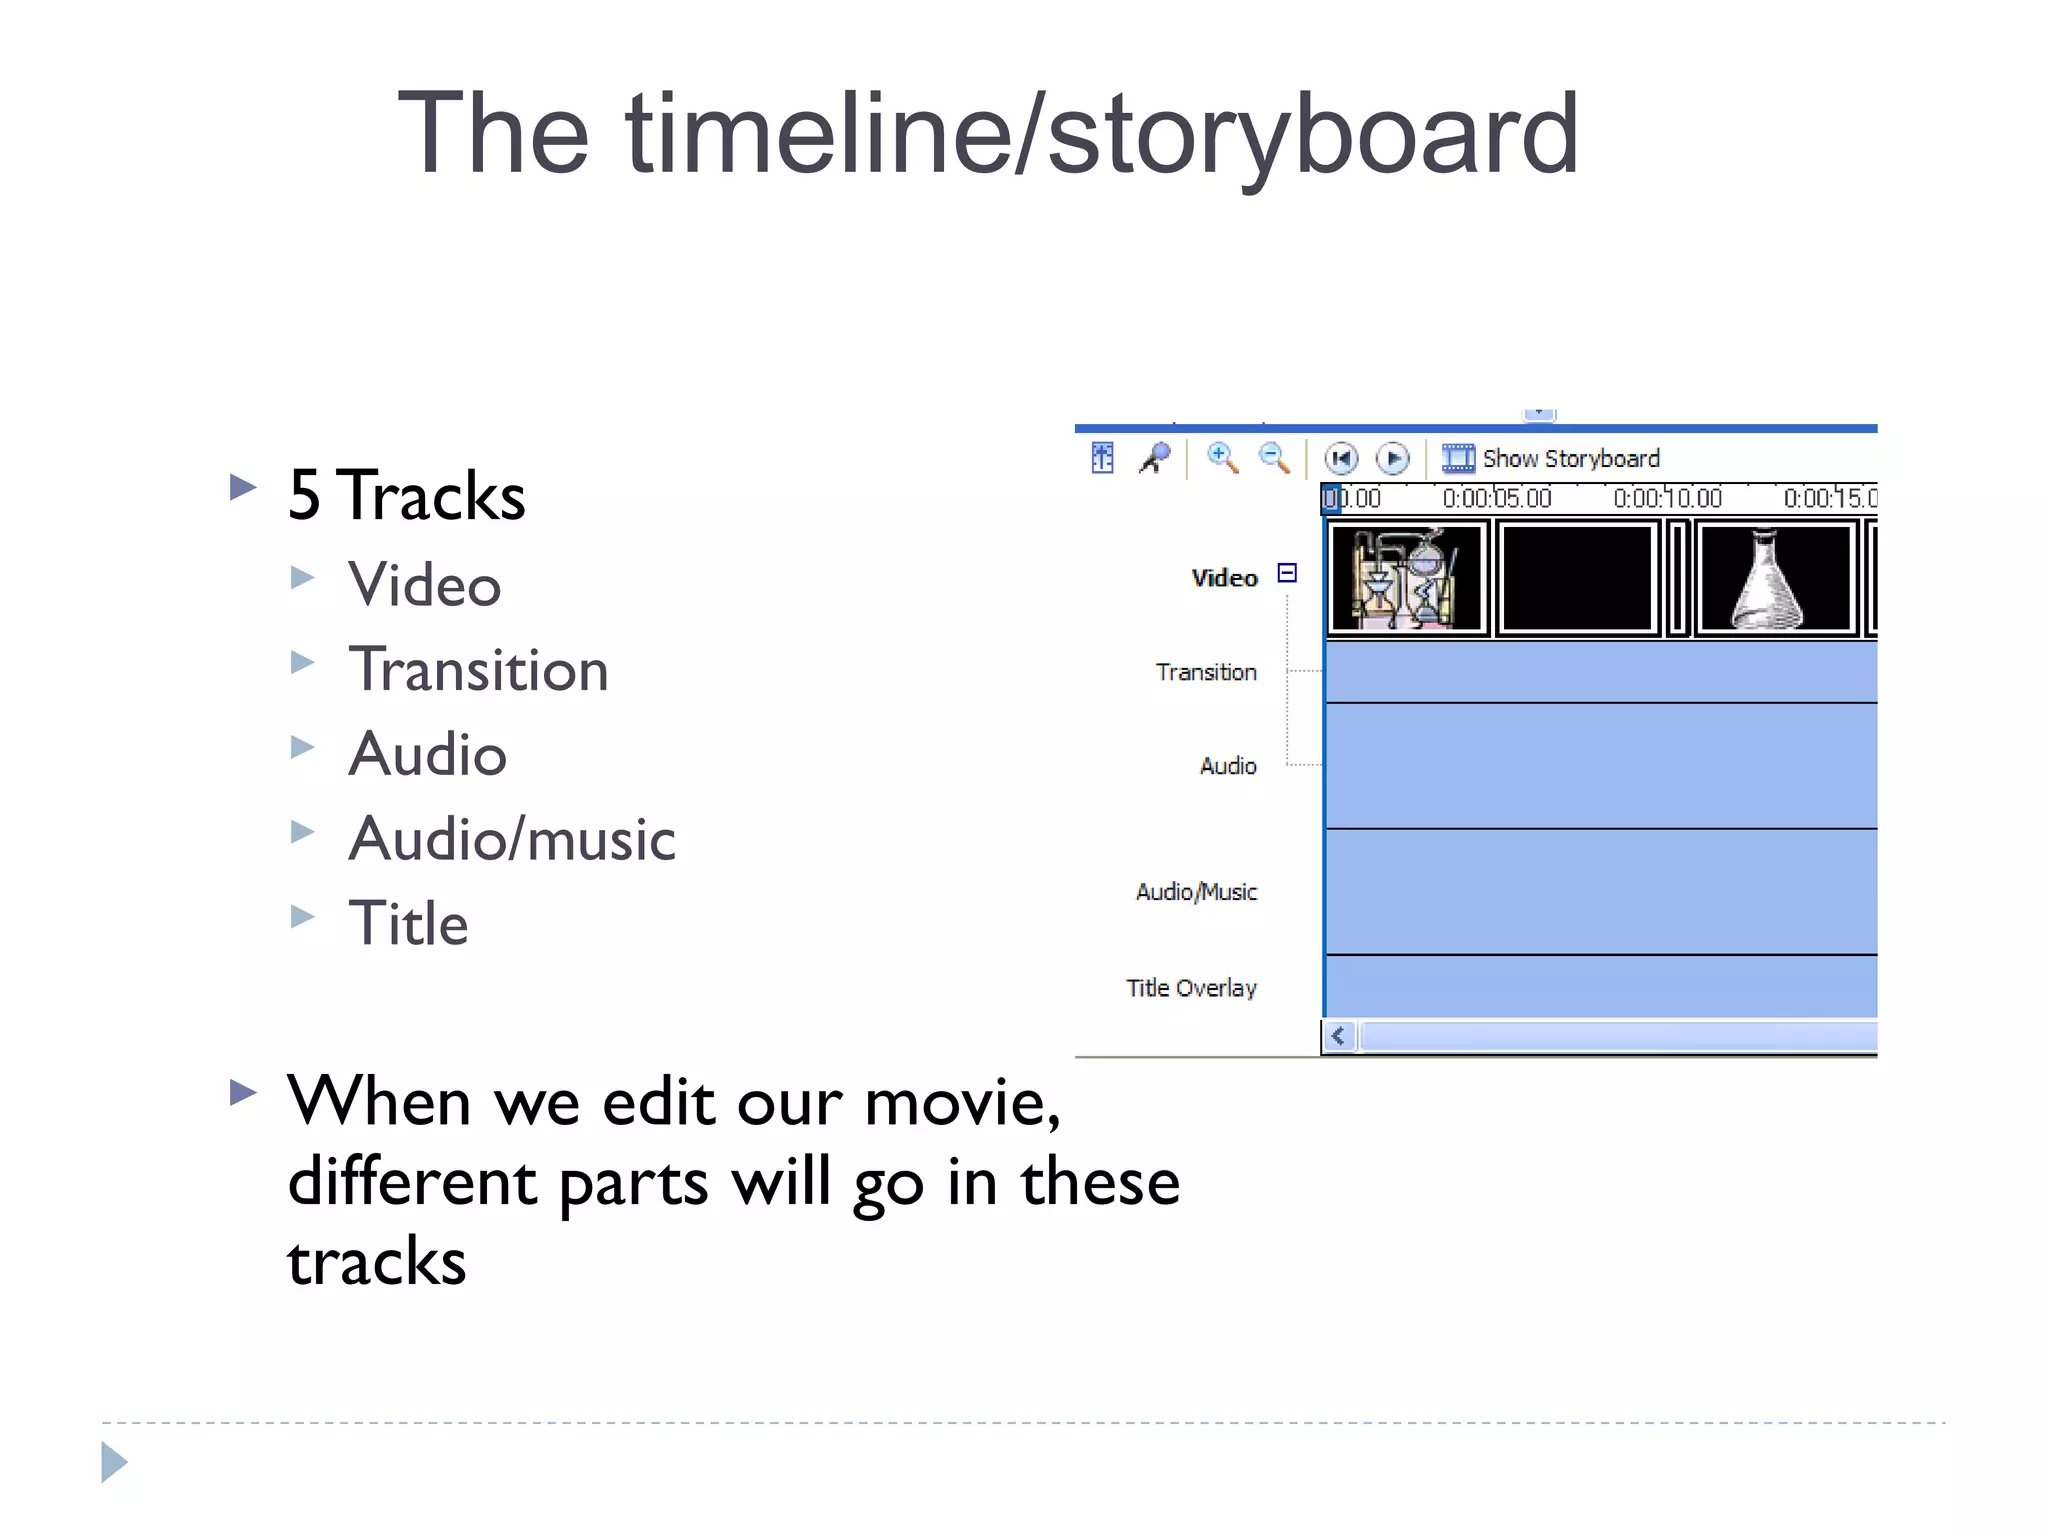
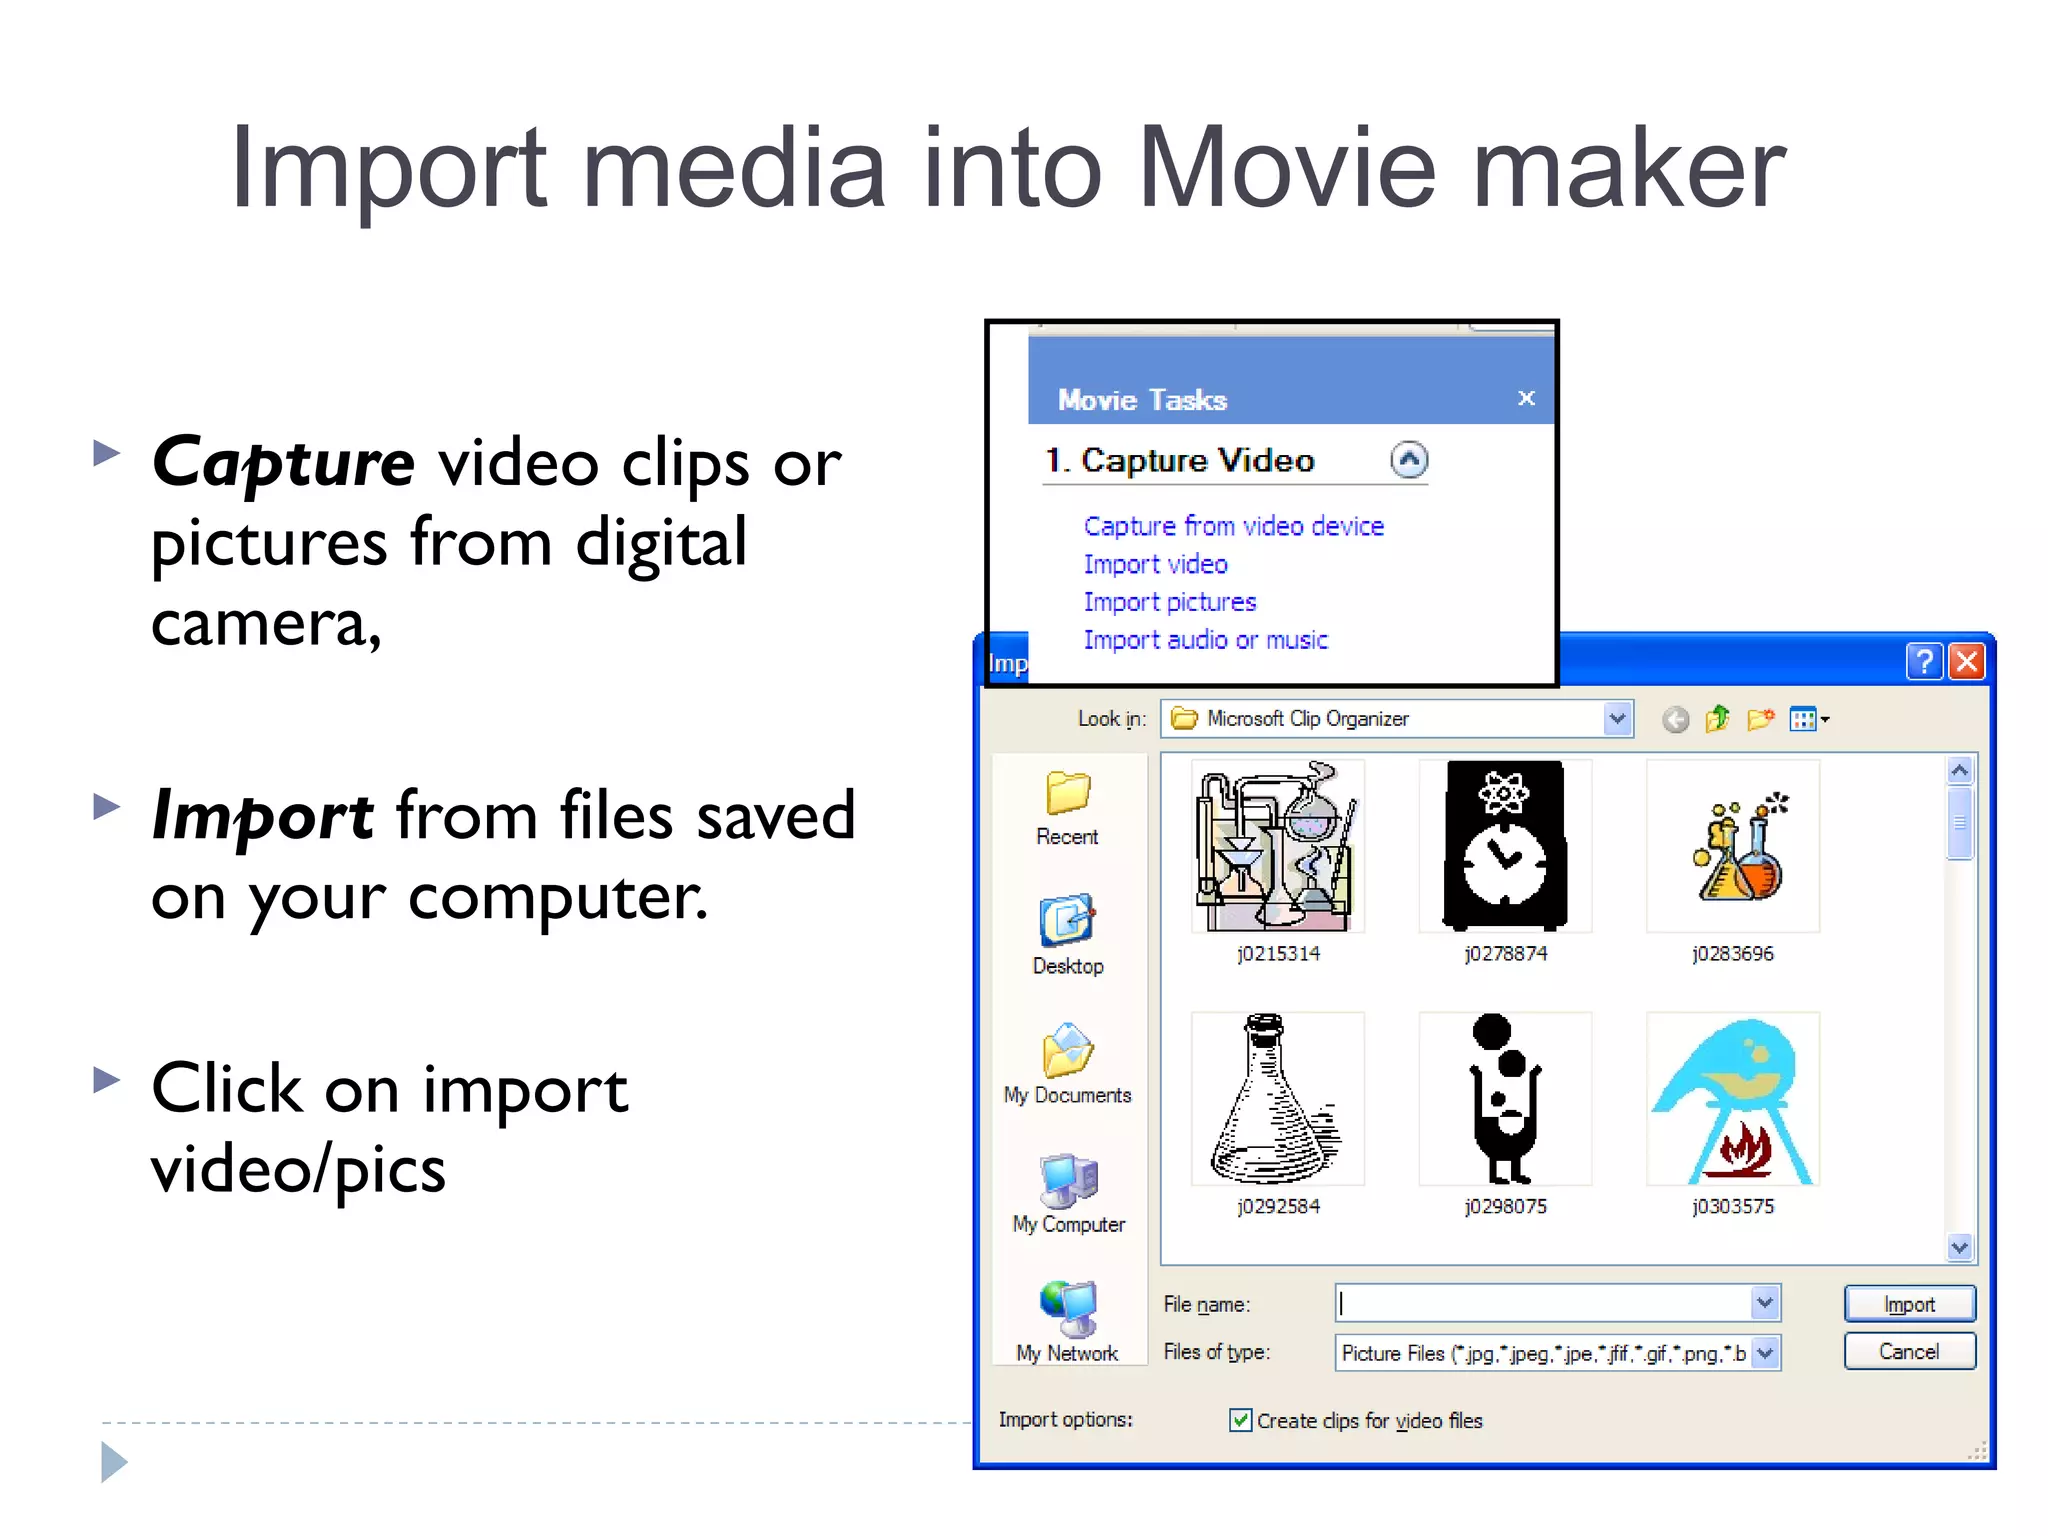
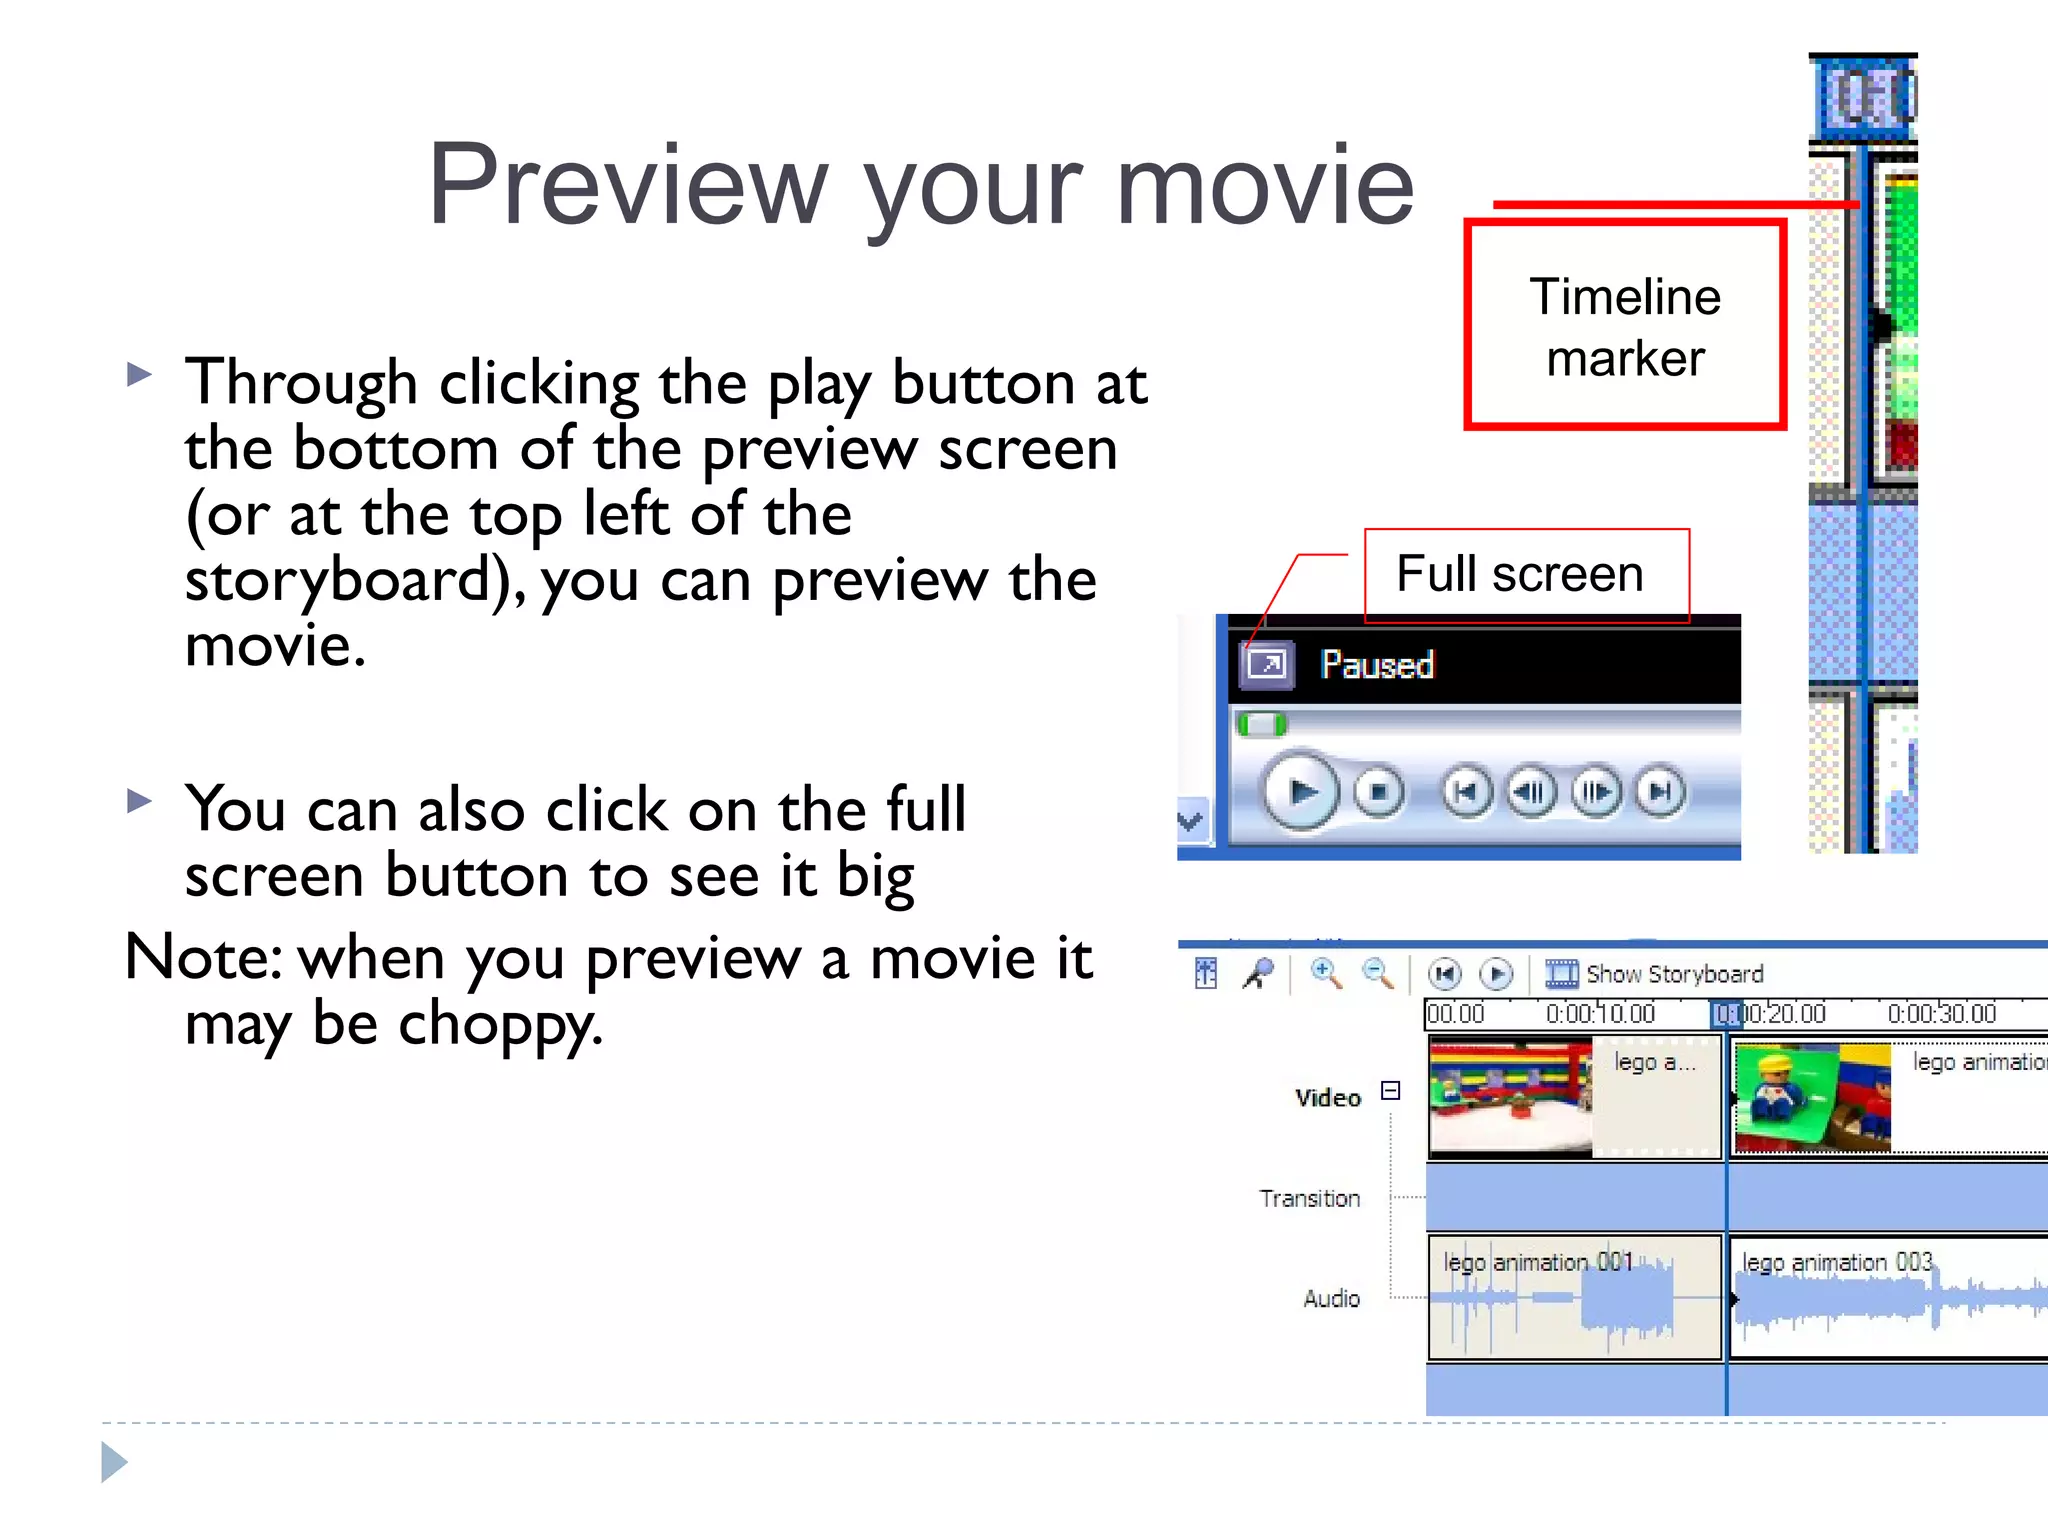
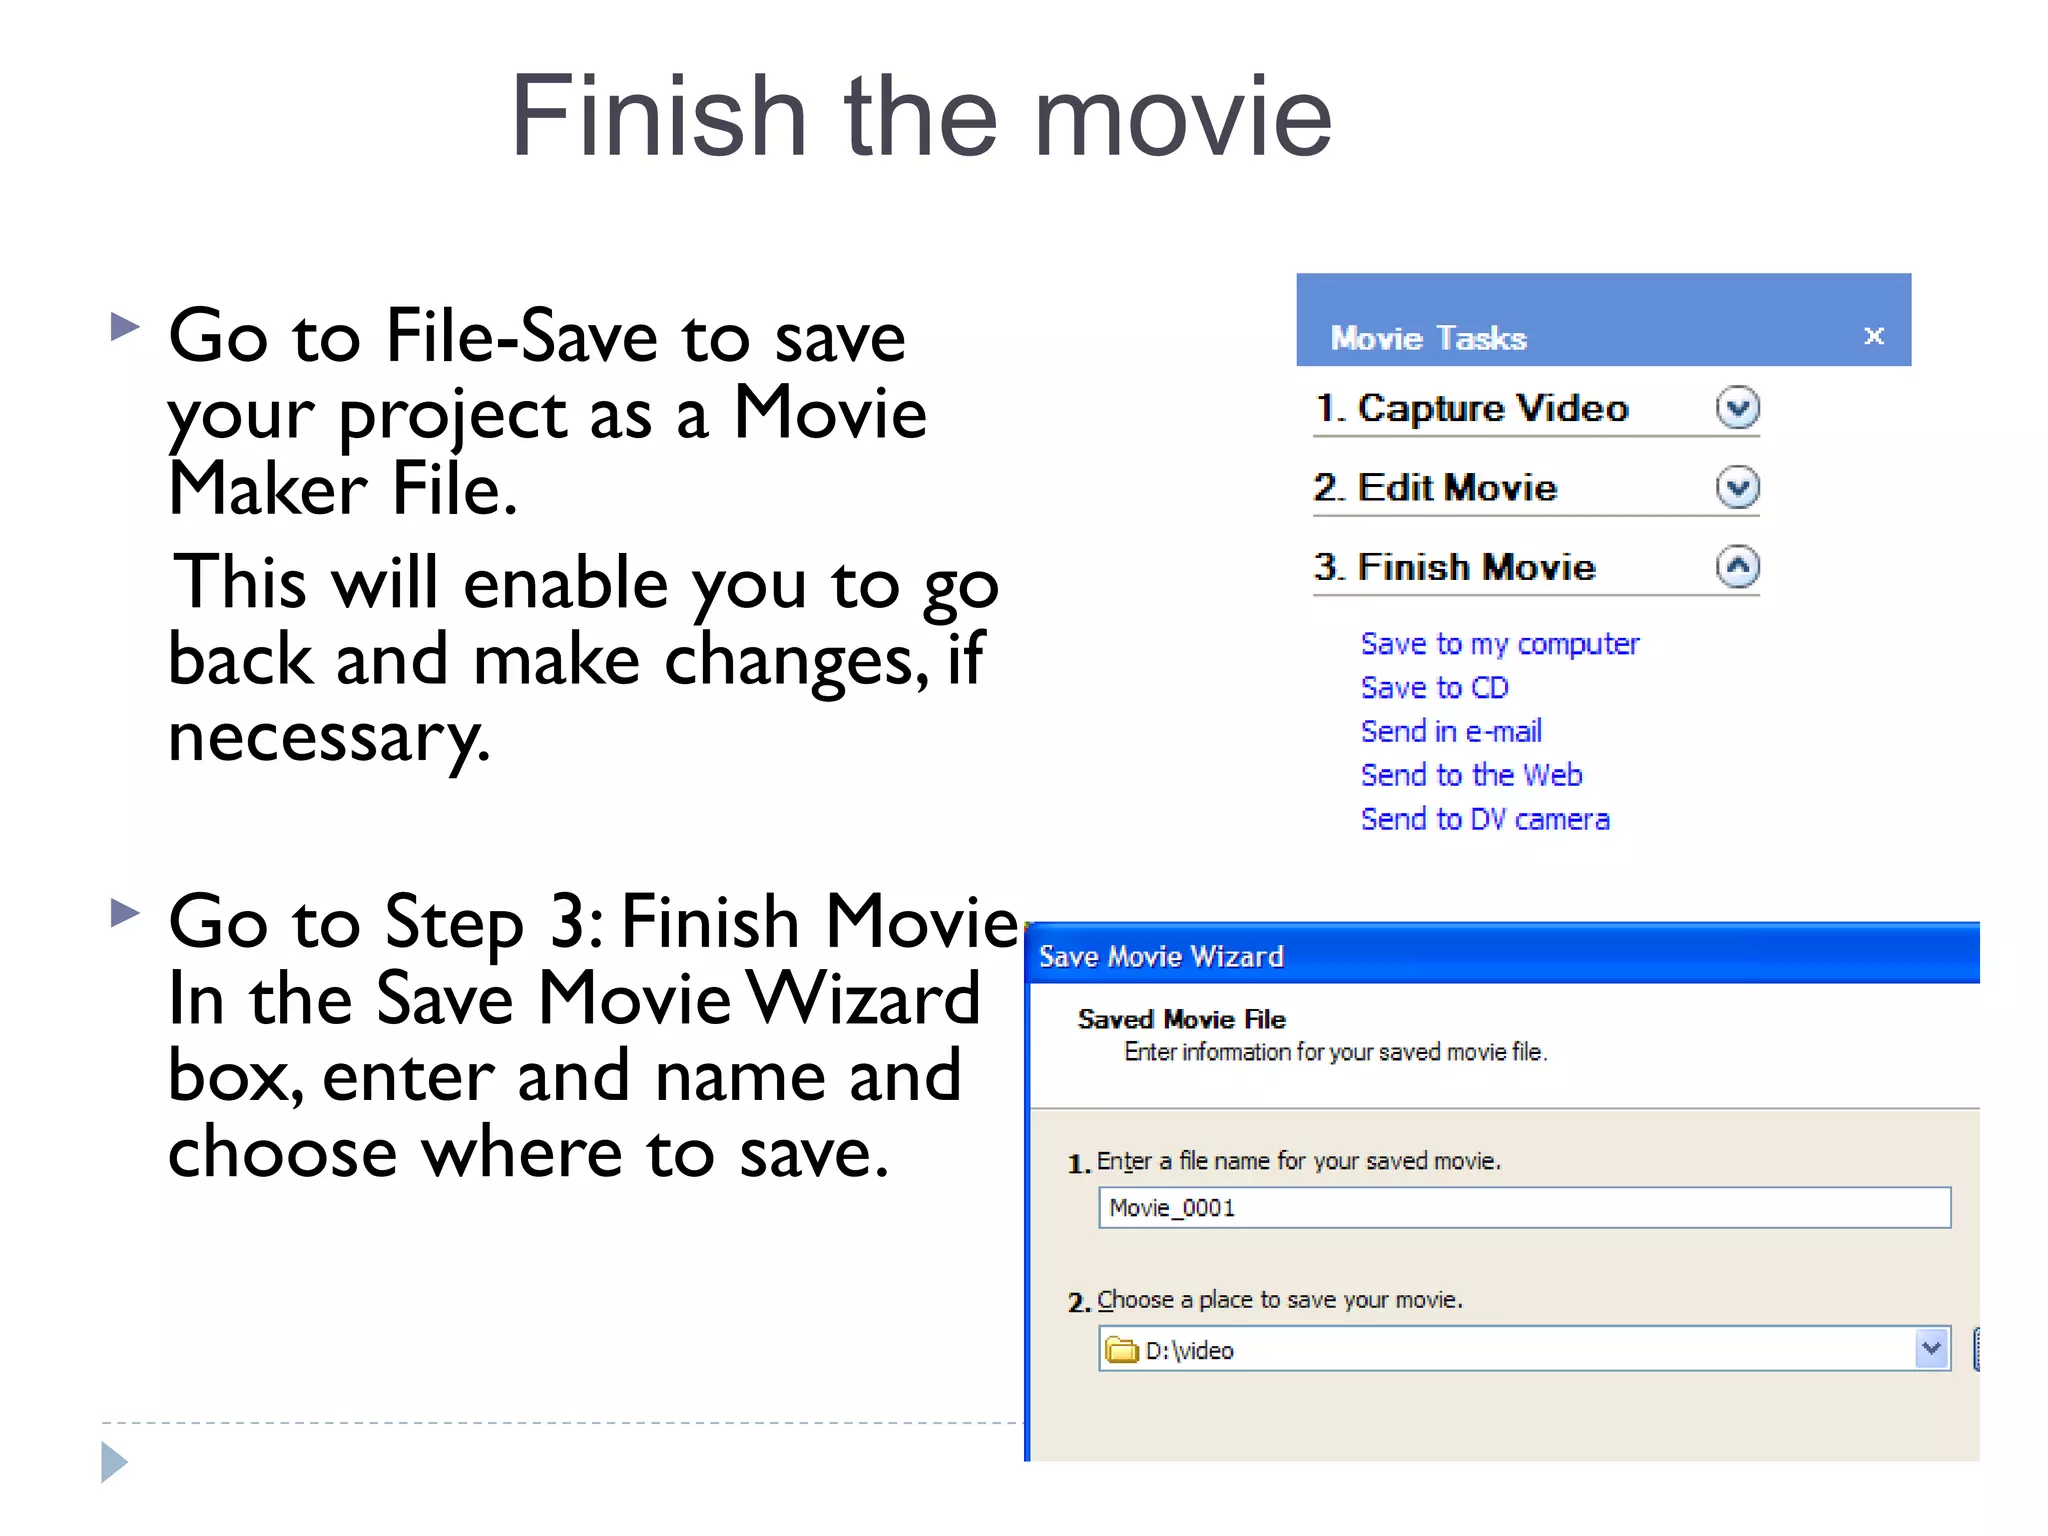
Video Production with
Windows Movie Maker
Credits to:
Joanne Steckling
joanne@jsteckling.com
Powerpoint courtesy of Scott Bell, Chaminade College Prep, St. Louis, Mo.
Reporters:
Precious Alyana M. Apalisok
Daniel M. Cuyno Jr.
BEED-SPED 2X1
Meet Movie Maker:
Windows XP: find it in C:Program Files:Movie
Maker. Make shortcut for desktop.
Using the program
 Working with the pictures and video
 Video effects
 Transitions
 Titles and credits
 Audio
 Saving the movie
The 4 panes of WMM
Using the task pane
3 Tasks:
1.Capture/Import
2.Edit
3.Finish
The timeline/storyboard
 5 Tracks
 Video
 Transition
 Audio
 Audio/music
 Title
 When we edit our movie,
different parts will go in these
tracks
Import media into Movie maker
 Capture video clips or
pictures from digital
camera,
 Import from files saved
on your computer.
 Click on import
video/pics
Move video/Pictures to the timeline
 Each item will appear in the
collections pane
 Drag each item to the story
board and drop them in the
order you wish them to
appear.
Picture time
 Change the length of time that the picture shown in the
movie
 Drag the “end trim handle” (shown below) to change
amount of time video is running.
.
 If using video you can crop the length of the video using the
same process.
Preview your movie
 Through clicking the play button at
the bottom of the preview screen
(or at the top left of the
storyboard), you can preview the
movie.
 You can also click on the full
screen button to see it big
Note: when you preview a movie it
may be choppy.
Timeline
marker
Full screen
Video Effects
 You can employ different
effects that will jazz up the
video.
 In the task pane, under step
2, click on “view video
effects”
 The collection of effects will
appear in the collections
area
Drag the effects down
 Once you have found
the effect that is
perfect… click and
drag it down to the
clip in the storyboard
 You can use multiple
effects on an item
Video effects
 When a star appears it
represent an effect is on the
picture.
 2 overlapping stars on a
picture mean 2 effects.
 You can preview the effect
on your pictures/video
Full screen
Transitions
 You can employ different
transitions to jazz up the video
 In the task pane, under step 2,
click on “view video transitions”
 The collection of transitions will
appear in the collections area
Drag the transitions down
 Once you have found the
transition that is
perfect… click and drag it
between the clips in the
storyboard.
 A blue line will appear to
show where the trans will
go
Transitions
 Notice that 2 clips will slightly overlap.
 Beneath the clips, the name of the trans will appear.
 Unlike effects, only one transition can be used at a time.
 Clicking on the picture and sliding it forward or back will
increase or decrease the transition’s speed.
Titles / Credits
 In the task pane, under
step 2 click on “Make
titles…”
 This will appear and you
can choose where you
want to put the
title/credits
Titles
 Type whatever you want in the text box
 Below, you can change the animation or the font and color
 Once complete, click on Done.
Audio
 Add music (mp3, wav,
wma) to your movie
 In the task pane, click
on “import audio…”
 Choose the file(s) you
want to use and click
“import”
Drag audio down…
 In the collections
pane, click on the
audio file and
drag it into the
Audio/Music
track.
Adjust the audio
 To adjust the volume, push
the Control key and U
 Or you can right-click on
the track and get this menu
which shows volume, fade in
and out.
 For video clips, you can
mute the recorded sound in
the same way
Trim the audio
 Be sure to make the music the same length as the video.
 Click on the end of the track and drag it left or right to trim the
length.
 You can add more audio tracks before or after this track
Finish the movie
 Go to File-Save to save
your project as a Movie
Maker File.
This will enable you to go
back and make changes, if
necessary.
 Go to Step 3: Finish Movie.
In the Save Movie Wizard
box, enter and name and
choose where to save.
Saving options
 When you save, you
have many options
based on the quality
that you want
 Leave it as
“recommended” or
click on “show more
choices”
Saving
 The amount of time
that it takes to save
depends upon how
long it is and the
quality options you
chose.
 The next screen will
tell you it is finished
and will ask if you
want to see your
work.
Watching the video
 The video is now set to
play back in Window
media player
 If you go to the folder you
saved it in and double
click it will open and play
for you
 Then you can burn the file
to cd or flash drive to
take with you
Thank you for listening!
The End.

Movie Maker by Apalisok and Cuyno Report

  • 1.
    Video Production with WindowsMovie Maker Credits to: Joanne Steckling joanne@jsteckling.com Powerpoint courtesy of Scott Bell, Chaminade College Prep, St. Louis, Mo. Reporters: Precious Alyana M. Apalisok Daniel M. Cuyno Jr. BEED-SPED 2X1
  • 2.
    Meet Movie Maker: WindowsXP: find it in C:Program Files:Movie Maker. Make shortcut for desktop. Using the program  Working with the pictures and video  Video effects  Transitions  Titles and credits  Audio  Saving the movie
  • 3.
  • 4.
    Using the taskpane 3 Tasks: 1.Capture/Import 2.Edit 3.Finish
  • 5.
    The timeline/storyboard  5Tracks  Video  Transition  Audio  Audio/music  Title  When we edit our movie, different parts will go in these tracks
  • 6.
    Import media intoMovie maker  Capture video clips or pictures from digital camera,  Import from files saved on your computer.  Click on import video/pics
  • 7.
    Move video/Pictures tothe timeline  Each item will appear in the collections pane  Drag each item to the story board and drop them in the order you wish them to appear.
  • 8.
    Picture time  Changethe length of time that the picture shown in the movie  Drag the “end trim handle” (shown below) to change amount of time video is running. .  If using video you can crop the length of the video using the same process.
  • 9.
    Preview your movie Through clicking the play button at the bottom of the preview screen (or at the top left of the storyboard), you can preview the movie.  You can also click on the full screen button to see it big Note: when you preview a movie it may be choppy. Timeline marker Full screen
  • 10.
    Video Effects  Youcan employ different effects that will jazz up the video.  In the task pane, under step 2, click on “view video effects”  The collection of effects will appear in the collections area
  • 11.
    Drag the effectsdown  Once you have found the effect that is perfect… click and drag it down to the clip in the storyboard  You can use multiple effects on an item
  • 12.
    Video effects  Whena star appears it represent an effect is on the picture.  2 overlapping stars on a picture mean 2 effects.  You can preview the effect on your pictures/video Full screen
  • 13.
    Transitions  You canemploy different transitions to jazz up the video  In the task pane, under step 2, click on “view video transitions”  The collection of transitions will appear in the collections area
  • 14.
    Drag the transitionsdown  Once you have found the transition that is perfect… click and drag it between the clips in the storyboard.  A blue line will appear to show where the trans will go
  • 15.
    Transitions  Notice that2 clips will slightly overlap.  Beneath the clips, the name of the trans will appear.  Unlike effects, only one transition can be used at a time.  Clicking on the picture and sliding it forward or back will increase or decrease the transition’s speed.
  • 16.
    Titles / Credits In the task pane, under step 2 click on “Make titles…”  This will appear and you can choose where you want to put the title/credits
  • 17.
    Titles  Type whateveryou want in the text box  Below, you can change the animation or the font and color  Once complete, click on Done.
  • 18.
    Audio  Add music(mp3, wav, wma) to your movie  In the task pane, click on “import audio…”  Choose the file(s) you want to use and click “import”
  • 19.
    Drag audio down… In the collections pane, click on the audio file and drag it into the Audio/Music track.
  • 20.
    Adjust the audio To adjust the volume, push the Control key and U  Or you can right-click on the track and get this menu which shows volume, fade in and out.  For video clips, you can mute the recorded sound in the same way
  • 21.
    Trim the audio Be sure to make the music the same length as the video.  Click on the end of the track and drag it left or right to trim the length.  You can add more audio tracks before or after this track
  • 22.
    Finish the movie Go to File-Save to save your project as a Movie Maker File. This will enable you to go back and make changes, if necessary.  Go to Step 3: Finish Movie. In the Save Movie Wizard box, enter and name and choose where to save.
  • 23.
    Saving options  Whenyou save, you have many options based on the quality that you want  Leave it as “recommended” or click on “show more choices”
  • 24.
    Saving  The amountof time that it takes to save depends upon how long it is and the quality options you chose.  The next screen will tell you it is finished and will ask if you want to see your work.
  • 25.
    Watching the video The video is now set to play back in Window media player  If you go to the folder you saved it in and double click it will open and play for you  Then you can burn the file to cd or flash drive to take with you
  • 26.
    Thank you forlistening! The End.

Editor's Notes

  • #2 Reporters: Precious Alyana M. Apalisok Daniel M. Cuyno Jr.
  • #27 The End