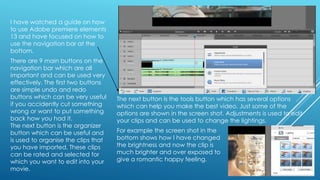
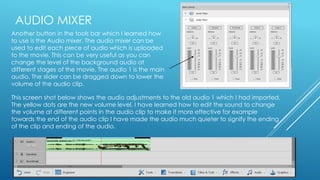
ADOBE PREMIERE ELEMENTS 
Production skills
I have watched a guide on how 
to use Adobe premiere elements 
13 and have focused on how to 
use the navigation bar at the 
bottom. 
There are 9 main buttons on the 
navigation bar which are all 
important and can be used very 
effectively. The first two buttons 
are simple undo and redo 
buttons which can be very useful 
if you accidently cut something 
wrong or want to put something 
back how you had it. 
The next button is the organizer 
button which can be useful and 
is used to organise the clips that 
you have imported. These clips 
can be rated and selected for 
which you want to edit into your 
movie. 
The next button is the tools button which has several options 
which can help you make the best video. Just some of the 
options are shown in the screen shot. Adjustments is used to edit 
your clips and can be used to change the lightings. 
For example the screen shot in the 
bottom shows how I have changed 
the brightness and now the clip is 
much brighter and over exposed to 
give a romantic happy feeling.
AUDIO MIXER 
Another button in the tools bar which I learned how 
to use is the Audio mixer. The audio mixer can be 
used to edit each piece of audio which is uploaded 
to the movie. This can be very useful as you can 
change the level of the background audio at 
different stages of the movie. The audio 1 is the main 
audio. The slider can be dragged down to lower the 
volume of the audio clip. 
This screen shot below shows the audio adjustments to the old audio 1 which I had imported. 
The yellow dots are the new volume level. I have learned how to edit the sound to change 
the volume at different points in the audio clip to make it more effective for example 
towards the end of the audio clip I have made the audio much quieter to signify the ending 
of the clip and ending of the audio.

Adobe premiere elements

  • 1.
    ADOBE PREMIERE ELEMENTS Production skills
  • 2.
    I have watcheda guide on how to use Adobe premiere elements 13 and have focused on how to use the navigation bar at the bottom. There are 9 main buttons on the navigation bar which are all important and can be used very effectively. The first two buttons are simple undo and redo buttons which can be very useful if you accidently cut something wrong or want to put something back how you had it. The next button is the organizer button which can be useful and is used to organise the clips that you have imported. These clips can be rated and selected for which you want to edit into your movie. The next button is the tools button which has several options which can help you make the best video. Just some of the options are shown in the screen shot. Adjustments is used to edit your clips and can be used to change the lightings. For example the screen shot in the bottom shows how I have changed the brightness and now the clip is much brighter and over exposed to give a romantic happy feeling.
  • 3.
    AUDIO MIXER Anotherbutton in the tools bar which I learned how to use is the Audio mixer. The audio mixer can be used to edit each piece of audio which is uploaded to the movie. This can be very useful as you can change the level of the background audio at different stages of the movie. The audio 1 is the main audio. The slider can be dragged down to lower the volume of the audio clip. This screen shot below shows the audio adjustments to the old audio 1 which I had imported. The yellow dots are the new volume level. I have learned how to edit the sound to change the volume at different points in the audio clip to make it more effective for example towards the end of the audio clip I have made the audio much quieter to signify the ending of the clip and ending of the audio.