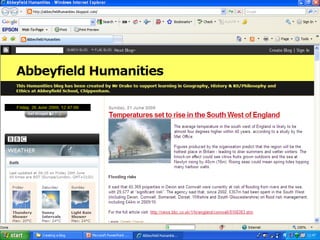
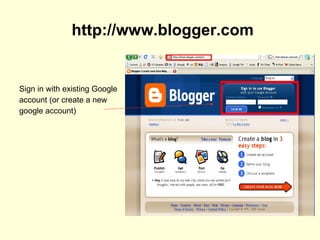
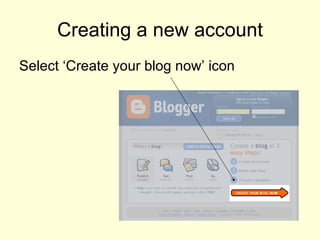
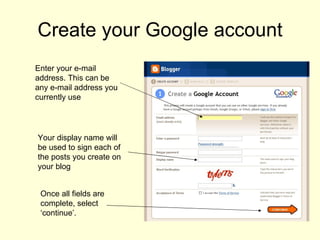
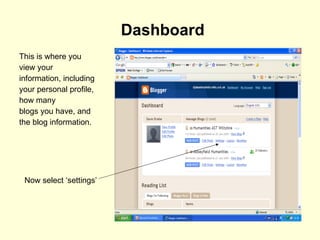
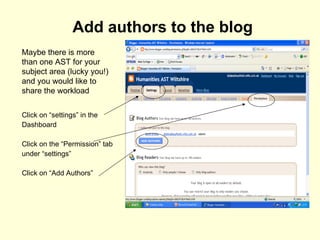
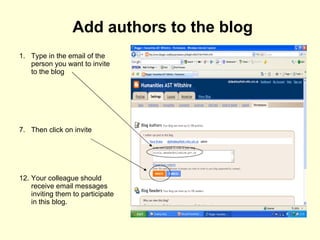
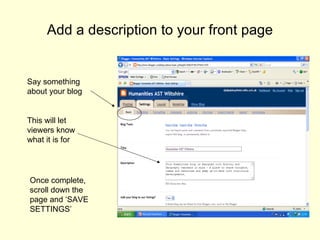
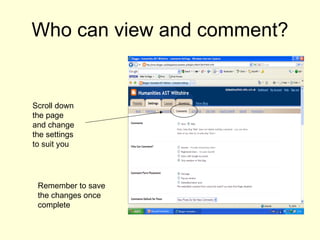
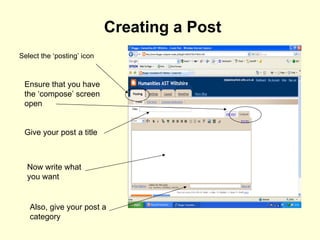
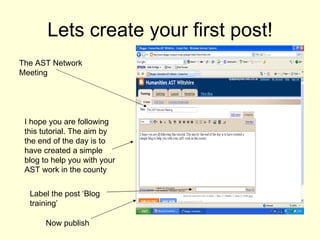
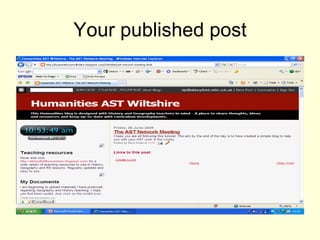
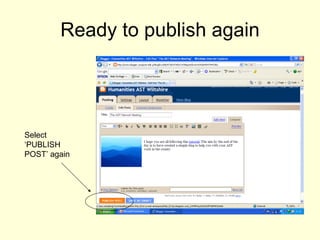
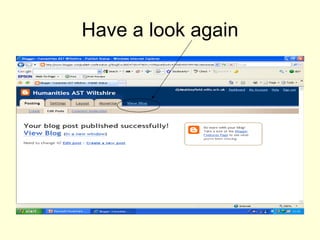
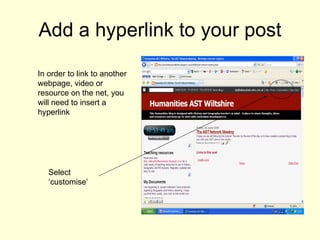
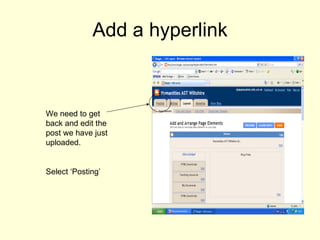
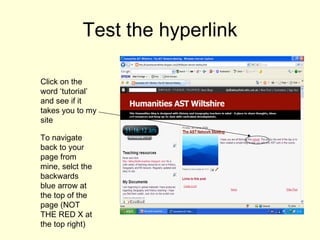
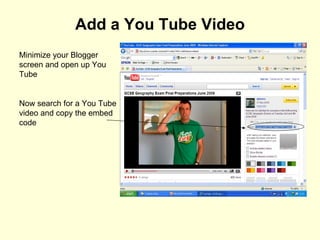
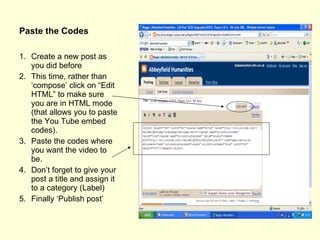
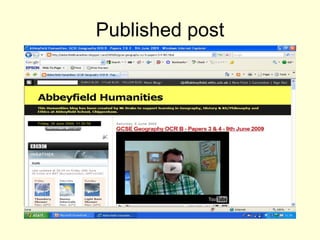
Setting up a website using  http://blogger.com Part 1 Presentation for the Wiltshire AST Network Meeting on 29 June 2009 Dave Drake Humanities Advanced Skills Teacher http://humanitiesastwiltshire.blogspot.com
 
 
http://www.blogger.com Sign in with existing Google account (or create a new google account)
Creating a new account Select ‘Create your blog now’ icon
Create your Google account Enter your e-mail address. This can be any e-mail address you currently use Your display name will be used to sign each of the posts you create on your blog Once all fields are complete, select ‘continue’.
Creating your account
Name your blog This is the name that will appear at the top of your web page ( Art Teaching  Wiltshire, The Wiltshire  Art Teacher,  Wilts  Art Resources  blog)  TIP: Think of something people may often type into a search engine This will be your web address. I suggest using the same name as the title of your blog  Don’t forget to check the availability though! Now you can move to the next stage
Choose the style Scroll down the page and select a style you like Select your chosen style Don’t take too much time over this now, you can easily change the template once the blog is set up Next stage
Congratulations fellow blogger!
Dashboard This is where you view your information, including your personal profile, how many blogs you have, and the blog information. Now select ‘settings’
Add authors to the blog Click on “settings” in the Dashboard Click on the “Permission” tab under “settings” Click on “Add Authors” Maybe there is more than one AST for your subject area (lucky you!) and you would like to share the workload
Add authors to the blog Type in the email of the person you want to invite to the blog Then click on invite Your colleague should receive email messages inviting them to participate in this blog.
Add a description to your front page Say something about your blog This will let viewers know what it is for Once complete, scroll down the page and ‘SAVE SETTINGS’
Who can view and comment? Scroll down the page and change the settings to suit you Remember to save the changes once complete
Creating a Post Select the ‘posting’ icon Ensure that you have the ‘compose’ screen open Give your post a title Now write what you want Also, give your post a category
Lets create your first post! The AST Network Meeting I hope you are following this tutorial. The aim by the end of the day is to have created a simple blog to help you with your AST work in the county Now publish Label the post ‘Blog training’
Have a look!
Your published post
Lets add an image
Add an image to your post Select ‘customise’
Add an image We need to get back and edit the post we have just uploaded. Select ‘Posting’
This time we want to edit an existing post rather than create a new one
Select the relevant post – you should only have one here so far
Add an Image Click on image icon Click on “Browse” in the pop up window Once you have selected a picture file, decide on the size you would like and the alignment on the page Now you can upload the image to your post
Select ‘DONE’
Ready to publish again Select ‘PUBLISH POST’ again
Have a look again
 
Add a hyperlink to your post Select ‘customise’  In order to link to another webpage, video or resource on the net, you will need to insert a hyperlink
Add a hyperlink We need to get back and edit the post we have just uploaded. Select ‘Posting’
Select the relevant post – you should only have one here so far
Create a hyperlink Select the word tutorial to insert a hyperlink 3. Type in the URL:  http://humanitiesastwiltshire.blogspot.com 4. Click OK 2. Select the link icon
Now publish your post again
Have a look!
Test the hyperlink Click on the word ‘tutorial’ and see if it takes you to my site To navigate back to your page from mine, selct the backwards blue arrow at the top of the page (NOT THE RED X at the top right)
Add a You Tube Video Minimize your Blogger screen and open up You Tube Now search for a You Tube video and copy the embed code
Paste the Codes Create a new post as you did before This time, rather than ‘compose’ click on “Edit HTML” to make sure you are in HTML mode (that allows you to paste the You Tube embed codes). Paste the codes where you want the video to be. Don’t forget to give your post a title and assign it to a category (Label) Finally ‘Publish post’
Published post
Over to you! Have a play Add some resources (pictures, links to other websites, You Tube clips) Later, we can look at adding labels (index), embedding clips in the margin and anything else you fancy!

How to create a blog - Part One

  • 1.
    Setting up awebsite using http://blogger.com Part 1 Presentation for the Wiltshire AST Network Meeting on 29 June 2009 Dave Drake Humanities Advanced Skills Teacher http://humanitiesastwiltshire.blogspot.com
  • 2.
  • 3.
  • 4.
    http://www.blogger.com Sign inwith existing Google account (or create a new google account)
  • 5.
    Creating a newaccount Select ‘Create your blog now’ icon
  • 6.
    Create your Googleaccount Enter your e-mail address. This can be any e-mail address you currently use Your display name will be used to sign each of the posts you create on your blog Once all fields are complete, select ‘continue’.
  • 7.
  • 8.
    Name your blogThis is the name that will appear at the top of your web page ( Art Teaching Wiltshire, The Wiltshire Art Teacher, Wilts Art Resources blog) TIP: Think of something people may often type into a search engine This will be your web address. I suggest using the same name as the title of your blog Don’t forget to check the availability though! Now you can move to the next stage
  • 9.
    Choose the styleScroll down the page and select a style you like Select your chosen style Don’t take too much time over this now, you can easily change the template once the blog is set up Next stage
  • 10.
  • 11.
    Dashboard This iswhere you view your information, including your personal profile, how many blogs you have, and the blog information. Now select ‘settings’
  • 12.
    Add authors tothe blog Click on “settings” in the Dashboard Click on the “Permission” tab under “settings” Click on “Add Authors” Maybe there is more than one AST for your subject area (lucky you!) and you would like to share the workload
  • 13.
    Add authors tothe blog Type in the email of the person you want to invite to the blog Then click on invite Your colleague should receive email messages inviting them to participate in this blog.
  • 14.
    Add a descriptionto your front page Say something about your blog This will let viewers know what it is for Once complete, scroll down the page and ‘SAVE SETTINGS’
  • 15.
    Who can viewand comment? Scroll down the page and change the settings to suit you Remember to save the changes once complete
  • 16.
    Creating a PostSelect the ‘posting’ icon Ensure that you have the ‘compose’ screen open Give your post a title Now write what you want Also, give your post a category
  • 17.
    Lets create yourfirst post! The AST Network Meeting I hope you are following this tutorial. The aim by the end of the day is to have created a simple blog to help you with your AST work in the county Now publish Label the post ‘Blog training’
  • 18.
  • 19.
  • 20.
  • 21.
    Add an imageto your post Select ‘customise’
  • 22.
    Add an imageWe need to get back and edit the post we have just uploaded. Select ‘Posting’
  • 23.
    This time wewant to edit an existing post rather than create a new one
  • 24.
    Select the relevantpost – you should only have one here so far
  • 25.
    Add an ImageClick on image icon Click on “Browse” in the pop up window Once you have selected a picture file, decide on the size you would like and the alignment on the page Now you can upload the image to your post
  • 26.
  • 27.
    Ready to publishagain Select ‘PUBLISH POST’ again
  • 28.
  • 29.
  • 30.
    Add a hyperlinkto your post Select ‘customise’ In order to link to another webpage, video or resource on the net, you will need to insert a hyperlink
  • 31.
    Add a hyperlinkWe need to get back and edit the post we have just uploaded. Select ‘Posting’
  • 32.
    Select the relevantpost – you should only have one here so far
  • 33.
    Create a hyperlinkSelect the word tutorial to insert a hyperlink 3. Type in the URL: http://humanitiesastwiltshire.blogspot.com 4. Click OK 2. Select the link icon
  • 34.
    Now publish yourpost again
  • 35.
  • 36.
    Test the hyperlinkClick on the word ‘tutorial’ and see if it takes you to my site To navigate back to your page from mine, selct the backwards blue arrow at the top of the page (NOT THE RED X at the top right)
  • 37.
    Add a YouTube Video Minimize your Blogger screen and open up You Tube Now search for a You Tube video and copy the embed code
  • 38.
    Paste the CodesCreate a new post as you did before This time, rather than ‘compose’ click on “Edit HTML” to make sure you are in HTML mode (that allows you to paste the You Tube embed codes). Paste the codes where you want the video to be. Don’t forget to give your post a title and assign it to a category (Label) Finally ‘Publish post’
  • 39.
  • 40.
    Over to you!Have a play Add some resources (pictures, links to other websites, You Tube clips) Later, we can look at adding labels (index), embedding clips in the margin and anything else you fancy!