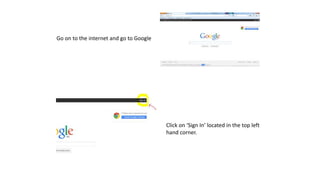
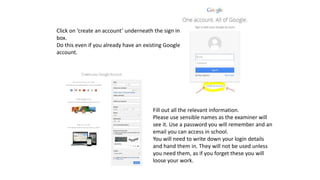
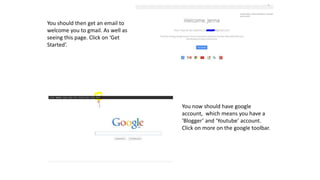
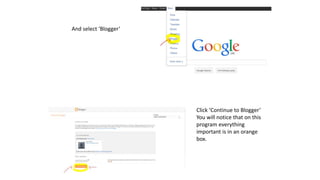
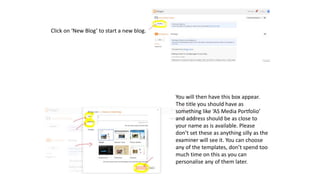
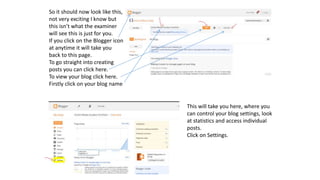
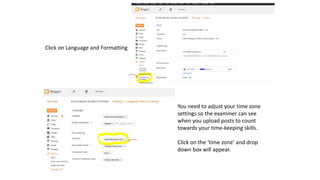
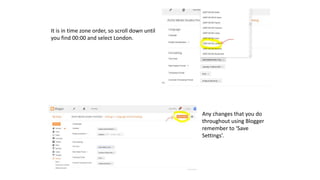
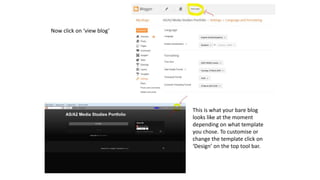
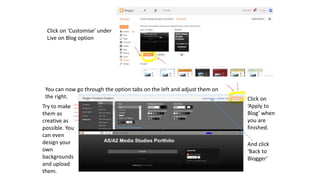
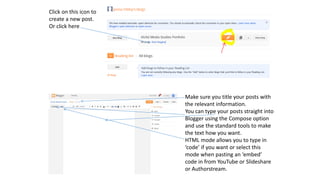
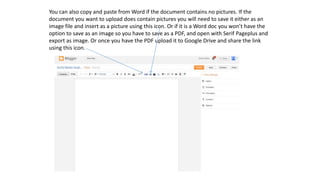
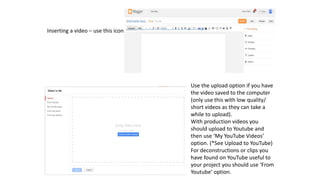
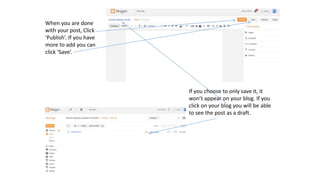
Go on to the internet and go to Google
Click on ‘Sign In’ located in the top left
hand corner.
Click on ‘create an account’ underneath the sign in
box.
Do this even if you already have an existing Google
account.
Fill out all the relevant information.
Please use sensible names as the examiner will
see it. Use a password you will remember and an
email you can access in school.
You will need to write down your login details
and hand them in. They will not be used unless
you need them, as if you forget these you will
loose your work.
You should then get an email to
welcome you to gmail. As well as
seeing this page. Click on ‘Get
Started’.
You now should have google
account, which means you have a
‘Blogger’ and ‘Youtube’ account.
Click on more on the google toolbar.
And select ‘Blogger’
Click ‘Continue to Blogger’
You will notice that on this
program everything
important is in an orange
box.
Click on ‘New Blog’ to start a new blog.
You will then have this box appear.
The title you should have as
something like ‘AS Media Portfolio’
and address should be as close to
your name as is available. Please
don’t set these as anything silly as the
examiner will see it. You can choose
any of the templates, don’t spend too
much time on this as you can
personalise any of them later.
So it should now look like this,
not very exciting I know but
this isn’t what the examiner
will see this is just for you.
If you click on the Blogger icon
at anytime it will take you
back to this page.
To go straight into creating
posts you can click here.
To view your blog click here.
Firstly click on your blog name
This will take you here, where you
can control your blog settings, look
at statistics and access individual
posts.
Click on Settings.
Click on Language and Formatting
You need to adjust your time zone
settings so the examiner can see
when you upload posts to count
towards your time-keeping skills.
Click on the ‘time zone’ and drop
down box will appear.
It is in time zone order, so scroll down until
you find 00:00 and select London.
Any changes that you do
throughout using Blogger
remember to ‘Save
Settings’.
Now click on ‘view blog’
This is what your bare blog
looks like at the moment
depending on what template
you chose. To customise or
change the template click on
‘Design’ on the top tool bar.
Click on ‘Customise’ under
Live on Blog option
You can now go through the option tabs on the left and adjust them on
the right.
Try to make
them as
creative as
possible. You
can even
design your
own
backgrounds
and upload
them.
Click on
‘Apply to
Blog’ when
you are
finished.
And click
‘Back to
Blogger’
Click on this icon to
create a new post.
Or click here
Make sure you title your posts with
the relevant information.
You can type your posts straight into
Blogger using the Compose option
and use the standard tools to make
the text how you want.
HTML mode allows you to type in
‘code’ if you want or select this
mode when pasting an ‘embed’
code in from YouTube or Slideshare
or Authorstream.
You can also copy and paste from Word if the document contains no pictures. If the
document you want to upload does contain pictures you will need to save it either as an
image file and insert as a picture using this icon. Or if it is a Word doc you won’t have the
option to save as an image so you have to save as a PDF, and open with Serif Pageplus and
export as image. Or once you have the PDF upload it to Google Drive and share the link
using this icon.
Inserting a video – use this icon.
Use the upload option if you have
the video saved to the computer
(only use this with low quality/
short videos as they can take a
while to upload).
With production videos you
should upload to Youtube and
then use ‘My YouTube Videos’
option. (*See Upload to YouTube)
For deconstructions or clips you
have found on YouTube useful to
your project you should use ‘From
Youtube’ option.
When you are done
with your post, Click
‘Publish’. If you have
more to add you can
click ‘Save’.
If you choose to only save it, it
won’t appear on your blog. If you
click on your blog you will be able
to see the post as a draft.

How to... blog

  • 2.
    Go on tothe internet and go to Google Click on ‘Sign In’ located in the top left hand corner.
  • 3.
    Click on ‘createan account’ underneath the sign in box. Do this even if you already have an existing Google account. Fill out all the relevant information. Please use sensible names as the examiner will see it. Use a password you will remember and an email you can access in school. You will need to write down your login details and hand them in. They will not be used unless you need them, as if you forget these you will loose your work.
  • 4.
    You should thenget an email to welcome you to gmail. As well as seeing this page. Click on ‘Get Started’. You now should have google account, which means you have a ‘Blogger’ and ‘Youtube’ account. Click on more on the google toolbar.
  • 5.
    And select ‘Blogger’ Click‘Continue to Blogger’ You will notice that on this program everything important is in an orange box.
  • 6.
    Click on ‘NewBlog’ to start a new blog. You will then have this box appear. The title you should have as something like ‘AS Media Portfolio’ and address should be as close to your name as is available. Please don’t set these as anything silly as the examiner will see it. You can choose any of the templates, don’t spend too much time on this as you can personalise any of them later.
  • 7.
    So it shouldnow look like this, not very exciting I know but this isn’t what the examiner will see this is just for you. If you click on the Blogger icon at anytime it will take you back to this page. To go straight into creating posts you can click here. To view your blog click here. Firstly click on your blog name This will take you here, where you can control your blog settings, look at statistics and access individual posts. Click on Settings.
  • 8.
    Click on Languageand Formatting You need to adjust your time zone settings so the examiner can see when you upload posts to count towards your time-keeping skills. Click on the ‘time zone’ and drop down box will appear.
  • 9.
    It is intime zone order, so scroll down until you find 00:00 and select London. Any changes that you do throughout using Blogger remember to ‘Save Settings’.
  • 10.
    Now click on‘view blog’ This is what your bare blog looks like at the moment depending on what template you chose. To customise or change the template click on ‘Design’ on the top tool bar.
  • 11.
    Click on ‘Customise’under Live on Blog option You can now go through the option tabs on the left and adjust them on the right. Try to make them as creative as possible. You can even design your own backgrounds and upload them. Click on ‘Apply to Blog’ when you are finished. And click ‘Back to Blogger’
  • 12.
    Click on thisicon to create a new post. Or click here Make sure you title your posts with the relevant information. You can type your posts straight into Blogger using the Compose option and use the standard tools to make the text how you want. HTML mode allows you to type in ‘code’ if you want or select this mode when pasting an ‘embed’ code in from YouTube or Slideshare or Authorstream.
  • 13.
    You can alsocopy and paste from Word if the document contains no pictures. If the document you want to upload does contain pictures you will need to save it either as an image file and insert as a picture using this icon. Or if it is a Word doc you won’t have the option to save as an image so you have to save as a PDF, and open with Serif Pageplus and export as image. Or once you have the PDF upload it to Google Drive and share the link using this icon.
  • 14.
    Inserting a video– use this icon. Use the upload option if you have the video saved to the computer (only use this with low quality/ short videos as they can take a while to upload). With production videos you should upload to Youtube and then use ‘My YouTube Videos’ option. (*See Upload to YouTube) For deconstructions or clips you have found on YouTube useful to your project you should use ‘From Youtube’ option.
  • 15.
    When you aredone with your post, Click ‘Publish’. If you have more to add you can click ‘Save’. If you choose to only save it, it won’t appear on your blog. If you click on your blog you will be able to see the post as a draft.