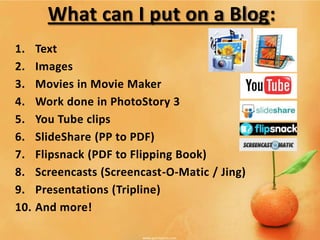
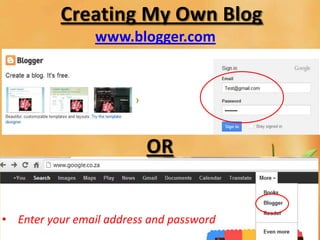
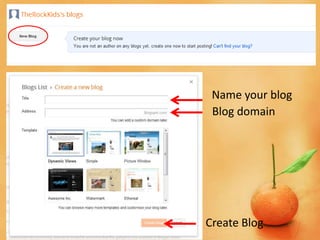
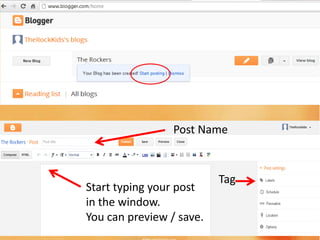
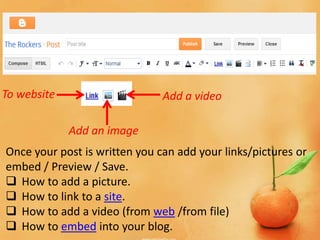
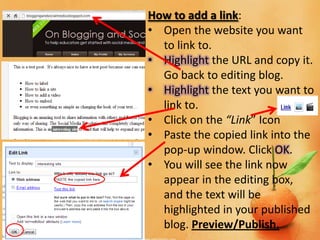
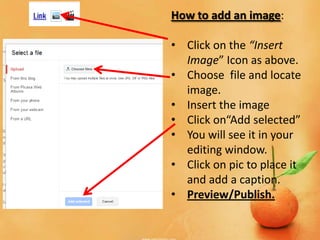
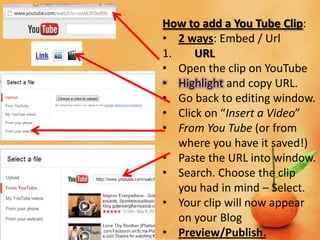
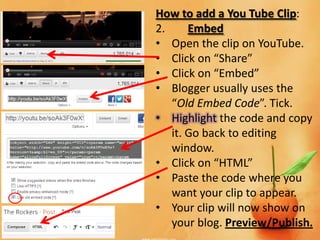
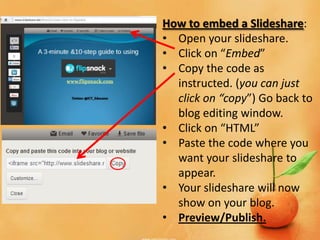
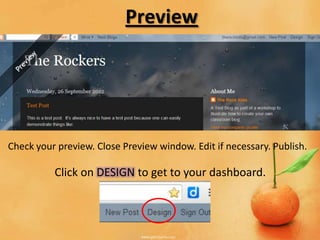
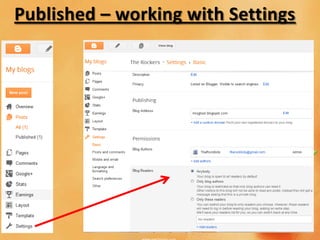
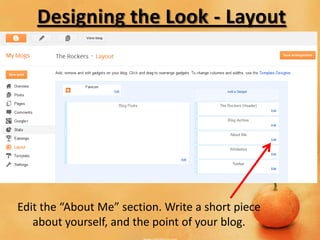
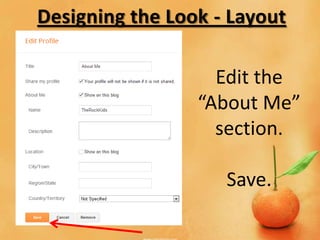
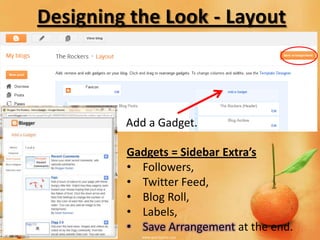
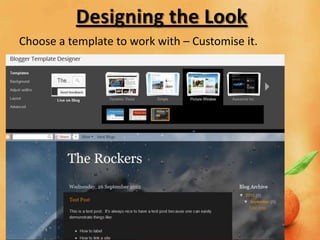
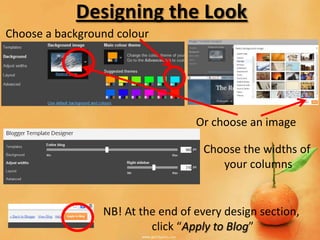
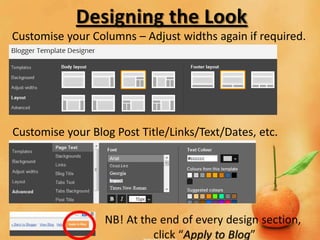
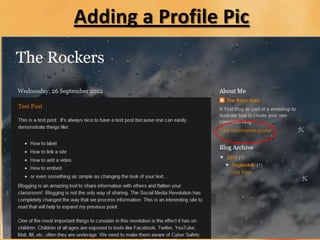
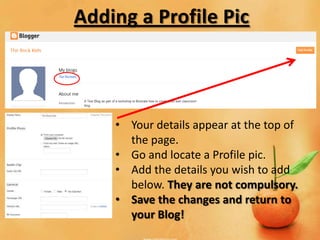
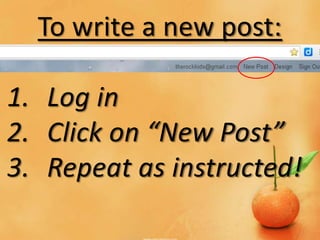
The Why to and How to:
      Create your own
    Class or School Blog

           Lisa G.
  Twitter: @ICT_Educator
www.icteducator.blogspot.com
What is a Blog:
1. A personal or business online discussion/editorial
   where posts are written and comments can be left.

              Who has a Blog?
    Stay at home parents / professionals / anyone.


            Why have a Blog?
1. Personal – as a journal for life thoughts / events
2. Business – to share events / ideas / tools
Blog Examples:
For Class Projects :          Flat Rosie
Record Lesson Ideas:          ICT with Mrs G
For Extra-Mural Activities:   Sunridge Computer Club
Online PD Advice:             Schoolnet
A Tutorial Site:              ICT Educator
Tools for Teachers:           Teach Amazing
Personal Reflection:          Shiny Headed Prophet
Children:                     Blog of a Bookaholic
What can I put on a Blog:
1.    Text
2.    Images
3.    Movies in Movie Maker
4.    Work done in PhotoStory 3
5.    You Tube clips
6.    SlideShare (PP to PDF)
7.    Flipsnack (PDF to Flipping Book)
8.    Screencasts (Screencast-O-Matic / Jing)
9.    Presentations (Tripline)
10.   And more!
Creating My Own Blog
                 www.blogger.com


                          OR


• Enter your email address and password
Name your blog
 Blog domain


Create Blog
Post Name


                          Tag
                    Blog domain
Start typing your post
in the window.
You can preview / save.
To website                     Add a video

             Add an image
Once your post is written you can add your links/pictures or
embed / Preview / Save.
 How to add a picture.
 How to link to a site.
 How to add a video (from web /from file)
 How to embed into your blog.
How to add a link:
• Open the website you want
  to link to.
• Highlight the URL and copy it.
  Go back to editing blog.
• Highlight the text you want to
  link to.
• Click on the “Link” Icon
• Paste the copied link into the
  pop-up window. Click OK.
• You will see the link now
  appear in the editing box,
  and the text will be
  highlighted in your published
  blog. Preview/Publish.
How to add an image:

• Click on the “Insert
  Image” Icon as above.
• Choose file and locate
  image.
• Insert the image
• Click on“Add selected”
• You will see it in your
  editing window.
• Click on pic to place it
  and add a caption.
• Preview/Publish.
How to add a You Tube Clip:
• 2 ways: Embed / Url
1.    URL
• Open the clip on YouTube
• Highlight and copy URL.
• Go back to editing window.
• Click on “Insert a Video”
• From You Tube (or from
   where you have it saved!)
• Paste the URL into window.
• Search. Choose the clip
   you had in mind – Select.
• Your clip will now appear
   on your Blog
• Preview/Publish.
How to add a You Tube Clip:
2.     Embed
• Open the clip on YouTube.
• Click on “Share”
• Click on “Embed”
• Blogger usually uses the
   “Old Embed Code”. Tick.
• Highlight the code and copy
   it. Go back to editing
   window.
• Click on “HTML”
• Paste the code where you
   want your clip to appear.
• Your clip will now show on
   your blog. Preview/Publish.
How to embed a Slideshare:
• Open your slideshare.
• Click on “Embed”
• Copy the code as
  instructed. (you can just
  click on “copy”) Go back to
  blog editing window.
• Click on “HTML”
• Paste the code where you
  want your slideshare to
  appear.
• Your slideshare will now
  show on your blog.
• Preview/Publish.
Preview


Check your preview. Close Preview window. Edit if necessary. Publish.

          Click on DESIGN to get to your dashboard.
Published – working with Settings
Working with Settings
              How many posts to
              show/page?

              Comments:
              • Do you want them
                embedded/pop up/new
                window/hide?
              • Who can comment
              • Do you want to
                moderate your
                comments?
              • Do you want a word
                verification to show?
              • Do you want to show
                backlinks?
              • What do you want to
                write on your comment
                form?
Designing the Look - Layout


Edit the “About Me” section. Write a short piece
   about yourself, and the point of your blog.
Designing the Look - Layout

                   Edit the
                 “About Me”
                   section.

                    Save.
Designing the Look - Layout


         Add a Gadget.

         Gadgets = Sidebar Extra’s
         • Followers,
         • Twitter Feed,
         • Blog Roll,
         • Labels,
         • Save Arrangement at the end.
Designing the Look
Designing the Look
Choose a template to work with – Customise it.
Designing the Look
Choose a background colour


                                   Or choose an image

                                    Choose the widths of
                                       your columns


                 NB! At the end of every design section,
                          click “Apply to Blog”
Designing the Look
Customise your Columns – Adjust widths again if required.


Customise your Blog Post Title/Links/Text/Dates, etc.
Adding a Profile Pic


    • Your details appear at the top of
      the page.
    • Go and locate a Profile pic.
    • Add the details you wish to add
      below. They are not compulsory.
    • Save the changes and return to
      your Blog!
To write a new post:

1. Log in
2. Click on “New Post”
3. Repeat as instructed!
You are now the proud
  owner of your own
  School /Class Blog.

      Have Fun!
Thank you for your time.

Creating a Blog

  • 1.
    The Why toand How to: Create your own Class or School Blog Lisa G. Twitter: @ICT_Educator www.icteducator.blogspot.com
  • 2.
    What is aBlog: 1. A personal or business online discussion/editorial where posts are written and comments can be left. Who has a Blog? Stay at home parents / professionals / anyone. Why have a Blog? 1. Personal – as a journal for life thoughts / events 2. Business – to share events / ideas / tools
  • 3.
    Blog Examples: For ClassProjects : Flat Rosie Record Lesson Ideas: ICT with Mrs G For Extra-Mural Activities: Sunridge Computer Club Online PD Advice: Schoolnet A Tutorial Site: ICT Educator Tools for Teachers: Teach Amazing Personal Reflection: Shiny Headed Prophet Children: Blog of a Bookaholic
  • 4.
    What can Iput on a Blog: 1. Text 2. Images 3. Movies in Movie Maker 4. Work done in PhotoStory 3 5. You Tube clips 6. SlideShare (PP to PDF) 7. Flipsnack (PDF to Flipping Book) 8. Screencasts (Screencast-O-Matic / Jing) 9. Presentations (Tripline) 10. And more!
  • 5.
    Creating My OwnBlog www.blogger.com OR • Enter your email address and password
  • 6.
    Name your blog Blog domain Create Blog
  • 7.
    Post Name Tag Blog domain Start typing your post in the window. You can preview / save.
  • 8.
    To website Add a video Add an image Once your post is written you can add your links/pictures or embed / Preview / Save.  How to add a picture.  How to link to a site.  How to add a video (from web /from file)  How to embed into your blog.
  • 9.
    How to adda link: • Open the website you want to link to. • Highlight the URL and copy it. Go back to editing blog. • Highlight the text you want to link to. • Click on the “Link” Icon • Paste the copied link into the pop-up window. Click OK. • You will see the link now appear in the editing box, and the text will be highlighted in your published blog. Preview/Publish.
  • 10.
    How to addan image: • Click on the “Insert Image” Icon as above. • Choose file and locate image. • Insert the image • Click on“Add selected” • You will see it in your editing window. • Click on pic to place it and add a caption. • Preview/Publish.
  • 11.
    How to adda You Tube Clip: • 2 ways: Embed / Url 1. URL • Open the clip on YouTube • Highlight and copy URL. • Go back to editing window. • Click on “Insert a Video” • From You Tube (or from where you have it saved!) • Paste the URL into window. • Search. Choose the clip you had in mind – Select. • Your clip will now appear on your Blog • Preview/Publish.
  • 12.
    How to adda You Tube Clip: 2. Embed • Open the clip on YouTube. • Click on “Share” • Click on “Embed” • Blogger usually uses the “Old Embed Code”. Tick. • Highlight the code and copy it. Go back to editing window. • Click on “HTML” • Paste the code where you want your clip to appear. • Your clip will now show on your blog. Preview/Publish.
  • 13.
    How to embeda Slideshare: • Open your slideshare. • Click on “Embed” • Copy the code as instructed. (you can just click on “copy”) Go back to blog editing window. • Click on “HTML” • Paste the code where you want your slideshare to appear. • Your slideshare will now show on your blog. • Preview/Publish.
  • 14.
    Preview Check your preview.Close Preview window. Edit if necessary. Publish. Click on DESIGN to get to your dashboard.
  • 15.
    Published – workingwith Settings
  • 16.
    Working with Settings How many posts to show/page? Comments: • Do you want them embedded/pop up/new window/hide? • Who can comment • Do you want to moderate your comments? • Do you want a word verification to show? • Do you want to show backlinks? • What do you want to write on your comment form?
  • 17.
    Designing the Look- Layout Edit the “About Me” section. Write a short piece about yourself, and the point of your blog.
  • 18.
    Designing the Look- Layout Edit the “About Me” section. Save.
  • 19.
    Designing the Look- Layout Add a Gadget. Gadgets = Sidebar Extra’s • Followers, • Twitter Feed, • Blog Roll, • Labels, • Save Arrangement at the end.
  • 20.
  • 21.
    Designing the Look Choosea template to work with – Customise it.
  • 22.
    Designing the Look Choosea background colour Or choose an image Choose the widths of your columns NB! At the end of every design section, click “Apply to Blog”
  • 23.
    Designing the Look Customiseyour Columns – Adjust widths again if required. Customise your Blog Post Title/Links/Text/Dates, etc.
  • 24.
  • 25.
    Adding a ProfilePic • Your details appear at the top of the page. • Go and locate a Profile pic. • Add the details you wish to add below. They are not compulsory. • Save the changes and return to your Blog!
  • 26.
    To write anew post: 1. Log in 2. Click on “New Post” 3. Repeat as instructed!
  • 27.
    You are nowthe proud owner of your own School /Class Blog. Have Fun! Thank you for your time.

Editor's Notes

  • #3 Ask who has a blog: Personal or BusinessAsk why they have a blog….