The document provides an introduction to the Arduino environment and programming. It discusses that Arduino boards are microcontrollers that can read inputs and produce outputs. The boards are programmed using the Arduino programming language and IDE. The document then provides tutorials on setting up an Arduino Uno board, writing and uploading a sample code to produce a stoplight program, and briefly discusses some industrial and other applications that use Arduino boards.
![INTRODUCTION TO ARDUINO
• Open-source electronics platform (original source
code is freely available to be redistributed and
modified)
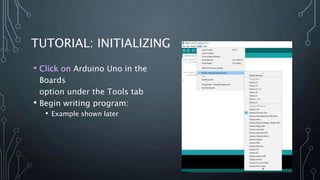
• Arduino Boards: microcontroller that reads input
and turns into outputs (i.e. finger on button turns
on an LED light)
• Instruct Arduino Board using Arduino Programming
Language and Arduino Software (IDE) communicating
through the board’s microcontroller
• Void setup() & Void Loop();
[1]](https://image.slidesharecdn.com/linkedinslidesdiamondproject-171128041827/85/Arduino-Environment-Tutorial-2-320.jpg)
![ARDUINO UNO
• Microcontroller with:
• 14 digital inputs
• 6 analog inputs with 10-bit resolution
• Can be:
• Purchased on eBay for $6
• Programmed in C
• Interfaced to a computer through USB
• Interfaced to many sensors
[3]](https://image.slidesharecdn.com/linkedinslidesdiamondproject-171128041827/85/Arduino-Environment-Tutorial-3-320.jpg)


![AN ARDUINO EXAMPLE
Stoplight
[2]](https://image.slidesharecdn.com/linkedinslidesdiamondproject-171128041827/85/Arduino-Environment-Tutorial-7-320.jpg)
![CODE
int red = 10;
int yellow = 9;
int green = 8;
void setup() {
pinMode(red,OUTPUT);
pinMode(yellow,OUTPUT);
pinMode(green,OUTPUT);
digitalWrite(green,HIGH);
Serial.begin(9600);
digitalWrite(green,HIGH);
Serial.println("Begin green
light");
delay(2000);
}
void loop() {
changeLights();
delay(3000);
}
[2]
void changeLights(){
Serial.println("Light Changes");
Serial.println("Yellow");
digitalWrite(green,LOW);
digitalWrite(yellow,HIGH);
delay(3000);
Serial.println("Red");
digitalWrite(yellow,LOW);
digitalWrite(red,HIGH);
delay(5000);
Serial.println("Green");
digitalWrite(yellow,LOW);
digitalWrite(red,LOW);
digitalWrite(green,HIGH);
delay(3000);
}](https://image.slidesharecdn.com/linkedinslidesdiamondproject-171128041827/85/Arduino-Environment-Tutorial-8-320.jpg)

![OTHER ARDUINO APPLICATIONS
• Break timer using a Mac computer
• Macs can’t communicate with motors, robots, sensors, etc without
something acting as a translator
• BreakTimer enables Mac to tell whether someone is sitting and if he/she
has been sitting for too long
• Real-time location systems
• GPS continually takes input data from satellite and stores longitude and
latitude
• Arduino Uno takes last received coordinates from GpsGate and sends
message to Google Earth
• Current location can then be shown on platform of choice
• Processing and image compression
• Arduino used as control element to integrate proposed algorithms
• Arduino enables further adjustments
[4], [5], [7]](https://image.slidesharecdn.com/linkedinslidesdiamondproject-171128041827/85/Arduino-Environment-Tutorial-10-320.jpg)
![REFERENCES
[1] Getting Started | Foundation - Introduction. (n.d.). Retrieved November 27, 2017, from
https://www.arduino.cc/en/Guide/Introduction
[2] Lee, J., Stegner, B., & Coburn, J. (2017, January 06). Arduino Programming For Beginners: The Traffic Light
Controller. Retrieved November 27, 2017, from http://www.makeuseof.com/tag/arduino-traffic-light-
controller/
[3] Nichols, D. (2017). Arduino-Based Data Acquisition into Excel, LabVIEW, and MATLAB. Physics Teacher,
55(4), 226-227. doi:10.1119/1.4978720
[4] Jepson, B. (2008). Control the World. Macworld, 25(6), 88-90.
[5] Ibrahim, M. M., & Audah, L. (2017). Real-Time Bus Location Monitoring Using Arduino. AIP Conference
Proceedings, 1883(1), 1-10. doi:10.1063/1.5002034
[6] Arrizabalaga, J. H., Simmons, A. D., & Nollert, M. U. (2017). Fabrication of an Economical Arduino-Based
Uniaxial Tensile Tester. Journal Of Chemical Education, 94(4), 530-533.
doi:10.1021/acs.jchemed.6b00639
[7] Lazar, J., Kostolanyova, K., & Bradac, V. (2017). Processing and Image Compression Based on the Platform
Arduino. AIP Conference Proceedings, 1863(1), 1-4. doi:10.1063/1.4992247
[8] Razali, Z. B., Mohamed Mydin M. Abdul, K., Akmal Kadir, M. A., & Daud, M. H. (2017). Reprogramming the](https://image.slidesharecdn.com/linkedinslidesdiamondproject-171128041827/85/Arduino-Environment-Tutorial-11-320.jpg)