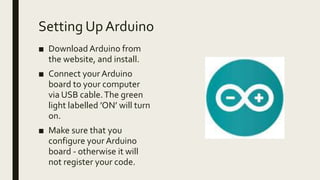
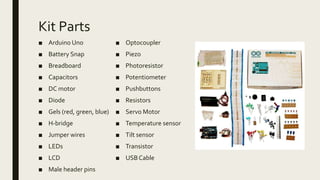
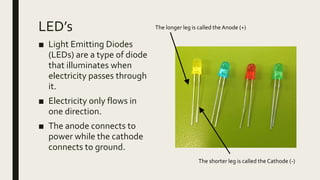
ARDUINO
Guide created by an awesomeGrade 9 girl
Arduino
■ Arduino is an open-source electronics platform with easy
to use software and hardware.The boards are able to
read inputs and turn it into an output.
■ The kits usually come with a book that starts you off with
some simple projects that allows you to get used to how
it works and to begin to understand circuits.
■ It also has an app that allows the user to code programs
in Java that can be uploaded to theArduino Board and
run.
Setting Up Arduino
■ Download Arduino from
the website, and install.
■ Connect your Arduino
board to your computer
via USB cable.The green
light labelled ’ON’ will turn
on.
■ Make sure that you
configure your Arduino
board - otherwise it will
not register your code.
Basic Functions of App
Verify
Upload
New
Open
Save
Kit Parts
■ Arduino Uno
■ Battery Snap
■ Breadboard
■ Capacitors
■ DC motor
■ Diode
■ Gels (red, green, blue)
■ H-bridge
■ Jumper wires
■ LEDs
■ LCD
■ Male header pins
■ Optocoupler
■ Piezo
■ Photoresistor
■ Potentiometer
■ Pushbuttons
■ Resistors
■ Servo Motor
■ Temperature sensor
■ Tilt sensor
■ Transistor
■ USB Cable
Breadboard & Arduino Duo
■ The breadboard is where you
build your circuit. Any mistakes
can have huge effects on how it
functions.
■ The most important thing to do
first, is to make sure that the
negative (black/ground) and
positive (red/power) leads are
plugged in properly and in the
right place.
Resistor’s
■ They resist the flow of
electrical energy in a
circuit, changing the
voltage and current as a
result.
■ Resistor values are
marked using coloured
bands, and each colour
corresponds to a number.
LED’s
■ Light Emitting Diodes
(LEDs) are a type of diode
that illuminates when
electricity passes through
it.
■ Electricity only flows in
one direction.
■ The anode connects to
power while the cathode
connects to ground.
The longer leg is called the Anode (+)
The shorter leg is called the Cathode (-)
Circuits Pt. 1
■ When using an Arduino, it becomes clear very quickly that having a basic
understanding of a circuit is useful.
■ Circuits are closed loops of wire with a power source, and something to do
with the power.
■ In a circuit, electricity flows from a point of higher potential energy (power
or +) to a point of lower potential energy (Ground/GND or - ).
■ Circuit Measurements;
Current is the amount of electrical charge at a specific point during
the circuit and is measured in Amps/Amperes.
Voltage is the difference of energy between one point in a circuit and
another and is measured in volts.
Resistance, which is measured in Ohms (Ω), is how much a
component resists the flow of electrical energy.
Circuits Pt. 2
■ There needs to be a complete path from the energy source (Power) to
the point of least energy (Ground) to make a circuit. If this is not done
properly the circuit will not work.
■ There are two types of circuits;
Series Circuit:
A series circuit is a circuit in which resistors are arranged in a
chain, so the current has only one path to take.The current is
the same through each resistor.
Parallel Circuit:
A parallel circuit has two or more paths for current to flow through.
Voltage is the same across each component of the parallel circuit.
Basic Circuits & Programming
Example – Spaceship Interface
■ The Spaceship Interface is
the first proper Arduino
Project, and also happens
to be the easiest in my
opinion.
■ You make a control panel
with a switch and lights
that turn on/change when
the switch is pressed.
■ As you can see in the code,
input only has two states–
commonly referred to HIGH
(voltage) and LOW (no
voltage).
Example – Keyboard Instrument
■ This project allows the user to
hook up a number of switches
that produce a number of
different tones depending on
what you put in.
■ However, not only do you
create a ‘Keyboard
Instrument’, you also
construct a resistor ladder.
■ Unfortunately, I did not get a
photo of this project.
Example – Motorised Pinwheel
■ In this project, the Arduino is
programmed to spin a colourful
pinwheel using a motor.
■ One of the bigger parts of this
project is understanding that
controlling motors are much
harder than controlling LEDs no
matter what the code looks like.
■ If/When you complete this task
for yourself, make sure that you
have a tight hold of the motor as
it is quite powerful and is hard to
control if you are unprepared for
it.
Arduino – Reflection Pt. 1
■ I have found Arduino to be a fun unit with little restrictions. I have a much better
understanding of circuits and how they function. My understanding of code has
also improved even though I could have focused on it more. I should have spent
more time playing around with the kit in general as I wish that I had done more.
■ I really enjoyed how I was given the choice as to which projects I got to do instead
of working systematically through them as the first few were quite boring from
the look of it.
■ If I had more time I would most likely have spent more time on how the
programming actually works and would have gone onto the internet to find more
interesting projects that I could do with the Arduino kit. I also would have liked to
see if I could change the speed of the motor with the spinning pinwheel as it was
very fast and hard to keep a hold of.
■ As a side note: I would have loved to find a way to organise my Arduino Kit better
as there is a box with almost everything in it all jumbled up and hard to find when
attempting to find the smaller components.
Arduino – Reflection Pt. 2
■ Being able to use the Arduino Kit gave me a glimpse at what I could do
in the future with IT. I found that I do enjoy doing hardware, however I
would like to have a further look in to software as I feel as if I haven’t
given it a proper go at all.
■ I have found that this experience has encouraged me to continue in IT
and that I would like to see where this takes me in the future.
■ The best thing about this unit was the fact that there was not a formal
Criteria for it and that I could focus on having fun instead of my writing.

Arduino Introduction Guide 1

  • 1.
    ARDUINO Guide created byan awesomeGrade 9 girl
  • 2.
    Arduino ■ Arduino isan open-source electronics platform with easy to use software and hardware.The boards are able to read inputs and turn it into an output. ■ The kits usually come with a book that starts you off with some simple projects that allows you to get used to how it works and to begin to understand circuits. ■ It also has an app that allows the user to code programs in Java that can be uploaded to theArduino Board and run.
  • 3.
    Setting Up Arduino ■Download Arduino from the website, and install. ■ Connect your Arduino board to your computer via USB cable.The green light labelled ’ON’ will turn on. ■ Make sure that you configure your Arduino board - otherwise it will not register your code.
  • 4.
    Basic Functions ofApp Verify Upload New Open Save
  • 5.
    Kit Parts ■ ArduinoUno ■ Battery Snap ■ Breadboard ■ Capacitors ■ DC motor ■ Diode ■ Gels (red, green, blue) ■ H-bridge ■ Jumper wires ■ LEDs ■ LCD ■ Male header pins ■ Optocoupler ■ Piezo ■ Photoresistor ■ Potentiometer ■ Pushbuttons ■ Resistors ■ Servo Motor ■ Temperature sensor ■ Tilt sensor ■ Transistor ■ USB Cable
  • 6.
    Breadboard & ArduinoDuo ■ The breadboard is where you build your circuit. Any mistakes can have huge effects on how it functions. ■ The most important thing to do first, is to make sure that the negative (black/ground) and positive (red/power) leads are plugged in properly and in the right place.
  • 7.
    Resistor’s ■ They resistthe flow of electrical energy in a circuit, changing the voltage and current as a result. ■ Resistor values are marked using coloured bands, and each colour corresponds to a number.
  • 8.
    LED’s ■ Light EmittingDiodes (LEDs) are a type of diode that illuminates when electricity passes through it. ■ Electricity only flows in one direction. ■ The anode connects to power while the cathode connects to ground. The longer leg is called the Anode (+) The shorter leg is called the Cathode (-)
  • 9.
    Circuits Pt. 1 ■When using an Arduino, it becomes clear very quickly that having a basic understanding of a circuit is useful. ■ Circuits are closed loops of wire with a power source, and something to do with the power. ■ In a circuit, electricity flows from a point of higher potential energy (power or +) to a point of lower potential energy (Ground/GND or - ). ■ Circuit Measurements; Current is the amount of electrical charge at a specific point during the circuit and is measured in Amps/Amperes. Voltage is the difference of energy between one point in a circuit and another and is measured in volts. Resistance, which is measured in Ohms (Ω), is how much a component resists the flow of electrical energy.
  • 10.
    Circuits Pt. 2 ■There needs to be a complete path from the energy source (Power) to the point of least energy (Ground) to make a circuit. If this is not done properly the circuit will not work. ■ There are two types of circuits; Series Circuit: A series circuit is a circuit in which resistors are arranged in a chain, so the current has only one path to take.The current is the same through each resistor. Parallel Circuit: A parallel circuit has two or more paths for current to flow through. Voltage is the same across each component of the parallel circuit.
  • 11.
    Basic Circuits &Programming
  • 12.
    Example – SpaceshipInterface ■ The Spaceship Interface is the first proper Arduino Project, and also happens to be the easiest in my opinion. ■ You make a control panel with a switch and lights that turn on/change when the switch is pressed. ■ As you can see in the code, input only has two states– commonly referred to HIGH (voltage) and LOW (no voltage).
  • 13.
    Example – KeyboardInstrument ■ This project allows the user to hook up a number of switches that produce a number of different tones depending on what you put in. ■ However, not only do you create a ‘Keyboard Instrument’, you also construct a resistor ladder. ■ Unfortunately, I did not get a photo of this project.
  • 14.
    Example – MotorisedPinwheel ■ In this project, the Arduino is programmed to spin a colourful pinwheel using a motor. ■ One of the bigger parts of this project is understanding that controlling motors are much harder than controlling LEDs no matter what the code looks like. ■ If/When you complete this task for yourself, make sure that you have a tight hold of the motor as it is quite powerful and is hard to control if you are unprepared for it.
  • 15.
    Arduino – ReflectionPt. 1 ■ I have found Arduino to be a fun unit with little restrictions. I have a much better understanding of circuits and how they function. My understanding of code has also improved even though I could have focused on it more. I should have spent more time playing around with the kit in general as I wish that I had done more. ■ I really enjoyed how I was given the choice as to which projects I got to do instead of working systematically through them as the first few were quite boring from the look of it. ■ If I had more time I would most likely have spent more time on how the programming actually works and would have gone onto the internet to find more interesting projects that I could do with the Arduino kit. I also would have liked to see if I could change the speed of the motor with the spinning pinwheel as it was very fast and hard to keep a hold of. ■ As a side note: I would have loved to find a way to organise my Arduino Kit better as there is a box with almost everything in it all jumbled up and hard to find when attempting to find the smaller components.
  • 16.
    Arduino – ReflectionPt. 2 ■ Being able to use the Arduino Kit gave me a glimpse at what I could do in the future with IT. I found that I do enjoy doing hardware, however I would like to have a further look in to software as I feel as if I haven’t given it a proper go at all. ■ I have found that this experience has encouraged me to continue in IT and that I would like to see where this takes me in the future. ■ The best thing about this unit was the fact that there was not a formal Criteria for it and that I could focus on having fun instead of my writing.