This document provides a 15-step process for applying color effects in Photoshop. It begins with opening an image in Photoshop and applying an unsharp mask. Next, it describes using layer masks to focus sharpening on specific areas and dodging and burning layers to highlight lights and shadows. A series of adjustment layers are then applied to manipulate hue, saturation, and curves to achieve the desired color effect. These include gradient maps, photo filters, and curves adjustments on individual color channels. The final result is an image with an enhanced color palette.
In the previous SlideShare, you learned how to create a RAW timelapse using your DSLR. This lesson will walk you through the process of editing and processing your RAW images.
Knowing how to sharpen a picture in Photoshop is helpful expertise for any photographic artist. Foggy pictures occur for various reasons. Perhaps you had your camera self-adjust and it set the center point in some unacceptable spot.
How to Turn a Picture Into a Line Drawing in PhotoshopZenith Clipping
To transform a photograph into a line drawing in Photoshop, you don’t need it to appear as though you did it in Photoshop, you’ll need to focus on detail and set up your picture appropriately before you apply any channels.
Learn how to create Sticky Note effect using photoshop. Please visit our website to learn more in tips our blog, and also to find cheap photography supplies.
Raw images aren’t ready for commercial use. So we need to manage it and prepare it for use by applying for many editing works. There are many ways for the cut out image but when we are going to Cut out image with hard hair mask from a model image sometimes it’s become harder. In that case, we need to apply advanced editing services or technique.
Book Formatting: Quality Control Checks for DesignersConfidence Ago
This presentation was made to help designers who work in publishing houses or format books for printing ensure quality.
Quality control is vital to every industry. This is why every department in a company need create a method they use in ensuring quality. This, perhaps, will not only improve the quality of products and bring errors to the barest minimum, but take it to a near perfect finish.
It is beyond a moot point that a good book will somewhat be judged by its cover, but the content of the book remains king. No matter how beautiful the cover, if the quality of writing or presentation is off, that will be a reason for readers not to come back to the book or recommend it.
So, this presentation points designers to some important things that may be missed by an editor that they could eventually discover and call the attention of the editor.
Top 5 Indian Style Modular Kitchen DesignsFinzo Kitchens
Get the perfect modular kitchen in Gurgaon at Finzo! We offer high-quality, custom-designed kitchens at the best prices. Wardrobes and home & office furniture are also available. Free consultation! Best Quality Luxury Modular kitchen in Gurgaon available at best price. All types of Modular Kitchens are available U Shaped Modular kitchens, L Shaped Modular Kitchen, G Shaped Modular Kitchens, Inline Modular Kitchens and Italian Modular Kitchen.
Expert Accessory Dwelling Unit (ADU) Drafting ServicesResDraft
Whether you’re looking to create a guest house, a rental unit, or a private retreat, our experienced team will design a space that complements your existing home and maximizes your investment. We provide personalized, comprehensive expert accessory dwelling unit (ADU)drafting solutions tailored to your needs, ensuring a seamless process from concept to completion.
Transforming Brand Perception and Boosting Profitabilityaaryangarg12
In today's digital era, the dynamics of brand perception, consumer behavior, and profitability have been profoundly reshaped by the synergy of branding, social media, and website design. This research paper investigates the transformative power of these elements in influencing how individuals perceive brands and products and how this transformation can be harnessed to drive sales and profitability for businesses.
Through an exploration of brand psychology and consumer behavior, this study sheds light on the intricate ways in which effective branding strategies, strategic social media engagement, and user-centric website design contribute to altering consumers' perceptions. We delve into the principles that underlie successful brand transformations, examining how visual identity, messaging, and storytelling can captivate and resonate with target audiences.
Methodologically, this research employs a comprehensive approach, combining qualitative and quantitative analyses. Real-world case studies illustrate the impact of branding, social media campaigns, and website redesigns on consumer perception, sales figures, and profitability. We assess the various metrics, including brand awareness, customer engagement, conversion rates, and revenue growth, to measure the effectiveness of these strategies.
The results underscore the pivotal role of cohesive branding, social media influence, and website usability in shaping positive brand perceptions, influencing consumer decisions, and ultimately bolstering sales and profitability. This paper provides actionable insights and strategic recommendations for businesses seeking to leverage branding, social media, and website design as potent tools to enhance their market position and financial success.
White wonder, Work developed by Eva TschoppMansi Shah
White Wonder by Eva Tschopp
A tale about our culture around the use of fertilizers and pesticides visiting small farms around Ahmedabad in Matar and Shilaj.
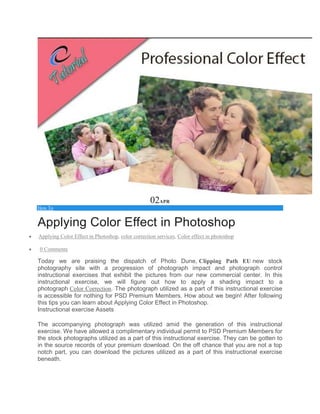
1. 02APR
How To
Applying Color Effect in Photoshop
Applying Color Effect in Photoshop, color correction services, Color effect in photoshop
0 Comments
Today we are praising the dispatch of Photo Dune, Clipping Path EU new stock
photography site with a progression of photograph impact and photograph control
instructional exercises that exhibit the pictures from our new commercial center. In this
instructional exercise, we will figure out how to apply a shading impact to a
photograph Color Correction. The photograph utilized as a part of this instructional exercise
is accessible for nothing for PSD Premium Members. How about we begin! After following
this tips you can learn about Applying Color Effect in Photoshop.
Instructional exercise Assets
The accompanying photograph was utilized amid the generation of this instructional
exercise. We have allowed a complimentary individual permit to PSD Premium Members for
the stock photographs utilized as a part of this instructional exercise. They can be gotten to
in the source records of your premium download. On the off chance that you are not a top
notch part, you can download the pictures utilized as a part of this instructional exercise
beneath.
4. Copy the picture layer and apply an Unsharp Mask by going to Filter > Sharpen > Unsharp
Mask. Apply the accompanying settings: Amount: 100, Radius: 1.0, Threshold: 0. Layer
ought to be set to Normal at 100% mistiness.
Stage 3
5. Presently we have the picture honed, however, we just need our subject in concentrate, so
we should influence a layer to cover and paint in a few spots to include profundity and
evacuate the hone.
Stage 4
6. Presently we should chip away at the lights and shadows of our characters, raising the level
of these to get more emotional and all the more intriguing impact. To do this we will go to
New Layer > Image > Apply Image and press OK with the default settings.
Stage 5
Utilize the Dodge and Burn devices to feature the lights and shadows of our subjects. When
you are done, set the darkness of the layer to 40%.
Stage 6
Go to Layer > New Adjustment Layer and apply an inclination outline dark to white. Set the
haziness to 30%. With the pen apparatus, draw a cover as demonstrated so the slope
outline applies to our characters.
Stage 7
How about we begin functioning the shading, make another alteration layer of Curves and
we will work in the Blue channel rather the RGB one. My settings are the ones in the photo,
however, don’t be reluctant to transform it to the point that you are content with the
outcome. This layer is in typical mode at 100% of murkiness
Stage 8
Include another Gradient Map from Black to White to marginally bring down the immersion
of the past bends. The layer will be in ordinary mode at 40% of mistiness.
Stage 9
To continue playing with the hues we will include a Photo Filter by going to Layer > New
Adjustment Layer > Photo Filter. Apply the Underwater channel at 25% thickness. Set the
layer to 20% haziness.
7. Stage 10
Go to Layer > New Adjustment Layer > Photo Filter > Warming Filter (85) at 25% thickness.
Set the layer to 60% darkness.
Stage 11
Go to Layer > New Adjustment Layer > Hue/Saturation and change the immersion to +11.
Set the layer to ordinary at 100% haziness.
Stage 12
Go to Layer > New Adjustment Layer > Curves. Select the blue channel and set the
parameters as appeared. Do until the point that you are content with the outcome.
Stage 13
8. Go to Layer > New Adjustment Layer > Gradient Map and apply a Violet to Orange in Light
mode at 10% darkness.
Stage 14
Go to Layer > New Adjustment Layer > Hue/Saturation. Change the delicacy to +5. Set the
layer mode to type at 100% mistiness.
Stage 15
9. Go to Layer > New Adjustment Layer > Gradient Map and include another angle outline
dark to white. Set it to delicate light mode at 16% mistiness.
This is the final image-