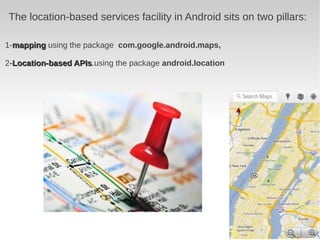
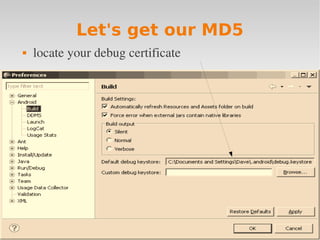
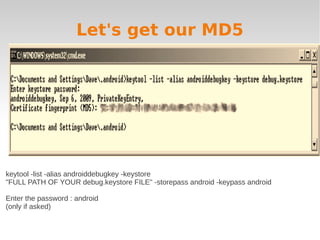
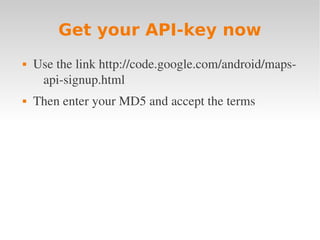
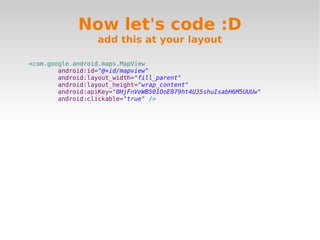
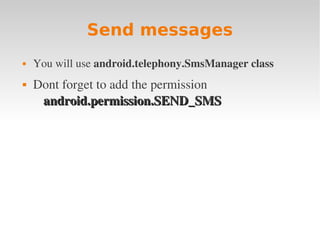
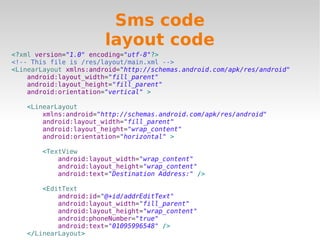
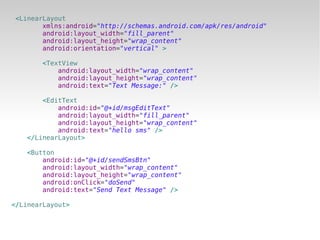
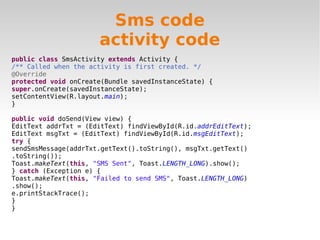
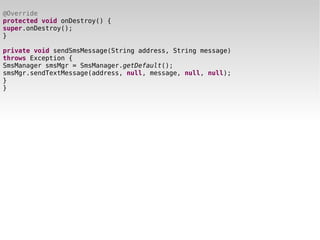
Level 3

android camp
Maps ,
Location-based Services
           &
    Telephony API
The location-based services facility in Android sits on two pillars:

1-mapping using the package com.google.android.maps,

2-Location-based APIs.using the package android.location
                 APIs
All we need to start is :
1-Internet connection

2-accept the terms of google


Then , let's develop :D
Understanding the Mapping
               Package

   Obtain your MD5 fingerprint 
   Obtaining a map­api Key from Google (two keys) one for 
      development with the emulator and another for production 
   Understanding MapView and MapActivity
Let's get our MD5
   locate your debug certificate
Let's get our MD5


keytool -list -alias androiddebugkey -keystore
"FULL PATH OF YOUR debug.keystore FILE" -storepass android -keypass android

Enter the password : android
(only if asked)
Get your API-key now
   Use the link http://code.google.com/android/maps­
     api­signup.html
   Then enter your MD5 and accept the terms
Now let's code :D
Now let's code :D
                               mainfest.xml
<?xml version="1.0" encoding="utf-8"?>
<manifest xmlns:android="http://schemas.android.com/apk/res/android"
    package="com.ashour.amar.map3"
    android:versionCode="1"
    android:versionName="1.0" >

    <uses-sdk android:minSdkVersion="4" />

    <uses-permission android:name="android.permission.INTERNET" />

    <application
        android:icon="@drawable/ic_launcher"
        android:label="@string/app_name" >
        <uses-library android:name="com.google.android.maps" />

        <activity
            android:label="@string/app_name"
            android:name=".Map3Activity" >
            <intent-filter >
                <action android:name="android.intent.action.MAIN" />

                <category android:name="android.intent.category.LAUNCHER" />
            </intent-filter>
        </activity>
    </application>
Now let's code :D
                  add this at your layout

<com.google.android.maps.MapView
        android:id="@+id/mapview"
        android:layout_width="fill_parent"
        android:layout_height="wrap_content"
        android:apiKey="0HjFnVeWB501OoE879ht4U35shuIsabH6M5UUUw"
        android:clickable="true" />
Now let's code :D
                              javaActivity
public class Map2Activity extends MapActivity{
    private MapView mapView;
private GeoPoint pt;

/** Called when the activity is first created. */
    @Override
    public void onCreate(Bundle savedInstanceState) {
        super.onCreate(savedInstanceState);
        setContentView(R.layout.main);
        mapView = (MapView)findViewById(R.id.mapview);
        mapView.setBuiltInZoomControls(true);

    }
    @Override
    protected boolean isLocationDisplayed() {
    return true;
    }
@Override
protected boolean isRouteDisplayed() {
return true;
}
}
TELEPHONY API

With the telephony API you can work with messages , make
calls and use the Internet to make calls VOIP
Now let's make SMS sender
          app :D
Send messages
   You will use android.telephony.SmsManager class
   Dont forget to add the permission 
     android.permission.SEND_SMS
Sms code
                        layout code
<?xml version="1.0" encoding="utf-8"?>
<!-- This file is /res/layout/main.xml -->
<LinearLayout xmlns:android="http://schemas.android.com/apk/res/android"
    android:layout_width="fill_parent"
    android:layout_height="fill_parent"
    android:orientation="vertical" >

   <LinearLayout
       xmlns:android="http://schemas.android.com/apk/res/android"
       android:layout_width="fill_parent"
       android:layout_height="wrap_content"
       android:orientation="horizontal" >

       <TextView
           android:layout_width="wrap_content"
           android:layout_height="wrap_content"
           android:text="Destination Address:" />

       <EditText
           android:id="@+id/addrEditText"
           android:layout_width="fill_parent"
           android:layout_height="wrap_content"
           android:phoneNumber="true"
           android:text="01095996548" />
   </LinearLayout>
<LinearLayout
       xmlns:android="http://schemas.android.com/apk/res/android"
       android:layout_width="fill_parent"
       android:layout_height="wrap_content"
       android:orientation="vertical" >

       <TextView
           android:layout_width="wrap_content"
           android:layout_height="wrap_content"
           android:text="Text Message:" />

       <EditText
           android:id="@+id/msgEditText"
           android:layout_width="fill_parent"
           android:layout_height="wrap_content"
           android:text="hello sms" />
   </LinearLayout>

   <Button
       android:id="@+id/sendSmsBtn"
       android:layout_width="wrap_content"
       android:layout_height="wrap_content"
       android:onClick="doSend"
       android:text="Send Text Message" />

</LinearLayout>
Sms code
                      activity code
public class SmsActivity extends Activity {
/** Called when the activity is first created. */
@Override
protected void onCreate(Bundle savedInstanceState) {
super.onCreate(savedInstanceState);
setContentView(R.layout.main);
}

public void doSend(View view) {
EditText addrTxt = (EditText) findViewById(R.id.addrEditText);
EditText msgTxt = (EditText) findViewById(R.id.msgEditText);
try {
sendSmsMessage(addrTxt.getText().toString(), msgTxt.getText()
.toString());
Toast.makeText(this, "SMS Sent", Toast.LENGTH_LONG).show();
} catch (Exception e) {
Toast.makeText(this, "Failed to send SMS", Toast.LENGTH_LONG)
.show();
e.printStackTrace();
}
}
@Override
protected void onDestroy() {
super.onDestroy();
}

private void sendSmsMessage(String address, String message)
throws Exception {
SmsManager smsMgr = SmsManager.getDefault();
smsMgr.sendTextMessage(address, null, message, null, null);
}
}
I think you know your way
            now
Good books you can use


   pro android 3 (my best )
   OReilly ­ Learning Android
   professional android application development
   Pro   Android Media Developing Graphics 
thanks

         Amar ashour
 amar_ashour@hotmail.com
https://www.facebook.com/amar.ashour

android level 3

  • 1.
  • 2.
  • 4.
    The location-based servicesfacility in Android sits on two pillars: 1-mapping using the package com.google.android.maps, 2-Location-based APIs.using the package android.location APIs
  • 5.
    All we needto start is : 1-Internet connection 2-accept the terms of google Then , let's develop :D
  • 6.
    Understanding the Mapping Package  Obtain your MD5 fingerprint   Obtaining a map­api Key from Google (two keys) one for  development with the emulator and another for production   Understanding MapView and MapActivity
  • 7.
    Let's get ourMD5  locate your debug certificate
  • 8.
    Let's get ourMD5 keytool -list -alias androiddebugkey -keystore "FULL PATH OF YOUR debug.keystore FILE" -storepass android -keypass android Enter the password : android (only if asked)
  • 9.
    Get your API-keynow  Use the link http://code.google.com/android/maps­ api­signup.html  Then enter your MD5 and accept the terms
  • 10.
  • 11.
    Now let's code:D mainfest.xml <?xml version="1.0" encoding="utf-8"?> <manifest xmlns:android="http://schemas.android.com/apk/res/android" package="com.ashour.amar.map3" android:versionCode="1" android:versionName="1.0" > <uses-sdk android:minSdkVersion="4" /> <uses-permission android:name="android.permission.INTERNET" /> <application android:icon="@drawable/ic_launcher" android:label="@string/app_name" > <uses-library android:name="com.google.android.maps" /> <activity android:label="@string/app_name" android:name=".Map3Activity" > <intent-filter > <action android:name="android.intent.action.MAIN" /> <category android:name="android.intent.category.LAUNCHER" /> </intent-filter> </activity> </application>
  • 12.
    Now let's code:D add this at your layout <com.google.android.maps.MapView android:id="@+id/mapview" android:layout_width="fill_parent" android:layout_height="wrap_content" android:apiKey="0HjFnVeWB501OoE879ht4U35shuIsabH6M5UUUw" android:clickable="true" />
  • 13.
    Now let's code:D javaActivity public class Map2Activity extends MapActivity{ private MapView mapView; private GeoPoint pt; /** Called when the activity is first created. */ @Override public void onCreate(Bundle savedInstanceState) { super.onCreate(savedInstanceState); setContentView(R.layout.main); mapView = (MapView)findViewById(R.id.mapview); mapView.setBuiltInZoomControls(true); } @Override protected boolean isLocationDisplayed() { return true; } @Override protected boolean isRouteDisplayed() { return true; } }
  • 14.
    TELEPHONY API With thetelephony API you can work with messages , make calls and use the Internet to make calls VOIP
  • 15.
    Now let's makeSMS sender app :D
  • 16.
    Send messages  You will use android.telephony.SmsManager class  Dont forget to add the permission  android.permission.SEND_SMS
  • 17.
    Sms code layout code <?xml version="1.0" encoding="utf-8"?> <!-- This file is /res/layout/main.xml --> <LinearLayout xmlns:android="http://schemas.android.com/apk/res/android" android:layout_width="fill_parent" android:layout_height="fill_parent" android:orientation="vertical" > <LinearLayout xmlns:android="http://schemas.android.com/apk/res/android" android:layout_width="fill_parent" android:layout_height="wrap_content" android:orientation="horizontal" > <TextView android:layout_width="wrap_content" android:layout_height="wrap_content" android:text="Destination Address:" /> <EditText android:id="@+id/addrEditText" android:layout_width="fill_parent" android:layout_height="wrap_content" android:phoneNumber="true" android:text="01095996548" /> </LinearLayout>
  • 18.
    <LinearLayout xmlns:android="http://schemas.android.com/apk/res/android" android:layout_width="fill_parent" android:layout_height="wrap_content" android:orientation="vertical" > <TextView android:layout_width="wrap_content" android:layout_height="wrap_content" android:text="Text Message:" /> <EditText android:id="@+id/msgEditText" android:layout_width="fill_parent" android:layout_height="wrap_content" android:text="hello sms" /> </LinearLayout> <Button android:id="@+id/sendSmsBtn" android:layout_width="wrap_content" android:layout_height="wrap_content" android:onClick="doSend" android:text="Send Text Message" /> </LinearLayout>
  • 19.
    Sms code activity code public class SmsActivity extends Activity { /** Called when the activity is first created. */ @Override protected void onCreate(Bundle savedInstanceState) { super.onCreate(savedInstanceState); setContentView(R.layout.main); } public void doSend(View view) { EditText addrTxt = (EditText) findViewById(R.id.addrEditText); EditText msgTxt = (EditText) findViewById(R.id.msgEditText); try { sendSmsMessage(addrTxt.getText().toString(), msgTxt.getText() .toString()); Toast.makeText(this, "SMS Sent", Toast.LENGTH_LONG).show(); } catch (Exception e) { Toast.makeText(this, "Failed to send SMS", Toast.LENGTH_LONG) .show(); e.printStackTrace(); } }
  • 20.
    @Override protected void onDestroy(){ super.onDestroy(); } private void sendSmsMessage(String address, String message) throws Exception { SmsManager smsMgr = SmsManager.getDefault(); smsMgr.sendTextMessage(address, null, message, null, null); } }
  • 21.
    I think youknow your way now
  • 22.
    Good books youcan use  pro android 3 (my best )  OReilly ­ Learning Android  professional android application development  Pro   Android Media Developing Graphics 
  • 23.
    thanks Amar ashour amar_ashour@hotmail.com https://www.facebook.com/amar.ashour