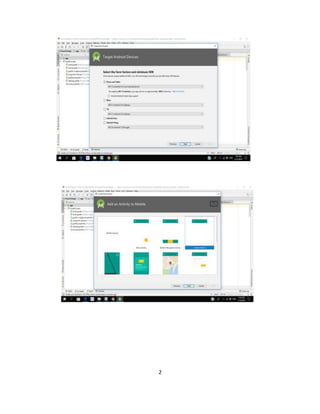
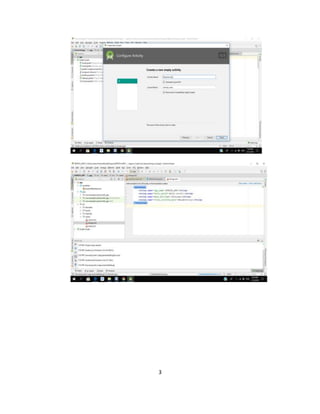
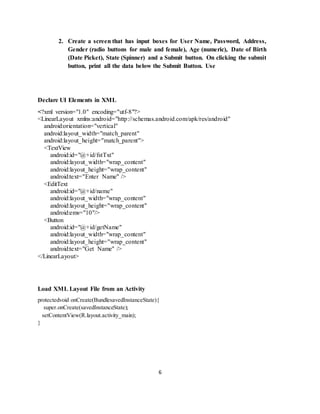
1
1. (a) Create an Android application that shows Hello + name of the
user and run it on an emulator.
Create Android Application:
2
3
4
5
1.b) Create an application that takes the name from a text box and shows hello
message along with the name entered in text box, when the user clicks the OK
button.
import android.app.*;
import android.os.*;
import android.view.*;
import android.widget.*;
public class MainActivity extends Activity {
private Button b;
EditText etname,etemail,etpassword;
TextView tv;
@Override
protected void onCreate(Bundle savedInstanceState) {
super.onCreate(savedInstanceState);
setContentView(R.layout.activity_main);
b=(Button)findViewById(R.id.click);
tv=(TextView)findViewById(R.id.display);
tv.setMovementMethod(new ScrollingMovementMethod())
b.setOnClickListener(new View.OnClickListener() {
@Override
public void onClick(View v) {
etname=(EditText)findViewById(R.id.name);
etemail=(EditText)findViewById(R.id.email);
etpassword=(EditText)findViewById(R.id.password);
tv.setText("Your Input:
n"+etname.getText().toString()+"n"+etemail.getText().toString()+"n"+etpassword.getText().to
String()+"nEnd.");
}
});
}
6
2. Create a screen that has input boxes for User Name, Password, Address,
Gender (radio buttons for male and female), Age (numeric), Date of Birth
(Date Picket), State (Spinner) and a Submit button. On clicking the submit
button, print all the data below the Submit Button. Use
Declare UI Elements in XML
<?xml version="1.0" encoding="utf-8"?>
<LinearLayout xmlns:android="http://schemas.android.com/apk/res/android"
android:orientation="vertical"
android:layout_width="match_parent"
android:layout_height="match_parent">
<TextView
android:id="@+id/fstTxt"
android:layout_width="wrap_content"
android:layout_height="wrap_content"
android:text="Enter Name" />
<EditText
android:id="@+id/name"
android:layout_width="wrap_content"
android:layout_height="wrap_content"
android:ems="10"/>
<Button
android:id="@+id/getName"
android:layout_width="wrap_content"
android:layout_height="wrap_content"
android:text="Get Name" />
</LinearLayout>
Load XML Layout File from an Activity
protectedvoid onCreate(BundlesavedInstanceState){
super.onCreate(savedInstanceState);
setContentView(R.layout.activity_main);
}
7
Create UI Element at Runtime
public class MainActivity extends AppCompatActivity {
@Override
protected void onCreate(Bundle savedInstanceState) {
super.onCreate(savedInstanceState);
TextView textView1 = new TextView(this);
textView1.setText("Name:");
EditText editText1 = new EditText(this);
editText1.setText("Enter Name");
Button button1 = new Button(this);
button1.setText("Add Name");
LinearLayout linearLayout = new LinearLayout(this);
linearLayout.addView(textView1);
linearLayout.addView(editText1);
linearLayout.addView(button1);
setContentView(linearLayout);
}
8
3. Develop an application that shows names as a list and on selecting a name
it should show the details of the candidate on the next screenwith a “Back”
button. If the screen is rotated to landscape mode (width greater than
height), then the screenshould show liston leftfragment and details onright
fragment instead of second screen with back button. Use Fragment
transactions and Rotation event listener.
public class AndroidListViewActivity extends ListActivity {
@Override
public void onCreate(Bundle savedInstanceState) {
super.onCre0ate(savedInstanceState);
// storing string resources into Array
String[] numbers = {"one","two","three","four"}
// here you store the array of string you got from the database
// Binding Array to ListAdapter
this.setListAdapter(new ArrayAdapter<String>(this, R.layout.list_item, R.id.label, numbers));
// refer the ArrayAdapter Document in developer.android.com
ListView lv = getListView();
// listening to single list item on click
lv.setOnItemClickListener(new OnItemClickListener() {
public void onItemClick(AdapterView<?> parent, View view,
int position, long id) {
// selected item
String num = ((TextView) view).getText().toString();
9
// Launching new Activity on selecting single List Item
Intent i = new Intent(getApplicationContext(), SingleListItem.class);
// sending data to new activity
i.putExtra("number", num);
startActivity(i);
}
});
}
}
The secondActivity to display the Particular item you have clicked should be
public class SingleListItem extends Activity{
@Override
public void onCreate(Bundle savedInstanceState) {
super.onCreate(savedInstanceState);
this.setContentView(R.layout.single_list_item_view);
TextView txtProduct = (TextView) findViewById(R.id.product_label);
Intent i = getIntent();
// getting attached intent data
String product = i.getStringExtra("number");
// displaying selected product name
txtProduct.setText(product);
}
}
10
4. Develop an application that uses a menu with 3 options for dialing a
number, opening a website and to sendan SMS.On selecting an option, the
appropriate action should be invoked using intents.
<?xml version="1.0" encoding="utf-8"?>
<menu xmlns:android="http://schemas.android.com/apk/res/android">
<item android:id="@+id/new_game"
android:icon="@drawable/ic_new_game"
android:title="@string/new_game"
android:showAsAction="ifRoom"/>
<item android:id="@+id/help"
android:icon="@drawable/ic_help"
android:title="@string/help" />
</menu>
<?xml version="1.0" encoding="utf-8"?>
<menu xmlns:android="http://schemas.android.com/apk/res/android">
<item android:id="@+id/file"
android:title="@string/file" >
<!-- "file" submenu -->
<menu>
<item android:id="@+id/create_new"
android:title="@string/create_new" />
<item android:id="@+id/open"
android:title="@string/open" />
</menu>
</item>
</menu>
11
@Override
public boolean onCreateOptionsMenu(Menu menu) {
MenuInflater inflater = getMenuInflater();
inflater.inflate(R.menu.game_menu, menu);
return true;
}
@Override
public boolean onOptionsItemSelected(MenuItem item) {
// Handle item selection
switch (item.getItemId()) {
case R.id.new_game:
newGame();
return true;
case R.id.help:
showHelp();
return true;
default:
return super.onOptionsItemSelected(item);
}
}
12
5. Developan application that inserts some notifications into Notification area
and whenever a notification is inserted, it should show a toast with details
of the notification.
Activity_main.xml
<?xml version="1.0" encoding="utf-8"?>
<RelativeLayout
xmlns:android="http://schemas.android.com/apk/res/android"
xmlns:tools="http://schemas.android.com/tools"
android:layout_width="match_parent"
android:layout_height="match_parent"
android:paddingBottom="@dimen/activity_vertical_margin"
android:paddingLeft="@dimen/activity_horizontal_margin"
android:paddingRight="@dimen/activity_horizontal_margin"
android:paddingTop="@dimen/activity_vertical_margin"
tools:context="com.journaldev.notifications.MainActivity">
<Button
android:layout_width="wrap_content"
android:layout_height="wrap_content"
android:text="CREATE NOTIFICATION"
android:id="@+id/button"
13
android:layout_alignParentTop="true"
android:layout_alignParentRight="true"
android:layout_alignParentEnd="true"
android:layout_alignParentLeft="true"
android:layout_alignParentStart="true" />
<Button
android:layout_width="wrap_content"
android:layout_height="wrap_content"
android:text="CANCEL NOTIFICATION"
android:id="@+id/button2"
android:layout_below="@+id/button"
android:layout_alignRight="@+id/button"
android:layout_alignEnd="@+id/button"
android:layout_alignParentLeft="true"
android:layout_alignParentStart="true" />
</RelativeLayout>
MainAcivity.Java
package com.journaldev.notifications;
import android.app.NotificationManager;
import android.app.PendingIntent;
14
import android.content.Context;
import android.content.Intent;
import android.graphics.BitmapFactory;
import android.net.Uri;
import android.support.v7.app.AppCompatActivity;
import android.os.Bundle;
import android.support.v7.app.NotificationCompat;
import android.widget.Toast;
import butterknife.ButterKnife;
import butterknife.OnClick;
public class MainActivity extends AppCompatActivity {
@Override
protected void onCreate(Bundle savedInstanceState) {
super.onCreate(savedInstanceState);
setContentView(R.layout.activity_main);
ButterKnife.inject(this);
}
@OnClick(R.id.button)
public void sendNotification() {
NotificationCompat.Builder builder = new NotificationCompat.Builder(this);
builder.setSmallIcon(android.R.drawable.ic_dialog_alert);
15
Intent intent = new Intent(Intent.ACTION_VIEW,
Uri.parse("https://www.journaldev.com/"));
PendingIntent pendingIntent = PendingIntent.getActivity(this, 0, intent, 0);
builder.setContentIntent(pendingIntent);
builder.setLargeIcon(BitmapFactory.decodeResource(getResources(), R.mipmap.ic_launcher));
builder.setContentTitle("Notifications Title");
builder.setContentText("Your notification content here.");
builder.setSubText("Tap to view the website.");
NotificationManager notificationManager = (NotificationManager)
getSystemService(NOTIFICATION_SERVICE);
// Will display the notification in the notification bar
notificationManager.notify(1, builder.build());
}
@OnClick(R.id.button2)
public void cancelNotification() {
String ns = Context.NOTIFICATION_SERVICE;
NotificationManager nMgr = (NotificationManager)
getApplicationContext().getSystemService(ns);
nMgr.cancel(1);
}
}
16
6.Create an application that uses a text file to store user names and passwords (tab
separated fields and one record per line)
importjava.io.File;
importjava.io.FileOutputStream;
importjava.io.FileReader;
importjava.io.FileWriter;
publicclassMainActivityextendsAppCompatActivity{
EditTextCodNum;
EditTextPltNum;
RadioButtonradButA;
RadioButtonradButD;
RadioButtonradButS;
RadioButtonradButR;
RadioButtonradButO;
RadioButtonradButI;
@Override
protectedvoidonCreate(BundlesavedInstanceState) {
super.onCreate(savedInstanceState);
setContentView(R.layout.activity_main);
Toolbartoolbar= (Toolbar) findViewById(R.id.toolbar);
setSupportActionBar(toolbar);
17
CodNum= (EditText) findViewById(R.id.CodNum);
PltNum= (EditText) findViewById(R.id.PltNum);
radButA = (RadioButton) findViewById(R.id.radButA);
radButD = (RadioButton) findViewById(R.id.radButD);
radButS = (RadioButton) findViewById(R.id.radButS);
radButR = (RadioButton) findViewById(R.id.radButR);
radButO = (RadioButton) findViewById(R.id.radButO);
radButI = (RadioButton) findViewById(R.id.radButI);
checkBoxMw= (CheckBox) findViewById(R.id.checkBoxMw);
checkBoxG7= (CheckBox) findViewById(R.id.checkBoxG7);
checkBoxGw= (CheckBox) findViewById(R.id.checkBoxGw);
checkBoxF= (CheckBox) findViewById(R.id.checkBoxF);
final FileOutputStreamoutputStream;
StringfileName ="feederTxtFile";
Button buttonS= (Button) findViewById(R.id.buttonS);
buttonS.setOnClickListener(newView.OnClickListener() {
@Override
publicvoidonClick(Viewv) {
try{
outputStream= openFileOutput(fileName,CONTEXT.MOOD_PRIVATE);
outputStream.write(String.getBytes());
outputStream.close();
18
}catch (Exceptione){
e.printStackTrace();
}
}
});
Button buttonE= (Button) findViewById(R.id.buttonE);
buttonE.setOnClickListener(new View.OnClickListener(){
@Override
publicvoidonClick(Viewv) {
//Editingtotextfile.
}
});
19
7.Create a user registration application that stores the user details in a database
table.
activity_login.xml.
<?xml version="1.0" encoding="utf-8"?>
<android.support.v4.widget.NestedScrollView
xmlns:android="http://schemas.android.com/apk/res/android"
xmlns:tools="http://schemas.android.com/tools"
android:id="@+id/nestedScrollView"
android:layout_width="match_parent"
android:layout_height="match_parent"
android:background="@color/colorBackground"
android:paddingBottom="20dp"
android:paddingLeft="20dp"
android:paddingRight="20dp"
android:paddingTop="20dp"
tools:context=".activities.LoginActivity">
<android.support.v7.widget.LinearLayoutCompat
android:layout_width="match_parent"
android:layout_height="match_parent"
20
android:orientation="vertical">
<android.support.v7.widget.AppCompatImageView
android:layout_width="wrap_content"
android:layout_height="wrap_content"
android:layout_gravity="center_horizontal"
android:layout_marginTop="40dp"
android:src="@drawable/logo" />
<android.support.design.widget.TextInputLayout
android:id="@+id/textInputLayoutEmail"
android:layout_width="match_parent"
android:layout_height="wrap_content"
android:layout_marginTop="40dp">
<android.support.design.widget.TextInputEditText
android:id="@+id/textInputEditTextEmail"
android:layout_width="match_parent"
android:layout_height="wrap_content"
android:hint="@string/hint_email"
android:inputType="text"
21
android:maxLines="1"
android:textColor="@android:color/white" />
</android.support.design.widget.TextInputLayout>
<android.support.design.widget.TextInputLayout
android:id="@+id/textInputLayoutPassword"
android:layout_width="match_parent"
android:layout_height="wrap_content"
android:layout_marginTop="20dp">
<android.support.design.widget.TextInputEditText
android:id="@+id/textInputEditTextPassword"
android:layout_width="match_parent"
android:layout_height="wrap_content"
android:hint="@string/hint_password"
android:inputType="textPassword"
android:maxLines="1"
android:textColor="@android:color/white" />
</android.support.design.widget.TextInputLayout>
<android.support.v7.widget.AppCompatButton
22
android:id="@+id/appCompatButtonLogin"
android:layout_width="match_parent"
android:layout_height="wrap_content"
android:layout_marginTop="40dp"
android:background="@color/colorTextHint"
android:text="@string/text_login" />
<android.support.v7.widget.AppCompatTextView
android:id="@+id/textViewLinkRegister"
android:layout_width="fill_parent"
android:layout_height="wrap_content"
android:layout_marginTop="30dp"
android:gravity="center"
android:text="@string/text_not_member"
android:textSize="16dp" />
</android.support.v7.widget.LinearLayoutCompat>
</android.support.v4.widget.NestedScrollView>
23
8.Create a database and a user table where the details of login names and
passwords are stored. Insert some names and passwords initially. Now the
login details entered by the user should be verified with the database and
an appropriate dialog should be shown to the user.
package com.example.sairamkrishna.myapplication;
importandroid.content.Context;
importandroid.content.Intent;
importandroid.support.v7.app.ActionBarActivity;
importandroid.os.Bundle;
importandroid.view.KeyEvent;
importandroid.view.Menu;
importandroid.view.MenuItem;
importandroid.view.View;
importandroid.widget.AdapterView;
importandroid.widget.ArrayAdapter;
importandroid.widget.AdapterView.OnItemClickListener;
importandroid.widget.ListView;
importjava.util.ArrayList;
importjava.util.List;
24
publicclassMainActivityextendsActionBarActivity{
publicfinal staticStringEXTRA_MESSAGE= "MESSAGE";
private ListViewobj;
DBHelpermydb;
@Override
protectedvoidonCreate(BundlesavedInstanceState) {
super.onCreate(savedInstanceState);
setContentView(R.layout.activity_main);
mydb= newDBHelper(this);
ArrayListarray_list= mydb.getAllCotacts();
ArrayAdapterarrayAdapter=newArrayAdapter(this,android.R.layout.simple_list_item_1,array_list);
obj = (ListView)findViewById(R.id.listView1);
obj.setAdapter(arrayAdapter);
obj.setOnItemClickListener(newOnItemClickListener(){
@Override
publicvoidonItemClick(AdapterView<?>arg0,View arg1,int arg2,longarg3) {
//TODO Auto-generatedmethodstub
intid_To_Search= arg2 + 1;
Bundle dataBundle =newBundle();
dataBundle.putInt("id",id_To_Search);
25
Intentintent=newIntent(getApplicationContext(),DisplayContact.class);
intent.putExtras(dataBundle);
startActivity(intent);
}
});
}
@Override
publicbooleanonCreateOptionsMenu(Menumenu) {
// Inflate the menu;thisaddsitemstothe actionbar if it ispresent.
getMenuInflater().inflate(R.menu.menu_main,menu);
returntrue;
}
@Override
publicbooleanonOptionsItemSelected(MenuItemitem){
super.onOptionsItemSelected(item);
switch(item.getItemId()) {
case R.id.item1:Bundle dataBundle=new Bundle();
dataBundle.putInt("id",0);
Intentintent=new Intent(getApplicationContext(),DisplayContact.class);
intent.putExtras(dataBundle);
26
startActivity(intent);
returntrue;
default:
returnsuper.onOptionsItemSelected(item);
}
}
publicbooleanonKeyDown(intkeycode,KeyEventevent) {
if (keycode ==KeyEvent.KEYCODE_BACK) {
moveTaskToBack(true);
}
returnsuper.onKeyDown(keycode,event);
}
}

Android App Dev Manual-1.doc