
Recommended
More Related Content
What's hot
What's hot (16)
Similar to Guide to create an ad on photoshop
Similar to Guide to create an ad on photoshop (20)
More from gabebest100
More from gabebest100 (20)
Recently uploaded
Recently uploaded (20)
Guide to create an ad on photoshop
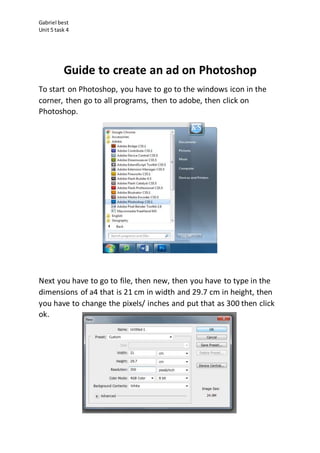
- 1. Gabriel best Unit 5 task 4 Guide to create an ad on Photoshop To start on Photoshop, you have to go to the windows icon in the corner, then go to all programs, then to adobe, then click on Photoshop. Next you have to go to file, then new, then you have to type in the dimensions of a4 that is 21 cm in width and 29.7 cm in height, then you have to change the pixels/ inches and put that as 300 then click ok.
- 2. Gabriel best Unit 5 task 4 Then you would get a page like this. Then you have to go to view, then rulers and click and you screen will look like this. I have added rulers to make it easier and when I am going to draw my lines it will be symmetric.
- 3. Gabriel best Unit 5 task 4 Next I am going to add a background colour you do this by going to layers at the top of the page, then click new, then click layer. Then an icon like this will pop up on your screen and you can enter a name for the new layer and then click ok.
- 4. Gabriel best Unit 5 task 4 When you do this you can now make the background colour do this you will need to go to the tool bar on the side, then go to the gradient icon, then hold down and to the paint bucket tool. Then when you have done this you can now go to the colour icon on the bottom of the tool bar and click the black square.
- 5. Gabriel best Unit 5 task 4 Then when you have got page with all of the colours now you can just get you house and drag thought all of the colours and when you have selected one you can now select all different shades of that colour. Once you have selected you colour go ahead and click ok. Then all you have to do is left click on the white page and you page will turn to the colour you selected.
- 6. Gabriel best Unit 5 task 4 You can also change the opacity. What it will do is increase or decrease the transparency level. All you have to do now is click on the opacity percentage and you can make it more transparent.
- 7. Gabriel best Unit 5 task 4 To add a title, you have to go to the T and then you have to drag the text box to as lager as you want. If sometimes you have made a title and it does not show up and the background is covering it make sure that the text layer is above the background layer.
- 8. Gabriel best Unit 5 task 4 Make sure that you make your text as big as you can so that the reader can see it and it will fill the page out. You can also change the colour of the text to the colour you want to use.
- 9. Gabriel best Unit 5 task 4 To change the font, you have to go to the tool bar at the top of the page and it will look like this. Then you can click on it and it will have thousands to choose from when you have chosen one just click on it and it will change you text to that font.
- 10. Gabriel best Unit 5 task 4 To add a picture, you have go on to google and search whatever and when you go to images you have to go more, then more tools, after that size then go to larger than, finally go to 2 MP. When you have found the image you want you have to click the image, then go to view image and it will turn out like this.
- 11. Gabriel best Unit 5 task 4 Then right click and select save image as. It will take you to a dialogue box where you can choose where you want to save it or you can choose what you want to call it but you should put it in a file where you will remember where it would be.
- 12. Gabriel best Unit 5 task 4 Then go back to Photoshop and go to open and it will take you to a dialogue b ox there you can go in and find the image you saved. When you click ok your page will look like this.
- 13. Gabriel best Unit 5 task 4 To add this picture to your advert you next have to go to the tool bar on the side and go to the lasso tool and hold down on it and go to the magnetic lasso. To use the magnetic lasso tool, you have to go to a point where you want to start and go around the image and when you get to the end of the image just left tap and it will start to glow around the image. And then it will look like this.
- 14. Gabriel best Unit 5 task 4 When you were using the magnetic lasso and you didn’t mark every part you wanted to or you need to deselect something you can go to the tool bar on the side and go the bottom tool. It is called quick mask and it will let you do that. When you click the quick mask button this will happen to your image.
- 15. Gabriel best Unit 5 task 4 If you can see in the image I have just quick masked I have go some of the background still in the image and I have cut out some of the car I am going to show you how to change it. So to erase the read we are going to have to use the brush tool and brush out the parts of the image we don’t want. If you have some very small thing you need to erase you can go to the zoom in or zoom out button in the left tool bar.
- 16. Gabriel best Unit 5 task 4 If your brush you are using is to big you can change it by going on to the brush tool and in the top bar there is an icon like this. If you click on this, it will look like this. There it says size you can make it all different sizes and where it has all different types of brushes it can be painted with a hard brush or a soft brush. To start changing the image zoom in and start holding down the left button and use the size brush you choose.
- 17. Gabriel best Unit 5 task 4 When you have erased the background from the image it should look something like this. As you can see I have removed the background from the picture but I have left it a little rough to fix this you are going to have to go to the eraser tool and make it look a lot neater.
- 18. Gabriel best Unit 5 task 4 Then you have to click the quick mask button again. And this will happen. Then on your key board hold down control and c and that will copy the image then go to the advert and then it will look like this.
- 19. Gabriel best Unit 5 task 4 When I copied the picture over it went really small so I need to enlarge the picture so to do this you will have to go on the layer which is the image then you go to your key board and hold down control and tap T this will enable free transform and this will let you enlarge the picture and move the picture around. Then if you don’t want to stretch out the image hold down shift and that will just enlarge the image and it won’t distort the image. Once you have got your image to where you want it and the size you want it will pop up with a dialogue box to be able to apply what you have done you have to click apply.
- 20. Gabriel best Unit 5 task 4 So now you have added you image and made your title to make the reader understand what you are doing you have to add some text so I am going to show you how to add text. First you have to go to your tool bar on the side and go to the T icon this icon means text box. then you have to hold down on the left click on the mouse and then you can make the text box as big as you want it. Then is you don’t like the position of it just hold down control button and click T then you will be able to move it where ever you want it.
- 21. Gabriel best Unit 5 task 4 no you can type in wheat ever you want you can also make the font bigger and change the font I have already shown in previous steps how to do this. Now you want to add more information to fill out the page to make it nice on the eyes you8ncan add more pictures or some more info I am going to add more information about the Bugatti. No the ad will look like this but I have used some fake text to see what it would look like. Now I am going to show you how to change your background colour to an image. first you have to go on to google.
- 22. Gabriel best Unit 5 task 4 Next type in the background type of your choice then click enter. Then when it loads p then go to images and your screen should look like this.
- 23. Gabriel best Unit 5 task 4 Then you have to go through the pictures and find the one that you think will nice on your ad and what would suit the topic you have chosen. So now to be able to get the image on to photo shop you have to save it so to do that you have to go to view image then it will look like this.
- 24. Gabriel best Unit 5 task 4 Now you have to right click and this will show up. Then you have to go to save image as and you can name it whatever you want and save it where ever it does not matter but you have to remember where you saved it. Now you have to go back in to your photo shop and go to file then open.
- 25. Gabriel best Unit 5 task 4 Then when you find you image you have to then click on the image and then click open. Then this should happen. No I am going to copy the image I am going to do this by going to the rectangle marquee tool.
- 26. Gabriel best Unit 5 task 4 No you have to drag the marquee tool over the whole image. Then on your key board hold down control and click c and then it will copy the image. Then you go back to your original document and then you have to hold down control and then click v and that will copy over the image and this will happen the image looks really small and faded because the colour background is in front of it.
- 27. Gabriel best Unit 5 task 4 Now it has been pasted it will look like this. Now we have to make the image bigger so you have to hold down control and click t and that will let you move the image and make it bigger. Now I have made my image bigger but as you can see the other background is showing thought and me wont to get rid of that so that’s what we are going to do.
- 28. Gabriel best Unit 5 task 4 Next, we are going to go to the layers in the bottom right corner and go to the layer that is light blue. Now you have to click on it then this will pop up and when it does you have to go to delete layer and they layer will be deleted and the back colour will be gone.
- 29. Gabriel best Unit 5 task 4 Now it will look like this. Now you cannot see the title and the text so you have to change it that is what I am going to do now.
- 30. Gabriel best Unit 5 task 4 Now I have finished my advert and now I am going to save it to make sure that all of the work I have done does not delete so I am going to do this by going to file then down to save.
- 31. Gabriel best Unit 5 task 4 Now I have finished my guide to make an advert I hope this was a good step-to-step help guide. I have gone through everything you will need to know to make an advert. Thanks for choosing this guide.