Music based magazine - contents page photoshop skills
Evaluation
1. We have used several features of photoshop for the makeing of our digi-pack, as we did not printscreen this through the makeing of
the various parts of it i will show the functions made on a immage of avenged sevenfould found on the internet, i will create a simple poster with the
immage as an exsample of the functintons used within photoshop.
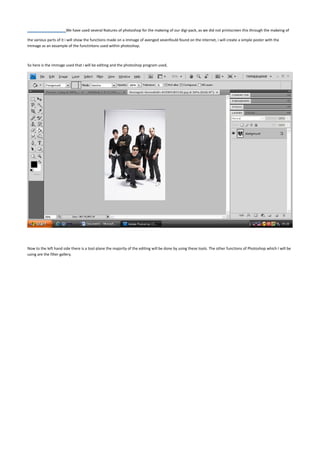
So here is the immage used that i will be editing and the photoshop program used,
Now to the left hand side there is a tool plane the majority of the editing will be done by using these tools. The other functions of Photoshop which I will be
using are the filter gallery.
2. By using the “magic wand tool” I am able to select certain parts of the image and by
holding down shift I am able to select more and more of the image.
3. And so here I have selected the background of the image as I want to put an effect on the background
and not the ban. I am going to use a somewhat simple effect on the back ground and I am going to fill with the fill tool to black.
So now that I have filled in the background with black I am going to convert the image into black and white.
4. By using the “burn” tool I can apply more and more darkness to the image making it darker and darker, this will make
the image seem more and more creepy.
However now that I have burned the image the band members are barely recognisable so by using the “dodge” tool I can apply lightness and place
highlights of light onto the image.
5. Now that I have made the band more recognisable
Once zoomed into the picture I see that the edges of
the image are somewhat pixeliesed which isn’t any good for a poster, and so to sort this out I will be using the blur tool to go around the edges and blend
outer into the inner of the image.
6. After applying this to the whole image it doesn’t look that different from the outer but once zoomed in you can see the change.
Now before I create anymore alterations to the image I want to create several new layers as I don’t want to have to start again if any of the text goes wrong,
creating another layer allows me to see what it looks like with and without the text and lets me decide if that is the best font for the image, it also allows me
to play around with the fonts places, without disturbing the image beneath it.
The reason I have placed a blown up image is that you can’t see what it looks like, as the tab saying what it is has gone on top of it.
7. The create a new layer button.
Here are teh several layers I chose three as it allows me to pace fonts with overlapping
and then allowing me to change the positions rather than having to redo and undo items if I’m not happy with them.
And so they have chose the first layer to modify and place a font. The first part of font I will be placing is the band’s name which is “avenged sevenfold”
And so I have to select a font which will be Adler, Adler is somewhat identical to the font used in the name of the band
8. Here is the font used it is pretty near to the one used within the official posters and merchandise
Here I am selecting the font size to make it more of a reasonable size for teh poster, as if it isn’t big enough people/ potential customers will not be able to
reads it.
9. Once the text has been placed upon the image the poster starts to some along, just the font used makes it look somewhat official.
The other font that we have used in the proper poster is “typewriter from hell”
Here is the word nightmare used in the same layout as the other poster.
10. to create a high quality image and able to edit it without having to edit it to a
massive degree layers are used as then the font and the background image are kept separate, the fonts will be flattened to one layer to allow for editing,
then when the image is totally finished it can be flattened then exported,
Once all the fonts are placed the image is like so.
Once that we are happy with the end product we then flatten the image
11. Once it is done we then save the image as the desired format have saved it as a jpg image
Once saved we then get a box asking to what quality we want to save the image in, as it is going to be a poster it will be the highest quality possible
12. And here is the saved image on the desktop
And then here are both of the images compared to each other.