SlideShare a Scribd company logo
1 of 87
When Photoshop is opened,
the first thing to do is to find
the word “File” at the top of the
computer screen and when
highlighted then click on “New”.
A box will then appear. The
Document Type must be
International Paper, if the
Document Type does not say
International Paper but
something else it can be
changed by clicking a visible
arrow facing downwards which
then shows the different
Document Types available. It is
at this moment when you click
on International Paper, when
this is done click OK.
After clicking OK, this should
appear on the computer
screen.
To get the image that is going to
be used as the magazine front
cover for “Teen Rulez!” (Social
Media) go to the top of the
screen (shown in the previous
slideshow) and find the word
“File” and when highlighted
then click on “Open”. After this
find the image and open it. It
should then should appear in a
new tab in Photoshop.
To get the image onto the Social
Media Magazine tab highlight
the whole image from
whichever corner using the
Rectangular Marquee Tool
(which can be seen highlighted)
with the left side of the mouse.
When this is done go to the top
of the page, find the word
“Edit” and when highlighted
then click on “Copy”.
When back on the Social Media
Magazine tab go to the top of
the screen, find the word “Edit”
and when highlighted click on
“Paste”. After this the image
copied should appear on the
screen.
To make the image smaller
without spreading it start by
going to the top of the screen
finding the word “Edit” and
when highlighted click on “Free
Transform”. After this the image
would look like this. Make sure
that the image layer (Layer 1) is
highlighted.
The next step in making the
image smaller without
spreading it to move the image
when highlighted after clicking
“Free Transform” to the top left
corner, when this is done hold
and drag the bottom right
corner of the image using the
left side of the mouse and hold
the “Shift” button on the
keyboard to the bottom of the
page. After this the image
would look like this.
Click the “Enter” key to make
the whole image visible and to
confirm the changes to the
image.
The next part of creating the
magazine front cover for “Teen
Rulez!” (Social Media) is
creating the Masthead/Title for
the magazine, in this case the
Masthead/Title will be “Teen
Rulez!”. Firstly, select the
Horizontal Type Tool and click
and drag a box where the
Masthead/Title will be typed
up.
Type the Masthead/Title in your
chosen colour, choice of font
and size of the font, in this case
I am using the colour White,
the font size is 80 pt and the
chosen front is Eras Bold ITC.
However, since the background
of the image I am using is also
white it is hard to see the
Masthead/Title so I will make
the Masthead/Title have a Black
outline so it can be visible for
the target audience.
To get a Black outline for the
Masthead/Title make sure the
“Teen Rulez!” layer is
highlighted and go to the top of
the screen, find the word
“Layer” find the words “Layer
Style” and click either “Drop
Shadow” or “Stroke”.
When “Stroke” is clicked change
the position to “Outside”, this
will be where the outline will
be. I also changed the size of
the outline from 1 px to 30 px
and I make the colour of the
outline Black. Once this is done
click OK, the Layer Style box will
then disappear and will be
returned to the Social Media
Magazine tab in Photoshop.
To get the barcode that is going
to be used at the bottom right
hand side of the front cover go
to the top of the screen and
find the word “File” and when
highlighted then click on
“Open”. After this find the
image of the barcode and open
it. It should then should appear
in a new tab in Photoshop.
To get the image of the barcode
onto the Social Media Magazine
tab highlight the whole image
from whichever corner using
the Rectangular Marquee Tool
(which can be seen highlighted)
with the left side of the mouse.
When this is done go to the top
of the page, find the word
“Edit” and when highlighted
then click on “Copy”.
When back on the Social Media
Magazine tab go to the top of
the screen, find the word “Edit”
and when highlighted click on
“Paste”. After this the image of
the barcode should appear on
the screen.
To make the image smaller
without spreading it start by
going to the top of the screen
finding the word “Edit” and
when highlighted click on “Free
Transform”. After this the image
would look like this. Make sure
that the image layer (Layer 1) is
highlighted.
The next step in making the
image smaller without
spreading it to move the image
when highlighted after clicking
“Free Transform” to the top left
corner, when this is done hold
and drag the bottom right
corner of the image using the
left side of the mouse and hold
the “Shift” button on the
keyboard to the bottom of the
page. After this the image
would look like this.
Click the “Enter” key to make
the whole image of the barcode
visible and to confirm the
changes to the image.
The next part of creating the
magazine front cover for “Teen
Rulez!” (Social Media) is
creating the Date and Price for
the magazine, in this case the
Date will be September 2017
and the Price will be £1.99.
Firstly, for the Date select the
Horizontal Type Tool and click
and drag a box just above the
Barcode.
Type the Date in your chosen
colour, choice of font and size
of the font, in this case I am
using the colour Purple, the
font size is 12 pt and the chosen
front is Eras Bold ITC. However,
I wanted to improve the Date
so it stands out for the target
audience, to improve this I will
make the Date have a Black
outline.
To get a Black outline for the
Date make sure the “September
2017” layer is highlighted and
go to the top of the screen, find
the word “Layer” find the
words “Layer Style” and click
either “Drop Shadow” or
“Stroke”.
When “Stroke” is clicked change
the position to “Outside”, this
will be where the outline will
be. I also changed the size of
the outline from 1 px to 10 px
and I make the colour of the
outline Black. Once this is done
click OK, the Layer Style box will
then disappear and will be
returned to the Social Media
Magazine tab in Photoshop.
The Price is also created by
selecting the Horizontal Type
Tool and click and drag a box
just above the Barcode and
below the Date.
Type the Price in your chosen
colour, choice of font and size
of the font, in this case I am
using the colour Purple, the
font size is 12 pt and the chosen
front is Eras Bold ITC. However,
I wanted to improve the Price
so it stands out for the target
audience, to improve this I will
make the Price have a Black
outline.
To get a Black outline for the
Price make sure the “£1.99”
layer is highlighted and go to
the top of the screen, find the
word “Layer” find the words
“Layer Style” and click either
“Drop Shadow” or “Stroke”.
When “Stroke” is clicked change
the position to “Outside”, this
will be where the outline will
be. I also changed the size of
the outline from 1 px to 10 px
and I make the colour of the
outline Black. Once this is done
click OK, the Layer Style box will
then disappear and will be
returned to the Social Media
Magazine tab in Photoshop.
The next part of creating the
magazine front cover for “Teen
Rulez!” (Social Media) is
creating the Main Coverline for
the magazine, in this case the
Main Coverline is “Aaliyah
Mcgregor- The New Face Of
YouTube!”. Firstly, start with the
name of the person (Aaliyah
Mcgregor) by selecting the
Horizontal Type Tool and click
and drag a box near towards
the bottom of the left side of
the front cover.
Type part of the Main Coverline
in your chosen colour, choice of
font and size of the font, in this
case I am using the colour Red,
the font size is 60 pt and the
chosen front is Eras Bold ITC.
The next part of creating the
magazine front cover for “Teen
Rulez!” (Social Media) is
creating the Main Coverline for
the magazine, in this case the
Main Coverline is “Aaliyah
Mcgregor-The New Face Of
YouTube!”. Next, finish the
Main Coverline with (The New
Face Of YouTube!) by typing
underneath the other part of
the Main Coverline shown on
the previous slideshow.
Type the rest of the Main
Coverline in your chosen colour,
choice of font and size of the
font, in this case I am using the
colour Purple, the font size is 18
pt and the chosen font is Eras
Bold ITC. I will make the whole
Main Coverline have a Black
outline so it can be visible for
the target audience.
To get a Black outline for the
Main Coverline make sure the
“Aaliyah Mcgregor- The New
Face Of YouTube!” layer is
highlighted and go to the top of
the screen, find the word
“Layer” find the words “Layer
Style” and click either “Drop
Shadow” or “Stroke”.
When “Stroke” is clicked change
the position to “Outside”, this
will be where the outline will
be. I also changed the size of
the outline from 1 px to 10 px
and I make the colour of the
outline White. Once this is done
click OK, the Layer Style box will
then disappear and will be
returned to the Social Media
Magazine tab in Photoshop.
The finished Main Coverline.
The Coverlines are then
created. The first Coverline
created is “Smosh: The Movie
2- Padilla And Hecox Working
On Movie Sequel!” To create
the Coverline select the
Horizontal Type Tool and click
and drag a box near the
Masthead/Title.
Type part of the first Coverline
“Smosh: The Movie 2” in your
chosen colour, choice of font
and size of the font, in this case
I am using the colour Red, the
font size is 24 pt and the chosen
front is Eras Bold ITC.
Type the remainder of the first
Coverline in your chosen colour,
choice of font and size of the
font, in this case I am using the
colour Purple, the font size is 18
pt and the chosen front is Eras
Bold ITC. However, I will make
the whole Coverline have a
Black outline so it can be visible
for the target audience as well
as match with the Main
Coverline and other Coverlines.
To get a Black outline for the
first Coverline make sure the
“Smosh: The Movie 2 Padilla
And Hecox Working On Movie
Sequel!” layer is highlighted
and go to the top of the screen,
find the word “Layer” find the
words “Layer Style” and click
either “Drop Shadow” or
“Stroke”.
When “Stroke” is clicked change
the position to “Outside”, this
will be where the outline will
be. I also changed the size of
the outline from 1 px to 10 px
and I make the colour of the
outline Black. Once this is done
click OK, the Layer Style box will
then disappear and will be
returned to the Social Media
Magazine tab in Photoshop.
The completed first Coverline
which can be seen in the
screenshot.
The second Coverline created is
“Google+- Your Guide To
Google+” To create the
Coverline select the Horizontal
Type Tool and click and drag a
box underneath the first
Coverline.
Type part of the second
Coverline “Google+” in your
chosen colour, choice of font
and size of the font, in this case
I am using the colour Red, the
font size is 24 pt and the chosen
front is Eras Bold ITC.
Type the remainder of the
second Coverline in your
chosen colour, choice of font
and size of the font, in this case
I am using the colour Purple,
the font size is 18 pt and the
chosen front is Eras Bold ITC.
However, I will make the whole
Coverline have a Black outline
so it can be visible for the target
audience as well as match with
the Main Coverline and other
Coverlines.
To get a Black outline for the
second Coverline make sure the
“Google+ Your Guide To
Google+” layer is highlighted
and go to the top of the screen,
find the word “Layer” find the
words “Layer Style” and click
either “Drop Shadow” or
“Stroke”.
When “Stroke” is clicked change
the position to “Outside”, this
will be where the outline will
be. I also changed the size of
the outline from 1 px to 10 px
and I make the colour of the
outline Black. Once this is done
click OK, the Layer Style box will
then disappear and will be
returned to the Social Media
Magazine tab in Photoshop.
The completed second
Coverline which can be seen in
the screenshot.
The third Coverline created is
“MySpace- The Rise And Fall!”
To create the Coverline select
the Horizontal Type Tool and
click and drag a box underneath
the second Coverline.
Type part of the third Coverline
“MySpace” in your chosen
colour, choice of font and size
of the font, in this case I am
using the colour Red, the font
size is 24 pt and the chosen
front is Eras Bold ITC.
Type the remainder of the third
Coverline in your chosen colour,
choice of font and size of the
font, in this case I am using the
colour Purple, the font size is 18
pt and the chosen front is Eras
Bold ITC. However, I will make
the whole Coverline have a
Black outline so it can be visible
for the target audience as well
as match with the Main
Coverline and other Coverlines.
To get a Black outline for the
third Coverline make sure the
“MySpace The Rise And Fall!”
layer is highlighted and go to
the top of the screen, find the
word “Layer” find the words
“Layer Style” and click either
“Drop Shadow” or “Stroke”.
When “Stroke” is clicked change
the position to “Outside”, this
will be where the outline will
be. I also changed the size of
the outline from 1 px to 10 px
and I make the colour of the
outline Black. Once this is done
click OK, the Layer Style box will
then disappear and will be
returned to the Social Media
Magazine tab in Photoshop.
The completed third Coverline
which can be seen in the
screenshot.
The fourth Coverline created is
“Social Media- Allowed In
Education?” To create the
Coverline select the Horizontal
Type Tool and click and drag a
box underneath the third
Coverline.
Type part of the fourth
Coverline “Social Media” in
your chosen colour, choice of
font and size of the font, in this
case I am using the colour Red,
the font size is 24 pt and the
chosen front is Eras Bold ITC.
Type the remainder of the
fourth Coverline in your chosen
colour, choice of font and size
of the font, in this case I am
using the colour Purple, the
font size is 18 pt and the chosen
front is Eras Bold ITC. However,
I will make the whole Coverline
have a Black outline so it can be
visible for the target audience
as well as match with the Main
Coverline and other Coverlines.
To get a Black outline for the
fourth Coverline make sure the
“Social Media Allowed In
Education?” layer is highlighted
and go to the top of the screen,
find the word “Layer” find the
words “Layer Style” and click
either “Drop Shadow” or
“Stroke”.
When “Stroke” is clicked change
the position to “Outside”, this
will be where the outline will
be. I also changed the size of
the outline from 1 px to 10 px
and I make the colour of the
outline Black. Once this is done
click OK, the Layer Style box will
then disappear and will be
returned to the Social Media
Magazine tab in Photoshop.
The completed fourth Coverline
which can be seen in the
screenshot.
The fifth Coverline created is
“Mark Zuckerberg- Facebook Is
Expanding!” To create the
Coverline select the Horizontal
Type Tool and click and drag a
box underneath the fourth
Coverline.
Type part of the fifth Coverline
“Mark Zuckerberg” in your
chosen colour, choice of font
and size of the font, in this case
I am using the colour Red, the
font size is 24 pt and the chosen
front is Eras Bold ITC.
Type the remainder of the fifth
Coverline in your chosen colour,
choice of font and size of the
font, in this case I am using the
colour Purple, the font size is 18
pt and the chosen front is Eras
Bold ITC. However, I will make
the whole Coverline have a
Black outline so it can be visible
for the target audience as well
as match with the Main
Coverline and other Coverlines.
To get a Black outline for the
fifth Coverline make sure the
“Mark Zuckerberg Facebook Is
Expanding!” layer is highlighted
and go to the top of the screen,
find the word “Layer” find the
words “Layer Style” and click
either “Drop Shadow” or
“Stroke”.
When “Stroke” is clicked change
the position to “Outside”, this
will be where the outline will
be. I also changed the size of
the outline from 1 px to 10 px
and I make the colour of the
outline Black. Once this is done
click OK, the Layer Style box will
then disappear and will be
returned to the Social Media
Magazine tab in Photoshop.
The completed fifth Coverline
which can be seen in the
screenshot.
The sixth Coverline created is
“Jacksepticeye Vs PewDiePie Vs
Markiplier- Who Will Gamer Of
The Year?” To create the
Coverline select the Horizontal
Type Tool and click and drag a
box across from the first
Coverline and underneath
Masthead/Title.
Type part of the sixth Coverline
“Jacksepticeye Vs PewDiePie Vs
Markiplier” in your chosen
colour, choice of font and size
of the font, in this case I am
using the colour Red, the font
size is 24 pt and the chosen
front is Eras Bold ITC.
Type the remainder of the sixth
Coverline in your chosen colour,
choice of font and size of the
font, in this case I am using the
colour Purple, the font size is 18
pt and the chosen front is Eras
Bold ITC. However, I will make
the whole Coverline have a
Black outline so it can be visible
for the target audience as well
as match with the Main
Coverline and other Coverlines.
To get a Black outline for the
sixth Coverline make sure the
“Jacksepticeye Vs PewDiePie Vs
Markiplier Who Will Gamer Of
The Year?” layer is highlighted
and go to the top of the screen,
find the word “Layer” find the
words “Layer Style” and click
either “Drop Shadow” or
“Stroke”.
When “Stroke” is clicked change
the position to “Outside”, this
will be where the outline will
be. I also changed the size of
the outline from 1 px to 10 px
and I make the colour of the
outline Black. Once this is done
click OK, the Layer Style box will
then disappear and will be
returned to the Social Media
Magazine tab in Photoshop.
The completed sixth Coverline
which can be seen in the
screenshot.
The seventh Coverline created
is “Dwayne “The Rock”
Johnson- Most Instagram
Followers!” To create the
Coverline select the Horizontal
Type Tool and click and drag a
box underneath the sixth
Coverline.
Type part of the seventh
Coverline “Dwayne “The Rock”
Johnson” in your chosen colour,
choice of font and size of the
font, in this case I am using the
colour Red, the font size is 24 pt
and the chosen front is Eras
Bold ITC.
Type the remainder of the
seventh Coverline in your
chosen colour, choice of font
and size of the font, in this case
I am using the colour Purple,
the font size is 18 pt and the
chosen front is Eras Bold ITC.
However, I will make the whole
Coverline have a Black outline
so it can be visible for the target
audience as well as match with
the Main Coverline and other
Coverlines.
To get a Black outline for the
seventh Coverline make sure
the “Dwayne “The Rock”
Johnson Most Instagram
Followers!” layer is highlighted
and go to the top of the screen,
find the word “Layer” find the
words “Layer Style” and click
either “Drop Shadow” or
“Stroke”.
When “Stroke” is clicked change
the position to “Outside”, this
will be where the outline will
be. I also changed the size of
the outline from 1 px to 10 px
and I make the colour of the
outline Black. Once this is done
click OK, the Layer Style box will
then disappear and will be
returned to the Social Media
Magazine tab in Photoshop.
The completed seventh
Coverline which can be seen in
the screenshot.
The eighth Coverline created is
“Vine- Is It Coming Back?” To
create the Coverline select the
Horizontal Type Tool and click
and drag a box underneath the
seventh Coverline.
Type part of the eighth
Coverline “Vine” in your chosen
colour, choice of font and size
of the font, in this case I am
using the colour Red, the font
size is 24 pt and the chosen
front is Eras Bold ITC.
Type the remainder of the
eighth Coverline in your chosen
colour, choice of font and size
of the font, in this case I am
using the colour Purple, the
font size is 18 pt and the chosen
front is Eras Bold ITC. However,
I will make the whole Coverline
have a Black outline so it can be
visible for the target audience
as well as match with the Main
Coverline and other Coverlines.
To get a Black outline for the
eighth Coverline make sure the
“Vine Is It Coming Back?” layer
is highlighted and go to the top
of the screen, find the word
“Layer” find the words “Layer
Style” and click either “Drop
Shadow” or “Stroke”.
When “Stroke” is clicked change
the position to “Outside”, this
will be where the outline will
be. I also changed the size of
the outline from 1 px to 10 px
and I make the colour of the
outline Black. Once this is done
click OK, the Layer Style box will
then disappear and will be
returned to the Social Media
Magazine tab in Photoshop.
The completed eighth Coverline
which can be seen in the
screenshot.
The ninth and final Coverline
created is “Twitter- Safer Than
Facebook?” To create the
Coverline select the Horizontal
Type Tool and click and drag a
box underneath the eighth
Coverline.
Type part of the ninth and final
Coverline “Twitter” in your
chosen colour, choice of font
and size of the font, in this case
I am using the colour Red, the
font size is 24 pt and the chosen
front is Eras Bold ITC.
Type the remainder of the ninth
and final Coverline in your
chosen colour, choice of font
and size of the font, in this case
I am using the colour Purple,
the font size is 18 pt and the
chosen front is Eras Bold ITC.
However, I will make the whole
Coverline have a Black outline
so it can be visible for the target
audience as well as match with
the Main Coverline and other
Coverlines.
To get a Black outline for the
ninth and final Coverline make
sure the “Twitter Safer Than
Facebook?” layer is highlighted
and go to the top of the screen,
find the word “Layer” find the
words “Layer Style” and click
either “Drop Shadow” or
“Stroke”.
When “Stroke” is clicked change
the position to “Outside”, this
will be where the outline will
be. I also changed the size of
the outline from 1 px to 10 px
and I make the colour of the
outline Black. Once this is done
click OK, the Layer Style box will
then disappear and will be
returned to the Social Media
Magazine tab in Photoshop.
The completed ninth and final
Coverline as well as the finished
Social Media Magazine front
cover which can be seen in the
screenshot.

More Related Content

Viewers also liked (8)

Social media magazine photoshop screenshots
Social media magazine photoshop screenshotsSocial media magazine photoshop screenshots
Social media magazine photoshop screenshots
 
Film
FilmFilm
Film
 
Film magazine photoshop screenshots
Film magazine photoshop screenshotsFilm magazine photoshop screenshots
Film magazine photoshop screenshots
 
Music
MusicMusic
Music
 
Music
MusicMusic
Music
 
Gaming
GamingGaming
Gaming
 
Film
FilmFilm
Film
 
Gaming
GamingGaming
Gaming
 

Similar to Social media magazine photoshop screenshots

Irls 571 indiv. proj. 1 how to create a new publication from
Irls 571 indiv. proj. 1 how to create a new publication fromIrls 571 indiv. proj. 1 how to create a new publication from
Irls 571 indiv. proj. 1 how to create a new publication from
srhbeeson
 
How to make a photoshop advert a4 poster
How to make a photoshop advert a4 posterHow to make a photoshop advert a4 poster
How to make a photoshop advert a4 poster
sparkly
 
Using microsoft-publisher-for-story-boards-07316
Using microsoft-publisher-for-story-boards-07316Using microsoft-publisher-for-story-boards-07316
Using microsoft-publisher-for-story-boards-07316
Anjetta Thackeray
 
Skills Development
Skills DevelopmentSkills Development
Skills Development
TaylaWebber
 
Microsoft office powerpoint
Microsoft office powerpointMicrosoft office powerpoint
Microsoft office powerpoint
timbram
 
Cdocumentsandsettingscdixionmydocumentsseminarsppppublisherseminar 1005131557...
Cdocumentsandsettingscdixionmydocumentsseminarsppppublisherseminar 1005131557...Cdocumentsandsettingscdixionmydocumentsseminarsppppublisherseminar 1005131557...
Cdocumentsandsettingscdixionmydocumentsseminarsppppublisherseminar 1005131557...
Jean Ulpindo
 

Similar to Social media magazine photoshop screenshots (20)

Fashion spread 1
Fashion spread 1Fashion spread 1
Fashion spread 1
 
Fashion spread 2
Fashion spread 2Fashion spread 2
Fashion spread 2
 
Fashion spread 4
Fashion spread 4Fashion spread 4
Fashion spread 4
 
Unit 5 Task 4 Tutorial
Unit 5 Task 4 TutorialUnit 5 Task 4 Tutorial
Unit 5 Task 4 Tutorial
 
Unit 5 Task 4 Create an Ad
Unit 5 Task 4 Create an AdUnit 5 Task 4 Create an Ad
Unit 5 Task 4 Create an Ad
 
How to use in design powerpoint
How to use in design powerpointHow to use in design powerpoint
How to use in design powerpoint
 
production diary
production diary production diary
production diary
 
How to use in design
How to use in designHow to use in design
How to use in design
 
Irls 571 indiv. proj. 1 how to create a new publication from
Irls 571 indiv. proj. 1 how to create a new publication fromIrls 571 indiv. proj. 1 how to create a new publication from
Irls 571 indiv. proj. 1 how to create a new publication from
 
Publisher Seminar
Publisher SeminarPublisher Seminar
Publisher Seminar
 
How to use picmonkey for a beginner
How to use  picmonkey for a beginnerHow to use  picmonkey for a beginner
How to use picmonkey for a beginner
 
How to use indesign
How to use indesignHow to use indesign
How to use indesign
 
Fanzine evaluation
Fanzine evaluationFanzine evaluation
Fanzine evaluation
 
Text and Extrude
Text and ExtrudeText and Extrude
Text and Extrude
 
Graphics
GraphicsGraphics
Graphics
 
How to make a photoshop advert a4 poster
How to make a photoshop advert a4 posterHow to make a photoshop advert a4 poster
How to make a photoshop advert a4 poster
 
Using microsoft-publisher-for-story-boards-07316
Using microsoft-publisher-for-story-boards-07316Using microsoft-publisher-for-story-boards-07316
Using microsoft-publisher-for-story-boards-07316
 
Skills Development
Skills DevelopmentSkills Development
Skills Development
 
Microsoft office powerpoint
Microsoft office powerpointMicrosoft office powerpoint
Microsoft office powerpoint
 
Cdocumentsandsettingscdixionmydocumentsseminarsppppublisherseminar 1005131557...
Cdocumentsandsettingscdixionmydocumentsseminarsppppublisherseminar 1005131557...Cdocumentsandsettingscdixionmydocumentsseminarsppppublisherseminar 1005131557...
Cdocumentsandsettingscdixionmydocumentsseminarsppppublisherseminar 1005131557...
 

More from cc05000041

More from cc05000041 (16)

Evaluation of magazine fashion spreads
Evaluation of magazine fashion spreadsEvaluation of magazine fashion spreads
Evaluation of magazine fashion spreads
 
Evaluation of magazine front covers
Evaluation of magazine front coversEvaluation of magazine front covers
Evaluation of magazine front covers
 
Fs 4
Fs 4Fs 4
Fs 4
 
Fs 3
Fs 3Fs 3
Fs 3
 
Fs 2
Fs 2Fs 2
Fs 2
 
Fs 1
Fs 1Fs 1
Fs 1
 
Social media
Social mediaSocial media
Social media
 
Fashion spread 4
Fashion spread 4Fashion spread 4
Fashion spread 4
 
Fashion spread 3
Fashion spread 3Fashion spread 3
Fashion spread 3
 
Fashion spread 2
Fashion spread 2Fashion spread 2
Fashion spread 2
 
Fashion spread 1
Fashion spread 1Fashion spread 1
Fashion spread 1
 
Social media magazine photoshop screenshots
Social media magazine photoshop screenshotsSocial media magazine photoshop screenshots
Social media magazine photoshop screenshots
 
Social media
Social mediaSocial media
Social media
 
Film
FilmFilm
Film
 
Mario Testino LO1
Mario Testino LO1Mario Testino LO1
Mario Testino LO1
 
Annie Leibovitz LO1
Annie Leibovitz LO1Annie Leibovitz LO1
Annie Leibovitz LO1
 

Recently uploaded

Call Girls In Saket Delhi 💯Call Us 🔝8264348440🔝
Call Girls In Saket Delhi 💯Call Us 🔝8264348440🔝Call Girls In Saket Delhi 💯Call Us 🔝8264348440🔝
Call Girls In Saket Delhi 💯Call Us 🔝8264348440🔝
soniya singh
 
Lucknow ❤CALL GIRL 88759*99948 ❤CALL GIRLS IN Lucknow ESCORT SERVICE❤CALL GIRL
Lucknow ❤CALL GIRL 88759*99948 ❤CALL GIRLS IN Lucknow ESCORT SERVICE❤CALL GIRLLucknow ❤CALL GIRL 88759*99948 ❤CALL GIRLS IN Lucknow ESCORT SERVICE❤CALL GIRL
Lucknow ❤CALL GIRL 88759*99948 ❤CALL GIRLS IN Lucknow ESCORT SERVICE❤CALL GIRL
imonikaupta
 
Hot Service (+9316020077 ) Goa Call Girls Real Photos and Genuine Service
Hot Service (+9316020077 ) Goa  Call Girls Real Photos and Genuine ServiceHot Service (+9316020077 ) Goa  Call Girls Real Photos and Genuine Service
Hot Service (+9316020077 ) Goa Call Girls Real Photos and Genuine Service
sexy call girls service in goa
 
Low Rate Young Call Girls in Sector 63 Mamura Noida ✔️☆9289244007✔️☆ Female E...
Low Rate Young Call Girls in Sector 63 Mamura Noida ✔️☆9289244007✔️☆ Female E...Low Rate Young Call Girls in Sector 63 Mamura Noida ✔️☆9289244007✔️☆ Female E...
Low Rate Young Call Girls in Sector 63 Mamura Noida ✔️☆9289244007✔️☆ Female E...
SofiyaSharma5
 
Call Girls In Model Towh Delhi 💯Call Us 🔝8264348440🔝
Call Girls In Model Towh Delhi 💯Call Us 🔝8264348440🔝Call Girls In Model Towh Delhi 💯Call Us 🔝8264348440🔝
Call Girls In Model Towh Delhi 💯Call Us 🔝8264348440🔝
soniya singh
 
Rohini Sector 26 Call Girls Delhi 9999965857 @Sabina Saikh No Advance
Rohini Sector 26 Call Girls Delhi 9999965857 @Sabina Saikh No AdvanceRohini Sector 26 Call Girls Delhi 9999965857 @Sabina Saikh No Advance
Rohini Sector 26 Call Girls Delhi 9999965857 @Sabina Saikh No Advance
Call Girls In Delhi Whatsup 9873940964 Enjoy Unlimited Pleasure
 
Rohini Sector 6 Call Girls Delhi 9999965857 @Sabina Saikh No Advance
Rohini Sector 6 Call Girls Delhi 9999965857 @Sabina Saikh No AdvanceRohini Sector 6 Call Girls Delhi 9999965857 @Sabina Saikh No Advance
Rohini Sector 6 Call Girls Delhi 9999965857 @Sabina Saikh No Advance
Call Girls In Delhi Whatsup 9873940964 Enjoy Unlimited Pleasure
 
₹5.5k {Cash Payment}New Friends Colony Call Girls In [Delhi NIHARIKA] 🔝|97111...
₹5.5k {Cash Payment}New Friends Colony Call Girls In [Delhi NIHARIKA] 🔝|97111...₹5.5k {Cash Payment}New Friends Colony Call Girls In [Delhi NIHARIKA] 🔝|97111...
₹5.5k {Cash Payment}New Friends Colony Call Girls In [Delhi NIHARIKA] 🔝|97111...
Diya Sharma
 

Recently uploaded (20)

Moving Beyond Twitter/X and Facebook - Social Media for local news providers
Moving Beyond Twitter/X and Facebook - Social Media for local news providersMoving Beyond Twitter/X and Facebook - Social Media for local news providers
Moving Beyond Twitter/X and Facebook - Social Media for local news providers
 
Call Now ☎ 8264348440 !! Call Girls in Sarai Rohilla Escort Service Delhi N.C.R.
Call Now ☎ 8264348440 !! Call Girls in Sarai Rohilla Escort Service Delhi N.C.R.Call Now ☎ 8264348440 !! Call Girls in Sarai Rohilla Escort Service Delhi N.C.R.
Call Now ☎ 8264348440 !! Call Girls in Sarai Rohilla Escort Service Delhi N.C.R.
 
Call Girls In Saket Delhi 💯Call Us 🔝8264348440🔝
Call Girls In Saket Delhi 💯Call Us 🔝8264348440🔝Call Girls In Saket Delhi 💯Call Us 🔝8264348440🔝
Call Girls In Saket Delhi 💯Call Us 🔝8264348440🔝
 
Lucknow ❤CALL GIRL 88759*99948 ❤CALL GIRLS IN Lucknow ESCORT SERVICE❤CALL GIRL
Lucknow ❤CALL GIRL 88759*99948 ❤CALL GIRLS IN Lucknow ESCORT SERVICE❤CALL GIRLLucknow ❤CALL GIRL 88759*99948 ❤CALL GIRLS IN Lucknow ESCORT SERVICE❤CALL GIRL
Lucknow ❤CALL GIRL 88759*99948 ❤CALL GIRLS IN Lucknow ESCORT SERVICE❤CALL GIRL
 
How is AI changing journalism? (v. April 2024)
How is AI changing journalism? (v. April 2024)How is AI changing journalism? (v. April 2024)
How is AI changing journalism? (v. April 2024)
 
On Starlink, presented by Geoff Huston at NZNOG 2024
On Starlink, presented by Geoff Huston at NZNOG 2024On Starlink, presented by Geoff Huston at NZNOG 2024
On Starlink, presented by Geoff Huston at NZNOG 2024
 
Hot Service (+9316020077 ) Goa Call Girls Real Photos and Genuine Service
Hot Service (+9316020077 ) Goa  Call Girls Real Photos and Genuine ServiceHot Service (+9316020077 ) Goa  Call Girls Real Photos and Genuine Service
Hot Service (+9316020077 ) Goa Call Girls Real Photos and Genuine Service
 
(+971568250507 ))# Young Call Girls in Ajman By Pakistani Call Girls in ...
(+971568250507  ))#  Young Call Girls  in Ajman  By Pakistani Call Girls  in ...(+971568250507  ))#  Young Call Girls  in Ajman  By Pakistani Call Girls  in ...
(+971568250507 ))# Young Call Girls in Ajman By Pakistani Call Girls in ...
 
Russian Call girl in Ajman +971563133746 Ajman Call girl Service
Russian Call girl in Ajman +971563133746 Ajman Call girl ServiceRussian Call girl in Ajman +971563133746 Ajman Call girl Service
Russian Call girl in Ajman +971563133746 Ajman Call girl Service
 
Low Rate Young Call Girls in Sector 63 Mamura Noida ✔️☆9289244007✔️☆ Female E...
Low Rate Young Call Girls in Sector 63 Mamura Noida ✔️☆9289244007✔️☆ Female E...Low Rate Young Call Girls in Sector 63 Mamura Noida ✔️☆9289244007✔️☆ Female E...
Low Rate Young Call Girls in Sector 63 Mamura Noida ✔️☆9289244007✔️☆ Female E...
 
Call Girls In Model Towh Delhi 💯Call Us 🔝8264348440🔝
Call Girls In Model Towh Delhi 💯Call Us 🔝8264348440🔝Call Girls In Model Towh Delhi 💯Call Us 🔝8264348440🔝
Call Girls In Model Towh Delhi 💯Call Us 🔝8264348440🔝
 
Rohini Sector 26 Call Girls Delhi 9999965857 @Sabina Saikh No Advance
Rohini Sector 26 Call Girls Delhi 9999965857 @Sabina Saikh No AdvanceRohini Sector 26 Call Girls Delhi 9999965857 @Sabina Saikh No Advance
Rohini Sector 26 Call Girls Delhi 9999965857 @Sabina Saikh No Advance
 
DDoS In Oceania and the Pacific, presented by Dave Phelan at NZNOG 2024
DDoS In Oceania and the Pacific, presented by Dave Phelan at NZNOG 2024DDoS In Oceania and the Pacific, presented by Dave Phelan at NZNOG 2024
DDoS In Oceania and the Pacific, presented by Dave Phelan at NZNOG 2024
 
WhatsApp 📞 8448380779 ✅Call Girls In Mamura Sector 66 ( Noida)
WhatsApp 📞 8448380779 ✅Call Girls In Mamura Sector 66 ( Noida)WhatsApp 📞 8448380779 ✅Call Girls In Mamura Sector 66 ( Noida)
WhatsApp 📞 8448380779 ✅Call Girls In Mamura Sector 66 ( Noida)
 
Rohini Sector 6 Call Girls Delhi 9999965857 @Sabina Saikh No Advance
Rohini Sector 6 Call Girls Delhi 9999965857 @Sabina Saikh No AdvanceRohini Sector 6 Call Girls Delhi 9999965857 @Sabina Saikh No Advance
Rohini Sector 6 Call Girls Delhi 9999965857 @Sabina Saikh No Advance
 
Top Rated Pune Call Girls Daund ⟟ 6297143586 ⟟ Call Me For Genuine Sex Servi...
Top Rated  Pune Call Girls Daund ⟟ 6297143586 ⟟ Call Me For Genuine Sex Servi...Top Rated  Pune Call Girls Daund ⟟ 6297143586 ⟟ Call Me For Genuine Sex Servi...
Top Rated Pune Call Girls Daund ⟟ 6297143586 ⟟ Call Me For Genuine Sex Servi...
 
₹5.5k {Cash Payment}New Friends Colony Call Girls In [Delhi NIHARIKA] 🔝|97111...
₹5.5k {Cash Payment}New Friends Colony Call Girls In [Delhi NIHARIKA] 🔝|97111...₹5.5k {Cash Payment}New Friends Colony Call Girls In [Delhi NIHARIKA] 🔝|97111...
₹5.5k {Cash Payment}New Friends Colony Call Girls In [Delhi NIHARIKA] 🔝|97111...
 
Call Girls Dubai Prolapsed O525547819 Call Girls In Dubai Princes$
Call Girls Dubai Prolapsed O525547819 Call Girls In Dubai Princes$Call Girls Dubai Prolapsed O525547819 Call Girls In Dubai Princes$
Call Girls Dubai Prolapsed O525547819 Call Girls In Dubai Princes$
 
Nanded City ( Call Girls ) Pune 6297143586 Hot Model With Sexy Bhabi Ready ...
Nanded City ( Call Girls ) Pune  6297143586  Hot Model With Sexy Bhabi Ready ...Nanded City ( Call Girls ) Pune  6297143586  Hot Model With Sexy Bhabi Ready ...
Nanded City ( Call Girls ) Pune 6297143586 Hot Model With Sexy Bhabi Ready ...
 
Hire↠Young Call Girls in Tilak nagar (Delhi) ☎️ 9205541914 ☎️ Independent Esc...
Hire↠Young Call Girls in Tilak nagar (Delhi) ☎️ 9205541914 ☎️ Independent Esc...Hire↠Young Call Girls in Tilak nagar (Delhi) ☎️ 9205541914 ☎️ Independent Esc...
Hire↠Young Call Girls in Tilak nagar (Delhi) ☎️ 9205541914 ☎️ Independent Esc...
 

Social media magazine photoshop screenshots

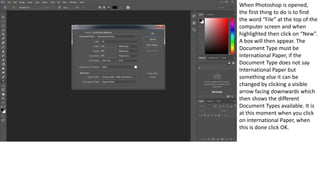
  • 1. When Photoshop is opened, the first thing to do is to find the word “File” at the top of the computer screen and when highlighted then click on “New”. A box will then appear. The Document Type must be International Paper, if the Document Type does not say International Paper but something else it can be changed by clicking a visible arrow facing downwards which then shows the different Document Types available. It is at this moment when you click on International Paper, when this is done click OK.
  • 2. After clicking OK, this should appear on the computer screen.
  • 3. To get the image that is going to be used as the magazine front cover for “Teen Rulez!” (Social Media) go to the top of the screen (shown in the previous slideshow) and find the word “File” and when highlighted then click on “Open”. After this find the image and open it. It should then should appear in a new tab in Photoshop.
  • 4. To get the image onto the Social Media Magazine tab highlight the whole image from whichever corner using the Rectangular Marquee Tool (which can be seen highlighted) with the left side of the mouse. When this is done go to the top of the page, find the word “Edit” and when highlighted then click on “Copy”.
  • 5. When back on the Social Media Magazine tab go to the top of the screen, find the word “Edit” and when highlighted click on “Paste”. After this the image copied should appear on the screen.
  • 6. To make the image smaller without spreading it start by going to the top of the screen finding the word “Edit” and when highlighted click on “Free Transform”. After this the image would look like this. Make sure that the image layer (Layer 1) is highlighted.
  • 7. The next step in making the image smaller without spreading it to move the image when highlighted after clicking “Free Transform” to the top left corner, when this is done hold and drag the bottom right corner of the image using the left side of the mouse and hold the “Shift” button on the keyboard to the bottom of the page. After this the image would look like this.
  • 8. Click the “Enter” key to make the whole image visible and to confirm the changes to the image.
  • 9. The next part of creating the magazine front cover for “Teen Rulez!” (Social Media) is creating the Masthead/Title for the magazine, in this case the Masthead/Title will be “Teen Rulez!”. Firstly, select the Horizontal Type Tool and click and drag a box where the Masthead/Title will be typed up.
  • 10. Type the Masthead/Title in your chosen colour, choice of font and size of the font, in this case I am using the colour White, the font size is 80 pt and the chosen front is Eras Bold ITC. However, since the background of the image I am using is also white it is hard to see the Masthead/Title so I will make the Masthead/Title have a Black outline so it can be visible for the target audience.
  • 11. To get a Black outline for the Masthead/Title make sure the “Teen Rulez!” layer is highlighted and go to the top of the screen, find the word “Layer” find the words “Layer Style” and click either “Drop Shadow” or “Stroke”.
  • 12. When “Stroke” is clicked change the position to “Outside”, this will be where the outline will be. I also changed the size of the outline from 1 px to 30 px and I make the colour of the outline Black. Once this is done click OK, the Layer Style box will then disappear and will be returned to the Social Media Magazine tab in Photoshop.
  • 13. To get the barcode that is going to be used at the bottom right hand side of the front cover go to the top of the screen and find the word “File” and when highlighted then click on “Open”. After this find the image of the barcode and open it. It should then should appear in a new tab in Photoshop.
  • 14. To get the image of the barcode onto the Social Media Magazine tab highlight the whole image from whichever corner using the Rectangular Marquee Tool (which can be seen highlighted) with the left side of the mouse. When this is done go to the top of the page, find the word “Edit” and when highlighted then click on “Copy”.
  • 15. When back on the Social Media Magazine tab go to the top of the screen, find the word “Edit” and when highlighted click on “Paste”. After this the image of the barcode should appear on the screen.
  • 16. To make the image smaller without spreading it start by going to the top of the screen finding the word “Edit” and when highlighted click on “Free Transform”. After this the image would look like this. Make sure that the image layer (Layer 1) is highlighted.
  • 17. The next step in making the image smaller without spreading it to move the image when highlighted after clicking “Free Transform” to the top left corner, when this is done hold and drag the bottom right corner of the image using the left side of the mouse and hold the “Shift” button on the keyboard to the bottom of the page. After this the image would look like this.
  • 18. Click the “Enter” key to make the whole image of the barcode visible and to confirm the changes to the image.
  • 19. The next part of creating the magazine front cover for “Teen Rulez!” (Social Media) is creating the Date and Price for the magazine, in this case the Date will be September 2017 and the Price will be £1.99. Firstly, for the Date select the Horizontal Type Tool and click and drag a box just above the Barcode.
  • 20. Type the Date in your chosen colour, choice of font and size of the font, in this case I am using the colour Purple, the font size is 12 pt and the chosen front is Eras Bold ITC. However, I wanted to improve the Date so it stands out for the target audience, to improve this I will make the Date have a Black outline.
  • 21. To get a Black outline for the Date make sure the “September 2017” layer is highlighted and go to the top of the screen, find the word “Layer” find the words “Layer Style” and click either “Drop Shadow” or “Stroke”.
  • 22. When “Stroke” is clicked change the position to “Outside”, this will be where the outline will be. I also changed the size of the outline from 1 px to 10 px and I make the colour of the outline Black. Once this is done click OK, the Layer Style box will then disappear and will be returned to the Social Media Magazine tab in Photoshop.
  • 23. The Price is also created by selecting the Horizontal Type Tool and click and drag a box just above the Barcode and below the Date.
  • 24. Type the Price in your chosen colour, choice of font and size of the font, in this case I am using the colour Purple, the font size is 12 pt and the chosen front is Eras Bold ITC. However, I wanted to improve the Price so it stands out for the target audience, to improve this I will make the Price have a Black outline.
  • 25. To get a Black outline for the Price make sure the “£1.99” layer is highlighted and go to the top of the screen, find the word “Layer” find the words “Layer Style” and click either “Drop Shadow” or “Stroke”.
  • 26. When “Stroke” is clicked change the position to “Outside”, this will be where the outline will be. I also changed the size of the outline from 1 px to 10 px and I make the colour of the outline Black. Once this is done click OK, the Layer Style box will then disappear and will be returned to the Social Media Magazine tab in Photoshop.
  • 27. The next part of creating the magazine front cover for “Teen Rulez!” (Social Media) is creating the Main Coverline for the magazine, in this case the Main Coverline is “Aaliyah Mcgregor- The New Face Of YouTube!”. Firstly, start with the name of the person (Aaliyah Mcgregor) by selecting the Horizontal Type Tool and click and drag a box near towards the bottom of the left side of the front cover.
  • 28. Type part of the Main Coverline in your chosen colour, choice of font and size of the font, in this case I am using the colour Red, the font size is 60 pt and the chosen front is Eras Bold ITC.
  • 29. The next part of creating the magazine front cover for “Teen Rulez!” (Social Media) is creating the Main Coverline for the magazine, in this case the Main Coverline is “Aaliyah Mcgregor-The New Face Of YouTube!”. Next, finish the Main Coverline with (The New Face Of YouTube!) by typing underneath the other part of the Main Coverline shown on the previous slideshow.
  • 30. Type the rest of the Main Coverline in your chosen colour, choice of font and size of the font, in this case I am using the colour Purple, the font size is 18 pt and the chosen font is Eras Bold ITC. I will make the whole Main Coverline have a Black outline so it can be visible for the target audience.
  • 31. To get a Black outline for the Main Coverline make sure the “Aaliyah Mcgregor- The New Face Of YouTube!” layer is highlighted and go to the top of the screen, find the word “Layer” find the words “Layer Style” and click either “Drop Shadow” or “Stroke”.
  • 32. When “Stroke” is clicked change the position to “Outside”, this will be where the outline will be. I also changed the size of the outline from 1 px to 10 px and I make the colour of the outline White. Once this is done click OK, the Layer Style box will then disappear and will be returned to the Social Media Magazine tab in Photoshop.
  • 33. The finished Main Coverline.
  • 34. The Coverlines are then created. The first Coverline created is “Smosh: The Movie 2- Padilla And Hecox Working On Movie Sequel!” To create the Coverline select the Horizontal Type Tool and click and drag a box near the Masthead/Title.
  • 35. Type part of the first Coverline “Smosh: The Movie 2” in your chosen colour, choice of font and size of the font, in this case I am using the colour Red, the font size is 24 pt and the chosen front is Eras Bold ITC.
  • 36. Type the remainder of the first Coverline in your chosen colour, choice of font and size of the font, in this case I am using the colour Purple, the font size is 18 pt and the chosen front is Eras Bold ITC. However, I will make the whole Coverline have a Black outline so it can be visible for the target audience as well as match with the Main Coverline and other Coverlines.
  • 37. To get a Black outline for the first Coverline make sure the “Smosh: The Movie 2 Padilla And Hecox Working On Movie Sequel!” layer is highlighted and go to the top of the screen, find the word “Layer” find the words “Layer Style” and click either “Drop Shadow” or “Stroke”.
  • 38. When “Stroke” is clicked change the position to “Outside”, this will be where the outline will be. I also changed the size of the outline from 1 px to 10 px and I make the colour of the outline Black. Once this is done click OK, the Layer Style box will then disappear and will be returned to the Social Media Magazine tab in Photoshop.
  • 39. The completed first Coverline which can be seen in the screenshot.
  • 40. The second Coverline created is “Google+- Your Guide To Google+” To create the Coverline select the Horizontal Type Tool and click and drag a box underneath the first Coverline.
  • 41. Type part of the second Coverline “Google+” in your chosen colour, choice of font and size of the font, in this case I am using the colour Red, the font size is 24 pt and the chosen front is Eras Bold ITC.
  • 42. Type the remainder of the second Coverline in your chosen colour, choice of font and size of the font, in this case I am using the colour Purple, the font size is 18 pt and the chosen front is Eras Bold ITC. However, I will make the whole Coverline have a Black outline so it can be visible for the target audience as well as match with the Main Coverline and other Coverlines.
  • 43. To get a Black outline for the second Coverline make sure the “Google+ Your Guide To Google+” layer is highlighted and go to the top of the screen, find the word “Layer” find the words “Layer Style” and click either “Drop Shadow” or “Stroke”.
  • 44. When “Stroke” is clicked change the position to “Outside”, this will be where the outline will be. I also changed the size of the outline from 1 px to 10 px and I make the colour of the outline Black. Once this is done click OK, the Layer Style box will then disappear and will be returned to the Social Media Magazine tab in Photoshop.
  • 45. The completed second Coverline which can be seen in the screenshot.
  • 46. The third Coverline created is “MySpace- The Rise And Fall!” To create the Coverline select the Horizontal Type Tool and click and drag a box underneath the second Coverline.
  • 47. Type part of the third Coverline “MySpace” in your chosen colour, choice of font and size of the font, in this case I am using the colour Red, the font size is 24 pt and the chosen front is Eras Bold ITC.
  • 48. Type the remainder of the third Coverline in your chosen colour, choice of font and size of the font, in this case I am using the colour Purple, the font size is 18 pt and the chosen front is Eras Bold ITC. However, I will make the whole Coverline have a Black outline so it can be visible for the target audience as well as match with the Main Coverline and other Coverlines.
  • 49. To get a Black outline for the third Coverline make sure the “MySpace The Rise And Fall!” layer is highlighted and go to the top of the screen, find the word “Layer” find the words “Layer Style” and click either “Drop Shadow” or “Stroke”.
  • 50. When “Stroke” is clicked change the position to “Outside”, this will be where the outline will be. I also changed the size of the outline from 1 px to 10 px and I make the colour of the outline Black. Once this is done click OK, the Layer Style box will then disappear and will be returned to the Social Media Magazine tab in Photoshop.
  • 51. The completed third Coverline which can be seen in the screenshot.
  • 52. The fourth Coverline created is “Social Media- Allowed In Education?” To create the Coverline select the Horizontal Type Tool and click and drag a box underneath the third Coverline.
  • 53. Type part of the fourth Coverline “Social Media” in your chosen colour, choice of font and size of the font, in this case I am using the colour Red, the font size is 24 pt and the chosen front is Eras Bold ITC.
  • 54. Type the remainder of the fourth Coverline in your chosen colour, choice of font and size of the font, in this case I am using the colour Purple, the font size is 18 pt and the chosen front is Eras Bold ITC. However, I will make the whole Coverline have a Black outline so it can be visible for the target audience as well as match with the Main Coverline and other Coverlines.
  • 55. To get a Black outline for the fourth Coverline make sure the “Social Media Allowed In Education?” layer is highlighted and go to the top of the screen, find the word “Layer” find the words “Layer Style” and click either “Drop Shadow” or “Stroke”.
  • 56. When “Stroke” is clicked change the position to “Outside”, this will be where the outline will be. I also changed the size of the outline from 1 px to 10 px and I make the colour of the outline Black. Once this is done click OK, the Layer Style box will then disappear and will be returned to the Social Media Magazine tab in Photoshop.
  • 57. The completed fourth Coverline which can be seen in the screenshot.
  • 58. The fifth Coverline created is “Mark Zuckerberg- Facebook Is Expanding!” To create the Coverline select the Horizontal Type Tool and click and drag a box underneath the fourth Coverline.
  • 59. Type part of the fifth Coverline “Mark Zuckerberg” in your chosen colour, choice of font and size of the font, in this case I am using the colour Red, the font size is 24 pt and the chosen front is Eras Bold ITC.
  • 60. Type the remainder of the fifth Coverline in your chosen colour, choice of font and size of the font, in this case I am using the colour Purple, the font size is 18 pt and the chosen front is Eras Bold ITC. However, I will make the whole Coverline have a Black outline so it can be visible for the target audience as well as match with the Main Coverline and other Coverlines.
  • 61. To get a Black outline for the fifth Coverline make sure the “Mark Zuckerberg Facebook Is Expanding!” layer is highlighted and go to the top of the screen, find the word “Layer” find the words “Layer Style” and click either “Drop Shadow” or “Stroke”.
  • 62. When “Stroke” is clicked change the position to “Outside”, this will be where the outline will be. I also changed the size of the outline from 1 px to 10 px and I make the colour of the outline Black. Once this is done click OK, the Layer Style box will then disappear and will be returned to the Social Media Magazine tab in Photoshop.
  • 63. The completed fifth Coverline which can be seen in the screenshot.
  • 64. The sixth Coverline created is “Jacksepticeye Vs PewDiePie Vs Markiplier- Who Will Gamer Of The Year?” To create the Coverline select the Horizontal Type Tool and click and drag a box across from the first Coverline and underneath Masthead/Title.
  • 65. Type part of the sixth Coverline “Jacksepticeye Vs PewDiePie Vs Markiplier” in your chosen colour, choice of font and size of the font, in this case I am using the colour Red, the font size is 24 pt and the chosen front is Eras Bold ITC.
  • 66. Type the remainder of the sixth Coverline in your chosen colour, choice of font and size of the font, in this case I am using the colour Purple, the font size is 18 pt and the chosen front is Eras Bold ITC. However, I will make the whole Coverline have a Black outline so it can be visible for the target audience as well as match with the Main Coverline and other Coverlines.
  • 67. To get a Black outline for the sixth Coverline make sure the “Jacksepticeye Vs PewDiePie Vs Markiplier Who Will Gamer Of The Year?” layer is highlighted and go to the top of the screen, find the word “Layer” find the words “Layer Style” and click either “Drop Shadow” or “Stroke”.
  • 68. When “Stroke” is clicked change the position to “Outside”, this will be where the outline will be. I also changed the size of the outline from 1 px to 10 px and I make the colour of the outline Black. Once this is done click OK, the Layer Style box will then disappear and will be returned to the Social Media Magazine tab in Photoshop.
  • 69. The completed sixth Coverline which can be seen in the screenshot.
  • 70. The seventh Coverline created is “Dwayne “The Rock” Johnson- Most Instagram Followers!” To create the Coverline select the Horizontal Type Tool and click and drag a box underneath the sixth Coverline.
  • 71. Type part of the seventh Coverline “Dwayne “The Rock” Johnson” in your chosen colour, choice of font and size of the font, in this case I am using the colour Red, the font size is 24 pt and the chosen front is Eras Bold ITC.
  • 72. Type the remainder of the seventh Coverline in your chosen colour, choice of font and size of the font, in this case I am using the colour Purple, the font size is 18 pt and the chosen front is Eras Bold ITC. However, I will make the whole Coverline have a Black outline so it can be visible for the target audience as well as match with the Main Coverline and other Coverlines.
  • 73. To get a Black outline for the seventh Coverline make sure the “Dwayne “The Rock” Johnson Most Instagram Followers!” layer is highlighted and go to the top of the screen, find the word “Layer” find the words “Layer Style” and click either “Drop Shadow” or “Stroke”.
  • 74. When “Stroke” is clicked change the position to “Outside”, this will be where the outline will be. I also changed the size of the outline from 1 px to 10 px and I make the colour of the outline Black. Once this is done click OK, the Layer Style box will then disappear and will be returned to the Social Media Magazine tab in Photoshop.
  • 75. The completed seventh Coverline which can be seen in the screenshot.
  • 76. The eighth Coverline created is “Vine- Is It Coming Back?” To create the Coverline select the Horizontal Type Tool and click and drag a box underneath the seventh Coverline.
  • 77. Type part of the eighth Coverline “Vine” in your chosen colour, choice of font and size of the font, in this case I am using the colour Red, the font size is 24 pt and the chosen front is Eras Bold ITC.
  • 78. Type the remainder of the eighth Coverline in your chosen colour, choice of font and size of the font, in this case I am using the colour Purple, the font size is 18 pt and the chosen front is Eras Bold ITC. However, I will make the whole Coverline have a Black outline so it can be visible for the target audience as well as match with the Main Coverline and other Coverlines.
  • 79. To get a Black outline for the eighth Coverline make sure the “Vine Is It Coming Back?” layer is highlighted and go to the top of the screen, find the word “Layer” find the words “Layer Style” and click either “Drop Shadow” or “Stroke”.
  • 80. When “Stroke” is clicked change the position to “Outside”, this will be where the outline will be. I also changed the size of the outline from 1 px to 10 px and I make the colour of the outline Black. Once this is done click OK, the Layer Style box will then disappear and will be returned to the Social Media Magazine tab in Photoshop.
  • 81. The completed eighth Coverline which can be seen in the screenshot.
  • 82. The ninth and final Coverline created is “Twitter- Safer Than Facebook?” To create the Coverline select the Horizontal Type Tool and click and drag a box underneath the eighth Coverline.
  • 83. Type part of the ninth and final Coverline “Twitter” in your chosen colour, choice of font and size of the font, in this case I am using the colour Red, the font size is 24 pt and the chosen front is Eras Bold ITC.
  • 84. Type the remainder of the ninth and final Coverline in your chosen colour, choice of font and size of the font, in this case I am using the colour Purple, the font size is 18 pt and the chosen front is Eras Bold ITC. However, I will make the whole Coverline have a Black outline so it can be visible for the target audience as well as match with the Main Coverline and other Coverlines.
  • 85. To get a Black outline for the ninth and final Coverline make sure the “Twitter Safer Than Facebook?” layer is highlighted and go to the top of the screen, find the word “Layer” find the words “Layer Style” and click either “Drop Shadow” or “Stroke”.
  • 86. When “Stroke” is clicked change the position to “Outside”, this will be where the outline will be. I also changed the size of the outline from 1 px to 10 px and I make the colour of the outline Black. Once this is done click OK, the Layer Style box will then disappear and will be returned to the Social Media Magazine tab in Photoshop.
  • 87. The completed ninth and final Coverline as well as the finished Social Media Magazine front cover which can be seen in the screenshot.