SlideShare a Scribd company logo
1 of 26
I started off with this
original image, and this is   I had to make a first layer to post
going to be the image I       the image onto that way I could
will use as my front          add the picture onto it and what I
cover.                        did to this it wouldn't affect the
                              background.
I selected the background with the quick selection
tool. I was able to select the parts I didn't want and
highlight them so I could tell what I had selected. I
decided this wasn't needed as I thought it would look
better with a plain background.
After the background had
                                 I then pressed 'CTRL,T' as this
been selected I deleted it and
                                 would let me change the picture
was left with a plain
                                 size to the size I would prefer and
background with just my
                                 then move it to the place where I
chosen photo on there.
                                 thought it would look best with my
                                 chosen size.
I created a new layer so my
I first imputed a grey masthead as I wanted to use   masthead could go on
this as my chosen masthead colour but when I         there. This is because if it
tried it out I decided that it looks too dull and    was all on the same layer it
would make the magazine look dark when I             would not work as well and
wanted it to look bright.                            the movement would all be
                                                     joined together.
I changed my masthead colour to purple as I
thought that this looked better and more for my
target audience which is 12-16 year old's.


At the bottom I decided to add a purple border using the shape tool, which raised the main
image from the bottom. Luckily I had already made the image size smaller because if I had
of left it, it would of taken up the whole page. I then added a white arrow using the custom
shape tool. Adding the black writing onto the arrow was easy as I selected the 'TEXT' tool I
then typed in what I wanted it to say which was 'One Direction Special'.
Next I added in the poster pictures which was using secondary source One Direction
Images. I added this in because I needed to state what the one direction special was.
With the arrow pointing towards the images you can clearly see that, this is the
special by having five posters of One Direction
I decided that I would add a half circle onto my front cover. I
used the shape tool again and added it, this is because I
thought that the background was boring and plain.
Adding three different coloured circles of different sizes onto the front cover makes it
look brighter, already. I used the Ellipse tool and then used the fill tool, that way I get
the different colour in each circle.
I decided that it was still too plain for my liking so I hid all the other layers and went
on the internet and found a secondary source image with different coloured spots. I
then clicked on the background layer pasted it on there. CTRL T then made it easier
for me to resize my background so that way it can fit page.
After the background had been positioned to where I wanted it and how I wanted it too
look. I un-hid all the other layers so that I could see what my magazine looked like so far.
At the moment this is what it looked like and I am very happy with it.
Even though my magazine is a music magazine, most of them have promotional offers
such as how to do your make-up etc. this issue is just before Valentines day so that way if
they are going out it can give you tips. I first decided that I would use a mixture of Priamry
and Secondary source photos. This is a photo I have taken myself on a blank piece of
paper.


  I first used the quick selection tool and which highlighted my chosen shape. Which in
  this case is the Rimmel nail varnish. After the selection I pressed CTRL C, which let me
  copy it.
After the selection, I pasted it onto the magazine front cover which left it like this. I
had to change the size of it by CTRL T and was able to make it smaller to fit onto
the Green ellipse.
I decided for this, I would use a secondary source photo of a lipstick. This is
because I didn't have one of my own which would fit into the colour scheme I
wanted. So again I used the 'Quick Selection Tool' which outlined the lipstick and I
CTRL T'd it.
I then did the same thing as with the Nail varnish I resized it then placed it next to
the nail varnish but at a angle as I thought it would be more eye catching then just
straight on.
This image is a primary source photo. I decided to take a lip-gloss swell as I
thought that it would also look good with the other make-up I have put on the front
cover they all link in well and work together.
This is with the three make-up pieces put together on one page. I think that
because they are all pink they contrast well with the lime green, which makes it
stand out.
Another secondary source image I have decided to use is a silver eye-shadow This
works well because it goes well with the colour scheme on the magazine and
everything looks nice and compatible, so again I used the Quick selection tool and
selected the top eye-shadow as I think that the shape of it would look better then the
square one.
Pasting the eye-shadow onto the magazine front cover and arranging the eye-
shadow in front of all the other make up pieces because it stands out more as it
isn't pink or purple.
This is one of my Puff's, a puff is a device which helps to draw attention to and
promote certain elements in the magazine. They are often set against colourful
backgrounds and are shaped. This puff is advertising a special feature in the
magazine. '101 Make-Up Idea's'.
Because I had not written any information on my main image on this photo so I
decided that I would add a rectangle, and change the opacity so it isn't as
harsh as it just being a rectangle placed in the middle.
This is the main anchorage on the front cover. An anchorage is a term that refers to how
images are referred to. This is done by the magazine photos directly explaining what
the pictures depict. Anchoring an image helps give it meaning, as it helps the reader
understand the significance. This is the main case as it is showing the reader how this
Up and coming music start is finding the real world.
Still thinking that it looks a bit plain I decided to add another pull quote onto my
magazine. This is because I didn't want to leave it with empty spaces and I wanted to
make my magazine more eye attractive. So by adding a pull quote as such with the
Interview with a vampire it makes the reader more interested in what he has to say,
especially with the 'Hide Your Daughters' meaning he could be looking for love, or the
fact that the young girls may find him really attractive.
Adding an image to the face was harder then I thought. This is because I wasn't sure
where to place the image. It Is a secondary source image off the internet, I tried placing
it above the text but it looked weird and you wasn't able to read what it was saying. So I
decided to make a new layer and post It underneath, I think this works better than
before as you can still see the writing and the picture off Robert Pattinson.
I decided to add in a quote saying 'Wanna Meet Union J & District 3, Read inside on
how to' I thought at the time that this would be a a good pull quote as they are two
up and coming boy-bands. However I decided against it as I thought it wouldn't be a
very good pull quote as other magazines are also doing offers like this and it
wouldn't be very appealing for my sort of magazine.
I decided to change it to 'In Jessie J's Bedroom (She could of cleaned it)'. I thought that
this would be more appealing to my audience. It is a very cheeky saying with the 'She
could of cleaned it' meaning that Jessie J is a messy person and not that neat and tidy. I
decided against putting a photo there as if I would of put a photo of Jessie J there it
would of made it look messy and disorganised. It would have been very crammed and not
that professional. When looking at other magazines they don't always use photos and just
put the pull quote by itself.
To finish off my magazine front cover I decided to add in one more pull quote but this time
using another female superstar Tulisa. 'ASK TULISA. How to deal with Boys & Bullies'.
This makes a good pull quote because you would be getting advice from a pop-star and it
would make you more interested on how 'Tulisa' would deal with certain situations. I
decided to merge the blue rectangle with the text as it would make it stand out more than
just having the writing on there. It would look boring and plain and not that eye catching if
it was just the writing on there.

More Related Content

What's hot

Horror Alice in Wonderland Edits
Horror Alice in Wonderland EditsHorror Alice in Wonderland Edits
Horror Alice in Wonderland EditsPaigeWard961
 
Production Reflection
Production ReflectionProduction Reflection
Production ReflectionImogen Minto
 
Production Reflection
Production ReflectionProduction Reflection
Production ReflectionImogen Minto
 
Production Reflection
Production ReflectionProduction Reflection
Production ReflectionImogen Minto
 
How i created my film poster
How i created my film posterHow i created my film poster
How i created my film posterjemimawright97
 
Development pro forma
Development pro formaDevelopment pro forma
Development pro formaalisrose1
 
Development pro forma
Development pro formaDevelopment pro forma
Development pro formaAmy Addison
 
Development pro forma !
Development pro forma !Development pro forma !
Development pro forma !alisrose1
 
Development pro forma(3)
Development pro forma(3)Development pro forma(3)
Development pro forma(3)OlliePull
 
Question 6: What have you learnt about the technologies from the process of c...
Question 6: What have you learnt about the technologies from the process of c...Question 6: What have you learnt about the technologies from the process of c...
Question 6: What have you learnt about the technologies from the process of c...klaudiamb
 
Ollie long unit 30 lo3
Ollie long unit 30   lo3Ollie long unit 30   lo3
Ollie long unit 30 lo3olong17
 
Construction
ConstructionConstruction
Construction07tjames
 
Production Reflection
Production Reflection Production Reflection
Production Reflection Simran Jabbal
 

What's hot (20)

Horror Alice in Wonderland Edits
Horror Alice in Wonderland EditsHorror Alice in Wonderland Edits
Horror Alice in Wonderland Edits
 
Evaluation
EvaluationEvaluation
Evaluation
 
Presentation1
Presentation1Presentation1
Presentation1
 
Production Reflection
Production ReflectionProduction Reflection
Production Reflection
 
Production Reflection
Production ReflectionProduction Reflection
Production Reflection
 
Production Reflection
Production ReflectionProduction Reflection
Production Reflection
 
Image portfolio
Image portfolioImage portfolio
Image portfolio
 
Final poster shots
Final poster shotsFinal poster shots
Final poster shots
 
How i created my film poster
How i created my film posterHow i created my film poster
How i created my film poster
 
Development pro forma
Development pro formaDevelopment pro forma
Development pro forma
 
Development pro forma
Development pro formaDevelopment pro forma
Development pro forma
 
D.e evaluation 2
D.e evaluation 2D.e evaluation 2
D.e evaluation 2
 
Proof of Concept
Proof of ConceptProof of Concept
Proof of Concept
 
Development pro forma !
Development pro forma !Development pro forma !
Development pro forma !
 
Development pro forma(3)
Development pro forma(3)Development pro forma(3)
Development pro forma(3)
 
Question 6: What have you learnt about the technologies from the process of c...
Question 6: What have you learnt about the technologies from the process of c...Question 6: What have you learnt about the technologies from the process of c...
Question 6: What have you learnt about the technologies from the process of c...
 
Ollie long unit 30 lo3
Ollie long unit 30   lo3Ollie long unit 30   lo3
Ollie long unit 30 lo3
 
Task 6 evaluation
Task 6  evaluationTask 6  evaluation
Task 6 evaluation
 
Construction
ConstructionConstruction
Construction
 
Production Reflection
Production Reflection Production Reflection
Production Reflection
 

Similar to Making Of My Rhiannon Front Cover.

Construction of magazine
Construction of magazine Construction of magazine
Construction of magazine Lyndan Trenholm
 
Construction of magazine
Construction of magazine Construction of magazine
Construction of magazine Lyndan Trenholm
 
Print screens for the construction of my front cover, contents and double pag...
Print screens for the construction of my front cover, contents and double pag...Print screens for the construction of my front cover, contents and double pag...
Print screens for the construction of my front cover, contents and double pag...brontesullivan14
 
Development diary media
Development diary mediaDevelopment diary media
Development diary mediagracesykes
 
second draft of front cover & how i made it
second draft of front cover & how i made itsecond draft of front cover & how i made it
second draft of front cover & how i made itchristinapericcos
 
Anciliary text front cover screen shots
Anciliary text front cover screen shotsAnciliary text front cover screen shots
Anciliary text front cover screen shotsnusuribibi
 
Ancillary Task = Creating My Magazine Cover
Ancillary Task = Creating My Magazine CoverAncillary Task = Creating My Magazine Cover
Ancillary Task = Creating My Magazine CoverElla Sandison
 
Front cover magazine process
Front cover magazine processFront cover magazine process
Front cover magazine processshannoncammish
 
Planning and Research Presentation
Planning and Research PresentationPlanning and Research Presentation
Planning and Research PresentationPNakan
 
Evidence of Front Cover
Evidence of Front CoverEvidence of Front Cover
Evidence of Front CoverTiaMaletta
 
Production Reflection
Production ReflectionProduction Reflection
Production ReflectionImogen Minto
 
Image manipulations
Image manipulationsImage manipulations
Image manipulationsasmediae15
 
Cover layout decisions and photoshop
Cover layout decisions and photoshopCover layout decisions and photoshop
Cover layout decisions and photoshopaamina24
 

Similar to Making Of My Rhiannon Front Cover. (20)

Construction on front cover
Construction on front coverConstruction on front cover
Construction on front cover
 
Construction of magazine
Construction of magazine Construction of magazine
Construction of magazine
 
Construction of magazine
Construction of magazine Construction of magazine
Construction of magazine
 
Magazine Development Diary
Magazine Development DiaryMagazine Development Diary
Magazine Development Diary
 
Print screens for the construction of my front cover, contents and double pag...
Print screens for the construction of my front cover, contents and double pag...Print screens for the construction of my front cover, contents and double pag...
Print screens for the construction of my front cover, contents and double pag...
 
Development diary media
Development diary mediaDevelopment diary media
Development diary media
 
second draft of front cover & how i made it
second draft of front cover & how i made itsecond draft of front cover & how i made it
second draft of front cover & how i made it
 
Screenshots
ScreenshotsScreenshots
Screenshots
 
Anciliary text front cover screen shots
Anciliary text front cover screen shotsAnciliary text front cover screen shots
Anciliary text front cover screen shots
 
Portrait shoot pp
Portrait shoot ppPortrait shoot pp
Portrait shoot pp
 
Ancillary Task = Creating My Magazine Cover
Ancillary Task = Creating My Magazine CoverAncillary Task = Creating My Magazine Cover
Ancillary Task = Creating My Magazine Cover
 
Front cover magazine process
Front cover magazine processFront cover magazine process
Front cover magazine process
 
Planning and Research Presentation
Planning and Research PresentationPlanning and Research Presentation
Planning and Research Presentation
 
Portrait shoot pp
Portrait shoot ppPortrait shoot pp
Portrait shoot pp
 
Presentation1
Presentation1Presentation1
Presentation1
 
Evidence of Front Cover
Evidence of Front CoverEvidence of Front Cover
Evidence of Front Cover
 
Production Reflection
Production ReflectionProduction Reflection
Production Reflection
 
Question six
Question sixQuestion six
Question six
 
Image manipulations
Image manipulationsImage manipulations
Image manipulations
 
Cover layout decisions and photoshop
Cover layout decisions and photoshopCover layout decisions and photoshop
Cover layout decisions and photoshop
 

More from TiffanyVanessah0512

More from TiffanyVanessah0512 (10)

Evaluation on questions 1, 6 and 7
Evaluation on questions 1, 6 and 7Evaluation on questions 1, 6 and 7
Evaluation on questions 1, 6 and 7
 
Analysis on q magazine
Analysis on q magazineAnalysis on q magazine
Analysis on q magazine
 
Overall magazine conventions
Overall magazine conventionsOverall magazine conventions
Overall magazine conventions
 
Q3: What have you learnt from audience feedback
Q3: What have you learnt from audience feedbackQ3: What have you learnt from audience feedback
Q3: What have you learnt from audience feedback
 
Movie reviews and plans
Movie reviews and plansMovie reviews and plans
Movie reviews and plans
 
Conventions of horror posters( Drag me to hell, The Exorcist, Insidious)
Conventions of horror posters( Drag me to hell, The Exorcist, Insidious)Conventions of horror posters( Drag me to hell, The Exorcist, Insidious)
Conventions of horror posters( Drag me to hell, The Exorcist, Insidious)
 
Shot drafts for Seance
Shot drafts for SeanceShot drafts for Seance
Shot drafts for Seance
 
Analysis on music covers
Analysis on music coversAnalysis on music covers
Analysis on music covers
 
Evaluation
EvaluationEvaluation
Evaluation
 
Photonarrative 121112142121-phpapp01
Photonarrative 121112142121-phpapp01Photonarrative 121112142121-phpapp01
Photonarrative 121112142121-phpapp01
 

Making Of My Rhiannon Front Cover.

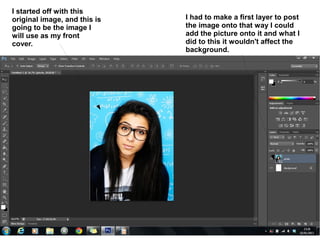
  • 1. I started off with this original image, and this is I had to make a first layer to post going to be the image I the image onto that way I could will use as my front add the picture onto it and what I cover. did to this it wouldn't affect the background.
  • 2. I selected the background with the quick selection tool. I was able to select the parts I didn't want and highlight them so I could tell what I had selected. I decided this wasn't needed as I thought it would look better with a plain background.
  • 3. After the background had I then pressed 'CTRL,T' as this been selected I deleted it and would let me change the picture was left with a plain size to the size I would prefer and background with just my then move it to the place where I chosen photo on there. thought it would look best with my chosen size.
  • 4. I created a new layer so my I first imputed a grey masthead as I wanted to use masthead could go on this as my chosen masthead colour but when I there. This is because if it tried it out I decided that it looks too dull and was all on the same layer it would make the magazine look dark when I would not work as well and wanted it to look bright. the movement would all be joined together.
  • 5. I changed my masthead colour to purple as I thought that this looked better and more for my target audience which is 12-16 year old's. At the bottom I decided to add a purple border using the shape tool, which raised the main image from the bottom. Luckily I had already made the image size smaller because if I had of left it, it would of taken up the whole page. I then added a white arrow using the custom shape tool. Adding the black writing onto the arrow was easy as I selected the 'TEXT' tool I then typed in what I wanted it to say which was 'One Direction Special'.
  • 6. Next I added in the poster pictures which was using secondary source One Direction Images. I added this in because I needed to state what the one direction special was. With the arrow pointing towards the images you can clearly see that, this is the special by having five posters of One Direction
  • 7. I decided that I would add a half circle onto my front cover. I used the shape tool again and added it, this is because I thought that the background was boring and plain.
  • 8. Adding three different coloured circles of different sizes onto the front cover makes it look brighter, already. I used the Ellipse tool and then used the fill tool, that way I get the different colour in each circle.
  • 9. I decided that it was still too plain for my liking so I hid all the other layers and went on the internet and found a secondary source image with different coloured spots. I then clicked on the background layer pasted it on there. CTRL T then made it easier for me to resize my background so that way it can fit page.
  • 10. After the background had been positioned to where I wanted it and how I wanted it too look. I un-hid all the other layers so that I could see what my magazine looked like so far. At the moment this is what it looked like and I am very happy with it.
  • 11. Even though my magazine is a music magazine, most of them have promotional offers such as how to do your make-up etc. this issue is just before Valentines day so that way if they are going out it can give you tips. I first decided that I would use a mixture of Priamry and Secondary source photos. This is a photo I have taken myself on a blank piece of paper. I first used the quick selection tool and which highlighted my chosen shape. Which in this case is the Rimmel nail varnish. After the selection I pressed CTRL C, which let me copy it.
  • 12. After the selection, I pasted it onto the magazine front cover which left it like this. I had to change the size of it by CTRL T and was able to make it smaller to fit onto the Green ellipse.
  • 13. I decided for this, I would use a secondary source photo of a lipstick. This is because I didn't have one of my own which would fit into the colour scheme I wanted. So again I used the 'Quick Selection Tool' which outlined the lipstick and I CTRL T'd it.
  • 14. I then did the same thing as with the Nail varnish I resized it then placed it next to the nail varnish but at a angle as I thought it would be more eye catching then just straight on.
  • 15. This image is a primary source photo. I decided to take a lip-gloss swell as I thought that it would also look good with the other make-up I have put on the front cover they all link in well and work together.
  • 16. This is with the three make-up pieces put together on one page. I think that because they are all pink they contrast well with the lime green, which makes it stand out.
  • 17. Another secondary source image I have decided to use is a silver eye-shadow This works well because it goes well with the colour scheme on the magazine and everything looks nice and compatible, so again I used the Quick selection tool and selected the top eye-shadow as I think that the shape of it would look better then the square one.
  • 18. Pasting the eye-shadow onto the magazine front cover and arranging the eye- shadow in front of all the other make up pieces because it stands out more as it isn't pink or purple.
  • 19. This is one of my Puff's, a puff is a device which helps to draw attention to and promote certain elements in the magazine. They are often set against colourful backgrounds and are shaped. This puff is advertising a special feature in the magazine. '101 Make-Up Idea's'.
  • 20. Because I had not written any information on my main image on this photo so I decided that I would add a rectangle, and change the opacity so it isn't as harsh as it just being a rectangle placed in the middle.
  • 21. This is the main anchorage on the front cover. An anchorage is a term that refers to how images are referred to. This is done by the magazine photos directly explaining what the pictures depict. Anchoring an image helps give it meaning, as it helps the reader understand the significance. This is the main case as it is showing the reader how this Up and coming music start is finding the real world.
  • 22. Still thinking that it looks a bit plain I decided to add another pull quote onto my magazine. This is because I didn't want to leave it with empty spaces and I wanted to make my magazine more eye attractive. So by adding a pull quote as such with the Interview with a vampire it makes the reader more interested in what he has to say, especially with the 'Hide Your Daughters' meaning he could be looking for love, or the fact that the young girls may find him really attractive.
  • 23. Adding an image to the face was harder then I thought. This is because I wasn't sure where to place the image. It Is a secondary source image off the internet, I tried placing it above the text but it looked weird and you wasn't able to read what it was saying. So I decided to make a new layer and post It underneath, I think this works better than before as you can still see the writing and the picture off Robert Pattinson.
  • 24. I decided to add in a quote saying 'Wanna Meet Union J & District 3, Read inside on how to' I thought at the time that this would be a a good pull quote as they are two up and coming boy-bands. However I decided against it as I thought it wouldn't be a very good pull quote as other magazines are also doing offers like this and it wouldn't be very appealing for my sort of magazine.
  • 25. I decided to change it to 'In Jessie J's Bedroom (She could of cleaned it)'. I thought that this would be more appealing to my audience. It is a very cheeky saying with the 'She could of cleaned it' meaning that Jessie J is a messy person and not that neat and tidy. I decided against putting a photo there as if I would of put a photo of Jessie J there it would of made it look messy and disorganised. It would have been very crammed and not that professional. When looking at other magazines they don't always use photos and just put the pull quote by itself.
  • 26. To finish off my magazine front cover I decided to add in one more pull quote but this time using another female superstar Tulisa. 'ASK TULISA. How to deal with Boys & Bullies'. This makes a good pull quote because you would be getting advice from a pop-star and it would make you more interested on how 'Tulisa' would deal with certain situations. I decided to merge the blue rectangle with the text as it would make it stand out more than just having the writing on there. It would look boring and plain and not that eye catching if it was just the writing on there.