
Recommended
More Related Content
What's hot
What's hot (20)
Viewers also liked
Viewers also liked (18)
Similar to Evaluation of the preliminary task
Similar to Evaluation of the preliminary task (20)
More from asmediaf12
More from asmediaf12 (20)
Evaluation of the preliminary task
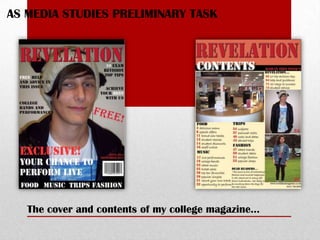
- 1. AS MEDIA STUDIES PRELIMINARY TASK The cover and contents of my college magazine…
- 2. In what ways does your media product use, develop or challenge forms and conventions of real media products? Masthead Coverlines Medium Close up Rule of thirds Plain background FRONT COVER SIMILARITIES…
- 3. The use of colour schemes for my magazine cover is rather bright and colourful so it‟s eye catching, although “Fashion” magazine have used a more calm and cool colour scheme which also stands out because it‟s on a white background. I have used a medium close up shot of a male student who has direct eye contact with the reader which makes it more direct and is giving a more friendly approach. Whereas “Fashion” magazine has used a medium close up of a famous celebrity who is looking elegant and fresh faced which suits their magazine genre perfectly. My college magazine has a barcode whereas “FASHION” magazine doesn‟t. FRONT COVER DIFFERENCES…
- 4. STRENGTHS: • The fact that I have used bright colours on top of a dimmed background makes the magazine seem more alive and eye-catching, creating an interesting affect. • There is not a lot of dead space on the cover, however, it isn‟t overly full with information either. • In my opinion, the medium close up shot looks quite professional and it works well with the genre of a magazine because he is a student from the college. • Important words have been emphasised such as “free” by being in a different colour so it stands out. WEAKNESSES: • I could have used a few more coverlines included on the cover to entice the readers more. • An improvement could be to increase the size of the masthead a little more to make it more noticeable and clearer. • I could have included a bit more information to fill up a little dead space that there is. STRENGTHS AND WEAKNESSES OF MY STUDENT MAGAZINE COVER…
- 5. Both magazines have the initial masthead on the contents pages. The text layout are roughly the same due to the fact they are organised into columns. Each of these contents pages have images which give an incite of the magazine issue. CONTENTS PAGE SIMILARITIES…
- 6. Vogue contents page gives away more information that my student magazine. My magazine contents page shows to be more colourful and attractive to the younger audience whereas “Vogue” is more simple and seems to target towards the more mature and older age. CONTENTS PAGE DIFFERENCES…
- 7. • The layout of my contents page is set out into the rule of thirds which makes it easier to follow and read. • I think I have used to right amount of images for a contents page because it gives a little incite into the magazine but at the same time it doesn‟t give too much information away. • The page numbers are easily readable and affective. • Another strength would be that I have included huge magazine information such as the magazine website and phone number at the bottom right hand corner to further advertise the “REVELATION”. • I could improve it by spacing out the headings of each section and moving them a little bit away from the pictures so it doesn‟t look too squashed. • Only a small colour range has been used and it may look a bit better with a more variety of colour. STRENGTHS AND WEAKNESSES OF MY STUDENT MAGAZINE CONTENTS…
- 8. What have you learnt about the technologies from the process of constructing this product? Finally, I extended it further and This print screen shot shows I used Adobe added “FREE” to advertise it as evidence that I have included a Photoshop to create and well as including a banner at the barcode and the number and date design my own student bottom. of this particular issue. magazine cover. Throughout this process I have learnt new skills finish and how to develop a new media product. STAGES… start Firstly, I went onto file and then Secondly, I used the textbox to Then, I started including the placed my chosen medium close create and design the masthead coverlines and main sell line and up shot to Photoshop. for my cover. edited them to individually stand out.
- 9. ALSO ON ADOBE PHOTOSHOP… I edited my masthead and added several different affects to make it more modern and original. I did this using a tool called „fx‟. The image to the right shows the effects which I chose to you for my masthead. I used many different pieces of technology throughout the process of constructing this product and one would be a digital camera. This was used to prepare and take the images needed for my magazine. It tested me on using the camera to capture multiple camera angles and shots such as: close up, medium close up, medium shot and a long shot. By using the camera myself, it increased my skills as well as making sure the photography was original and my own. Whilst taking the photos I was also acknowledging the rule of thirds and aiming for a MCU. Furthermore, I was able to give the student- who I chose to model for my magazine-clear instructions as where to stand such as in front of a plain background, so there wasn‟t a huge interference when it came to editing and adding text and also to smile so they seemed friendly. USE OF THE CAMERA…
- 10. I used “In Design” to create the contents page for my magazine. The first thing I thought about was arranging the boxes to make sure they were organised into the rule of thirds. I also thought ahead about the colour scheme I was going to use and I decided to keep it the same as the front cover to keep it looking professional and not too tacky by using a wide range of colour. I think one of my main strengths was Once I had placed an image into “In Design”, each making sure all the text was lined up time they would appear to be to big to fit into the and arranged appropriately as well as boxes so I had to resize them by making them making the page numbers a different smaller. I experimented with quite a few different colour, font and bolder to make them fonts but come to the conclusion that it looked more stand out more. I could have improved professional with only a limit of two. To conclude, I my contents page by adding an affect or found “In Design” quite difficult and complicated to two to the images such as rotating them use being as I have never used a piece of technology a little or edited them into a different like this before, however, by the end of the task I had shape. However, I think I used the learnt a variety of new skills which I hope I can correct amount of colour variation. develop further in future. USING IN DESIGN FOR MY CONTENTS…