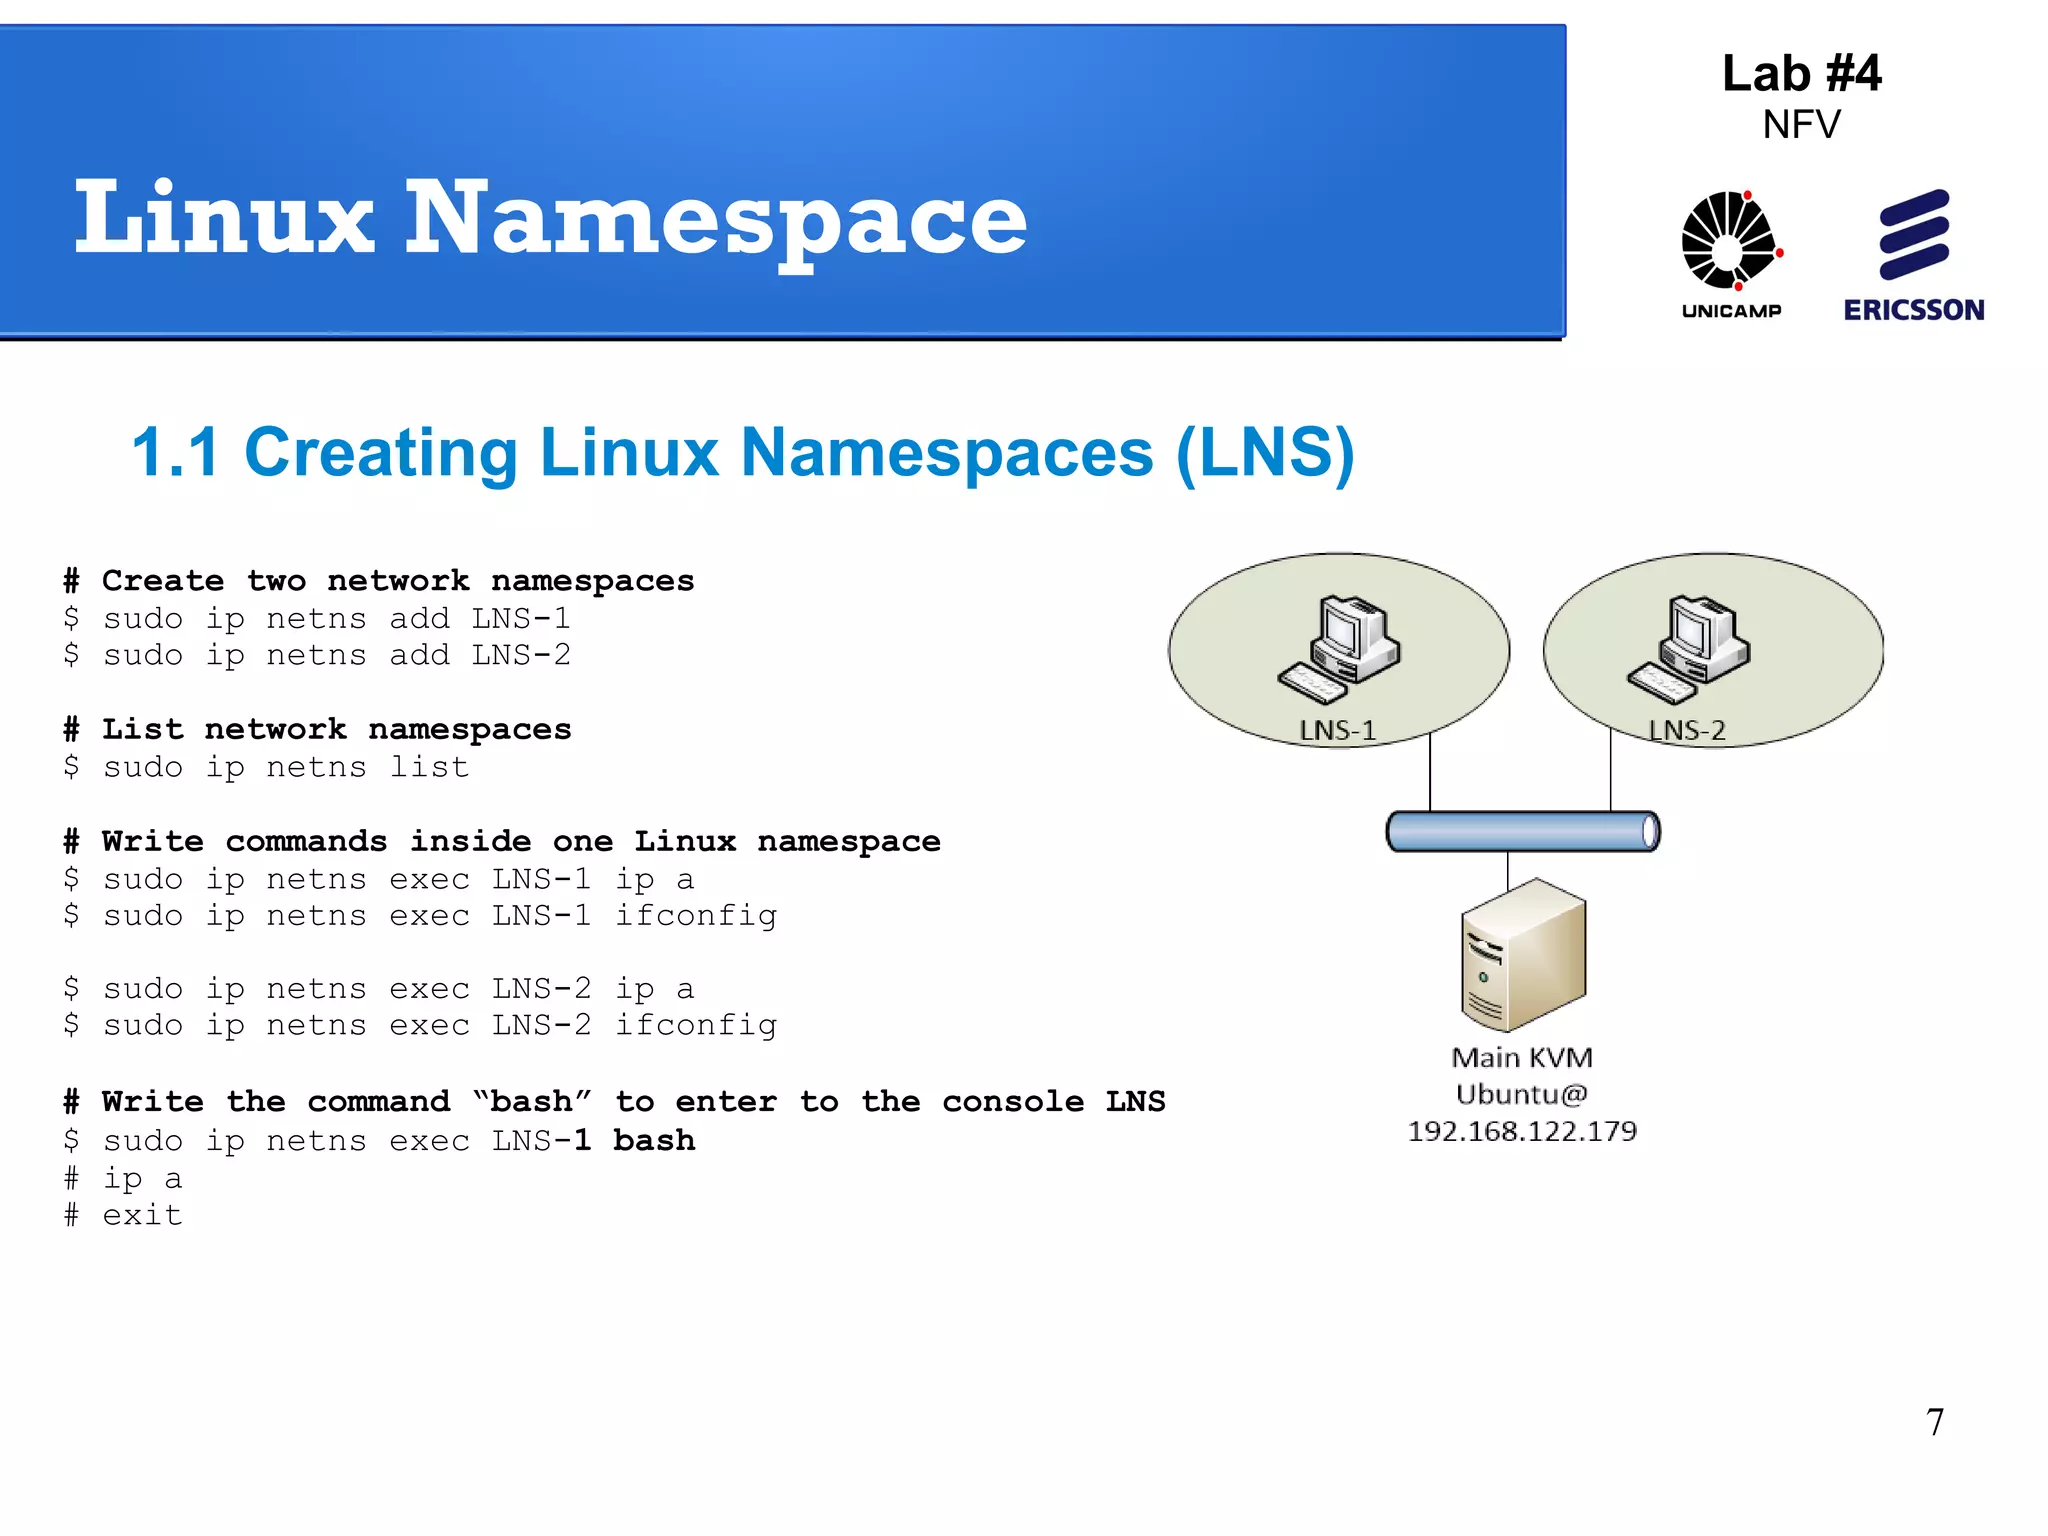
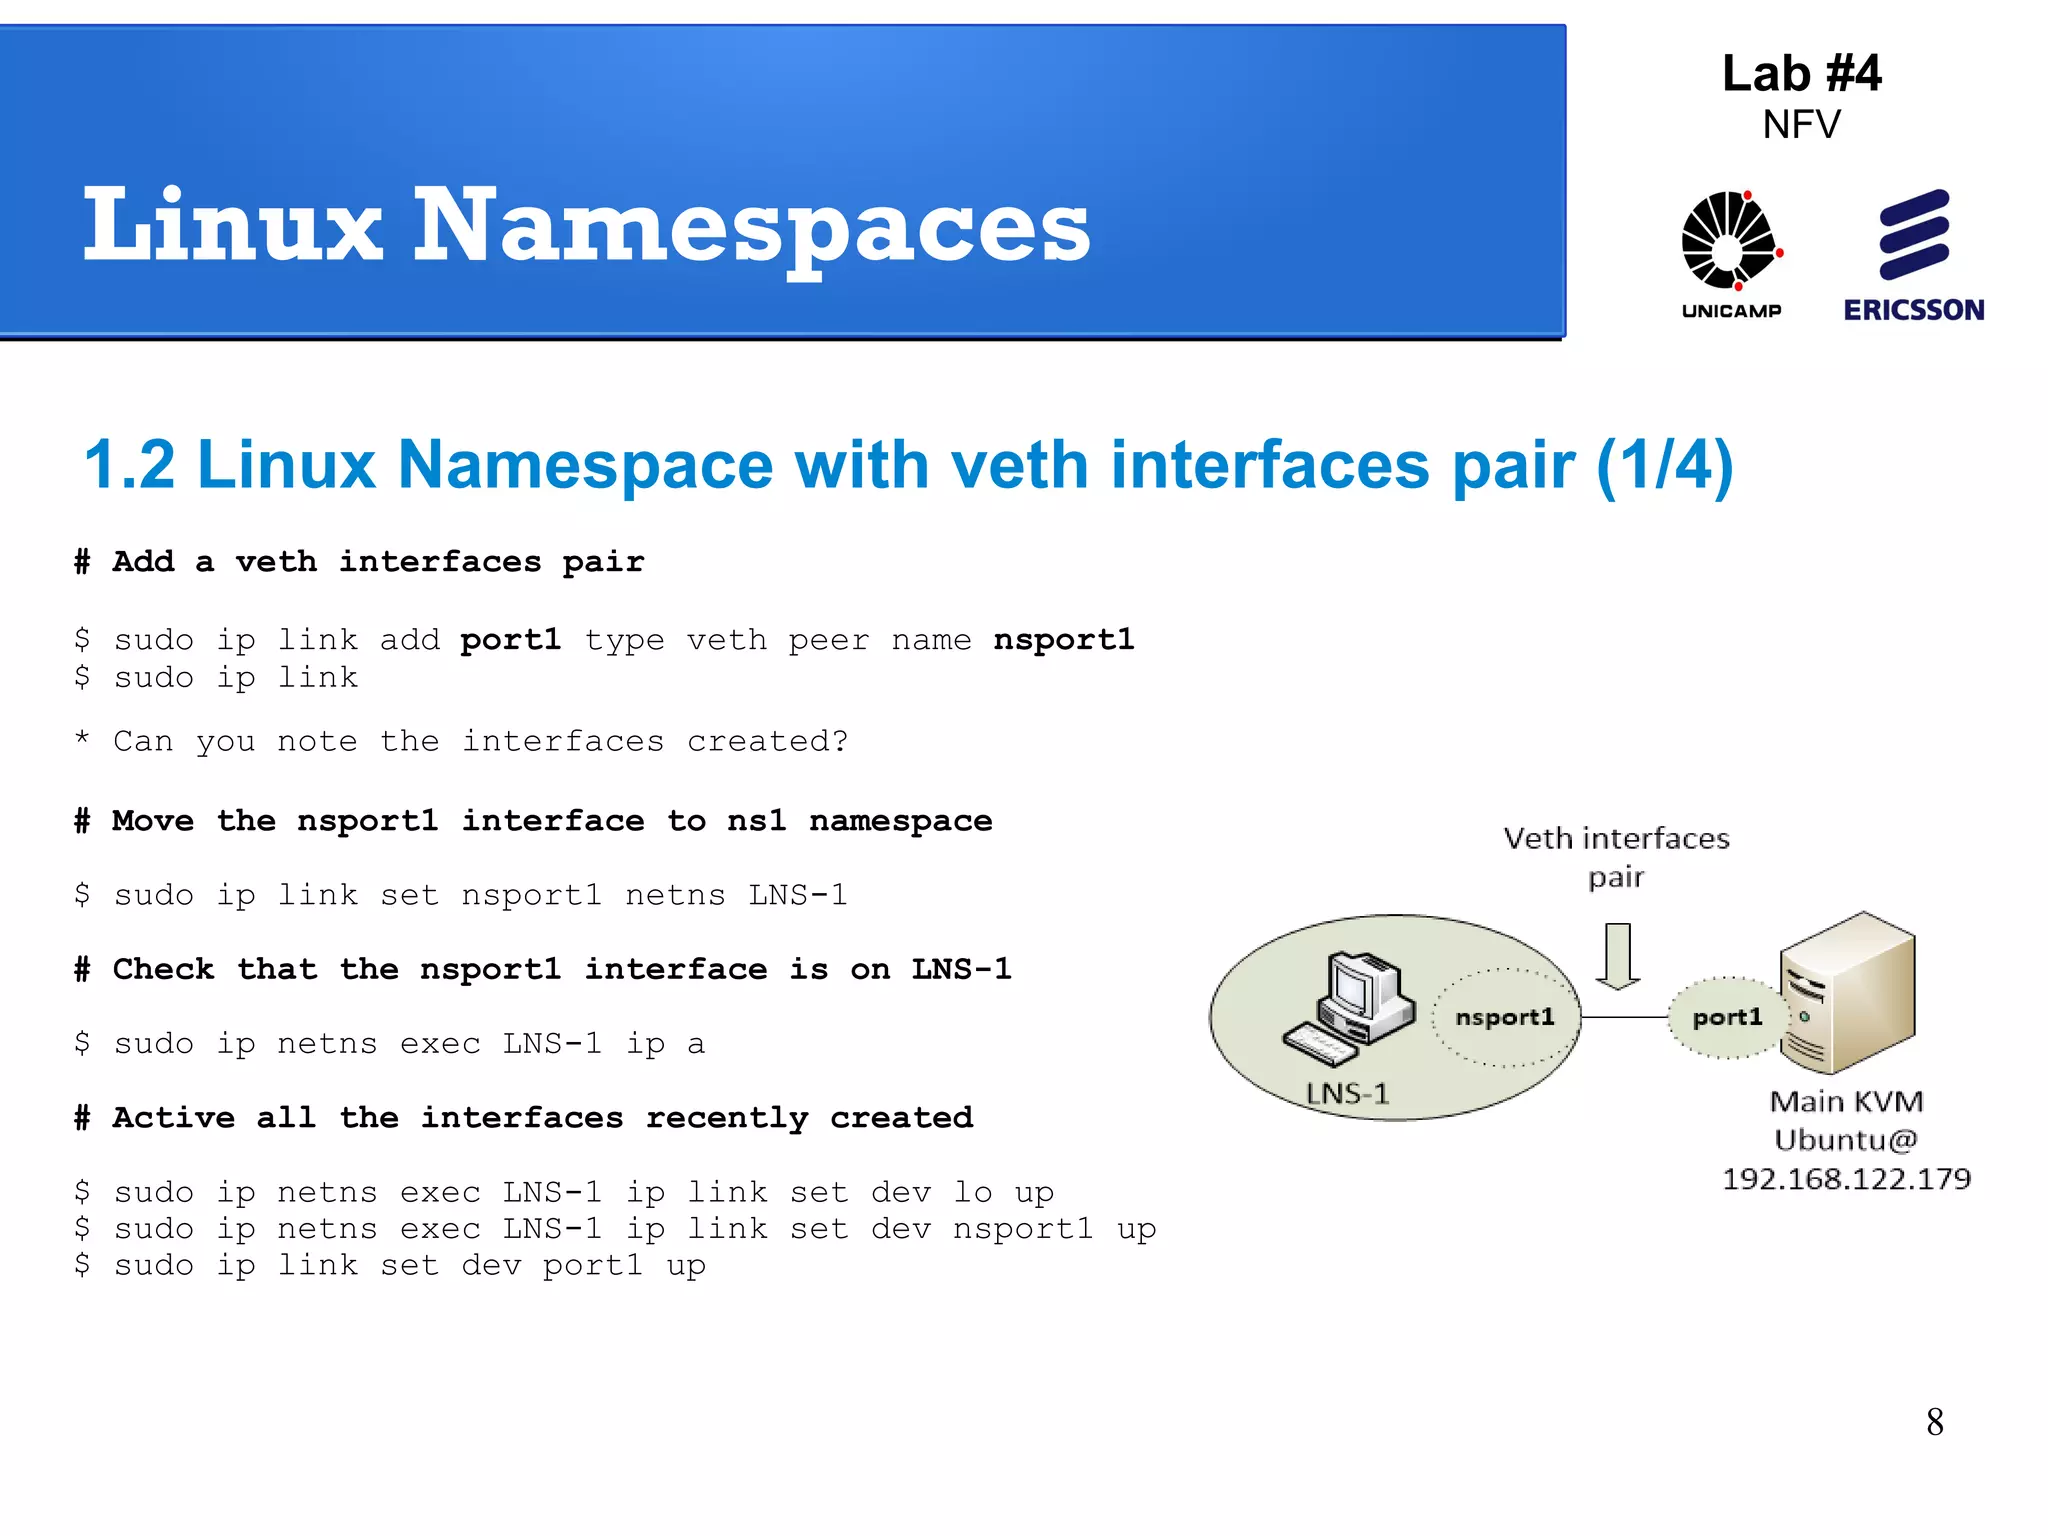
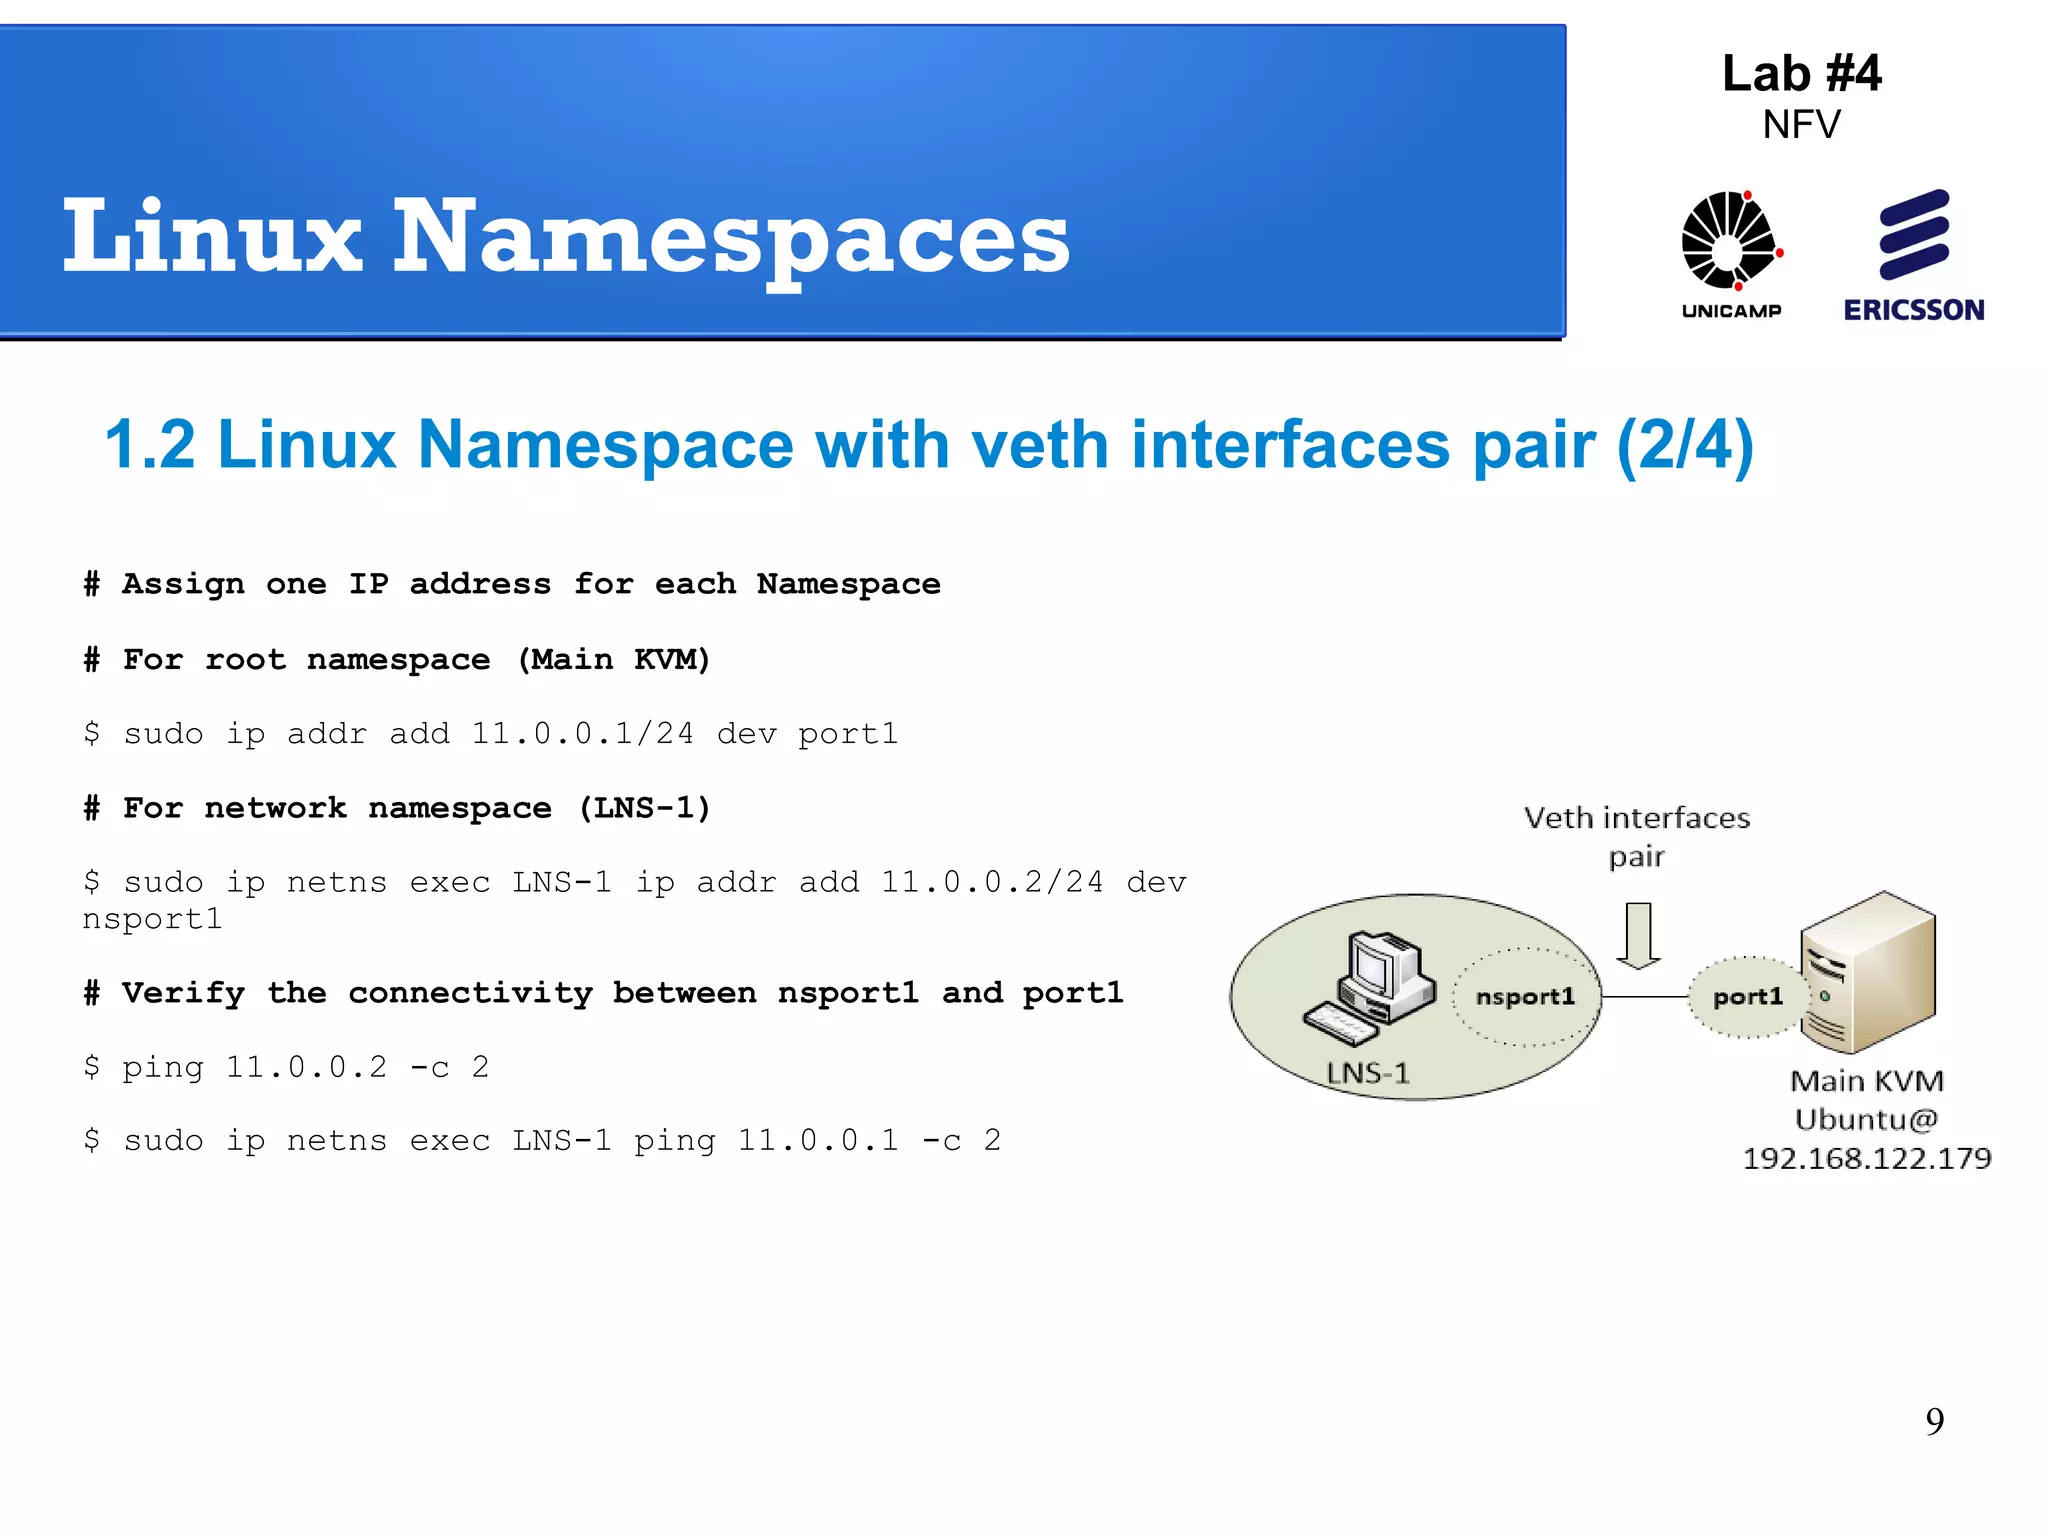
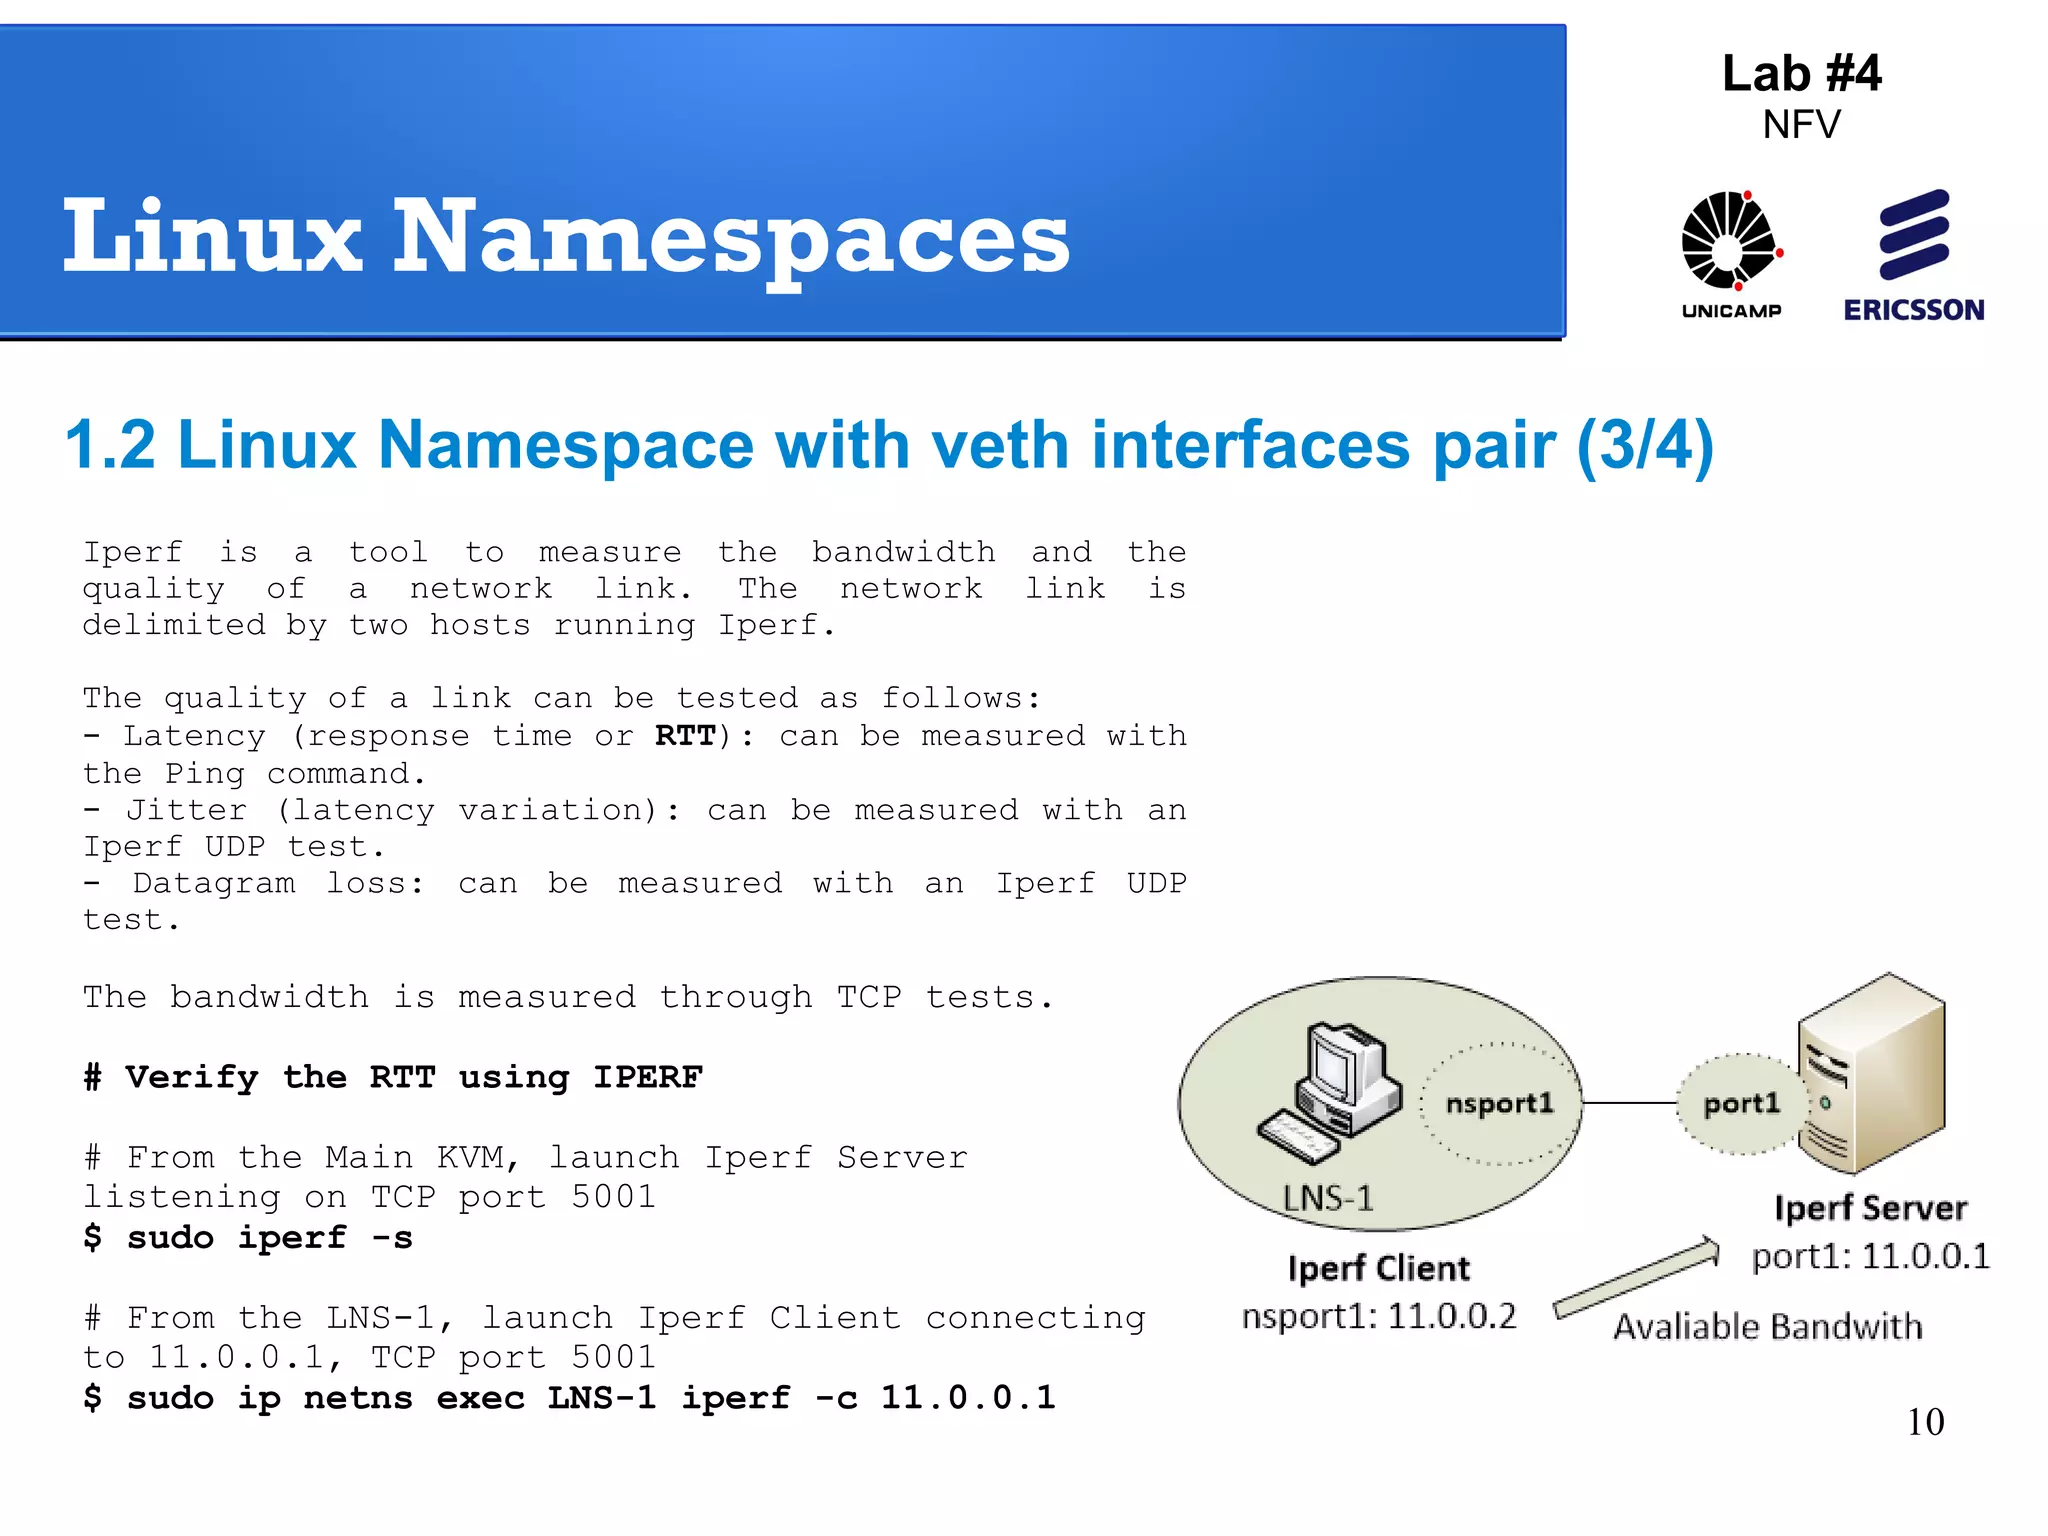
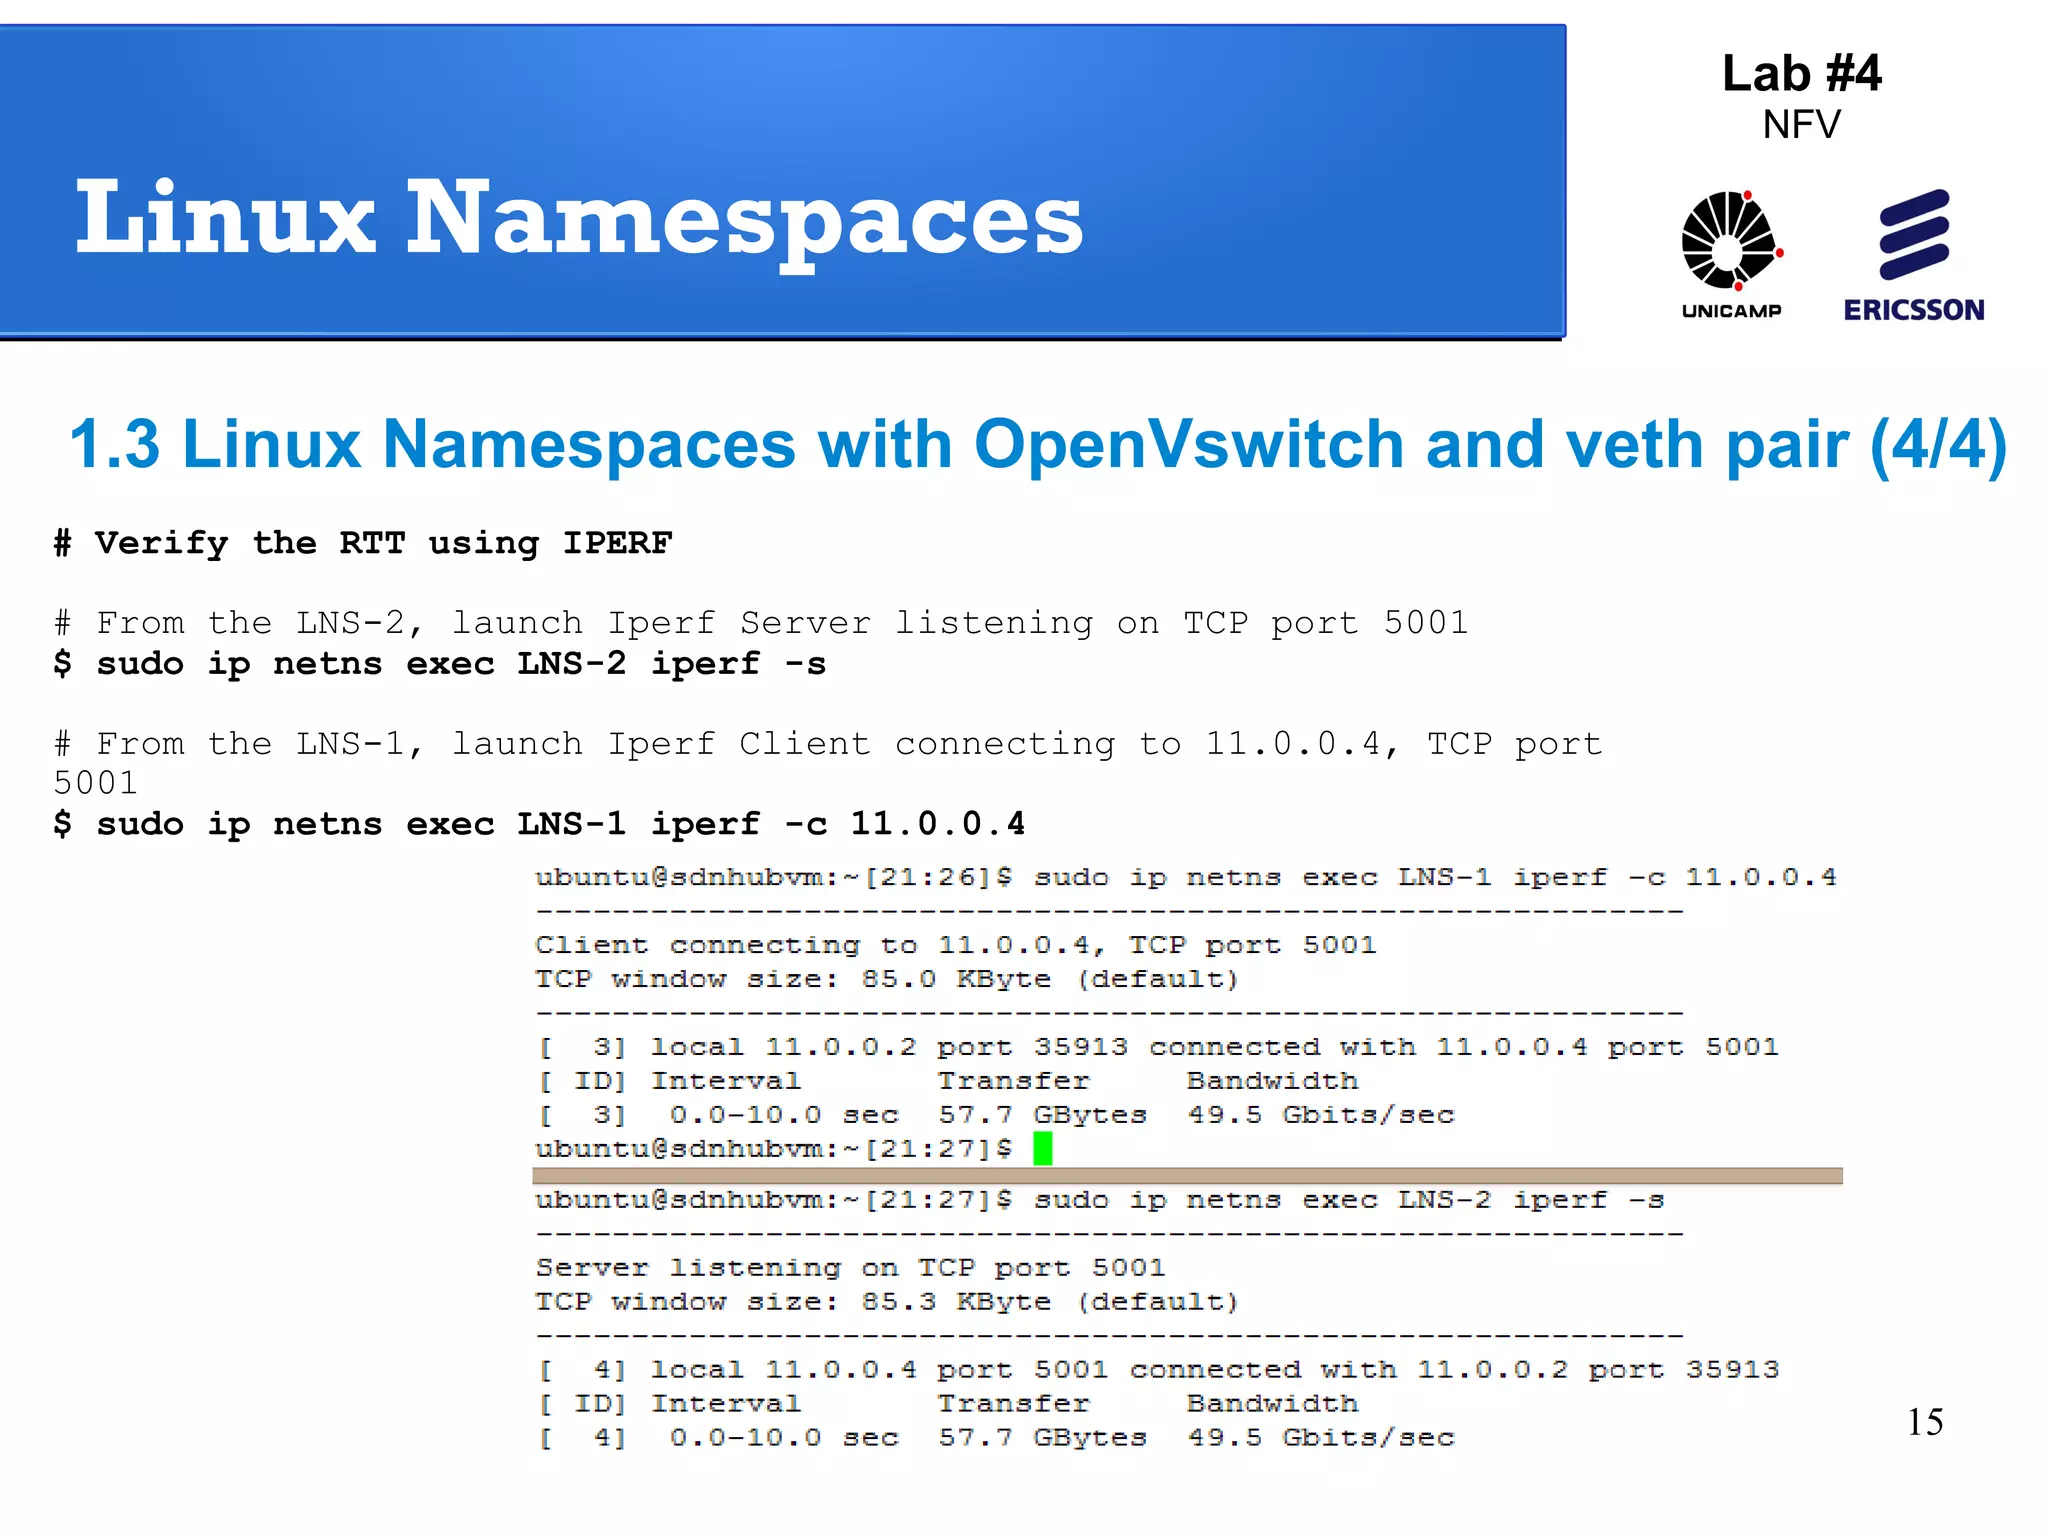
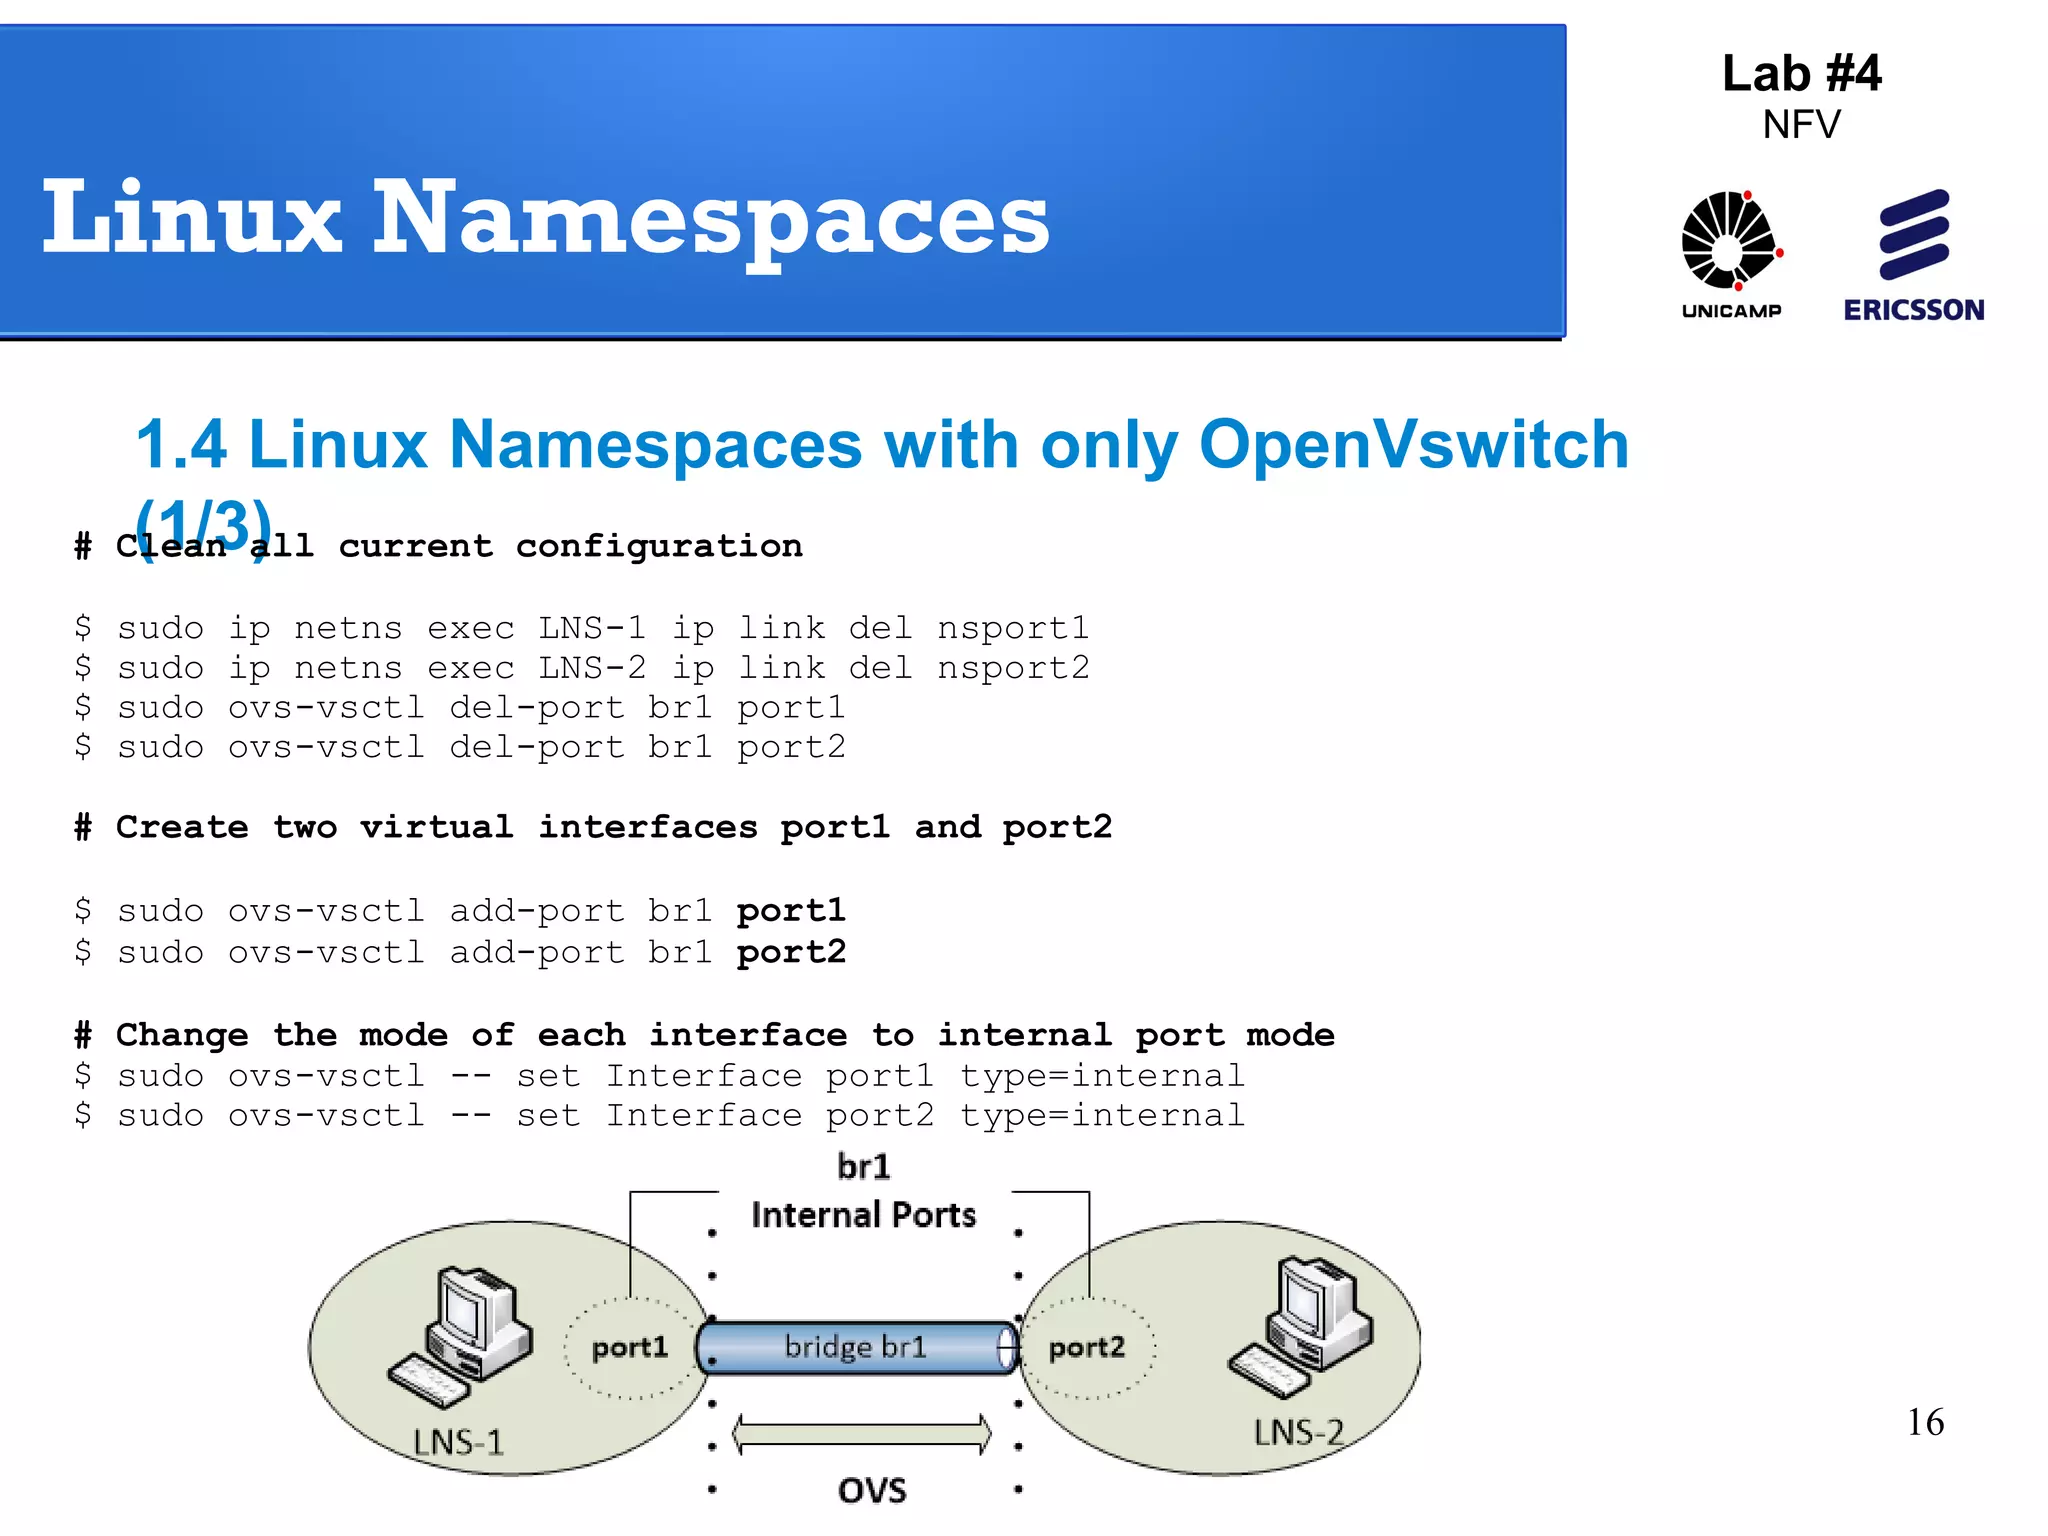
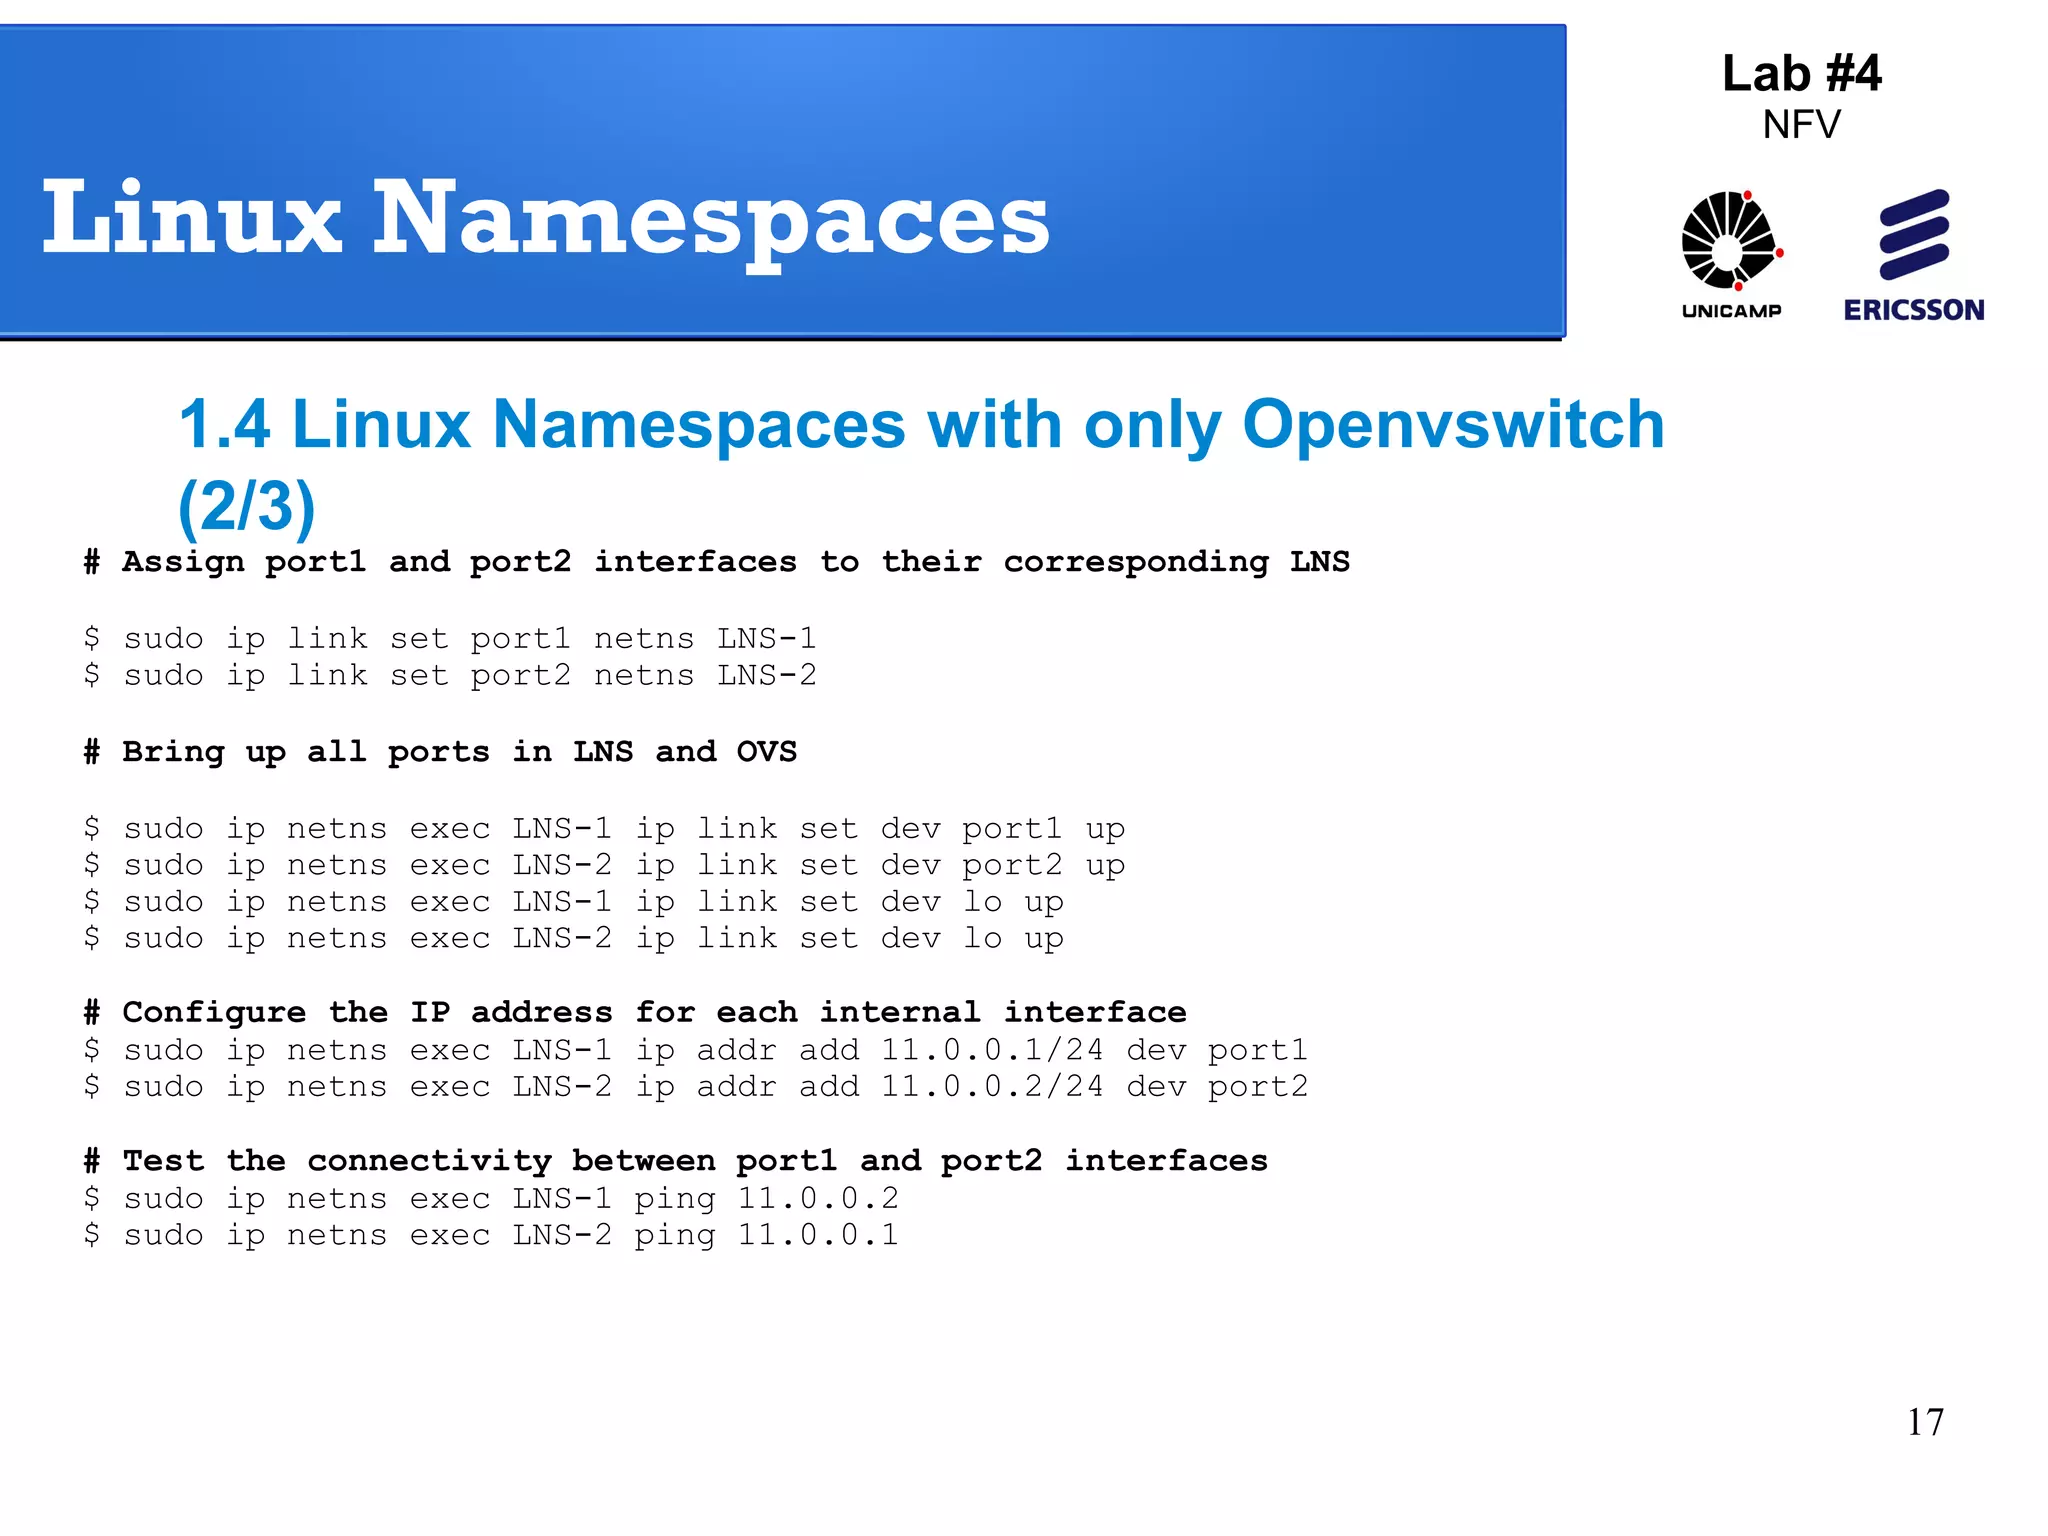
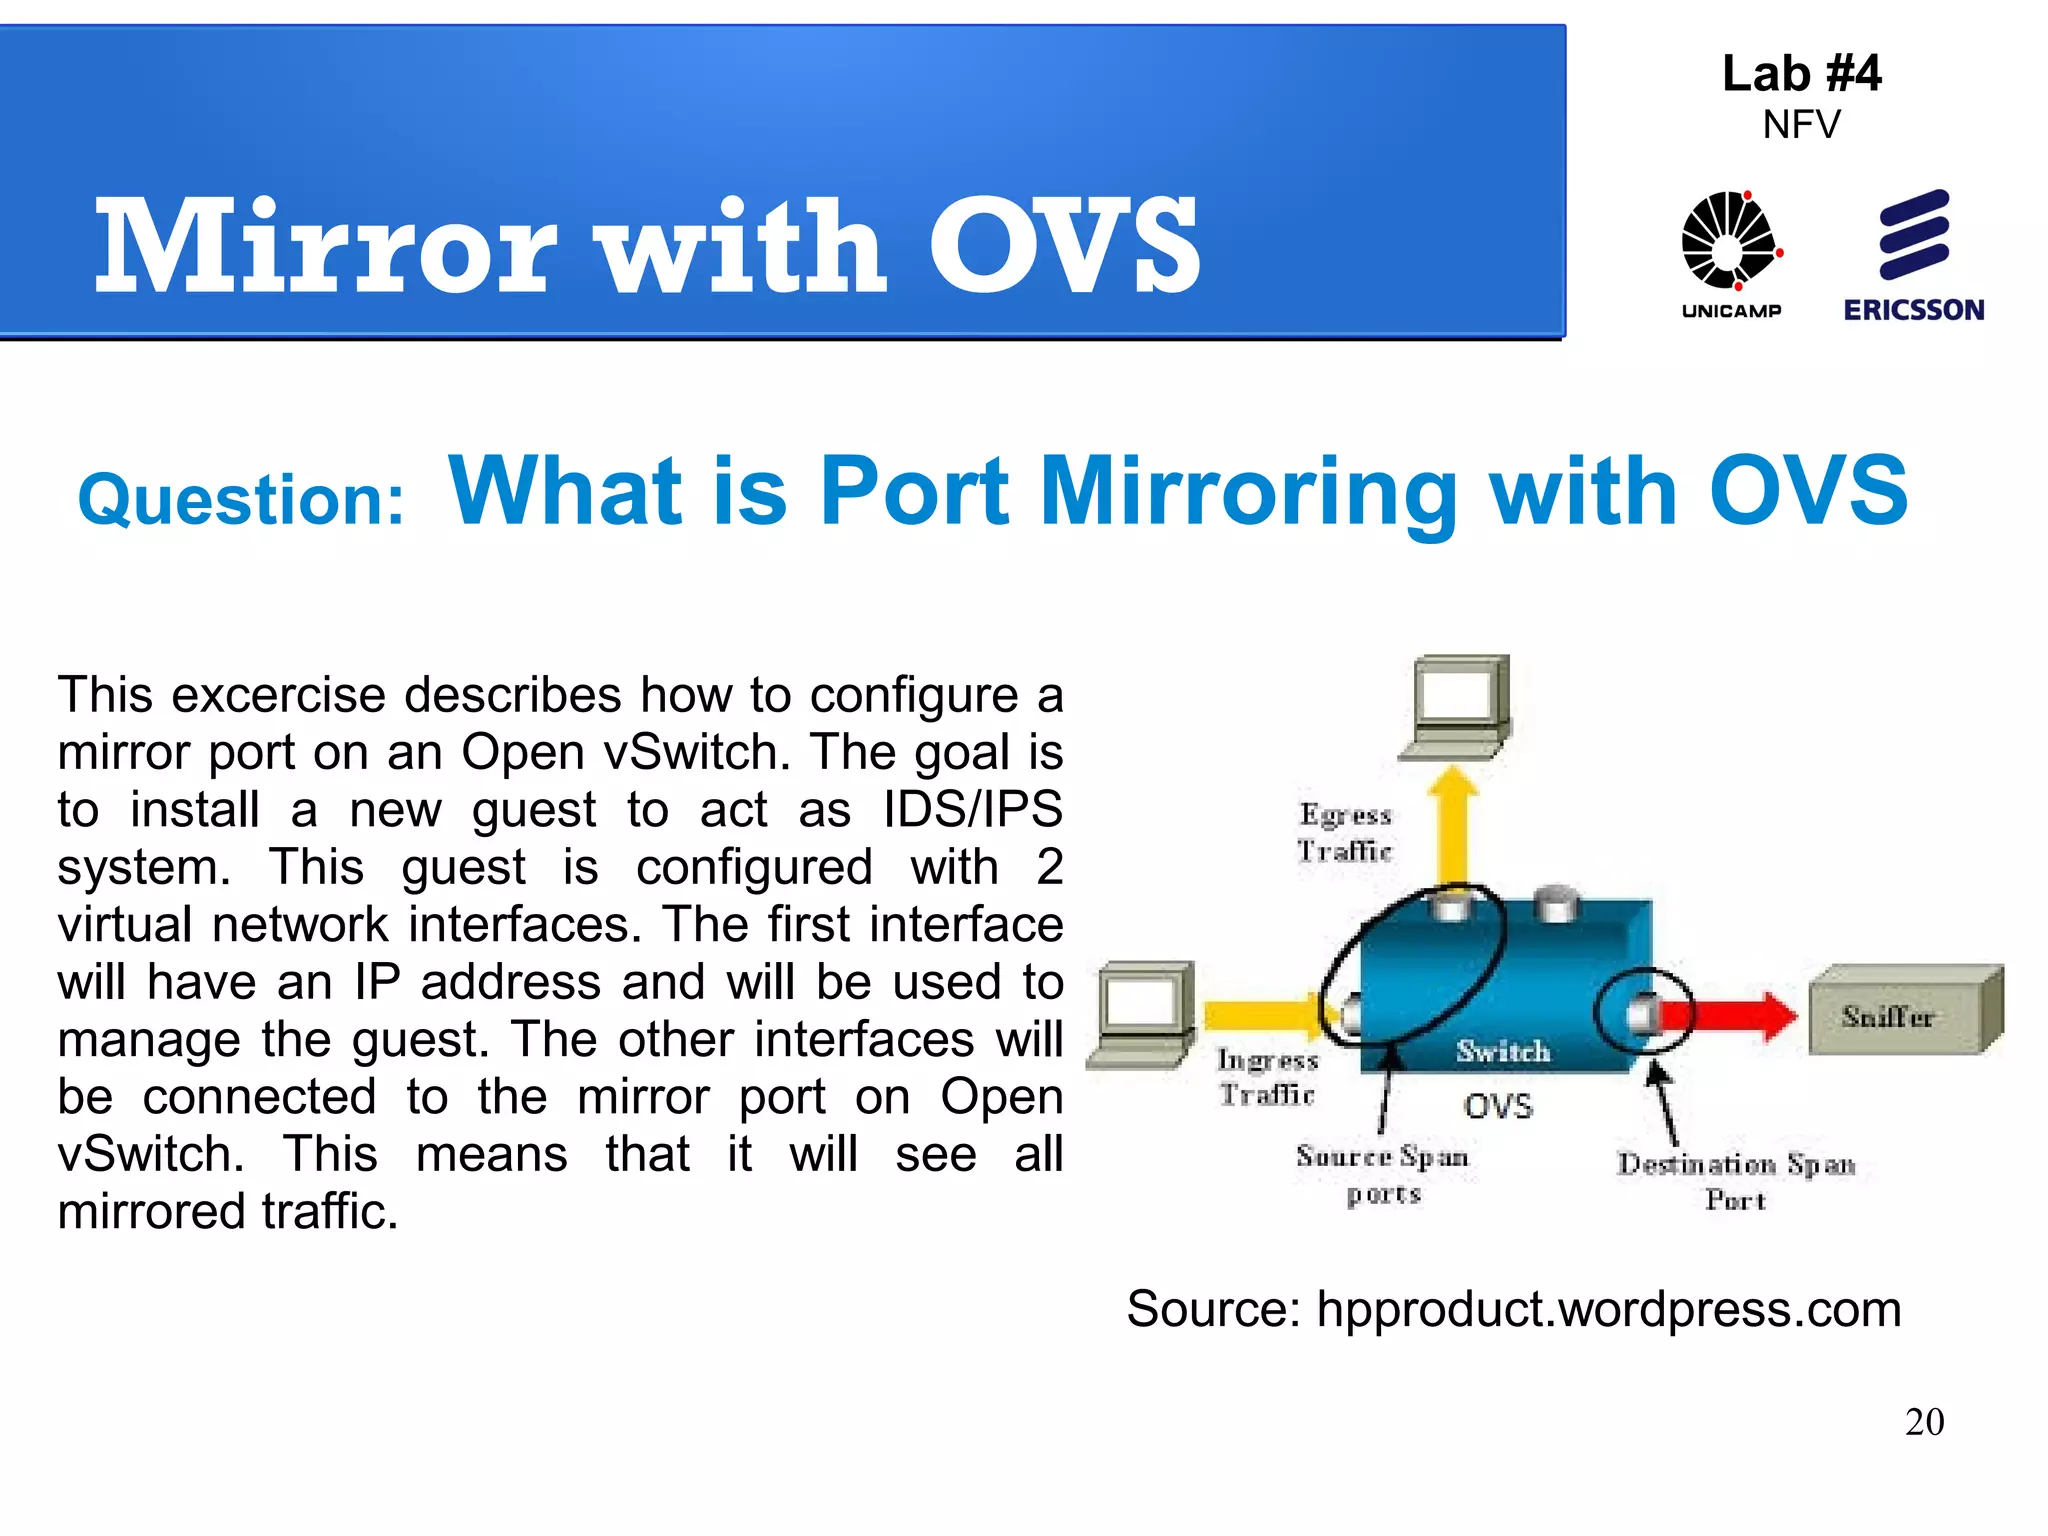
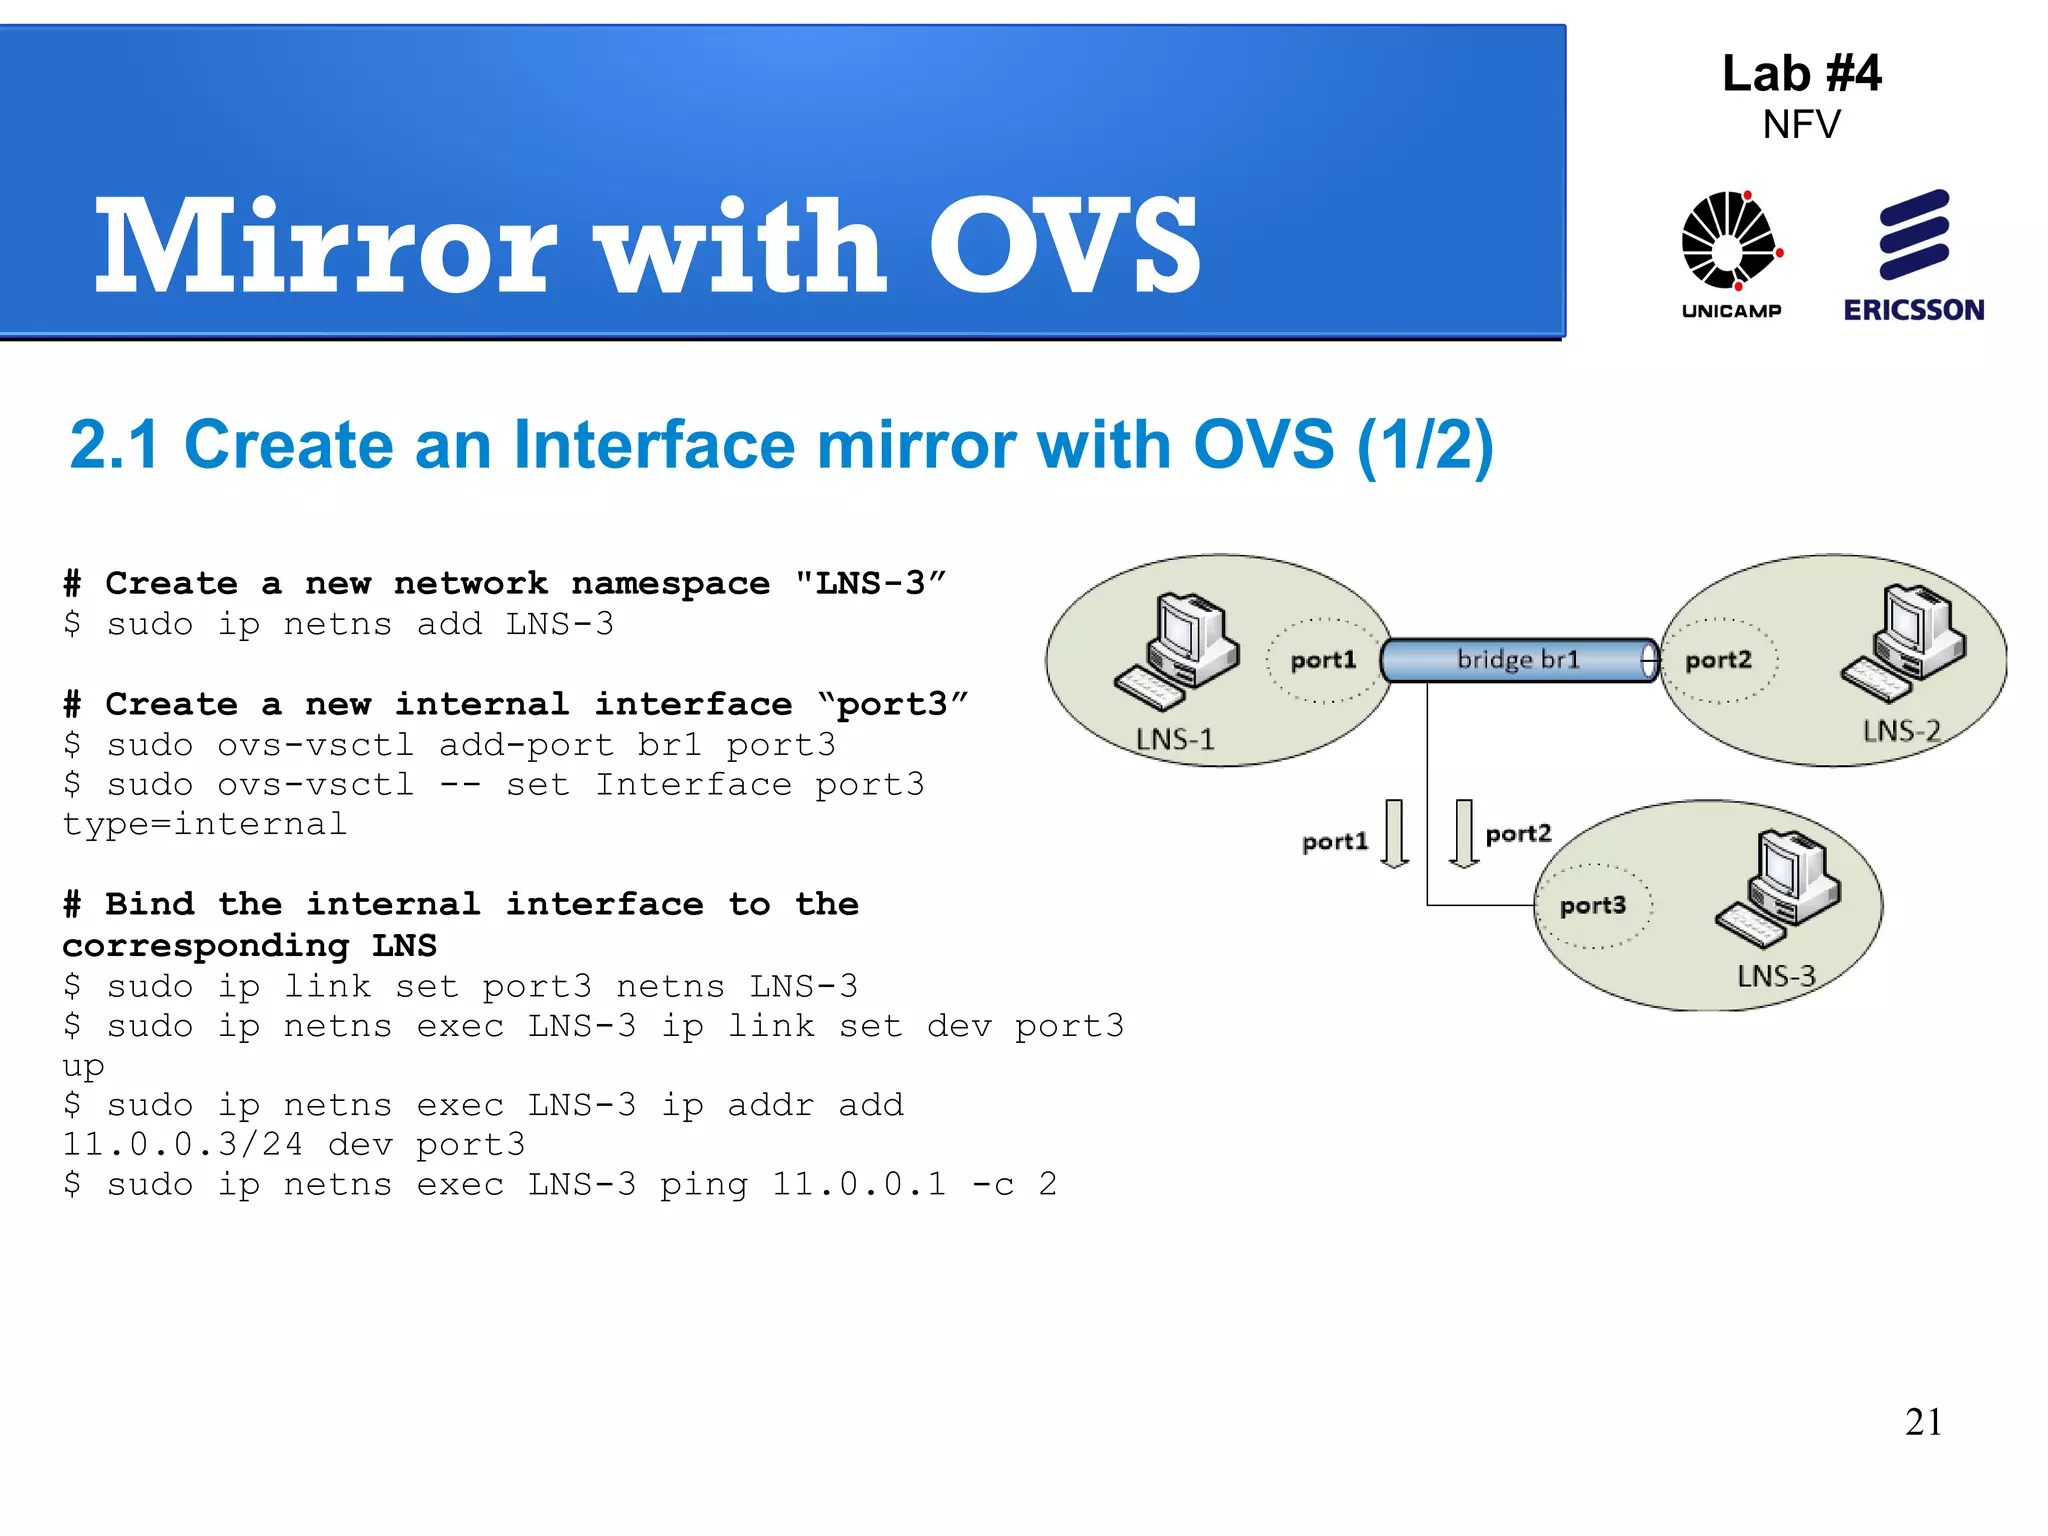
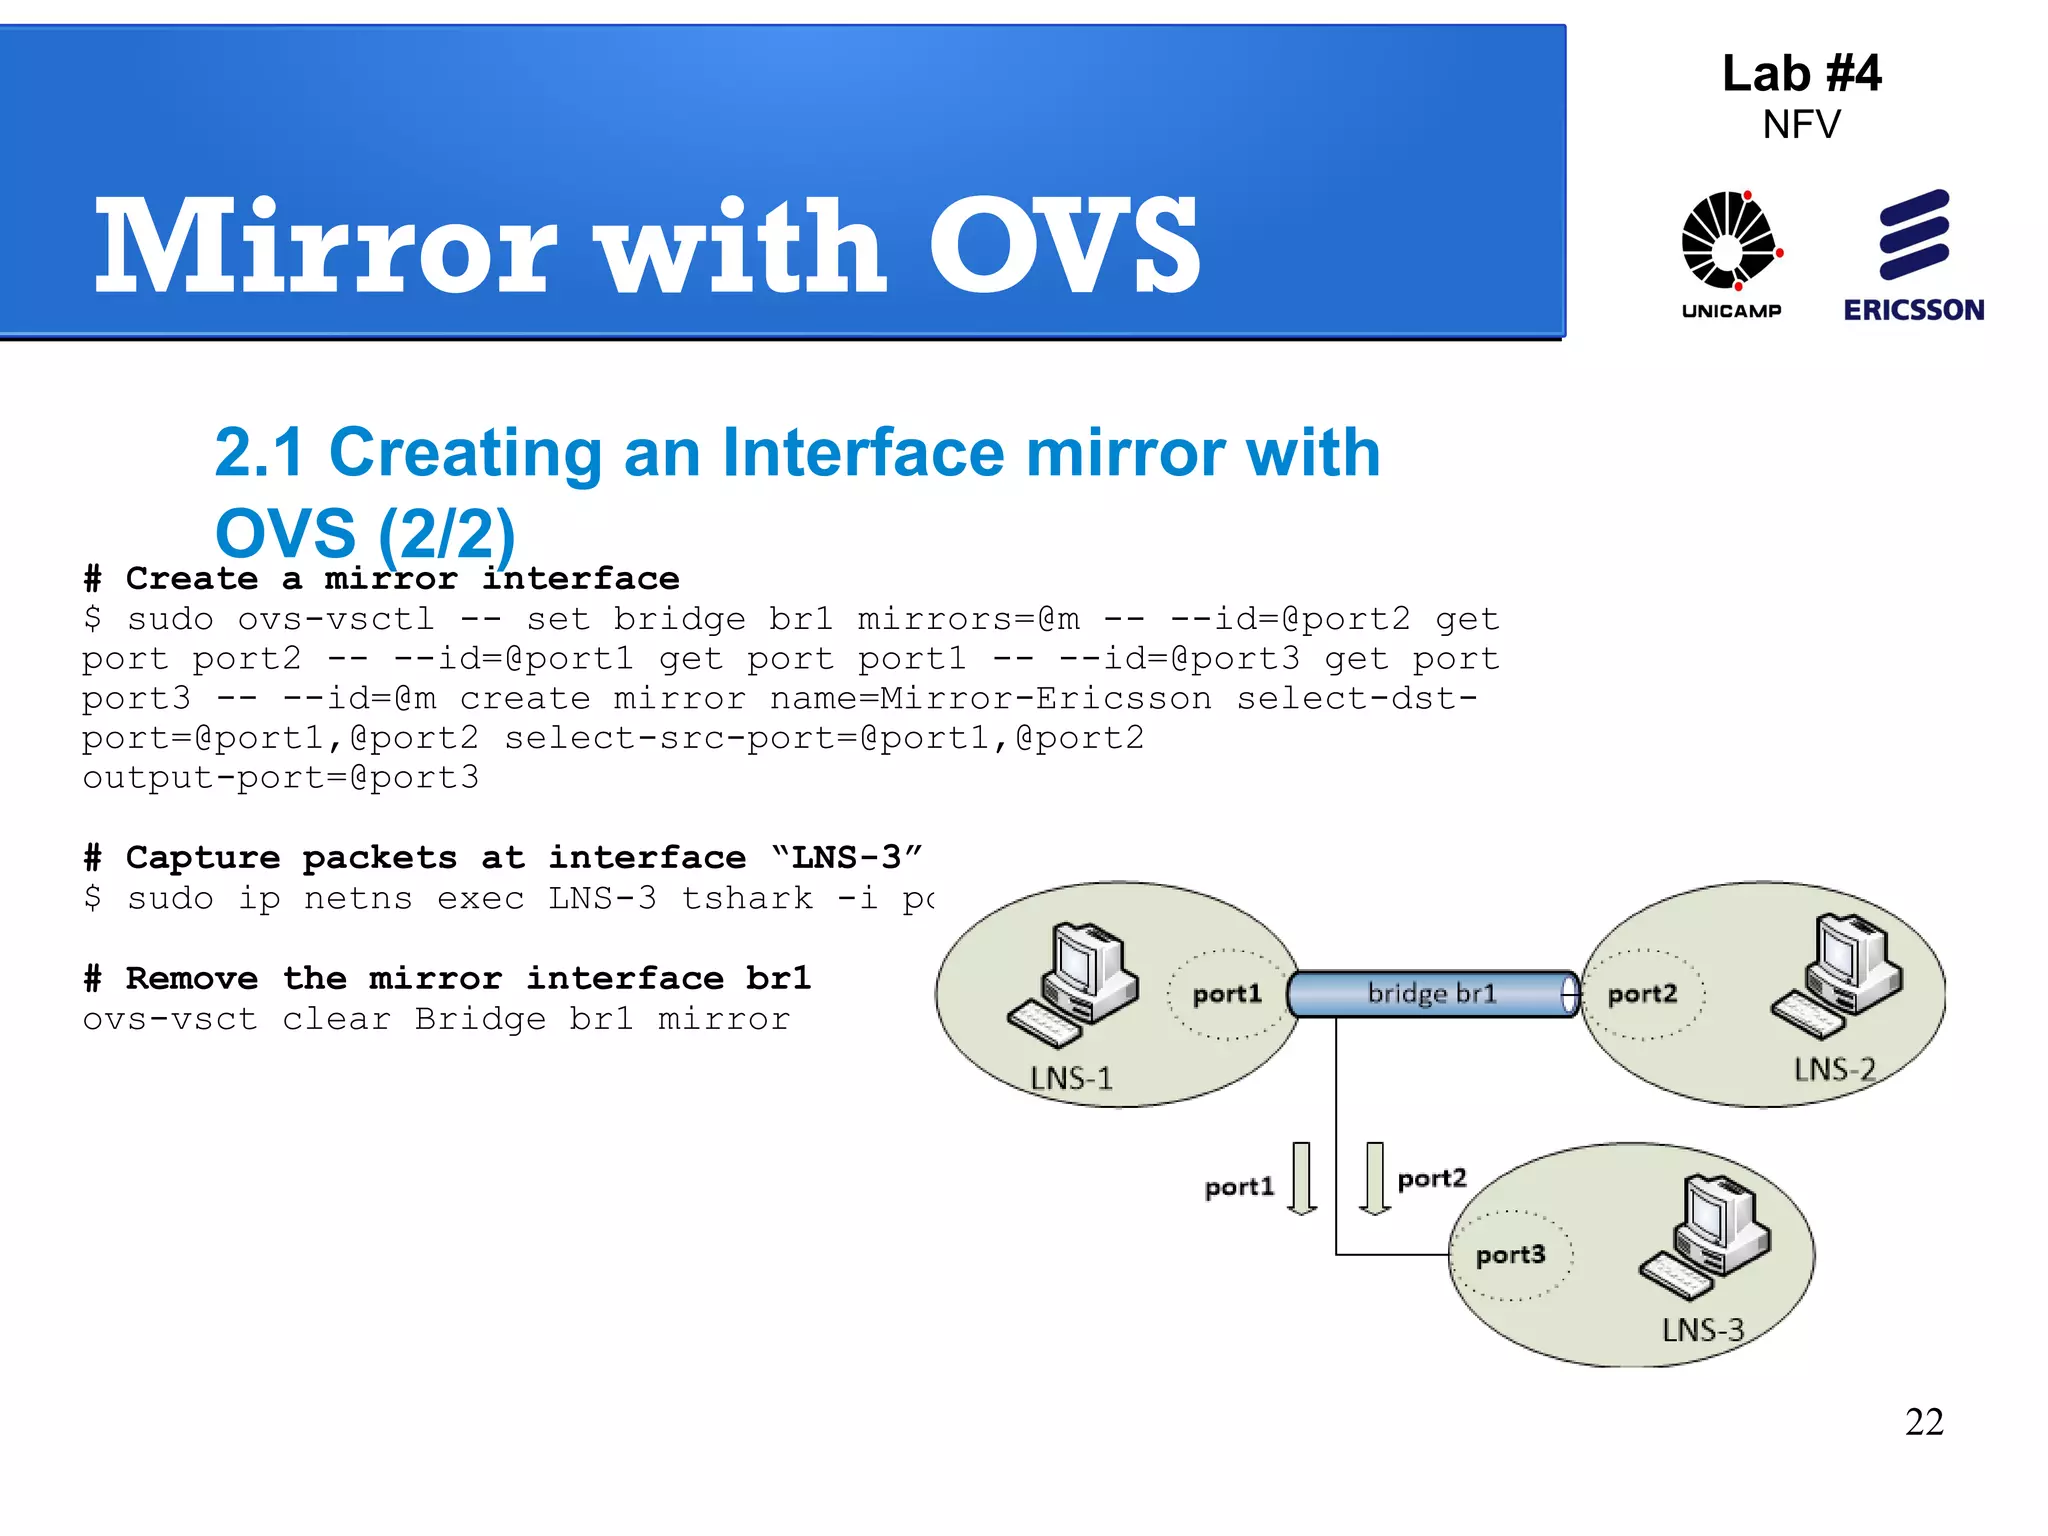
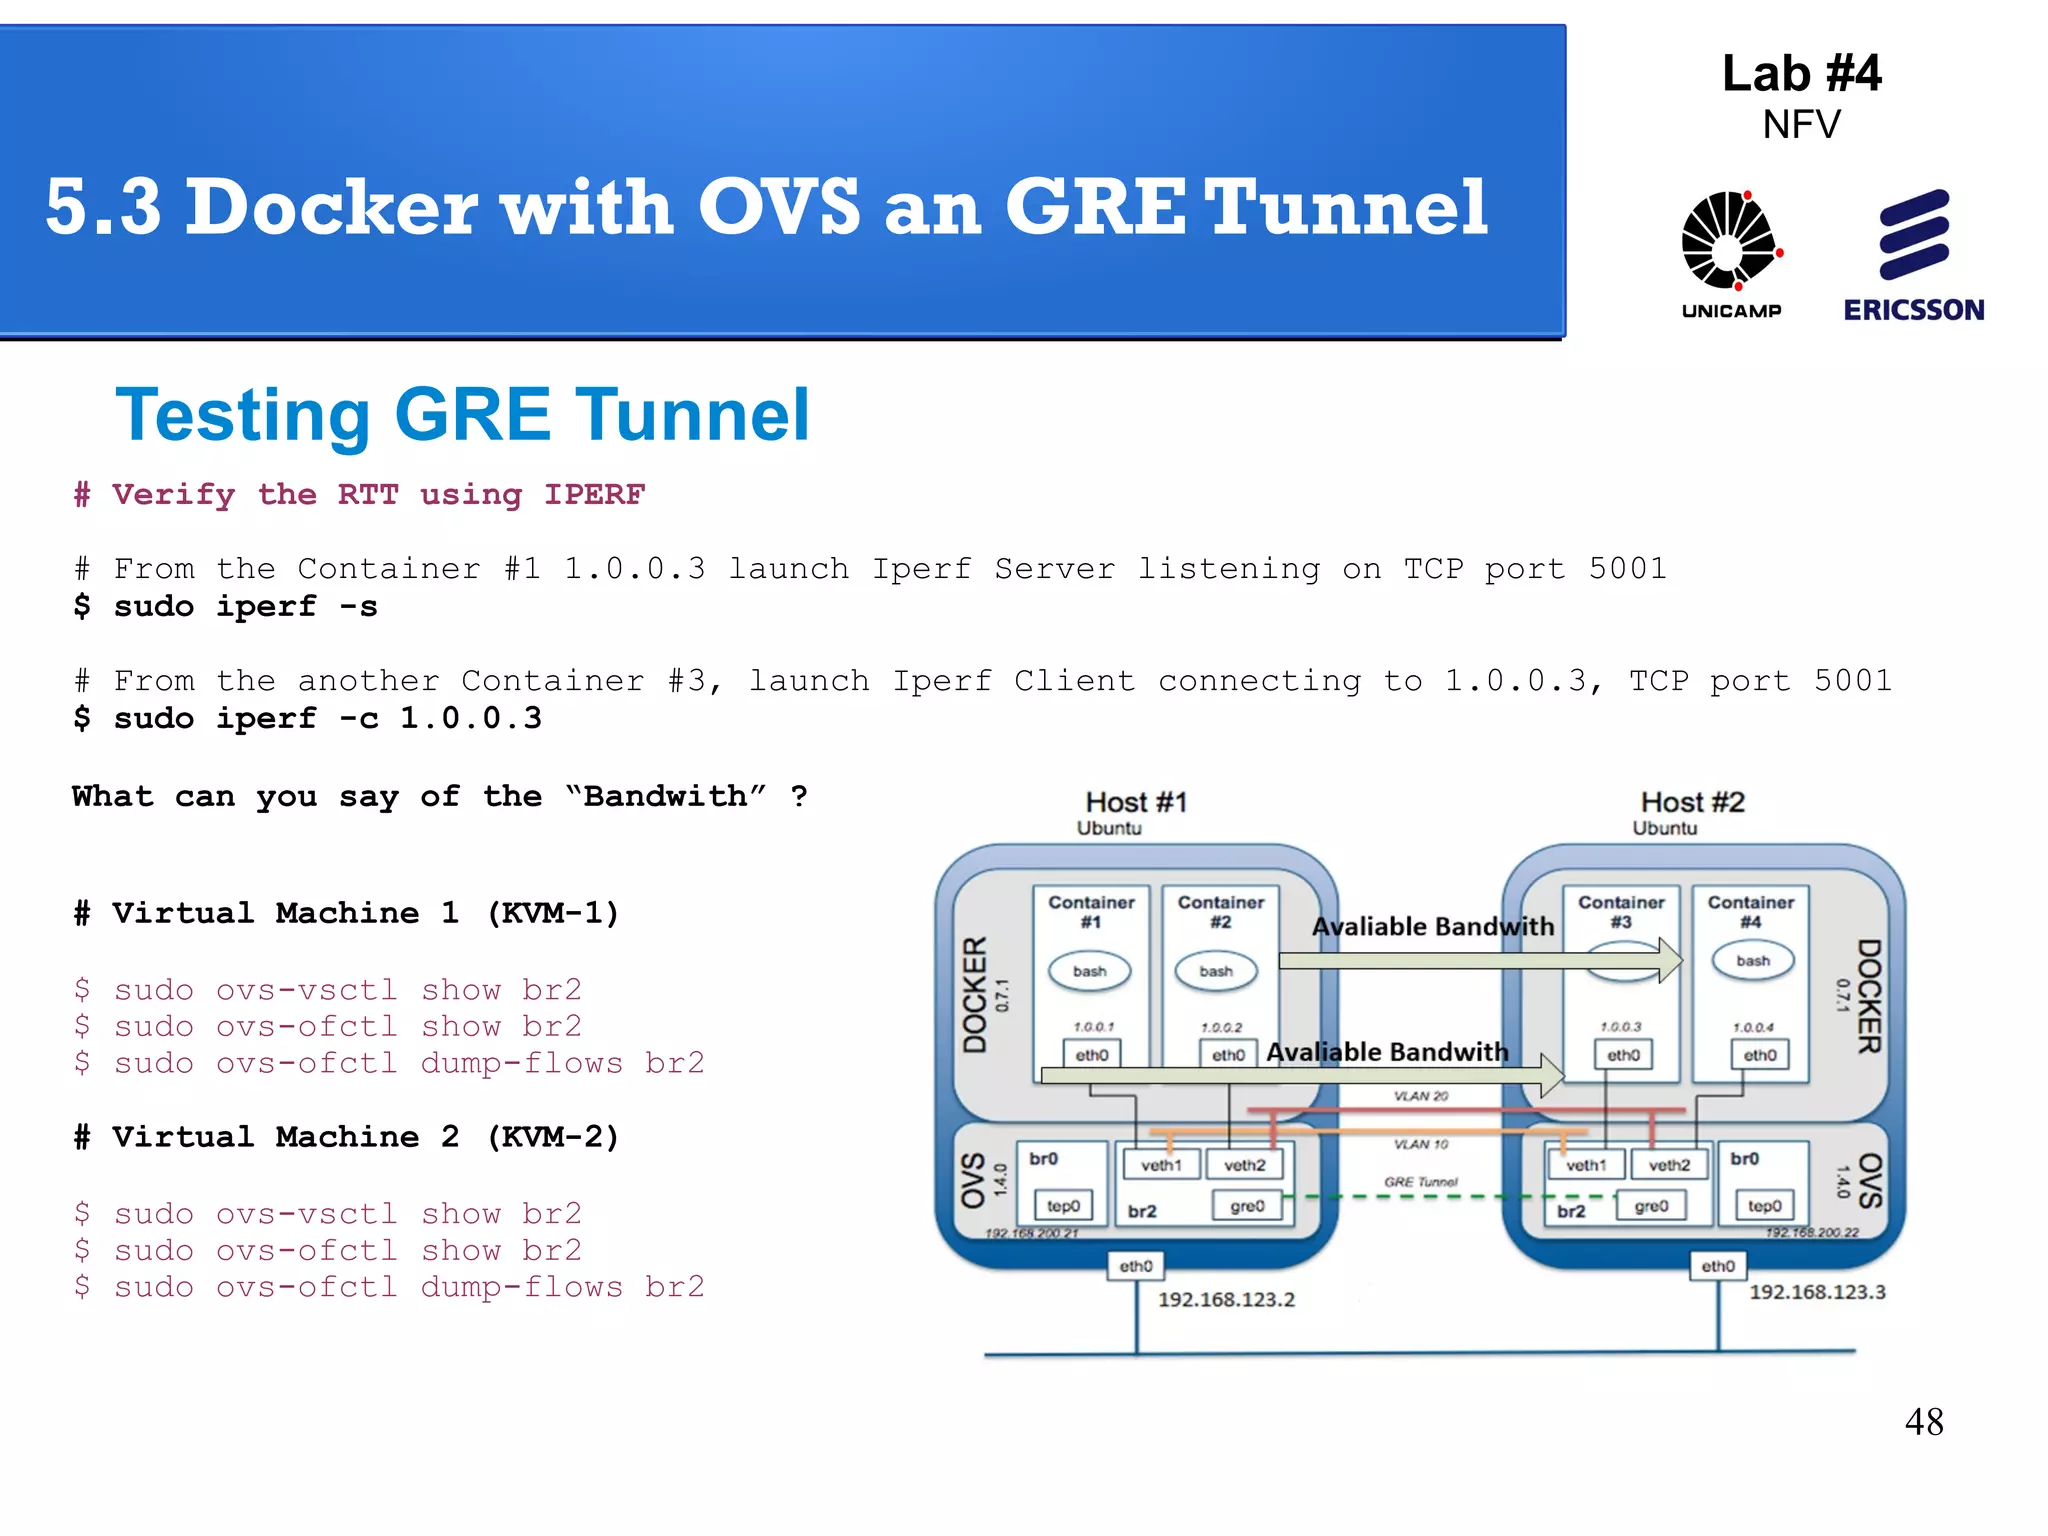
Lab 4: NFV Technology 
Javier Richard Quinto Ancieta 
27 Sep 2014
2 
Agenda 
Lab #4 
NFV 
Exercise 1: Linux NameSpace 
Exercise 2: Port Mirroring with OVS 
Exercise 3: Linux Containers 
Exercise 4: Docker
3 
Introduction 
Containers and Hypervisor 
Source: sdanielf.github.io
4 
Agenda 
1. Linux Namespace (LNS) 
Lab #4 
NFV 
1.1 – Creating Linux Namespaces 
1.2 – LNS with veth interfaces pair 
1.3 – LNS with OpenVswitch and veth interfaces 
1.4 – LNS with only OpenVswitch
5 
Lab #4 
NFV 
Question: What is Linux Namespaces? 
Is logically another copy of the network stack, with its own routes, 
firewall rules, and network devices. By convention a named network 
namespace is an object at /var/run/netns/NAME that can be opened. 
The file descriptor resulting from opening /var/run/netns/NAME refers to 
the specified network namespace. 
Source: lwn.net
6 
Linux Namespace 
Accessing virtual machines 
# To start the Main KVM, open a terminal and type: 
$ virsh start tutorialNFV 
# Access to the VM recently started: 
$ ssh ubuntu@192.168.122.179 (username = ubuntu; password = ubuntu)
7 
Lab #4 
NFV 
Linux Namespace 
1.1 Creating Linux Namespaces (LNS) 
# Create two network namespaces 
$ sudo ip netns add LNS-1 
$ sudo ip netns add LNS-2 
# List network namespaces 
$ sudo ip netns list 
# Write commands inside one Linux namespace 
$ sudo ip netns exec LNS-1 ip a 
$ sudo ip netns exec LNS-1 ifconfig 
$ sudo ip netns exec LNS-2 ip a 
$ sudo ip netns exec LNS-2 ifconfig 
# Write the command “bash” to enter to the console LNS-1 
$ sudo ip netns exec LNS-1 bash 
# ip a 
# exit
8 
Lab #4 
NFV 
Linux Namespaces 
1.2 Linux Namespace with veth interfaces pair (1/4) 
# Add a veth interfaces pair 
$ sudo ip link add port1 type veth peer name nsport1 
$ sudo ip link 
* Can you note the interfaces created? 
# Move the nsport1 interface to ns1 namespace 
$ sudo ip link set nsport1 netns LNS-1 
# Check that the nsport1 interface is on LNS-1 
$ sudo ip netns exec LNS-1 ip a 
# Active all the interfaces recently created 
$ sudo ip netns exec LNS-1 ip link set dev lo up 
$ sudo ip netns exec LNS-1 ip link set dev nsport1 up 
$ sudo ip link set dev port1 up
9 
Lab #4 
NFV 
Linux Namespaces 
1.2 Linux Namespace with veth interfaces pair (2/4) 
# Assign one IP address for each Namespace 
# For root namespace (Main KVM) 
$ sudo ip addr add 11.0.0.1/24 dev port1 
# For network namespace (LNS-1) 
$ sudo ip netns exec LNS-1 ip addr add 11.0.0.2/24 dev 
nsport1 
# Verify the connectivity between nsport1 and port1 
$ ping 11.0.0.2 -c 2 
$ sudo ip netns exec LNS-1 ping 11.0.0.1 -c 2
10 
Lab #4 
NFV 
Linux Namespaces 
1.2 Linux Namespace with veth interfaces pair (3/4) 
Iperf is a tool to measure the bandwidth and the 
quality of a network link. The network link is 
delimited by two hosts running Iperf. 
The quality of a link can be tested as follows: 
- Latency (response time or RTT): can be measured with 
the Ping command. 
- Jitter (latency variation): can be measured with an 
Iperf UDP test. 
- Datagram loss: can be measured with an Iperf UDP 
test. 
The bandwidth is measured through TCP tests. 
# Verify the RTT using IPERF 
# From the Main KVM, launch Iperf Server 
listening on TCP port 5001 
$ sudo iperf -s 
# From the LNS-1, launch Iperf Client connecting 
to 11.0.0.1, TCP port 5001 
$ sudo ip netns exec LNS-1 iperf -c 11.0.0.1
11 
Lab #4 
NFV 
Linux Namespaces 
1.2 Linux Namespace with veth interfaces pair (4/4)
12 
Lab #4 
NFV 
Linux Namespaces 
1.3 Linux Namespaces with OpenVswitch and Veth pair 
(1# C/l4ea)n the configuration of the last step 
$ sudo ip link del port1 type veth peer name nsport1 
# Create veth interface pairs, such as is shown below 
$ sudo ip link add nsport1 type veth peer name port1 
$ sudo ip link add nsport2 type veth peer name port2 
# Create a new virtual switch 
$ sudo ovs-vsctl add-br br1 
# Attach the “port1” and ”port2” interfaces to the bridge br1 
$ sudo ovs-vsctl add-port br1 port1 
$ sudo ovs-vsctl add-port br1 port2
13 
Lab #4 
NFV 
Linux Namespaces 
1.3 Linux Namespaces with OpenVswitch and veth pair 
(2/4) 
# Attach “nsport1” and “nsport2” interfaces to their corresponding LNS 
$ sudo ip link set nsport1 netns LNS-1 
$ sudo ip link set nsport2 netns LNS-2 
# Bring up all the interfaces of LNS and OVS 
$ sudo ip netns exec LNS-1 ip link set dev nsport1 up 
$ sudo ip netns exec LNS-2 ip link set dev nsport2 up 
$ sudo ip link set dev port1 up 
$ sudo ip link set dev port2 up
Linux Namespaces 
1.3 Linux Namespaces with OpenVswitch and veth pair (3/4) 
14 
Lab #4 
NFV 
# Assign IP address for each interface 
$ sudo ip addr add 11.0.0.1/24 dev port1 
$ sudo ip addr add 11.0.0.3/24 dev port2 
$ sudo ip netns exec LNS-1 ip addr add 11.0.0.2/24 dev nsport1 
$ sudo ip netns exec LNS-2 ip addr add 11.0.0.4/24 dev nsport2 
# Verify the connectivity between nsport1 and nsport2 
$ sudo ip netns exec LNS-1 ping 11.0.0.4 
$ sudo ip netns exec LNS-2 ping 11.0.0.2
Linux Namespaces 
1.3 Linux Namespaces with OpenVswitch and veth pair (4/4) 
15 
Lab #4 
NFV 
# Verify the RTT using IPERF 
# From the LNS-2, launch Iperf Server listening on TCP port 5001 
$ sudo ip netns exec LNS-2 iperf -s 
# From the LNS-1, launch Iperf Client connecting to 11.0.0.4, TCP port 
5001 
$ sudo ip netns exec LNS-1 iperf -c 11.0.0.4
16 
Lab #4 
NFV 
Linux Namespaces 
1.4 Linux Namespaces with only OpenVswitch 
# C(l1ea/n3 a)l l current configuration 
$ sudo ip netns exec LNS-1 ip link del nsport1 
$ sudo ip netns exec LNS-2 ip link del nsport2 
$ sudo ovs-vsctl del-port br1 port1 
$ sudo ovs-vsctl del-port br1 port2 
# Create two virtual interfaces port1 and port2 
$ sudo ovs-vsctl add-port br1 port1 
$ sudo ovs-vsctl add-port br1 port2 
# Change the mode of each interface to internal port mode 
$ sudo ovs-vsctl -- set Interface port1 type=internal 
$ sudo ovs-vsctl -- set Interface port2 type=internal
17 
Lab #4 
NFV 
Linux Namespaces 
1.4 Linux Namespaces with only Openvswitch 
(2/3) 
# Assign port1 and port2 interfaces to their corresponding LNS 
$ sudo ip link set port1 netns LNS-1 
$ sudo ip link set port2 netns LNS-2 
# Bring up all ports in LNS and OVS 
$ sudo ip netns exec LNS-1 ip link set dev port1 up 
$ sudo ip netns exec LNS-2 ip link set dev port2 up 
$ sudo ip netns exec LNS-1 ip link set dev lo up 
$ sudo ip netns exec LNS-2 ip link set dev lo up 
# Configure the IP address for each internal interface 
$ sudo ip netns exec LNS-1 ip addr add 11.0.0.1/24 dev port1 
$ sudo ip netns exec LNS-2 ip addr add 11.0.0.2/24 dev port2 
# Test the connectivity between port1 and port2 interfaces 
$ sudo ip netns exec LNS-1 ping 11.0.0.2 
$ sudo ip netns exec LNS-2 ping 11.0.0.1
18 
Lab #4 
NFV 
Linux Namespaces 
1.4 Linux Namespaces with only Openvswitch (3/3) 
# Verify the RTT using IPERF 
# From the LNS-2, launch Iperf Server listening on TCP port 5001 
$ sudo ip netns exec LNS-2 iperf -s 
# From the LNS-1, launch Iperf Client connecting to 11.0.0.2, TCP 
port 5001 
$ sudo ip netns exec LNS-1 iperf -c 11.0.0.2
19 
Agenda 
Lab #4 
NFV 
2. Port Mirroring with OVS 
2.1 – Creating an mirror interface with OVS
Question: What is Port Mirroring with OVS 
20 
Mirror with OVS 
Lab #4 
NFV 
This excercise describes how to configure a 
mirror port on an Open vSwitch. The goal is 
to install a new guest to act as IDS/IPS 
system. This guest is configured with 2 
virtual network interfaces. The first interface 
will have an IP address and will be used to 
manage the guest. The other interfaces will 
be connected to the mirror port on Open 
vSwitch. This means that it will see all 
mirrored traffic. 
Source: hpproduct.wordpress.com
21 
Mirror with OVS 
Lab #4 
NFV 
2.1 Create an Interface mirror with OVS (1/2) 
# Create a new network namespace "LNS-3” 
$ sudo ip netns add LNS-3 
# Create a new internal interface “port3” 
$ sudo ovs-vsctl add-port br1 port3 
$ sudo ovs-vsctl -- set Interface port3 
type=internal 
# Bind the internal interface to the 
corresponding LNS 
$ sudo ip link set port3 netns LNS-3 
$ sudo ip netns exec LNS-3 ip link set dev port3 
up 
$ sudo ip netns exec LNS-3 ip addr add 
11.0.0.3/24 dev port3 
$ sudo ip netns exec LNS-3 ping 11.0.0.1 -c 2
22 
Mirror with OVS 
Lab #4 
NFV 
2.1 Creating an Interface mirror with 
OVS (2/2) 
# Create a mirror interface 
$ sudo ovs-vsctl -- set bridge br1 mirrors=@m -- --id=@port2 get 
port port2 -- --id=@port1 get port port1 -- --id=@port3 get port 
port3 -- --id=@m create mirror name=Mirror-Ericsson select-dst-port=@ 
port1,@port2 select-src-port=@port1,@port2 
output-port=@port3 
# Capture packets at interface “LNS-3” 
$ sudo ip netns exec LNS-3 tshark -i port3 
# Remove the mirror interface br1 
ovs-vsct clear Bridge br1 mirror
23 
Agenda 
3. Linux 
Containers (LXC) 
3.1 – Configure 
LXC 
3.2 – Tunnel GRE 
with LXC 
Lab #4 
NFV
24 
Linux Containers 
Lab #4 
NFV 
Question: What is Linux Containers 
Source: https://access.redhat.com 
LXC is a userspace interface for the 
Linux kernel containment features. 
Through a powerful API and simple 
tools, it lets Linux users easily create 
and manage system or application 
containers.
25 
Lab #4 
NFV 
3.1 Configure LXC (1/5) 
Accessing virtual machines 
# To start the Main KVM, open a terminal and type: 
$ virsh start tutorialNFV 
# Access to the VM recently started: 
$ ssh ubuntu@192.168.122.179 (username = ubuntu; password = ubuntu) 
# To start each VM (KVM-1, KVM-2), type: 
$ sudo virsh net-start default 
$ sudo virsh start ubuntu1 
$ sudo virsh start ubuntu2 
#Use different terminals to acces each VM 
From terminal 1 
$ ssh ubuntu@192.168.123.2 (password: ubuntu) 
From terminal 2 
$ ssh ubuntu@192.168.123.3 (password: ubuntu)
26 
Lab #4 
NFV 
3.1 Configure LXC (2/5) 
Instantiation of Containers 
LXC 
# Create a LXC container for each VM using ubuntu 
14.04 template 
From KVM-1: $ sudo lxc-create -t download -n 
test-ubuntu1 -- -d ubuntu -r 
trusty -a amd64 
From KVM-2: $ sudo lxc-create -t download -n 
test-ubuntu1 -- -d ubuntu -r 
trusty -a amd64 
# List the containers created 
From KVM-1: $ sudo lxc-ls 
From KVM-2: $ sudo lxc-ls
27 
Lab #4 
NFV 
3.1 Configure LXC (3/5) 
Connecting LXC to the bridge br0 for VM-1 
(KVM-1) 
Add the required lines of the LXC config file which are highlighted below and 
comment 
the line that start with “ lxc.network.link”. 
ubuntu@KVM-1:~$ sudo vim /var/lib/lxc/test-ubuntu1/config 
... 
# Container specific configuration 
lxc.rootfs = /var/lib/lxc/test-ubuntu1/rootfs 
lxc.utsname = test-ubuntu1 
# Network configuration 
lxc.network.type = veth 
lxc.network.veth.pair = host1 
lxc.network.script.up = /etc/lxc/ovsup 
lxc.network.script.down = /etc/lxc/ovsdown 
lxc.network.flags = up 
lxc.network.ipv4 = 11.1.1.11/24 
lxc.network.ipv4.gateway = 11.1.1.1 
#lxc.network.link = lxcbr0 
lxc.network.hwaddr = 00:16:3e:fb:cb:db
28 
Lab #4 
NFV 
3.1 Configure LXC (4/5) 
Connecting LXC to the bridge br0 for VM-2 
(KVM-2) 
Add the required lines of the LXC config file which are highlighted 
below and comment 
the line that start with “ lxc.network.link”. 
ubuntu@KVM-2:~$ sudo vim /var/lib/lxc/test-ubuntu1/config 
... 
# Container specific configuration 
lxc.rootfs = /var/lib/lxc/test-ubuntu1/rootfs 
lxc.utsname = test-ubuntu1 
# Network configuration 
lxc.network.type = veth 
lxc.network.veth.pair = host1 
lxc.network.script.up = /etc/lxc/ovsup 
lxc.network.script.down = /etc/lxc/ovsdown 
lxc.network.flags = up 
lxc.network.ipv4 = 11.1.1.12/24 
lxc.network.ipv4.gateway = 11.1.1.2 
#lxc.network.link = lxcbr0 
lxc.network.hwaddr = 00:16:3e:fb:cb:db
29 
Lab #4 
NFV 
3.1 Configure LXC (5/5) 
Script for the Container-1 and 
Container-2 
Create/delete interfaces of containers 
There is a script named “ovsup” that allows to create interfaces inside br0 
$ sudo vim /etc/lxc/ovsup 
#!/bin/bash 
BRIDGE="br0" 
ovs-vsctl --may-exist add-br $BRIDGE 
ovs-vsctl --if-exist add-port $BRIDGE $5 
ovs-vsctl --may-exist add-port $BRIDGE $5 
There is another script named “ovsdown” that allows to delete interfaces created by OVS when the Linux 
Containers was up 
$ sudo vim /etc/lxc/ovsdown 
#!/bin/bash 
BRIDGE="br0" 
ovs-vsctl del-port $BRIDGE host1
30 
Lab #4 
NFV 
3.2 Tunnel GRE with LXC 
Cr 
eat 
e 
GRE 
Tunnel 
# Create the interface bridge br0 for each KVM 
KVM-1: sudo ovs-vsctl add-br br0 
KVM-2: sudo ovs-vsctl add-br br0 
# Configure the IP address for the interface br0 in 
each KVM 
KVM-1: sudo ifconfig br0 11.1.1.1 netmask 255.255.255.0 
KVM-2: sudo ifconfig br0 11.1.1.2 netmask 255.255.255.0 
# Create a GRE tunnel between the bridges br0 
KVM-1: sudo ovs-vsctl add-port br0 gre1 -- set Interface 
gre1 type=gre options:remote_ip=192.168.123.3 
KVM-2: sudo ovs-vsctl add-port br0 gre1 -- set Interface 
gre1 type=gre options:remote_ip=192.168.123.2
31 
Lab #4 
NFV 
3.2 Tunnel GRE with LXC 
# Start each container from different console 
KVM1: sudo lxc-start -n test-ubuntu1 
KVM2: sudo lxc-start -n test-ubuntu1 
# Testing the connectivity between the containers 
- From the container 1 (IP=11.1.1.11) 
$ ping 11.1.1.12 
64 bytes from 11.1.1.12: icmp_seq=90 ttl=64 time=5.55 ms 
... 
- From the container 2 (IP=11.1.1.12) 
$ ping 11.1.1.11 
64 bytes from 11.1.1.11: icmp_seq=90 ttl=64 time=5.55 ms 
... 
I 
nst 
a 
nti 
ati 
on
32 
3.2 Tunnel GRE with LXC 
Testing with Iperf 
# Instalar “iperf” in each virtual machine KVM1, KVM2 
KVM1: sudo apt-get install iperf 
KVM2: sudo apt-get install iperf 
# Copy the binary “iperf” from KVM1 to Container ofKVM-1 
KVM1: sudo cp /usr/bin/iperf /var/lib/lxc/test-ubuntu1/rootfs/usr/bin/ 
KVM2: sudo cp /usr/bin/iperf /var/lib/lxc/test-ubuntu1/rootfs/usr/bin/ 
# Verify the RTT using IPERF 
# From the Container LXC 11.1.1.12, launch Iperf Server listening on 
TCP port 5001 
$ sudo iperf -s 
# From the another Container LXC 11.1.1.11, launch Iperf Client 
connecting to 11.1.1.12, TCP port 5001 
$ sudo iperf -c 11.1.1.12
33 
3.2 Tunnel GRE with LXC 
# Finally shutdown each container and delete br0 
ubuntu@test-ubuntu1:$ sudo init 0 
ubuntu@KVM-1:$ sudo ovs-vsctl del-br br0 
ubuntu@test-ubuntu1:$ sudo init 0 
ubuntu@KVM-2:$ sudo ovs-vsctl del-br br0
34 
Agenda 
4. Dockers 
4.1 – Installation Guide 
4.2 – Docker with GRE Tunnel 
4.3 – Docker with Open Vswitch and GRE 
Tunnel 
Lab #4 
NFV
35 
Lab #4 
NFV 
Question: What is Docker? 
Docker is an open platform for developers 
and sysadmins to build, ship, and run 
distributed applications. Consisting of 
Docker Engine, a portable, lightweight 
runtime and packaging tool, and Docker 
Hub, a cloud service for sharing applications 
and automating workflows, Docker enables 
apps to be quickly assembled from 
components and eliminates the friction 
between development, QA, and production 
environments
36 
Docker (done!) 
Lab #4 
NFV 
4.1 – Installation Guide (1/2) 
# Install and configure docker (v1.01) from the oficial repository Ubuntu 
sudo apt-get update && apt-get install docker.io 
sudo ln -sf /usr/bin/docker.io /usr/local/bin/docker 
sudo sed -i '$acomplete -F _docker docker' /etc/bash_completion.d/docker.io 
# Install the latest version of docker (v1.2) 
Add the key public in where is found Docker 
$ sudo apt-key adv --keyserver hkp://keyserver.ubuntu.com:80 --recv-keys 
> 36A1D7869245C8950F966E92D8576A8BA88D21E9 
Copy the docker’s site in the Ubuntu repository’s source 
$ sudo sh -c "echo deb https://get.docker.io/ubuntu docker main > /etc/apt/sources.list.d/docker.list" 
Update the Kernel 
$ sudo apt-get update 
Install the latest version of docker 
$ sudo apt-get install lxc-docker
37 
Docker (done!) 
# What do you observe when you give below command: 
$ docker -h ? 
# Allowing non-root access 
$ sudo gpasswd -a <user-actual> docker 
$ logout 
# Access again to the virtual machine and give the below 
command again: 
$docker -h 
# Enabling the memory and swap accounting 
$sudo vim /etc/default/grub 
GRUB_CMDLINE_LINUX="" 
Replace by: 
GRUB_CMDLINE_LINUX="cgroup_enable=memory swapaccount=1" 
# Update the grub and restart the machine 
$sudo update-grub2 && reboot 
# Installing LXC and bridge-utils 
$sudo apt-get install lxc bridge-utils 
Lab #4 
NFV 
4.1 – Installation Guide (2/2)
38 
4.2 Docker with GRE Tunnel 
# For this exercise we will continue using the same VMs (KVM-1, KVM-2), 
(see slide 27) 
# Check if the docker is up 
$ sudo ps aux |grep docker 
# If docker is not up then give the below command: 
service docker start 
# In each VM, search and pull the pre-configured container from docker hub 
KVM-1: $ docker search intrig/tutorial 
KVM-2: $ docker search intrig/tutorial 
KVM-1: $ docker pull intrig/tutorial 
KVM-2: $ docker pull intrig/tutorial 
# Check if docker was correctly downloaded 
KVM-1: $ docker images 
KVM-2: $ docker images 
Lab #4 
NFV 
Initiating 
Docker
39 
Lab #4 
NFV 
4.2 Docker with GRE Tunnel 
Create GRE Tunnel in Docker (1/3) 
# Virtual Machine 1 (KVM-1) 
KVM-1$ sudo ip link set docker0 down 
KVM-1$ sudo brctl delbr docker0 
KVM-1$ sudo brctl addbr docker0 
KVM-1$ sudo ip addr add 172.16.1.1/24 dev docker0 
KVM-1$ sudo ip link set docker0 up 
KVM-1$ sudo ovs-vsctl add-br br0 
KVM-1$ sudo ovs-vsctl add-port br0 gre0 -- set interface 
gre0 type=gre options:remote_ip=192.168.123.3 
KVM-1$ sudo brctl addif docker0 br0 
# Virtual Machine 2 (KVM-2) 
KVM-2$ sudo ip link set docker0 down 
KVM-2$ sudo brctl delbr docker0 
KVM-2$ sudo brctl addbr docker0 
KVM-2$ sudo ip addr add 172.16.1.2/24 dev docker0 
KVM-2$ sudo ip link set docker0 up 
KVM-2$ sudo ovs-vsctl add-br br0 
KVM-2$ sudo ovs-vsctl add-port br0 gre0 -- set interface 
gre0 type=gre options:remote_ip=192.168.123.2 
KVM-2$ sudo brctl addif docker0 br0
40 
Lab #4 
NFV 
4.2 Docker with GRE Tunnel 
Create GRE Tunnel in Docker (2/3) 
# Virtual Machine 1 (KVM-1) 
# Activate docker for the container 1 
$ docker run -i -t --privileged --name=container1 
--hostname=container1 --publish 127.0.0.1:2222:22 
intrig/tutorial:v1 /bin/bash 
# If you get the below mentioned prompt, then configure 
an IP address for it. This prompt signifies that you have 
successfully started the container. 
root@container1:/# 
root@container1:/# ifconfig eth0 172.16.1.11 netmask 255.255.255.0 
root@container1:/# route add default gw 172.16.1.1
41 
Lab #4 
NFV 
4.2 Docker with GRE Tunnel 
Create GRE Tunnel in Docker (3/3) 
# Virtual Machine 2 (KVM-2) 
# Activate docker for the container 2 
$ docker run -i -t --privileged --name=container2 
--hostname=container2 --publish 127.0.0.1:2222:22 
intrig/tutorial:v1 /bin/bash 
# If you get the below mentioned prompt, then 
configure an IP address for it. This prompt 
signifies that you have successfully started the 
container. 
root@container2:/# 
root@container2:/# ifconfig eth0 172.16.1.12 netmask 
255.255.255.0 
root@container2:/# route add default gw 172.16.1.2
42 
Lab #4 
NFV 
4.2 Docker with GRE Tunnel 
# Testing the connectivity between dockers 
-From the Container 1 to Container 2 
Container1:/# ping 172.16.1.12 
- From the Container 2 to Container 1 
Container2:/# ping 172.16.1.11 
Testi 
ng 
GRE 
Tunne 
# Copy the binary “iperf” from KVM1 to Container 
ofKVM-1 
KVM1: sudo cp /usr/bin/iperf 
/var/lib/docker/aufs/diff/<ID-docker1>/usr/bin/ 
KVM2: sudo cp /usr/bin/iperf 
/var/lib/docker/aufs/diff/<ID-docker2>/usr/bin/ 
# Verify the RTT using IPERF 
# From the Container Docker 172.16.1.12 
launch Iperf Server listening on TCP 
port 5001 
$ sudo iperf -s 
# From the another Container Docker 
172.16.1.11, launch Iperf Client 
connecting to 172.16.1.12, TCP port 5001 
$ sudo iperf -c 172.16.1.12 
What can you say of the “Bandwith” ?
43 
4.3 Docker with OVS an GRE Tunnel 
Source: http://fbevmware.blogspot.com.br 
Lab #4 
NFV
44 
4.3 Docker with OVS an GRE Tunnel 
Creating GRE Tunnel using OVS 
# Virtual Machine 1 (KVM-1) 
$ sudo ovs-vsctl del-br br0 
$ sudo ovs-vsctl add-br br0 
$ sudo ovs-vsctl add-br br2 
$ sudo ovs-vsctl br0 tep0 -- set interface tep0 type=internal 
$ sudo ifconfig tep0 192.168.200.21 netmask 255.255.255.0 
$ sudo ovs-vsctl add-port br2 gre0 -- set interface gre0 type=gre 
options:remote_ip=192.168.123.3 
# Virtual Machine 2 (KVM-2) 
$ sudo ovs-vsctl del-br br0 
$ sudo ovs-vsctl add-br br0 
$ sudo ovs-vsctl add-br br2 
$ sudo ovs-vsctl br0 tep0 -- set interface tep0 type=internal 
$ sudo ifconfig tep0 192.168.200.22 netmask 255.255.255.0 
$ sudo ovs-vsctl add-port br2 gre0 -- set interface gre0 type=gre 
options:remote_ip=192.168.123.2 
Lab #4 
NFV
45 
4.3 Docker with OVS an GRE Tunnel 
Starting Containers 
# Virtual Machine 1 (KVM-1) 
# Delete the container docker created in the last exercise 
$ docker stop container1 
$ docker rm container1 
# Create two containers docker and set the network mode to none 
$ C1=$(docker run -d --net=none -t -i --name=container1 ubuntu /bin/bash) 
$ C2=$(docker run -d --net=none -t -i --name=container2 ubuntu /bin/bash) 
# Virtual Machine 2 (KVM-2) 
# Delete the container docker created in the last exercise 
$ docker stop container2 
$ docker rm container2 
# Create two containers docker and set the network mode to none 
$ C3=$(docker run -d --net=none -t -i --name=container3 ubuntu /bin/bash) 
$ C4=$(docker run -d --net=none -t -i --name=container4 ubuntu /bin/bash) 
Lab #4 
NFV
46 
4.3 Docker with OVS an GRE Tunnel 
Binding docker with Open Vswitch Interface (1/2) 
# Virtual Machine 1 (KVM-1) 
# To know the PID value of the container created, to use the script findPID 
$./findPID.sh $C1 
The PID value of the container created is: 6485 (for example). Same for $C2 
# Bind dockers with a OpenVswitch interface 
$./ovswork-1.sh br2 $C1 1.0.0.1/24 1.0.0.255 1.0.0.254 10 
$./ovswork-1.sh br2 $C2 1.0.0.2/24 1.0.0.255 1.0.0.254 20 
# Using different terminals, start the container1 and container2 
From terminal 1: 
$ docker start -a -i container1 
From terminal 2: 
$ docker start -a -i container2 
Lab #4 
NFV
47 
4.3 Docker with OVS an GRE Tunnel 
Binding docker with Open Vswitch Interface 
(2/2) 
# Virtual Machine 2 (KVM-2) 
# Bind dockers with a OpenVswitch interface 
$./ovswork-1.sh br2 $C3 1.0.0.3/24 1.0.0.255 1.0.0.254 10 
$./ovswork-1.sh br2 $C4 1.0.0.4/24 1.0.0.255 1.0.0.254 20 
# Using different terminals, start the container3 and container4 
From terminal 3: 
$ docker start -a -i container3 
From terminal 4: 
$ docker start -a -i container4 
# From the Container1 (Terminal 1) 
Container1$ ping 1.0.0.3 -c 2 
Container1$ ping 1.0.0.4 -c 2 
# From the Container3 (Terminal 3) 
Container3$ ping 1.0.0.1 -c 2 
Container3$ ping 1.0.0.2 -c 2 
What ping is successful? And why? 
Lab #4 
NFV
48 
5.3 Docker with OVS an GRE Tunnel 
Testing GRE Tunnel 
# Verify the RTT using IPERF 
# From the Container #1 1.0.0.3 launch Iperf Server listening on TCP port 5001 
$ sudo iperf -s 
# From the another Container #3, launch Iperf Client connecting to 1.0.0.3, TCP port 5001 
$ sudo iperf -c 1.0.0.3 
What can you say of the “Bandwith” ? 
# Virtual Machine 1 (KVM-1) 
$ sudo ovs-vsctl show br2 
$ sudo ovs-ofctl show br2 
$ sudo ovs-ofctl dump-flows br2 
# Virtual Machine 2 (KVM-2) 
$ sudo ovs-vsctl show br2 
$ sudo ovs-ofctl show br2 
$ sudo ovs-ofctl dump-flows br2 
Lab #4 
NFV
49 
Thank you! 
Lab. NFV 
Javier Richard Quinto Ancieta 
richardq@dca.fee.unicamp.br 
richardqa@gmail.com 
Lab #4 
NFV

New Virtualization Technologies

  • 1.
    Lab 4: NFVTechnology Javier Richard Quinto Ancieta 27 Sep 2014
  • 2.
    2 Agenda Lab#4 NFV Exercise 1: Linux NameSpace Exercise 2: Port Mirroring with OVS Exercise 3: Linux Containers Exercise 4: Docker
  • 3.
    3 Introduction Containersand Hypervisor Source: sdanielf.github.io
  • 4.
    4 Agenda 1.Linux Namespace (LNS) Lab #4 NFV 1.1 – Creating Linux Namespaces 1.2 – LNS with veth interfaces pair 1.3 – LNS with OpenVswitch and veth interfaces 1.4 – LNS with only OpenVswitch
  • 5.
    5 Lab #4 NFV Question: What is Linux Namespaces? Is logically another copy of the network stack, with its own routes, firewall rules, and network devices. By convention a named network namespace is an object at /var/run/netns/NAME that can be opened. The file descriptor resulting from opening /var/run/netns/NAME refers to the specified network namespace. Source: lwn.net
  • 6.
    6 Linux Namespace Accessing virtual machines # To start the Main KVM, open a terminal and type: $ virsh start tutorialNFV # Access to the VM recently started: $ ssh ubuntu@192.168.122.179 (username = ubuntu; password = ubuntu)
  • 7.
    7 Lab #4 NFV Linux Namespace 1.1 Creating Linux Namespaces (LNS) # Create two network namespaces $ sudo ip netns add LNS-1 $ sudo ip netns add LNS-2 # List network namespaces $ sudo ip netns list # Write commands inside one Linux namespace $ sudo ip netns exec LNS-1 ip a $ sudo ip netns exec LNS-1 ifconfig $ sudo ip netns exec LNS-2 ip a $ sudo ip netns exec LNS-2 ifconfig # Write the command “bash” to enter to the console LNS-1 $ sudo ip netns exec LNS-1 bash # ip a # exit
  • 8.
    8 Lab #4 NFV Linux Namespaces 1.2 Linux Namespace with veth interfaces pair (1/4) # Add a veth interfaces pair $ sudo ip link add port1 type veth peer name nsport1 $ sudo ip link * Can you note the interfaces created? # Move the nsport1 interface to ns1 namespace $ sudo ip link set nsport1 netns LNS-1 # Check that the nsport1 interface is on LNS-1 $ sudo ip netns exec LNS-1 ip a # Active all the interfaces recently created $ sudo ip netns exec LNS-1 ip link set dev lo up $ sudo ip netns exec LNS-1 ip link set dev nsport1 up $ sudo ip link set dev port1 up
  • 9.
    9 Lab #4 NFV Linux Namespaces 1.2 Linux Namespace with veth interfaces pair (2/4) # Assign one IP address for each Namespace # For root namespace (Main KVM) $ sudo ip addr add 11.0.0.1/24 dev port1 # For network namespace (LNS-1) $ sudo ip netns exec LNS-1 ip addr add 11.0.0.2/24 dev nsport1 # Verify the connectivity between nsport1 and port1 $ ping 11.0.0.2 -c 2 $ sudo ip netns exec LNS-1 ping 11.0.0.1 -c 2
  • 10.
    10 Lab #4 NFV Linux Namespaces 1.2 Linux Namespace with veth interfaces pair (3/4) Iperf is a tool to measure the bandwidth and the quality of a network link. The network link is delimited by two hosts running Iperf. The quality of a link can be tested as follows: - Latency (response time or RTT): can be measured with the Ping command. - Jitter (latency variation): can be measured with an Iperf UDP test. - Datagram loss: can be measured with an Iperf UDP test. The bandwidth is measured through TCP tests. # Verify the RTT using IPERF # From the Main KVM, launch Iperf Server listening on TCP port 5001 $ sudo iperf -s # From the LNS-1, launch Iperf Client connecting to 11.0.0.1, TCP port 5001 $ sudo ip netns exec LNS-1 iperf -c 11.0.0.1
  • 11.
    11 Lab #4 NFV Linux Namespaces 1.2 Linux Namespace with veth interfaces pair (4/4)
  • 12.
    12 Lab #4 NFV Linux Namespaces 1.3 Linux Namespaces with OpenVswitch and Veth pair (1# C/l4ea)n the configuration of the last step $ sudo ip link del port1 type veth peer name nsport1 # Create veth interface pairs, such as is shown below $ sudo ip link add nsport1 type veth peer name port1 $ sudo ip link add nsport2 type veth peer name port2 # Create a new virtual switch $ sudo ovs-vsctl add-br br1 # Attach the “port1” and ”port2” interfaces to the bridge br1 $ sudo ovs-vsctl add-port br1 port1 $ sudo ovs-vsctl add-port br1 port2
  • 13.
    13 Lab #4 NFV Linux Namespaces 1.3 Linux Namespaces with OpenVswitch and veth pair (2/4) # Attach “nsport1” and “nsport2” interfaces to their corresponding LNS $ sudo ip link set nsport1 netns LNS-1 $ sudo ip link set nsport2 netns LNS-2 # Bring up all the interfaces of LNS and OVS $ sudo ip netns exec LNS-1 ip link set dev nsport1 up $ sudo ip netns exec LNS-2 ip link set dev nsport2 up $ sudo ip link set dev port1 up $ sudo ip link set dev port2 up
  • 14.
    Linux Namespaces 1.3Linux Namespaces with OpenVswitch and veth pair (3/4) 14 Lab #4 NFV # Assign IP address for each interface $ sudo ip addr add 11.0.0.1/24 dev port1 $ sudo ip addr add 11.0.0.3/24 dev port2 $ sudo ip netns exec LNS-1 ip addr add 11.0.0.2/24 dev nsport1 $ sudo ip netns exec LNS-2 ip addr add 11.0.0.4/24 dev nsport2 # Verify the connectivity between nsport1 and nsport2 $ sudo ip netns exec LNS-1 ping 11.0.0.4 $ sudo ip netns exec LNS-2 ping 11.0.0.2
  • 15.
    Linux Namespaces 1.3Linux Namespaces with OpenVswitch and veth pair (4/4) 15 Lab #4 NFV # Verify the RTT using IPERF # From the LNS-2, launch Iperf Server listening on TCP port 5001 $ sudo ip netns exec LNS-2 iperf -s # From the LNS-1, launch Iperf Client connecting to 11.0.0.4, TCP port 5001 $ sudo ip netns exec LNS-1 iperf -c 11.0.0.4
  • 16.
    16 Lab #4 NFV Linux Namespaces 1.4 Linux Namespaces with only OpenVswitch # C(l1ea/n3 a)l l current configuration $ sudo ip netns exec LNS-1 ip link del nsport1 $ sudo ip netns exec LNS-2 ip link del nsport2 $ sudo ovs-vsctl del-port br1 port1 $ sudo ovs-vsctl del-port br1 port2 # Create two virtual interfaces port1 and port2 $ sudo ovs-vsctl add-port br1 port1 $ sudo ovs-vsctl add-port br1 port2 # Change the mode of each interface to internal port mode $ sudo ovs-vsctl -- set Interface port1 type=internal $ sudo ovs-vsctl -- set Interface port2 type=internal
  • 17.
    17 Lab #4 NFV Linux Namespaces 1.4 Linux Namespaces with only Openvswitch (2/3) # Assign port1 and port2 interfaces to their corresponding LNS $ sudo ip link set port1 netns LNS-1 $ sudo ip link set port2 netns LNS-2 # Bring up all ports in LNS and OVS $ sudo ip netns exec LNS-1 ip link set dev port1 up $ sudo ip netns exec LNS-2 ip link set dev port2 up $ sudo ip netns exec LNS-1 ip link set dev lo up $ sudo ip netns exec LNS-2 ip link set dev lo up # Configure the IP address for each internal interface $ sudo ip netns exec LNS-1 ip addr add 11.0.0.1/24 dev port1 $ sudo ip netns exec LNS-2 ip addr add 11.0.0.2/24 dev port2 # Test the connectivity between port1 and port2 interfaces $ sudo ip netns exec LNS-1 ping 11.0.0.2 $ sudo ip netns exec LNS-2 ping 11.0.0.1
  • 18.
    18 Lab #4 NFV Linux Namespaces 1.4 Linux Namespaces with only Openvswitch (3/3) # Verify the RTT using IPERF # From the LNS-2, launch Iperf Server listening on TCP port 5001 $ sudo ip netns exec LNS-2 iperf -s # From the LNS-1, launch Iperf Client connecting to 11.0.0.2, TCP port 5001 $ sudo ip netns exec LNS-1 iperf -c 11.0.0.2
  • 19.
    19 Agenda Lab#4 NFV 2. Port Mirroring with OVS 2.1 – Creating an mirror interface with OVS
  • 20.
    Question: What isPort Mirroring with OVS 20 Mirror with OVS Lab #4 NFV This excercise describes how to configure a mirror port on an Open vSwitch. The goal is to install a new guest to act as IDS/IPS system. This guest is configured with 2 virtual network interfaces. The first interface will have an IP address and will be used to manage the guest. The other interfaces will be connected to the mirror port on Open vSwitch. This means that it will see all mirrored traffic. Source: hpproduct.wordpress.com
  • 21.
    21 Mirror withOVS Lab #4 NFV 2.1 Create an Interface mirror with OVS (1/2) # Create a new network namespace "LNS-3” $ sudo ip netns add LNS-3 # Create a new internal interface “port3” $ sudo ovs-vsctl add-port br1 port3 $ sudo ovs-vsctl -- set Interface port3 type=internal # Bind the internal interface to the corresponding LNS $ sudo ip link set port3 netns LNS-3 $ sudo ip netns exec LNS-3 ip link set dev port3 up $ sudo ip netns exec LNS-3 ip addr add 11.0.0.3/24 dev port3 $ sudo ip netns exec LNS-3 ping 11.0.0.1 -c 2
  • 22.
    22 Mirror withOVS Lab #4 NFV 2.1 Creating an Interface mirror with OVS (2/2) # Create a mirror interface $ sudo ovs-vsctl -- set bridge br1 mirrors=@m -- --id=@port2 get port port2 -- --id=@port1 get port port1 -- --id=@port3 get port port3 -- --id=@m create mirror name=Mirror-Ericsson select-dst-port=@ port1,@port2 select-src-port=@port1,@port2 output-port=@port3 # Capture packets at interface “LNS-3” $ sudo ip netns exec LNS-3 tshark -i port3 # Remove the mirror interface br1 ovs-vsct clear Bridge br1 mirror
  • 23.
    23 Agenda 3.Linux Containers (LXC) 3.1 – Configure LXC 3.2 – Tunnel GRE with LXC Lab #4 NFV
  • 24.
    24 Linux Containers Lab #4 NFV Question: What is Linux Containers Source: https://access.redhat.com LXC is a userspace interface for the Linux kernel containment features. Through a powerful API and simple tools, it lets Linux users easily create and manage system or application containers.
  • 25.
    25 Lab #4 NFV 3.1 Configure LXC (1/5) Accessing virtual machines # To start the Main KVM, open a terminal and type: $ virsh start tutorialNFV # Access to the VM recently started: $ ssh ubuntu@192.168.122.179 (username = ubuntu; password = ubuntu) # To start each VM (KVM-1, KVM-2), type: $ sudo virsh net-start default $ sudo virsh start ubuntu1 $ sudo virsh start ubuntu2 #Use different terminals to acces each VM From terminal 1 $ ssh ubuntu@192.168.123.2 (password: ubuntu) From terminal 2 $ ssh ubuntu@192.168.123.3 (password: ubuntu)
  • 26.
    26 Lab #4 NFV 3.1 Configure LXC (2/5) Instantiation of Containers LXC # Create a LXC container for each VM using ubuntu 14.04 template From KVM-1: $ sudo lxc-create -t download -n test-ubuntu1 -- -d ubuntu -r trusty -a amd64 From KVM-2: $ sudo lxc-create -t download -n test-ubuntu1 -- -d ubuntu -r trusty -a amd64 # List the containers created From KVM-1: $ sudo lxc-ls From KVM-2: $ sudo lxc-ls
  • 27.
    27 Lab #4 NFV 3.1 Configure LXC (3/5) Connecting LXC to the bridge br0 for VM-1 (KVM-1) Add the required lines of the LXC config file which are highlighted below and comment the line that start with “ lxc.network.link”. ubuntu@KVM-1:~$ sudo vim /var/lib/lxc/test-ubuntu1/config ... # Container specific configuration lxc.rootfs = /var/lib/lxc/test-ubuntu1/rootfs lxc.utsname = test-ubuntu1 # Network configuration lxc.network.type = veth lxc.network.veth.pair = host1 lxc.network.script.up = /etc/lxc/ovsup lxc.network.script.down = /etc/lxc/ovsdown lxc.network.flags = up lxc.network.ipv4 = 11.1.1.11/24 lxc.network.ipv4.gateway = 11.1.1.1 #lxc.network.link = lxcbr0 lxc.network.hwaddr = 00:16:3e:fb:cb:db
  • 28.
    28 Lab #4 NFV 3.1 Configure LXC (4/5) Connecting LXC to the bridge br0 for VM-2 (KVM-2) Add the required lines of the LXC config file which are highlighted below and comment the line that start with “ lxc.network.link”. ubuntu@KVM-2:~$ sudo vim /var/lib/lxc/test-ubuntu1/config ... # Container specific configuration lxc.rootfs = /var/lib/lxc/test-ubuntu1/rootfs lxc.utsname = test-ubuntu1 # Network configuration lxc.network.type = veth lxc.network.veth.pair = host1 lxc.network.script.up = /etc/lxc/ovsup lxc.network.script.down = /etc/lxc/ovsdown lxc.network.flags = up lxc.network.ipv4 = 11.1.1.12/24 lxc.network.ipv4.gateway = 11.1.1.2 #lxc.network.link = lxcbr0 lxc.network.hwaddr = 00:16:3e:fb:cb:db
  • 29.
    29 Lab #4 NFV 3.1 Configure LXC (5/5) Script for the Container-1 and Container-2 Create/delete interfaces of containers There is a script named “ovsup” that allows to create interfaces inside br0 $ sudo vim /etc/lxc/ovsup #!/bin/bash BRIDGE="br0" ovs-vsctl --may-exist add-br $BRIDGE ovs-vsctl --if-exist add-port $BRIDGE $5 ovs-vsctl --may-exist add-port $BRIDGE $5 There is another script named “ovsdown” that allows to delete interfaces created by OVS when the Linux Containers was up $ sudo vim /etc/lxc/ovsdown #!/bin/bash BRIDGE="br0" ovs-vsctl del-port $BRIDGE host1
  • 30.
    30 Lab #4 NFV 3.2 Tunnel GRE with LXC Cr eat e GRE Tunnel # Create the interface bridge br0 for each KVM KVM-1: sudo ovs-vsctl add-br br0 KVM-2: sudo ovs-vsctl add-br br0 # Configure the IP address for the interface br0 in each KVM KVM-1: sudo ifconfig br0 11.1.1.1 netmask 255.255.255.0 KVM-2: sudo ifconfig br0 11.1.1.2 netmask 255.255.255.0 # Create a GRE tunnel between the bridges br0 KVM-1: sudo ovs-vsctl add-port br0 gre1 -- set Interface gre1 type=gre options:remote_ip=192.168.123.3 KVM-2: sudo ovs-vsctl add-port br0 gre1 -- set Interface gre1 type=gre options:remote_ip=192.168.123.2
  • 31.
    31 Lab #4 NFV 3.2 Tunnel GRE with LXC # Start each container from different console KVM1: sudo lxc-start -n test-ubuntu1 KVM2: sudo lxc-start -n test-ubuntu1 # Testing the connectivity between the containers - From the container 1 (IP=11.1.1.11) $ ping 11.1.1.12 64 bytes from 11.1.1.12: icmp_seq=90 ttl=64 time=5.55 ms ... - From the container 2 (IP=11.1.1.12) $ ping 11.1.1.11 64 bytes from 11.1.1.11: icmp_seq=90 ttl=64 time=5.55 ms ... I nst a nti ati on
  • 32.
    32 3.2 TunnelGRE with LXC Testing with Iperf # Instalar “iperf” in each virtual machine KVM1, KVM2 KVM1: sudo apt-get install iperf KVM2: sudo apt-get install iperf # Copy the binary “iperf” from KVM1 to Container ofKVM-1 KVM1: sudo cp /usr/bin/iperf /var/lib/lxc/test-ubuntu1/rootfs/usr/bin/ KVM2: sudo cp /usr/bin/iperf /var/lib/lxc/test-ubuntu1/rootfs/usr/bin/ # Verify the RTT using IPERF # From the Container LXC 11.1.1.12, launch Iperf Server listening on TCP port 5001 $ sudo iperf -s # From the another Container LXC 11.1.1.11, launch Iperf Client connecting to 11.1.1.12, TCP port 5001 $ sudo iperf -c 11.1.1.12
  • 33.
    33 3.2 TunnelGRE with LXC # Finally shutdown each container and delete br0 ubuntu@test-ubuntu1:$ sudo init 0 ubuntu@KVM-1:$ sudo ovs-vsctl del-br br0 ubuntu@test-ubuntu1:$ sudo init 0 ubuntu@KVM-2:$ sudo ovs-vsctl del-br br0
  • 34.
    34 Agenda 4.Dockers 4.1 – Installation Guide 4.2 – Docker with GRE Tunnel 4.3 – Docker with Open Vswitch and GRE Tunnel Lab #4 NFV
  • 35.
    35 Lab #4 NFV Question: What is Docker? Docker is an open platform for developers and sysadmins to build, ship, and run distributed applications. Consisting of Docker Engine, a portable, lightweight runtime and packaging tool, and Docker Hub, a cloud service for sharing applications and automating workflows, Docker enables apps to be quickly assembled from components and eliminates the friction between development, QA, and production environments
  • 36.
    36 Docker (done!) Lab #4 NFV 4.1 – Installation Guide (1/2) # Install and configure docker (v1.01) from the oficial repository Ubuntu sudo apt-get update && apt-get install docker.io sudo ln -sf /usr/bin/docker.io /usr/local/bin/docker sudo sed -i '$acomplete -F _docker docker' /etc/bash_completion.d/docker.io # Install the latest version of docker (v1.2) Add the key public in where is found Docker $ sudo apt-key adv --keyserver hkp://keyserver.ubuntu.com:80 --recv-keys > 36A1D7869245C8950F966E92D8576A8BA88D21E9 Copy the docker’s site in the Ubuntu repository’s source $ sudo sh -c "echo deb https://get.docker.io/ubuntu docker main > /etc/apt/sources.list.d/docker.list" Update the Kernel $ sudo apt-get update Install the latest version of docker $ sudo apt-get install lxc-docker
  • 37.
    37 Docker (done!) # What do you observe when you give below command: $ docker -h ? # Allowing non-root access $ sudo gpasswd -a <user-actual> docker $ logout # Access again to the virtual machine and give the below command again: $docker -h # Enabling the memory and swap accounting $sudo vim /etc/default/grub GRUB_CMDLINE_LINUX="" Replace by: GRUB_CMDLINE_LINUX="cgroup_enable=memory swapaccount=1" # Update the grub and restart the machine $sudo update-grub2 && reboot # Installing LXC and bridge-utils $sudo apt-get install lxc bridge-utils Lab #4 NFV 4.1 – Installation Guide (2/2)
  • 38.
    38 4.2 Dockerwith GRE Tunnel # For this exercise we will continue using the same VMs (KVM-1, KVM-2), (see slide 27) # Check if the docker is up $ sudo ps aux |grep docker # If docker is not up then give the below command: service docker start # In each VM, search and pull the pre-configured container from docker hub KVM-1: $ docker search intrig/tutorial KVM-2: $ docker search intrig/tutorial KVM-1: $ docker pull intrig/tutorial KVM-2: $ docker pull intrig/tutorial # Check if docker was correctly downloaded KVM-1: $ docker images KVM-2: $ docker images Lab #4 NFV Initiating Docker
  • 39.
    39 Lab #4 NFV 4.2 Docker with GRE Tunnel Create GRE Tunnel in Docker (1/3) # Virtual Machine 1 (KVM-1) KVM-1$ sudo ip link set docker0 down KVM-1$ sudo brctl delbr docker0 KVM-1$ sudo brctl addbr docker0 KVM-1$ sudo ip addr add 172.16.1.1/24 dev docker0 KVM-1$ sudo ip link set docker0 up KVM-1$ sudo ovs-vsctl add-br br0 KVM-1$ sudo ovs-vsctl add-port br0 gre0 -- set interface gre0 type=gre options:remote_ip=192.168.123.3 KVM-1$ sudo brctl addif docker0 br0 # Virtual Machine 2 (KVM-2) KVM-2$ sudo ip link set docker0 down KVM-2$ sudo brctl delbr docker0 KVM-2$ sudo brctl addbr docker0 KVM-2$ sudo ip addr add 172.16.1.2/24 dev docker0 KVM-2$ sudo ip link set docker0 up KVM-2$ sudo ovs-vsctl add-br br0 KVM-2$ sudo ovs-vsctl add-port br0 gre0 -- set interface gre0 type=gre options:remote_ip=192.168.123.2 KVM-2$ sudo brctl addif docker0 br0
  • 40.
    40 Lab #4 NFV 4.2 Docker with GRE Tunnel Create GRE Tunnel in Docker (2/3) # Virtual Machine 1 (KVM-1) # Activate docker for the container 1 $ docker run -i -t --privileged --name=container1 --hostname=container1 --publish 127.0.0.1:2222:22 intrig/tutorial:v1 /bin/bash # If you get the below mentioned prompt, then configure an IP address for it. This prompt signifies that you have successfully started the container. root@container1:/# root@container1:/# ifconfig eth0 172.16.1.11 netmask 255.255.255.0 root@container1:/# route add default gw 172.16.1.1
  • 41.
    41 Lab #4 NFV 4.2 Docker with GRE Tunnel Create GRE Tunnel in Docker (3/3) # Virtual Machine 2 (KVM-2) # Activate docker for the container 2 $ docker run -i -t --privileged --name=container2 --hostname=container2 --publish 127.0.0.1:2222:22 intrig/tutorial:v1 /bin/bash # If you get the below mentioned prompt, then configure an IP address for it. This prompt signifies that you have successfully started the container. root@container2:/# root@container2:/# ifconfig eth0 172.16.1.12 netmask 255.255.255.0 root@container2:/# route add default gw 172.16.1.2
  • 42.
    42 Lab #4 NFV 4.2 Docker with GRE Tunnel # Testing the connectivity between dockers -From the Container 1 to Container 2 Container1:/# ping 172.16.1.12 - From the Container 2 to Container 1 Container2:/# ping 172.16.1.11 Testi ng GRE Tunne # Copy the binary “iperf” from KVM1 to Container ofKVM-1 KVM1: sudo cp /usr/bin/iperf /var/lib/docker/aufs/diff/<ID-docker1>/usr/bin/ KVM2: sudo cp /usr/bin/iperf /var/lib/docker/aufs/diff/<ID-docker2>/usr/bin/ # Verify the RTT using IPERF # From the Container Docker 172.16.1.12 launch Iperf Server listening on TCP port 5001 $ sudo iperf -s # From the another Container Docker 172.16.1.11, launch Iperf Client connecting to 172.16.1.12, TCP port 5001 $ sudo iperf -c 172.16.1.12 What can you say of the “Bandwith” ?
  • 43.
    43 4.3 Dockerwith OVS an GRE Tunnel Source: http://fbevmware.blogspot.com.br Lab #4 NFV
  • 44.
    44 4.3 Dockerwith OVS an GRE Tunnel Creating GRE Tunnel using OVS # Virtual Machine 1 (KVM-1) $ sudo ovs-vsctl del-br br0 $ sudo ovs-vsctl add-br br0 $ sudo ovs-vsctl add-br br2 $ sudo ovs-vsctl br0 tep0 -- set interface tep0 type=internal $ sudo ifconfig tep0 192.168.200.21 netmask 255.255.255.0 $ sudo ovs-vsctl add-port br2 gre0 -- set interface gre0 type=gre options:remote_ip=192.168.123.3 # Virtual Machine 2 (KVM-2) $ sudo ovs-vsctl del-br br0 $ sudo ovs-vsctl add-br br0 $ sudo ovs-vsctl add-br br2 $ sudo ovs-vsctl br0 tep0 -- set interface tep0 type=internal $ sudo ifconfig tep0 192.168.200.22 netmask 255.255.255.0 $ sudo ovs-vsctl add-port br2 gre0 -- set interface gre0 type=gre options:remote_ip=192.168.123.2 Lab #4 NFV
  • 45.
    45 4.3 Dockerwith OVS an GRE Tunnel Starting Containers # Virtual Machine 1 (KVM-1) # Delete the container docker created in the last exercise $ docker stop container1 $ docker rm container1 # Create two containers docker and set the network mode to none $ C1=$(docker run -d --net=none -t -i --name=container1 ubuntu /bin/bash) $ C2=$(docker run -d --net=none -t -i --name=container2 ubuntu /bin/bash) # Virtual Machine 2 (KVM-2) # Delete the container docker created in the last exercise $ docker stop container2 $ docker rm container2 # Create two containers docker and set the network mode to none $ C3=$(docker run -d --net=none -t -i --name=container3 ubuntu /bin/bash) $ C4=$(docker run -d --net=none -t -i --name=container4 ubuntu /bin/bash) Lab #4 NFV
  • 46.
    46 4.3 Dockerwith OVS an GRE Tunnel Binding docker with Open Vswitch Interface (1/2) # Virtual Machine 1 (KVM-1) # To know the PID value of the container created, to use the script findPID $./findPID.sh $C1 The PID value of the container created is: 6485 (for example). Same for $C2 # Bind dockers with a OpenVswitch interface $./ovswork-1.sh br2 $C1 1.0.0.1/24 1.0.0.255 1.0.0.254 10 $./ovswork-1.sh br2 $C2 1.0.0.2/24 1.0.0.255 1.0.0.254 20 # Using different terminals, start the container1 and container2 From terminal 1: $ docker start -a -i container1 From terminal 2: $ docker start -a -i container2 Lab #4 NFV
  • 47.
    47 4.3 Dockerwith OVS an GRE Tunnel Binding docker with Open Vswitch Interface (2/2) # Virtual Machine 2 (KVM-2) # Bind dockers with a OpenVswitch interface $./ovswork-1.sh br2 $C3 1.0.0.3/24 1.0.0.255 1.0.0.254 10 $./ovswork-1.sh br2 $C4 1.0.0.4/24 1.0.0.255 1.0.0.254 20 # Using different terminals, start the container3 and container4 From terminal 3: $ docker start -a -i container3 From terminal 4: $ docker start -a -i container4 # From the Container1 (Terminal 1) Container1$ ping 1.0.0.3 -c 2 Container1$ ping 1.0.0.4 -c 2 # From the Container3 (Terminal 3) Container3$ ping 1.0.0.1 -c 2 Container3$ ping 1.0.0.2 -c 2 What ping is successful? And why? Lab #4 NFV
  • 48.
    48 5.3 Dockerwith OVS an GRE Tunnel Testing GRE Tunnel # Verify the RTT using IPERF # From the Container #1 1.0.0.3 launch Iperf Server listening on TCP port 5001 $ sudo iperf -s # From the another Container #3, launch Iperf Client connecting to 1.0.0.3, TCP port 5001 $ sudo iperf -c 1.0.0.3 What can you say of the “Bandwith” ? # Virtual Machine 1 (KVM-1) $ sudo ovs-vsctl show br2 $ sudo ovs-ofctl show br2 $ sudo ovs-ofctl dump-flows br2 # Virtual Machine 2 (KVM-2) $ sudo ovs-vsctl show br2 $ sudo ovs-ofctl show br2 $ sudo ovs-ofctl dump-flows br2 Lab #4 NFV
  • 49.
    49 Thank you! Lab. NFV Javier Richard Quinto Ancieta richardq@dca.fee.unicamp.br richardqa@gmail.com Lab #4 NFV