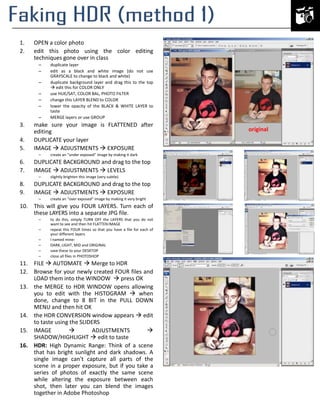
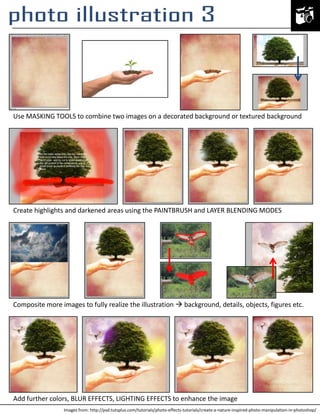
1.
2.

OPEN a color photo
edit this photo using the color editing
techniques gone over in class
–
–
–
–
–
–
–

3.
4.
5.

duplicate layer
edit as a black and white image (do not use
GRAYSCALE to change to black and white)
duplicate background layer and drag this to the top
 edit this for COLOR ONLY
use HUE/SAT, COLOR BAL, PHOTO FILTER
change this LAYER BLEND to COLOR
lower the opacity of the BLACK & WHITE LAYER to
taste
MERGE layers or use GROUP

make sure your image is FLATTENED after
editing
DUPLICATE your layer
IMAGE  ADJUSTMENTS  EXPOSURE
–

create an “under exposed” image by making it dark

6.
7.

DUPLICATE BACKGROUND and drag to the top
IMAGE  ADJUSTMENTS  LEVELS

8.
9.

DUPLICATE BACKGROUND and drag to the top
IMAGE  ADJUSTMENTS  EXPOSURE

–

–

slightly brighten this image (very subtle)

create an “over exposed” image by making it very bright

10. This will give you FOUR LAYERS. Turn each of
these LAYERS into a separate JPG file.
–
–
–
–
–
–

to do this, simply TURN OFF the LAYERS that you do not
want to see and then hit FLATTEN IMAGE
repeat this FOUR times so that you have a file for each of
your different layers
I named mine:
DARK, LIGHT, MID and ORIGINAL
save these to your DESKTOP
close all files in PHOTOSHOP

11. FILE  AUTOMATE  Merge to HDR
12. Browse for your newly created FOUR files and
LOAD them into the WINDOW  press OK
13. the MERGE to HDR WINDOW opens allowing
you to edit with the HISTOGRAM  when
done, change to 8 BIT in the PULL DOWN
MENU and then hit OK
14. the HDR CONVERSION window appears  edit
to taste using the SLIDERS
15. IMAGE

ADJUSTMENTS

SHADOW/HIGHLIGHT  edit to taste
16. HDR: High Dynamic Range: Think of a scene
that has bright sunlight and dark shadows. A
single image can't capture all parts of the
scene in a proper exposure, but if you take a
series of photos of exactly the same scene
while altering the exposure between each
shot, then later you can blend the images
together in Adobe Photoshop

original
1.
2.

OPEN a color photo
edit this photo using the color editing
techniques gone over in class
–
–
–
–
–
–
–

3.
4.
5.
6.
7.
8.
9.

duplicate layer
edit as a black and white image (do not use
GRAYSCALE to change to black and white)
duplicate background layer and drag this to the top
 edit this for COLOR ONLY
use HUE/SAT, COLOR BAL, PHOTO FILTER
change this LAYER BLEND to COLOR
lower the opacity of the BLACK & WHITE LAYER to
taste
MERGE layers or use GROUP

make sure your image is FLATTENED after
editing
DUPLICATE your layer
IMAGE  ADJUSTMENTS  INVERT (ctrl+I)
change LAYER BLENDING MODE to OVERLAY
FILTER  BLUR  GAUSSIAN BLUR
use an increasing amount of G-BLUR to soften
the effect of the INVERT/OVERLAY .
ADJUSTMENT LAYER  GRADIENT MAP
–

choose an outlandish gradient  I chose the SECONDARY
COLOR SCHEME (green, purple and orange)

10. change LAYER BLENDING MODE to one of the
“lightens” such as SOFT LIGHT
11. use a SOFT ROUND BRUSH and paint with
BLACK on the MASK to remove areas that are
too saturated or have too much color added
12. LAYER  FLATTEN IMAGE
13. IMAGE

ADJUSTMENTS

SHADOW/HIGHLIGHT to taste
14. experiment with color editing, toning (sepia or
other Photo Filter) or turning this image black
and white
EXAMPLES of TRUE HDR Photo IMAGES

original
Create a silhouette from a landscape photo

Extend the background, add other images (of clouds, other skies, etc.) and then reflect the image

Use COLOR ADJUST, ADJUSTMENT LAYERS, BLURS and LIGHTING EFFECTS to enhance the image

Add a moon, stars, reflections in the water, by using MASKING TOOLS and LAYER BLENDING MODES
Images from: http://www.psdtop.com/blog/photo-effects/the-magic-night/
Use ADJUSTMENT LAYERS to change the colors of an image and isolate colors in a portrait

Use images of nature and blend these into your initial image by using QUICK MASK or LAYER MASK

Use the CLONE STAMP or ERASER TOOL to blend the nature images into the photo further

Images from: http://psd.tutsplus.com/tutorials/photo-effects-tutorials/nature-inspired-photo-illustration/ /
Use MASKING TOOLS to combine two images on a decorated background or textured background

Create highlights and darkened areas using the PAINTBRUSH and LAYER BLENDING MODES

Composite more images to fully realize the illustration  background, details, objects, figures etc.

Add further colors, BLUR EFFECTS, LIGHTING EFFECTS to enhance the image
Images from: http://psd.tutsplus.com/tutorials/photo-effects-tutorials/create-a-nature-inspired-photo-manipulation-in-photoshop/

Unit 4: Case Study and Tutorials

  • 2.
    1. 2. OPEN a colorphoto edit this photo using the color editing techniques gone over in class – – – – – – – 3. 4. 5. duplicate layer edit as a black and white image (do not use GRAYSCALE to change to black and white) duplicate background layer and drag this to the top  edit this for COLOR ONLY use HUE/SAT, COLOR BAL, PHOTO FILTER change this LAYER BLEND to COLOR lower the opacity of the BLACK & WHITE LAYER to taste MERGE layers or use GROUP make sure your image is FLATTENED after editing DUPLICATE your layer IMAGE  ADJUSTMENTS  EXPOSURE – create an “under exposed” image by making it dark 6. 7. DUPLICATE BACKGROUND and drag to the top IMAGE  ADJUSTMENTS  LEVELS 8. 9. DUPLICATE BACKGROUND and drag to the top IMAGE  ADJUSTMENTS  EXPOSURE – – slightly brighten this image (very subtle) create an “over exposed” image by making it very bright 10. This will give you FOUR LAYERS. Turn each of these LAYERS into a separate JPG file. – – – – – – to do this, simply TURN OFF the LAYERS that you do not want to see and then hit FLATTEN IMAGE repeat this FOUR times so that you have a file for each of your different layers I named mine: DARK, LIGHT, MID and ORIGINAL save these to your DESKTOP close all files in PHOTOSHOP 11. FILE  AUTOMATE  Merge to HDR 12. Browse for your newly created FOUR files and LOAD them into the WINDOW  press OK 13. the MERGE to HDR WINDOW opens allowing you to edit with the HISTOGRAM  when done, change to 8 BIT in the PULL DOWN MENU and then hit OK 14. the HDR CONVERSION window appears  edit to taste using the SLIDERS 15. IMAGE  ADJUSTMENTS  SHADOW/HIGHLIGHT  edit to taste 16. HDR: High Dynamic Range: Think of a scene that has bright sunlight and dark shadows. A single image can't capture all parts of the scene in a proper exposure, but if you take a series of photos of exactly the same scene while altering the exposure between each shot, then later you can blend the images together in Adobe Photoshop original
  • 3.
    1. 2. OPEN a colorphoto edit this photo using the color editing techniques gone over in class – – – – – – – 3. 4. 5. 6. 7. 8. 9. duplicate layer edit as a black and white image (do not use GRAYSCALE to change to black and white) duplicate background layer and drag this to the top  edit this for COLOR ONLY use HUE/SAT, COLOR BAL, PHOTO FILTER change this LAYER BLEND to COLOR lower the opacity of the BLACK & WHITE LAYER to taste MERGE layers or use GROUP make sure your image is FLATTENED after editing DUPLICATE your layer IMAGE  ADJUSTMENTS  INVERT (ctrl+I) change LAYER BLENDING MODE to OVERLAY FILTER  BLUR  GAUSSIAN BLUR use an increasing amount of G-BLUR to soften the effect of the INVERT/OVERLAY . ADJUSTMENT LAYER  GRADIENT MAP – choose an outlandish gradient  I chose the SECONDARY COLOR SCHEME (green, purple and orange) 10. change LAYER BLENDING MODE to one of the “lightens” such as SOFT LIGHT 11. use a SOFT ROUND BRUSH and paint with BLACK on the MASK to remove areas that are too saturated or have too much color added 12. LAYER  FLATTEN IMAGE 13. IMAGE  ADJUSTMENTS  SHADOW/HIGHLIGHT to taste 14. experiment with color editing, toning (sepia or other Photo Filter) or turning this image black and white EXAMPLES of TRUE HDR Photo IMAGES original
  • 4.
    Create a silhouettefrom a landscape photo Extend the background, add other images (of clouds, other skies, etc.) and then reflect the image Use COLOR ADJUST, ADJUSTMENT LAYERS, BLURS and LIGHTING EFFECTS to enhance the image Add a moon, stars, reflections in the water, by using MASKING TOOLS and LAYER BLENDING MODES Images from: http://www.psdtop.com/blog/photo-effects/the-magic-night/
  • 5.
    Use ADJUSTMENT LAYERSto change the colors of an image and isolate colors in a portrait Use images of nature and blend these into your initial image by using QUICK MASK or LAYER MASK Use the CLONE STAMP or ERASER TOOL to blend the nature images into the photo further Images from: http://psd.tutsplus.com/tutorials/photo-effects-tutorials/nature-inspired-photo-illustration/ /
  • 6.
    Use MASKING TOOLSto combine two images on a decorated background or textured background Create highlights and darkened areas using the PAINTBRUSH and LAYER BLENDING MODES Composite more images to fully realize the illustration  background, details, objects, figures etc. Add further colors, BLUR EFFECTS, LIGHTING EFFECTS to enhance the image Images from: http://psd.tutsplus.com/tutorials/photo-effects-tutorials/create-a-nature-inspired-photo-manipulation-in-photoshop/